When you click on links to various merchants on this site and make a purchase, this can result in this site earning a commission. Affiliate programs and affiliations include, but are not limited to, the eBay Partner Network.
Tri-power carb and intake: Issues, rebuild, fix thread
UPDATE: I’m doing this thread so maybe I can help others who might be like me – I didn’t really understand very much about how tri-power really works but I’m sure learning. I’m sharing the good, the bad, and the ugly – including any dumb things I do. Learn with me as I get it right. And I really appreciate all the help from fellow forum members!
Hi, I hope this thread will be helpful to forum members.
Car is a ’68 L71 427/435. I’ve had it about 3 and half years. Low miles. Engine was ‘refreshed’ while the 2nd to last owner had it for over 20 years; he couldn’t remember exactly – last owner had it for 11 years, so +/-20ish years ago. I know it was done because there is a Cloyes chain, etc. and everything checks out.
Car ran decent since we got it, but I could tell it wasn’t quite right. I never could feel the 2nd two carbs come in (see the caption under one of the pics below for the reason!), but it still had good power and I never really got after it that much anyway. Didn’t use any oil (drove it 500-1000 miles each of the first 2 years; the third year it was down for a suspension and complete rebuild below the beltline: https://www.corvetteforum.com/forums...-in-there.html).
When I got it out of hibernation this year I knew it wasn’t right. The idle was much worse (not the cammed idle you expect from an L71, but really messed up). I found small gas leaks from bowls on 2 of the carbs that I hadn’t seen before. I did some checking and could see that whoever was in the carbs before did some stuff that wasn’t right - you could tell from miss-matched screws, etc.. I will admit that I hadn’t looked at them very closely before – only to see if the model and dates were correct (which they are).
I asked for some advice from the forum and, as always, got some great help. I checked some items and here is what I found:
Running extremely rich. I could close off both center carb mixture screws with no change in rpm.
Vacuum was 5” at 800 rpm. Yes, 5.
Timing was good: 14-15 @ 800; all in at 36 @ 2800-2900. This was on the Mallory that was in the car, and it seemed to be set up correctly. The TI was replaced by a Mallory when the engine was refreshed. I have the TI all rebuilt and ready to go. That will be another thread after I get it fired up again - since I know the Mallory works okay.
All cylinders were between 180-190 in a compression check. I didn’t do a leak down test.
I knew the carbs needed work. I also wanted to refurbish the intake and get it all prettied up. To get that kind of vacuum leak I figured it was the carbs leaking badly and/or an intake leak. So……I did some research on getting the carbs rebuilt.
@Lars, our resident carb expert, let me know he doesn’t do tri-powers any longer. But he was a great help with his ideas and papers. Thank you.
I researched getting Holley to rebuild them, but @RescueRogers warned me that they did a lousy job on his. Thank you.
I found some very helpful videos on YouTube done by Harold Demes. I reached out to him and he did a fantastic job on replating and rebuilding the carbs. I'll share details a few days down the road. Harold found and corrected several issues.
While the carbs were out being refurbished, I took some time to remove the intake and get some advice on the various methods of making certain it’s sealed when replaced https://www.corvetteforum.com/forums...practices.html. Some really good advice. I used a combination of a couple of the ideas. We’ll see how well it works when I fire it up.
In this thread I thought I’d provide a methodical update on what I’ve found, what I did, and share the results as I get it ready to start again.
As I write this, I’m about 80% of the way to getting all back together. Intake and carbs are back on, clocking the distributor over the next day or so, etc. We have family visiting starting in a few days, so I’ll start by sharing how it looked when I took it apart, and then add some details as I get time. Anyone who is interested in the results can follow along with me as I see how it all works when it’s fired up. And maybe give me some advice if something isn’t right.
In the meantime, wishing you all the best. Paul
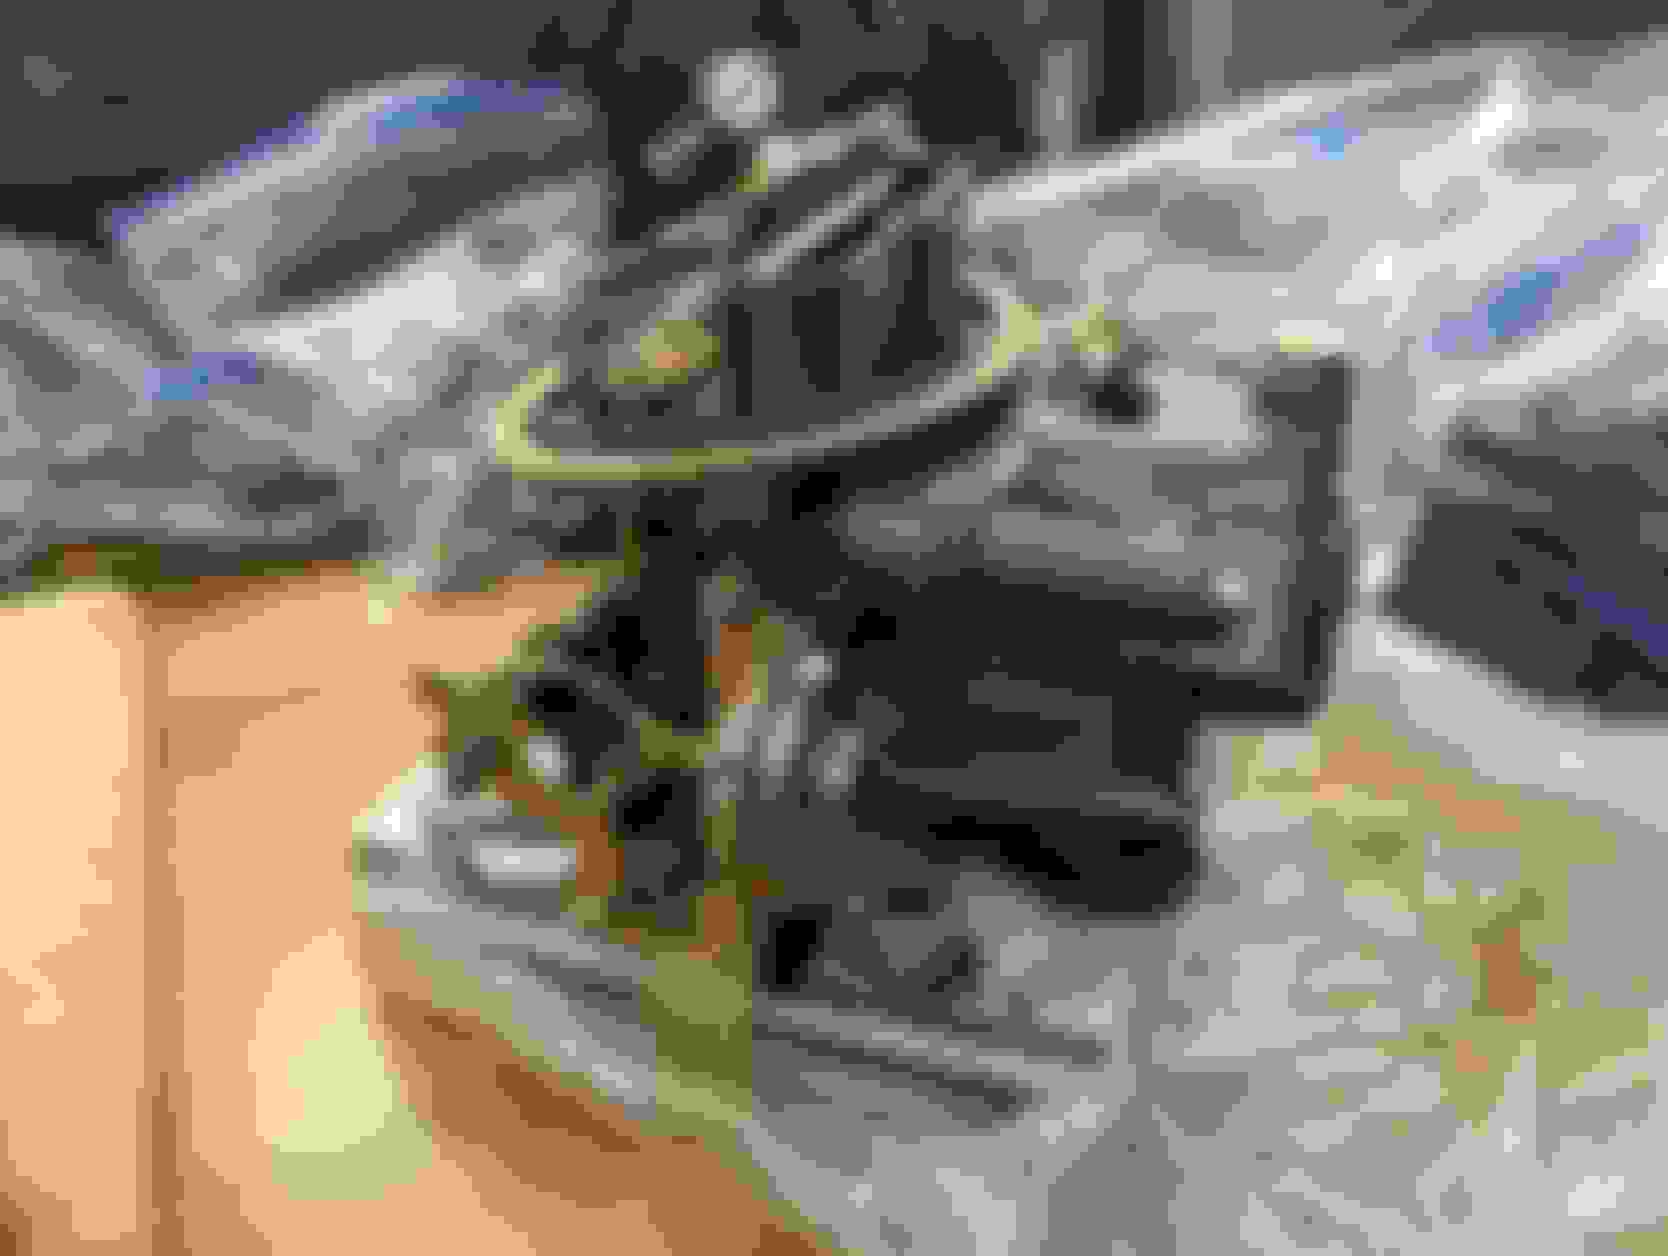
This is an example of a leaking bowl; some incorrect 'screws'; etc. Harold had to install 4 helicoils to fix stripped threads on the screws. Someone did some lousy work on these in the past.
Anyone want to guess why I never felt the front/rear carbs come in? Look at the front gasket. I found it was too small to allow the throttle plates to open on the front carb - which will also prevent the rear carb from opening due to the way the linkage works (to make sure the 2 outboard carbs close when the throttle is closed - so the vacuum won't keep them open). Wow. Been like that for a long time.
Intake off before gasket removal and clean up.
80% cleaned up.
I'll provide much more information on what was found in the carb rebuild, but thought I'd show you how they look now. I hope they work as good as they look!
2020 Corvette of the Year Finalist (performance mods)
2019 C3 of Year Winner (performance mods)
2016 C3 of Year Finalist
Did harold plate your carbs when he repaired them? You should add links to this thread on your other threads to give those threads and their followers closure and answers.
Im glad you are getting closer to a driving car. When those outboard carbs open, hang on!!!
Did harold plate your carbs when he repaired them? You should add links to this thread on your other threads to give those threads and their followers closure and answers.
Im glad you are getting closer to a driving car. When those outboard carbs open, hang on!!!
Hi Rescue, Harold plated everything, and did a great job. I'll include links to his videos when I add more information too - including the plating process. Good idea on the links, and I'll be sure to do that when I add more information. I also checked one of your replies to me/advice and you knew about that potential gasket issue. Good call! Thanks, Paul
I thought I'd share a bit more about the rebuilding process with Harold Demes. (I'm not quite ready to fire it up yet - going to replace the water outlet gasket before I put the anti-freeze back in; clock dist; install plugs; etc.).
Several miss-matched screws.
4 helicoils installed on float screws - 'good as new'
Found 2 badly corroded metering plates and replaced them
Re-plated everything - I put a link in below so you can see what he does. Wow is all I can say. He's very thorough.
Found several other items that needed fixing.
Several gaskets were shot
Below is more information and pics. Harold turned them in about 4 weeks, which is really good in my book. Best, Paul
First pic is how they looked before removal....
These had been worked on +/-20 years ago. By someone didn't really know what what they were doing. Stripped screws, outboard carbs wouldn't open due to too small of a gasket, etc.
Harold returned the corroded metering plates after he cleaned them up. Corn gas?
Getting the carbs back was like Christmas morning as a kid. Packed really well too.
Not only rebuilt, but completely re-plated and very well done.
Getting closer to firing the thing up if I can get it done before family arrives on Saturday for a great week visit. Last night got the oil/filter changed, water outlet gasket changed, and anti-freeze back in. I thought I'd share a couple of items that were really helpful to me.
A video from Harold on how tri-power setups work, and how the outboard carbs work; how the secondary closing rods work (and why it's imperative to have the rods hooked up or the vacuum to the outboard carbs disconnected); and pics of mine installed along with a shot of the instructions in the service manual.
A good way to ensure a seal on the fuel lines to the carbs. Whoever did mine 20ish years ago decided that some thread sealer was a good idea. But that's not where the seal takes place and it not only looks junky (see pic), but it doesn't really do any good. I include a video by Harold on using copper flare washers to help them seal. I recognize that others have ideas too, but I used this and I guess I'll see how well they work when I start it up.
Again, I hope this information - in one place sequentially - helps some forum members with issues they might be having and how to correct them. Best, Paul
Here are the secondary closing rods, all re plated (Harold re plates the carbs and all rods, screws, etc.) and installed.
Next up are the fuel lines.
The previous 'carb rebuilder' decided to use some thread sealer. You can see that it's fuel soaked and looks awful. All of them were like this. This type of 'help' does not create a good seal.
These are the copper flare washers that Harold suggests and I used.
Using the flare washers and cleaning up the original lines/blocks makes for a much better looking setup and should seal really well.
Here is the flare washer video I referenced. These could be good from brake connections too, I think. Don't forget to use a hold back wrench on the carb inlets and the brass blocks:
Thank you. Im sending a set of my Holley garbage rebuilds to him this winter
I've had a set of 3X2's rebuilt by Holley. They're still in the box. I am planning on on setting them up soon on the intake manifold. Can you tell me what problems you have with your rebuilds?
2020 Corvette of the Year Finalist (performance mods)
2019 C3 of Year Winner (performance mods)
2016 C3 of Year Finalist
Originally Posted by 68/70Vette
I've had a set of 3X2's rebuilt by Holley. They're still in the box. I am planning on on setting them up soon on the intake manifold. Can you tell me what problems you have with your rebuilds?
Thanks!!
Oh thats easy
no machining work done to plane the surfaces fully, and they were painted not plated. They can replace any parts they want but if they arent planed flat they will leak and bind when torqued down. When I talked to them before I sent them those were the 2 main concerns and the guy I was talking to got all insolent and said "Thats what we do!" I had to flat file the bases to get them to work properly combining those that I sent to Holley with a set I bought to replace what I had sent to be made perfect. I spent well over $1000 for their labor and I do better job with flat files and a 12 inch square steel plate with stick on 600 grit paper.
They stopped returning my emails and as far as I am concerned if anyone deals with Holleys performance shop they are a fool. Guys like Harold take pride in their work and word of mouth travels fast. I had my own handyman/ home maintenance business that I had never had to advertise for and never had to worry over having work/customers because I cared about the product I was paid for. Not too many have that kind of pride in todays world of the welfare working class.
I haven�t updated things for a month or so. Life is fun, a bit of vacation, etc. But there are some good updates and a few new learnings.
I reinstalled the carbs last week with the gaskets Harold sent with the rebuilt carbs. My son watched for leaks as I went to fire it up. As soon as the fuel hit it started right up. Small fuel leak at the front carb filter fitting � wrenched it just a bit and good to go. Now it�s time to make some adjustments.
The floats were set just right. Adjusted the idle, and here is where I had my next bit of learning about tuning tri-power carbs. I had the link rods set up just as I learned in the video and the assembly manual. Wrong.
When I adjusted the idle, I couldn�t get it to idle back down to where I wanted (around 850+). I�d adjust the idle again, and it would go too low � around 550-600 or so and wanted to quit. So, I�d bump the idle back up and have the same issue again, with the engine not coming back down to the right idle speed after revving it up a bit. Those of you who know tri-power already know what I was doing wrong.
I shot Harold a note asking his advice, and he asked me to watch the setup video again (he also shot me his number and we talked for a long time about a lot of stuff � great guy). Here�s the trick I didn�t understand: you have to leave the link rods unhooked and make all adjustments on the center carb first. Then hook the link rods up � just a little differently than the assembly manual shows: you want to be sure you set them up so that the throttle plates on the outboard carbs are completely closed at idle when the link rods are at the bottom of the center carb throttle linkage slot.
Here's what was happening: when the link rods are set up and you adjust the idle up on the center carb, the link rods move and open up the outboard carbs ever so slightly. Rev the engine and the outboard carb throttle plates can no longer close all the way. Then you have a situation where the outboard carbs are introducing more air, and your idle will be too high. Adjust the idle back down to where the outboard throttle plates close, and your idle will be too low. Repeat.
After understanding what was happening, I unhooked the link rods, checked timing, made all the adjustments on the center carb (idle, fuel mixture), hooked the link rods back up, and it idles great and settles back down after revving it.
Finished that up on Saturday, just before a thunderstorm, so I didn�t get to go for a trial run. That�ll come later this week. Should be fun because, if you read one of my earlier posts in this thread, you�ll remember that whoever worked on the carbs last installed phenolic intake/carb gaskets � but used one on the front carb with the same throttle plate opening as the center carb. The outboard carb throttle plates are larger than the center carb, so the outboard carbs could not work due to the way the link rods work. This engine had been running on the center carb only for over 20 years! I had wondered why I couldn�t feel the carbs kick in since I bought it.
More to come. Best, Paul
In this photo, you can look and see why the link rods will move the outboard carb throttle plates when you adjust the center carb idle speed. Adjusting the center carb idle speed moves the slot where the link rods attach to the center carb.
Good job
Dont forget to add the second throttle return spring inside the yellow spring.
2 springs for safety
Hi Scott, that's a great idea and I'll take care of that right away. Whoever worked on it last did have a double return spring set up - they were incorrect and went to the front carb fuel line, but they worked well and had the safety of a double spring. When I put them back on after installing the new carbs, guess what happened? One of them broke, proving your point. I have an assortment of springs that should fit well. Thanks! Paul
PS: those copper flare washers mentioned earlier work GREAT.
UPDATE: I�m doing this thread so maybe I can help others who might be like me � I didn�t really understand very much about how tri-power really works but I�m sure learning. I�m sharing the good, the bad, and the ugly � including any dumb things I do. Learn with me as I get it right. And I really appreciate all the help from fellow forum members!
Hi, I hope this thread will be helpful to forum members.
Car is a �68 L71 427/435. I�ve had it about 3 and half years. Low miles. Engine was �refreshed� while the 2nd to last owner had it for over 20 years; he couldn�t remember exactly � last owner had it for 11 years, so +/-20ish years ago. I know it was done because there is a Cloyes chain, etc. and everything checks out.
Originally Posted by Rescue Rogers
Oh thats easy
no machining work done to plane the surfaces fully, and they were painted not plated. They can replace any parts they want but if they arent planed flat they will leak and bind when torqued down. When I talked to them before I sent them those were the 2 main concerns and the guy I was talking to got all insolent and said "Thats what we do!" I had to flat file the bases to get them to work properly combining those that I sent to Holley with a set I bought to replace what I had sent to be made perfect. I spent well over $1000 for their labor and I do better job with flat files and a 12 inch square steel plate with stick on 600 grit paper.
They stopped returning my emails and as far as I am concerned if anyone deals with Holleys performance shop they are a fool. Guys like Harold take pride in their work and word of mouth travels fast. I had my own handyman/ home maintenance business that I had never had to advertise for and never had to worry over having work/customers because I cared about the product I was paid for. Not too many have that kind of pride in todays world of the welfare working class.
Thanks for this great post and a belated thanks to Rescue Rogers.
I got some time on Saturday and took the car out to an area where I could safely (wide two lanes, boonies, no side roads at all, absolutely no one around) run it up through the gears 3-4 times. All I can say is WOW, I now know what the L71 should feel like when all 3 carbs are working. That car has been running on the center carb only for over 20 years because (unknown to me until I took the intake/carbs apart) the last one who worked on the carbs used a carb/intake gasket on the front carb with the same throttle plate opening as the center carb - no way either outboard carb could work!
The carbs are working perfectly. Really impressed with Harold's work - both aesthetics and function. I'm liking it soooo much better. And the wifey says the car still rattles the pics on the other side of the wall. Mission accomplished there.
Still more to do and some additional learnings to share. I noticed I have a bit more noise than I like from the solids after 3-4 good pulls. I'll adjust them and enjoy more adventures.
PS to Scott (@RescueRogers): thanks to your reminder, I installed the 'safety spring'. I have a better one on the way. Thx
2020 Corvette of the Year Finalist (performance mods)
2019 C3 of Year Winner (performance mods)
2016 C3 of Year Finalist
Originally Posted by Hopper12
I got some time on Saturday and took the car out to an area where I could safely (wide two lanes, boonies, no side roads at all, absolutely no one around) run it up through the gears 3-4 times. All I can say is WOW, I now know what the L71 should feel like when all 3 carbs are working. That car has been running on the center carb only for over 20 years because (unknown to me until I took the intake/carbs apart) the last one who worked on the carbs used a carb/intake gasket on the front carb with the same throttle plate opening as the center carb - no way either outboard carb could work!
The carbs are working perfectly. Really impressed with Harold's work - both aesthetics and function. I'm liking it soooo much better. And the wifey says the car still rattles the pics on the other side of the wall. Mission accomplished there.
Still more to do and some additional learnings to share. I noticed I have a bit more noise than I like from the solids after 3-4 good pulls. I'll adjust them and enjoy more adventures.
PS to Scott (@RescueRogers): thanks to your reminder, I installed the 'safety spring'. I have a better one on the way. Thx
Please PM harolds info to me. I need to get on his list for my Crap carbs. I would like to have that Holley Speed Shop fiasco behind me sooner than later. I can relate to the tripower kicking in. Love all that torque
Thanks
Scott
Please PM harolds info to me. I need to get on his list for my Crap carbs. I would like to have that Holley Speed Shop fiasco behind me sooner than later. I can relate to the tripower kicking in. Love all that torque
Thanks
Scott
Hi Scott, should be in your inbox. I think you're going to like this! Thanks for all the help you provide. Paul
There isn't a lot of clearance between the intake runners and the outboard carb link rods. The carb linkage clips that were on my carbs were incorrect. In fact, I find that most of the ones that are sold are incorrect. The wrong ones are built so that they have to 'swing' to close on the rod in the wrong direction. I learned the solution from Rescue Rogers (Scott), although he may not realize he taught me the fix yet.
Scott sent me a pic of his link rods and I noticed that his carb link clips were different from the ones that were on my setup and also different from the ones sold on many/most of the vendor sites. So I looked around and found the right ones at Zip. They're called 'original style', and they work perfectly. So thank you again Scott. This forum is great - many helpful people here. Best, Paul
The incorrect linkage clips are on the right. You can see a big difference in the correct clips - they provide lots of room for the clip to pivot as the outboard carbs open up, and 'swing' the right way to close up on the rods.
Correct front clip installed.
Correct rear clip installed.
i don't think the throttle cable bracket is correct for a 68/9. Mine mounts to the rear carb studs..

 07-19-2022, 01:12 AM