
1971 Tach Cable replacement instrux
 05-12-2016, 04:59 PM
#1
Intermediate

Thread Starter

Member Since: Dec 2014
Location: Westchester Co, NY New York
Posts: 36
Received 0 Likes
on
0 Posts
Does anyone have procedures on how to replace the tach cable on a 71 coupe? Is it difficult to do? Looking to do this weekend.
Thanks,
Chas
Thanks,
Chas
 05-12-2016, 08:10 PM
#2
Drifting

Member Since: Oct 2005
Location: Forth Worth TX
Posts: 1,615
Likes: 0
Received 148 Likes
on
136 Posts

Wilcox may have a video on how to do it, but yes it is a PITA.
The tach cable only comes out from the instrument side, so you either have to take the top dash pad off or reach up under the dash though the pedals and wiring to access it. Either way is a very tight fit and you risk breaking and knocking loose other items.
To provide the most room, you need to remove the upper windshield interior molding, which allows you to remove the A-pillar moldings, which allows you to remove the upper dash pad, but the upper dash pad also has a bolt/bracket mounted on the passenger side behind the glove box. So you also need to remove the passenger side dash to access this bolt/bracket. You will also need to loosen the drivers side dash panel. You should also loosen/drop the steering column to give you another inch or so of movement for the drivers side dash pad to be pulled out (towards you).
Why does your tach cable need changed? What exactly is the problem?
The chances of your tach problem being just the cable is probably pretty low. It's usually the distributor gears or tach head that cause the issues.
Last edited by Revi; 05-12-2016 at 08:25 PM.
05-12-2016, 08:20 PM
#3
Racer

Wilcox may have a video on how to do it, but yes it is a PITA.
The tach cable only comes out from the instrument side, so you either have to take the top dash pad off or reach up under the dash though the pedals and wiring to access it. Either way is a very tight fit.
To provide the most room, you need to remove the upper windshield interior molding, which allows you to remove the A-pillar moldings, which allows you to remove the upper dash pad, which allows you to loosen the drivers side dash panel. You should also loosen/drop the steering column to give you another inch or so of movement for the drivers side dash pad.
Why does your tach cable need changed? What exactly is the problem?
The chances of your tach problem being just the cable is probably pretty low. It's usually the distributor gears or tach head that cause the issues.
I must have got off easy with my 1970, all I did was reached up from underneath the instrument panel and pushed on the cable securing tab located on the rear of the tach while gently pulling on the cable. In fact I had to do it several times for various reasons but that's another story. I agree with making sure the cable is the problem before you take it out for no reason.
Eric
05-12-2016, 08:43 PM
#4
Burning Brakes

I didn't have a problem replacing mine on my '72 ragtop. You just have to be able to bend enough to get on the floor and look upside down. Have a good light handy, and take off your wristwatch and rings before you stick your hand up to push on the tab that secures the cable. It might help if you have a helper to pull a little on the cable once you release the tab. It's kind of tight in there to be able to push the cable back toward the firewall after you release it. Good luck.
Duane
Duane
05-12-2016, 10:53 PM
#5
Drifting

If you are just replacing the inner cable (the part that spins), make sure the replacement is the correct length. Seems some replacements are longer than the originals and folks just slap them in and crank them down and wonder why their cross gears wear out and put a groove in the back of the distributor housing 6 months later.
Make sure you have the proper free-play.

Make sure you have the proper free-play.
Last edited by ezobens; 05-12-2016 at 10:53 PM.
05-13-2016, 07:23 AM
#7
Team Owner

Member Since: Sep 2006
Location: Westminster Maryland
Posts: 30,173
Likes: 0
Received 2,878 Likes
on
2,515 Posts

Hi c,
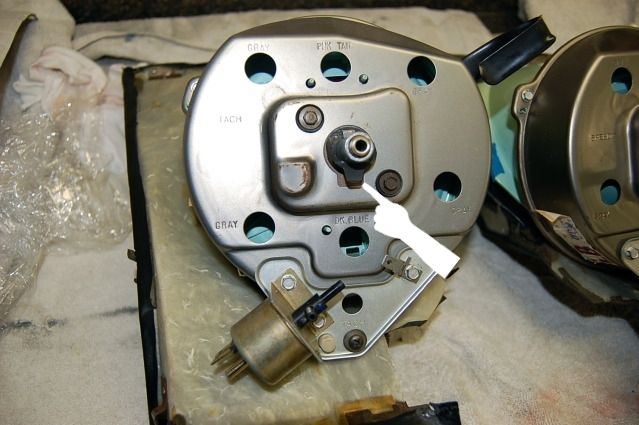
Here's a picture of the back of the tachometer.
There's a spring clip that holds the cable in place.
This clip must be depressed to pull the cable off the tach housing.
When putting the new cable in place push it on to the fitting until you hear/feel the clip grab the cable. It happens automatically once you've pushed the cable on to the fitting far enough.
I too would at least give it a try by reaching up from below.
Good Luck!
Regards,
Alan
The back of the tach.
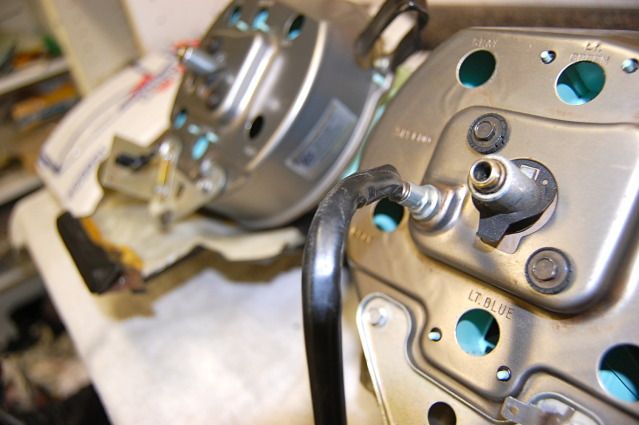
This is the speedometer but the fitting and clip is the same.
Here's a picture of the back of the tachometer.
There's a spring clip that holds the cable in place.
This clip must be depressed to pull the cable off the tach housing.
When putting the new cable in place push it on to the fitting until you hear/feel the clip grab the cable. It happens automatically once you've pushed the cable on to the fitting far enough.
I too would at least give it a try by reaching up from below.
Good Luck!
Regards,
Alan
The back of the tach.
This is the speedometer but the fitting and clip is the same.
The following users liked this post:
Primoz (08-26-2021)
05-13-2016, 03:03 PM
#8
Melting Slicks

also,,,,,pushed cable thru the firewall as straight as possible, then inside cabin, reached up behind (I probably had the AC vent out at the time), and made sure the cable had 'made' by merely feeling around, then back out to push the cable home. Seems like after pushing it thru firewall I may have secured it slightly to keep it from moving...can't really remember for sure. Good luck
05-16-2016, 02:42 AM
#9

Hi c,
Here's a picture of the back of the tachometer.
There's a spring clip that holds the cable in place.
This clip must be depressed to pull the cable off the tach housing.
When putting the new cable in place push it on to the fitting until you hear/feel the clip grab the cable. It happens automatically once you've pushed the cable on to the fitting far enough.
I too would at least give it a try by reaching up from below.
Good Luck!
Regards,
Alan
The back of the tach.
This is the speedometer but the fitting and clip is the same.