
Rear Toe Adjustment Advice Please
 04-21-2014, 08:34 PM
#1
Melting Slicks

Thread Starter

Hi
So using my from my crude Toe measurement my front is fine but Ď have about 3/8" total Toe out at the rear ...Yikes

So the trailing arm shim packs are like this.
Shims
L = 1/4"
M = 1/8"
S = 1/32"
Outer
1 x L
1 x M
2 x S
Inner
1 x L
3 x S
I have the packs removed now.
Anyone have rough guess how much I need to swap inner to outer to get to Toe in of around 1/8".
So using my from my crude Toe measurement my front is fine but Ď have about 3/8" total Toe out at the rear ...Yikes
So the trailing arm shim packs are like this.
Shims
L = 1/4"
M = 1/8"
S = 1/32"
Outer
1 x L
1 x M
2 x S
Inner
1 x L
3 x S
I have the packs removed now.
Anyone have rough guess how much I need to swap inner to outer to get to Toe in of around 1/8".
Last edited by CraigH; 04-21-2014 at 11:40 PM.
 04-21-2014, 10:50 PM
#2
Le Mans Master


Not only is the toe important, but the thrust angle too. Both wheels should be lined up with the frame center line.
You will need to move it about a 1/8 inch total to get into the ballpark.
You will need to move it about a 1/8 inch total to get into the ballpark.
Last edited by wombvette; 04-21-2014 at 10:52 PM.
04-21-2014, 11:36 PM
#3
Hi
So using my from my crude Toe measurement my front is fine but Ď have about 3/8" total Toe out at the rear ...Yikes
So the trailing arm shim packs are like this.
Shims
L = 1/4"
M = 1/8"
S = 1/6
Outer
1 x L
1 x M
2 x S
Inner
1 x L
3 x S
I have the packs removed now.
Anyone have rough guess how much I need to swap inner to outer to get to Toe in of around 1/8".
Now for me the thinist shim .75mm I get about 0.03 degree's change ( moving the shim from one side to the other ) which is less then 1/32 toe change. With only 1/6" shims as the thinest you dont have much of a chance getting a good ailgnment. Also are you using any skid plates under the wheels ?
04-21-2014, 11:50 PM
#4
Nam Labrat


Member Since: Sep 2013
Location: New Orleans Loo-z-anna
Posts: 33,897
Received 4,175 Likes
on
2,737 Posts

But I also realize that if I start with the Driver's side rear wheel----the shims on that trailing arm should be installed so that the rotor is parallel with the frame on the driver's side........then I need to shim the Passenger's side trailing arm to be parallel with the frame on the passenger's side
(*This will prevent the rear wheels from forming a parallelogram*)
Then shims can be re-arranged equally on both trailing arms to achieve the correct Toe-IN
Last edited by doorgunner; 05-06-2014 at 12:54 AM.
04-22-2014, 12:41 AM
#5
Melting Slicks
Thread Starter
Thanks guys.
I had a typo in the fist post (now corrected)
Shims
L = 1/4"
M = 1/8"
S = 1/32"
Outer
1 x L
1 x M
2 x S
Inner
1 x L
3 x S
The alignment had been done before the car was lowered at the back and has been like this for a while.
So if we assume the setup before was correct then moving shims evenly esch side - inner to outer will bring the Toe from out to in.
Will start with 2 x 1/32" shims.
04-22-2014, 10:34 AM
#7
Thanks guys.
I had a typo in the fist post (now corrected)
Shims
L = 1/4"
M = 1/8"
S = 1/32"
Outer
1 x L
1 x M
2 x S
Inner
1 x L
3 x S
The alignment had been done before the car was lowered at the back and has been like this for a while.
So if we assume the setup before was correct then moving shims evenly esch side - inner to outer will bring the Toe from out to in.
Will start with 2 x 1/32" shims.
I had a typo in the fist post (now corrected)
Shims
L = 1/4"
M = 1/8"
S = 1/32"
Outer
1 x L
1 x M
2 x S
Inner
1 x L
3 x S
The alignment had been done before the car was lowered at the back and has been like this for a while.
So if we assume the setup before was correct then moving shims evenly esch side - inner to outer will bring the Toe from out to in.
Will start with 2 x 1/32" shims.
This way you can always go back to a known point (original alignment)
Do you have the original alignment print out ?
It is best to confirm that your process to determine toe matches the actual alignment. You should be able to get similar readings if the process is working.
When I first started doing my own alignments I would take the car in to confirm what I get vs an alignment machine. They only charged $30 to check and some places here provide free alignment checks, hoping to sell you on expensive work.
One thing I have found is that its impossible to get the same reading twice, but it should be close +- 1/32. I would usually measure then test drive at least 3 times taking the average of all 3 measurements.
Also rub your hands on the tires to feel how smooth they feel when you move your hands with a forward tire rotation vs a reverse tire rotation. If you feel ridges in one direction then toe settings are likely out of spec. If your rear is actually 3/8" toe out you should feel ridges, mainly on the outer edges of the tires. Tire wear should be even inner vs outer. If they are worn on the inner sides more then camber may also be out.
Enjoy once you feel confident your process works it will be rewarding to know your car drives nicely.
04-22-2014, 10:38 AM
#8
To make cheap skid plates purchase some floor tiles and put grease between 2 tiles. Place this under your tires and check pavement vs the tiles. If it vaires alot then start looking for worn parts.
04-22-2014, 06:41 PM
#9
Melting Slicks
Thread Starter
Thanks Guys
I thought about this overnight and came up with this
Current inner shims
Inner
1 x L = 1/4"
3 x S = 3/32"
Total = 11/32"
I need to go from 3/8" out to 1/8" in so 1/2" change 1/4" per side
So if the trailing arm was pivoted at its right end that would mean a 1/4" shim would need to move (Diagram Black to Red)
But given the arm is pivited at the axle a 1/4" shim change would have more than a 1/4" effect on toe. (Diagram Black to Blue)
Black is original trailing arm
Red is trailing arm if pivot was at right end
Blue is trailing arm if pivot is at axle.

Am I thinking correctly or an I over thinking :-)
PS as said i can always go back to original shim setup - dont have prontout from lst alignment but can go back an dget it checked as you said easy enough once I make the change.
I thought about this overnight and came up with this
Current inner shims
Inner
1 x L = 1/4"
3 x S = 3/32"
Total = 11/32"
I need to go from 3/8" out to 1/8" in so 1/2" change 1/4" per side
So if the trailing arm was pivoted at its right end that would mean a 1/4" shim would need to move (Diagram Black to Red)
But given the arm is pivited at the axle a 1/4" shim change would have more than a 1/4" effect on toe. (Diagram Black to Blue)
Black is original trailing arm
Red is trailing arm if pivot was at right end
Blue is trailing arm if pivot is at axle.
Am I thinking correctly or an I over thinking :-)
PS as said i can always go back to original shim setup - dont have prontout from lst alignment but can go back an dget it checked as you said easy enough once I make the change.
04-22-2014, 08:44 PM
#10
Thanks Guys
I thought about this overnight and came up with this
Current inner shims
Inner
1 x L = 1/4"
3 x S = 3/32"
Total = 11/32"
I need to go from 3/8" out to 1/8" in so 1/2" change 1/4" per side
So if the trailing arm was pivoted at its right end that would mean a 1/4" shim would need to move (Diagram Black to Red)
But given the arm is pivited at the axle a 1/4" shim change would have more than a 1/4" effect on toe. (Diagram Black to Blue)
Black is original trailing arm
Red is trailing arm if pivot was at right end
Blue is trailing arm if pivot is at axle.
Am I thinking correctly or an I over thinking :-)
PS as said i can always go back to original shim setup - dont have prontout from lst alignment but can go back an dget it checked as you said easy enough once I make the change.
You would need to measure the distance from the shim bolt to the centre of the axle and account for any offset in the arm.
Measure the diameter of the tire. The first calculation would be the angle change by moving the shims, and then the toe calculation of the tire based on size and angle change. This would be worth calculating to help know how much to adjust to get the desired change. I find it is just quicker to move the shims and just re-measure. I find its very important to be able to get the same measurements each time. Try taking a measure, drive the car around the block and re-measure. See how many times you get the same measurement. If you can be with-in 1/32" each time +/- then you will be able to make effective changes without making things worse.
How do the tire surfaces feel right now. Can you feel any ridges in the tread ? If not the toe measurement may not be off by much or with-in specs.
04-22-2014, 11:17 PM
#11
Le Mans Master
Since it pivots at the axle, and moving the front in also moves the rear out, the change is about double. I would start with 1/8 in on both sides and go from there.
04-23-2014, 01:03 AM
#12
Melting Slicks
Thread Starter
The Tires dont feel too bad, inside is a little broken but I have a bit of camber on the rear.
So with
1 x M shim on the inside of training arm......
I have toe measures on the wheels of 3/16" in
Possibly a little more than the 1/8" I wanted but I may tighten it up and drive it a bit like that then check again.
Could move a 1/32" shim outside to inside to get it closer.
Will take it out later and see how it drives as it is now :-)
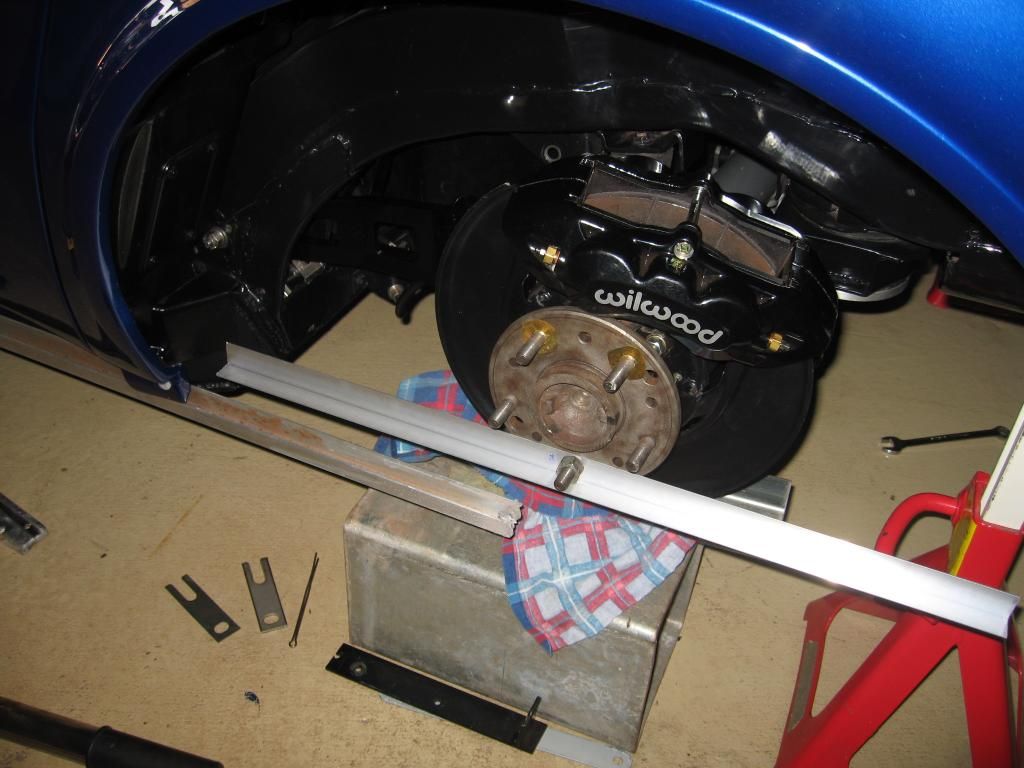
What I will do later also is get another bit of Aluminium and bolt it to rotor and start again using it to measure against the frame as a starting reference.
So with
1 x M shim on the inside of training arm......
I have toe measures on the wheels of 3/16" in
Possibly a little more than the 1/8" I wanted but I may tighten it up and drive it a bit like that then check again.
Could move a 1/32" shim outside to inside to get it closer.
Will take it out later and see how it drives as it is now :-)
What I will do later also is get another bit of Aluminium and bolt it to rotor and start again using it to measure against the frame as a starting reference.
04-24-2014, 12:36 AM
#13
Nam Labrat
Member Since: Sep 2013
Location: New Orleans Loo-z-anna
Posts: 33,897
Received 4,175 Likes
on
2,737 Posts
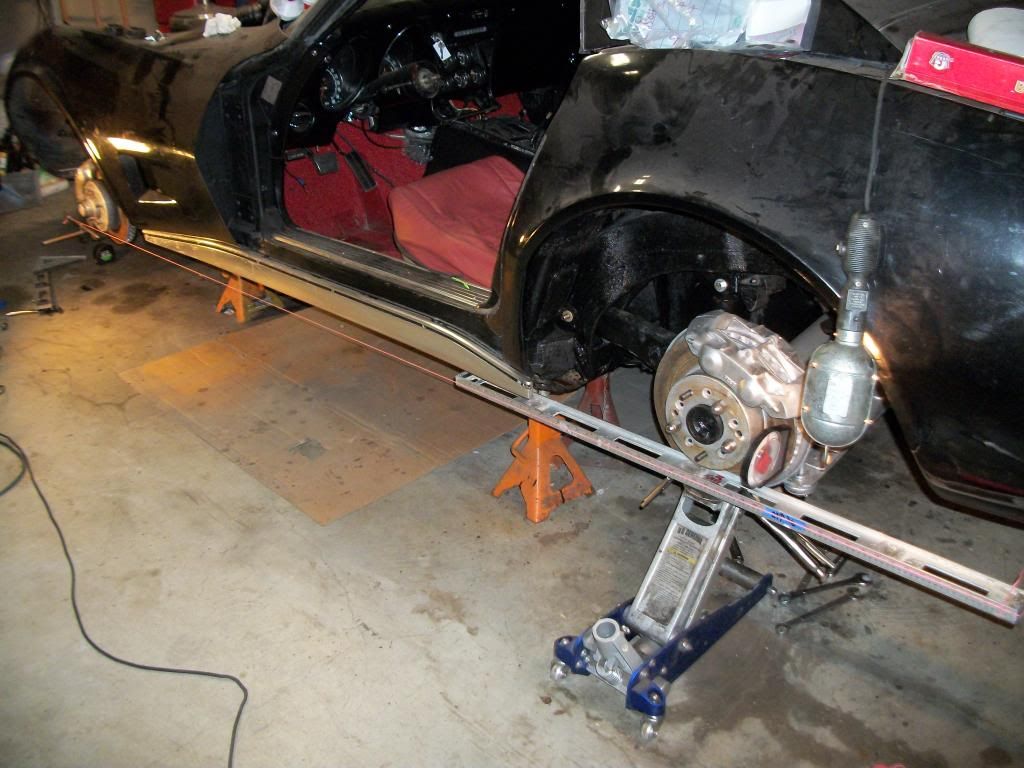
I used a carpenter's level held in place with C-clamps to get rotor to fame measurements with the rotor raised to "normal ride height"....
Last edited by doorgunner; 04-24-2014 at 12:38 AM.
The following users liked this post:
JOZW30 (08-09-2022)
04-24-2014, 11:13 AM
#15
Please note the wheel is blocked up to the correct height to what it would be with tires on the ground. Any variation in height side to side might skew the measurements. Also note the string that follows down the line to the front wheels, I would measure the distance on each side to the front axle. Because this is a further distance the accuracy will be much better.
Last edited by cagotzmann; 04-24-2014 at 11:15 AM.
04-24-2014, 11:46 AM
#16
Nam Labrat
Member Since: Sep 2013
Location: New Orleans Loo-z-anna
Posts: 33,897
Received 4,175 Likes
on
2,737 Posts
Please note the wheel is blocked up to the correct height to what it would be with tires on the ground. Any variation in height side to side might skew the measurements. Also note the string that follows down the line to the front wheels, I would measure the distance on each side to the front axle. Because this is a further distance the accuracy will be much better.
I measured from the frame to the string (taking into consideration the frame width differences) from front to rear to make sure the string was parallel with the frame center-line....that way I could make sure the front rotor was aligned properly as well as the carpenter's square on the rear rotor.
I measured from the string to the carpenter's level with machinist's dial calipers to try and be accurate

I hope this helps CraigH.