
74 Frame-Off Restoration and LS1/4L60E Swap
 04-01-2014, 12:15 PM
#21
Instructor

Thread Starter
Member Since: Oct 2013
Location: Cameron Park California
Posts: 222
Likes: 0
Received 4 Likes
on
3 Posts
If you're talking about the motor and trans mounts I would shop for the best price on a set that sets the engine in the stock location, I used a set that sits the engine one inch back and it makes it difficult to get to the transmission bolts if you have to sperate the motor and trans while in the car, it will be easier if the motor isn't so close to the fire wall.
As far as the cross member, you'll have to fab up your own mount from the crossmember for the trans to mount on or I do believe that there is a tubular crossmember but I don't have any real knowledge on that to pass along.
The chassis is looking really nice.
Terry
As far as the cross member, you'll have to fab up your own mount from the crossmember for the trans to mount on or I do believe that there is a tubular crossmember but I don't have any real knowledge on that to pass along.
The chassis is looking really nice.
Terry
I am stalled on putting the rear suspension on until the rear shocks get delivered. They are supposedly on back order until April

Thanks for responding!
 04-01-2014, 01:33 PM
#22
Racer

I was asked to post some photos of the wiring kit. My plan is to put the fuse panel in the compartment next to the battery for easier access. I went with the extended wire option to facilitate this.
They have provided detailed instructions and a wiring diagram to follow. I like their approach of going in alphabetical order, bag by bag. Not open all the bags and try to figure out what goes where. Also I really like the "Selecta Circuit" feature being able to change a circuit from switched to hot and back by moving a fuse.
They have provided detailed instructions and a wiring diagram to follow. I like their approach of going in alphabetical order, bag by bag. Not open all the bags and try to figure out what goes where. Also I really like the "Selecta Circuit" feature being able to change a circuit from switched to hot and back by moving a fuse.
I put my fuses in the jack compartment to make it easer to reach if needed. Plus, with the dry sump tank; there was no room anywhere up front.

 04-01-2014, 02:02 PM
#23
Instructor
Thread Starter
Member Since: Oct 2013
Location: Cameron Park California
Posts: 222
Likes: 0
Received 4 Likes
on
3 Posts
That looks great and exactly what I want to do! How did you run the wires from the dash / engine compartment back to the circuit panel?
04-01-2014, 04:32 PM
#24
Racer
Well, this certainly isn't finished and I am going to have to make it work; but I don't think it will be an issue. When I had the original harness from the 2010 GS redone and the computer reprogrammed; I had them add 5 feet to the fuse box with this in mind. I am going to run the wiring under the gap in the sill plate. You can see where I drilled into the back metal panel to get where it is now. Fuel pump wiring runs along the driver's side.

04-02-2014, 12:23 AM
#25
Instructor
Thread Starter
Member Since: Oct 2013
Location: Cameron Park California
Posts: 222
Likes: 0
Received 4 Likes
on
3 Posts
Well, this certainly isn't finished and I am going to have to make it work; but I don't think it will be an issue. When I had the original harness from the 2010 GS redone and the computer reprogrammed; I had them add 5 feet to the fuse box with this in mind. I am going to run the wiring under the gap in the sill plate. You can see where I drilled into the back metal panel to get where it is now. Fuel pump wiring runs along the driver's side.
04-03-2014, 02:10 AM
#26
Instructor
Thread Starter
Member Since: Oct 2013
Location: Cameron Park California
Posts: 222
Likes: 0
Received 4 Likes
on
3 Posts
I am considering keeping my stock dashboard and using Auto Meter Phantom II gauges.
Doing some initial research I read that I would need to purchase the programmable fuel gauge due to the requirements for the fuel tank sender if using the fuel pump assembly from a 99 - 02 Camaro. I expect this will be quite expensive ($1k+) by the time I purchase all the gauges and install kit.
I have read that others just replaced the Speedo / Tach with electric units and kept the stock gauges. Can someone tell me what I would need so far as senders and how I would handle the fuel tank sender issue? I suspect some have just gone with external fuel pumps and kept the stock float which works with the stock fuel level gauge but I have read in several places that the external fuel pump is more prone to early failure due to the potential for scavenging and working harder than an in tank fuel pump?
I have attached the notes I made from information I read on the Auto Meter web site.
1. Air/Fuel Ratio � Oxygen Sensor Gauge Installation for 5.7 LS1 engine(s)
a. Purple wire with a white stripe for the left bank primary sensor or at pin # 69 of the PCM. OR you may use the solid purple for the right bank primary sensor or at pin # 66 of the PCM
2. Fuel Level Sender Resistance Range
a. 40 ohms @ Empty to 250 ohms @ Full. Must use Full Sweep Programmable fuel level gauge. Or if you use a short sweep standard fuel level gauge, it will then have to be sent in to Service at Auto Meter for special calibration. Use our Ask a Question icon to ask about the procedure and cost.
b. Phantom II 7510 Programmable fuel level gauge
3. Oil Pressure Gauge Thread Size for 5.7L engine(s)
a. M16 x 1.5 Although you may drill & tap into adapter above oil filter
4. Tachometer Signal Wire Installation for 5.7 LS1 engine(s)
a. PCM, Red connector, Pin 10, White wire. Set up as 4 cyl, 2 pulse.
5. Vehicle Speed Sensor (VSS) Signal Wire for 5.7 engine(s)
a. Purple wire with a white stripe or at pin 21 of the red PCM Connector
6. Water Temp Location and/or Thread Size for LS-1 engine(s)
a. Remove the threaded in plug in passenger side cylinder head located past the last exhaust port. Use Auto Meter #2277 adapter. If using a short sweep electric gauge (with a single wire sender), you will need a model #2259 sender as well to fit the adapter. If using a full sweep electric gauge (with a 2-wire sender), then that will fit the adapter. Sorry, we do not offer a mechanical adapter for this application. Thread size of the hole is 12mm X 1.5
� Auto Meter 5284 GM LS Engine Gauge Adapter Kit
04-19-2014, 01:07 AM
#27
Instructor
Thread Starter
Member Since: Oct 2013
Location: Cameron Park California
Posts: 222
Likes: 0
Received 4 Likes
on
3 Posts
Going slow but making progress. The engine is married to the transmission and the brake plumbing is in. I will bolt up the torque converter tomorrow and I have some fine tuning of the transmission bracket to do as well. Going to measure the driveshaft and get a price on cutting my original drive shaft down and rebalanced and as the same shop does exhaust systems I will get a quote on that as well.
The Vetteworks engine mount plates worked as advertised and the oil pan clears the rack and pinion.
The rear shocks are still on backorder until May so the rear of the frame will sit on wood until then :0
The Vetteworks engine mount plates worked as advertised and the oil pan clears the rack and pinion.
The rear shocks are still on backorder until May so the rear of the frame will sit on wood until then :0
04-20-2014, 12:51 AM
#29
Instructor
Thread Starter
Member Since: Oct 2013
Location: Cameron Park California
Posts: 222
Likes: 0
Received 4 Likes
on
3 Posts
I used 3/4 set back mounts for my swap. http://www.brphotrods.com/
Thanks!
04-20-2014, 02:52 AM
#30
Instructor
Thread Starter
Member Since: Oct 2013
Location: Cameron Park California
Posts: 222
Likes: 0
Received 4 Likes
on
3 Posts
Seeing now first hand just how snug the alternator fit is and considering future maintenance I am thinking about purchasing a bracket that moves the alternator topside similar to the stock small block location. I have read several threads about different vendors but would appreciate any current recommendations and part numbers. Also, when going with an aftermarket bracket how is the accessory belt handled? As I am going with with VintageAir will the combination of the bracket and aftermarket A/C pose a problem with accessory belts?
Thanks!
Thanks!
Last edited by mmesa005; 04-20-2014 at 04:00 AM.
 04-20-2014, 07:24 AM
#32
Burning Brakes


Seeing now first hand just how snug the alternator fit is and considering future maintenance I am thinking about purchasing a bracket that moves the alternator topside similar to the stock small block location. I have read several threads about different vendors but would appreciate any current recommendations and part numbers. Also, when going with an aftermarket bracket how is the accessory belt handled? As I am going with with VintageAir will the combination of the bracket and aftermarket A/C pose a problem with accessory belts?
Thanks!
Thanks!

 04-20-2014, 09:55 AM
#33
Burning Brakes
The sanden compressor mount. If I did it over I would have the compressor hose fittings come out the rear of compressor instead of side. Cleaner routing of hoses. Notice how close the water pump fittings are to the upper A arm. 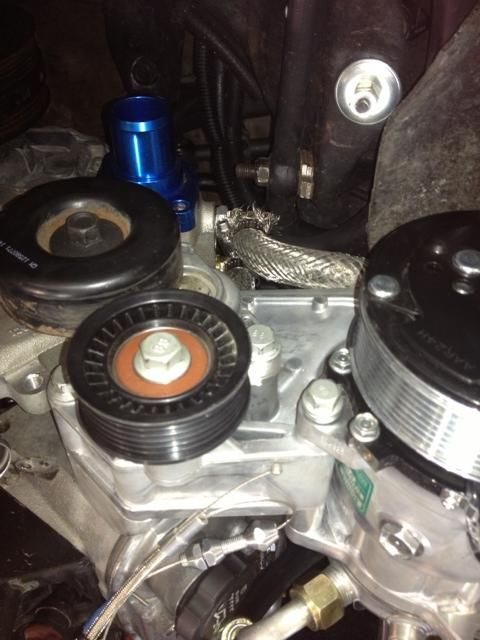
 04-20-2014, 05:41 PM
#35
Burning Brakes
http://www.holley.com/types/LS%20Swa...y%20Drives.asp
Depends on your base engine you are using as to what parts you need. I installed a LQ9 truck engine. These brackets are top of the line and fit and finish are very nice. I also had to modify a PS pulley to work with my application. Very tight around the upper A arms.
Depends on your base engine you are using as to what parts you need. I installed a LQ9 truck engine. These brackets are top of the line and fit and finish are very nice. I also had to modify a PS pulley to work with my application. Very tight around the upper A arms.
04-20-2014, 05:51 PM
#36
Instructor
Thread Starter
Member Since: Oct 2013
Location: Cameron Park California
Posts: 222
Likes: 0
Received 4 Likes
on
3 Posts
http://www.holley.com/types/LS%20Swa...y%20Drives.asp
Depends on your base engine you are using as to what parts you need. I installed a LQ9 truck engine. These brackets are top of the line and fit and finish are very nice. I also had to modify a PS pulley to work with my application. Very tight around the upper A arms.
Depends on your base engine you are using as to what parts you need. I installed a LQ9 truck engine. These brackets are top of the line and fit and finish are very nice. I also had to modify a PS pulley to work with my application. Very tight around the upper A arms.
04-29-2014, 10:21 PM
#39
Instructor
Thread Starter
Member Since: Oct 2013
Location: Cameron Park California
Posts: 222
Likes: 0
Received 4 Likes
on
3 Posts
I am getting ready to order a yoke for my transmission (4L60E) and associated U-Joints. I checked several web sites (Bowtie, Nook and Tranny, Monster) I did further searching for information and found Denny's http://www.dennysdriveshaft.com/p100...smissions.html
I want to confirm this is the correct yoke/u-joints for my engine / transmission combo (LS1/4L60E) and ask if anyone has had a custom drive shaft built for their swap and if so what length you wound up using?
BTW - my rear shocks are due to ship @ mid-may which will finally allow me to get the chassis completed. I have a radiator from DeWitts on order, a gas tank with internal fuel pump from Vettworks, A/C heating from VintageAir, and Auto Meter gauges from Jeg's. Fingers crossed and I could be putting the body back in in another month?
Just need to figure out seats and belts and everything less paint will be ordered!
Thanks!
Last edited by mmesa005; 04-30-2014 at 12:37 AM.
06-25-2014, 12:41 AM
#40
Instructor
Thread Starter
Member Since: Oct 2013
Location: Cameron Park California
Posts: 222
Likes: 0
Received 4 Likes
on
3 Posts
A family medical situation caused me to put the project on hold for a while. I contemplated selling it but I am back at it for now. I bolted up the rear suspension and noticed the rear anti-sway bar does not sit level? Will that compress when I put the body back on or am I doing something wrong?
I received the fuel tank last week so I will install it and fabricate the fuel lines. After that I think I will be ready to put the body back on
I pretty much have everything less the seats to get the car back together and running. Just have to keep at it!
I received the fuel tank last week so I will install it and fabricate the fuel lines. After that I think I will be ready to put the body back on
I pretty much have everything less the seats to get the car back together and running. Just have to keep at it!