
Vacuum to Electric - My Version
 04-22-2014, 11:29 PM
#21
Le Mans Master

Member Since: May 2003
Location: Fernandina Beach FL
Posts: 8,481
Received 3,219 Likes
on
1,731 Posts
2023 Restomod of the Year finalist
2020 C3 of the Year Winner - Modified

OK, I've completed the install, but the headlights aren't opening all the way or closing all the way. With the armatures at 1 1/4" there doesn't seem to be enough throw, unless the springs are supposed to complete the travel and mine are just too old. My choices now seem to be to slot the armature and tighten the bolt down where ever it fits best for the distance I need to travel. I was thinking about that anyhow for adjustability reasons. Also, the rod that connects the headlight side heim joint on mine is larger in the center, so there's slop on the 3/8" bolt I'm using. I'm looking at sleeves to help soak that up. Anybody else ran into that one? I'm working on a 1969, so that might be the difference.
Rick
Rick
Disconnect the rod from the motor- manually open and close the headlights and the rod should move a TOTAL of 2˝"
We need some pics!!!
If you still need some plugs email me and I can send you some.
Richard
 04-23-2014, 06:12 AM
#22
Safety Car

If you have the Probe motors, you may have to do the same thing, and seek them out in a junk yard.
04-23-2014, 11:22 AM
#23
Heel & Toe


Member Since: Mar 2014
Location: Hilton NY
Posts: 22
Likes: 0
Received 0 Likes
on
0 Posts
I bought weather resistant connectors on Ebay and replaced the ones on the motors with them. Everything's mounted and wired. I even soldered all the pins to the wires. If I can get the travel issue resolved I'll be done. I have the signal connected to the front marker light plug at the moment, but I'm thinking about running a wire all the way back to the brights switch. I assume I want to connect this to the input for that switch, but I'll confirm with a volt meter. Weatherproofing that connection isn't as important as it's in the cockpit. Hopefully that will never get wet. 
01-13-2015, 12:06 PM
#24
Safety Car

Thread Starter
Must be that time of the year when people are working instead of driving their VETTES 
Had 3-4 people email me asking about my how-to vacuum-to-electric headlight conversion.
I pointed them to this thread and decided to bring it to the top again.
George
Had 3-4 people email me asking about my how-to vacuum-to-electric headlight conversion.
I pointed them to this thread and decided to bring it to the top again.
George
01-13-2015, 03:13 PM
#25
Nam Labrat


Member Since: Sep 2013
Location: New Orleans Loo-z-anna
Posts: 33,893
Received 4,173 Likes
on
2,735 Posts

elec-trick!
03-30-2015, 06:17 PM
#26
Banned Scam/Spammer

Member Since: Jul 2007
Location: Oldsmar FL
Posts: 518
Likes: 0
Received 0 Likes
on
0 Posts

Nice write up, quick and to the point. I just have a question on the trigger wire used with a diode to 85 on the relay. You mention a light green low beam wire going to the 85 post.
I have a 1979 L82 4 speed and my shop manual shows a tan wire for the low beams and light green for the hi beams. Did you just use the light green for your install and does it work? Is it necessary for both the tan and light green to be used with one diode to make this work?
Sorry for the questions, I just get mentally challenged when it comes to wiring. Thanks for any information.
03-30-2015, 06:43 PM
#27
Le Mans Master
Member Since: May 2003
Location: Fernandina Beach FL
Posts: 8,481
Received 3,219 Likes
on
1,731 Posts
2023 Restomod of the Year finalist
2020 C3 of the Year Winner - Modified
Nice write up, quick and to the point. I just have a question on the trigger wire used with a diode to 85 on the relay. You mention a light green low beam wire going to the 85 post.
I have a 1979 L82 4 speed and my shop manual shows a tan wire for the low beams and light green for the hi beams. Did you just use the light green for your install and does it work? Is it necessary for both the tan and light green to be used with one diode to make this work?
Sorry for the questions, I just get mentally challenged when it comes to wiring. Thanks for any information.
I have a 1979 L82 4 speed and my shop manual shows a tan wire for the low beams and light green for the hi beams. Did you just use the light green for your install and does it work? Is it necessary for both the tan and light green to be used with one diode to make this work?
Sorry for the questions, I just get mentally challenged when it comes to wiring. Thanks for any information.
You need BOTH high and low beam wires - just use one and when you switch from high to low (or vise versa) the headlights would go down. Where as they would only go up on high or low but not on both!!

And here's a harness I made up to just plug in between the headlights -
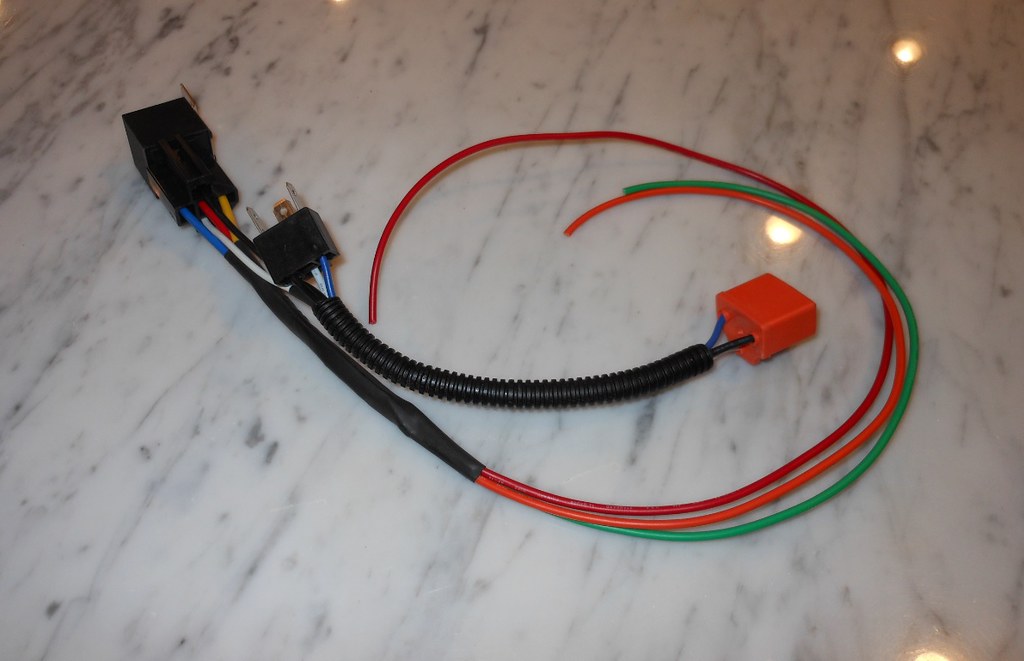 plug-in harness by richardhayes454, on Flickr
03-30-2015, 09:45 PM
plug-in harness by richardhayes454, on Flickr
03-30-2015, 09:45 PM
#28
Banned Scam/Spammer
Member Since: Jul 2007
Location: Oldsmar FL
Posts: 518
Likes: 0
Received 0 Likes
on
0 Posts
Richard,
Thanks for the reply, your diagram is a little different from what George has posted to his thread in post #1. He has the Miata motors as I do and a '79 as I do also. If you look at his second wiring diagram he has the white/red stripe spliced into his 12v fused wire at the 86 terminal. He also shows his light green wire with a diode claiming it is the lo beam wire going to the 85 terminal and claims this triggers the headlights.
As I stated in my first post my shop manual shows the tan wire as going to the lo beam headlights and the light green going to the hi beams. If this works on his system which he claims it does then I fail to understand why I would need to wire both tan and light green to the relay.
I really appreciate any help with this as working with wiring is not something I feel totally comfortable with.
03-31-2015, 01:24 AM
#29
Le Mans Master
Member Since: May 2003
Location: Fernandina Beach FL
Posts: 8,481
Received 3,219 Likes
on
1,731 Posts
2023 Restomod of the Year finalist
2020 C3 of the Year Winner - Modified
I'm sorta familiar w/ wiring....
There are four ways to wire the Miata/ Probe motors-and five if you count adding a switch under your dash!
Wire colors of the motors-
Probe Motors
I am referencing the wires BEFORE the connector- colors change right AFTER the connector -
WHITE w/ RED stripe - positive
BLACK wire - ground
YELLOW wire- trigger
RED wire-trigger
Miata Motors
I am referencing the wires BEFORE the connector- colors change right AFTER the connector-
BROWN wire- positive
BLACK wire - ground-
RED /YELLOW wire - trigger
RED/GREEN wire - trigger
other wire not used- controls instrument warning light
1) Replace headlight switch w/ a C4 one- then you have to run 2 wires from the dash to the headlight motors.
2) Tap the headlight wire BEFORE the dimmer switch ( light blue) and run a single wire to the headlight motors and add a relay.
3) Parking light wire- add a relay. HOWEVER when you turn on your hazards the headlights will go up and down as the lights flash.
4) Use both the high and low beam wires- two diodes and a relay as I have pictured above. The high and low beams share a ground.
I have tried several different ways- you have to use both headlight wires and two diodes- here's my bench test- You are welcome to PM me as I have a PDF w/ installation instructions.
03-31-2015, 01:08 PM
#30
Banned Scam/Spammer
Member Since: Jul 2007
Location: Oldsmar FL
Posts: 518
Likes: 0
Received 0 Likes
on
0 Posts
Richard,
Thanks again for taking the time to explain this. I plan on using option 4 as described above. I was just curious as to how the OP got his to work with the hi beam light green wire as a trigger. With your explanation I'm guessing if he switches to lo beams his headlights will go down.
Thanks again for taking the time to explain this. I plan on using option 4 as described above. I was just curious as to how the OP got his to work with the hi beam light green wire as a trigger. With your explanation I'm guessing if he switches to lo beams his headlights will go down.
03-31-2015, 02:58 PM
#31
Safety Car
Thread Starter
Richard,
Thanks again for taking the time to explain this. I plan on using option 4 as described above. I was just curious as to how the OP got his to work with the hi beam light green wire as a trigger. With your explanation I'm guessing if he switches to lo beams his headlights will go down.
Thanks again for taking the time to explain this. I plan on using option 4 as described above. I was just curious as to how the OP got his to work with the hi beam light green wire as a trigger. With your explanation I'm guessing if he switches to lo beams his headlights will go down.
If you going to use headlight for trigger use the low beam as it is HOT with low or high beams.
George
BTW...I sold the '79 and bought a '69 and am thinking about doing same to it after I get done the N14 Side PIpes, Vintage Air & TKO 5 speed
==>> 1969 Projects
03-31-2015, 08:31 PM
#32
Le Mans Master
I disagree, the low beam wire is only hot with the low beams on. The outer lamps have 2 filaments, hi and low beam. When on hi, the low beam filament in the outer bulbs is not on.