
Valvetrain trouble
 09-20-2013, 10:00 AM
#1
Instructor

Thread Starter

So I've been working on my new-to-me 1970 coupe trying to get into driving shape after it sat for quite a while. Just finished the last thing I had to do to get it inspected (parking brake) and was backing it out of the driveway when a loud clacking noise started coming from under the hood. Clearly a lifter issue on the passenger side.
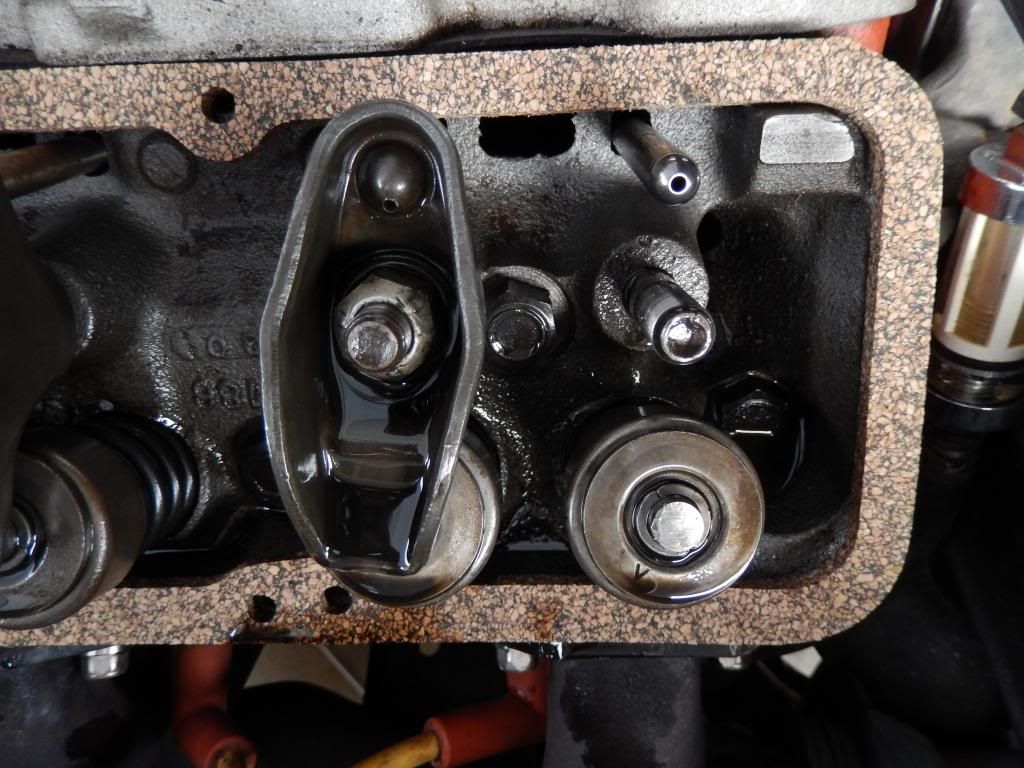
I pulled the valve cover and found the the tip of the #2 exhaust rocker had slid off the valve tip and was resting on the retainer. Pulled the rocker off and the pushrod out. It was bent. I noticed that the intake rocker on the same cylinder was cocked to the side even though it was still on the valve tip. Pulled the other cover and it seems like three or four rockers don't look quite straight, even though not as pronounced as on #2.
Another concern I have is that the valve tip is scored on the side where the rocker slipped off. You can see it in the pic below. Is the valve damaged to the point I need to replace it? I got a new pushrod, but when I installed it and tightened down the adjustment nut, it's still sitting cocked to the side, a little more than the intake rocker in the pic.
What causes the rockers to do this? There was no valvetrain noise prior to this so I don't think there was excessive lash. Is there a way to stabilize the valvetrain short of machining for studs and getting a spendy roller setup? This is an 350/350 that runs pretty good and I'm kind of an aggressive driver so I may want to wind it out occasionally (OK, maybe more than occaisionally ).
).
One more question, I found Lars valve adjustment procedure and thought I'd do that but he doesn't mention whether it's done with the engine hot or cold. Can you tell me?
Thanks for the help.
I pulled the valve cover and found the the tip of the #2 exhaust rocker had slid off the valve tip and was resting on the retainer. Pulled the rocker off and the pushrod out. It was bent. I noticed that the intake rocker on the same cylinder was cocked to the side even though it was still on the valve tip. Pulled the other cover and it seems like three or four rockers don't look quite straight, even though not as pronounced as on #2.
Another concern I have is that the valve tip is scored on the side where the rocker slipped off. You can see it in the pic below. Is the valve damaged to the point I need to replace it? I got a new pushrod, but when I installed it and tightened down the adjustment nut, it's still sitting cocked to the side, a little more than the intake rocker in the pic.
What causes the rockers to do this? There was no valvetrain noise prior to this so I don't think there was excessive lash. Is there a way to stabilize the valvetrain short of machining for studs and getting a spendy roller setup? This is an 350/350 that runs pretty good and I'm kind of an aggressive driver so I may want to wind it out occasionally (OK, maybe more than occaisionally
).One more question, I found Lars valve adjustment procedure and thought I'd do that but he doesn't mention whether it's done with the engine hot or cold. Can you tell me?
Thanks for the help.

 09-20-2013, 10:18 AM
#2
Drifting


Member Since: Aug 2013
Location: perth Aus w.a
Posts: 1,263
Received 510 Likes
on
270 Posts
2020 Corvette of the Year Finalist (stock)
C3 of Year Winner (stock) 2019

hi mate had same prob it was the rocker stud had been worn away where it rubs on the rocker so I had to replace the stud
 09-20-2013, 10:41 AM
#4
Instructor
Thread Starter
Anyone got any opinions on a new rocker arm setup? I'm new to SBC and I don't know what's out there. Is there a decent setup out there that doesn't cost an arm and a leg?
09-20-2013, 11:50 AM
#5
Drifting

The valve is damaged. Could be from over-rev, could be from losing a timing chain earlier in its life. For now do minimal repairs to get your inspection and green sheet. Then plan on pulling the heads.
Mike
Mike
09-20-2013, 12:15 PM
#6
Instructor
Thread Starter
Thanks Mike. I've been doing a little more searching on this. I'm a little inexperienced in this area as most of my hot-rodding has been with Mopars (stock shaft mounted rockers). I think this one rocker is going to have a hard time staying in place if I just bolt it back down. I thought you would have to have a machine shop R&R the stock rocker studs, but then I found some stuff about doing it yourself.
If I get this:
http://www.summitracing.com/parts/pow-pow351300
to remove the stud, how do I press a new one in? Is there some fitting that you can screw over it and just hammer it in? Like you say, I just need to get it drivable at this point. I don't really want to get into cutting threads for screw-ins.
09-20-2013, 12:26 PM
#7
Le Mans Master


First poster SUG has it, I can see a notch in the lower LH part of the rocker stud right now. You can get new studs at an auto machine shop, stack a bunch of washers on the stud, get a standard grade 8 fine nut (don't use the rocker nut, it is a disrupted nut that grabs the threads!) put an impact gun or long breaker bar on the WELL LUBRICATED with good grease or better yet anti-sieze and pull it out. Clean the stud pocket out well with brake parts cleaner, get some red or better yet #680 Locktite, coat the new stud with the Locktite, and install a nut on the end of the stud and carfully align the new stud and install with a BFH! Make SURE! the rocker hole is clean and dry! if there is oil, or liquid in there you will hydraulic the head and crack to stud boss! Check for stud proper heigth by using a straight edge across the adjoining studs for proper installation heigth. I would want to check all my studs, if a couple are failing there are probably others.
The valve tip has a little damage, use a Dremel and smooth out the edge, you should be OK.
The valve tip has a little damage, use a Dremel and smooth out the edge, you should be OK.
Last edited by Solid LT1; 09-20-2013 at 12:30 PM.
09-20-2013, 01:29 PM
#8
Instructor
Thread Starter
OK thanks LT1. I do think several others are worn the same way, just not as bad. I'll probably have a machine shop put screw in studs in soon. Just want to do a stop-gap for now so I can get the car inspected and licensed. I bought the car out of state and Texas requires an inspection before they will title and license it.
Also, can someone tell me if Lars valve adjustment is supposed to be done on a cold or hot engine?
Also, can someone tell me if Lars valve adjustment is supposed to be done on a cold or hot engine?
09-20-2013, 04:41 PM
#9
Le Mans Master
For setting lifter preload, you can do it on a cold engine. I don't know Lar's method, I mark the harmonic balancer with a sharpie ink pen at 90 degrees, turn the motor over and adjust valves at TDC when they are on firing position. Easy to do, measure balancer diameter, most Vettes are 8" multiply by PI (3.14) and divide by 4 example 8x3.12 = 25.12 divide by 4 = 6.28 so steal a sewing tape measure and mark balancer every 6 1/4" to get you 4 TDC refrence points (don't get caught with the sewing tape is the biggest challenge of this job.) The firing order of a standard GEN1 Chevy is 1-8-4-3-6-5-7-2 so starting at #1 TDC with the factory balancer mark, adjust #1 intake and exhaust, turn motor over to 1st 90 degree mark adjust #8......... If you have all the spark plugs pulled, this is an easy job in fact on manual trans cars, I leave them in gear and push the car forward to get perfect TDC at each cylinder, and you don't have to be exact! there is plenty of error in my method.
Your Vette has hydraulic lifter, adjust the rocker arm down until the clearance is taken up in the valve train to zero lash, then an additional 1/4-1/2 turn to preload the lifters.
I would definatley take a good look at all your rocker studs, they also have 0.001" oversize studs avalible if yours are loose, although I have never had the need for these myself.
09-20-2013, 07:12 PM
#11

Zero lash; should I be able to twist the pushrod left to right between my finger? I can't move 'm up or down, but some are rock solid in place and others I can roll between my fingers easily.
09-20-2013, 07:28 PM
#12
Le Mans Master

Member Since: Feb 2001
Location: Grapevine Tx
Posts: 7,969
Received 774 Likes
on
468 Posts
2018 C3 of Year Finalist
2016 C3 of the Year Finalist

Not exactly, at least for solid lifters. At TDC he sets the 8E and 2I. And he sets them at .023".
Search for his paper "30-30 cam and other OEM SB solid lifter cam valve adjustment" by John Hinckley and Duke Williams.
He has a different setting for the LT-1 and Duntov cams.
Search for his paper "30-30 cam and other OEM SB solid lifter cam valve adjustment" by John Hinckley and Duke Williams.
He has a different setting for the LT-1 and Duntov cams.
09-21-2013, 02:30 PM
#14
Instructor
Thread Starter
Here are some pics. There is a lot of meat ground out of there. How does this happen? I would assume these studs are hardened in the way a pushrod scrubbing against guide plates are. Is this normal wear?

 09-21-2013, 06:33 PM
#15
Melting Slicks


Wear on the side of the rocker stud is not unusual, but when worn, they should be replaced. Common cause for this wear is that the rocker tip is not centered on the end of the valve - if guide plates are used, they may be adjusted side to side to improve the alignment. In the case of pushrods centered by the guide hole in the head such as you show, misalignment could be due to bent pushrods or bent rocker stud. Another cause is the tip of the valve is not flat; valves like this should be replaced. However, if it's able to be dressed without any overhang, one can use lash caps to provide a flat surface for the rocker to run on. Caution - ensure that the lash caps don't touch the keepers!
If you find engine coolant in the bottom of the rocker stud hole, that's because the stud hole goes into the water jacket - not a problem at all. You can not crack the boss due to hydraulic lock in this case.

If you find engine coolant in the bottom of the rocker stud hole, that's because the stud hole goes into the water jacket - not a problem at all. You can not crack the boss due to hydraulic lock in this case.
09-21-2013, 07:56 PM
#16
Race Director

Your best bet is to order a complete set of assembled LT-1 heads ...you will be spending more on the old set then getting the set I suggested....you cant get any better...just think, screw in studs, guide plates, and a set of valves and springs and retainers...equals LT-1 heads.........
.
.
Last edited by Ironcross; 09-21-2013 at 08:02 PM.
09-22-2013, 01:28 AM
#17
Le Mans Master
Rocker studs are case hardened can be as shallow as a few thousandths. Old age long time between oil changes can all cause the wear. Yes rocker stud holes can get into water passage. Make sure there is no coolant in heads! Clean hole with brake parts cleaner, wipe stud with locktite put your nut on the end to protect threads and start hammering away! The adjustment of the rocker arms get them to zero lash, check by wiggling side to side or spinning the pushrod, when lash clearance is taken up tighten an additional 1/4 turn, it takes some experience to get it down but, shouldn't be too hard. If your concerned its better to be a little loose than too tight. The rockers can then be readjusted on a running motor but, do yourself a favor and get some oil blockers at the local auto parts store K&D or Lisle tool makes them, they are little plastic parts with wire clips that clip on rocker arm by pushrod seat and keep oil from flinging off rockers while you adjust them on a running motor. It is also best to use a cut away valve cover to keep most of the oil inside the motor. Doing adjustment on a running motor, you can back off rocker nuts until you hear valve clattering, then tighten to point of zero lash, then go another 1/4 turn. If you over tighten, you will hear the stumbling you created by going too far on a running motor. This is a messy! job even for a good mechanic. Plan on having to do major engine clean up after doing adjustment on a running motor. If you get zero lash preload right, you won't have to do running motor adjustment. Hope this helps you out.
09-22-2013, 10:43 AM
#18
Instructor
Thread Starter
Thanks for the info guys, it helps a lot.
LT1, I did make an attempt to adjust the lifters after initially replacing the bent pushrod, before SUG told me to check the stud for wear. The car ran like crap! Pretty sure I had them cranked down too tight and the valves weren't closing completely. Yesterday afternoon, I went back through the procedure and used my leakdown tester on each cylinder after I adjusted them. On the second one, the cylinder wouldn't hold but about 5 psi. Backed off the adjuster nut a hair and it sealed right up. This engine is very touchy on that adjustment. Can't go very far past zero lash before it opens up.
On the good side every cylinder is holding about 90-95% pressure at 100 psi on a cold engine. So I guess it's in pretty good shape.
The local parts shops didn't have any studs in stock so I had to order it. Should be there today so I'm going to try to get this thing going this afternoon.
Larry, thanks for the tip on the lash caps. I may have to use one (can you use them on just one valve?) on the valve pictured in my first post because the rocker wore it to a slight angle.
Ironcross, thanks for the tip on the LT1 heads, but I think I want to keep this car somewhat close to original. Partly because I don't want to spend a lot of money on it right now. I have three other project cars I'm working on and they're eating my budget up. I got this partly because I wanted a classic to drive while I work on them, and a Corvette specifically because I had a 72 roadster in the early 80's that I loved. Got a hankerin' lately to get back into them. This car runs so good, at least until the rocker trouble, that I really didn't think I needed to do anything to it.
LT1, I did make an attempt to adjust the lifters after initially replacing the bent pushrod, before SUG told me to check the stud for wear. The car ran like crap! Pretty sure I had them cranked down too tight and the valves weren't closing completely. Yesterday afternoon, I went back through the procedure and used my leakdown tester on each cylinder after I adjusted them. On the second one, the cylinder wouldn't hold but about 5 psi.
Backed off the adjuster nut a hair and it sealed right up. This engine is very touchy on that adjustment. Can't go very far past zero lash before it opens up.On the good side every cylinder is holding about 90-95% pressure at 100 psi on a cold engine. So I guess it's in pretty good shape.
The local parts shops didn't have any studs in stock so I had to order it. Should be there today so I'm going to try to get this thing going this afternoon.
Larry, thanks for the tip on the lash caps. I may have to use one (can you use them on just one valve?) on the valve pictured in my first post because the rocker wore it to a slight angle.
Ironcross, thanks for the tip on the LT1 heads, but I think I want to keep this car somewhat close to original. Partly because I don't want to spend a lot of money on it right now.
I have three other project cars I'm working on and they're eating my budget up. I got this partly because I wanted a classic to drive while I work on them, and a Corvette specifically because I had a 72 roadster in the early 80's that I loved. Got a hankerin' lately to get back into them. This car runs so good, at least until the rocker trouble, that I really didn't think I needed to do anything to it.
09-22-2013, 05:26 PM
#19
Instructor
Thread Starter
Well I got the studs and lo and behold, encountered more problems. I'm going to rant a little here because this has happened a number of times recently with parts vendors.
I get everything cleaned up, put the nut and the Loctite on the stud and start to drive it in with my 3 lb sledge, tapping pretty gently at first as I've never done this before. I get it a little ways in and it seems to really be getting difficult. Now I've been know to use duct tape and/or a BFH to solve a lot of issues before, but pounding the crap outta a V8 head makes me nervous.
So I pull it back out and mic it (shoulda done that first) and they gave me .003 over studs!. I clearly asked for standard. I'm lucky I didn't crack the boss. Man, I am sick of this, as I mentioned, I'm restoring other cars and it seems like nobody can do anything right lately. This is probably the 4th or 5th time in the last few weeks I've gotten the wrong part, or a broken part, or something. The other day I got a package from Willcox with some new window felts. UPS totally destroyed the package, mangled it really, and then had the nerve to tape it up and drop it at my door! There was no freaking way that anything could have survived what they did to that package. To Willcox credit, they are replacing it immediately.
Now I know they don't have any more studs in stock and I'll have to wait till next weekend, so I stick the stud in my poor man's lathe (drill press) and work it with a file and emory paper to clean it up. Get it down to exactly .372. For good measure, I put it in the freezer for a while. It goes in pretty easy after that, but I till am nervous pounding it in at the last cause it's getting tight. I was probably being over cautious, but I stopped while it was still a bit higher than the others, probably less than 1/16". I put it together and started it and it worked. Still running a little rough which is probably that I still have one of the valves a little too tight, so I'll have to play with that.
Is leaving that stud a little higher going to hurt anything? I'm going to have these heads machined for screw-in studs as soon as I can, I don't like these press in deals.
Last edited by DWinTX; 09-22-2013 at 05:32 PM.
09-24-2013, 03:32 PM
#20
Le Mans Master
If stud is within 1/8" of others in heigth it should be OK. If your bottoming adjuster nut running out of preload adjustment, put a grade 8 hardened aircraft washer under the rocker nut.