When you click on links to various merchants on this site and make a purchase, this can result in this site earning a commission. Affiliate programs and affiliations include, but are not limited to, the eBay Partner Network.
They get rid of about 100 lbs of weight, the vacuum can and all the horrible vacuum lines under the hood and dash.
I found the buckets on flea bay for 150. I built the covers and frames myself.
It is really nice to pull the switch and have light consistently.
Originally Posted by myko
Yeah, I have been lucky with the lights on my car that is on the road but have found a bunch of parts that will need replaced on the re-builder. I am planning on a dark grey car so I was toying with the idea of smoked glass covers on fixed headlights to make them less visible. I would potentially avoid a lot of weight and headaches with vacuum. Ahh, but that is so far off I only dare to dream. I still need to get this thing wired so I can start it!
NOT TO GO OFF TOPIC GUYS - BUT -
Do you guys have any write ups or pics of your fixed headlight setups?
I picked up a set of buckets (Ecklers) but need most of the hardware and of course the lenses.
Do you guys have any write ups or pics of your fixed headlight setups?
I picked up a set of buckets (Ecklers) but need most of the hardware and of course the lenses.
Thanks for any help.
Good luck with your project
Bman
I really like this thread and have been following it closely. The work to adapt that vette to the newer motor is awesome!!!
Please forgive the off topic post.
As for my lights, I got the buckets on Flea bay. They are pretty straightforward. Four nuts hold them on.
Just like the stock lights. Four bolts and the whole mechanism comes out.
The lights are just standard early small rectangular lights with simple buckets and frames.
The clear acrylic frames I molded and built myself. Ecklers now wants 320 dollars plus taxes and shipping which seemed awful high to me.
I built my frames for less than 50.00, including the 1/4 inch acrylic lenses. I ordered a sheet of 24 X 24 1/4 sheet of acrylic online for 24.99.
Then I got some fiberglass from West Marine. With just a little patience and time you can mold almost anything with fiberglass.
I fitted and made a frame of heavy cardboard and laid the fiberglass. It is thick, about 1/4 inch, and then I glassed them in up under the light openings.
I then cut the clear acrylic with a dremel tool. I beveled the edges inward and fit the acrylic really close. Then I measured and drilled the holes. I set aluminum 1/4 X 20 threaded sleeves.
I beveled the holes in the acrylic and then used stainless steel recessed Alan bolts to hold the acrylic in place. The black gasket is actually soft latex air conditioning tubing that totally seals the bucket.
I also made the fiberglass for the license plate in the Monza bumper. Front plate is not required in Georgia.
Last edited by commander_47; 02-28-2014 at 09:34 AM.
I really like this thread and have been following it closely. The work to adapt that vette to the newer motor is awesome!!!
Please forgive the off topic post.
As for my lights, I got the buckets on Flea bay. They are pretty straightforward. Four nuts hold them on.
Just like the stock lights. Four bolts and the whole mechanism comes out.
The lights are just standard early small rectangular lights with simple buckets and frames.
The clear acrylic frames I molded and built myself. Ecklers now wants 320 dollars plus taxes and shipping which seemed awful high to me.
I built my frames for less than 50.00, including the 1/4 inch acrylic lenses. I ordered a sheet of 24 X 24 1/4 sheet of acrylic online for 24.99.
Then I got some fiberglass from West Marine. With just a little patience and time you can mold almost anything with fiberglass.
I fitted and made a frame of heavy cardboard and laid the fiberglass. It is thick, about 1/4 inch, and then I glassed them in up under the light openings.
I then cut the clear acrylic with a dremel tool. I beveled the edges inward and fit the acrylic really close. Then I measured and drilled the holes. I set aluminum 1/4 X 20 threaded sleeves.
I beveled the holes in the acrylic and then used stainless steel recessed Alan bolts to hold the acrylic in place. The black gasket is actually soft latex air conditioning tubing that totally seals the bucket.
I also made the fiberglass for the license plate in the Monza bumper. Front plate is not required in Georgia.
Awesome work!
Txs for the info.
Apologies for going off topic but this is the great thing about this forum and the free sharing of info.
Steve at tuned by frost is great to deal with, he is usually very busy so it may take some time for him to get back to you.
Terry
I looked into their website and they don't work on the GTO ECU. I think I am going to have probs finding someone who works in this narrow niche. I will probably troll LS1 a bit more.
As for the "off topic" sideline on the fixed lights, that was a great addition. I will be doing something very similar and was so glad to see the pics. Very helpful! As you can tell from reading the thread I am the king of "off topic"
I found a parts list somewhere--that I can't now put my hands on--that the 74-76 vette kits use the vintage air condenser vta-03263-vuc. I found it at summit. Below is a pic from vintage air's advertisement. They never would answer an email.
I haven't installed it, but it is substantially smaller than stock--though one of their biggest that I found. I'll have to modify or make mounts to hold it.
Funny you too came up with the S7. Maybe it will work! I haven't made new hoses yet. I had new ones made a couple years ago, and I'm hoping they will fit. Custom hoses were the norm where I had my AC last repaired and were not expensive.
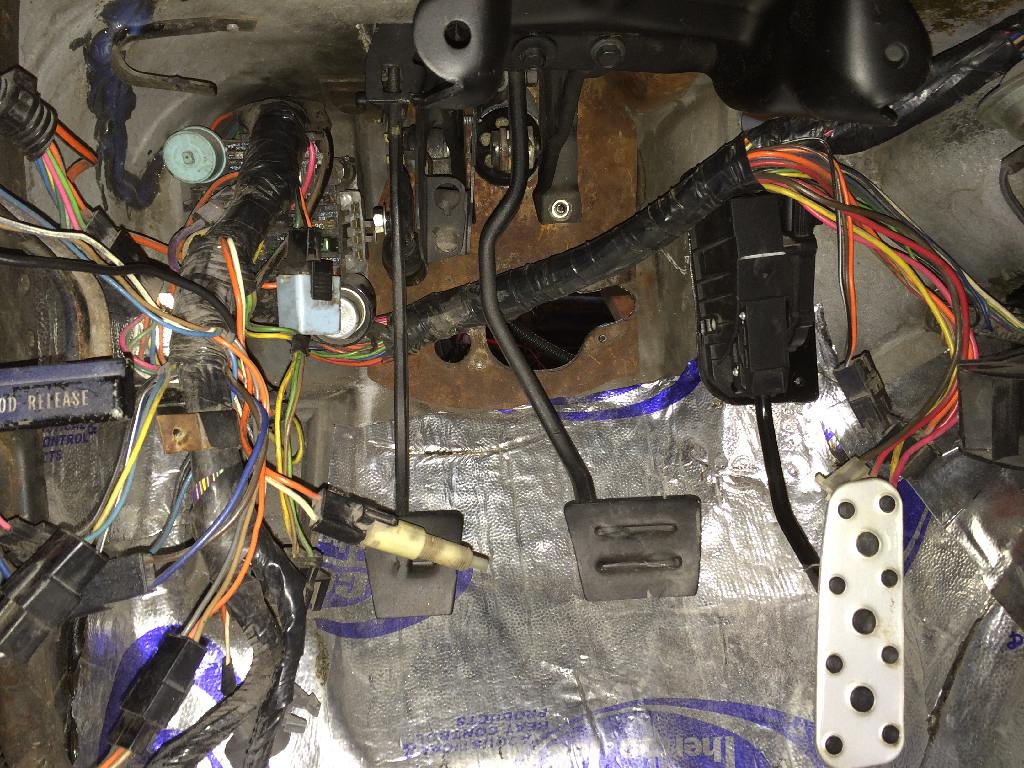
I finally got back to work on the car! Steve at Tuned by Frost did get agree to work on the ECU and it is back already! Very fast and great communication. Overall, I am very impressed with Tuned by Frost. I have gotten the pedals installed and have to drop the body on the chassis to fit the steering column, drive shaft, tunnel, and decide where attach the clutch reservoir, ECU, and relays.
Here is a pic of the petals and rear of the interior:
I am glassing the dash pad to use the GTO instrument cluster, new speaker enclosures, and possibly the Vintage Air ducts.
Last edited by myko; 04-15-2014 at 06:18 AM.
Reason: Spelling
I am still working on trying to get the fuel line figured out. I want to find a better way to run hose from the in tank pump to the pressure regulator without so many hose clamped connections. I am using trying to use the stock 1980 tank with the bladder and the stock sending unit. I may have to abandon this setup if I can't mod something better.
Also, does anyone have a diagram or pics of how they routed the PS hoses using the Holley brackets? The reservoir has the hose connections in front of the belt and there aren't many holes to route through to get the hose around to the pump.
Can't you stay with the same plumbing configuration as the 80, but change out the pump for a bigger pump and use a C5 filter regulator next to the tank?
Can't you stay with the same plumbing configuration as the 80, but change out the pump for a bigger pump and use a C5 filter regulator next to the tank?
Terry
Post #57 shows how I fit the 255 GPH pump on the stock sending unit. This configuration has 3 connections and utilizes the stock plumbing. I put the 58 PSI regulator on the frame so it would be as close to the fuel rails as possible. I am thinking of running a single tube from the pump, through the fitting plate, and on to the regulator (2 connections). The tricks will be 1) welding a guide so it is relatively fixed and 2) getting a good seal where the hose passes through the plate to avoid gas leaking.
Thanks, bebezote. It is starting to take shape but every time I have a long break, I keep going back and reworking parts that I finished!
On fans and fuel pump:
Your ecu has 2 outputs for fans, they're a ground for relays. The ecu can be programmed for on/off setpoints. GM had them wired for 2 speed operation (schematic below). But if you have AC, it's best to wire one fan to a trinary switch as well as the temp setpoint.
The ecu has a 12V+ output to trigger the fuel pump relay.
I finally figured out the diagram with some help from Cutlass on LS1: "The triple fan relay setup is there so the fans can run slow speed or high speed. When the #1 relay is on, the 2 fans are wired in series and run slow speed. When #1, #2, and #3 relays are on, the fans each have there own power and ground and run high speed."
Since I am planning on A/C, how would I go about wiring a trinary switch as well as the temp setpoint?
I haven't had much time this spring but I was able to get the body back on for a test fit. I am working to refit the transmission crossmember, the tranny tunnel, and the steering column for the Borgeson conversion. Once I have the fuel lines finalized and wire in the harness I should be ready for a test start!
I had to move the engine forward an 1" to clear the tunnel then back 1/4" to clear the hood. Now 3/4" forward from stock. You can see how close the A/C compressor will be in the last pic. It becomes obvious how much the engine sits to the passenger side as the oil pan and alternator are not nearly as close to the chassis and body on the driver side.
I haven't had much time this spring but I was able to get the body back on for a test fit. I am working to refit the transmission crossmember, the tranny tunnel, and the steering column for the Borgeson conversion. Once I have the fuel lines finalized and wire in the harness I should be ready for a test start!
I had to move the engine forward 3/4" to clear the hood. You can see how close the A/C compressor will be in the last pic. It becomes obvious how much the engine sits to the passenger side as the oil pan and alternator are not nearly as close to the chassis and body on the driver side.
It just depends on what pulley/bracket configuration, I'm running the same engine/trans as you and mine is mounted in the stock location.
It just depends on what pulley/bracket configuration, I'm running the same engine/trans as you and mine is mounted in the stock location.
The shift forward was to clear the tunnel better. It also puts the shifter in a better place. It is off center both at the top (the compressor) and the bottom. The oil pan is a couple inches closer on the passenger side. I couldn't get good pics. Just want to be sure of the position before I cut the column and drive shaft. Good times!
Finally got back to this project and got it started! If there is one good thing from the whole lock down, it is free time for completing projects.
It runs, idles fine, and the throttle works with the DBW gas pedal. It was running on but I had switched one of the wires to ignition 3 per the ECU pinouts. This was fixed when I switched it back to ignition 1 on a pink wire.
Last edited by myko; 05-09-2020 at 10:39 AM.
Reason: Added same vid twice
Nice, Got my 6.0 LS running in my 78. I just installed Digital Dakota gauges. Blast to drive. When are you remounting body? Are you going to have A/C? How are you going mount the stock gauges?Attachment 48187419
Now I can finally address this stuff. I obviously have an AC compressor but that issue will be down the road. I�m trying to figure out a way to mount the original instrument cluster from the GTO as I modified the dash pad for it. Does anyone have an idea of how to get information from the ECU to the cluster? I was going to use an OBD Bluetooth adapter to get tack, oil pressure, and temperature readings but that is not working. It doesn�t even look like the unit is getting power from the OBD port. I�m a little nervous about running it much without this information.
Pin 16 (bottom right corner pin if you have the big part of the plug on top) should be 12v. Are you getting that?
I did have the power. It was a ground issue. I now have the OBDLink getting codes. It is still heating but I suspect an air lock or thermostat issue. Then I am on to decisions about gauges. I have a couple of sets of 1980 gauge clusters but want digital tach and speedo off the ECM. I have the OEM GTO cluster but didn't want to have to buy and program a BCM and PIM. I was hoping to find a Raspberry pi CAN BUS solution but haven't found anything that looks promising. I am trying to convince myself that Dakota Digital or *suggestions* are worth it for a first attempt swap project.
Im not that far along just yet, but Ive been trying to decide the same things. I *think* Im going to do speedhut gauges for the main gauges, then a custom console with maybe a screen or something. My thought was a pi or small pc that can do the both the odb2 and radio duties. Otherwise you can get an android head unit that can run something like Torque.


 02-28-2014, 12:20 AM