
Fellow frame-off Victims - Time to reunite body-frame - Potential Pitfalls?
 03-05-2013, 05:55 PM
#1
Pro

Thread Starter

Those of you that have suffered through a frame-off know the feeling when you finally get to the point you see below.... The point when you get to bring body and chassis back together again! I'm there, or so I think I am, and I only want to do this once (I've done everything else on the car at least twice already  ). Does anyone have any advice or last minute things that should be done before I drop her back on?? No comment is too obvious, it's always the obvious stuff that seems to go unnoticed, and this is my first attempt at this. Has anyone made a pre-drop to-do list?
Here's a picture of where i'm at with the chassis.
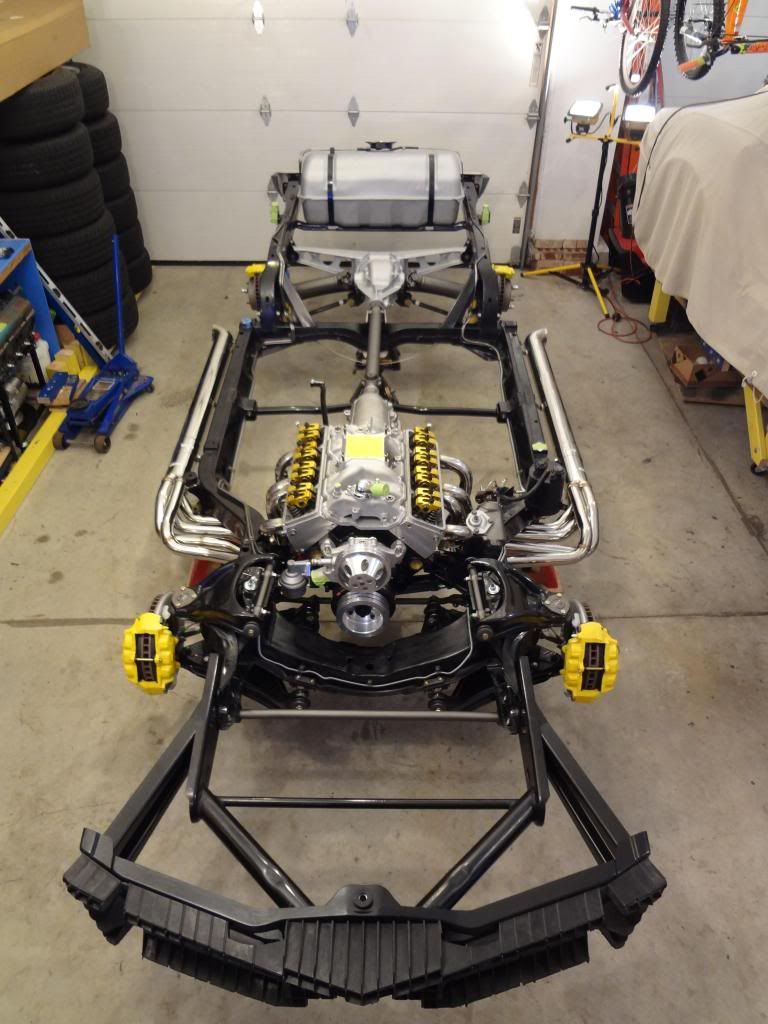
The frame has been leveled, body mounts are shimmed where needed, and I will be wrapping the frame with cellophane as the car needs paint too. I've mocked up the motor accessories already but removed them to make getting the body up and over easier. Oh, and the + battery cable has been run. My biggest question is whether or not I will be able to install the engine side of the Air Conditioner / Heater Box after I do the drop. Even if I can, should I just do it now to make life easy? I've heard it both ways.
Feel free to fill in the blanks, and THANKS!!
1)
2)
3)
4).....
). Does anyone have any advice or last minute things that should be done before I drop her back on?? No comment is too obvious, it's always the obvious stuff that seems to go unnoticed, and this is my first attempt at this. Has anyone made a pre-drop to-do list?Here's a picture of where i'm at with the chassis.
The frame has been leveled, body mounts are shimmed where needed, and I will be wrapping the frame with cellophane as the car needs paint too. I've mocked up the motor accessories already but removed them to make getting the body up and over easier. Oh, and the + battery cable has been run. My biggest question is whether or not I will be able to install the engine side of the Air Conditioner / Heater Box after I do the drop. Even if I can, should I just do it now to make life easy? I've heard it both ways.
Feel free to fill in the blanks, and THANKS!!
1)
2)
3)
4).....
 03-05-2013, 06:19 PM
#2
Pro

Member Since: Nov 2012
Location: Chesapeake Virginia
Posts: 672
Likes: 0
Received 0 Likes
on
0 Posts
I'm not there YET but it won't be long.
from what I see it looks like the frame is ready, one question, have you already run the motor for break-in? I'm planning on running mine with the body off first, that way if there are any issues I can address them while everything is easy to get to. I would certainly try to do the heater box now rather than later, it's pretty tight in there with the motor in the way. I read somewhere on here, that if you find a couple pieces of pipe the right size, you can drop them in the holes on the frame, then lower the body over the pipe, there are holes in the rocker areas of the body that line up with the holes in the frame, that way you know the body is back on the way it's supposed to be.
also, remember not to torque the bolts on the front and rear suspension until the car is back on the wheels and sitting on the ground.
03-05-2013, 06:43 PM
#3
Pro
Thread Starter
Thanks Jig. I'm not going to run the motor before I get the body on because it's a new crate motor and the builder did the break-in for me on a stand and made a vid of it. I know I could still have problems, but I'd rather get the radiator hooked up once and be done with it after the drop. I did remember not to torque the A-arm bolts but I appreicate it, that's the kind of thing I'm looking for. Good luck with your build!
03-05-2013, 07:08 PM
#4
Team Owner

Member Since: Sep 2006
Location: Westminster Maryland
Posts: 30,173
Likes: 0
Received 2,878 Likes
on
2,515 Posts

Hi gb,
Here's a suggestion:
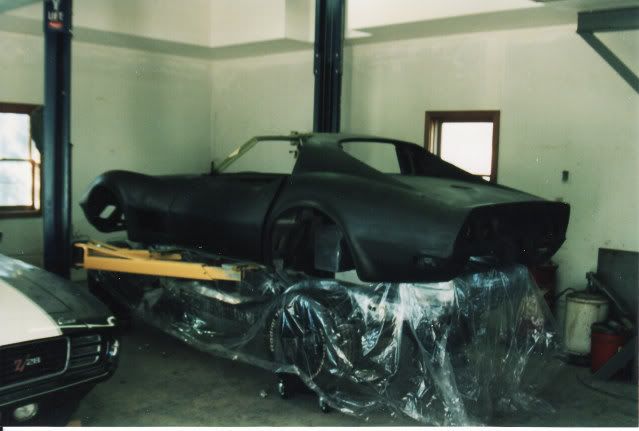
Besides wrapping the frame as well as you can, you might also put one large sheet of plastic loosely over the frame as you drop the body. I found that offered a bit of additional protection.
Good Luck! Frame and running gear look very nice!
Regards,
Alan
Sorta like this:

Here's a suggestion:
Besides wrapping the frame as well as you can, you might also put one large sheet of plastic loosely over the frame as you drop the body. I found that offered a bit of additional protection.
Good Luck! Frame and running gear look very nice!
Regards,
Alan
Sorta like this:
03-05-2013, 07:26 PM
#5
Safety Car

Member Since: Aug 2001
Location: North Easton Mass
Posts: 4,883
Likes: 0
Received 8 Likes
on
8 Posts

I couldn't find it in my AIM, but make sure that you have the bolts for your transmission crossmember oriented correctly or you won't be able to remove the bolts once the body is on. If you look at the underside of the body you can probably figure out which way the bolt head needs to be pointing, otherwise check it once the body is on the frame before bolting the body down.
As you can probably tell, my bolts weren't oriented correctly.

Rick B.
As you can probably tell, my bolts weren't oriented correctly.
Rick B.
03-05-2013, 07:27 PM
#6
Pro
Thread Starter
Hey Alan, that is quite the chassis coccoon you have there! I'd feel a lot better having it wrapped that well, so I will take your advice and do just that. Appreciate the pics and comments!
03-05-2013, 08:34 PM
#7
Safety Car
you need the cocoon !, paint goes everywhere without it,
next time I am painting the body off, then installing on the frame.
The overspary will **** you off, .... it goes on everything/everywhere.
next time I am painting the body off, then installing on the frame.
The overspary will **** you off, .... it goes on everything/everywhere.
03-05-2013, 09:13 PM
#8
BubbaHut
 03-05-2013, 09:22 PM
#9
Melting Slicks

I didn't hook up my reverse lockout cable on the trans (man.) and that came back to haunt me later. Don't forget the line-up holes on the rockers before you tighten it down.
03-05-2013, 09:27 PM
#10
Pro
Thread Starter
I couldn't find it in my AIM, but make sure that you have the bolts for your transmission crossmember oriented correctly or you won't be able to remove the bolts once the body is on. If you look at the underside of the body you can probably figure out which way the bolt head needs to be pointing, otherwise check it once the body is on the frame before bolting the body down.
As you can probably tell, my bolts weren't oriented correctly.
Rick B.
As you can probably tell, my bolts weren't oriented correctly.
Rick B.
 . Maybe that was you! Either way, that is why I love this forum.
  03-05-2013, 09:41 PM
#11

You will see two holes drilled through the frame, one on each side, one forward and one back, under where the door sills will be. If you get a couple of pieces of 1/4 inch pipe about 18 inches long, you can use them as alignment pins. When you drop the body, the pins go straight up through the frame holes and line up with holes in the fiberglass under the aluminum sill plates. (These holes are plugged with red/orange little plastic pieces.) This will guide the body down on the frame perfectly. That's how Chevrolet did it at the factory.
Piece of cake.
Piece of cake.
03-05-2013, 09:46 PM
#12
Pro
Thread Starter
Mick, good points, especially on the Trans. I have a 2004R and I have not hooked up the cooling lines yet, or the TV cable. Wonder If I can get to those easily enough with the body on.......?
03-05-2013, 09:48 PM
#13
Advanced

Member Since: Jun 2008
Location: Murphy Texas
Posts: 68
Likes: 0
Received 0 Likes
on
0 Posts
i just dropped mine on today. I would put the a/c- heater box, blower and accumulator in before putting it on. If you have the rear shocks on, make sure the top bolt goes from the outside to the inside. If you have it the other way you can't get the bolt out once the body is on, fortunatley I noticed this before I bolted the body down. Also- get some help, I did it by myself but it is really a two man job- it will save you a lot of time.
Very nice job on the frame.
Very nice job on the frame.
Last edited by rham; 03-05-2013 at 09:52 PM. Reason: Add comment
03-05-2013, 10:07 PM
#14
Melting Slicks
You're well on the way, keep us posted.
03-05-2013, 10:23 PM
#15
Pro
Thread Starter
i just dropped mine on today. I would put the a/c- heater box, blower and accumulator in before putting it on. If you have the rear shocks on, make sure the top bolt goes from the outside to the inside. If you have it the other way you can't get the bolt out once the body is on, fortunatley I noticed this before I bolted the body down. Also- get some help, I did it by myself but it is really a two man job- it will save you a lot of time.
Very nice job on the frame.
Very nice job on the frame.
03-05-2013, 10:32 PM
#16
Pro
Thread Starter
You will see two holes drilled through the frame, one on each side, one forward and one back, under where the door sills will be. If you get a couple of pieces of 1/4 inch pipe about 18 inches long, you can use them as alignment pins. When you drop the body, the pins go straight up through the frame holes and line up with holes in the fiberglass under the aluminum sill plates. (These holes are plugged with red/orange little plastic pieces.) This will guide the body down on the frame perfectly. That's how Chevrolet did it at the factory.
Piece of cake.
Piece of cake.
03-05-2013, 10:35 PM
#17
Drifting

Greg--
Frame and drive train look outstanding, great job!!! Tracdogg (Mike D.) had me level mine with the wheels/tires installed with weight on the suspension... I leveled four spots on my garage floor with floor tiles and then rolled the frame on the leveled spots (Stinger's resto page has some great detail on this)... Then, I ensured the frame was level in all four planes (front, side to side, diagonally both ways)... Then dropped the body, and did it with six guys...
Do you know your shims on each body mount??? Work with both 2s and 3s to level the body... Once the body is leveled, you'll shim 4s with the quarters and rear of doors to set that gap... Finally, you can install your 1s and check your rad support connections... I started with 2 shims on both 2s and 3s and worked out perfectly... Ended up with more shims on my 4s, but 2 shims on my 1s...
You using a hoist, lift or manual labor to drop??? When my helped dropped the body, they snapped on of the fiberglass tabs right in front of the rear tire and adjacent to the 3 mount... Not a biggie as it was an easy fix, but try to drop slowly if possible...
Definitely try to attach your trans cooling lines, as this will be a PITA if you wait, IMHO...
Guessing you've installed your battery cables to the underneath of the body???
If I think of anything else, I'll chime in...
Get plenty of pictures before and after!!!
Rogman
03-05-2013, 10:42 PM
#18
Melting Slicks
You will see two holes drilled through the frame, one on each side, one forward and one back, under where the door sills will be. If you get a couple of pieces of 1/4 inch pipe about 18 inches long, you can use them as alignment pins. When you drop the body, the pins go straight up through the frame holes and line up with holes in the fiberglass under the aluminum sill plates. (These holes are plugged with red/orange little plastic pieces.) This will guide the body down on the frame perfectly. That's how Chevrolet did it at the factory.
Piece of cake.
Piece of cake.
I hope I explained that well.
Good luck.
03-05-2013, 11:00 PM
#19
Pro
Thread Starter
Greg--
Frame and drive train look outstanding, great job!!! Tracdogg (Mike D.) had me level mine with the wheels/tires installed with weight on the suspension... I leveled four spots on my garage floor with floor tiles and then rolled the frame on the leveled spots (Stinger's resto page has some great detail on this)... Then, I ensured the frame was level in all four planes (front, side to side, diagonally both ways)... Then dropped the body, and did it with six guys...
Do you know your shims on each body mount??? Work with both 2s and 3s to level the body... Once the body is leveled, you'll shim 4s with the quarters and rear of doors to set that gap... Finally, you can install your 1s and check your rad support connections... I started with 2 shims on both 2s and 3s and worked out perfectly... Ended up with more shims on my 4s, but 2 shims on my 1s...
You using a hoist, lift or manual labor to drop??? When my helped dropped the body, they snapped on of the fiberglass tabs right in front of the rear tire and adjacent to the 3 mount... Not a biggie as it was an easy fix, but try to drop slowly if possible...
Definitely try to attach your trans cooling lines, as this will be a PITA if you wait, IMHO...
Guessing you've installed your battery cables to the underneath of the body???
If I think of anything else, I'll chime in...
Get plenty of pictures before and after!!!
Rogman
Frame and drive train look outstanding, great job!!! Tracdogg (Mike D.) had me level mine with the wheels/tires installed with weight on the suspension... I leveled four spots on my garage floor with floor tiles and then rolled the frame on the leveled spots (Stinger's resto page has some great detail on this)... Then, I ensured the frame was level in all four planes (front, side to side, diagonally both ways)... Then dropped the body, and did it with six guys...
Do you know your shims on each body mount??? Work with both 2s and 3s to level the body... Once the body is leveled, you'll shim 4s with the quarters and rear of doors to set that gap... Finally, you can install your 1s and check your rad support connections... I started with 2 shims on both 2s and 3s and worked out perfectly... Ended up with more shims on my 4s, but 2 shims on my 1s...
You using a hoist, lift or manual labor to drop??? When my helped dropped the body, they snapped on of the fiberglass tabs right in front of the rear tire and adjacent to the 3 mount... Not a biggie as it was an easy fix, but try to drop slowly if possible...
Definitely try to attach your trans cooling lines, as this will be a PITA if you wait, IMHO...
Guessing you've installed your battery cables to the underneath of the body???
If I think of anything else, I'll chime in...
Get plenty of pictures before and after!!!
Rogman
Anyway, I really apprecaite the info, and now that you mention it I remember reading and bookmarking both yours and Stingers posts about leveling. I will have to go back and re-read. It has been bothering me not to level it up with the car on wheels / ground. All along I've thought that it will undobutely sit very differently on jackstands vs on the wheels due to the flexible nature of our Vette frames. Guess I have some homework to do but I sure do enjoy it. I don't have the original shim counts because they ended up scattered all over during the body lift. oops... I'll get the trans lines sorted out and installed prior to moving ahead, kinda figured that would be a real pain later too.
I'll be employing manual labor to get this done, and if they break anything the rule is the same as the night of the body lift..... They have to buy all the beer.

I'll post up pics of my process and the before-during-aftermath.
How's DC? When do you get to come back and start sanding again?
Last edited by gbarmore; 03-06-2013 at 07:32 AM.
03-05-2013, 11:08 PM
#20
Pro
Thread Starter
A couple people made the point about using the alignment holes. If you have the doors on the body then you only have maybe 3/4 of an inch that the rod or pipe can go through the rockers until it hits the bottom of the door. That doesn't give you a lot of room between the frame and the rocker panel to see the hole and align it. I got around that by putting a stack of foam insulation (you could use styrofoam or anything else that will hold the pipe up but compress easily) under the pipe. That put the pipe (i used pieces of 1/2 inch rebar) up higher so I could position the hole in the rocker over it easily. As the weight of the body came down, it pressed the bottom of the pipe into the foam. As long as the pipe is shorter than the distance from the bottom of the frame to the ground you will be able to remove the foam and easily remove the pipe. You can also put tape on the top of the pipe to protect the bottom of the door.
I hope I explained that well.
Good luck.
I hope I explained that well.
Good luck.
Last edited by gbarmore; 03-06-2013 at 07:32 AM.