
Center Outlet Exhaust
 02-22-2013, 09:48 AM
#1
Pro


Thread Starter

I have seen several C2’s with center exhaust outlets but I haven’t seen any on chrome bumper C3’s. I’m thinking of modifying my '72 coupe and decided to do it on paper first. I’d also like to get some feedback before I cut the fiberglass.
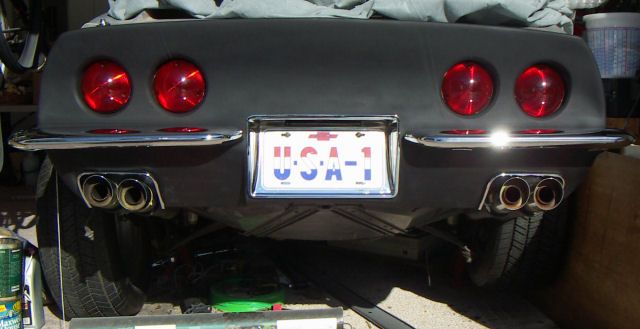
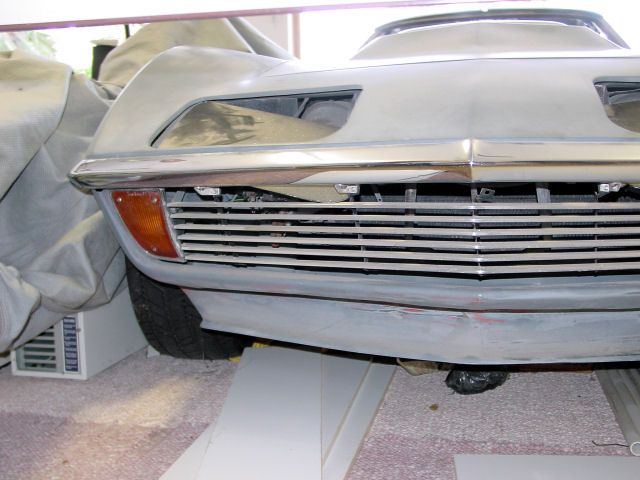
I've made several modifications to the car already so this isn’t about changing a NCRS specimen. Among the modifications is a custom rear bumper. I cut up two sets of tired old stock bumpers and had them welded up to look like a 61-62 rear bumper. I also modified the rear filler panel to remove the raised areas behind the stock bumper turn-downs. In this picture everything is loosely mounted with no time spent aligning the bumpers. The exhaust is a funky old system with quad mufflers and 1.25-inch inlet pipes. The spare tire carrier is installed in this shot:
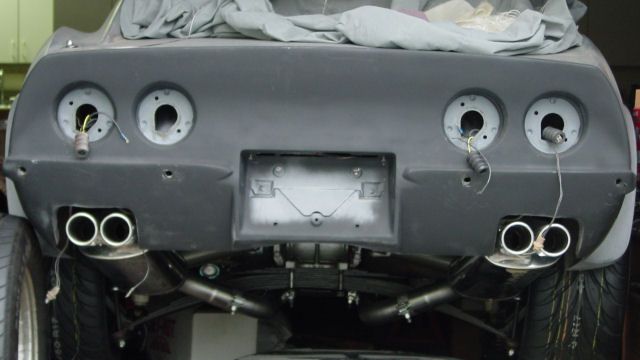
This picture shows the new Magnaflow stainless system I bought for the car. I think the outlets look fine in the stock positions but with the spare tire carrier removed, the mufflers and pipes are really prominent. Not a real problem with the stock suspension but I'm installing the VanSteel coilover setup in the car and I would like the suspension to be visible.
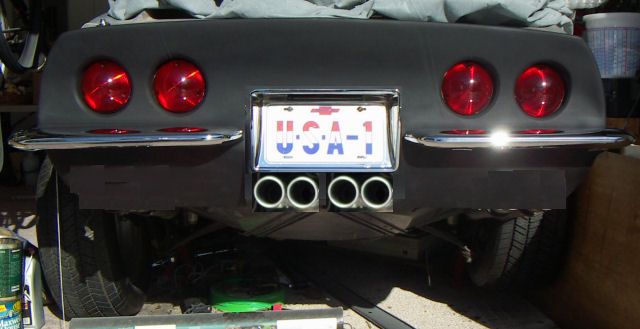
My crude photoshop of the magnaflow outlets moved to the center of the car. I also moved the license surround about 2.5 inches higher in the tail panel to position the exhaust outlets at about the same ground clearance as the stock tip location. Although this license frame location is higher than stock, it’s a lot like the frame position on a 61-62 rear.
The Magnaflow system has to be cut up a bit to fit in the new location. I will probably use the same single muffler Bee Jay used with dual 2.5-inch inlets/outlets and weld these tips on.
What do you think of the look? It's OK to hate it -- I'm way too old to have sensitive feelings -- except maybe in my feet.
I've made several modifications to the car already so this isn’t about changing a NCRS specimen. Among the modifications is a custom rear bumper. I cut up two sets of tired old stock bumpers and had them welded up to look like a 61-62 rear bumper. I also modified the rear filler panel to remove the raised areas behind the stock bumper turn-downs. In this picture everything is loosely mounted with no time spent aligning the bumpers. The exhaust is a funky old system with quad mufflers and 1.25-inch inlet pipes. The spare tire carrier is installed in this shot:
This picture shows the new Magnaflow stainless system I bought for the car. I think the outlets look fine in the stock positions but with the spare tire carrier removed, the mufflers and pipes are really prominent. Not a real problem with the stock suspension but I'm installing the VanSteel coilover setup in the car and I would like the suspension to be visible.
My crude photoshop of the magnaflow outlets moved to the center of the car. I also moved the license surround about 2.5 inches higher in the tail panel to position the exhaust outlets at about the same ground clearance as the stock tip location. Although this license frame location is higher than stock, it’s a lot like the frame position on a 61-62 rear.
The Magnaflow system has to be cut up a bit to fit in the new location. I will probably use the same single muffler Bee Jay used with dual 2.5-inch inlets/outlets and weld these tips on.
What do you think of the look? It's OK to hate it -- I'm way too old to have sensitive feelings -- except maybe in my feet.

 02-22-2013, 05:34 PM
#5
Pro
Thread Starter
bluedawg, it's growing on me. I haven't seen any 68-73s with this setup so it's hard to tell how it's going to look from different angles. I like the stock configuration as well but I'm ready for something different.
Learning_Curve, I plan to ditch the spare. I started patching the tub and realized I was polishing a turd. My AAA card will get the car home and a puncture repair kit and tiny 12v compressor works fine for me and takes up half a shoebox either side of the new muffler.
Redwing01, thanks I just ordered the muffler from Summit.
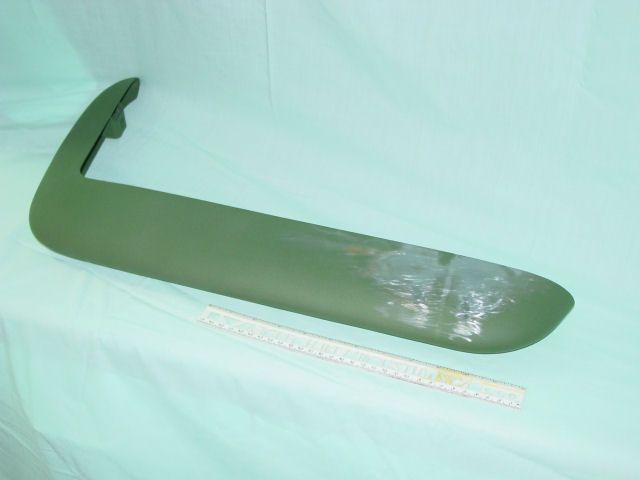
I haven't made radical changes to the car. Hopefully they are subtle enough so the car is recognizable as a C3. The modified egg-crate side griIles and custom front grille from Ecklers (discontinued long ago) have the same horizontal theme as the rear bumper.
Learning_Curve, I plan to ditch the spare. I started patching the tub and realized I was polishing a turd. My AAA card will get the car home and a puncture repair kit and tiny 12v compressor works fine for me and takes up half a shoebox either side of the new muffler.
Redwing01, thanks I just ordered the muffler from Summit.
I haven't made radical changes to the car. Hopefully they are subtle enough so the car is recognizable as a C3. The modified egg-crate side griIles and custom front grille from Ecklers (discontinued long ago) have the same horizontal theme as the rear bumper.
Last edited by Bob Heine; 02-26-2013 at 07:48 PM.
02-22-2013, 05:47 PM
#6
Le Mans Master

i like it, i have a 79 and have thought of getting a fiberglass rear panel and moving the license plate up. its a lot of work . i vote DO IT!
02-22-2013, 08:57 PM
#7
The ORIGINAL and bestest
Member Since: Oct 2000
Location: Toronto Ontario
Posts: 10,009
Received 234 Likes
on
143 Posts
Toronto Events Coordinator

As I said in the other thread.....I like it! I had basically the same idea about raising the license plate recess up to have the exhaust outlets at about the same height as stock. I wonder what it would look like with 1 larger or 2 small square exhaust tips? Interesting mod to the bumpers, I couldn't figure out what was different about them at first! 

02-23-2013, 01:38 AM
#9
Pro
Thread Starter
7t9l82, I'm not sure you need to move your license plate recess. Bee Jay's design gave him the center outlets without moving the license frame. He used the same turn-down style tips as the stock mufflers. His main goal was to reduce weight and one muffler is a whole lot lighter than two. My design uses a shorter muffler because I'm using some pretty large bends from the Magnaflow stainless system. Here's a picture of Bee Jay's setup and a link to the thread:
http://forums.corvetteforum.com/c3-t...w-exhaust.html
7t2vette, I wasn't crazy about the idea of raising the license plate recess until I realized it didn't really line up with anything in the stock position. Its top is already above the bumper line and moving it up 3 inches lines its top edge up with the mounting holes for the C O R V E T T E letters. I'll see if I can photoshop the stock rectangular tips and some small square ones like the Borla tips. It turns out the Magnaflow tips are a Y configuration and will be about an inch out of line with the two outlets on the Magnaflow muffler like Bee Jay used (they are 4" apart at the centerlines and the Ys are 6" or so apart.
The rear bumpers were quite the project. I didn't own a welder at the time and the aircraft certified guy who offered to do them needed the chrome removed. Sent four bumpers out to a chrome shop to be stripped and then cut the downturns off one pair and the outer corners off the second pair. The welds were beautiful but had to be ground down. Not wanting to chance putting dips in the finished bumpers, I hand filed the welds. Fast forward 20 years and they went back to another chrome shop (I couldn't decide if I wanted chrome or body-color bumpers but hey, they call them "chrome bumper C3s" for a reason).
Learning_Curve, I think your '76 has some of the work already done. I don't have a picture of the stock fiberglass surround but my re-do involved fabricating a whole new lip and center section.
The more subtle the change, the more work it seems to involve.
03-04-2013, 09:21 PM
#10
Safety Car

Member Since: Nov 2005
Location: Lompoc, CA. Santa Barbara County
Posts: 3,932
Received 543 Likes
on
198 Posts

How did I miss this thread? Sweet! You definitely want the exhaust going straight back instead of bouncing off of the garage floor at 6am. Ask me how I know.
 03-05-2013, 01:07 AM
#12
Racer

I like it! I think that a chrome bezel would have to be placed there (similar to stock location bezels) so It wont look bubba'd. Also since the bumpers end in the center area it would be nice to have some extra chrome in the center for a nice aesthetic look....
03-07-2013, 11:23 AM
#13
Drifting

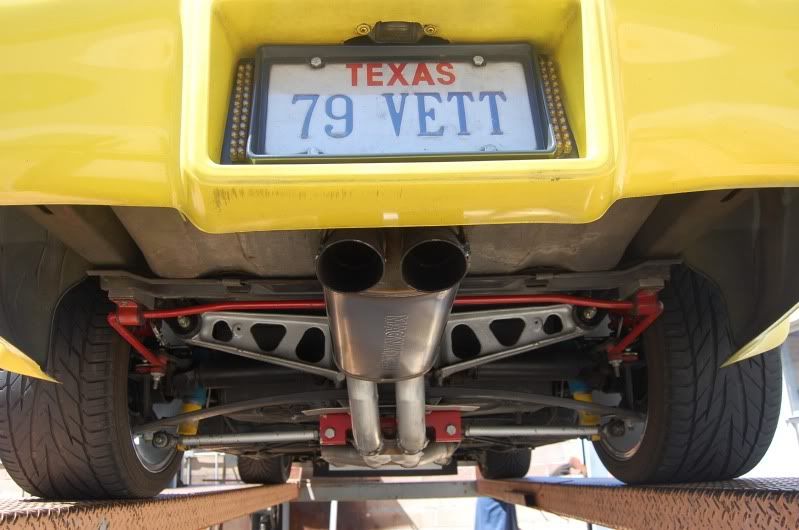
I did the center mounted exhaust and used stainless square tips that look like the ones found on the chrome bumper C3.
Here is an old photo of when I first did this mod, the exhaust pipes are now in polished stainless.
Riggs.

Here is an old photo of when I first did this mod, the exhaust pipes are now in polished stainless.
Riggs.
Last edited by riggs 74; 03-07-2013 at 06:22 PM.
03-07-2013, 01:13 PM
#14
Team Owner

If you don't need a spare tire and don't mind having the exhaust pipes directly under the gas tank, go for it.
03-07-2013, 03:53 PM
#15
Racer
I did the center mounted exhaust and used stainless square tips that look like the ones found on the chrome bumper C3.
Here is an old photo of when I first did this mod, the exhaust pipes are now in polished stainless.
Riggs.
http://s454.photobucket.com/albums/q...er_media_share
Here is an old photo of when I first did this mod, the exhaust pipes are now in polished stainless.
Riggs.
http://s454.photobucket.com/albums/q...er_media_share
03-07-2013, 04:12 PM
#16
Team Owner

Member Since: Oct 2004
Location: altered state
Posts: 81,242
Received 3,043 Likes
on
2,602 Posts
St. Jude Donor '05
2 large rectangulars wouldnt look bad
Remember the tips on the slp camaro loudmouth system?
Remember the tips on the slp camaro loudmouth system?
03-07-2013, 04:44 PM
#17
Racer
you see how on the link he has two rectangulars with two round pipes going in with extra blank space on each side of the rectangular box? I was thinking that two rectangular boxes the width of the license plate area, so it fits the body/bumper with two round pipes entering each rectangular box (two boxes and four pipes visible from outside).... Other option would cut the bumper out a little bit and do something like a pocket with chrome bezel and 4 pipes inside... anyhow I think he did a nice job! also forward to his next pics on the exhaust construction...
03-07-2013, 06:32 PM
#18
Drifting
That is an old photo of when the tips had no cabon in then to darken the inside.
Here is another old photo that kind of shows more of the underside.
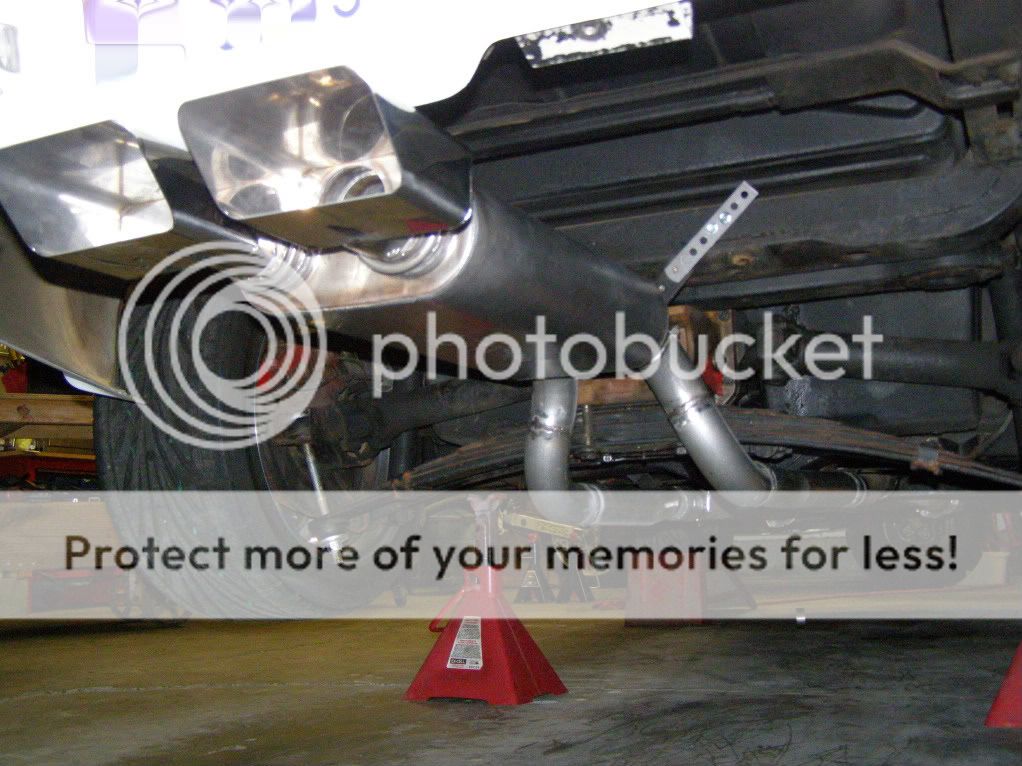
And one more recent

Riggs
Here is another old photo that kind of shows more of the underside.
And one more recent
Riggs
03-08-2013, 04:27 PM
#19
Pro
Thread Starter
Apologies for not responding sooner. My brother-in-law and his wife came down from Maine for a visit and my wife gets stressed out for no reason. Now that I've re-sodded 2,500 square feet of the yard, pressure cleaned the pool patio, polished the silver, helped clean up every room in the house and neatened up the garage, maybe I can get back to the Corvette projects.
Bee Jay,
The exhaust modification you and riggs 74 did were the inspiration for doing this to mine.
vetteman1976,
I used a hole saw to make a hole in a 5" diameter 1/4" thick aluminum disk so the Motion-style gas cap could be securely mounted to the rear deck. My $49 drill press nearly destroyed that piece of metal so I have little hope of drilling four holes in a sheet of chrome plating. I agree it would look trick but if it isn't done almost perfectly it's gonna look like my usual bubba job.
PaPaPork,
We are on the same page. I want to somehow maintain the chrome license housing. I bought a repro piece on eBay for $50 and I expect to have to modify it extensively. I also bought a pair of exhaust bezels and I'm pretty sure they are polished stainless (as opposed to chromed stainless). I plan to section them and weld them back together as a single double-wide piece. I have welded some stainless already so my setup will work (Eastwood MIG 175, ER308LSI stainless wire and 98% argon/2% CO2 shielding gas). Four big stainless tips should provide some bling as well.
Riggs,
I really like that look and I would have done that as well. My system is stainless (not yet polished) and the square tips I already have are stainless boxes with plain steel pipes welded to them (not sure why). I have a bunch of stainless pipe left over from the Magnaflow system, along with the two dual-outlet mufflers. Instead of spending $129 for new quad tips, I'm going to cut the tips off and use them with the rest of the collection.
7T1vette,
A cell phone and AAA will be my spare tire, with one of those tiny 12V compressors and a tire plug kit as my backup. I also plan on putting that stick-on heat shielding on the bottom of the gas tank, in the area where pipes and muffler pass.
cuisinartvette,
I'm a Neanderthal in the automotive world. My first new car was a '68 GTO and my last new car was a '71 Vega GT. The Vega caused me to swear off car dealers and any desire for a metal-bodied car. I do like the square-tipped setup riggs 74 created but I'm not familiar with the SLP Camaro tips. Not to mention I already have a pair of repro square tips and a set of quad round ones. I'm not afraid to re-do stuff -- I am just trying to hold it down to two re-dos per system. I 1) rebuilt the steering and then put in R&P, 2) replaced the brake booster and then installed hydroboost, 3) rebuilt the trailing arms, bought a shorter main leaf and then installed Van Steel rear coilovers. I don't even count replacing the Blaupunkt stereo with a Sony CD system (cassette head with changer) or the third set of outside mirrors.
PaPaPork,
I've done some work and took pictures but the new PhuctupBucket site stores my pictures in some undecipherable order. Apparently it takes Steve Jobs' smarter brother to find them. I am going to leave the existing collection on PB and see about uploading to a friendlier hosting site and then I'll get some pictures and progress posted.
Riggs,
I really like your system and I'll be thrilled if mine comes out anywhere near as nice.
My car is not going to have a leaf spring so the the pipes are going to be in an odd location. They are spread apart, like yours (as opposed to Bee Jay's which are close together) so I may try to move them closer together to pass under the differential. The x-pipe determines the current position and if the new, really small muffler is too loud, I might install a second one in place of the x-pipe (these mufflers are actually x-pipes with baffling).
The exhaust modification you and riggs 74 did were the inspiration for doing this to mine.
I used a hole saw to make a hole in a 5" diameter 1/4" thick aluminum disk so the Motion-style gas cap could be securely mounted to the rear deck. My $49 drill press nearly destroyed that piece of metal so I have little hope of drilling four holes in a sheet of chrome plating. I agree it would look trick but if it isn't done almost perfectly it's gonna look like my usual bubba job.
We are on the same page. I want to somehow maintain the chrome license housing. I bought a repro piece on eBay for $50 and I expect to have to modify it extensively. I also bought a pair of exhaust bezels and I'm pretty sure they are polished stainless (as opposed to chromed stainless). I plan to section them and weld them back together as a single double-wide piece. I have welded some stainless already so my setup will work (Eastwood MIG 175, ER308LSI stainless wire and 98% argon/2% CO2 shielding gas). Four big stainless tips should provide some bling as well.
I really like that look and I would have done that as well. My system is stainless (not yet polished) and the square tips I already have are stainless boxes with plain steel pipes welded to them (not sure why). I have a bunch of stainless pipe left over from the Magnaflow system, along with the two dual-outlet mufflers. Instead of spending $129 for new quad tips, I'm going to cut the tips off and use them with the rest of the collection.
A cell phone and AAA will be my spare tire, with one of those tiny 12V compressors and a tire plug kit as my backup. I also plan on putting that stick-on heat shielding on the bottom of the gas tank, in the area where pipes and muffler pass.
I'm a Neanderthal in the automotive world. My first new car was a '68 GTO and my last new car was a '71 Vega GT. The Vega caused me to swear off car dealers and any desire for a metal-bodied car. I do like the square-tipped setup riggs 74 created but I'm not familiar with the SLP Camaro tips. Not to mention I already have a pair of repro square tips and a set of quad round ones. I'm not afraid to re-do stuff -- I am just trying to hold it down to two re-dos per system. I 1) rebuilt the steering and then put in R&P, 2) replaced the brake booster and then installed hydroboost, 3) rebuilt the trailing arms, bought a shorter main leaf and then installed Van Steel rear coilovers. I don't even count replacing the Blaupunkt stereo with a Sony CD system (cassette head with changer) or the third set of outside mirrors.
you see how on the link he has two rectangulars with two round pipes going in with extra blank space on each side of the rectangular box? I was thinking that two rectangular boxes the width of the license plate area, so it fits the body/bumper with two round pipes entering each rectangular box (two boxes and four pipes visible from outside).... Other option would cut the bumper out a little bit and do something like a pocket with chrome bezel and 4 pipes inside... anyhow I think he did a nice job! also forward to his next pics on the exhaust construction...
I've done some work and took pictures but the new PhuctupBucket site stores my pictures in some undecipherable order. Apparently it takes Steve Jobs' smarter brother to find them. I am going to leave the existing collection on PB and see about uploading to a friendlier hosting site and then I'll get some pictures and progress posted.
I really like your system and I'll be thrilled if mine comes out anywhere near as nice.
My car is not going to have a leaf spring so the the pipes are going to be in an odd location. They are spread apart, like yours (as opposed to Bee Jay's which are close together) so I may try to move them closer together to pass under the differential. The x-pipe determines the current position and if the new, really small muffler is too loud, I might install a second one in place of the x-pipe (these mufflers are actually x-pipes with baffling).
03-08-2013, 04:43 PM
#20
Pro
Thread Starter
Riggs,
Are those V-band clamps in your system (under the differential? I ask because I want to weld my system together but still be able to remove sections. The slip-joint connection at the transmission crossmember has to stay but I think I only need one more connection point. I'm thinking about the same spot you have yours or, for a little more ground clearance, at about the same place you have the weld seams in the vertical run. I bought a pair of 2.5" stainless v-band clamps for $14, anticipating this project.
Are those V-band clamps in your system (under the differential? I ask because I want to weld my system together but still be able to remove sections. The slip-joint connection at the transmission crossmember has to stay but I think I only need one more connection point. I'm thinking about the same spot you have yours or, for a little more ground clearance, at about the same place you have the weld seams in the vertical run. I bought a pair of 2.5" stainless v-band clamps for $14, anticipating this project.