
Is it possible ?
 03-27-2012, 10:37 PM
#1
Melting Slicks

Thread Starter
Member Since: Aug 2010
Location: Palm Beach Florida
Posts: 2,487
Likes: 0
Received 8 Likes
on
5 Posts
St. Jude Donor '12
To have the distrib. Off by one tooth of the key on the cam for cylinder # 1 and the car still start and run?
 03-27-2012, 10:47 PM
#2
Race Director


sure..but we usually talk in degrees with timing....the teeth in the distributor are relative to the spark plug orientation. you could put the distributor in any position you want and as long as the spark plug wires are moved accordingly the car will run. most of the orientation of the distributor is so that the spark plug wires and the vacuum cannister allow you to move the distributor with out hitting things to get the final timing. so the teeth alignment are really relative. its not like the cam and crank timing gear chain which has to be aligned perfectly.
so its not that unusual with a new engine build that in the final tuning you may have to pull the distributor out and move it back or forward a tooth so that you can get the timing you want and not have the vacuum cannister hitting obstructions.
do you think you are having timing issues?
so its not that unusual with a new engine build that in the final tuning you may have to pull the distributor out and move it back or forward a tooth so that you can get the timing you want and not have the vacuum cannister hitting obstructions.
do you think you are having timing issues?
Last edited by bobs77vet; 03-27-2012 at 10:53 PM.
03-27-2012, 11:13 PM
#3
Melting Slicks
Thread Starter
Member Since: Aug 2010
Location: Palm Beach Florida
Posts: 2,487
Likes: 0
Received 8 Likes
on
5 Posts
St. Jude Donor '12
Thank you! That's what I was wanting to hear. When I placed my distrib. In I thought to myself that the rotor was not perfectly lined up with cylinder #1. It was a tooth (degree) off, towards the #3. To get the car running I had to turn the distrib. So that the vac. Canister is almost hitting carb. Tomorrow I will take it out and move it clockwise a tooth (degree) Thanks.
03-27-2012, 11:24 PM
#4
Race Director
an easy way to do this is to mark the distributor with a Sharpie right at the base of the #1 spark plug tower.....then when you move the distibutor up you can clock it back wards and when you set it down you can see the rotor point to the line you made and keep moving the ditributor up and down unitl the rotor stops at the point you want. you can actually measure backwards the distnace the rotor travels and reset it by measuring back that distance from the line you created. when you set the distributor in place the rotor will always advance that same amount.
03-27-2012, 11:50 PM
#5
Race Director
You will have to turn the oil pump driveshaft a little with a long screwdriver once the distributor is removed to move the distributor that tooth.
03-28-2012, 07:13 AM
#6
Race Director
Here are a couple recent threads and posts on the subject
This one of you are really close and just want to move a tooth one way or the other. You don't have to pull dist all the way out. Choose your direction appropriately. Rotor CCW to move the housing CCW and rotor CW to move housing CW.
This way, if you want to start from scratch or just double check and don't want to remove anything such as the valve covers. I edited it a bit to clarify better.
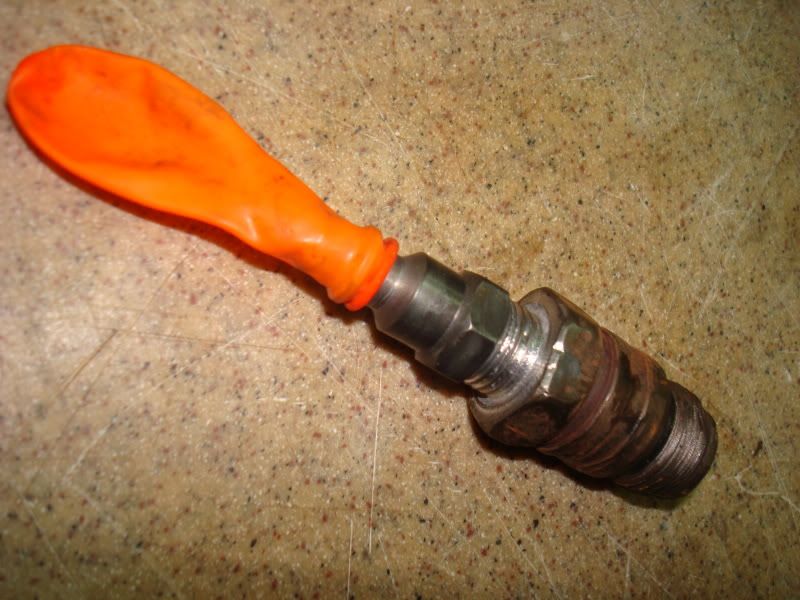
Knock the guts out of a spark plug, screw in an air fitting and solder or braze it. Can use it later to do oil seals.
100 water balloons at the dollar store for a buck.
Finger tight into #1 and when the balloon starts to fill, you are coming up on #1 firing position (balloon won't stay full forever), continue by watching the damper marks and set the damper mark to 10� BTDC and the dist so the rotor is pointing at #1 tower on the cap. Then time with a light.
This one of you are really close and just want to move a tooth one way or the other. You don't have to pull dist all the way out. Choose your direction appropriately. Rotor CCW to move the housing CCW and rotor CW to move housing CW.
Here is the easiest way, if you are now 2� retarded.
Take cap off.
Remove dist clamp and bolt.
Standing on driver's side, with left hand resting on manifold and fingers slowly pushing up dist; use right hand to hold slight counterclockwise pressure on rotor. Pry dist very, very slowly up with left hand fingers and you will feel dist gear releasing from cam gear. Lift up just a hair more and while your right hand applies pressure in clockwise rotation, you will feel the rotor and gear skip 1 tooth.
Press down the dist. It may not seat and leave a 1/4" gap at the manifold, either jiggle it or have someone just click the starter while pushing down on the dist and it will seat. Stay clear of rotor while pushing.
Time with a light. You should now be able to advance with no interference.
All this does it keep the dist housing in the same position and advances the rotor. If not enough for your particular advance, do it again.
Sounds confusing, but it's very simple and only takes a minute.
This way, if you want to start from scratch or just double check and don't want to remove anything such as the valve covers. I edited it a bit to clarify better.
100 water balloons at the dollar store for a buck.
Finger tight into #1 and when the balloon starts to fill, you are coming up on #1 firing position (balloon won't stay full forever), continue by watching the damper marks and set the damper mark to 10� BTDC and the dist so the rotor is pointing at #1 tower on the cap. Then time with a light.

 03-28-2012, 04:00 PM
#8
Burning Brakes

Or you could just put your finger over the outside of # 1 spark plug hole while you click the starter a little at a time . I use a remote start switch or have someone click the key .
Bill
Bill
03-28-2012, 09:04 PM
#10
Advanced

Member Since: Apr 2011
Location: Newington Ct
Posts: 82
Likes: 0
Received 0 Likes
on
0 Posts
 what works for me is to stick a rolled up rag into the spark plug hole turn over the engine a little at a time untill the rag blows out of the hole with a pop then you can rotate the crank by hand(socket on the crank) back to tdc and be certain you are on the compression stroke.
05-24-2012, 08:12 PM
what works for me is to stick a rolled up rag into the spark plug hole turn over the engine a little at a time untill the rag blows out of the hole with a pop then you can rotate the crank by hand(socket on the crank) back to tdc and be certain you are on the compression stroke.
05-24-2012, 08:12 PM
#11
I'm curious to try this whistle for comparison the next time I have all my new plugs out again in a few weeks to see how they are running (after addressing another issue on my L79 a few weeks ago). I'll also probably squirt some oil in the #1 cylinder before trying it out.
Any other opinions of the whistle approach are welcome.


Last edited by RRod; 05-24-2012 at 08:15 PM.
05-25-2012, 12:59 PM
#13
Team Owner


Member Since: Jun 2000
Location: Southbound
Posts: 38,928
Likes: 0
Received 1,470 Likes
on
1,249 Posts
Cruise-In II Veteran

Stock manifolds and distributors each have stake marks which made it easy to install the distributors on the assembly line. Bring #1 to TDC on the compression stroke, lower the distributor, and align the mark on the distributor with the mark on the manifold.
Aligning the marks also orientates the distributor vac advance can correctly.

Aligning the marks also orientates the distributor vac advance can correctly.