
Build thread: LS into 1975 Convertible


 07-04-2012, 12:07 PM
#142
Drifting

Thread Starter
 07-29-2012, 07:53 PM
#143
Drifting
Thread Starter
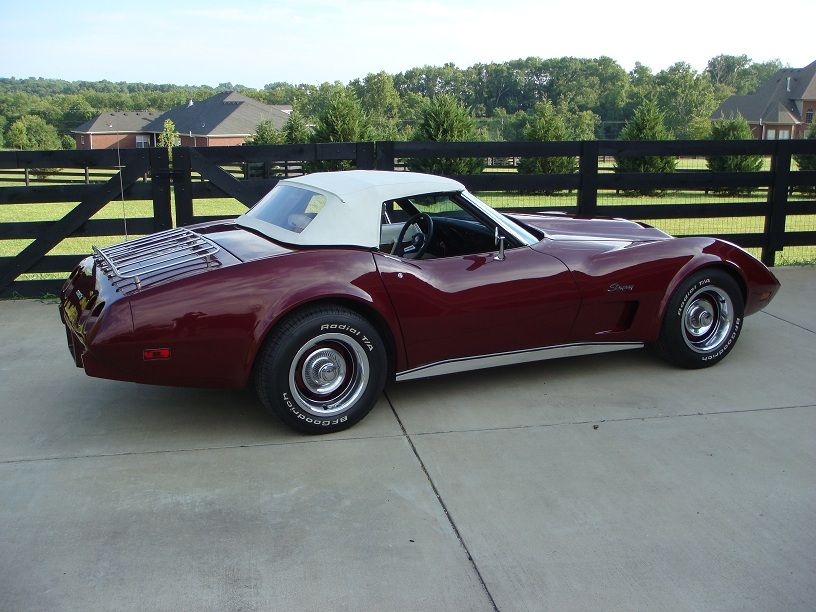
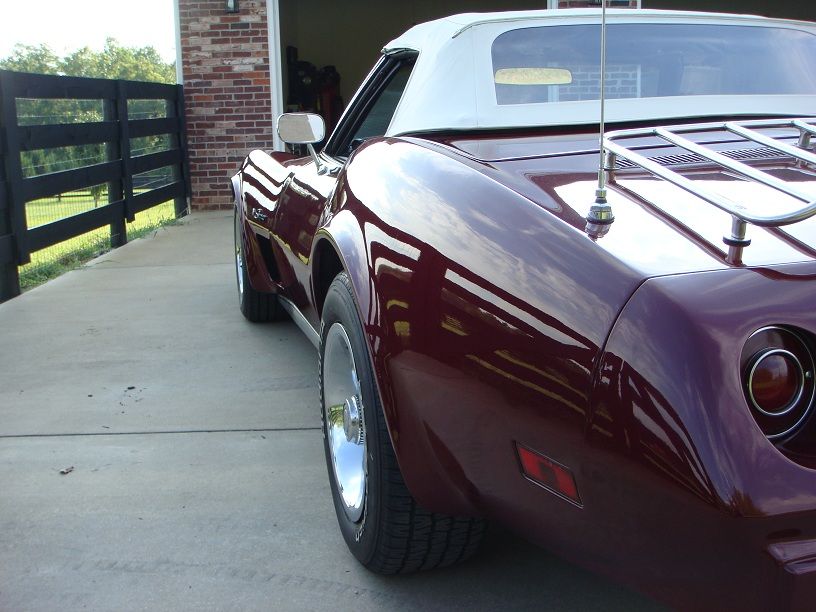
So long time, no update. I'm back with a ton of pics I took today of what is a 90% completed swap. Today was my customary day of garage clean-up and car clean-up after what has been a long and challenging journey. Onto the pics.
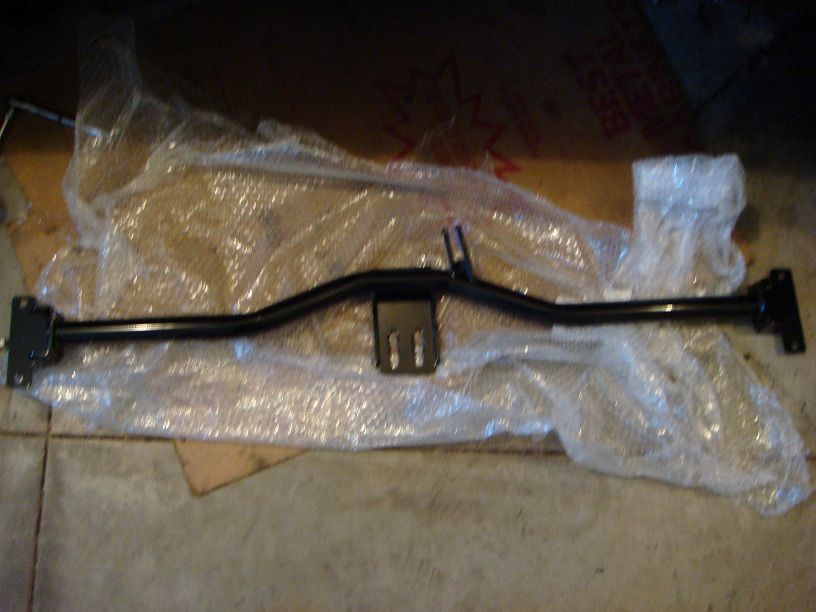
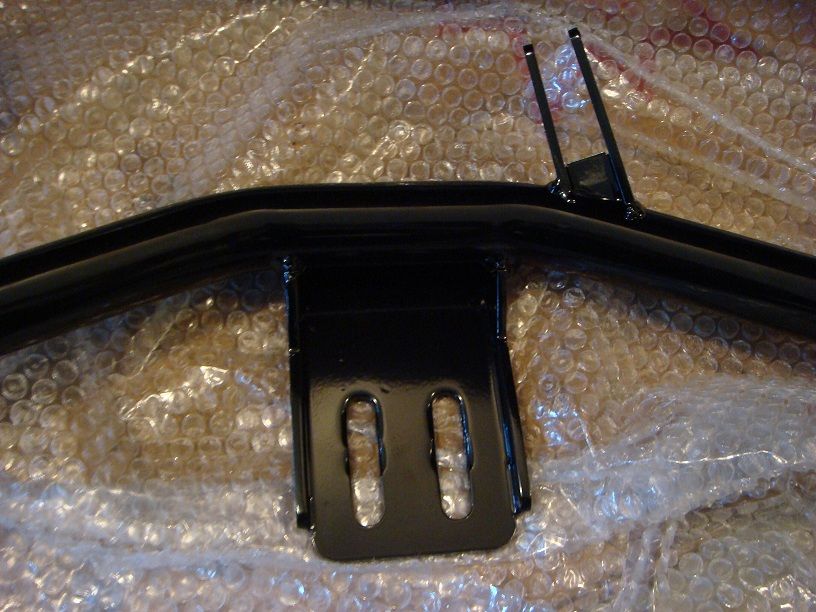
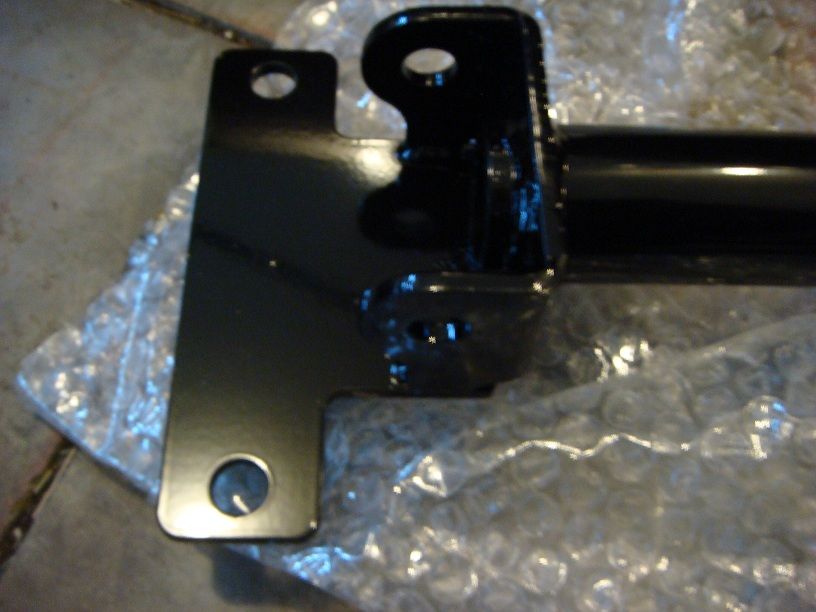
Riggs had asked for pics of the crossmember I was using for the T56, so here's a few. Sorry for the fuzzy pic on the first one. I had issues with the trans mount holes lining up with the slots on the crossmember slots, even as long as they were. I think my engine is sitting just about as far forward as you can get it without hitting the front crossmember. For reference, I only had to have 2" of driveshaft cut out...from 29.5 to 27.5...
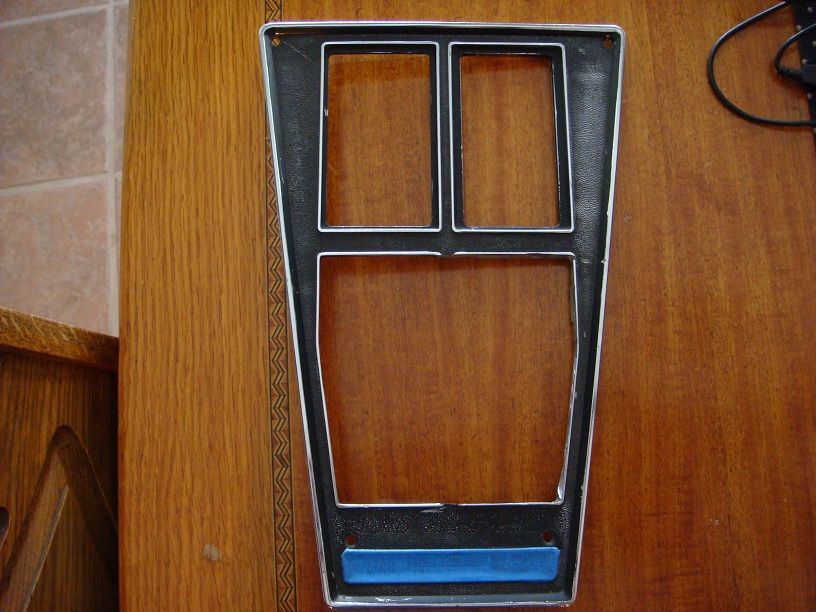
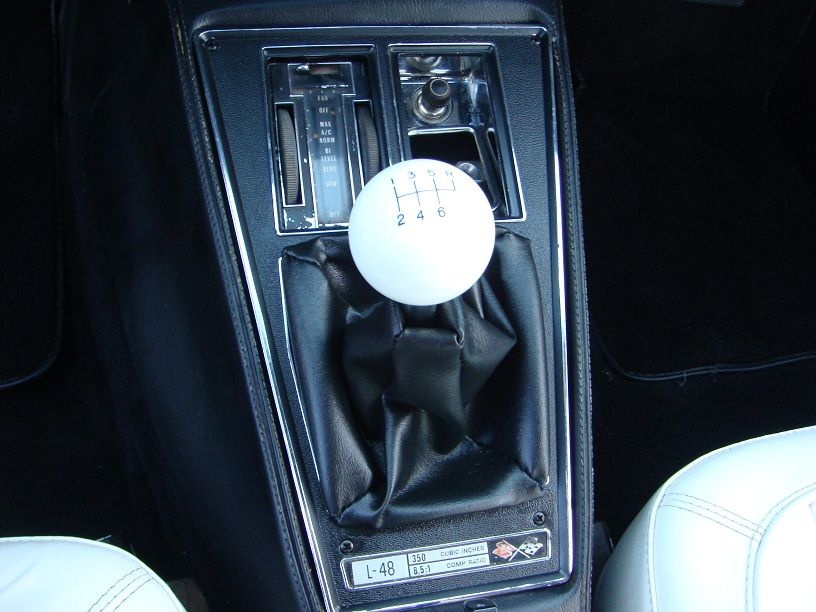
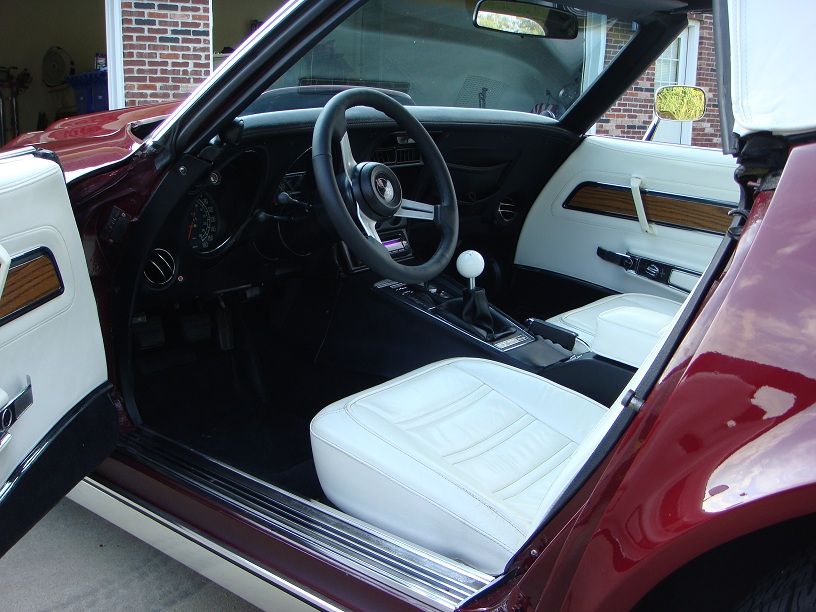
I ended up biting the bullet and cutting up my stock shifter console plate. I hated to do it, but it was pretty much my only option. As you can see in the pic, I combined the holes on the right and left into one big hole (this was an auto console). More pics of finished product installed later...
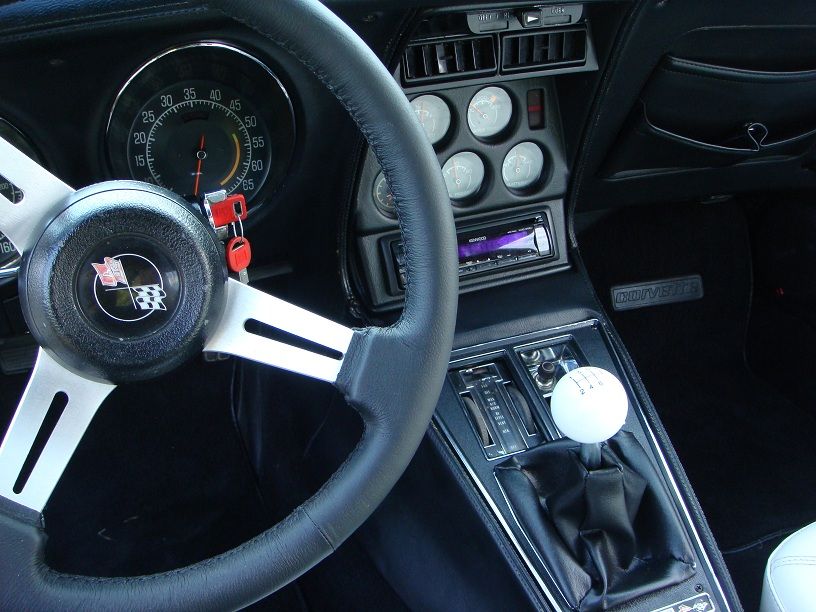
For my MIL light, I decided against drilling a hole in my lower dash and opted to use the existing hole where the vent open/close **** came through. I never use those ***** anyways, and I thought this worked well.
Here is my finished console plate. Believe it or not, I made the shifter boot myself out of a piece of black vinyl I got at an arts and crafts store. Not the greatest, but it works. I am also using a WS6store short stick for the shifter...I thought the height was perfect.
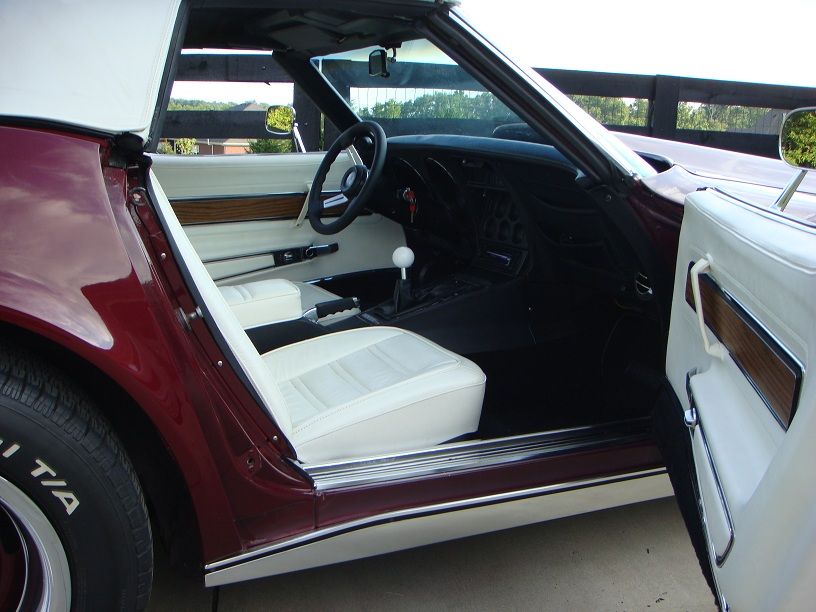
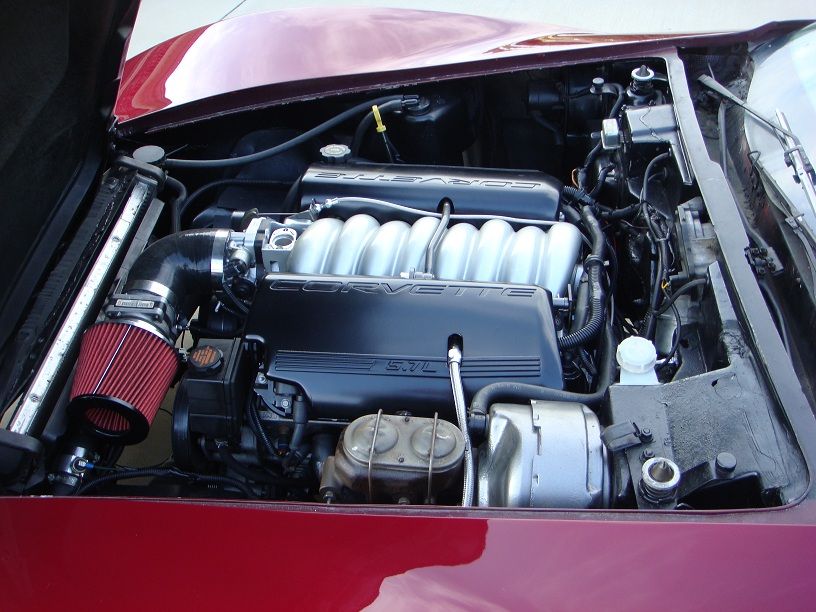
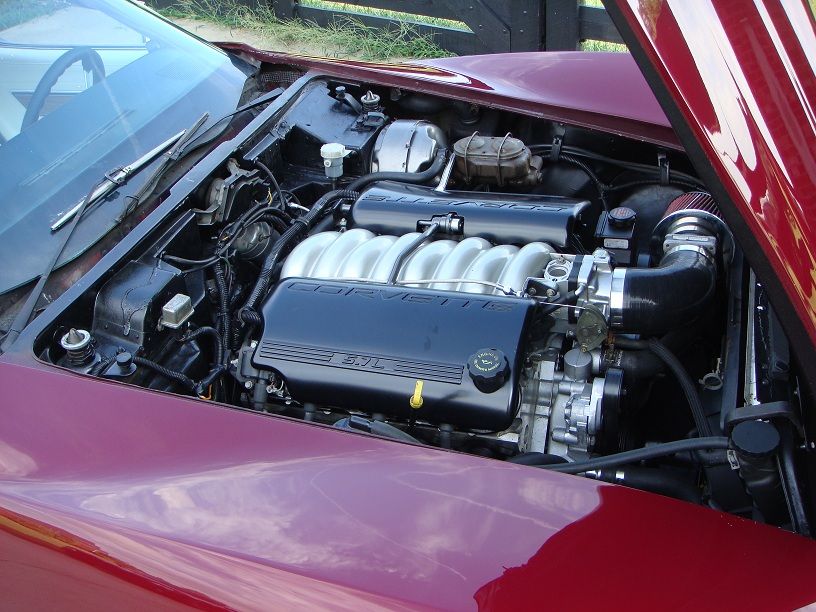
So here's the finished product in the engine bay. I'm relatively pleased with how it came up. Still going to do a little more cleanup on the wiring harness and add some loom here and there, as well as paint touch-up.
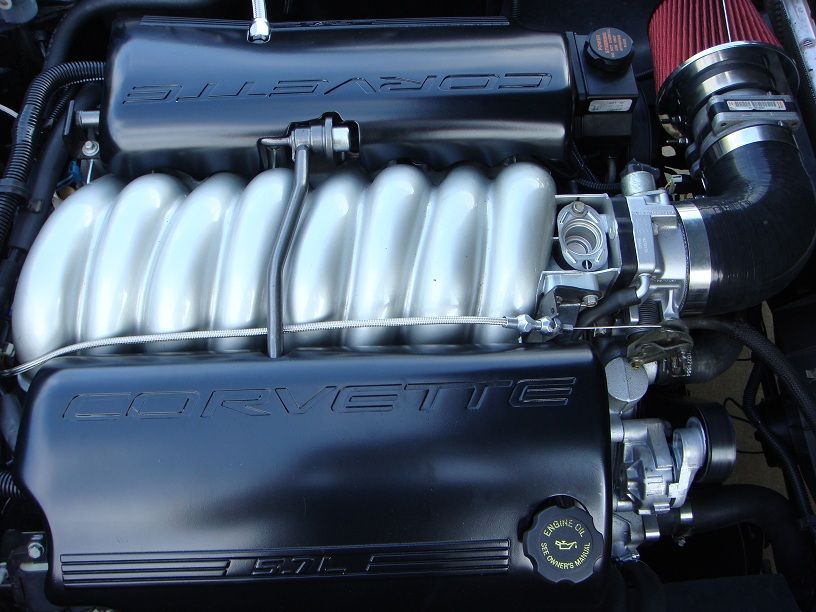
Fuel rail covers are painted semi-gloss black. I tried going with gloss black and a clear coat, and it didn't come out well...

So that's about it for now. I'm still deciding about the exhaust...I'm trying to talk myself into spending a couple grand on a custom set of sidemount headers and sidepipes to finish it off. Otherwise, I'll go to an exhaust shop and get them to fab up something temporary underneath...just a couple mufflers and then dumped before the axle.
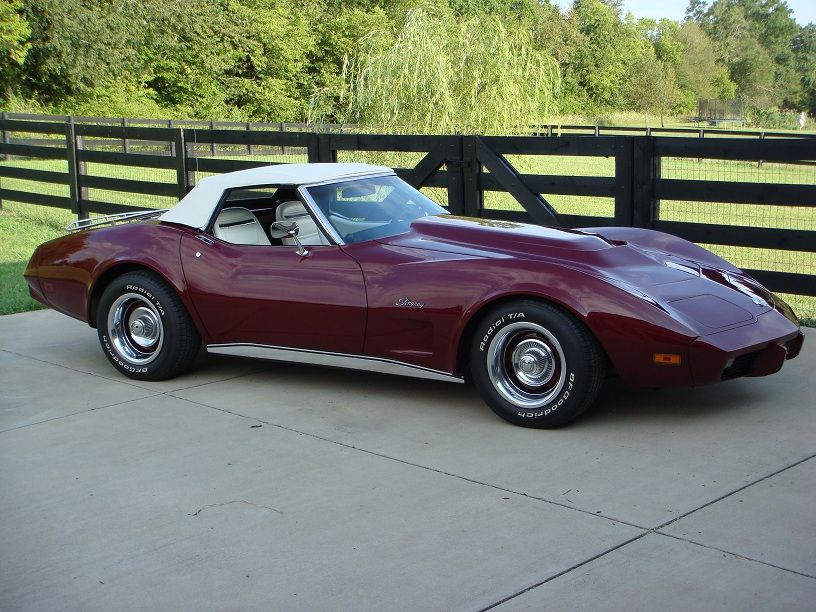
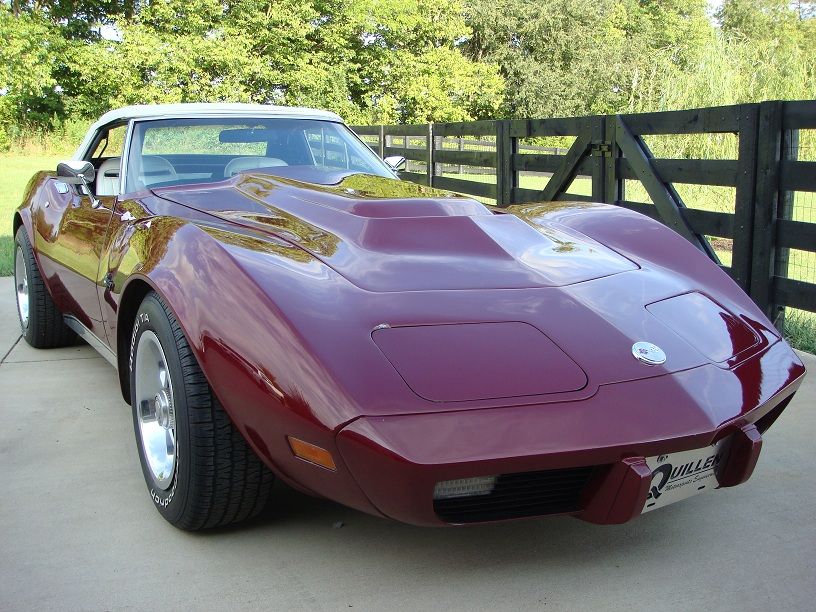
Here's some after pics of today's car clean-up! Car is now lowered on 8" bolts in the back, and new coils with one spring cut in the front. There's about 1" of rake from back to front, with ride height in front being 26.5". Enjoy!

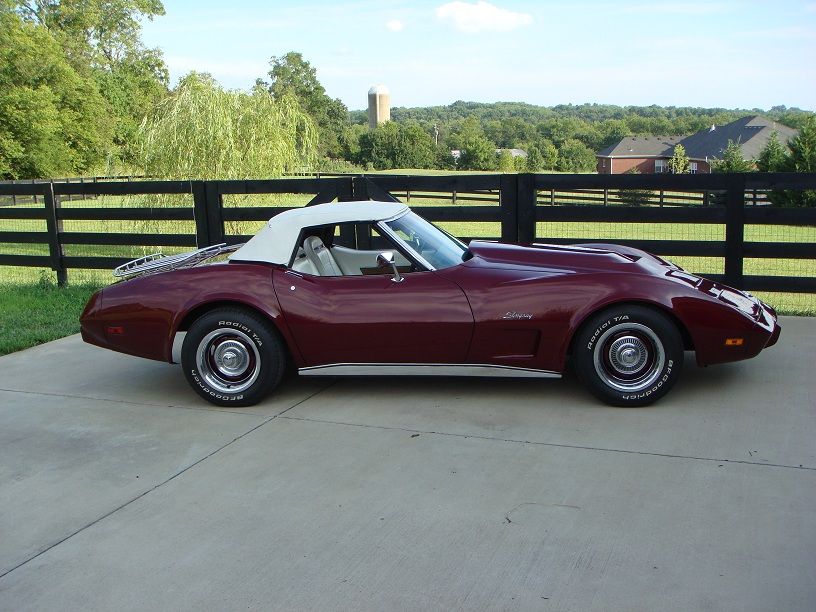
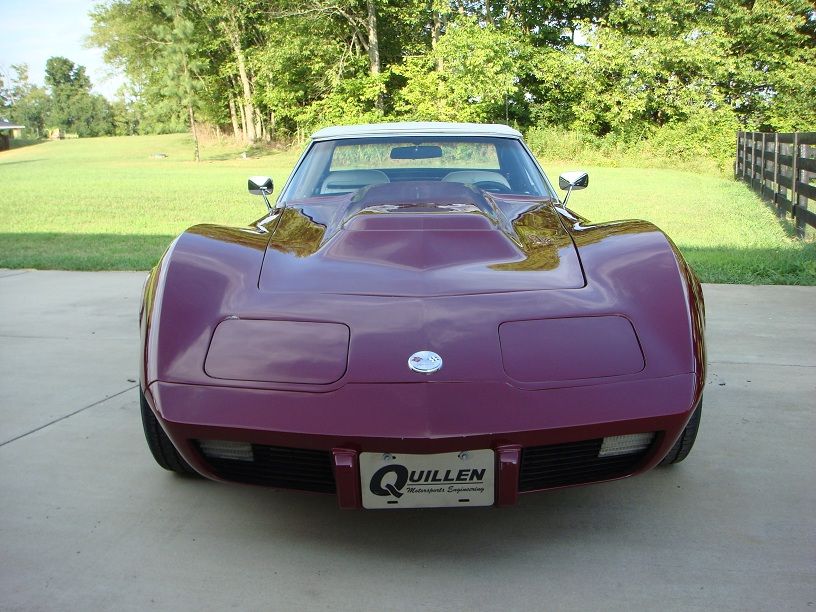
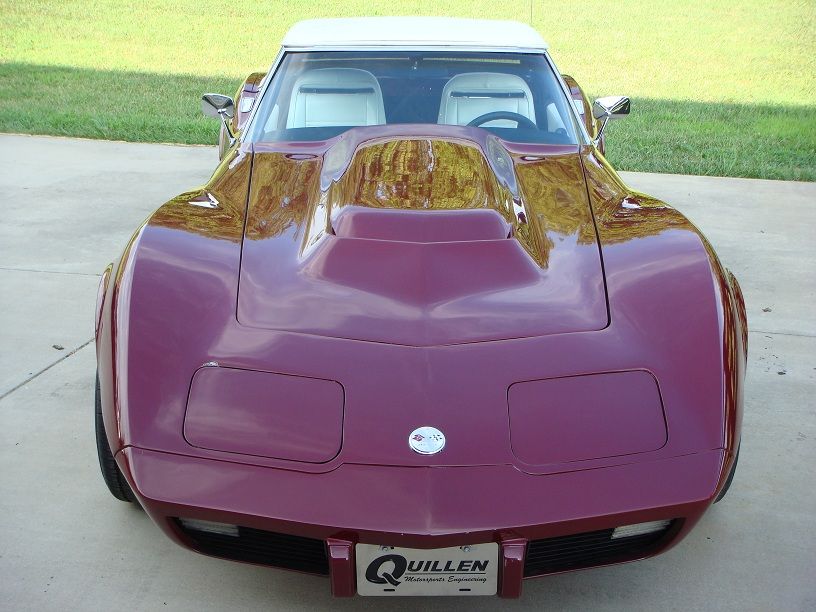
Quillen Motorsports Engineering (my brother's shop) in the house!

Thanks for following, guys. And thanks so much to all the LS-swappers who came before me and helped me out with tech support and advice. Couldn't have done it without this forum and you guys. I'll update when the exhaust is in, and as modifications come along. Cam, heads, intake, throttle body all to come, and eventually...Maggie supercharger!
Riggs had asked for pics of the crossmember I was using for the T56, so here's a few. Sorry for the fuzzy pic on the first one. I had issues with the trans mount holes lining up with the slots on the crossmember slots, even as long as they were. I think my engine is sitting just about as far forward as you can get it without hitting the front crossmember. For reference, I only had to have 2" of driveshaft cut out...from 29.5 to 27.5...
I ended up biting the bullet and cutting up my stock shifter console plate. I hated to do it, but it was pretty much my only option. As you can see in the pic, I combined the holes on the right and left into one big hole (this was an auto console). More pics of finished product installed later...
For my MIL light, I decided against drilling a hole in my lower dash and opted to use the existing hole where the vent open/close **** came through. I never use those ***** anyways, and I thought this worked well.
Here is my finished console plate. Believe it or not, I made the shifter boot myself out of a piece of black vinyl I got at an arts and crafts store. Not the greatest, but it works. I am also using a WS6store short stick for the shifter...I thought the height was perfect.
So here's the finished product in the engine bay. I'm relatively pleased with how it came up. Still going to do a little more cleanup on the wiring harness and add some loom here and there, as well as paint touch-up.
Fuel rail covers are painted semi-gloss black. I tried going with gloss black and a clear coat, and it didn't come out well...
So that's about it for now. I'm still deciding about the exhaust...I'm trying to talk myself into spending a couple grand on a custom set of sidemount headers and sidepipes to finish it off. Otherwise, I'll go to an exhaust shop and get them to fab up something temporary underneath...just a couple mufflers and then dumped before the axle.
Here's some after pics of today's car clean-up! Car is now lowered on 8" bolts in the back, and new coils with one spring cut in the front. There's about 1" of rake from back to front, with ride height in front being 26.5". Enjoy!
Quillen Motorsports Engineering (my brother's shop) in the house!
Thanks for following, guys. And thanks so much to all the LS-swappers who came before me and helped me out with tech support and advice. Couldn't have done it without this forum and you guys. I'll update when the exhaust is in, and as modifications come along. Cam, heads, intake, throttle body all to come, and eventually...Maggie supercharger!
 07-29-2012, 08:52 PM
#145
Drifting
Wow, it turned out beautiful, both the swap and the look of the car.
A local friend on mine just finished a 74 vert restoration same color as yours, I was trying to get him to drop in an LS but he was building it to sell off to fund his 74 he's looking to build next, maybe I can convince his to go with the LS in that car since he is going nuts over my LS setup.
looking forward to seeing some video when you have it a 100%
Riggs
08-12-2012, 08:09 AM
#148
Drifting
Thread Starter
Brian, the crossmember is from Custom Image Corvettes.
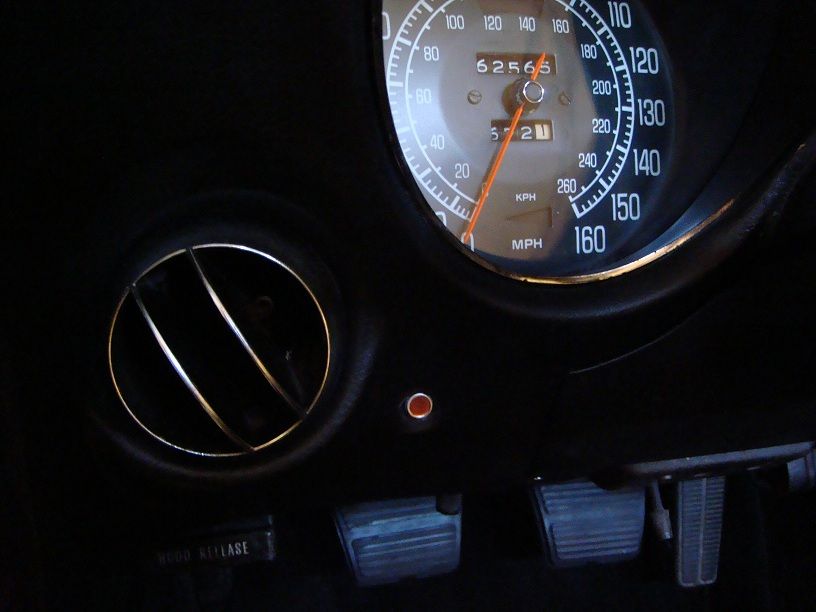
Gary, all gauges except speedo work. Tach is way off. Going to replace speedo and tach with an Autometer setup.
Gary, all gauges except speedo work. Tach is way off. Going to replace speedo and tach with an Autometer setup.


 looking swap.
10-29-2012, 09:46 AM
looking swap.
10-29-2012, 09:46 AM
#152
Burning Brakes

That really looks impressive. I can't wait to try one myself. One project at a time though, right now I am finishing my basement.
One thing you might try, something that I get a lot of compliments on, is powder coating your master cylinder. I did the MC in black and the top in red to match the theme of my C3. I think it looks a little more unique than just a chrome one and I had it done locally for under $100. Just a thought.
Great looking build!
-DT
Last edited by Dantana; 10-29-2012 at 09:49 AM.
10-30-2012, 06:06 PM
#153
Drifting
Thread Starter
That really looks impressive. I can't wait to try one myself. One project at a time though, right now I am finishing my basement.
One thing you might try, something that I get a lot of compliments on, is powder coating your master cylinder. I did the MC in black and the top in red to match the theme of my C3. I think it looks a little more unique than just a chrome one and I had it done locally for under $100. Just a thought.
Great looking build!
-DT
One thing you might try, something that I get a lot of compliments on, is powder coating your master cylinder. I did the MC in black and the top in red to match the theme of my C3. I think it looks a little more unique than just a chrome one and I had it done locally for under $100. Just a thought.
Great looking build!
-DT
12-29-2012, 11:26 PM
#154
Racer

Q,
I am in the same boat with my shifter plate. How did you secure the boot you made to the plate. Did you screw it in from under, or side, glue it in place? I have an LS3 Dry Sump and TKO 500 with shifter in the middle.
Thanks.

I ended up biting the bullet and cutting up my stock shifter console plate. I hated to do it, but it was pretty much my only option. As you can see in the pic, I combined the holes on the right and left into one big hole (this was an auto console). More pics of finished product installed later...
Here is my finished console plate. Believe it or not, I made the shifter boot myself out of a piece of black vinyl I got at an arts and crafts store. Not the greatest, but it works. I am also using a WS6store short stick for the shifter...I thought the height was perfect.
I am in the same boat with my shifter plate. How did you secure the boot you made to the plate. Did you screw it in from under, or side, glue it in place? I have an LS3 Dry Sump and TKO 500 with shifter in the middle.
Thanks.
I ended up biting the bullet and cutting up my stock shifter console plate. I hated to do it, but it was pretty much my only option. As you can see in the pic, I combined the holes on the right and left into one big hole (this was an auto console). More pics of finished product installed later...
Here is my finished console plate. Believe it or not, I made the shifter boot myself out of a piece of black vinyl I got at an arts and crafts store. Not the greatest, but it works. I am also using a WS6store short stick for the shifter...I thought the height was perfect.
12-29-2012, 11:34 PM
#155
Drifting
Thread Starter
The boot actually settled in and looks 10 times better now than in that pic...lol.
01-12-2013, 02:59 AM
#156
Racer
Riggs,
I need to set up my temp sensor. The original gauge dark green wire will go to the passenger side head with S&P adapter and original temp sensor. Does the LS tempe sensor interact with the ecm and plug into the driver side head temp sensor. So I will be using both sensors? How would I get the reading, or do I need to get the readings from the LS sensor on the drivers side, or does the ecm handle it, or do I program that out and just go off the original gauge? Thanks for any ideas. Take care.
Pic of LS sensor, do I still use it since I'm running the 70 gauge.

Thanks.
I need to set up my temp sensor. The original gauge dark green wire will go to the passenger side head with S&P adapter and original temp sensor. Does the LS tempe sensor interact with the ecm and plug into the driver side head temp sensor. So I will be using both sensors? How would I get the reading, or do I need to get the readings from the LS sensor on the drivers side, or does the ecm handle it, or do I program that out and just go off the original gauge? Thanks for any ideas. Take care.
Pic of LS sensor, do I still use it since I'm running the 70 gauge.
Thanks.
The temps were off by about 50, I'm referring to the single wire sensor for the gauge, the one for the ECU seams to be fine. With the car up to operating temps, the one for the ECU reads around 190, while the one for the gauge reads as high as 240/250, it had me really worried until I was able to hook up HP tuners to it and have a look at what the ECU was seeing.
Riggs
Riggs
 01-12-2013, 11:58 AM
#158
Drifting
Yes you still need the driver side sensor if you're running fuel injection so the Ecu can monitor the temp for the fuel/ air mixture circuits.
My gauge sensor was off because of a faulty sensor, but has since been replaced.
Riggs
My gauge sensor was off because of a faulty sensor, but has since been replaced.
Riggs
01-12-2013, 12:57 PM
#159
Drifting
Thread Starter
Update on my car/build...
I just finished installing parking brake components onto the car (previous owner removed the assemblies completely), and everything works, which I am quite proud of considering the horror stories I've read about parking brakes on C3s. Now I need to do some other small things like adjust the side windows to seal better with the convertible top, paint my rally wheels (back to silver...PO had painted them body color), and some other minor jobs.
I did finally bite the bullet and order a custom set of 304 stainless sidemount headers and sidepipes. Hoping to see them on my doorstep here in a month or so. They weren't cheap, but they are high quality craftmanship and sidepipes is really what I want on the car, so I had a mini-firesale of car parts to lessen the financial blow. Here's a couple pics of the exhaust from the manufacturer's website...


Really looking forward to getting this exhaust on.
I just finished installing parking brake components onto the car (previous owner removed the assemblies completely), and everything works, which I am quite proud of considering the horror stories I've read about parking brakes on C3s. Now I need to do some other small things like adjust the side windows to seal better with the convertible top, paint my rally wheels (back to silver...PO had painted them body color), and some other minor jobs.
I did finally bite the bullet and order a custom set of 304 stainless sidemount headers and sidepipes. Hoping to see them on my doorstep here in a month or so. They weren't cheap, but they are high quality craftmanship and sidepipes is really what I want on the car, so I had a mini-firesale of car parts to lessen the financial blow. Here's a couple pics of the exhaust from the manufacturer's website...
Really looking forward to getting this exhaust on.
01-12-2013, 02:15 PM
#160
Racer
Wow, those are beautiful headers.
I took 2" out of my parking brake front cable and had it re-crimpped, works very well.
Riggs, thanks for the heads up. I will be using the EFI, and it makes perfect sense now.
I took 2" out of my parking brake front cable and had it re-crimpped, works very well.
Riggs, thanks for the heads up. I will be using the EFI, and it makes perfect sense now.