
LS2 swap under way
 12-27-2011, 05:36 AM
#41
Drifting

Thread Starter
SMSRACEENGINES,
Whats your take on the end result of the LS Swap, Is/was it worth it?
Did you do anything to the internals, or did it remain stock? Would love
to see some photo's of it.
Riggs.
Whats your take on the end result of the LS Swap, Is/was it worth it?
Did you do anything to the internals, or did it remain stock? Would love
to see some photo's of it.
Riggs.
 12-27-2011, 07:17 AM
#42
Race Director


I like you think the best option for the header tube is put a bend in it. Dimpled just does not give enough clearance and there is plenty of room on the inside to make it bend. Not sure why this was not done when they were made. not real happy about it either.
12-27-2011, 05:52 PM
#43
Drifting
Thread Starter
Riggs
12-27-2011, 06:21 PM
#44
Race Director
My thoughts exactly. I would not have gotten them coated if I knew there was some fitting involved. I really don't want to pay again to have them coated. Plus the cost of having the tube welded in. These are not cheap headers.
12-27-2011, 06:55 PM
#45
Drifting
Thread Starter
I am going to use 304 polished stainless tubing and since the header will have to be exposed, I will coat the area of the header where the repair is made and then wrap all the tubes with thermal wrap to control the heat in the engine bay and cabin. Since I was already thinking about wrapping the header tubes, I don't feel so bad about cutting into it, it is a shame though, they do look nice as is. I post what they look like when finished, the parts should be here by the end of the week.
Riggs
Riggs
12-31-2011, 06:00 PM
#46
Drifting
Thread Starter
Well I started to fab up the offset needed for the clearance around the steering stem from the rack.
Here's a couple of photo's of what's been done so far.


Now I have to grit my teeth and cut the ceramic coated header, Its a shame to have to spend so much money on something that you thought was engineered correctly before being put on the market for sale, these headers weren't designed to fit with a rack and pinion system.
I still hope to weld this into the header tonight, I'll post a photo once completed.
Riggs
Here's a couple of photo's of what's been done so far.
Now I have to grit my teeth and cut the ceramic coated header, Its a shame to have to spend so much money on something that you thought was engineered correctly before being put on the market for sale, these headers weren't designed to fit with a rack and pinion system.
I still hope to weld this into the header tonight, I'll post a photo once completed.
Riggs
12-31-2011, 08:13 PM
#47
Race Director


We must have our engines mounted in a little different location. I did not have any clearance issues with the Steeroids rack in my setup. I guess I was lucky on this one. I did however have to go through two different sets of engine mounts when I did my swap. I wound up with the engine moved back about an inch. Its pretty tight to the firewall but worked out pretty good.
I am looking at your intake setup and like what you have started because that is where I went, but stopped. I am hoping to glean something cool from you and Gordon to help me out. You guys are doing some excellent work. Keep it up, I love it.
I am looking at your intake setup and like what you have started because that is where I went, but stopped. I am hoping to glean something cool from you and Gordon to help me out. You guys are doing some excellent work. Keep it up, I love it.
12-31-2011, 10:18 PM
#48
Drifting
Thread Starter
Eddie, What brand of headers are you running? Even if I used the one inch set back motor mounts, it still wouldn't have cleared.
The cold air intake I am using is form Spectre, it's a 4'' Aluminum 90 into the mass air sensor then a K&N cone air filter. I hope to build an intake that will run out over the radiator support and down in front of the radiator to get cool fresh air. I seen a few made for the F-body cars that I think might work.
Riggs
12-31-2011, 10:33 PM
#49
Drifting
Thread Starter
Well the surgery was a success, here is the results. I was going to grind every thing smooth and polish is to make myself feel better about having to ruin the finish, but since I am going to wrap the headers, I'm not going to waste my time with that. I'll wrap them tomorrow and maybe install them.


Riggs
Riggs
01-01-2012, 12:03 AM
#50
Drifting

Riggs,
Looking good, I've never tried to weld stainless, so that's impressive. How's the braking side of things going?
Regards from Down Under.
aussiejohn
Looking good, I've never tried to weld stainless, so that's impressive. How's the braking side of things going?
Regards from Down Under.
aussiejohn

 01-01-2012, 09:42 PM
#52
Race Director
Eddie, What brand of headers are you running? Even if I used the one inch set back motor mounts, it still wouldn't have cleared.
The cold air intake I am using is form Spectre, it's a 4'' Aluminum 90 into the mass air sensor then a K&N cone air filter. I hope to build an intake that will run out over the radiator support and down in front of the radiator to get cool fresh air. I seen a few made for the F-body cars that I think might work.
Riggs
The cold air intake I am using is form Spectre, it's a 4'' Aluminum 90 into the mass air sensor then a K&N cone air filter. I hope to build an intake that will run out over the radiator support and down in front of the radiator to get cool fresh air. I seen a few made for the F-body cars that I think might work.
Riggs


 01-01-2012, 10:59 PM
#54
Drifting
Thread Starter
Eddie, I see a couple of difference's, You're running three u-joints in your steering and you said you're running a 1'' set back motor mount, that would've probably given me the clearances needed to have made that work. Unfortunately I am running a stock location motor mount plate and I am using only two U-joints on the steering stem which angles the stem into the header more so. My headers are also the Melrose design. I guess for my setup at this point I had no other choice but to modify the header.
Thanks for helping me out with the photo's.
Riggs
Thanks for helping me out with the photo's.
Riggs
01-08-2012, 07:17 PM
#55
Drifting
Thread Starter
Well after a lot of research of should I wrap the ceramic header or not, I decided to wrap it. As I put this LS swap together, I am trying to eliminate as much heat as I possibly can from engine bay. I have been wrapping just about everything that I want to keep from the heat of the headers, so why not wrap the headers. In the past I have had to deal with heat in the cabin, and I had my 700R4 fail do to seeing to much heat because the cooling lines were ran to close to the headers never giving the transmission a chance to cool down. I am eliminating the heat issues once and for all, or at least I hope:laughing:
Here is the drivers side wrapped, I still need to seal it, so it won't absorb any oils and become a fire hazard latter. I still need to do the passenger side once I get some time to do so.

Here is an up to date photo of the LS, I still need to build the exhaust system and hook up the gauges, I think were getting closer to turning the key, hopefully soon.

Riggs.
Here is the drivers side wrapped, I still need to seal it, so it won't absorb any oils and become a fire hazard latter. I still need to do the passenger side once I get some time to do so.
Here is an up to date photo of the LS, I still need to build the exhaust system and hook up the gauges, I think were getting closer to turning the key, hopefully soon.
Riggs.
01-26-2012, 05:29 PM
#56
Drifting
Thread Starter
Not much of an update, but there has been a little progress.
Headers are wrapped, sealed and installed, with O2 sensors connected. I am glad I wrapped the headers, on the passenger side, the header is really close to the starter, I would not want to deal with a Hot starter not allowing me to start the car when I go to restart it after a quick stop, I have had to deal with that before, and that is so annoying to have to wait for the starter to cool before you can start the car to journey on. I feel that Wrapping the headers will be a big benefit.
I also had to reroute the Transmission cooling lines to move away from the header and it's heat.
I started to work on the gauges, I am using (steeling) the Ideal from Brent319, Hopefully the finished product well turn out as nice as His did, Thanks Brent for the great Ideal.
Started out with having to make a mold to create a recessed adapter plate for the gauge to set in, the recessed area will have a fiber optic/led setup for the turn signals, high beam, E-brake and a check engine light.
Is it a Booby trap, nope it's were I cut out the panels needed to create a recessed adapter mold.
Sorry, My wife thought it was cute. LOL

Mold made,

and fiberglass laid,

Cut out and gauge fitted,

This is a trail fit of the solid Plastic tubing I am using to create an LED fiber optic setup. Still tweaking this setup, I have two thoughts on how I want to finish this, so stay tuned.


Riggs
Headers are wrapped, sealed and installed, with O2 sensors connected. I am glad I wrapped the headers, on the passenger side, the header is really close to the starter, I would not want to deal with a Hot starter not allowing me to start the car when I go to restart it after a quick stop, I have had to deal with that before, and that is so annoying to have to wait for the starter to cool before you can start the car to journey on. I feel that Wrapping the headers will be a big benefit.
I also had to reroute the Transmission cooling lines to move away from the header and it's heat.
I started to work on the gauges, I am using (steeling) the Ideal from Brent319, Hopefully the finished product well turn out as nice as His did, Thanks Brent for the great Ideal.
Started out with having to make a mold to create a recessed adapter plate for the gauge to set in, the recessed area will have a fiber optic/led setup for the turn signals, high beam, E-brake and a check engine light.
Is it a Booby trap, nope it's were I cut out the panels needed to create a recessed adapter mold.
Sorry, My wife thought it was cute. LOL
Mold made,
and fiberglass laid,
Cut out and gauge fitted,
This is a trail fit of the solid Plastic tubing I am using to create an LED fiber optic setup. Still tweaking this setup, I have two thoughts on how I want to finish this, so stay tuned.
Riggs
01-27-2012, 02:32 AM
#57
Safety Car


Looking good . I read the entire thread because I too am thinking about an LS swap on my '74, but going to go with an LS1/t56. What are the part numbers for those hose fittings that are going to the fuel filter/regulator? I am planning my fuel system. Did you use the existing fuel lines for yours? All you did was flip the fuel rails so that the fuel inlet would be on the passenger side?
. I read the entire thread because I too am thinking about an LS swap on my '74, but going to go with an LS1/t56. What are the part numbers for those hose fittings that are going to the fuel filter/regulator? I am planning my fuel system. Did you use the existing fuel lines for yours? All you did was flip the fuel rails so that the fuel inlet would be on the passenger side?
01-27-2012, 06:03 AM
#58
Drifting
Thread Starter
The fuel system parts are detailed here in the Post, If I missed something let me know.
http://forums.corvetteforum.com/1579063926-post19.htmlThe fuel pump setup is from
http://tanksinc.com/ thanks to Gordonm for sharing this with me.
The fuel line is a new 3/8 steel line. On the fuel rails I just moved the fittings around, not the rails, along with moving
the hose loop to the front so I could move the fuel feed to the rear.
Riggs
01-27-2012, 12:18 PM
#60
Instructor

Member Since: May 2007
Location: Houston TX
Posts: 130
Likes: 0
Received 0 Likes
on
0 Posts

Riggs,
Enjoyed reviewing your swap thread and cudos on your work...since the fuel sys is the current subject I hope you don't mind if I show my pump install as another choice for those like jordan89 and others anticipating a similar project.
This is a rebuilt Camaro in-tank pump from Vetteworks that requires a bypass line "t" off the outlet. Here are two pics showing conn to 3/8" ss hardline to engine. The pump power is conn to the LS harness/relay but I kept the existing sending unit conn to my gage. Those are 6AN fittings and braided hose.
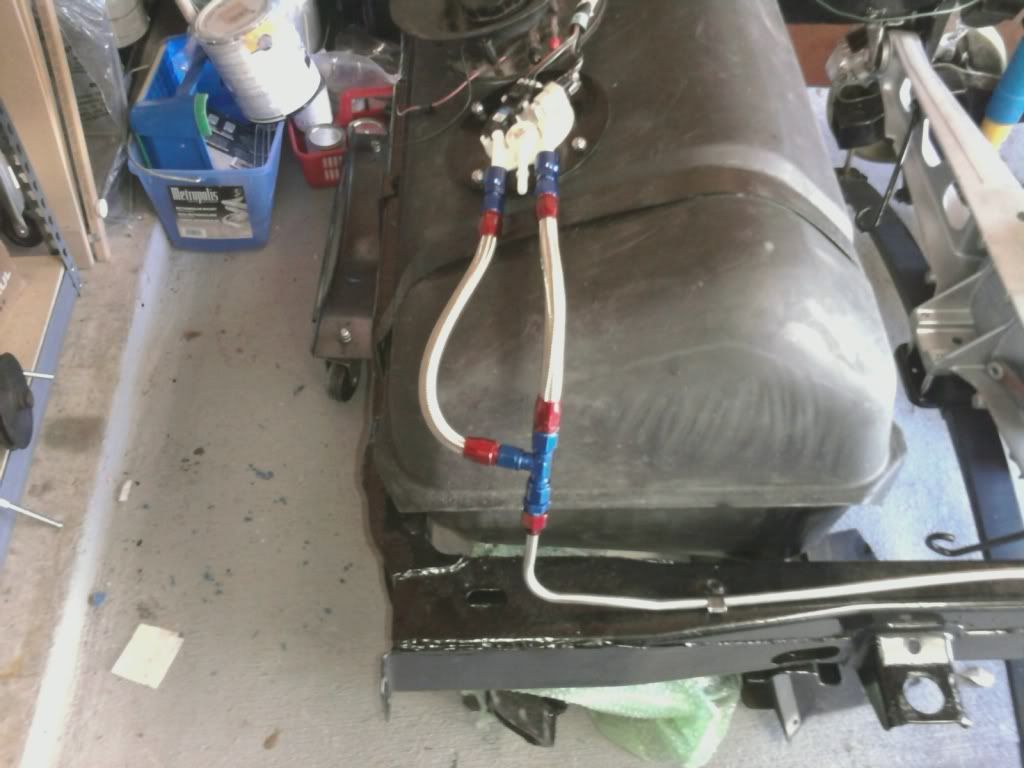
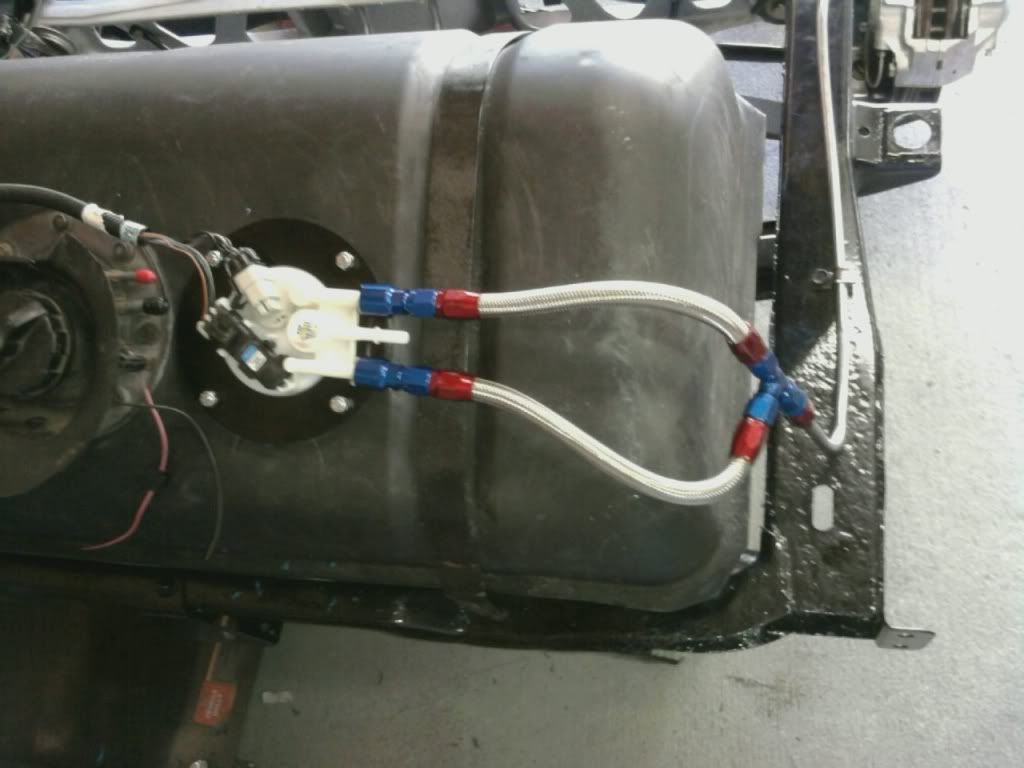