
Installing TKO-600 5speed kit into my 71
 07-05-2011, 11:48 AM
#1
Racer

Thread Starter

Well here we go! I got my lift setup and the vette up on it.. time to get to work. I have today as a vacation day to get cranking. Photos will be forth coming. I am removing exhaust today and whatever else I can get started on. I bought this kit a few months ago from American Powertrain. I also have new stainless headers and sidepipes to put on.
I am still undecided on how to change the tranny as I have seen it done multiple ways
1. Remove motor and tranny together
2. Cut out crossmember and make it removable (I'd have to go buy a welder)
3. Undo motor mounts and tilt motor (Not sure how that would work with my blower setup and clearance on top when tipped, can't raise hood when on lift)
4. Remove bellhousing and tranny together (Some people I think have done this without tipping motor or cutting crossmember)
But either way I have to remove stuff before I get to that point so thats what I am doing now and I will take photos and start posting them in this thread.
I am a few weeks shy of 31 yrs old and my 'friends' are not really into old cars so I don't have any helpers. I will be doing most if not all this work myself. I got my 4 post lift installed myself so maybe I can do this myself (I do have a tall transmission jack I bought for this).
 07-05-2011, 12:08 PM
#2
Le Mans Master


A retired work buddy of mine did the Keisler TKO kit for his 79' L-82 4 speed car a few years ago, and makes no claims of being the greatest wrench. Wasn't there when he did this, but he left the cross member alone and jacked up the rear of the engine. He did say the whole thing was a real pain, but got it done.
07-05-2011, 12:32 PM
#3
Race Director


I have done a bunch of these swaps and by far the easiest way is to make the cross member removeable. There was no question when I did my first one which was my own car that it was going to be removeable. I have had my transmission(s) out countless times since then and it is a breeze once it is removeable. The best way to go about this instead of buying an expensive welder is to hire a local welder to do it. I did not want to invest in this nor do I have the expertise in welding to do this. The few times I have needed welding I hired a local guy. I now have a welder buddy and can call him and he comes over with his truck and welds anything I want and I know it is done right. Not really a big deal to do if you have the right equipment and the knowledge. Fab everything up and have it ready so all he has to do is weld it up. I have since done 2 other cars and made it removeable and done a few auto to sticks which the Xmember was already removeable.
07-05-2011, 05:57 PM
#4
Instructor
Member Since: Sep 2007
Location: Colorado Springs Colorado
Posts: 198
Likes: 0
Received 0 Likes
on
0 Posts
Matt, you know my opinion on how I like to do them, but in this case, I completely agree with Gordon. You need a removable crossmember. I hadn't realized you had a blower, and as such, will be changing clutch's at some point. And with your 4 post, it just makes good sense to be able to drop and reinstall the TKO with the least amount of work. If you don't want to hire/purchase a welder, perhaps the bolt-on crossmember from Bowtie Overdrives would be something to look at. This is the one Gene, at American Powertrain told me to get:
http://www.bowtieoverdrives.com/cata...php?ITEMID=115
Good Luck, and post up the pictures!
http://www.bowtieoverdrives.com/cata...php?ITEMID=115
Good Luck, and post up the pictures!
07-05-2011, 06:29 PM
#5
Race Director
Even with that bolt in one from Bowtie you are still going to have to do some welding and fabbing. There are no brackets or bolt holes when you have the welded in crossmember. Nice crossmember but it does not bolt in. It will if you have an auto car though.
07-05-2011, 07:51 PM
#6
Instructor
Member Since: Sep 2007
Location: Colorado Springs Colorado
Posts: 198
Likes: 0
Received 0 Likes
on
0 Posts
Another good catch Gordon! I forgot Matt's is a '71. I think on an '81, it will bolt right in as the crossmember on an '81 4spd. is bolt-in from the factory. I didn't buy the BTO crossmember because it's not much to make the stock crossmember mounting pad work. I read all your postings on making the bolt in CM. I was ready to start making mine per your instructions, but noticed mine came from the factory bolted in!
07-05-2011, 11:10 PM
#7
Racer
Thread Starter
Yeah I can't do one of those crossmember things but thanks for posting. Keisler was trying to sell me one of them but then I found out you have to have the body off to install it.
Well I got a start on it today. I removed the shifter handle and the rubber boot under it was all tore up so need to find where to order one of them if possible. Also found a broken fiber optic line.
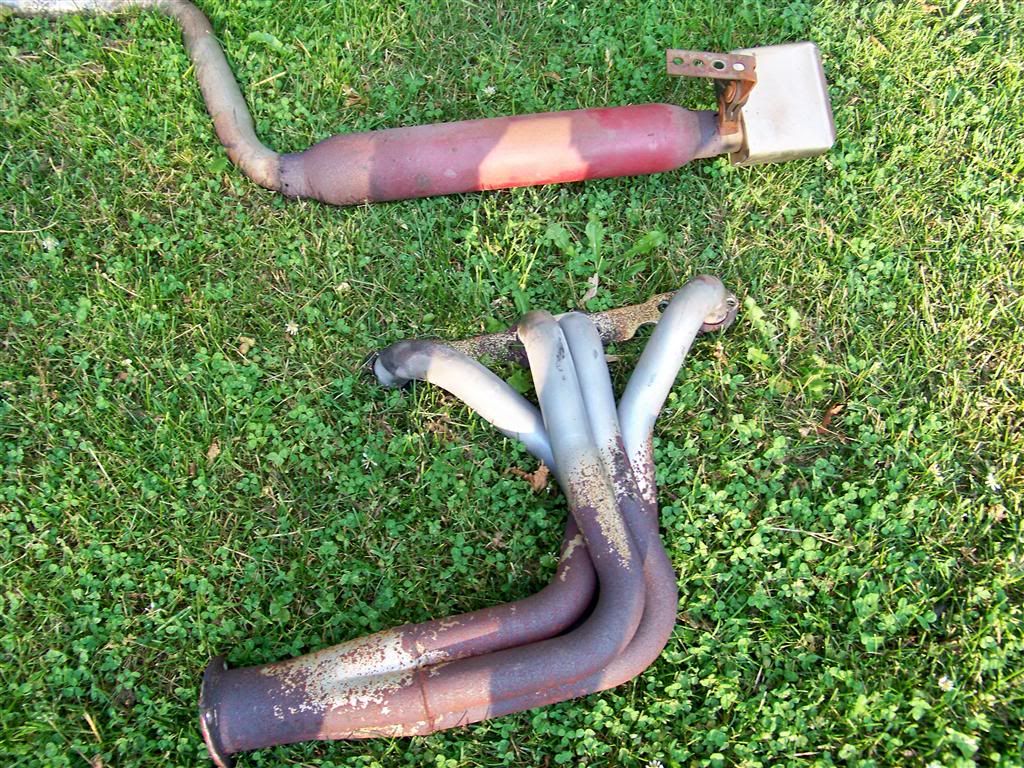
I cut my exhaust in half using sawzall and removed that. What am I going to do about the two huge holes in the rear of the car after I get the sidepipes installed? The rear empty holes look weird.
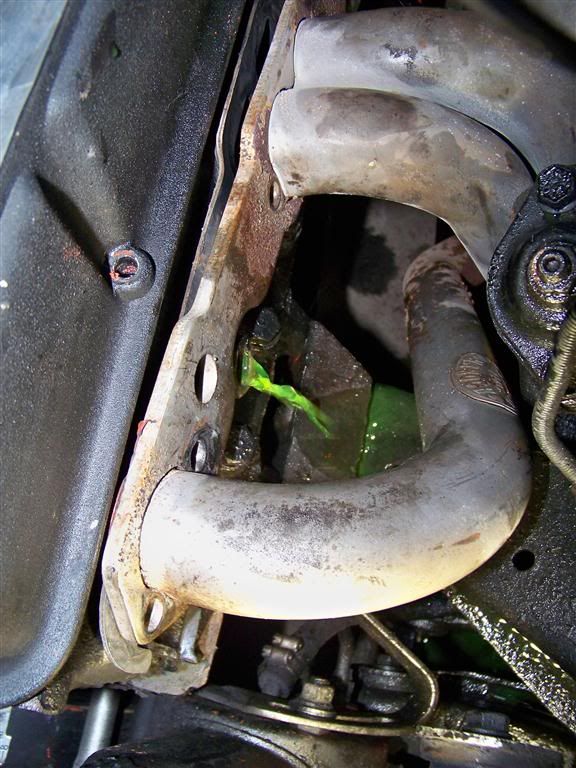
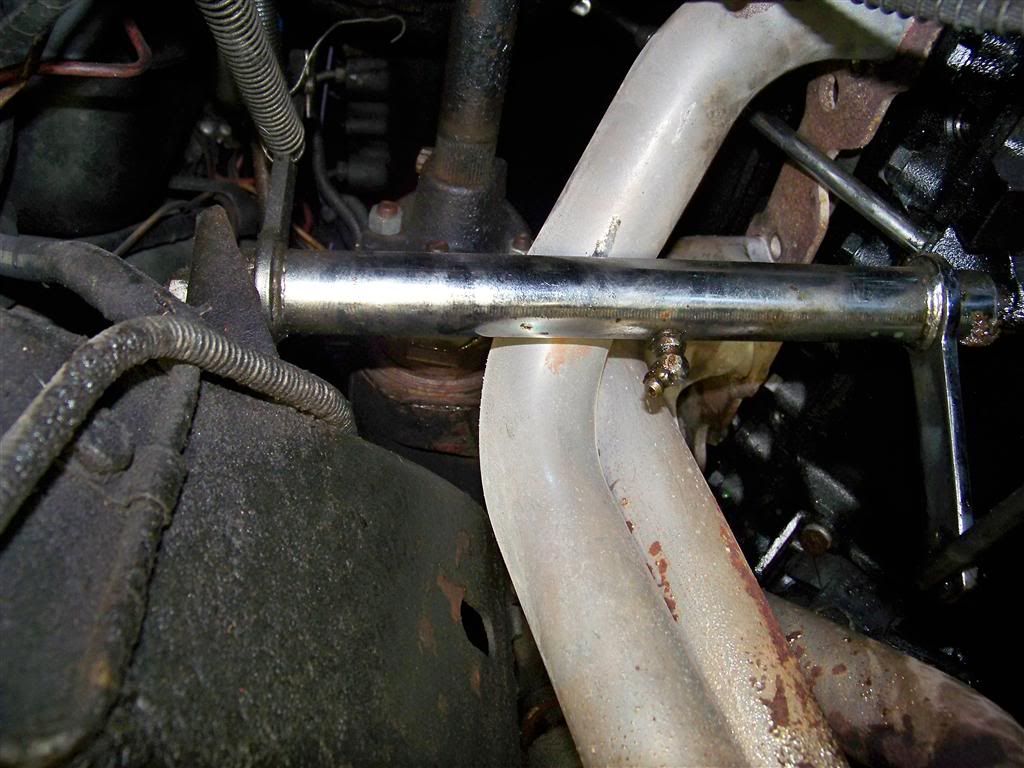
I removed all spark plugs and header bolts and alternator. Passenger side came out the bottom with some jiggling. The driverside is going to give me grief. I posted a photo of that. What is that chrome part called? It transfers the clutch movement. Even after I remove that I think that header will have to come out the top? We'll see. Also the oil dipstick tube is going to get in the way, what do I do with that? Does the entire thing unscrew?
I also didn't know when I pulled out the temp sensor that over a gallon of antifreeze would come with it DOH! Oh well.. slight mess before I could get the bucket.
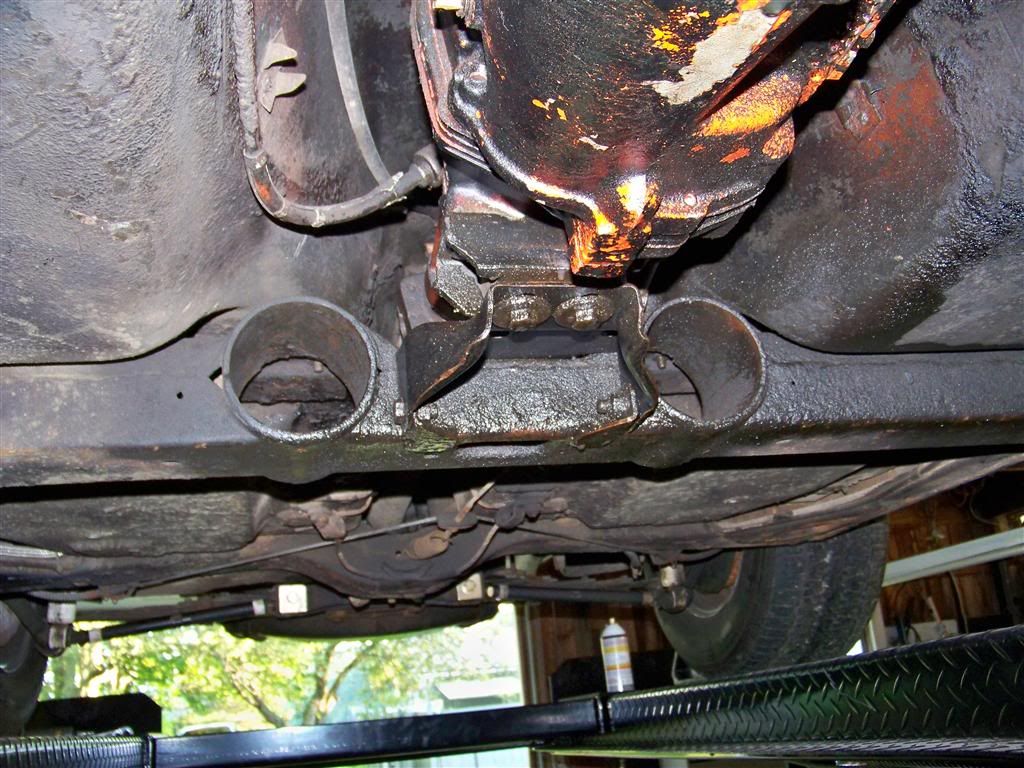
Also posted are photos of the crossmember area. Trying to decide the best way to cut it straight. I really wish I had one of those diamond rope things they cut rock with that I could just pull down on while it cut
First picture of my new lift setup on here

antifreeze pouring
stuff in the way!
crossmember

crossmember
exhaust removed.. headers were hooker super comps (for sale)
Well I got a start on it today. I removed the shifter handle and the rubber boot under it was all tore up so need to find where to order one of them if possible. Also found a broken fiber optic line.
I cut my exhaust in half using sawzall and removed that. What am I going to do about the two huge holes in the rear of the car after I get the sidepipes installed? The rear empty holes look weird.
I removed all spark plugs and header bolts and alternator. Passenger side came out the bottom with some jiggling. The driverside is going to give me grief. I posted a photo of that. What is that chrome part called? It transfers the clutch movement. Even after I remove that I think that header will have to come out the top? We'll see. Also the oil dipstick tube is going to get in the way, what do I do with that? Does the entire thing unscrew?
I also didn't know when I pulled out the temp sensor that over a gallon of antifreeze would come with it DOH! Oh well.. slight mess before I could get the bucket.
Also posted are photos of the crossmember area. Trying to decide the best way to cut it straight. I really wish I had one of those diamond rope things they cut rock with that I could just pull down on while it cut
First picture of my new lift setup on here
antifreeze pouring
stuff in the way!
crossmember
crossmember
exhaust removed.. headers were hooker super comps (for sale)
Last edited by arcticcatmatt; 07-05-2011 at 11:21 PM.
07-05-2011, 11:38 PM
#8
Burning Brakes


I also purchased a TKO-600 for my 71. I will be shipping off my frame tomorrow to the local corvette shop to have some rot repaired and then get refinished. Although it will be very easy to do the tranny install with the body off, the owner of the shop and I are going to do a little experimenting...I purchased a used original "automatic crossmember" that looks identical to the welded in one. We will cut away the bottom of the welded in member and then cut the top of the welded in crossmember leaving the "ears" on the inside frame rails alone. What we will then do is have to fit in the auto crossmember, mark 2 holes on the bottoms of the R&L sides of the frame. We will then make an access hole (that will later be repaired, so you would never know this was done) so we can weld in nuts on the inside/bottom of the frame that will later be used to secure the auto crossmember in place. For the top mounting holes, we will drill horizontal holes front to rear through the original "ears" from the 4spd crossmember that we left in place and round over the edges so we can slide the long bolts through the tops of the crossmember. Kinda hard to explain...what I am going for is to make it look factory, like it originally had an automatic transmission. It would then be removable and I would be able to service the TKO-600 whenever necessary to make repairs, replace clutch, etc. Some of you might think this is way too much work or unnecessary, but the only one I am looking to satisfy is myself! Hopefully our plan works out. I'll keep you all posted!
07-06-2011, 05:37 AM
#9
Race Director
The chrome thing is called the Z bar and it does transfer the linkage movememnt to the clutch rod and clutch fork. It needs to be removed. Undo the bolt or just loosen the nut on the left side of it and the linkage will slide up out of the frame bracket then it slides off the shaft. The header should come out the bottom from there.
I cut my cross member with a sawzall. Just had to be careful and take your time not to get into the floor of the body. It can be done and has been done this way many times.
As for fittling in the holes some just fiberglass over the holes, there is a filler panel available but I still think some glass work is needed.
07-06-2011, 10:59 AM
#10
Racer
Thread Starter
spdrcr29 - wow you are into it! My body is on so I can't do that of course. Good luck to ya!
Gordonm - Thanks for the information. I will probably buy the filler panel as I dont' want to make a perm change like glassing over the holes. I am going to get some grinding wheels today to use in conjuction with the sawzall. I also am going to get a house jack to support the engine while I cut out the crossmember. Can someone tell me how to remove the dipstick tube so I don't mutilate it figuring it out?
My body is on so I can't do that of course. Good luck to ya! Gordonm - Thanks for the information. I will probably buy the filler panel as I dont' want to make a perm change like glassing over the holes. I am going to get some grinding wheels today to use in conjuction with the sawzall. I also am going to get a house jack to support the engine while I cut out the crossmember. Can someone tell me how to remove the dipstick tube so I don't mutilate it figuring it out?
07-06-2011, 01:19 PM
#11
Instructor
Member Since: Sep 2007
Location: Colorado Springs Colorado
Posts: 198
Likes: 0
Received 0 Likes
on
0 Posts
Matt,
There should be a welded tab on the dipstick tube, that has a hole for a bolt. That bolt will fasten to the block just under where the cyl. head mates to the block. From the top of your dipstick tube, run your hand down and you should be able to feel it. Once removed, gently twist the tube, back and forth, while pulling up.
There should be a welded tab on the dipstick tube, that has a hole for a bolt. That bolt will fasten to the block just under where the cyl. head mates to the block. From the top of your dipstick tube, run your hand down and you should be able to feel it. Once removed, gently twist the tube, back and forth, while pulling up.
07-06-2011, 09:05 PM
#13
Racer
Thread Starter
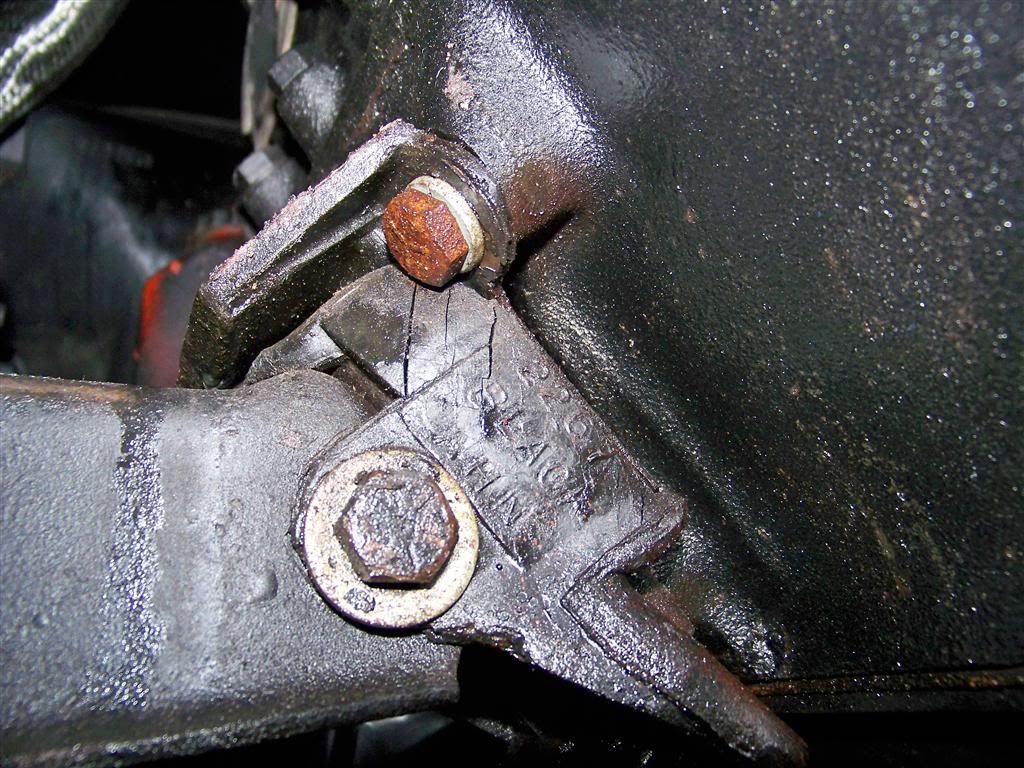
Well there wasn't a tab holding the dipstick tube in.. it was pressed in with silcone and was a pain to get out. I got that, the Zbar, and header off out the bottom like was said. I noticed a 2 cracks in the motor mount in the plastic, it doesn't look like it goes thru it by any means.. this common and OK I hope?
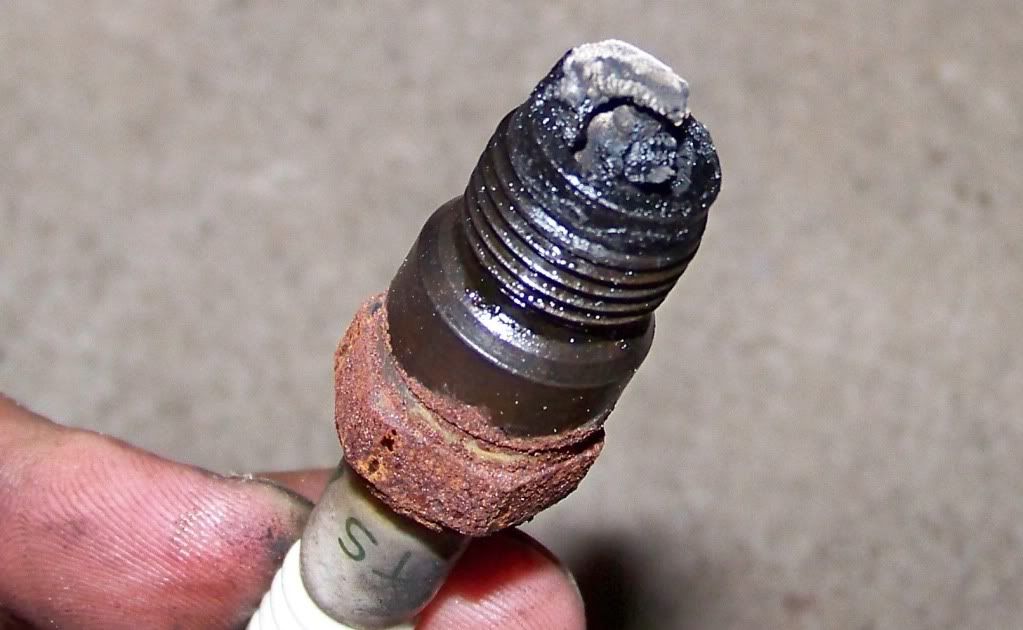
Look at what my spark plugs look like.. Yikes! I am still figuring out the causes of the extra oil getting burnt.. That comes after all this.
Look at what my spark plugs look like.. Yikes! I am still figuring out the causes of the extra oil getting burnt.. That comes after all this.
07-06-2011, 09:33 PM
#14
Race Director
That is not plastic on the motor mount but a rubberized coating on the mount. That cracking is pretty normal but does show that it is worn. They are cheap and easy to replace at thhis time. Might want to upgrade to poly mounts. They are a little stiffer and will last forever. Yes the dipstick on the early C3s are just pressed in. I sand mine down so tha tthe yjust slide in so I can remmove it easier when needed. The spark plug you need to find out what is causing it, valve seals or rings or whatever.
07-06-2011, 09:53 PM
#15
Racer
Thread Starter
^ To change the motor mounts I would have to lower the car, undo the mounts, and lift the motor up with my engine hoist right? I fear that is true because with the blower on it I don't know where else to grab it from. I will worry about that mount later (still after this tranny change).
I either have worn rings, bad valve guide seals, or (I think the cause) pcv valve system is sucking oil. I haven't done testing yet. The car did have 2 carbs on it when I bought it and was running super rich. That is not the case anymore and 600 miles ago I replaced 1 spark plug, that spark plug I just removed and it was not filled with carbon.
I plan on cutting into the crossmember tomorrow night or the next night. I purchased a floor jack today to support the motor and some super thin cut off wheels. Haven't decided if i am using my sawsall or grinding wheel.
07-06-2011, 10:07 PM
#16
Race Director
If you have a floor jack you can jack the front of the motor up just enough to get the mounts out. I have done this on several cars. It does not have to go up much. You can also do one side at a time and use the pan rail to jack the motor up slightly.
07-11-2011, 03:56 PM
#17
Former Vendor

Member Since: Aug 2008
Location: Cookeville TN
Posts: 67
Likes: 0
Received 0 Likes
on
0 Posts
Might want to upgrade to poly mounts. They are a little stiffer and will last forever.
If you do this you would be advised to switch to a rubber trans mount not the one we sent with the kit. The three Poly mounts could cause undo harmonic vibration or just vibration period.
If you do this you would be advised to switch to a rubber trans mount not the one we sent with the kit. The three Poly mounts could cause undo harmonic vibration or just vibration period.
07-11-2011, 04:16 PM
#18
Intermediate

Member Since: Aug 2007
Posts: 25
Likes: 0
Received 0 Likes
on
0 Posts
Well there wasn't a tab holding the dipstick tube in.. it was pressed in with silcone and was a pain to get out. I got that, the Zbar, and header off out the bottom like was said. I noticed a 2 cracks in the motor mount in the plastic, it doesn't look like it goes thru it by any means.. this common and OK I hope?
Look at what my spark plugs look like.. Yikes! I am still figuring out the causes of the extra oil getting burnt.. That comes after all this.
Look at what my spark plugs look like.. Yikes! I am still figuring out the causes of the extra oil getting burnt.. That comes after all this.
07-12-2011, 09:34 AM
#19
Racer
Thread Starter
Thanks for the replies. I think I am going to leave the motor mounts alone for the time being, got bigger fish to fry.
That plug has been in there a long time by the looks of it!
I am now supporting the engine with a house jack I got from lowes that is on the oil pan

all exhaust parts now removed so I just removed the driveshaft and unbolted the tranny from it. Crossmember now ready to be modified. I was surprised at the lack of foil insulation in my tunnel. My parts list is growing of things I need to order shortly to install everything. Going to look at buying a welder this week.

That plug has been in there a long time by the looks of it!
I am now supporting the engine with a house jack I got from lowes that is on the oil pan
all exhaust parts now removed so I just removed the driveshaft and unbolted the tranny from it. Crossmember now ready to be modified. I was surprised at the lack of foil insulation in my tunnel. My parts list is growing of things I need to order shortly to install everything. Going to look at buying a welder this week.
07-13-2011, 10:38 PM
#20
Racer
Thread Starter
I'm committed now! Crossmember now cut out. It was a pain. Anyone planning on doing this I recommend you get a sawzall with a very short stroke. My long stroke saw made it a real pain. My wife was kind enough to move my new cutting disks for my grinder so that option was out as now I can't find them.
