
Front Suspension Refresh project
 04-14-2011, 12:30 AM
#1
Drifting

Thread Starter

5/2- Added some new updates and pics to page 2.
Decided to rip apart the front suspension for a rebuild. Its in need of new bushings, ball joints, tie rods, idler arm. I already have new 550 springs and shocks.
Started around 5 pm yesterday on driver side and about the same time today on passenger side. Got all the control arms, both tie rods, and spindles and springs removed. About 10 hours total for both sides. There were lots of issues, I came across, but I learned alot by doing it myself. All the pieces are filthy and in need of deep cleaning/sanding. I plan to repaint all the parts maybe red or Chevy orange.
Any good ideas for a do it yourself cleaning solution for these parts? I had planned on taking a wire brush to most of it to get the gunk removed.
I am going to have the new bushings pressed in by Tracdogg2. I am also thinking of having him rebuild the steering box, while I am at it.
Here are a few pics. I will post the finished product once I am completed.


THIS TOOL IS A MUST.............

These are the new parts that will be installed.

Decided to rip apart the front suspension for a rebuild. Its in need of new bushings, ball joints, tie rods, idler arm. I already have new 550 springs and shocks.
Started around 5 pm yesterday on driver side and about the same time today on passenger side. Got all the control arms, both tie rods, and spindles and springs removed. About 10 hours total for both sides. There were lots of issues, I came across, but I learned alot by doing it myself. All the pieces are filthy and in need of deep cleaning/sanding. I plan to repaint all the parts maybe red or Chevy orange.
Any good ideas for a do it yourself cleaning solution for these parts? I had planned on taking a wire brush to most of it to get the gunk removed.
I am going to have the new bushings pressed in by Tracdogg2. I am also thinking of having him rebuild the steering box, while I am at it.
Here are a few pics. I will post the finished product once I am completed.
THIS TOOL IS A MUST.............
These are the new parts that will be installed.
Last edited by Rebelrob; 05-02-2011 at 06:05 PM.
 04-14-2011, 04:06 AM
#2
Burning Brakes


Member Since: Apr 2009
Location: VIRGINIA BEACH VIRGINIA
Posts: 807
Likes: 0
Received 1 Like
on
1 Post
I just used PB blaster and a wire wheel to clean mine up when I pulled it off. Went the cheap route and used a rust inhibitor and the spray primer and paint to paint them all black. My car does not get wet so I am not that worried about rust and it is not a show car so I did not worry about getting them powder coated or anything. Did it over a year ago and everything is holding up fine.

 04-14-2011, 09:15 AM
#4
Burning Brakes

not a fun job, i just did my 82 @a year ago. i would sand blast or you can do this.http://1bad6t.com/rust_removal.html
i hope to see that beast in person some day.
good luck and post pics.
i hope to see that beast in person some day.
good luck and post pics.
04-14-2011, 09:44 AM
#5
Instructor

Member Since: Jul 2010
Location: woodinville washington
Posts: 108
Likes: 0
Received 0 Likes
on
0 Posts
You're going to love the end result. I did everything you did, plus new A arms and the Borgeson box on my 75. I went with the poly bushings...no squeeks. It feels like a new car, tracking straight and sure. Thats a good feeling in a 36 year old car. Worth every dollar.
Last edited by JB46; 04-14-2011 at 09:47 AM.
 04-14-2011, 10:47 AM
#7
Drifting
Thread Starter
Great tips... Thank you. I have done the wire wheel on the drill before. I have a friend with a bench grinder, might try that also. Wish I had a sand blaster. Did not want to bore everybody with the details. But I had to back out 3 of the 4 upper control arm studs off the shafts due to not having enough room to push them off the studs. NOW I KNOW, what many told me about it being much easier with the engine out... The Dewitt Rad/Spal fans were the culprit up front. I am pretty good with a hammer now.
I hope to get these things clean up by end of weekend. I will post more updates.
I hope to get these things clean up by end of weekend. I will post more updates.
04-14-2011, 11:46 AM
#8
Safety Car

Thats a good start to your project. Its one of the items on my list to do also.
I did some work on my front end recently and used Simple Green and a wire brush to get rid of the grease and oil. After it dried I then used a drill with a wire brush wheel to get all of the rust and paint off. It looked good and clean. Then I painted it with a rust inhibitor based paint.
One day I will go back and take the control arms like you did. Doing a refresh of all the bushings, washers and bolts really cleans us the front end area.
kdf
04-14-2011, 05:55 PM
#9
Intermediate
Member Since: Apr 2011
Location: Parlin New Jersey
Posts: 29
Likes: 0
Received 0 Likes
on
0 Posts
I am in the middle of this job right now. Getting the upper a-frames out so far was the biggest pain.. 4 nuts to take off, I figured it would be cake.. Wrong! lol
After scraping all the grease off those puppies I will use a strong degreaser/hose then I'll go the wire brush drill route. Once they are reasonably clean I will beging fighting to get the old bushings out..
With any luck I should be ready to press in the new ones over the weekend..
After scraping all the grease off those puppies I will use a strong degreaser/hose then I'll go the wire brush drill route. Once they are reasonably clean I will beging fighting to get the old bushings out..
With any luck I should be ready to press in the new ones over the weekend..
04-15-2011, 12:04 AM
#10
Drifting
Thread Starter
Yes, nothing cake about this project. 
Update: I got the ball joints removed today with the help of a air hammer with a chisel bit. I had to keep sharpening over and over. What a big PIA, that was. I figured out how to use the tool, after making a few mistakes. Cutting the tops off the upper control arm rivets was not to difficult. The lower control arm rivets were a different story. They were much bigger/thicker, the chisel was not making much of a dent. Took a long time to cut thru them. I had to do both sides, so 4 cuts per arm. Maybe it was the chisel I had, not sure. Then on top of that one of the arms rolled off the vice and I caught it, but the edge of it landed on the air hose and cut almost in half. Glad it was not my foot.....
So I had to get anothe air hose set up to finish the last control arm.
Forget about trying to get the old bushings out. I managed to turn one bushing into a pile of metal mush. They would not budge..I trimed it up best I could, but I will need to have someone with a press push them out as well as put the new ones in. Nothing is easy....
More to come.
04-15-2011, 05:35 AM
#11
Instructor
Member Since: May 2010
Location: Shelby Twp. Michigan
Posts: 113
Likes: 0
Received 0 Likes
on
0 Posts
]I just did this with mine. I burned the rubber bushings out and the hammerd the shells out after the rubber was out. I did however take them to a shop to have them pressed in.
I would suggest you take your stuff to a blasting shop and let them blast everything for you. It'll be a whole lot easier and cleaner for you and will get it much cleaner then wire brushing will ever do.
Here's a couple pics of mine.
[IMG] [/IMG]
[IMG] [/IMG]
I would suggest you take your stuff to a blasting shop and let them blast everything for you. It'll be a whole lot easier and cleaner for you and will get it much cleaner then wire brushing will ever do.
Here's a couple pics of mine.
[IMG]
[/IMG][IMG]
[/IMG]
04-15-2011, 04:50 PM
#12
Intermediate
Member Since: Apr 2011
Location: Parlin New Jersey
Posts: 29
Likes: 0
Received 0 Likes
on
0 Posts
Yes, nothing cake about this project.
Update: I got the ball joints removed today with the help of a air hammer with a chisel bit. I had to keep sharpening over and over. What a big PIA, that was. I figured out how to use the tool, after making a few mistakes. Cutting the tops off the upper control arm rivets was not to difficult. The lower control arm rivets were a different story. They were much bigger/thicker, the chisel was not making much of a dent. Took a long time to cut thru them. I had to do both sides, so 4 cuts per arm. Maybe it was the chisel I had, not sure. Then on top of that one of the arms rolled off the vice and I caught it, but the edge of it landed on the air hose and cut almost in half. Glad it was not my foot.....
So I had to get anothe air hose set up to finish the last control arm.
Forget about trying to get the old bushings out. I managed to turn one bushing into a pile of metal mush. They would not budge..I trimed it up best I could, but I will need to have someone with a press push them out as well as put the new ones in. Nothing is easy....
More to come.
]I just did this with mine. I burned the rubber bushings out and the hammerd the shells out after the rubber was out. I did however take them to a shop to have them pressed in.
I would suggest you take your stuff to a blasting shop and let them blast everything for you. It'll be a whole lot easier and cleaner for you and will get it much cleaner then wire brushing will ever do.
Here's a couple pics of mine.
[IMG][/IMG]
[IMG][/IMG]
I would suggest you take your stuff to a blasting shop and let them blast everything for you. It'll be a whole lot easier and cleaner for you and will get it much cleaner then wire brushing will ever do.
Here's a couple pics of mine.
[IMG]
[/IMG][IMG]
[/IMG]
04-15-2011, 08:58 PM
#13
Instructor
Member Since: May 2010
Location: Shelby Twp. Michigan
Posts: 113
Likes: 0
Received 0 Likes
on
0 Posts
Thank you! I'm not gonna say this wasn't a pain in the a$$, cause it was! I've got a bruised hand and a purple finger nail to prove it! If you take a hacksaw blade (or a sawzall if you're carefull) on the inside of the casing after the rubber's burnt out, it'll collapse the metal and make it a ton easier to get em out.
 04-16-2011, 04:41 PM
#15
Intermediate
Member Since: Apr 2011
Location: Parlin New Jersey
Posts: 29
Likes: 0
Received 0 Likes
on
0 Posts
Found a cool way to clean up some of these parts.. A buffer and a wire wheel.
It works surprisingly well!


Tomarrow hopefully some paint.. (now to get all this rust out of my hair..) lol
It works surprisingly well!
Tomarrow hopefully some paint.. (now to get all this rust out of my hair..) lol
04-16-2011, 07:08 PM
#16
Drifting
Thread Starter
Lots of good info men. Powdercoatbill, that is very nice...
Update- not much really:
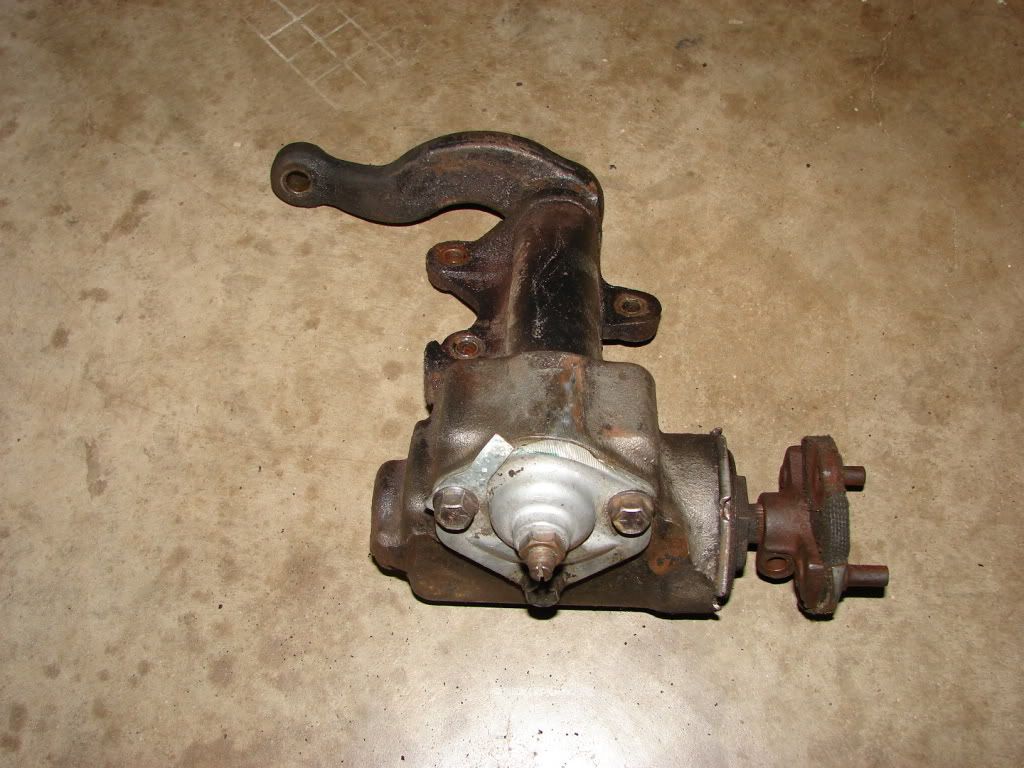
I decided, " while I was at it" to remove the steering box for inspection and rebuild.
Once again, nothing is easy.
The pitman shaft from the steering box was seized (imagine that) to the pitman arm.
The pitman arm puller rental from the local auto part store did not work, nor did one of my cheap 2 prong pullers. The 2 prong puller shaft bent. In the trash it goes. The rental would not fit, because the 2 inch primary header tube was in the way.
So I beat on it with the picklefork tool. My swinging motion with the hammer is about 3 inches, so no real blunt force. I decided to remove the bolt from the pitman arm to the ps control valve and remove the pitman arm with the steering box. Mike Dyer approved this for me before I tried it. The ps assembly is new. No real time has passed for it to seize to the pitman arm. This time I went to other side of the pitman arm and pitman shaft to bang on it from a different angle. This caused the pitman arm to seperate from the ps control valve, by accident, but I was happy to see it. I pulled the whole mess out in one piece.
Steering box and wheel hubs are currently with Mike for a rebuild. He could tell by moving the pitman shaft, that is was worn. He also pressed out my old bushings with an air hammer and chisel tool. They were completely rusted to the A arm shafts.
The control arms and a few other pieces are at the sandblaster/powdercoating place.
I got lazy and did not want to mess with cleaning those things up. They were filthy with some rust. I think it will be money well spent.
I think this job might be a slightly easier with a stock SB with exhaust manifolds. More wrench room for sure.
Will post more pics when I have them all back before assembly.


Update- not much really:
I decided, " while I was at it" to remove the steering box for inspection and rebuild.
Once again, nothing is easy.
The pitman shaft from the steering box was seized (imagine that) to the pitman arm.
The pitman arm puller rental from the local auto part store did not work, nor did one of my cheap 2 prong pullers. The 2 prong puller shaft bent. In the trash it goes. The rental would not fit, because the 2 inch primary header tube was in the way.
So I beat on it with the picklefork tool. My swinging motion with the hammer is about 3 inches, so no real blunt force. I decided to remove the bolt from the pitman arm to the ps control valve and remove the pitman arm with the steering box. Mike Dyer approved this for me before I tried it. The ps assembly is new. No real time has passed for it to seize to the pitman arm. This time I went to other side of the pitman arm and pitman shaft to bang on it from a different angle. This caused the pitman arm to seperate from the ps control valve, by accident, but I was happy to see it. I pulled the whole mess out in one piece.
Steering box and wheel hubs are currently with Mike for a rebuild. He could tell by moving the pitman shaft, that is was worn. He also pressed out my old bushings with an air hammer and chisel tool. They were completely rusted to the A arm shafts.
The control arms and a few other pieces are at the sandblaster/powdercoating place.
I got lazy and did not want to mess with cleaning those things up. They were filthy with some rust. I think it will be money well spent.
I think this job might be a slightly easier with a stock SB with exhaust manifolds. More wrench room for sure.
Will post more pics when I have them all back before assembly.
Last edited by Rebelrob; 04-16-2011 at 07:11 PM.
04-23-2011, 05:44 PM
#17
Drifting
Thread Starter
Got the front suspension pieces back from the blaster/powder coater.
Considering how terrible they looked before, they look practically brand new now.
He had more colors than a bag of skittles to choose from. Many with clear coats, gloss, semi gloss, etc etc. I chose dark copper color with a clear coat to give it sort of satin finish. I was not looking for anything very shiny. This will somewhat match the color of the engine block and oil pan. He told me he had a shiny penny copper color, but that would of been a little to much shine for me. Little cloudy today, so could not really get the true color with the pics. Probably be the last sun these parts will see for a long time.
Several step process as many of you probably already know.
First all the pieces were baked in an oven, to remove grease, grime, rust chips. Then they were given a chemical bath, then re-baked in the oven again, then media blasted with some sort of glass bead material (not sand), then they were powder coated, baked, then cleared coated then baked to finish off the process.
You can now see the part numbers of the wheel spindle pieces indicating left or right side as well as GM stamps. None of these were remotely visible before.
I am having the upper control arms redone because for some reason they came our darker.
If anybody is interested, I will share the contact information with you for the gent that did this. Reasonable prices and he works out of his house.
[IMG] [/IMG]
[IMG] [/IMG]
[IMG] [/IMG]
[IMG] [/IMG]
[IMG] [/IMG]
[IMG] [/IMG]
Considering how terrible they looked before, they look practically brand new now.
He had more colors than a bag of skittles to choose from. Many with clear coats, gloss, semi gloss, etc etc. I chose dark copper color with a clear coat to give it sort of satin finish. I was not looking for anything very shiny. This will somewhat match the color of the engine block and oil pan. He told me he had a shiny penny copper color, but that would of been a little to much shine for me. Little cloudy today, so could not really get the true color with the pics. Probably be the last sun these parts will see for a long time.
Several step process as many of you probably already know.
First all the pieces were baked in an oven, to remove grease, grime, rust chips. Then they were given a chemical bath, then re-baked in the oven again, then media blasted with some sort of glass bead material (not sand), then they were powder coated, baked, then cleared coated then baked to finish off the process.
You can now see the part numbers of the wheel spindle pieces indicating left or right side as well as GM stamps. None of these were remotely visible before.
I am having the upper control arms redone because for some reason they came our darker.
If anybody is interested, I will share the contact information with you for the gent that did this. Reasonable prices and he works out of his house.
[IMG]
[/IMG][IMG]
[/IMG][IMG]
[/IMG][IMG]
[/IMG][IMG]
[/IMG][IMG]
[/IMG]
Last edited by Rebelrob; 04-25-2011 at 03:55 PM.
04-23-2011, 07:09 PM
#18
Le Mans Master

Member Since: Oct 2002
Location: Las Vegas - Just stop perpetuating myths please.
Posts: 7,098
Received 373 Likes
on
356 Posts

Man that's a cool color. Really personalizes the car. Just be careful u don't get "while i'm at it itice". And remember leave the body on the car.
Good luck at lets see it again when it done,
cardo0
Good luck at lets see it again when it done,
cardo0
04-24-2011, 01:29 AM
#20
Le Mans Master

4/23 ADDED SOME NEW PICS BELOW
Decided to rip apart the front suspension for a rebuild. Its in need of new bushings, ball joints, tie rods, idler arm. I already have new 550 springs and shocks.
Started around 5 pm yesterday on driver side and about the same time today on passenger side. Got all the control arms, both tie rods, and spindles and springs removed. About 10 hours total for both sides. There were lots of issues, I came across, but I learned alot by doing it myself. All the pieces are filthy and in need of deep cleaning/sanding. I plan to repaint all the parts maybe red or Chevy orange.
Any good ideas for a do it yourself cleaning solution for these parts? I had planned on taking a wire brush to most of it to get the gunk removed.
I am going to have the new bushings pressed in by Tracdogg2. I am also thinking of having him rebuild the steering box, while I am at it.
Here are a few pics. I will post the finished product once I am completed.
THIS TOOL IS A MUST.............
These are the new parts that will be installed.