
Temperature Gauge Success
 08-25-2010, 01:23 PM
#1
Race Director

Thread Starter
Pretty sure I've got it now.
Theses crappy senders are enough to drive a guy nuts. I'm working on a 70 that is going for it's PV test and the temp gauge has never gone above the mark in-between the 100 and 210 mark.
I have tested senders from Lectric Limited , Paragon , Autozone , O Rileys and Advanced Auto.
I used boiling water , 212 degrees as a base for testing the senders (the gauge is marked at 210 so that is almost perfect). Most stock C3 gauges when inputted with 79-82 Ohms will read right around 212. So if you put a sender in boiling water it needs to have an ohms reading of 79-82 ohms to make the gauge read 212.
The best and closest senders I've found are the ones from Advanced and O-Rileys both from BWD #WT203 at $6 each. O-Rileys has an AC Delco also but it is exactly the same part as the WT203 but in an AC Delco box and has a price tag of $22. These all tested from 80-82 ohms in boiling water.
The Lectric Limited #06400759 and Autozone TU5 looked identical and tested identical , 102 ohms in boiling water.
102 ohms gives a gauge reading of aprox. 150 degrees ( no wonder so many think these senders are great , their engines appear to be running nice and cool). This is 62 degrees too cold , not good in my opinion.
Paragons #8454 looks different with the correct writing on it but it tested exactly the same as the LL and Autozone TU5 , 102 ohms in boiling water.
The LL and Paragon senders do have the correct pin for connecting the green sender wire.
On the BWD WT203 the connection is the thumb tack style.( For the 70 I am working on I ground the connector round to use the original harness connector.)
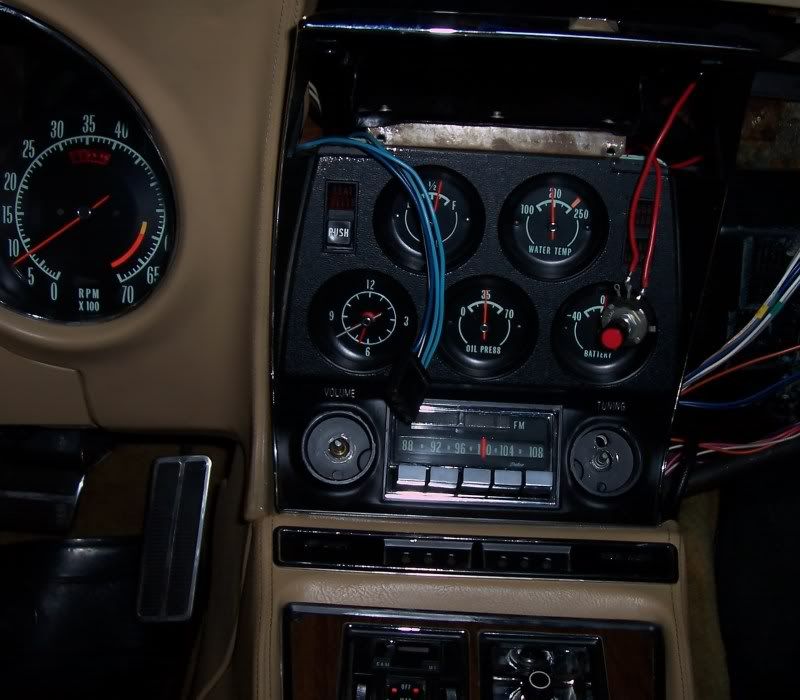
On the 70 the BWD WT203 was pretty close but because of the PV test I wanted to experiment and get a little closer. Here are some pics of the process using the WT203 sender and with the gauge resistor removed and a variable potentiometer set at 80 ohms (original resistor read 86 ohms).
This first pic is engine idling with a temp gun reading on top of thermostat housing of 198 and a reading of 201 at the base of the housing. I think its pretty close. Yahoo !
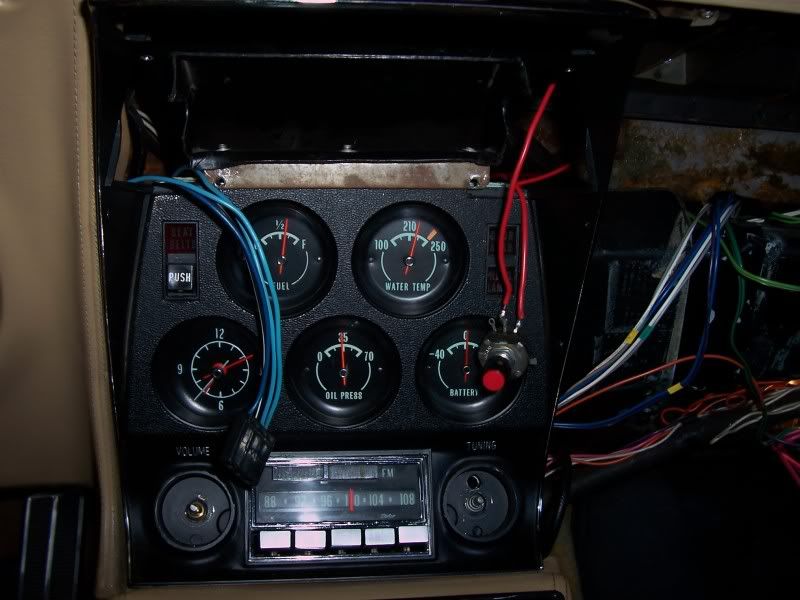
This pic is with a gun reading of 223 top and 226 base. So far so good.
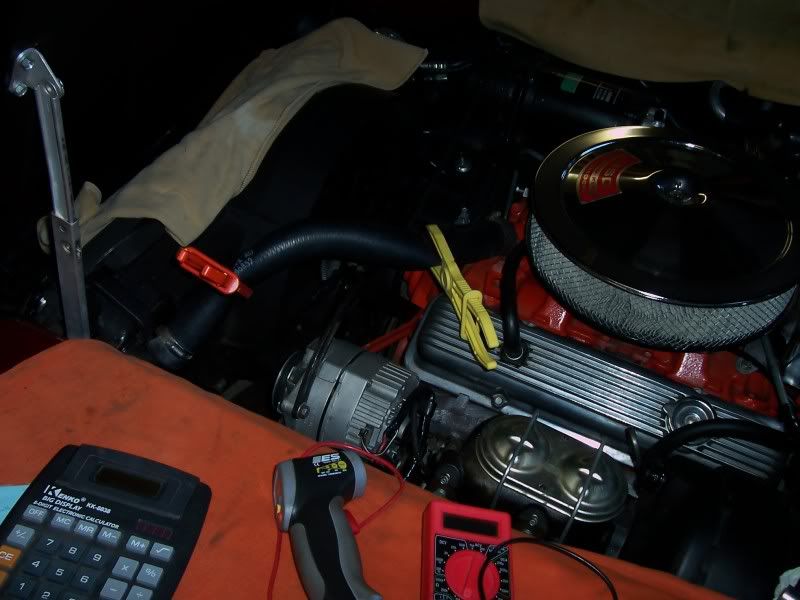
I wanted to force the engine to run hotter but was difficult to do with the usual covering of the radiator. I had to all but pinch off the upper rad hose. Found out later in the process the TCS wasn't working correctly and at normal temps was allowing vacuum to reach the dist.
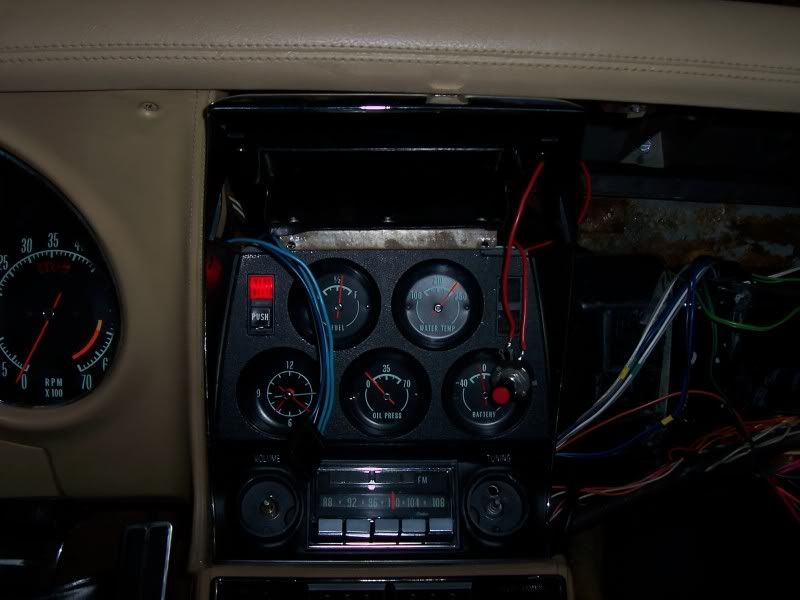
This last pic is with the engine off and the heat rising. I was hoping to see this so I was assured the sender would produce a high temp reading. The gun read 245 at this point and after a min or so read 260 and the gauge was buried into the red. I'm pretty satisfied for the purpose of protection this combination of sender,gauge and resistor is pretty accurate and will throw red flags when the engine is getting hot.
Here are couple more threads with some more temp gauge info.
http://forums.corvetteforum.com/c3-t...uge-stuff.html
http://forums.corvetteforum.com/c3-t...ender-pic.html
http://forums.corvetteforum.com/c3-g...-ohms-law.html
Theses crappy senders are enough to drive a guy nuts. I'm working on a 70 that is going for it's PV test and the temp gauge has never gone above the mark in-between the 100 and 210 mark.
I have tested senders from Lectric Limited , Paragon , Autozone , O Rileys and Advanced Auto.
I used boiling water , 212 degrees as a base for testing the senders (the gauge is marked at 210 so that is almost perfect). Most stock C3 gauges when inputted with 79-82 Ohms will read right around 212. So if you put a sender in boiling water it needs to have an ohms reading of 79-82 ohms to make the gauge read 212.
The best and closest senders I've found are the ones from Advanced and O-Rileys both from BWD #WT203 at $6 each. O-Rileys has an AC Delco also but it is exactly the same part as the WT203 but in an AC Delco box and has a price tag of $22. These all tested from 80-82 ohms in boiling water.
The Lectric Limited #06400759 and Autozone TU5 looked identical and tested identical , 102 ohms in boiling water.
102 ohms gives a gauge reading of aprox. 150 degrees ( no wonder so many think these senders are great , their engines appear to be running nice and cool). This is 62 degrees too cold , not good in my opinion.
Paragons #8454 looks different with the correct writing on it but it tested exactly the same as the LL and Autozone TU5 , 102 ohms in boiling water.
The LL and Paragon senders do have the correct pin for connecting the green sender wire.
On the BWD WT203 the connection is the thumb tack style.( For the 70 I am working on I ground the connector round to use the original harness connector.)
On the 70 the BWD WT203 was pretty close but because of the PV test I wanted to experiment and get a little closer. Here are some pics of the process using the WT203 sender and with the gauge resistor removed and a variable potentiometer set at 80 ohms (original resistor read 86 ohms).
This first pic is engine idling with a temp gun reading on top of thermostat housing of 198 and a reading of 201 at the base of the housing. I think its pretty close. Yahoo !
This pic is with a gun reading of 223 top and 226 base. So far so good.
I wanted to force the engine to run hotter but was difficult to do with the usual covering of the radiator. I had to all but pinch off the upper rad hose. Found out later in the process the TCS wasn't working correctly and at normal temps was allowing vacuum to reach the dist.
This last pic is with the engine off and the heat rising. I was hoping to see this so I was assured the sender would produce a high temp reading. The gun read 245 at this point and after a min or so read 260 and the gauge was buried into the red. I'm pretty satisfied for the purpose of protection this combination of sender,gauge and resistor is pretty accurate and will throw red flags when the engine is getting hot.
Here are couple more threads with some more temp gauge info.
http://forums.corvetteforum.com/c3-t...uge-stuff.html
http://forums.corvetteforum.com/c3-t...ender-pic.html
http://forums.corvetteforum.com/c3-g...-ohms-law.html
Last edited by ...Roger...; 09-10-2010 at 12:29 PM.

The following 2 users liked this post by ...Roger...:
CamaroRick (05-03-2017),
ckirsch100 (10-29-2020)
08-25-2010, 03:06 PM
#2
Former Vendor
Member Since: Aug 2006
Location: Jeffersonville Indiana 812-288-7103
Posts: 76,656
Received 1,813 Likes
on
1,458 Posts
St. Jude Donor '08-'09-'10-'11-'12-'13-'14-'15

Nicely done Roger! 
08-25-2010, 03:07 PM
#3
Racer

All great information. This'll help a lot of people make smart choices when replacing their senders. I'll probably run down and grab one too. My 69 BB doesn't get above 180 no matter how I'm driving...and it's 110 degrees in Phoenix.
What's the easiest way to measure the resistance with the sender installed? Should you do it at the sender and ground or where it connects to the gauge?
What's the easiest way to measure the resistance with the sender installed? Should you do it at the sender and ground or where it connects to the gauge?
Last edited by shrekviper; 08-25-2010 at 03:15 PM.
08-25-2010, 04:32 PM
#4
Race Director
Thread Starter
All great information. This'll help a lot of people make smart choices when replacing their senders. I'll probably run down and grab one too. My 69 BB doesn't get above 180 no matter how I'm driving...and it's 110 degrees in Phoenix.
What's the easiest way to measure the resistance with the sender installed? Should you do it at the sender and ground or where it connects to the gauge?
What's the easiest way to measure the resistance with the sender installed? Should you do it at the sender and ground or where it connects to the gauge?
But it never hurts to check the green sender wire for resistance as it does go through the firewall connector. Added resistance on the green sender wire will cause a lower temp reading at the gauge.
08-25-2010, 04:39 PM
#5
Race Director
Thread Starter
 08-25-2010, 04:40 PM
#6
Team Owner

Boy, ...Roger... you're just a regular McGuyver. Interesting results! And I won't be advising anyone else to buy senders at LL (their results are a real disappointment to me).
08-25-2010, 05:29 PM
#7
Le Mans Master

I have done some testing with this as well. I am using the Lectric Limited sender as well as an equiis mechanical gauge. Lastly I used a IR temp gun at the inlet of the radiator. On mine, the first mark between 100 and 210 (or the 1/4 mark if you will) is right around 185-190* depending on the angle you look at the factory gauge. At 210* exactly on the factory gauge is exactly 208* on my mechanical gauge and 207-209* with the temp gun. A couple of needle widths past 210* on the factory gauge was 214-215* on the mechanical and temp gun. That was as high as I tested.
To me it seems that my factory gauge is pretty accurate in the 185* and up range, but below that it is pretty far off. Nomally my car runs 170-175* on my mechanical gauge and the factory gauge shows about halfway between 100 and the first mark....(you would assume that is 140* if the first mark is an actual 185-190)....
All this being said, I just go by the mechanical and never let it get over 210*.
Last edited by ajrothm; 08-25-2010 at 05:36 PM.
08-25-2010, 05:35 PM
#8
Team Owner
Member Since: Sep 2006
Location: Westminster Maryland
Posts: 30,173
Likes: 0
Received 2,878 Likes
on
2,515 Posts
Hi Roger,
Nice report on your findings!!
I believe you can use your potentiometer to test the gas gauge too. John Hinkley wrote an article for CORVETTE ENTHUSIAST about testing gas gauges and sending units that use the 'pot'. He even included simple instructions on how to make it yourself.
Thanks Again!
Regards,
Alan
08-25-2010, 05:39 PM
#10
Race Director
Thread Starter
I was even more disappointed when the second sender arrived and it was the same. I'm not calling the tech back because I'll just get into an argument. Dang,this isn't rocket science and I know the tech is smarter than that,the sender sends a signal , the gauge picks it up and interprets it. Jeeze
 08-25-2010, 06:33 PM
#11
Burning Brakes


Member Since: Jun 2000
Location: GA
Posts: 892
Likes: 0
Received 0 Likes
on
0 Posts

Admit it Roger...
You did all this for my benefit! The sight of me running out to the garage with a pan full of boiling water to test my setup was to much to bare...
A few questions for clarity... the pot setting at 80ohm was to dial in a closer calibration? Did you put the factory 86ohm resistor back on or just hide the pot behind the dash board?
I still cannot believe something this simple is actually this time consuming...
08-25-2010, 06:54 PM
#12
Race Director
Thread Starter
Admit it Roger...
You did all this for my benefit! The sight of me running out to the garage with a pan full of boiling water to test my setup was to much to bare...
A few questions for clarity... the pot setting at 80ohm was to dial in a closer calibration? Did you put the factory 86ohm resistor back on or just hide the pot behind the dash board?
I still cannot believe something this simple is actually this time consuming...
You did all this for my benefit! The sight of me running out to the garage with a pan full of boiling water to test my setup was to much to bare...
A few questions for clarity... the pot setting at 80ohm was to dial in a closer calibration? Did you put the factory 86ohm resistor back on or just hide the pot behind the dash board?
I still cannot believe something this simple is actually this time consuming...

Yes the 80 ohms was to get closer mainly for the PV test the car is going to undergo. I'm not sure how tight these tests are and I didn't want him to fail due to a couple degrees.
The factory 86 (i'm pretty sure it was 86 , i sorta removed it and tossed it in the cup with about 15 others) was replaced with a factory resistor that happen to measure 80 ohms.
Pot was removed.
These "90" ohms factory resistors are all over the place. I have one thats 76 if I remember right.
Now I have to put the dash back together AND put shielding back on both sides of the engine.
 08-25-2010, 10:33 PM
#13
Former Vendor
Member Since: Aug 2006
Location: Jeffersonville Indiana 812-288-7103
Posts: 76,656
Received 1,813 Likes
on
1,458 Posts
St. Jude Donor '08-'09-'10-'11-'12-'13-'14-'15
No problem!
The pot is put inline as a substitute for for the resistor and used to dial in the correct resistance to match up the gauge to the sender. Once you remove the adjustable pot.. you simply take a reading to know what needs to be exchanged for the factory resistor. This reading should be taken with the pot removed from the gauge.
Changing the gauge resistance on the back of the gauge will make a gauge correct within a certain scale... Adding resistance in the ohms wire before the gauge will only make the gauge correct at one point.
Ernie
Last edited by Willcox Corvette; 08-26-2010 at 02:11 PM.
 ....Nice...
08-25-2010, 11:00 PM
....Nice...
08-25-2010, 11:00 PM
#15
Race Director
Thread Starter
08-25-2010, 11:37 PM
#16
Drifting

I verified my gauge just recently with an IR gun and it seemed accurate.
My new build will require me to place the sender in the intake and not the stock location on the driver side head. Hopefully I will still get accurate readings.
08-26-2010, 10:19 AM
#17
Burning Brakes
Member Since: Jun 2000
Location: GA
Posts: 892
Likes: 0
Received 0 Likes
on
0 Posts
"Changing the gauge resistance will not make a gauge correct at one point like adding resistance to the ohms wire. Ernie"
My electronics courses are coming back to haunt me, but here goes... If I am thinking correctly, as the gauge is not the issue it is solely the inaccuracy of the sending unit. Changing the ohms on the gauge only provides an accurate reading at that specific temperature. Wilcox website it shows the correct ohms needed for the gauge to read accurate at each temp mark. If the sending unit is not sending correct ohms for an accurate 210* mark, the gauge resistor could be modified so the gauge reads 210* too. However, this is only one temp reading. As I am thinking... the sending unit is sending the wrong ohms throughout the entire range. So while 80 ohms on the gauge gives 210*... the sending unit could be even further off at 250*. Meaning, 80ohms on the gauge might not work. It may need more or less to read 250* correctly. It is the "intervals" of ohms from the sending unit that is bad and I do not see any way to fix this...? The service that is offered to pair a gauge and a sender seems worth it at this piont to me... but how is that accomplished since it is the sending range that is wrong?
I also bought 5 sending units and measured at 212* boiling water
LectricLimited- 83ohms
Advanced Auto Duralast- 101ohms (be great if we ran that cool huh?)
OReilly BWD- 82ohms
Summit Racing- 97ohms
VDO universal- 190ohms (not sending unit fault... just not for our gauges)
As Roger stated, we can get close and probably be okay... but this is really bad accuracy...
08-26-2010, 11:23 AM
#18
Race Director
Thread Starter
I also bought 5 sending units and measured at 212* boiling water
LectricLimited- 83ohms
Advanced Auto Duralast- 101ohms (be great if we ran that cool huh?)
OReilly BWD- 82ohms
Summit Racing- 97ohms
VDO universal- 190ohms (not sending unit fault... just not for our gauges)
As Roger stated, we can get close and probably be okay... but this is really bad accuracy...

I'm surprised on the LL sender , I ask a couple buddys to test their LL senders for me ( this makes 5). All were above 100 except for 1 and it was 99.
Just curious , did your ORiley BWD have white sealer around the threads ?
I remember years ago seeing a sender with a tiny screw in the top for adjustment but can't remember if it was American or not.
Has anyone ever dissected one of these senders. I just took an original AC one apart and it reminds me of the cardboard tube that is in a radio.
It looks like the spring should change length pulling a plug of some type through the cardboard tube. I tried heating the spring but it didnt change length so now I don't know how it works. ( ive come to the end of my capabilities )
I finished up with this 70 and it seems to work really well. The new 195 thermostat is a bit lazy and you can see it on the gauge. The gauge is very active and rises to around 220 before the thermostat opens then backs down below 210 and then back up to 215 and then settles just under the 210 mark and stays there.
The new TCS switch has me a little concerned,the high limit seems to be overriding at normal temps , I'll have to take it for another ride after I get the dash back together.
08-26-2010, 01:21 PM
#19
Burning Brakes
Member Since: Jun 2000
Location: GA
Posts: 892
Likes: 0
Received 0 Likes
on
0 Posts
The LL sender shocked me too. At first, the lower temperature ohms were waaaay off. Once the water temperature climbed toward 200* the sender was sending better ohm reading. (What is that????)
The BWD sending unit from O’Reilly’s does have the Teflon Tape around the top half of the threads. It had the most accurate (term use lightly) ohms output of all sending units. As stated, the sending unit connection is the “tack” type and not pin type. No big deal but worth noting.
There a few options IMHO…
1.Send to WILCOX to calibrate the pair (like to know how this is accomplished- I am clueless)
2.Install new resistor at gauge to read 210* accurately but know the other temps could be inaccurate.
3.Accept new sending unit are useless and convince yourself the manufactures have found a way to make your Corvette run 30* cooler.
4.Install aftermarket setup and live with the non-factory gauge appearance.
Anthony
btw- that unit with the screw... was that to dial in the resistance?
Last edited by Mr.Gearhead; 08-26-2010 at 01:24 PM.
