
Has anyone ran a new fuel line (with Body on Frame) ? How ?
 04-13-2010, 10:46 AM
#1
Pro

Thread Starter

Ive stepped up the power, alot, on my 1970 BB and need to run a larger fuel line ; had a good look around underneath and concluded its not going to be easy. Its the area around the passenger side rear wheel well thats the challenge --- has anyone figured out a nifty way of doing it ? I need a minimum 3/8" i.d. line. Thanks for tips.
 04-13-2010, 11:17 AM
#2
Le Mans Master

Member Since: Apr 2000
Location: cincinnati ohio
Posts: 5,202
Likes: 0
Received 8 Likes
on
7 Posts
St. Jude Donor '09

I tried to run an 1/2" aluminum line where the stock one used to live, and gave up before I shot myself. I ended up running -8 socketless Aeroquip stuff 
04-13-2010, 11:31 AM
#3
Team Owner

Replacing the existing line with a larger line in a single piece would be very difficult. IMO, your best solution is to plan on replacing the line with a 2 or 3 piece fuel line using solid compression fittings to join them at the 'break' locations. Get under the car and decide how many pieces the line needs to have for a [fairly] simple installation. Then, with a permanent marker, identify on your present line where those 'break' cuts need to be...making sure you leave enough room on either side of that break-point for the width of the compression fitting.
Clamp off the fuel flow from the tank with a clamp (or vise-grip) on the rubber line going to that fuel line. Then remove the old line by releasing the end connections and cutting the line at those marks you made earlier. Now you can use the pieces of your old line as "masters" for bending the new [larger] line into the correct shapes to fit your car so it will be a simple installation.
You must also deal with a way to enlarge the outlet fitting on the fuel tank so that it will not be a "bottleneck" for that new, larger line. It may be that the outlet fitting is larger than your present line...in which case you will not have a problem; but I don't know the size of that fitting. You will also have to replace the fuel line clamps on the frame so that they match the size of line you are going to install.
Your line won't exactly look "stock"...but it will be larger than stock, anyway. If you select your "cut" locations properly, you may be able to have the compression fittings in locations that aren't that visible.
Good luck with your project.
04-13-2010, 11:42 AM
#4
Pro
Thread Starter
How did you get around the hurdle of the passenger real wheel well dilemna ? How exactly did you run it ? Thanks. 71 vettes suggestion might work but I can see thats going to look like a botched job trying to come up with proper bends using steel tubing....unless it can be run away from the frame rail more toward the center of the vehicle and properly secured.
04-13-2010, 12:09 PM
#6
Pro
Thread Starter
04-13-2010, 01:53 PM
#7
Team Owner
Member Since: Sep 2006
Location: Westminster Maryland
Posts: 30,173
Likes: 0
Received 2,878 Likes
on
2,515 Posts

Hi Dave,
Based on some previous threads it seems to be possible.
Success seems to depend on lots of bending of the line and then straightening it out. It seems to me the higher off the ground the car is the better the access will be.
Good Luck!
Regards,
Alan
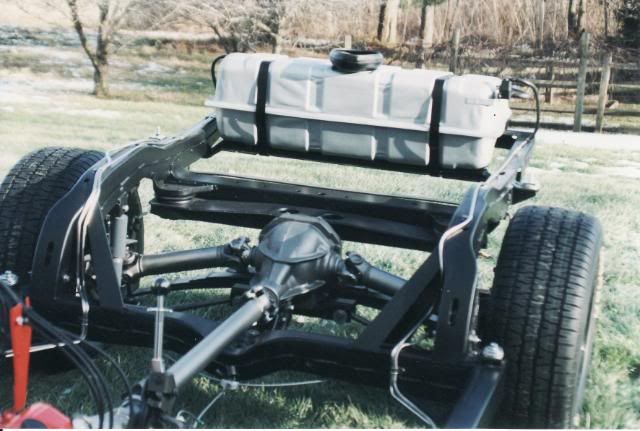
I'll post a picture so you can see how the line travels up over the kick-up to the top of the frame rail.
Based on some previous threads it seems to be possible.
Success seems to depend on lots of bending of the line and then straightening it out. It seems to me the higher off the ground the car is the better the access will be.
Good Luck!
Regards,
Alan
I'll post a picture so you can see how the line travels up over the kick-up to the top of the frame rail.
 04-13-2010, 06:32 PM
#10
The ORIGINAL and bestest

Member Since: Oct 2000
Location: Toronto Ontario
Posts: 10,009
Received 234 Likes
on
143 Posts
Toronto Events Coordinator
I just did this for my EFI conversion. I ordered a return line pre-bent the same as the factory return line in SS 3/8". First I removed the passenger side rear bumper, and then I removed the 4 passenger side body bolts, and then I jacked the body up at the rocker about 1 1/2" which was just enough to get the line up and over the rear kick up in the frame. I had the body up as high as I could on jackstands, and I also had a friend guiding the line up through the wheel well while I was underneath. I was dreading this job, but it turned out to be fairly easy, just time consuming preparing for it.
 01-13-2013, 09:43 AM
#12
The ORIGINAL and bestest
Member Since: Oct 2000
Location: Toronto Ontario
Posts: 10,009
Received 234 Likes
on
143 Posts
Toronto Events Coordinator
There was no damage to anything; since I had removed the four body bolts from the passenger side and the passenger side chrome bumper, it lifted with ease. There is a lot of flex in these fiberglass bodies! 
Last edited by 7t2vette; 01-13-2013 at 01:59 PM.
01-13-2013, 10:03 AM
#13

Summit Racing -6AN Teflon lined SS braided from tank to Edelbrock mechanical pump. Cheaper steel braided rubber from pump to Edelbrok 650 carb on my small block. You can always step up to -8AN for your big block. The only issues I had were clocking the pump with proper fitting to fit near frame rails, and connecting to stock sending unit. At the unit I used a -6AN to 3/8" barbed adapter and used a 3" piece of rubber fuel injection hose to make the connection.
One word of caution. Lay out the hose first so you have plenty of slack. You do not want to kink the hose because you may damage the teflon. Good luck!
One word of caution. Lay out the hose first so you have plenty of slack. You do not want to kink the hose because you may damage the teflon. Good luck!
 01-13-2013, 10:37 AM
#15
Racer


Ditto
Getting OEM style hardline through the section between the body and up over the frame to the tank is dam near impossible. My handline looked so bad when I was done; I tore it out and ran Jegs Pro-Flo 200 Series Braided Hose. I ran the Braided Hose along the OEM route between the body to a point about the rear 3rd of the door where I mated using AN fittings with the OEM hardline so it would be factory appearing entering the engine compartment.

 01-14-2013, 09:26 AM
#19
The OEM plastic line and fittings are becoming more popular with the fuel injection swaps. There was some mention of heating it to be more pliable over at LS1tech. The only place that would require that would probably be at the kickup in front of the rear tire.
The ends are generally quick disconnects though, not the best for carbs.
The ends are generally quick disconnects though, not the best for carbs.
01-14-2013, 11:26 PM
#20
Burning Brakes

I used the late model factory nylon line for the front and rear of my swap. Use boiling water to help form bends, a heat gun, flame, or similar is too easy to get the line overheated. I have also used copper/nickel alloy line, that is very easy to form.
Last edited by 74modified; 01-14-2013 at 11:29 PM.