
Big block Vintage Air compressor install.....pics..
 01-01-2010, 07:44 PM
#1
Le Mans Master

Thread Starter
Just figured I would throw this out there because when I was searching for pics on how to do this, I could only find some from HamadUP and his brackets were different....So anyway, here is some pics and info potential Vintage Air buyers will need to know for the install...
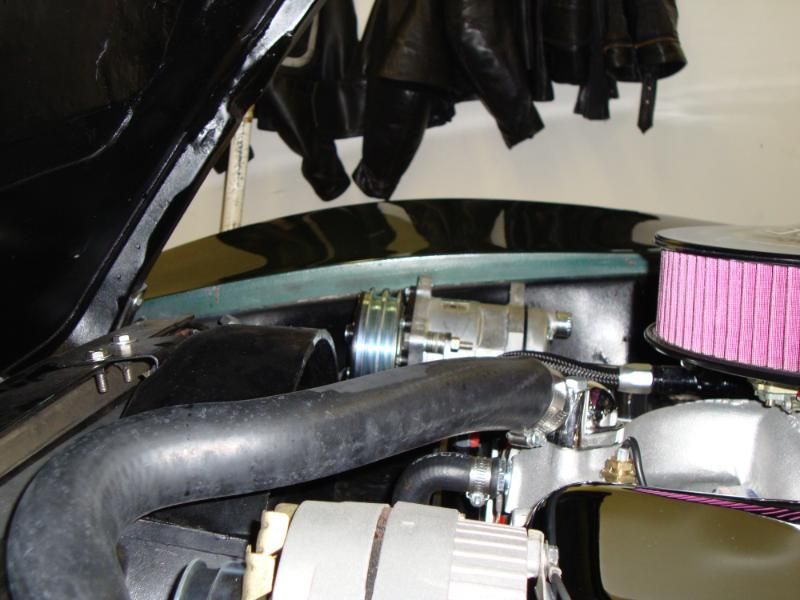
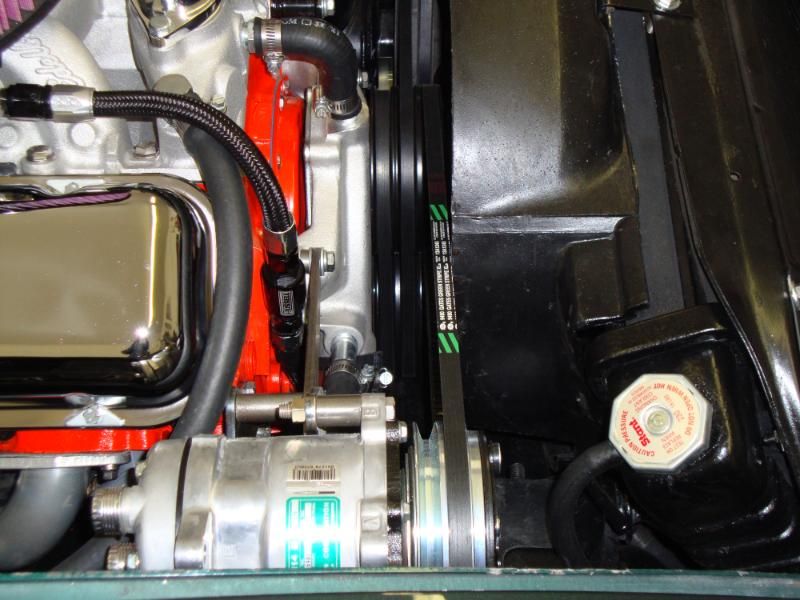
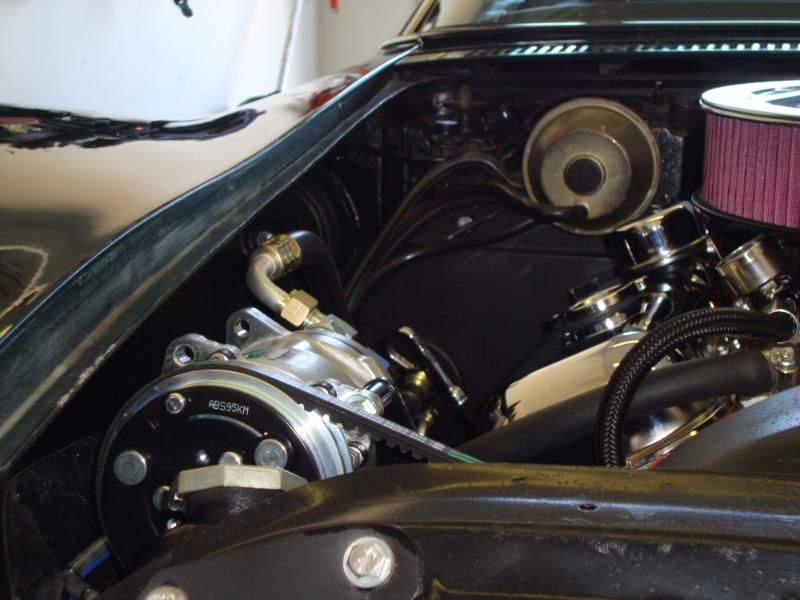
Right off the bat, I realized that the spacing on the compressor was wrong and in order to use the front groove on the water pump pulley like the stock AC used, I would have to space the crap out of the compressor. I knew I wanted to loop the belt around the water pump pulley ONLY to prevent the belt from slapping the lower radiator hose that is known to happen if you loop the crank pulley also. I have no issues so far but I did have to clearance my SB shroud slightly...No biggie though...Then I also noticed the potential hood clearance issue. After talking with my Vintage Air dealer, he had VA make up and send me a 2nd design rear bracket that "should" lower the compressor 1". Vintage Air is waiting for my feedback on this and if it works, they will make it standard production. Apparently many complain about hood clearance issues but no one has tried to work with VA on a resolution. I think I have found it.
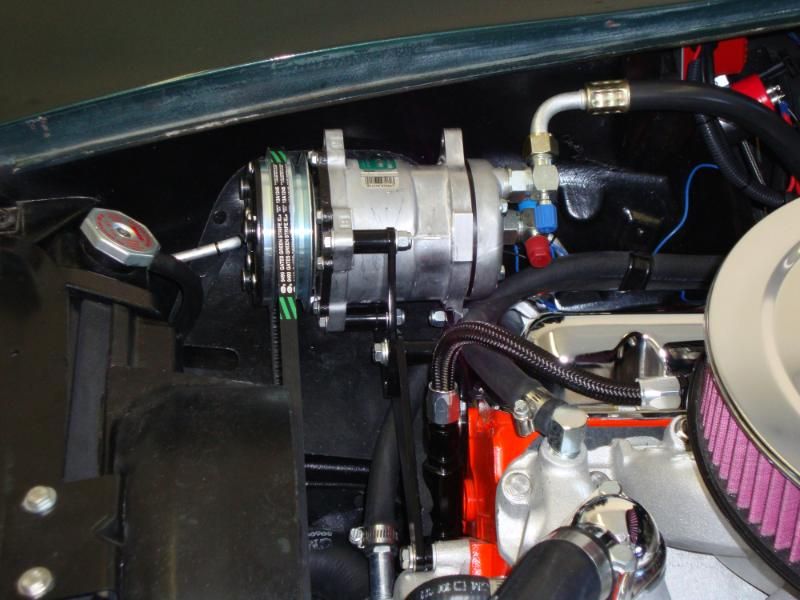
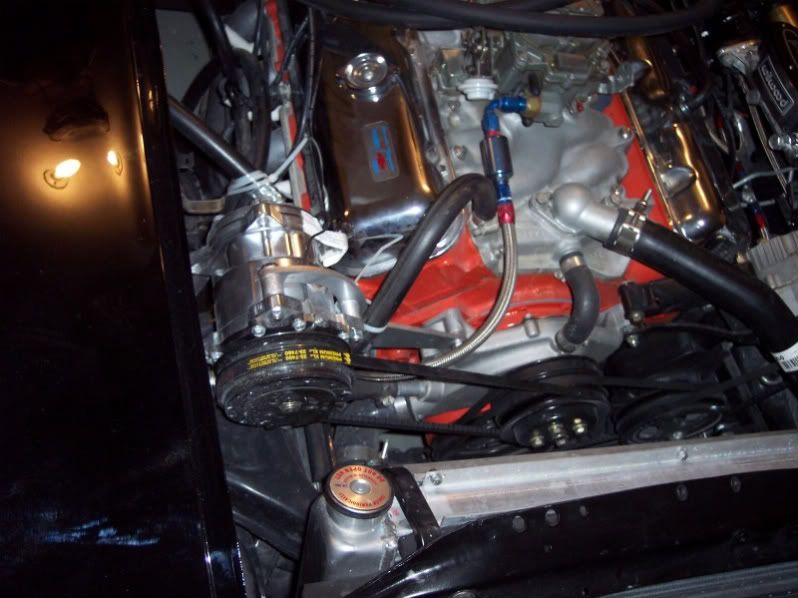
Mock up with the standard brackets:
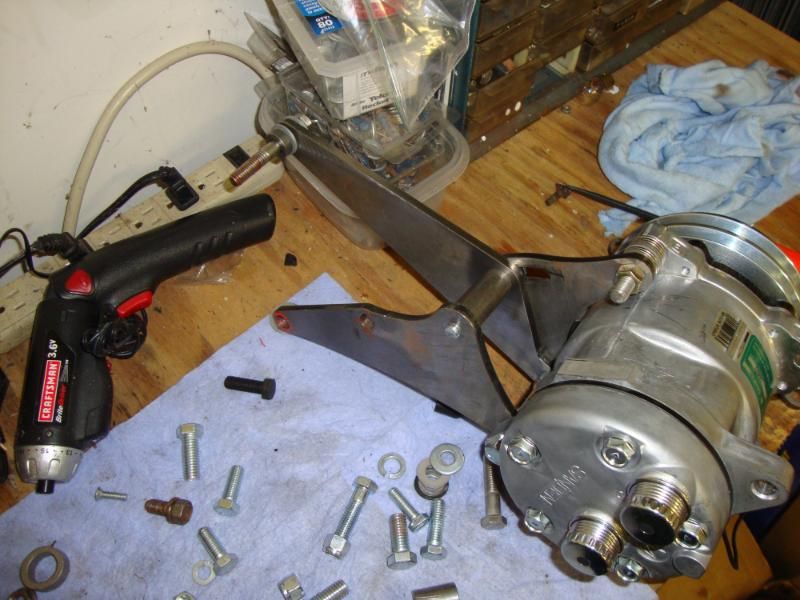
Here is a side by side pic of the updated bracket....I will try the install with the standard bracket first.
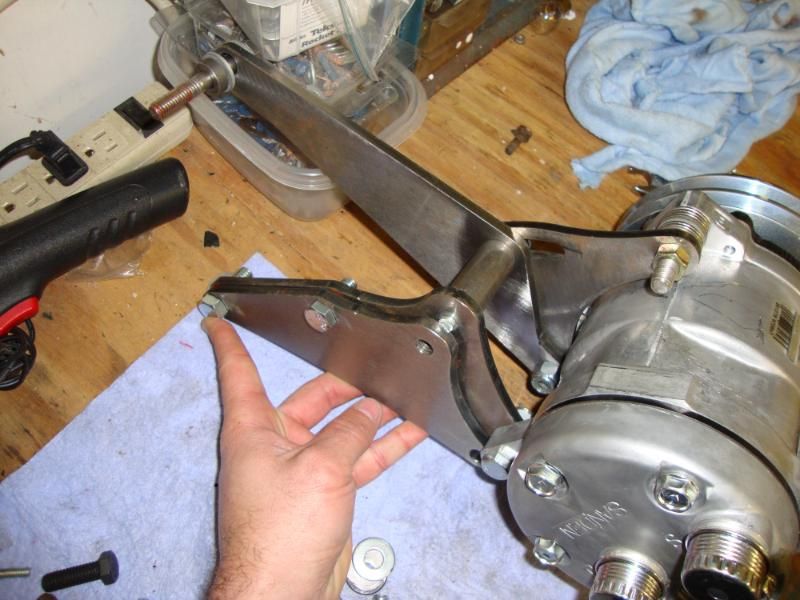
Washers installed for mock up to see exactly how much shimming the compressor will need. Also this is the standard brackets.
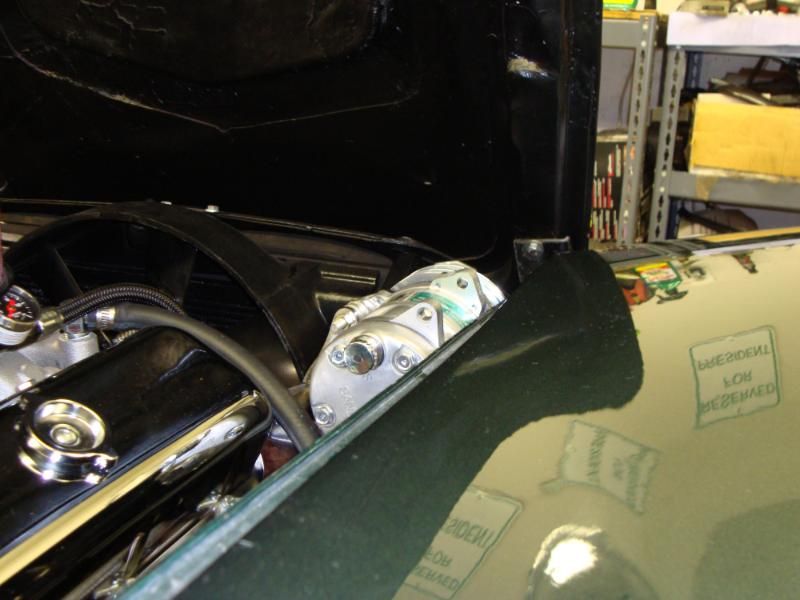
Sitting a little high...
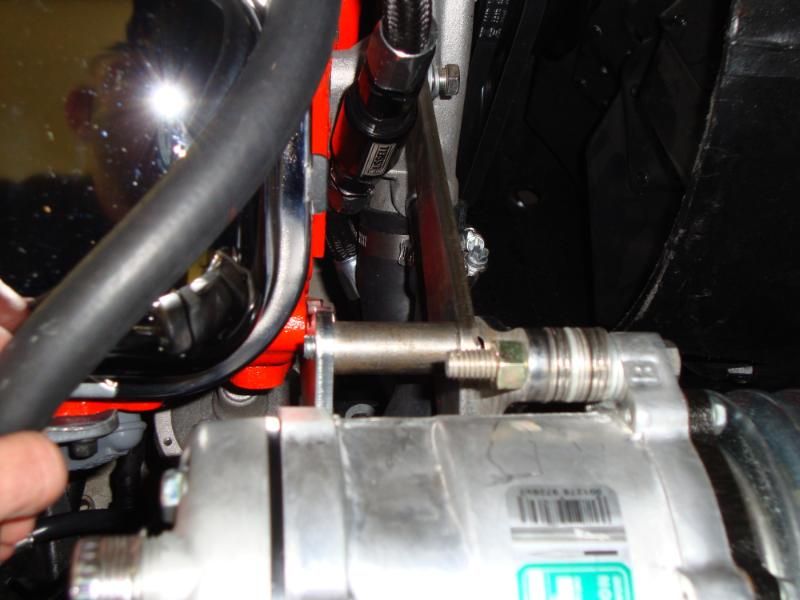
Don't think this is gonna clear..

Front shot

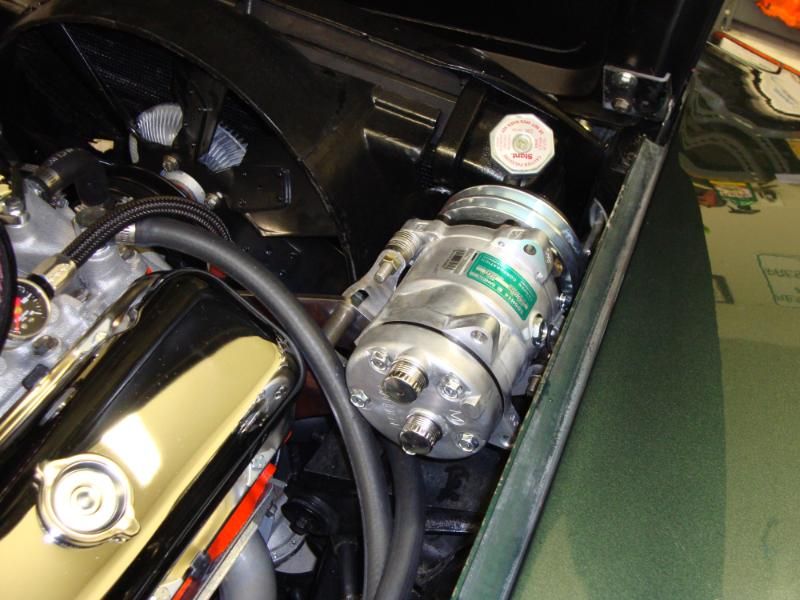
I had to get some spacers from my VA dealer, once I figured out how much shimming it was gonna need. These are 1.05". Here is the pics with the 2nd design, 1" lower bracket and the spacers.
Nice drop
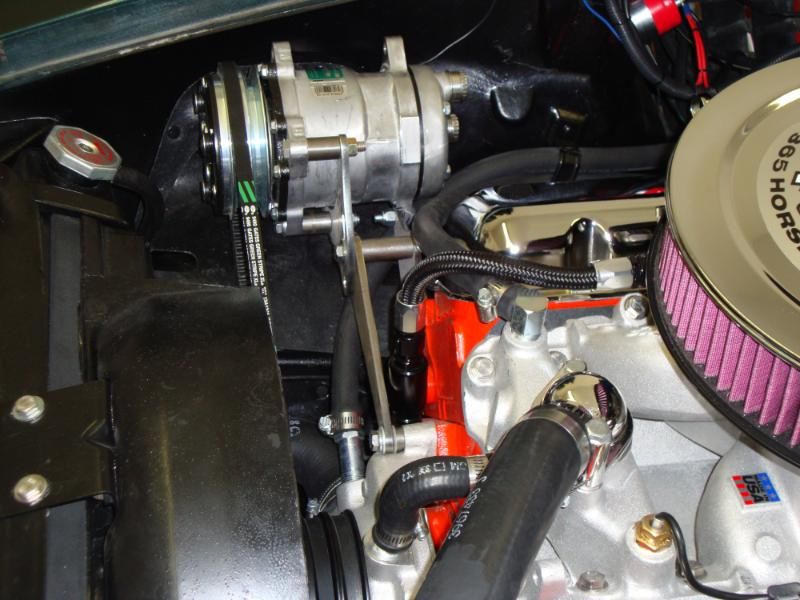
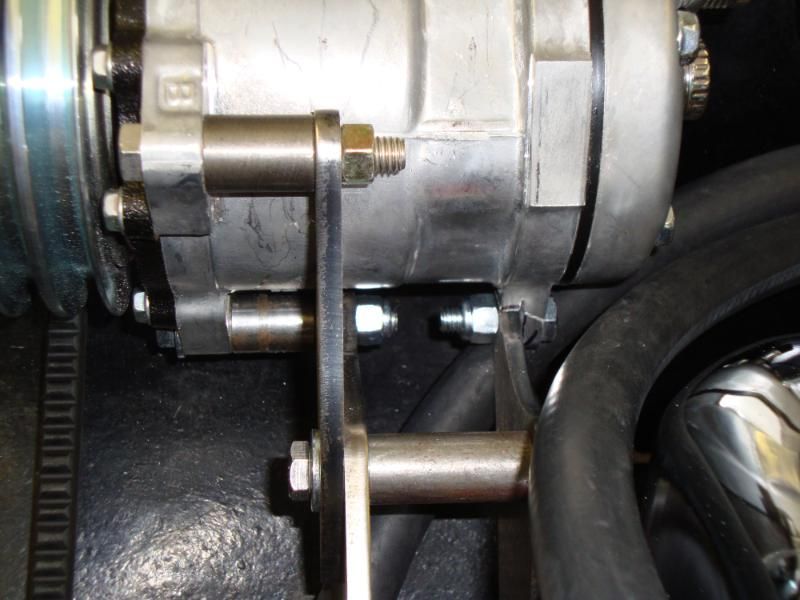
Alignment
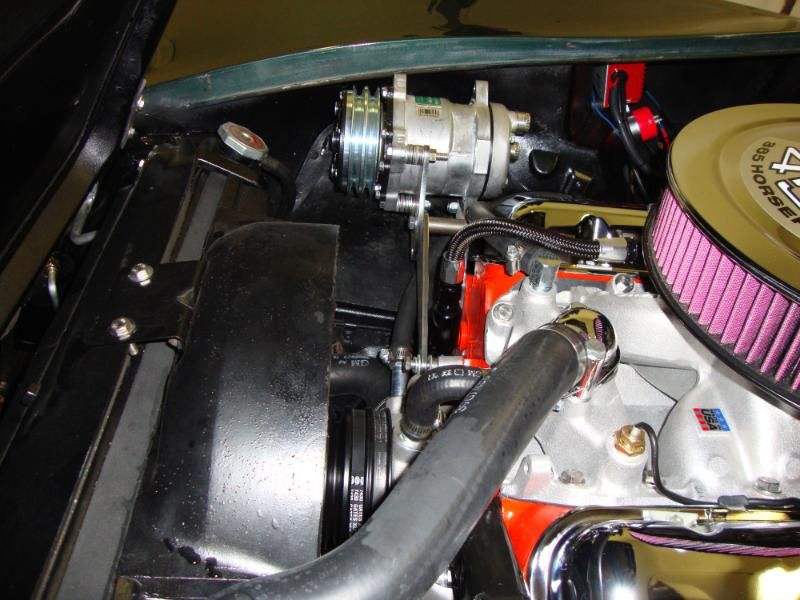
After painting all of the brackets/spacers and doing the final install....
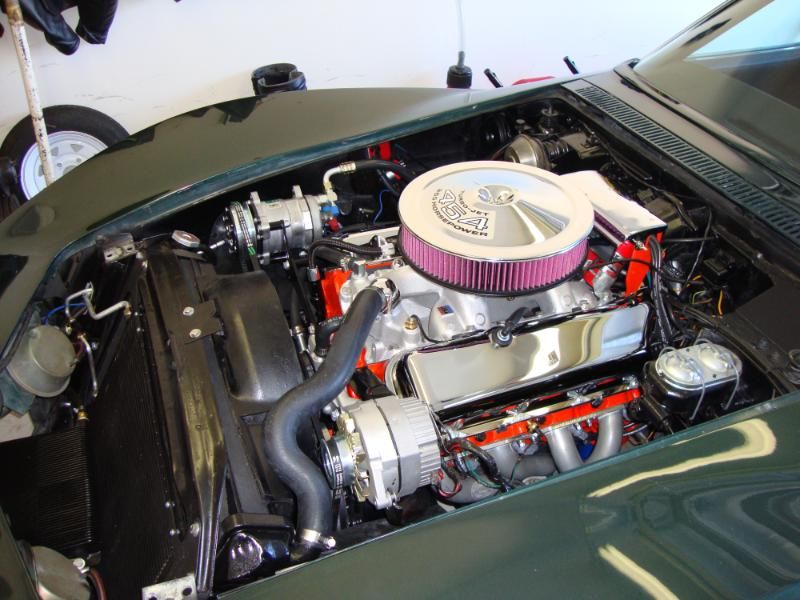
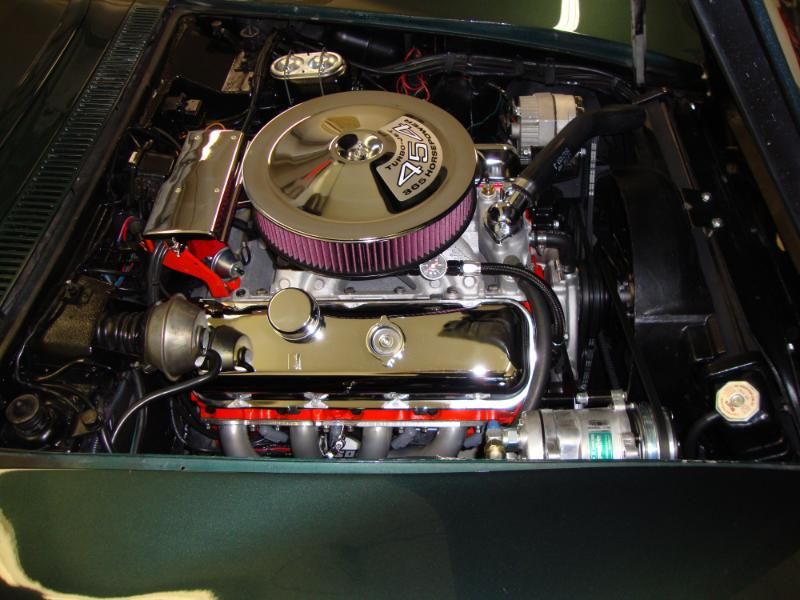


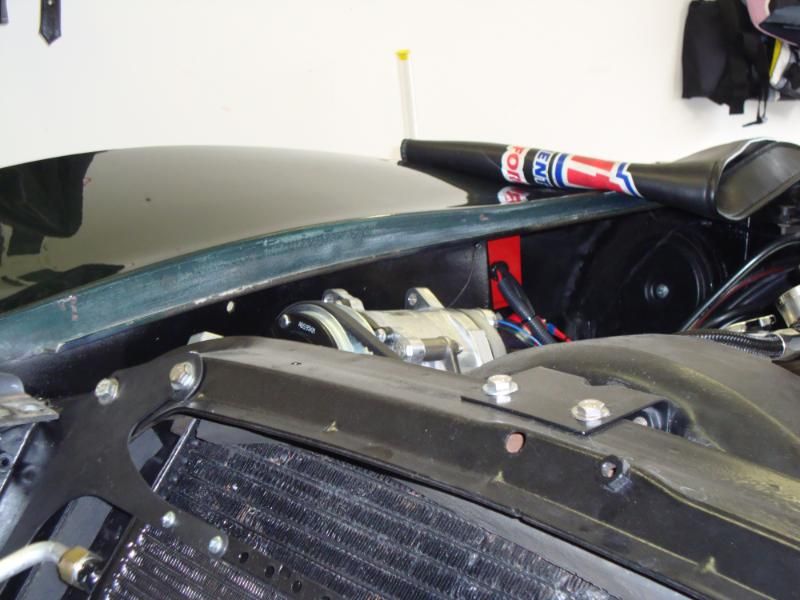
Shameless final shot with the hood closed(demonstrating it WILL close with the compressor on....its still real close though....)

Sorry for all the pics, hopefully when Spring time comes around and BB C3 guys start looking for Vintage Air install info....this may help with the belt alignment, hood clearance, belt clearance on the lower radiator hose etc.
Right off the bat, I realized that the spacing on the compressor was wrong and in order to use the front groove on the water pump pulley like the stock AC used, I would have to space the crap out of the compressor. I knew I wanted to loop the belt around the water pump pulley ONLY to prevent the belt from slapping the lower radiator hose that is known to happen if you loop the crank pulley also. I have no issues so far but I did have to clearance my SB shroud slightly...No biggie though...Then I also noticed the potential hood clearance issue. After talking with my Vintage Air dealer, he had VA make up and send me a 2nd design rear bracket that "should" lower the compressor 1". Vintage Air is waiting for my feedback on this and if it works, they will make it standard production. Apparently many complain about hood clearance issues but no one has tried to work with VA on a resolution. I think I have found it.
Mock up with the standard brackets:
Here is a side by side pic of the updated bracket....I will try the install with the standard bracket first.
Washers installed for mock up to see exactly how much shimming the compressor will need. Also this is the standard brackets.
Sitting a little high...
Don't think this is gonna clear..
Front shot
I had to get some spacers from my VA dealer, once I figured out how much shimming it was gonna need. These are 1.05". Here is the pics with the 2nd design, 1" lower bracket and the spacers.
Nice drop
Alignment
After painting all of the brackets/spacers and doing the final install....
Shameless final shot with the hood closed(demonstrating it WILL close with the compressor on....its still real close though....)
Sorry for all the pics, hopefully when Spring time comes around and BB C3 guys start looking for Vintage Air install info....this may help with the belt alignment, hood clearance, belt clearance on the lower radiator hose etc.
 01-01-2010, 08:19 PM
#2
Race Director

The factory placed the compressor much closer to the engine. You may want to work with VA to make brackets that way instead. It would let you use a shorter belt and IMO it is more aesthetically pleasing.
01-01-2010, 08:56 PM
#3
that reminds of another "adjustment" project that I should work on. I also will be realigning by a/c to the front pulley one of these days....just so I can put my PS belt back to normal.
01-01-2010, 09:06 PM
#4
Melting Slicks

I think Hot Rod Air uses the same brackets. I had similar problems as I had to space the compressor forward to align up with the third groove on the WP pulley. All other clearances were fine, but I don't have the shroud on. Hoses have yet to be attached.
Last edited by RobRace10; 01-01-2010 at 09:46 PM.
01-02-2010, 12:14 AM
#5
Le Mans Master
Thread Starter
Yeah the only problem with having the compressor closer to the engine is its harder to get at the spark plugs, harder to get the valve cover off and the AC hoses would be sitting right over the headers.....I actually like the fact the compressor is further away from the engine. Although I will be concerned about the belt. I made a pass tonight in it, went from a 40mph roll to about 115mph and the belt stayed on fine and made no noise so....hopefully its good to go...
 01-02-2010, 05:19 AM
#6
Melting Slicks

Member Since: Jan 2003
Location: Doha
Posts: 2,876
Likes: 0
Received 13 Likes
on
6 Posts
St. Jude Donor '08

It looks awesome! .. I agree with having the compressor further away from the engine, makes my life much easier, I can now replace all 8 plugs in 15 min, used to take 1 hour at least with the stock A6.
That new bracket design is indeed working well, I had the same clearing issue and I fixed it by rotating the while sompressor 90* towards the inner fender.
That new bracket design is indeed working well, I had the same clearing issue and I fixed it by rotating the while sompressor 90* towards the inner fender.

 01-02-2010, 07:00 PM
#8
Le Mans Master
Thread Starter


 04-21-2010, 08:53 AM
#12
Le Mans Master

Member Since: Jul 2006
Location: charlotte north carolina
Posts: 8,117
Likes: 0
Received 100 Likes
on
92 Posts

i see that you had the same problem as i did with pulley alignment.
i took a similar approach to the problem. instead of using spacers to move the compressor forward, i moved the brackets forward. the bracket set comes with two sets of tubular collars for mounting, one for cast iron exhaust and one for headers. i cut the extra set collars to proper length, and the welded them to the side of the main bracket(the one that is bolted to the water pump) at the two places it's bolted to the engine(the water pump and the exhaust bracket). it's like a two legged table. then used an exhaust stud at the water pump bolt hole and a 6" number 8 bolt to attach to the exhaust bracket.
i took a similar approach to the problem. instead of using spacers to move the compressor forward, i moved the brackets forward. the bracket set comes with two sets of tubular collars for mounting, one for cast iron exhaust and one for headers. i cut the extra set collars to proper length, and the welded them to the side of the main bracket(the one that is bolted to the water pump) at the two places it's bolted to the engine(the water pump and the exhaust bracket). it's like a two legged table. then used an exhaust stud at the water pump bolt hole and a 6" number 8 bolt to attach to the exhaust bracket.
04-21-2010, 11:41 AM
#13
Burning Brakes

Member Since: Apr 2003
Location: Central KY
Posts: 844
Likes: 0
Received 0 Likes
on
0 Posts

The brackets they sent me place the compressor up high like yours - but the belt alignment worked out fine without the need for any extra spacers... My car is at the shop today (they called me 5 mins ago to say that the vacuum test was fine - no leaks!) getting charged up with freon.
My main issues with the install were that they say to "discard" both the electrical and vacuum harnesses that pass through the firewall close together side-by-side. I used the rubber plug from the electircal harness to surround my new VA harness and to send it out to the engine compartment... How else did they expect us to route those wires? Looks factory... I did use one of their plugs to seal up the hole where vacuum hoses used to go.
My compressor lines up fine using the rearward pulley location on it - but why send a compressor out with two belt tracks? It would look much cleaner to have a single-belt compressor pulley... We both have the same issue of those unsightly tabs on the compressor sticking straight up though... You would think that they would have machined them down as they did another tab on there... My hood seems to close barely but you have to use the shortest possible belt (47.4" in my case) between the water pump pulley and the new compressor to avoid any rubbing of the hood at its edge...
I would like to "lower" my compressor like yours will be - as long as I don't lose the currently-OK belt alignment... and I agree that having it outboard makes it easier to deal with valve covers and spark plugs over the stock location.
UPDATE is that I went to the shop over lunch and picked up my car. Can you say "Cold a/c!!!!" ? They had called me to ask "what is the expected outlet temperature?" I figured the conversation would go on that they couldn't get it cold enough... Turns out that they had it a 25 degrees using the recommended amount of f134a - 28.8 oz. The technician was impressed and said he would be putting one of these systems in his '67 Mustang. So, the VA instructions are correct in that we will have to pay attention to temps and not freeze up the evaporator core on hot summer days. That's what the temp control is for. I ran the fan at slow setting and got plenty of nice chilled air as I drove the car to my office. What a change from before. I did hear the compressor rattling the hood at idle (my cam idles just a touch rough at 750 RPM (I could raise it to 900 to smooth it out I guess..) - but sounds great!) and it went away the instant I raised RPMs up above idle. I will likley have to Sawzall those two vertical tabs to avoid damaging my factory hood... I'll inspect tonight for any rub marks on the underside and then decide if I need to cut...
Last edited by djcwardog; 04-21-2010 at 04:13 PM. Reason: Updates - cold a/c!
04-22-2010, 04:36 PM
#14
Burning Brakes
Member Since: Apr 2003
Location: Central KY
Posts: 844
Likes: 0
Received 0 Likes
on
0 Posts
He notes that my order stated that the car has a long water pump and that's the kit they sent me. The water pump on my car seems correct as all the belts line up - as did the belt for the old (original) a/c compressor. We determined that I have a short pump - like the rest of you... Alan's car (subject of this post originally) seems to have the compressor much as mine is now - before he got the revised bracket to lower it. So far, Mark agrees with me that I should sawzall the two offending vertical tabs on my compressor but he remains concerned that with the compressor so far forward and the slope of our hoods that the pulley may rub the insulation under the hood. The forward of the two vertical tabs punched a hole in my underhood insulation but no evidence that it punched through the hood itself...
Mark is committed to helping me solve this problem, so any input from fellow members appreciated...
Mark is committed to helping me solve this problem, so any input from fellow members appreciated...
Last edited by djcwardog; 05-12-2010 at 10:48 AM.
04-22-2010, 04:53 PM
#15
Le Mans Master
Thread Starter
My car is a big block, therefore it uses a short water pump only. 71-74 BBs use a special short water pump with a 3/4" shaft. Have to have pulleys that match the age range. As for VA, the first bracket VA sent me was way too long leaving the compressor too high. The 2nd bracket they sent me lowered the compressor at least an inch. I set the compressor in the middle of it's belt adjustment and everything fit fine. One of the bolt ears SLIGHTLY touched the hood in a 1/4" area....I just filed the hood a bit right there and repainted it...no problem since.
I will tell you I did freeze the evaporator up a couple time. I think running the fan on low is what is causing this. Run the fan on medium and it has not frozen the evaporator yet, although it did freeze me out of the car....now I lower the temp adj wheel and keep the fan on atleast medium.
I average 37-38* vent temps with the fan on medium....38-40* vent temps with the fan on high. Fan speed on low will get 36-37* but will freeze the evaporator in about 30 mins... I have verified these temps with 2 digital thermometers and the AC shop's thermal probe thing.....
It's F'n cold....lol....but we'll see how it does when it's hot out in summer....only 80 ish here now.
04-22-2010, 05:14 PM
#16
Burning Brakes
Member Since: Apr 2003
Location: Central KY
Posts: 844
Likes: 0
Received 0 Likes
on
0 Posts
I have to agree that the temps are cold. I will watch out for freezing up the evap core and use the heat control to regulate. We have a 1997 Jeep Cherokee 4-door I-6 that does that sometimes in the summer - 240,000 miles and running strong!
From looking at your photos compared to mine (now posted up, click next to my user name to the left...) I think our water pumps are the same - so I must really have a "short pump" as well... Actually, I think my compressor is now installed just like your previous high setup. If I really have their long pump kit and I am running from the rearward pulley groove - but want to use the front like you are doing - then maybe this is the case: If the difference in projection distance between short and long water pump is 1.5" and you used a 1.05" set of VA spacers in order to run from the front pulley groove then perhaps VA's answer was to send you a modified short pump kit and have you space it forward that 1.05" to make it work with the Corvette BB setup. My belts are just like the Assembly Manual calls for...
From looking at your photos compared to mine (now posted up, click next to my user name to the left...) I think our water pumps are the same - so I must really have a "short pump" as well... Actually, I think my compressor is now installed just like your previous high setup. If I really have their long pump kit and I am running from the rearward pulley groove - but want to use the front like you are doing - then maybe this is the case: If the difference in projection distance between short and long water pump is 1.5" and you used a 1.05" set of VA spacers in order to run from the front pulley groove then perhaps VA's answer was to send you a modified short pump kit and have you space it forward that 1.05" to make it work with the Corvette BB setup. My belts are just like the Assembly Manual calls for...
Last edited by djcwardog; 05-12-2010 at 10:49 AM. Reason: photos now up
04-22-2010, 05:30 PM
#17
Le Mans Master
Thread Starter
No way your car has a long pump if it is a BB....if that was
true the clutch fan would be digging into the radiator....you have to have a short pump. Yes I went round and round with VA about the brackets. That's exactly why I posted the pics in this thread to help others to a resolution. As for the spacers, I used them to line up the compressor to the front groove of the wp pulley. I could have gotten rid of the "dead man" belt on the rear groove of the wp pulley and ran the ac compressor off of the rear groove but...I wanted a more factory like setup...plus it gave me more room to get the valve cover off which I need. These are definetly mod to fit kits.....seems every car is a little different also....
They are great kits though.
04-22-2010, 05:57 PM
#18
Burning Brakes
Member Since: Apr 2003
Location: Central KY
Posts: 844
Likes: 0
Received 0 Likes
on
0 Posts
Mark just called me back after I linked him to this post. He says that by dumb luck I was sent the long pump bracket kit. That was based on my dealer asking me which pump and I said to him, "it's an all stock, factory a/c car" and he checked his order block for "long pump" but wrote "stock" next to that. Mark says the long pump kit works on my short pump (we agree that is what I really have) because it's a unique car - a Corvette with unique fan belt tracks. Note that I had to run the belt off the rear track of the pulley to make it all work. He says he will send me a modified rear bracket and ask me to check it to see if lowers the long pump bracket kit enough - like yours did with a short pump kit. I did notice where you not only used the 1.05" spacers but that you also milled a portion of the rear tab off the Sanden compressor. You wrote of this in your interior post you linked us to earlier in the thread. With time having passed, do you have any remaining concern over even a remote possibility that it might shear off there some day (and send the bracket plus compressor into your fan blades?) or is that horrible scenario just a bit of over-worry on my part? Mark and his company are very appreciative of me taking a few measurements of the distance above my pulley after I cut the two vertical tabs off. He wants to be sure that I don't have that pulley rub into the underhood insulation...
More info - after going home I cut the vertical tabs off the new VA-supplied Sanden compressor using my Sawzall. That was sure a lot of fun! Even though it is a lightweight aluminum alloy, the metal is pretty hardy and my cutting blade did NOT slice through like butter! Now I will check to see if the pulley rubs underhood insulation. If not, Marks thinks that I may be OK to just run with it as is. He likes that I am using the rearward of the two pulley grooves as that actually reduces the moment arm applied to the brackets. Yes, these compressors do deflect slightly with the belt under tension. The factory set up used a rear bracket coming off the header bolts but these Sandens are really all attached using two brackets that both attach to the front of the motor... More to follow...
More info - after going home I cut the vertical tabs off the new VA-supplied Sanden compressor using my Sawzall. That was sure a lot of fun! Even though it is a lightweight aluminum alloy, the metal is pretty hardy and my cutting blade did NOT slice through like butter! Now I will check to see if the pulley rubs underhood insulation. If not, Marks thinks that I may be OK to just run with it as is. He likes that I am using the rearward of the two pulley grooves as that actually reduces the moment arm applied to the brackets. Yes, these compressors do deflect slightly with the belt under tension. The factory set up used a rear bracket coming off the header bolts but these Sandens are really all attached using two brackets that both attach to the front of the motor... More to follow...
Last edited by djcwardog; 04-23-2010 at 05:22 PM. Reason: Updates
05-11-2010, 01:16 PM
#19
Melting Slicks
Gents - what size water hoses did you install for your Big Block application ?
The Vintage Air has 5/8" for both inlet and outlet at the firewall. With my Big Block and the Expansion tank, it uses 3/4"
I know the limiting factor (other than the true internals of the heater core is the inlet/outlet size on the Vinatge Air heater core - which is 5/8".
I actually considered not hooking up the heater/lines at all. But I am thinking I will based on 'possibly' needing more water capacity in case something were to malfunction.
I am thinking:
5/8" from Intake to Valve to Core Inlet.
5/8" from Core Outlet to Expansion Tank (tight fit on tank though)
3/4" from Expansion Tank to Water Pump.
Did you all use a straight fitting at the intake? or a 45 or 90 degree?
Last edited by kaiserbud; 05-11-2010 at 01:19 PM.
05-11-2010, 04:30 PM
#20
Burning Brakes
Member Since: Apr 2003
Location: Central KY
Posts: 844
Likes: 0
Received 0 Likes
on
0 Posts
Mine is 5/8" throughout. I had to buy a new fitting for the water pump to accept the smaller 5/8" hose. It was found in those carousels with all the "Help" products at my local parts store. Just another thing to remember to acquire along with 8' of 5/8" hose before you can wrap up the installation.
BTW - My pulley STILL rubs a bit under the hood so the car is not using a/c until VA sends me a new rear bracket to try. They think that the same revised rear bracket used in the short water pump application will work here if I keep the same spacers in the same order... They said that they had a dealer in Texas with a 1973 in their shop having the install done so they were getting real-time feedback from that dealer as to what is needed. More to follow...
BTW - My pulley STILL rubs a bit under the hood so the car is not using a/c until VA sends me a new rear bracket to try. They think that the same revised rear bracket used in the short water pump application will work here if I keep the same spacers in the same order... They said that they had a dealer in Texas with a 1973 in their shop having the install done so they were getting real-time feedback from that dealer as to what is needed. More to follow...
Last edited by djcwardog; 05-11-2010 at 04:36 PM.