
68 frame off rebuild
 01-01-2008, 12:13 PM
#1
Drifting

Thread Starter
Member Since: Jun 2006
Location: Schaumburg (Chicago) Illinois
Posts: 1,912
Likes: 0
Received 12 Likes
on
7 Posts

Ok, I am going to start posting some pictures of my frame off rebuild. Notice I did not say restoration. I am making decisions as I go along as to going stock, original or using other items.
There have been some extremely well documented rebuilds posted here. I am amazed and thankful that they are here for reference. But, I am not going to do that. Mine will be more high level progress reports.
I will post pictures here and there for those that may be interested and for getting help along the way because I will need it!!!
Conversely if anyone needs to see something that will help them I will be glad to take a picture and post.
My plans are to be driving again in the spring. To do that here is what needs to happen:
Engine tear down and rebuild. (in process)
Body removed. (done)
Chassis dissasembled (done), frame sandblasted, some rebuilds, re-assembly.
Engine back in.
Body back on.
All completed by end of May!!!!!
 01-01-2008, 12:24 PM
#2
Melting Slicks

Sounds like a geat winter project. Hope you enjoy the process. My motor will be going in later this month along with some other minor projects.
Will keep an eye on this post for updates.
shmoky
Will keep an eye on this post for updates.
shmoky
01-01-2008, 12:55 PM
#3
Drifting
Thread Starter
Member Since: Jun 2006
Location: Schaumburg (Chicago) Illinois
Posts: 1,912
Likes: 0
Received 12 Likes
on
7 Posts
Heres how it looked when I bought it a little over a year ago:

Engine out:

Body raised early December/07:
Going Up:

Dolly built underneath:

Body out the door 12/23/07. I made a dolly that goes around the car. This way I can raise the car with the Jacks I have and then build the dolly under it. Then I lowered the body on the dolly and wheeled it out of the garage. There are pluses and minuses to this. I was trying to save money so I don't have to buy the lift straps.

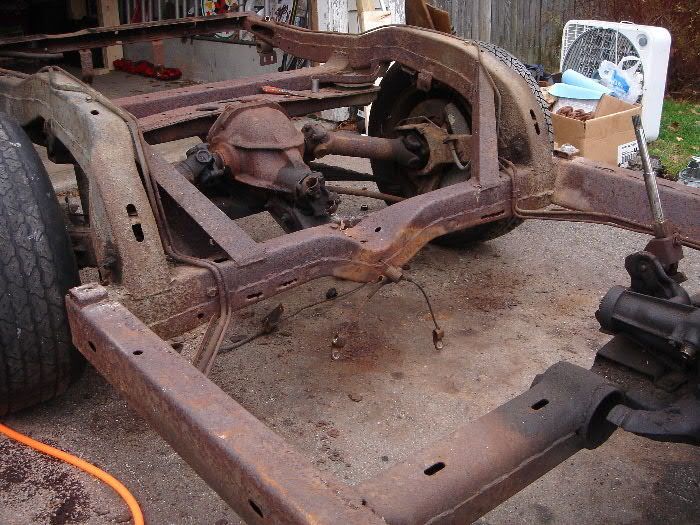
Rolling Chassis on 1/29/07

Frame on 1/31/07. All components are under the frame. Lots of fun, lots of aggravation due to the rusty bolts. Advice: Bag and ID bolts as you go along! Take tons of pictures. I have well over 125 pictures so far!

Engine out:
Body raised early December/07:
Going Up:
Dolly built underneath:
Body out the door 12/23/07. I made a dolly that goes around the car. This way I can raise the car with the Jacks I have and then build the dolly under it. Then I lowered the body on the dolly and wheeled it out of the garage. There are pluses and minuses to this. I was trying to save money so I don't have to buy the lift straps.
Rolling Chassis on 1/29/07
Frame on 1/31/07. All components are under the frame. Lots of fun, lots of aggravation due to the rusty bolts. Advice: Bag and ID bolts as you go along! Take tons of pictures. I have well over 125 pictures so far!
Last edited by AWilson; 01-01-2008 at 01:07 PM.
01-01-2008, 01:16 PM
#4
Drifting
Thread Starter
Member Since: Jun 2006
Location: Schaumburg (Chicago) Illinois
Posts: 1,912
Likes: 0
Received 12 Likes
on
7 Posts
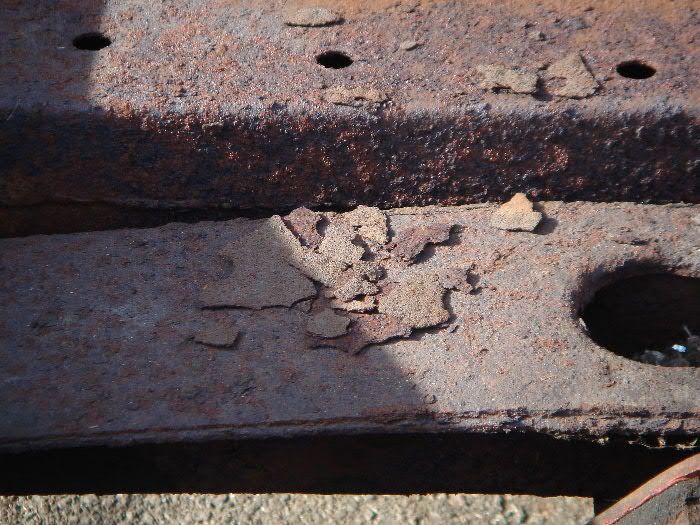
Here is a typical picture of the rust. It is uniform throughout. No holes anywhere except the front lower crossmember (same as Ecklers # 43283). Apparently it is 68 only. It will have to be replaced. Any one got a good one? I know it is hard to tell from one picture but is this frame worth sandblasting and moving foreward? Like I said no holes or soft spots anywhere that I can tell yet. Is it average condition or worse? I know it isn't a California frame!!!
The good news is that engine area is so greasy it is as good as when it left the factory.

The good news is that engine area is so greasy it is as good as when it left the factory.
01-01-2008, 02:45 PM
#5
Safety Car

Member Since: Aug 2001
Location: North Easton Mass
Posts: 4,883
Likes: 0
Received 8 Likes
on
8 Posts

Feel inside the frame holes, especially the differential crossmember, to see if there are large chunks of scale inside. That will give you an idea if the frame has lost much of its original metal. You could also blow some air into the frame holes and see what comes flying out.
This the kind of scale I'm talking about:
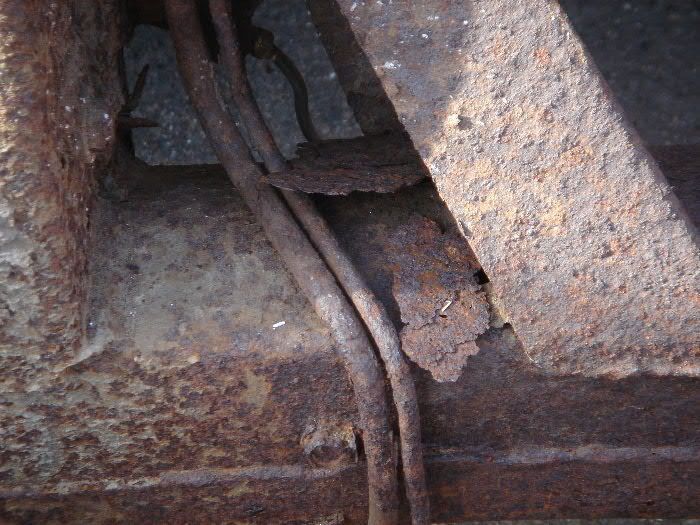
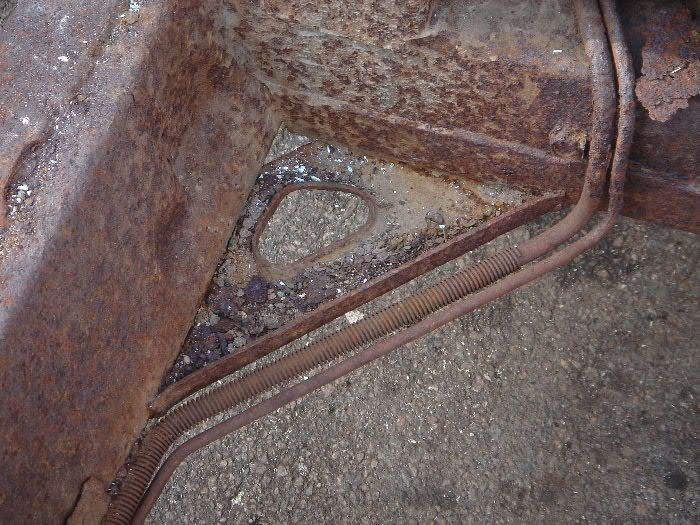
Note the piles of rust under the frame that fell out while I was banging around on the frame.

Rick B.
This the kind of scale I'm talking about:
Note the piles of rust under the frame that fell out while I was banging around on the frame.
Rick B.
01-01-2008, 03:20 PM
#7
Drifting
Thread Starter
Member Since: Jun 2006
Location: Schaumburg (Chicago) Illinois
Posts: 1,912
Likes: 0
Received 12 Likes
on
7 Posts
As a reference, this is definitely rustier than mine but I had my fair share of flakes falling out.
Feel inside the frame holes, especially the differential crossmember, to see if there are large chunks of scale inside. That will give you an idea if the frame has lost much of its original metal. You could also blow some air into the frame holes and see what comes flying out.
This the kind of scale I'm talking about:
Note the piles of rust under the frame that fell out while I was banging around on the frame.
Rick B.
This the kind of scale I'm talking about:
Note the piles of rust under the frame that fell out while I was banging around on the frame.
Rick B.
01-01-2008, 03:37 PM
#8
Drifting
Thread Starter
Member Since: Jun 2006
Location: Schaumburg (Chicago) Illinois
Posts: 1,912
Likes: 0
Received 12 Likes
on
7 Posts
So, Rick, considering your frame what are you going to do?
Feel inside the frame holes, especially the differential crossmember, to see if there are large chunks of scale inside. That will give you an idea if the frame has lost much of its original metal. You could also blow some air into the frame holes and see what comes flying out.
This the kind of scale I'm talking about:
Note the piles of rust under the frame that fell out while I was banging around on the frame.
Rick B.
This the kind of scale I'm talking about:
Note the piles of rust under the frame that fell out while I was banging around on the frame.
Rick B.
01-01-2008, 04:09 PM
#9
Drifting
Thread Starter
Member Since: Jun 2006
Location: Schaumburg (Chicago) Illinois
Posts: 1,912
Likes: 0
Received 12 Likes
on
7 Posts
I am lucky to have both options within 70 miles of me, Redi-Strip is 5 miles away in Roselle Illinois!
I will be investigating both and let you guys know what they say.
I will be investigating both and let you guys know what they say.
01-01-2008, 05:38 PM
#10
Team Owner

Member Since: Sep 2006
Location: Westminster Maryland
Posts: 30,173
Likes: 0
Received 2,878 Likes
on
2,515 Posts
Looks like an interesting project you have underway. I always enjoy seeing pictures taken during the process. You really learn a lot doing it step by step like you are. Nothing beats playing around with old cars!
Regards,
Alan
Regards,
Alan
01-02-2008, 12:18 AM
#11
Melting Slicks
Great pictures Alan, I am so enthused! My frame was in a little worse condition, and had also cracked around the rear kickup. The areas on the frame where the roll cage was welded on my frame also were the source of a weak spot or two when the roll cage was cut out of the car in the 80's. In any case I replaced my frame, however, it was with a 69 frame, and none of the forward bracketry is the same. if your frame is usable or restorable, all of those bumper brackets and parts are early 68 only! So try and repair them if you can. The front crossmember is a 68 only piece, and has no drain holes...which explains why they changed it. How amazing that our cars so close in production, Alan's car followed mine off the line in October of 67, are being restored simultaniously. One day 1272 and 1273 will drive together I hope!
01-02-2008, 01:46 PM
#12
Drifting
Thread Starter
Member Since: Jun 2006
Location: Schaumburg (Chicago) Illinois
Posts: 1,912
Likes: 0
Received 12 Likes
on
7 Posts
i talked to a guy at Redi-Strip. They do not do a acid dip. Acid dips create all the trouble will seepage and finish failure on frames where you get the seepage. They do a alkaline emersion. I read alot about it on other forums, one in particular was Hotrodders.com. You get the entire frame inside and out cleaned and it has a rust preventive coating on it. When your ready you rinse that off with water and coat it. I guess I will use POR-15 or the Eastwood product. They say any seepage that you don't thoroughly dry out is no more harmful than water and if your top coat is dry it will have no effect.
They say they have done many Vette frames and cost is $500- $800 depending on rust but probably more close to the $500.
So I am looking for comments on this and what to coat the inside of the boxes with. Eastwood has a undercoating system you can do yourself. Or simply a boiled linseed oil which is what they use on steel tube airframes. Or powder coating which will go inside and out I guess?
Any thoughts?
Last edited by AWilson; 01-02-2008 at 01:56 PM.
01-02-2008, 07:27 PM
#13


Have you checked with the facility I believe in Michigan that builds new frames for C3's? Don't know what the cost is today or if they build frames for 68's. They may also sell sections of the frame.
01-02-2008, 09:48 PM
#14
Drifting
Thread Starter
Member Since: Jun 2006
Location: Schaumburg (Chicago) Illinois
Posts: 1,912
Likes: 0
Received 12 Likes
on
7 Posts
I think my frame is very restorable. I just want to go down the right path. I believe new frames are in the $4000 range. Then the cost of shipping on top of that. I thought about it because of all the work in getting the body off. But then it wouldn't be original. Although the serial number on my frame has rusted away and it wouldn't matter. At least I could not find the serial number by the driver side #4 mount where I believe it is supposed to be.
01-03-2008, 10:35 PM
#15


My frame was a little worse than this. It had holes in the left side rail, number 2 and 3 cross members. After I had it phospate dipped, there was pin holes in the number 4 x member. I replaced all of these and the number 1 belly pan.
When I took these members off, and weighed them and compared with new members, there was about 15 to20% weight reductions. I don't think these were safe anymore.
Point is that the frame rusts from the outside and inside leaving very thin material. So it doesn't necessry have to have rust holes completely through to make it unsafe. All the rust holes that I found were created when I took a screwdriver and hammer and started to inspect. Had I not done that, you could stand back and look at the frame and it would look exactly like the pictures you are showing.
Steve L.
01-04-2008, 12:18 AM
#16
Drifting
Thread Starter
Member Since: Jun 2006
Location: Schaumburg (Chicago) Illinois
Posts: 1,912
Likes: 0
Received 12 Likes
on
7 Posts
I appreciate this information. I will inspect closer but have beat it up a little with a hammer and so far so good. But again I hear you loud and clear.
My frame was a little worse than this. It had holes in the left side rail, number 2 and 3 cross members. After I had it phospate dipped, there was pin holes in the number 4 x member. I replaced all of these and the number 1 belly pan.
When I took these members off, and weighed them and compared with new members, there was about 15 to20% weight reductions. I don't think these were safe anymore.
Point is that the frame rusts from the outside and inside leaving very thin material. So it doesn't necessry have to have rust holes completely through to make it unsafe. All the rust holes that I found were created when I took a screwdriver and hammer and started to inspect. Had I not done that, you could stand back and look at the frame and it would look exactly like the pictures you are showing.
Steve L.
When I took these members off, and weighed them and compared with new members, there was about 15 to20% weight reductions. I don't think these were safe anymore.
Point is that the frame rusts from the outside and inside leaving very thin material. So it doesn't necessry have to have rust holes completely through to make it unsafe. All the rust holes that I found were created when I took a screwdriver and hammer and started to inspect. Had I not done that, you could stand back and look at the frame and it would look exactly like the pictures you are showing.
Steve L.
01-04-2008, 09:02 AM
#17
Melting Slicks
Also remember to see how close to a frame restoration shop you are. Caledonia or some other Corvette shops are able to restore frames to perfection!
JOE
JOE
01-04-2008, 11:25 AM
#18

Just an option. I got a quote down here in TN for having my 74' frame blasted and powdercoated for $650. I thought that was pretty good. ussandblasting dot com in Lafayette TN. I'm looking into them right now.
01-16-2008, 10:29 PM
#19
Drifting
Thread Starter
Member Since: Jun 2006
Location: Schaumburg (Chicago) Illinois
Posts: 1,912
Likes: 0
Received 12 Likes
on
7 Posts
Ok for better or worse, I have decided to sandblast my own frame. I contacted a local company that literally sells about 100 different medias and has been in business +100 years. I told their technical guy what I wanted to do and they recommended the same material that is used to sandblast bridges, coal slag, 12-40 grit. He said it is the way to go if you will not be capturing the material to use again mostly because it is cheap and effective. I can just sweep it up and toss it out. That way I am not fighting clogged nozzles, etc. with contaminated product.
So 400 lbs @ .12 = $48. Plus the cheap pressurized media tank from Eastwood $180 including shipping. So I am going the cheap route. Many times I regret doing that. But I have to try to save money where I can so I can spend where it is important. And I get the pressure tank out of the deal,,, and my wife saying "How come you always need another tool every time you start a project"
Here in Chicago it will be -3F degrees in a couple days. So for this and a variety of reasons cleaning and blasting the frame may get delayed. But I will suffer through it and advise the results. Meanwhile rear trailing arm assemblies are being rebuilt/replaced at Vansteel.
Last edited by AWilson; 01-16-2008 at 10:33 PM.
01-17-2008, 06:37 AM
#20

Just a thought, my frame was at that stage this summer and instead of blasting that whole thing I used a wire cup on a 4" grinder and hit all the areas I could, then went back and got those hard to reach spots with the blaster. Worked good and saved on hours of blasting