68 frame off rebuild
#22
Drifting


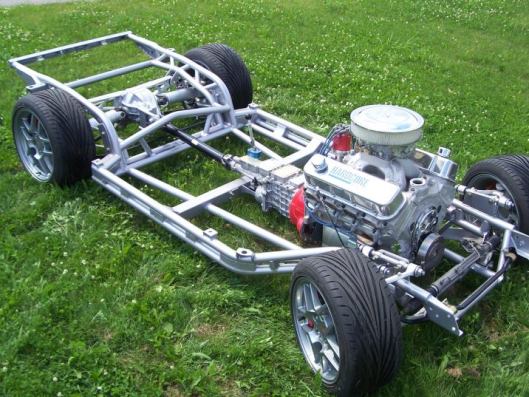
Here's some of my 68 frame off. I hope to have the body back on by this winter.
before:

After: I even clear coated the pumpkin.


LS1 Trial fit with body:

http://www.vetteworksonline.com/frame.htm
before:

After: I even clear coated the pumpkin.


LS1 Trial fit with body:

http://www.vetteworksonline.com/frame.htm
#23
Safety Car


Member Since: Aug 2001
Location: North Easton Mass
Posts: 4,883
Likes: 0
Received 8 Likes
on
8 Posts

I bought a really nice 73 auto trans frame. It cleaned up nicely and the removeable crossmember is ideal for the T56 install.


BTW, I saved a lot of weight by going to the all-wood rear suspension.
The original frame is going into the shed with the other original parts that I'm mothballing in case a future owner wants to return the car to stock form.

Rick B.


BTW, I saved a lot of weight by going to the all-wood rear suspension.

The original frame is going into the shed with the other original parts that I'm mothballing in case a future owner wants to return the car to stock form.

Rick B.
#25
Drifting


Are you doing a "back to factory specs" type of restoration?
If not, and you do need to go with a new frame, you should consider the SR-III frame over a factory one:

http://www.sriiimotorsports.com/196382corvette.html
If not, and you do need to go with a new frame, you should consider the SR-III frame over a factory one:

http://www.sriiimotorsports.com/196382corvette.html
#26
Melting Slicks


I used a 3" and 4" wire wheel and drill to get my frame down to metal, then ruffed it up and used POR-15. The POR-15 went on great and I followed every steup but I am noticing when I lift the car up by a floor jack the paint will peel on the frame at the point of contact.
I have no problem with it chipping but it should come off as a peel.
If I could do it over again, I would have spent the money on powder coating. BUT I don't beleive they powder coat the inside of the frame. Power coating process uses a gun like a spray gun and the powdercoating media attaches to the outside of the metal then is baked. I don't know how they would get that media inside the frame.
Most times people will paint the outisde then take their frame to a lube shop where they insert grease or special rust preventative into the inside of the frame rails. Painting the inside is not recommended as it can trap rust, oxygen and water against the metal. Just my .02
I think you may have some of the dates on your pictures messed up.
You pulled the body in December of 2007 but you disassembled your rolling chasis in January of 2007?
#27
Drifting


I used a 3" and 4" wire wheel and drill to get my frame down to metal, then ruffed it up and used POR-15. The POR-15 went on great and I followed every steup but I am noticing when I lift the car up by a floor jack the paint will peel on the frame at the point of contact.
I have no problem with it chipping but it should come off as a peel.
I have no problem with it chipping but it should come off as a peel.
#29
Racer


Member Since: Nov 2007
Location: Upstate New York
Posts: 320
Likes: 0
Received 0 Likes
on
0 Posts
My frame was a little worse than this. It had holes in the left side rail, number 2 and 3 cross members. After I had it phospate dipped, there was pin holes in the number 4 x member. I replaced all of these and the number 1 belly pan.
When I took these members off, and weighed them and compared with new members, there was about 15 to20% weight reductions. I don't think these were safe anymore.
Point is that the frame rusts from the outside and inside leaving very thin material. So it doesn't necessry have to have rust holes completely through to make it unsafe. All the rust holes that I found were created when I took a screwdriver and hammer and started to inspect. Had I not done that, you could stand back and look at the frame and it would look exactly like the pictures you are showing.
Steve L.
Your frame has been rusting from the inside as well as the outside and if you are going to keep it you should do what ever you can to preserve whats left of it.
AWilson mentioned the alkaline emersion process which will coat the frame all around and stop any further degradation. It might cost you more today but down the road you will be glad you did.
This is a picture of my 68 when I replaced the frame back in 87 which cost a little over $1,000 for a new GM replacement. (now it's $4,000)
Sorry for the picture quality as they are scanned photos.
I coated the new frame with Rustlok steel primer which is as good now as the day I put it on.

#31
Melting Slicks


#32
Melting Slicks


I'm not pulling my frame again just to powdercoat it so I plan on finding a nice rubber mat that I can cut and keep on the tongue of the floor jack to protect the frame.
#33
Safety Car


I used a 3" and 4" wire wheel and drill to get my frame down to metal, then ruffed it up and used POR-15. The POR-15 went on great and I followed every steup but I am noticing when I lift the car up by a floor jack the paint will peel on the frame at the point of contact.
I have no problem with it chipping but it should come off as a peel.
I have no problem with it chipping but it should come off as a peel.

#34
Le Mans Master


Member Since: Oct 2002
Location: Las Vegas - Just stop perpetuating myths please.
Posts: 7,098
Received 373 Likes
on
356 Posts

Here is a typical picture of the rust. It is uniform throughout. No holes anywhere except the front lower crossmember (same as Ecklers # 43283). Apparently it is 68 only. It will have to be replaced. Any one got a good one? I know it is hard to tell from one picture but is this frame worth sandblasting and moving foreward? Like I said no holes or soft spots anywhere that I can tell yet. Is it average condition or worse? I know it isn't a California frame!!!
The good news is that engine area is so greasy it is as good as when it left the factory.

The good news is that engine area is so greasy it is as good as when it left the factory.

That frame looks a little rusty and in good shape. Don't see enough reason why u would do a frame off.
 Its easy to catch the while i'm at it itice bug. Man that a ton of work but alot of Sharks have rot just in the lower side rails where the body mounts connect the body to frame. How does the bird cage look?
cardo0

#35
Drifting


Thread Starter
Member Since: Jun 2006
Location: Schaumburg (Chicago) Illinois
Posts: 1,912
Likes: 0
Received 12 Likes
on
7 Posts

That frame looks a little rusty and in good shape. Don't see enough reason why u would do a frame off. Its easy to catch the while i'm at it itice bug. Man that a ton of work but alot of Sharks have rot just in the lower side rails where the body mounts connect the body to frame. How does the bird cage look?
cardo0
 Its easy to catch the while i'm at it itice bug. Man that a ton of work but alot of Sharks have rot just in the lower side rails where the body mounts connect the body to frame. How does the bird cage look?
cardo0

The base of the bird cage, down in the foot area looks very good. I haven't taken out the windshield and all the trim yet to see what that looks like. That too has to be done because the windshield is broken anyway.
#38
Melting Slicks


On the contrary, I see every reason to do a frame off on your car Alan, because the car that came down the line before it really needed one and was in similar condition!
1272, the car before Allen's getting fitted with the L88 Richmond setup
#39
Is the original posters car #1271? If so, why does it have frame reinforcements in the rear kickups (see them in the body lift shots)? If your car is #1272, I assume you added yours?


