
Old Fart w/ No Experience '71 Resto
 07-17-2014, 04:00 AM
#1
Old Fart Pilot

Thread Starter

Hello,
I've been lurking here for quite a while reading about various projects while I prepared to start my own. Jeremy, Roger, David, Kortensi, Chadillac2000, bwinterstine, Texas70, mac79vette and many others that have documented their restorations have motivated me to finally start the restoration of my '71 coupe. Inputs from the likes of Gary, Lars, Tracdog, Alan and others on the forum led me to believe I might actually be able to attempt this myself. With the help of this forum, I sure hope so!
First of all, an introduction might be in order. I'm a retired USAF pilot presently flying for a major US passenger airline. Presently 58 years old, I've done many things, but a frame off Corvette restoration isn't one of them! In fact, other than routine maintenance, I've never done anything like this.
My brother purchased the car new and I bought it from him around 1978. It was a daily driver until 1989 when I stored it in a barn/shed on the east coast while I was stationed in Hawaii. It sat there for over 22 years until I "rescued" it for eventual restoration. After shipping it to the pacific northwest, it sat in my garage for 3 more years while I converted the garage into my mini-shop. I finally ran out of things to do in my attempts to procrastinate (out of fear I would be biting off more than I could chew) soooo... I'VE FINALLY BEGUN.
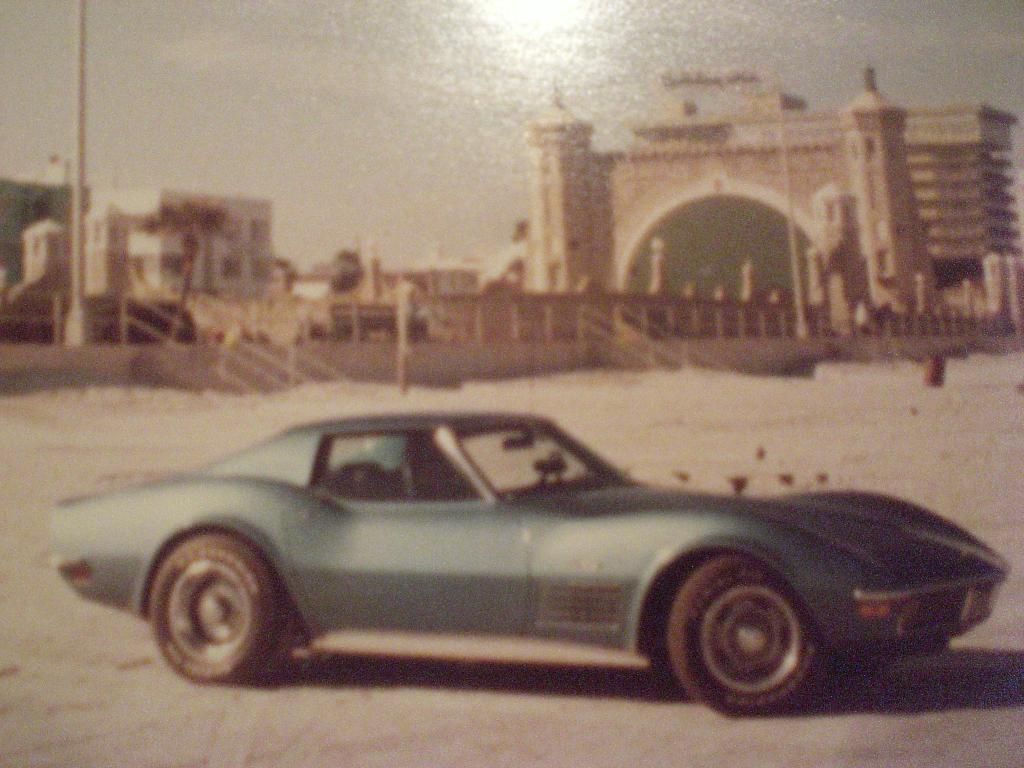
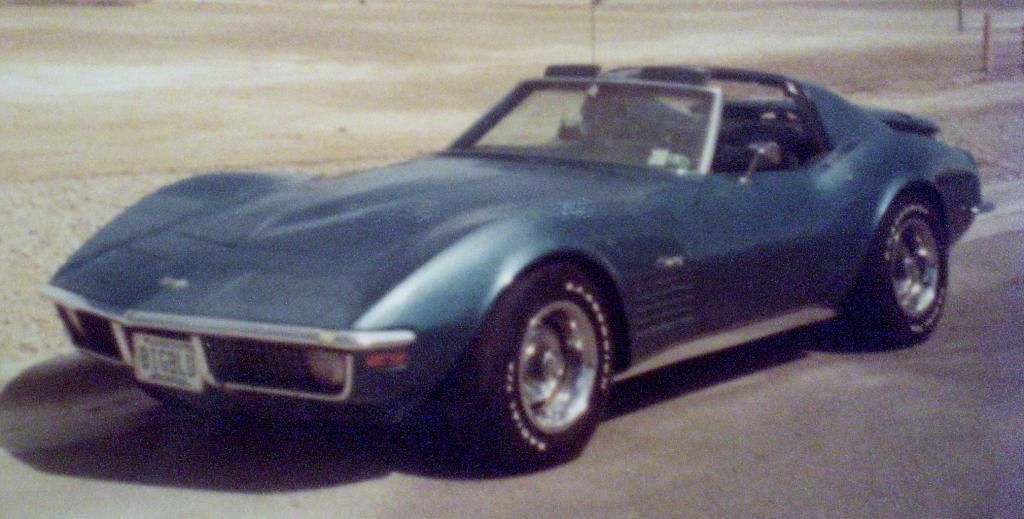
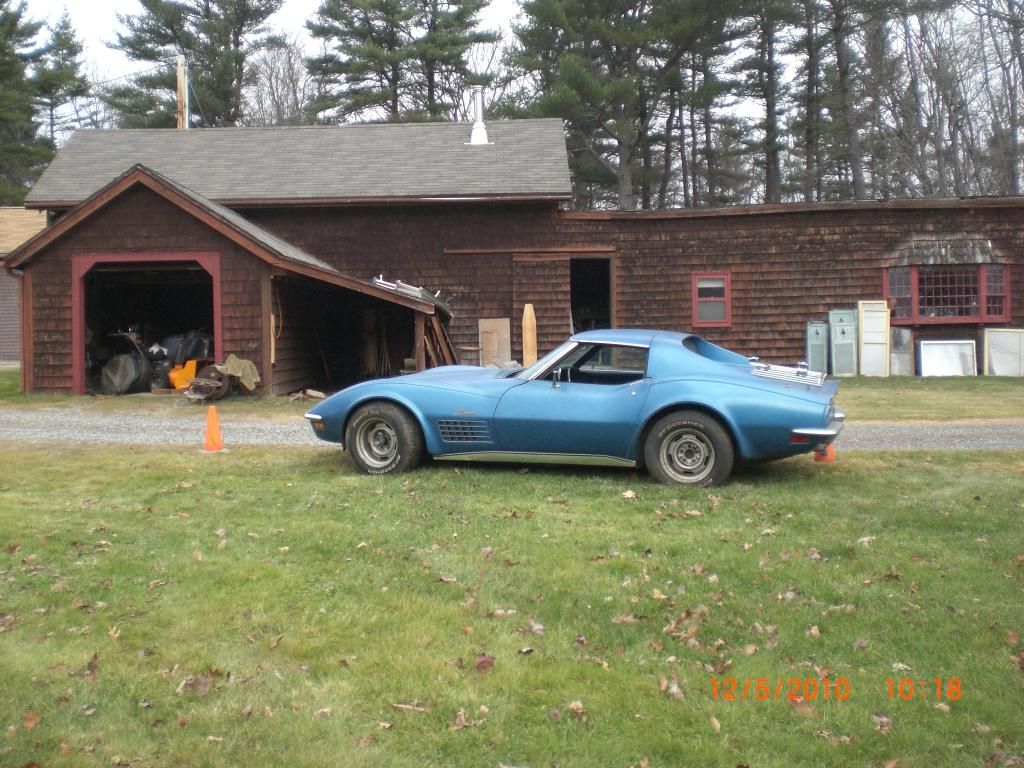
Here's what she looked like in 1979:
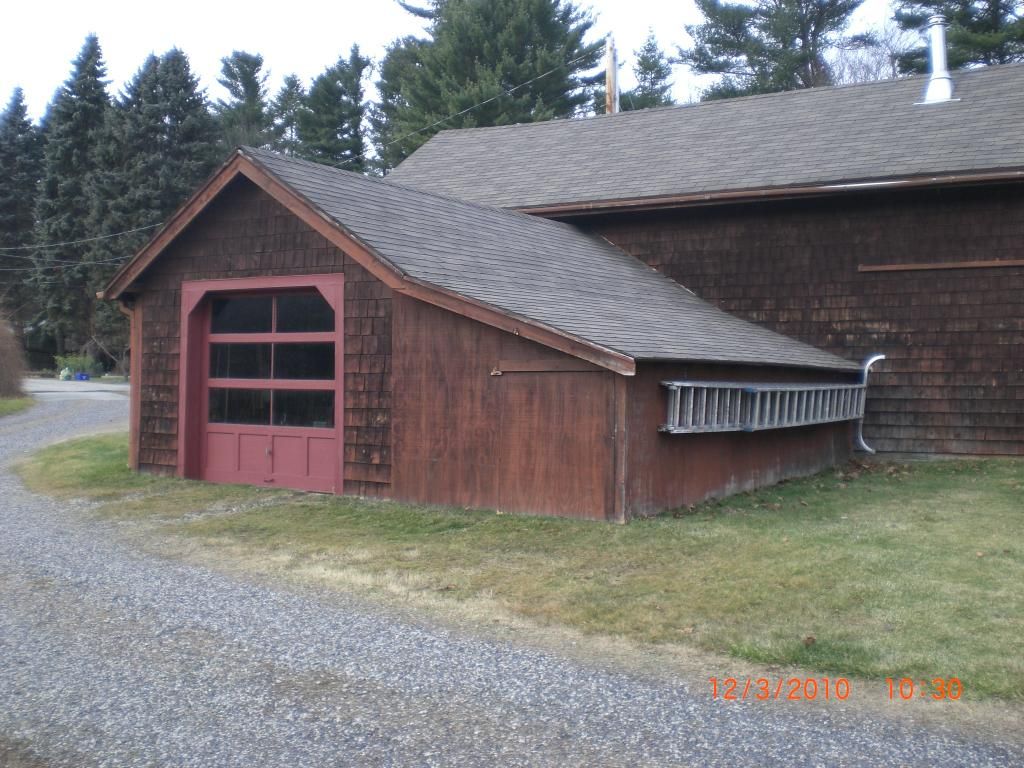
Here's where she was stored for so long:
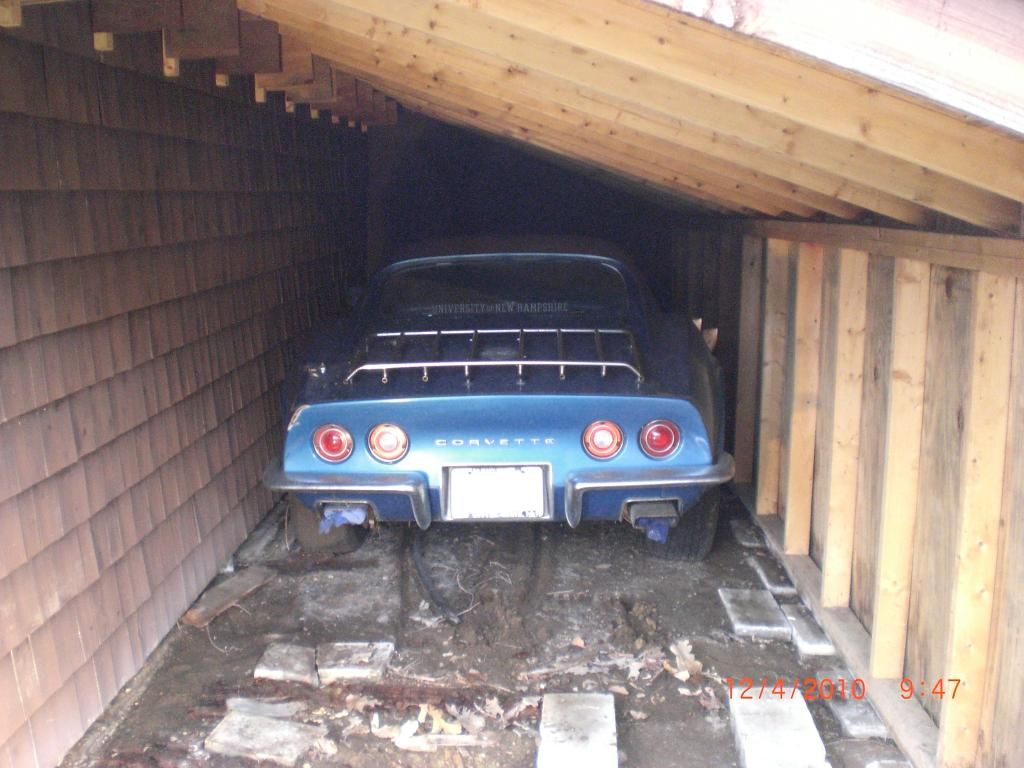
It was almost like a tomb:
Rear brake was rusted so we improvised since there wasn't enough room to remove the wheel:
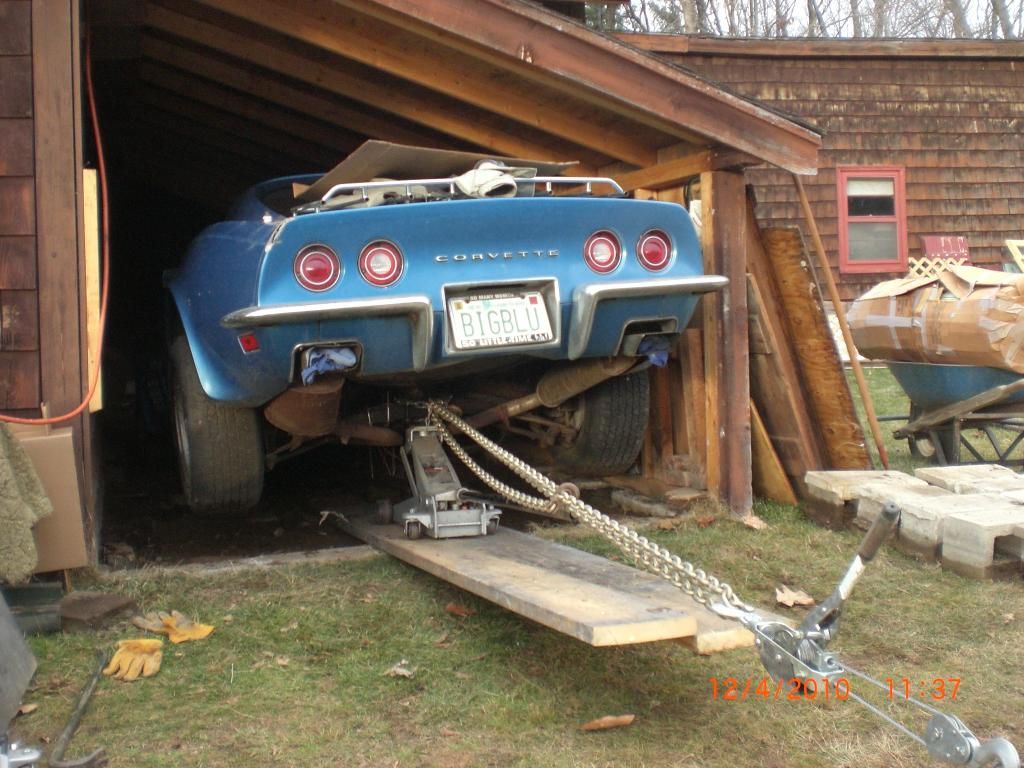
A 40 year old "50 footer" (or more) after 22 years entombed:
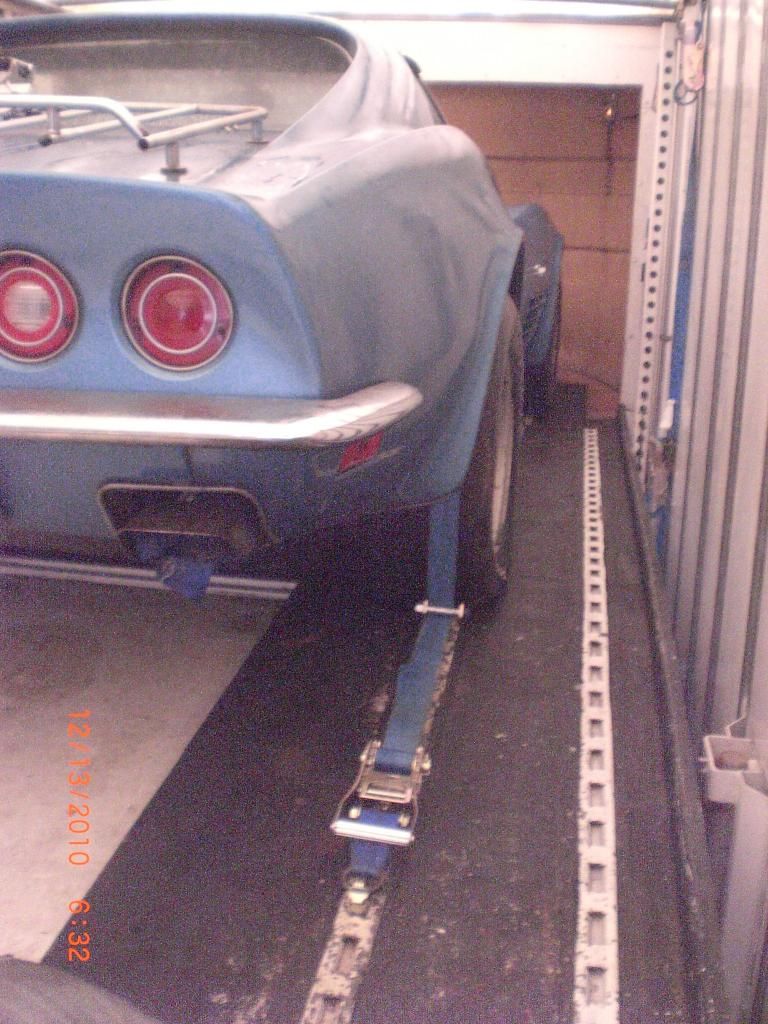
Intercity Lines sent a real nice rig to pick her up:
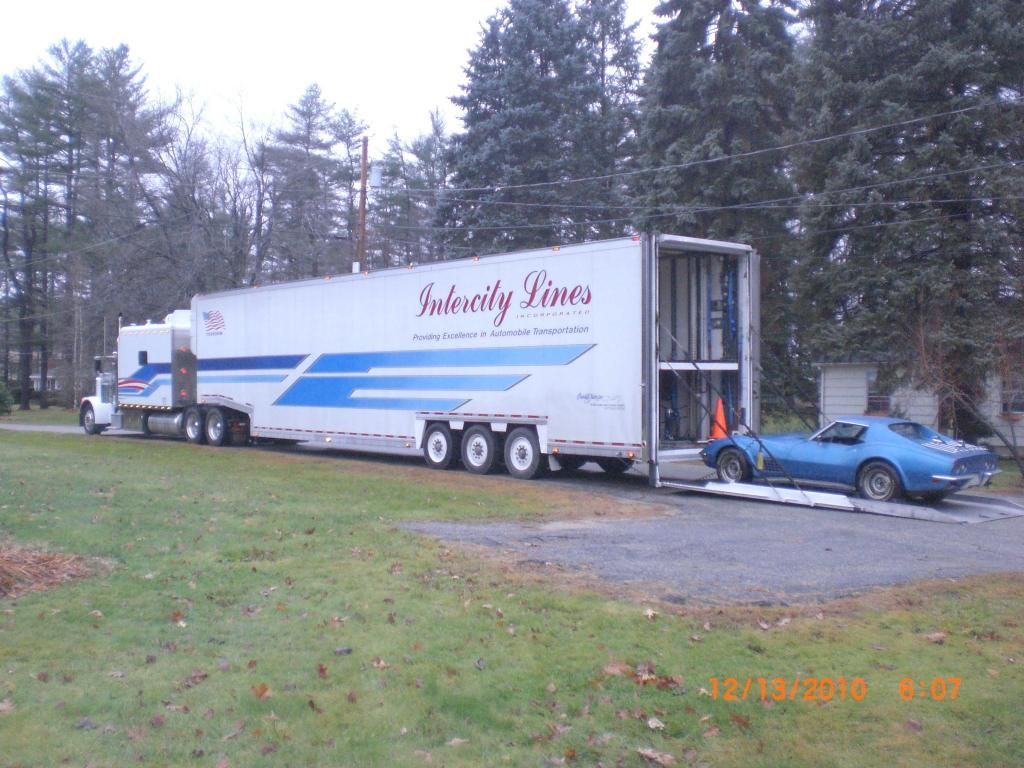
Since she wasn't running, they put her way forward on the upper deck:
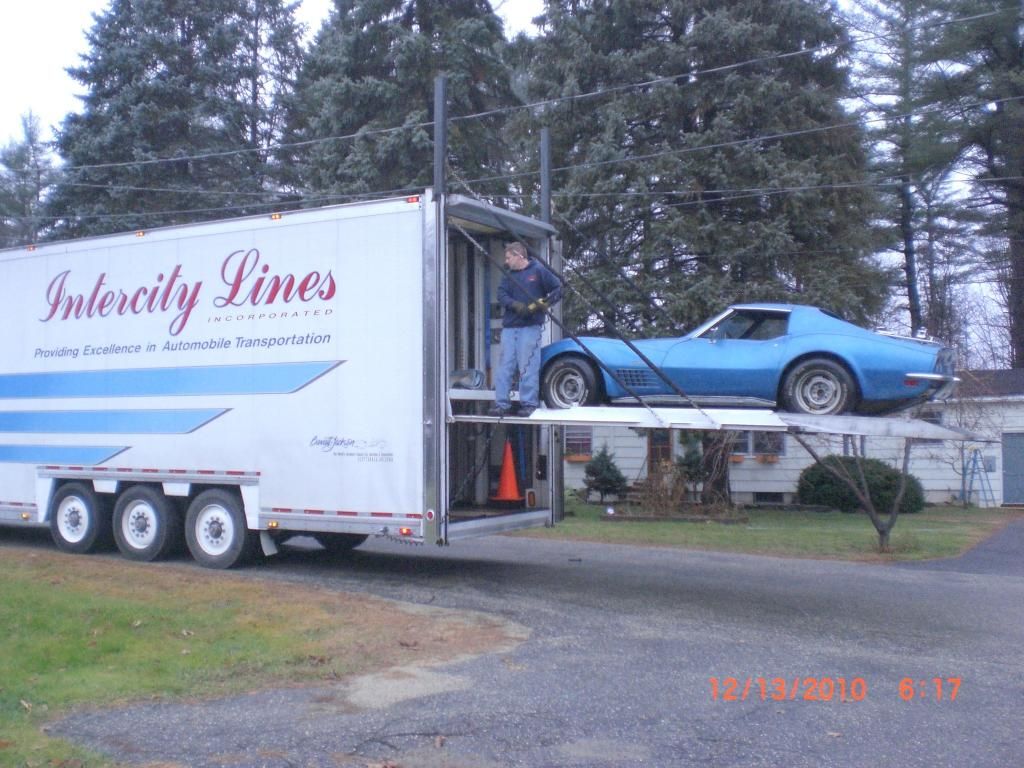
Nice tie down method over the tires yields no damage:
More to come, thanks for viewing...
Paul
I've been lurking here for quite a while reading about various projects while I prepared to start my own. Jeremy, Roger, David, Kortensi, Chadillac2000, bwinterstine, Texas70, mac79vette and many others that have documented their restorations have motivated me to finally start the restoration of my '71 coupe. Inputs from the likes of Gary, Lars, Tracdog, Alan and others on the forum led me to believe I might actually be able to attempt this myself. With the help of this forum, I sure hope so!
First of all, an introduction might be in order. I'm a retired USAF pilot presently flying for a major US passenger airline. Presently 58 years old, I've done many things, but a frame off Corvette restoration isn't one of them! In fact, other than routine maintenance, I've never done anything like this.
My brother purchased the car new and I bought it from him around 1978. It was a daily driver until 1989 when I stored it in a barn/shed on the east coast while I was stationed in Hawaii. It sat there for over 22 years until I "rescued" it for eventual restoration. After shipping it to the pacific northwest, it sat in my garage for 3 more years while I converted the garage into my mini-shop. I finally ran out of things to do in my attempts to procrastinate (out of fear I would be biting off more than I could chew) soooo... I'VE FINALLY BEGUN.
Here's what she looked like in 1979:


Here's where she was stored for so long:

It was almost like a tomb:

Rear brake was rusted so we improvised since there wasn't enough room to remove the wheel:

A 40 year old "50 footer" (or more) after 22 years entombed:

Intercity Lines sent a real nice rig to pick her up:

Since she wasn't running, they put her way forward on the upper deck:

Nice tie down method over the tires yields no damage:

More to come, thanks for viewing...
Paul
Last edited by nwav8tor; 07-17-2014 at 04:57 AM.
 07-17-2014, 04:18 AM
#2
Le Mans Master


Never too late! You might just be able to buff that paint out, as it's only original once! Great story and pics, but I've got to ask, where was that first pic taken? That is one oddball looking building!
07-17-2014, 04:21 AM
#3
Old Fart Pilot
Thread Starter
Here's what I'm facing now that she's 43...
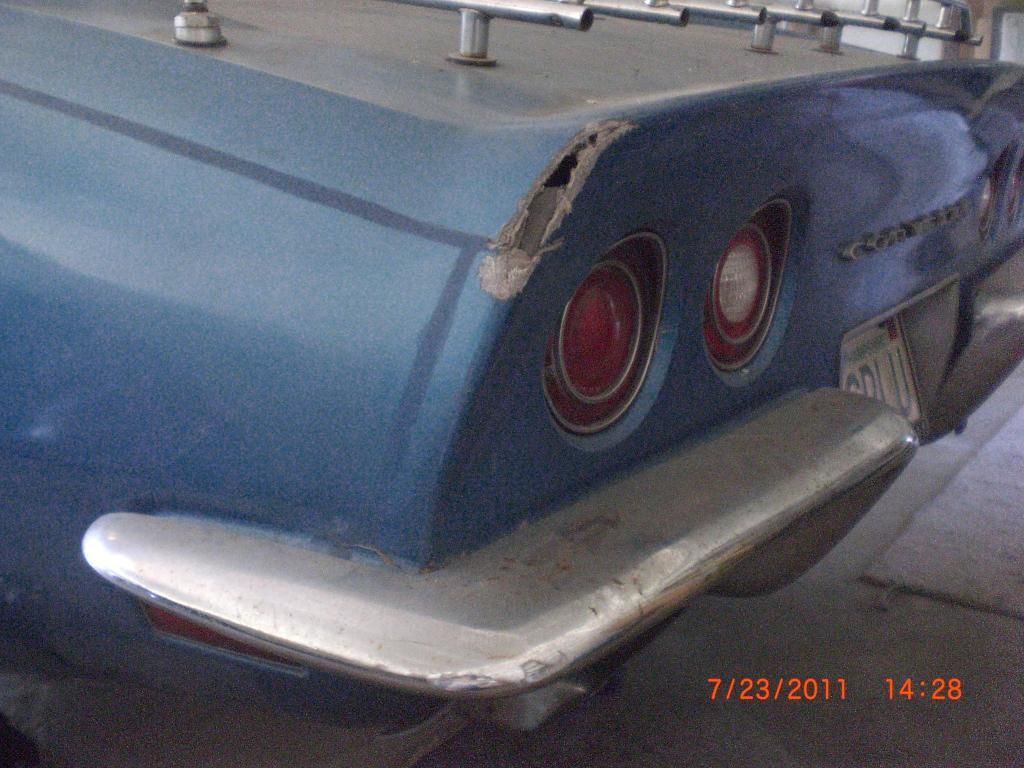
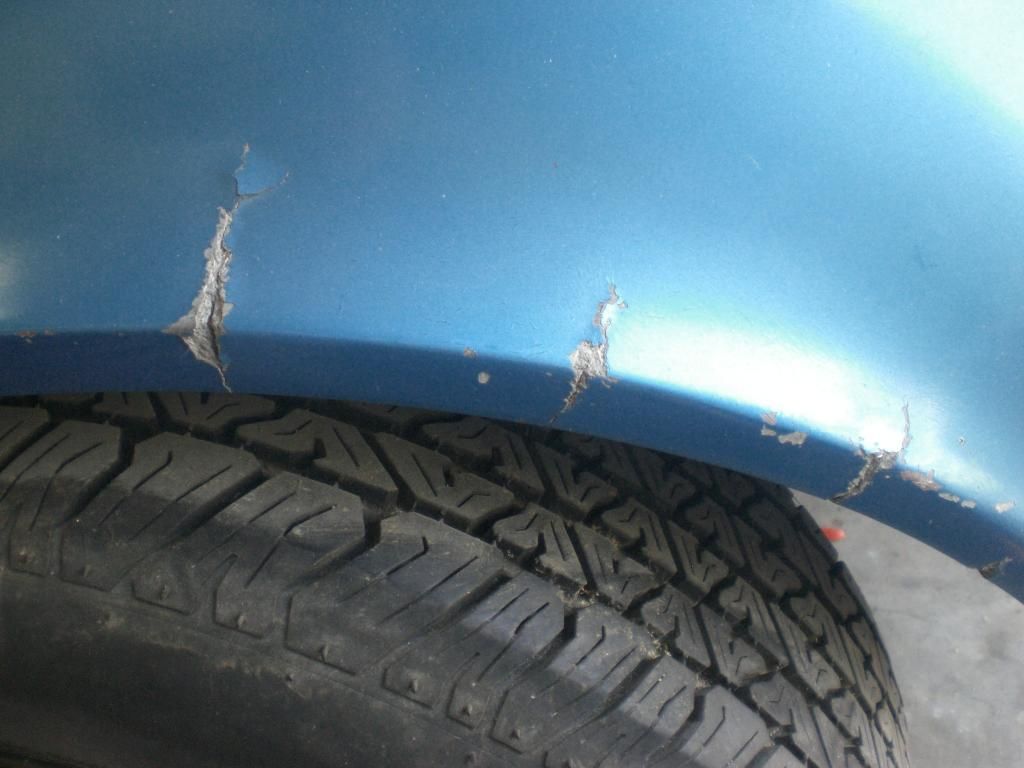
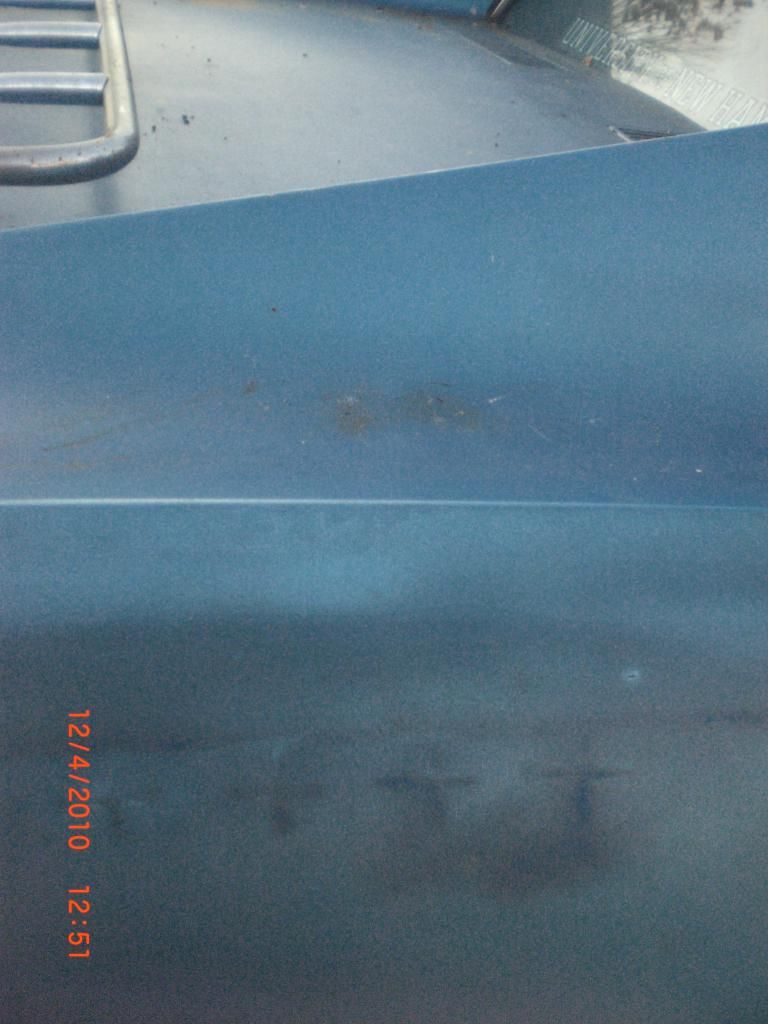
Body seams and a few dings certainly need to be repaired:
One question I do have right off the bat is it best to separate the body panels at the joints and re-bond them to correct the seams, or can the fiberglass just be dished out and re-glassed?
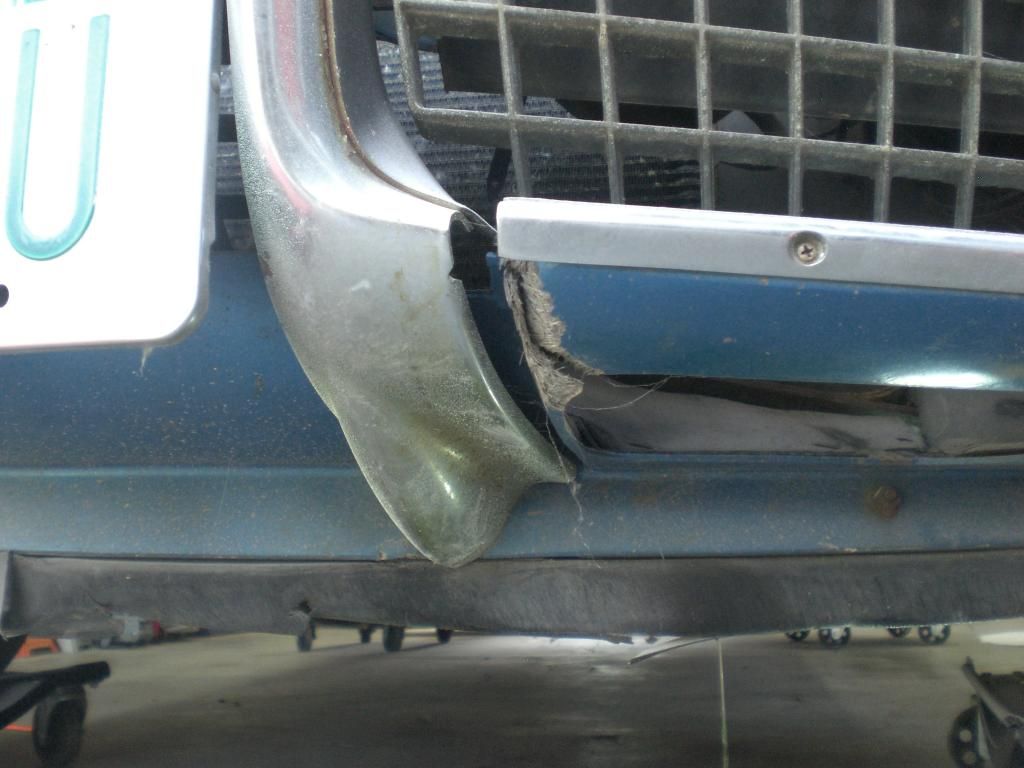
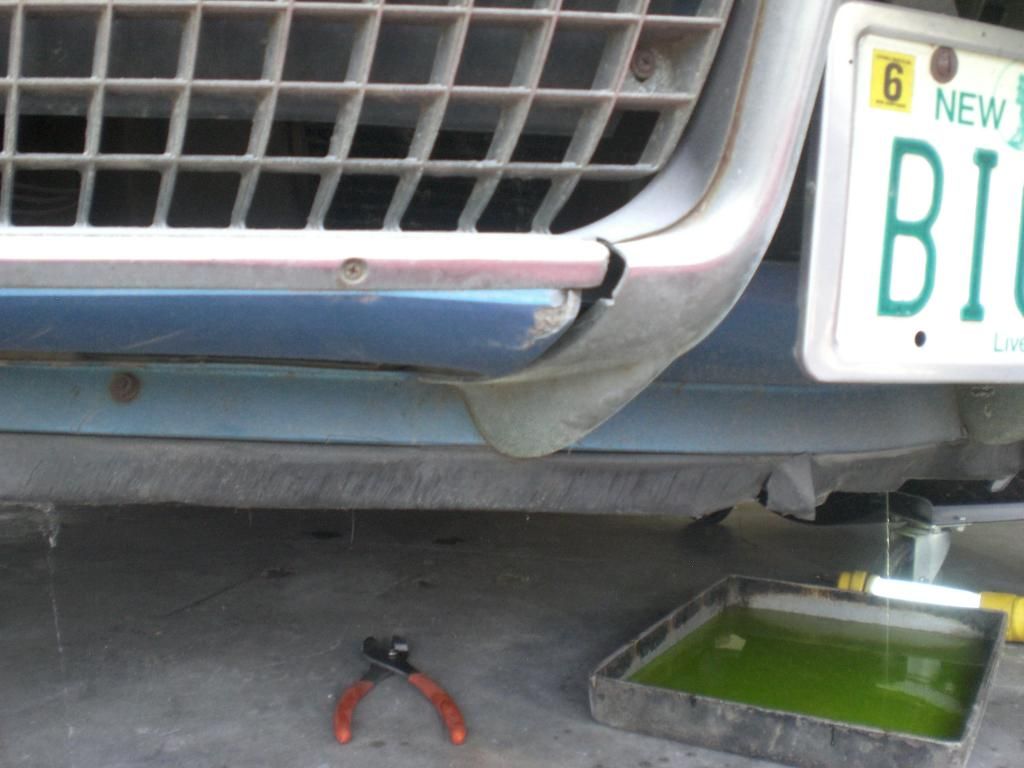
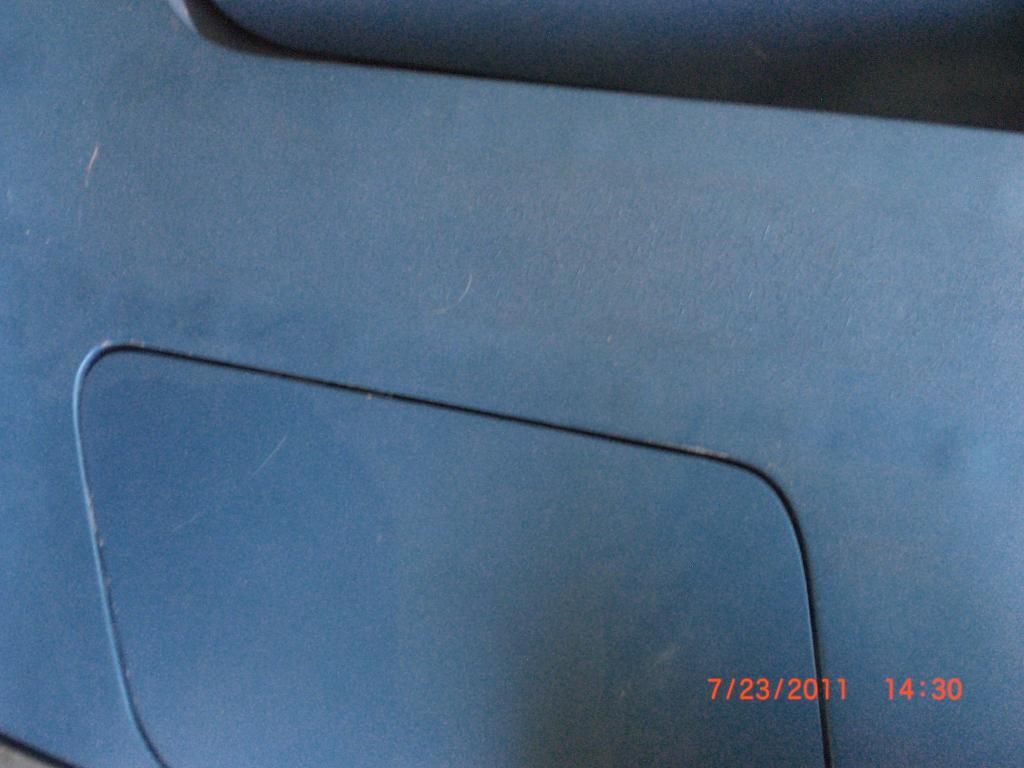
The right rear quarter panel seam popped open years ago and this is the repair a local Chevy dealer did:

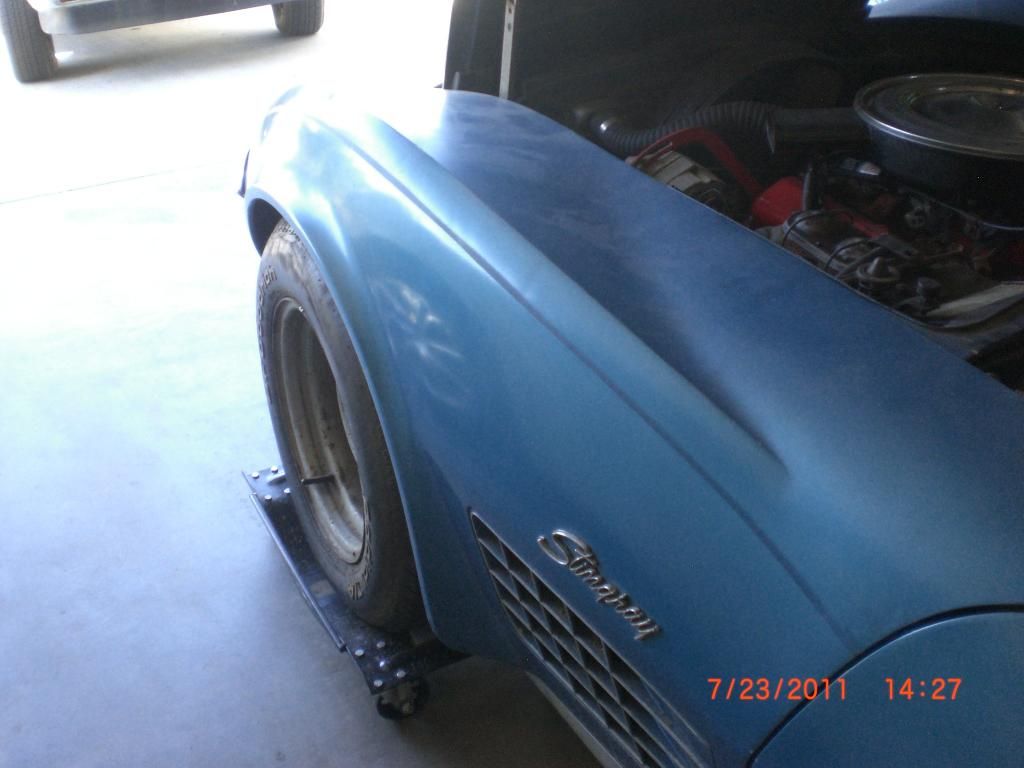
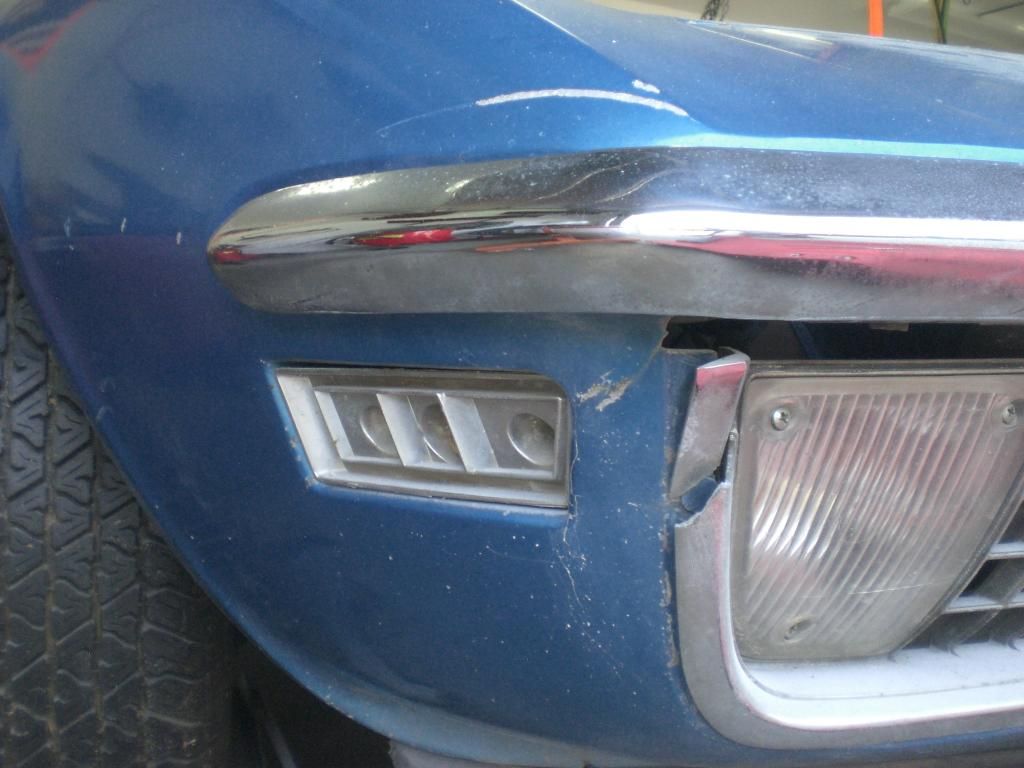
The front end suffers from the all-too-common dimples
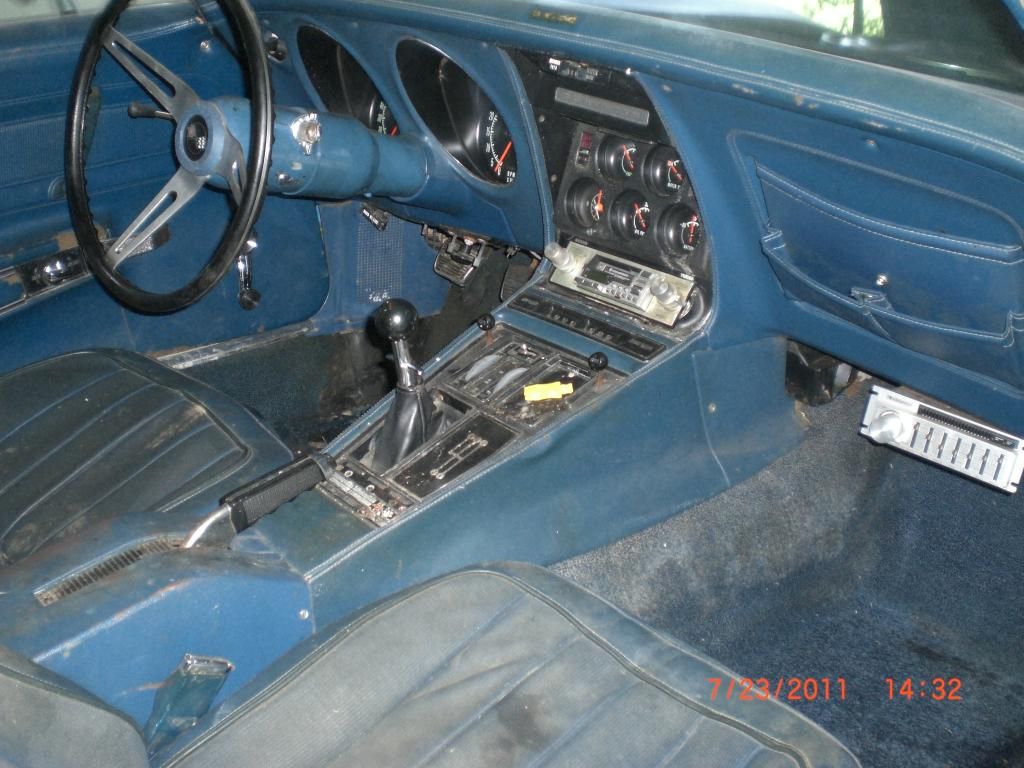
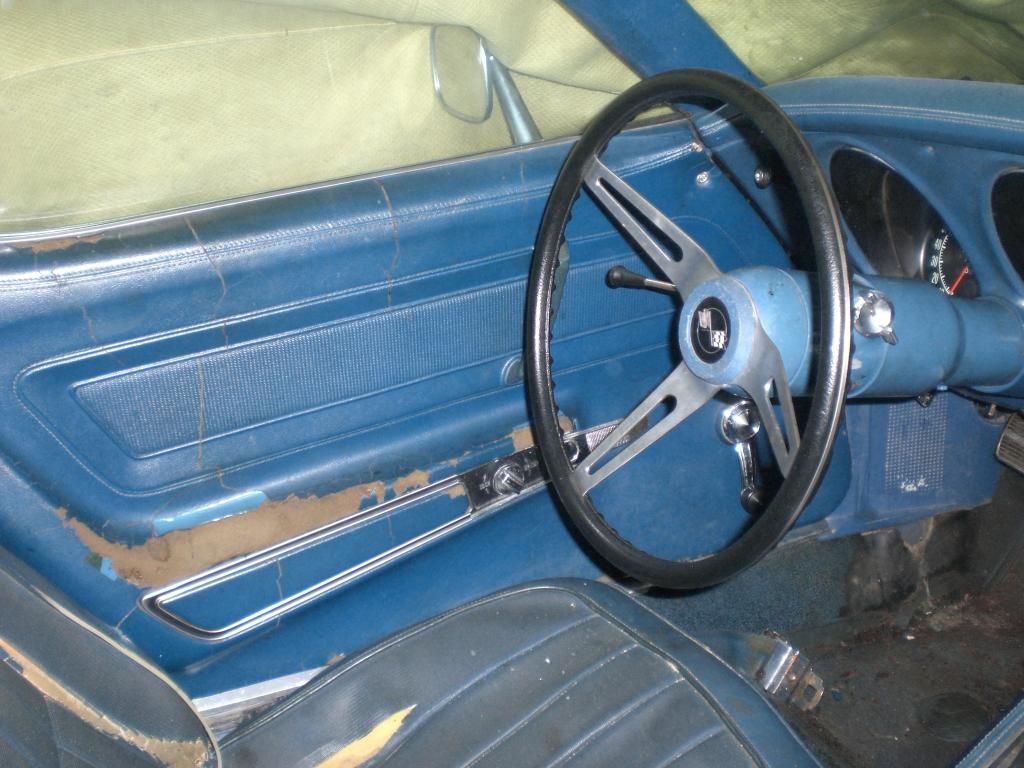
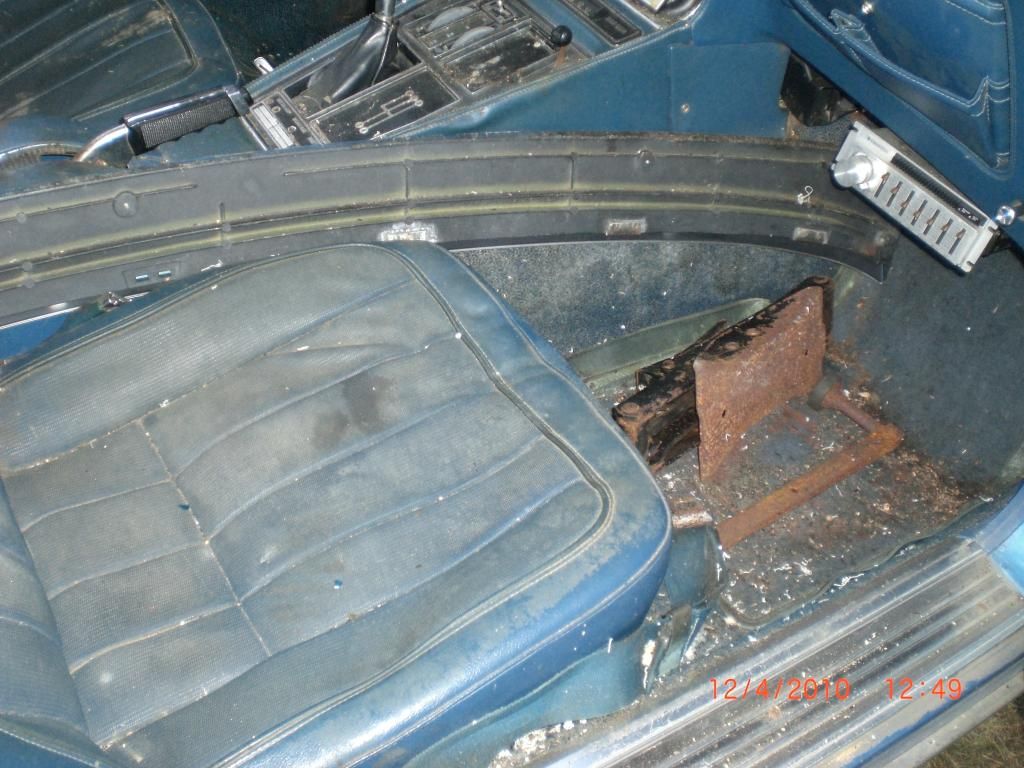
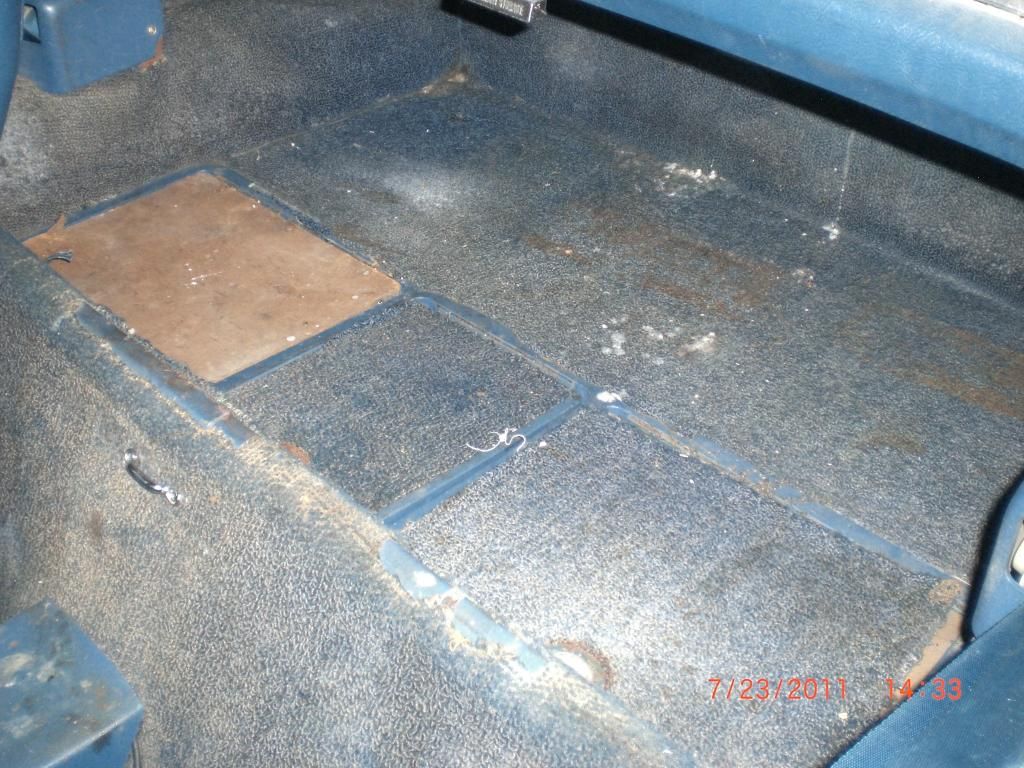
Interior isn't much better
LOTS and LOTS of work ahead of me...
Paul

Body seams and a few dings certainly need to be repaired:


One question I do have right off the bat is it best to separate the body panels at the joints and re-bond them to correct the seams, or can the fiberglass just be dished out and re-glassed?
The right rear quarter panel seam popped open years ago and this is the repair a local Chevy dealer did:


The front end suffers from the all-too-common dimples

Interior isn't much better


LOTS and LOTS of work ahead of me...
Paul
07-17-2014, 04:38 AM
#4
Old Fart Pilot
Thread Starter
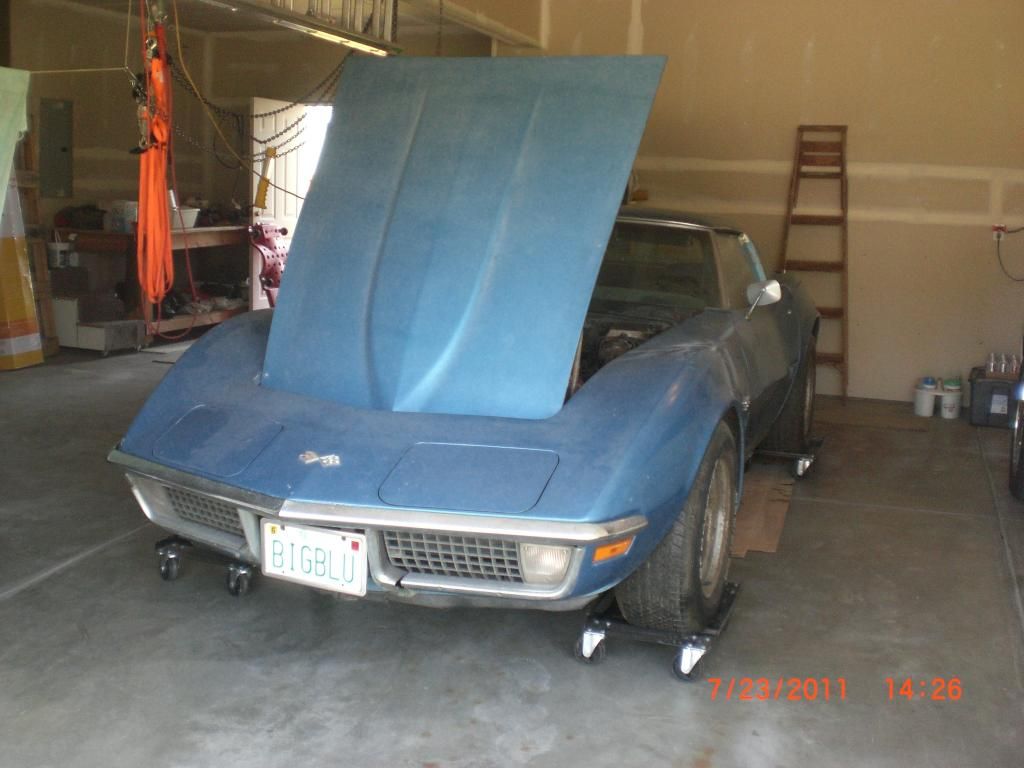
Started the prep steps for body removal on Tuesday. Got the rocker panels below both doors off and only stripped the head of one machine screw. I did manage, however, to snap two others right off. My first step and I already ran into problems. I'm sure there will be MANY, MANY more! I know from Rogman's thread that replacement nut kits are available for this now necessary repair...
Removing the fuel filler bezel and the hood went well.
Notice that her registration expired back in June of 1989...
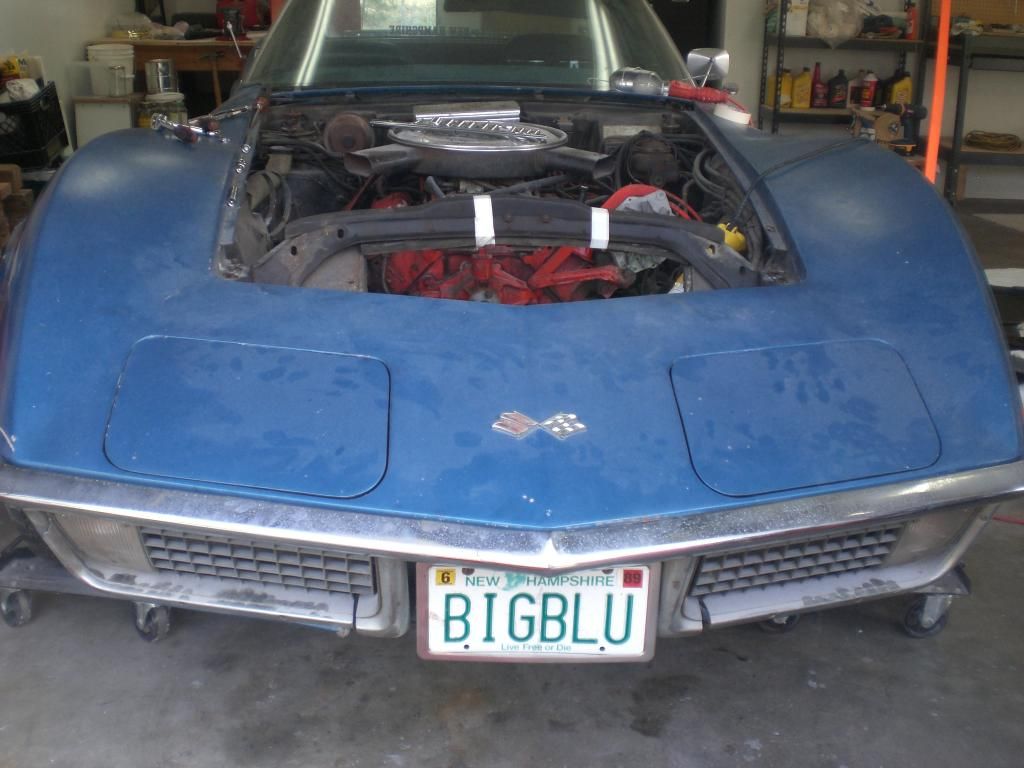
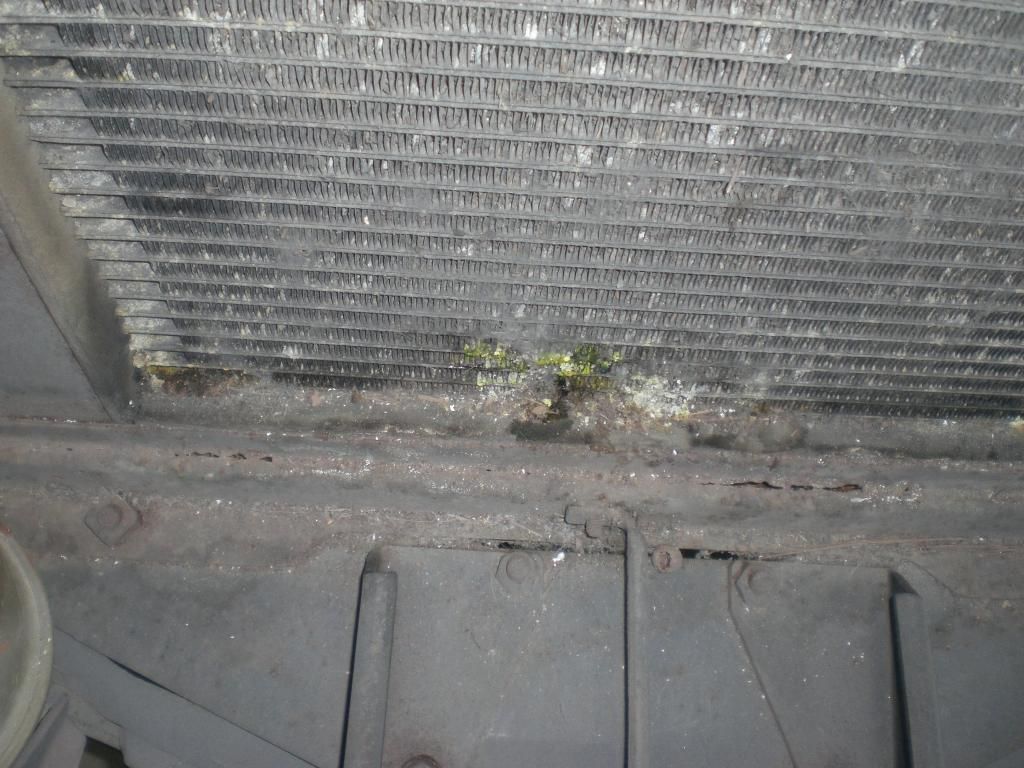
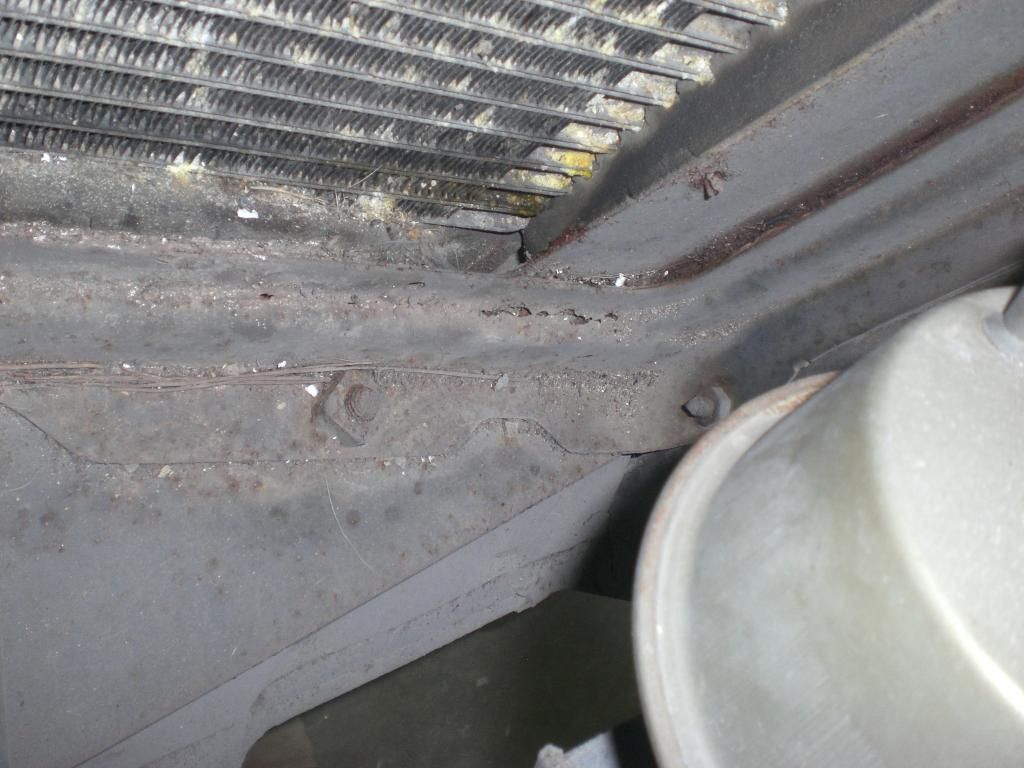
Fan and cooling system components (except water pump) also came out fairly easily

There is a few areas of rusted through spots in the radiator support frame, but hopefully it won't be too hard to fix. Easy replacement could also be possible.
I'll keep you updated as I continue along and I'm confident there will be more questions...
Paul

Removing the fuel filler bezel and the hood went well.

Notice that her registration expired back in June of 1989...

Fan and cooling system components (except water pump) also came out fairly easily

There is a few areas of rusted through spots in the radiator support frame, but hopefully it won't be too hard to fix. Easy replacement could also be possible.


I'll keep you updated as I continue along and I'm confident there will be more questions...
Paul
07-17-2014, 04:54 AM
#5
Old Fart Pilot
Thread Starter
I'm not looking for as "easy out." I really want to do the frame off and make her better than new. Since she is original and mostly numbers matching (NAPA generator, Midas mufflers and after-market coil are probably "incorrect"), she is a survivor in poor condition, but a survivor none the less. If she was a vert or a BB or LT-1, I might consider the NCRS route, but as a basic model coupe, I think an updated resto-mod is more in order.
Initial plan is to upgrade the suspension and brakes, rebuild the engine if the block is good and possibly add a Vintage Air unit along with all the other new/refurbished parts a frame-off leads to.
First pic was in Daytona Beach while I was driving cross country to go to pilot training...
Paul
07-17-2014, 06:11 AM
#6
Safety Car

Paul, what you have there will be easy compared to what some on this board have gone through! My wife & I built a few cars, but now we`re doing our retirement toy, a 71 coupe. Our last project is our first Vette! We still have a long way to go, but here`s some inspiration for you...
http://s569.photobucket.com/user/old...?sort=6&page=1
http://s569.photobucket.com/user/old...?sort=6&page=1
07-17-2014, 07:53 AM
#7
Team Owner

Member Since: Sep 2006
Location: Westminster Maryland
Posts: 30,173
Likes: 0
Received 2,878 Likes
on
2,515 Posts

Hi Paul,
This looks like a very nice project! MANY nice original parts!!!!
A lot of work in front of you but I believe you'll find it to be a personally rewarding process.
I'd encourage you to at least seriously consider and an NCRS type restoration even though it's a base motor car.
There are lot's of helpful 70-72 people around and plenty of information available.
Your question about the seams…. you can use either method you mention. On a body that's being Flight Judged the exterior judges like to see a TINY hint that the seams are there, and THAT dismays many restorers… it's up to you.
I suggest that you at least purchase the 70-72 Technical Information Manual & Judging Guide and get a copy of the Judging Sheets to look over so you can see if that NCRS route is something that might interest you.
But if you decide on the rest-mod route you'll have just as much fun, maybe even more!
GOOD LUCK!
Regards,
Alan
That original paint would likely be a wealth of information to people interested in just what was painted and how.
Have you purchased the 71 Assembly Instruction Manual (AIM) and the 71 GM Chassis Service Manual?
Last edited by Alan 71; 07-17-2014 at 07:56 AM.
07-17-2014, 09:08 AM
#8
Burning Brakes

07-17-2014, 09:26 AM
#9
Race Director

Old fart at 58? 
Now that looks like fun! Really neat that you were able to "hide" it for so long! What's with pilots and the need for speed?
I have to agree with A71, it's a four speed base motor with tons of original parts. Definitely worth bringing back to life! In a great color combo.
I admire that you have researched and read a lot on the how's and what's involved BEFORE attempting the resto!
Welcome to the 71 club, even though you had the car so long.
Certainly Alan71 will be your most reliable resource for information and PHOTOS on your upcoming SB project.
Love the pictures!
WB
07-17-2014, 09:32 AM
#10

Old fart at 58?
Now that looks like fun! Really neat that you were able to "hide" it for so long! What's with pilots and the need for speed?
I have to agree with A71, it's a four speed base motor with tons of original parts. Definitely worth bringing back to life! In a great color combo.
I admire that you have researched and read a lot on the how's and what's involved BEFORE attempting the resto!
Welcome to the 71 club, even though you had the car so long.
Certainly Alan71 will be your most reliable resource for information and PHOTOS on your upcoming SB project.
Love the pictures!
WB
Roger
07-17-2014, 09:34 AM
#11
Advanced

Member Since: Apr 2014
Location: Brookfield Wisconsin
Posts: 52
Received 0 Likes
on
0 Posts
Very Nice Project!
I'll be starting one of a similar nature soon, a 69 vert stored since the mid 70's.
I'll be keeping an eye on your thread.
Good Luck!!!
I'll be starting one of a similar nature soon, a 69 vert stored since the mid 70's.
I'll be keeping an eye on your thread.
Good Luck!!!
 07-17-2014, 12:07 PM
#14
Team Owner
You do have your work cut out for you. First thing to do is buy a BARREL of PB Blaster (penetrant) so you can get those rusted bolts loose. That will take patience...try to force frozen fasteners loose and you end up with 'nightmares'. Patience is king!!!
Positive: You have all the components already on the vehicle. Salvage/repair everything that you can.
Negative: Lots of minor damage--particularly body damage. You might want to 'farm out' the actual repairs to the body, if you don't already have experience with that. You do all the prep; someone else does the 'glass' work. Much quicker---eliminates the learning-curve on glass repairs.
Project is very do-able, if you have the facility and tools to accomplish the task. If you can only apply some part-time effort at this [sounds like you are still in the 9-to-5 world], you MAY be able to have this project on the road about the time you retire.
Oh, did I mention that "patience is king"???
P.S. You MUST own a copy of the 1971 Chevrolet Chassis Service Manual and the 1971 Assembly Instruction Manual (AIM), if you want to be relatively efficient and accurate in disassembling and reassembling your car. And, if you want to rebuild your original engine, transmission, and accessory components, the 1971 Chevrolet Chassis Overhaul Manual is "golden".
Last edited by 7T1vette; 07-17-2014 at 12:13 PM.
The following users liked this post:
1971corvette (05-28-2023)
07-17-2014, 12:17 PM
#15
Old Fart Pilot
Thread Starter
Paul, what you have there will be easy compared to what some on this board have gone through! My wife & I built a few cars, but now we`re doing our retirement toy, a 71 coupe. Our last project is our first Vette! We still have a long way to go, but here`s some inspiration for you...
http://s569.photobucket.com/user/old...?sort=6&page=1
http://s569.photobucket.com/user/old...?sort=6&page=1
Paul
07-17-2014, 12:34 PM
#16
Burning Brakes
Thats great that that you still have it after all this time. In the late 70s I had a 70 'Cuda that I sold in 86 or so. I often have dreams of finding that car in storage somewhere in simular condition as yours and think "ok it needs work but at least I still have it" then I wake up, and it's really gone, at least your dream is still alive, good luck.
07-17-2014, 12:34 PM
#17
Old Fart Pilot
Thread Starter
Hi Paul,
This looks like a very nice project! MANY nice original parts!!!!
A lot of work in front of you but I believe you'll find it to be a personally rewarding process.
I'd encourage you to at least seriously consider and an NCRS type restoration even though it's a base motor car.
There are lot's of helpful 70-72 people around and plenty of information available.
Your question about the seams…. you can use either method you mention. On a body that's being Flight Judged the exterior judges like to see a TINY hint that the seams are there, and THAT dismays many restorers… it's up to you.
I suggest that you at least purchase the 70-72 Technical Information Manual & Judging Guide and get a copy of the Judging Sheets to look over so you can see if that NCRS route is something that might interest you.
But if you decide on the rest-mod route you'll have just as much fun, maybe even more!
GOOD LUCK!
Regards,
Alan
That original paint would likely be a wealth of information to people interested in just what was painted and how.
Have you purchased the 71 Assembly Instruction Manual (AIM) and the 71 GM Chassis Service Manual?
This looks like a very nice project! MANY nice original parts!!!!
A lot of work in front of you but I believe you'll find it to be a personally rewarding process.
I'd encourage you to at least seriously consider and an NCRS type restoration even though it's a base motor car.
There are lot's of helpful 70-72 people around and plenty of information available.
Your question about the seams…. you can use either method you mention. On a body that's being Flight Judged the exterior judges like to see a TINY hint that the seams are there, and THAT dismays many restorers… it's up to you.
I suggest that you at least purchase the 70-72 Technical Information Manual & Judging Guide and get a copy of the Judging Sheets to look over so you can see if that NCRS route is something that might interest you.
But if you decide on the rest-mod route you'll have just as much fun, maybe even more!
GOOD LUCK!
Regards,
Alan
That original paint would likely be a wealth of information to people interested in just what was painted and how.
Have you purchased the 71 Assembly Instruction Manual (AIM) and the 71 GM Chassis Service Manual?
Thanks for the info about the seams!
As for the paint, it'll be a while before I do any serious body work, so if anyone wants any info about or photos of the body or paint, give me a shout...
Regarding the end result, I'm leaning towards the rest-mod route mostly due to my desire to change a few things such as LT-1 style hood, air conditioning, slightly "warmed-up" engine, noise & heat barriers, suspension updates, etc, etc.
I already have the NCRS material and the AIM and the GM Chassis Service Manual as well as a few other restoration books including a Chevy small block engine rebuild book.
There's so much info out there in publications, on the internet and in forums such as this, it's hard to digest it all!
Paul
07-17-2014, 12:42 PM
#18
What a very cool project
Great looking color and neat old motor . I bet it will all turn out good ..
Looking forward to following this thread
Best luck

Great looking color and neat old motor . I bet it will all turn out good ..
Looking forward to following this thread
Best luck
07-17-2014, 01:09 PM
#19
Old Fart Pilot
Thread Starter
Old fart at 58?
Now that looks like fun! Really neat that you were able to "hide" it for so long! What's with pilots and the need for speed?
I have to agree with A71, it's a four speed base motor with tons of original parts. Definitely worth bringing back to life! In a great color combo.
I admire that you have researched and read a lot on the how's and what's involved BEFORE attempting the resto!
Welcome to the 71 club, even though you had the car so long.
Certainly Alan71 will be your most reliable resource for information and PHOTOS on your upcoming SB project.
Love the pictures!
WB
Now that looks like fun! Really neat that you were able to "hide" it for so long! What's with pilots and the need for speed?
I have to agree with A71, it's a four speed base motor with tons of original parts. Definitely worth bringing back to life! In a great color combo.
I admire that you have researched and read a lot on the how's and what's involved BEFORE attempting the resto!
Welcome to the 71 club, even though you had the car so long.
Certainly Alan71 will be your most reliable resource for information and PHOTOS on your upcoming SB project.
Love the pictures!
WB
Hi Paul, but wait a minute Old Fart, I'am 66 what am I? Kidding . What a great car to restore with original parts to guide you. The Forum is a great place. My 69 had either the wrong parts or they were no good. Knowing the background will be a big help. Good luck, ask questions, take pics and we all will be watching and helping.
Roger
Roger
You do have your work cut out for you. First thing to do is buy a BARREL of PB Blaster (penetrant) so you can get those rusted bolts loose. That will take patience...try to force frozen fasteners loose and you end up with 'nightmares'. Patience is king!!!
Positive: You have all the components already on the vehicle. Salvage/repair everything that you can.
Negative: Lots of minor damage--particularly body damage. You might want to 'farm out' the actual repairs to the body, if you don't already have experience with that. You do all the prep; someone else does the 'glass' work. Much quicker---eliminates the learning-curve on glass repairs.
Project is very do-able, if you have the facility and tools to accomplish the task. If you can only apply some part-time effort at this [sounds like you are still in the 9-to-5 world], you MAY be able to have this project on the road about the time you retire.
Oh, did I mention that "patience is king"???
P.S. You MUST own a copy of the 1971 Chevrolet Chassis Service Manual and the 1971 Assembly Instruction Manual (AIM), if you want to be relatively efficient and accurate in disassembling and reassembling your car. And, if you want to rebuild your original engine, transmission, and accessory components, the 1971 Chevrolet Chassis Overhaul Manual is "golden".
Positive: You have all the components already on the vehicle. Salvage/repair everything that you can.
Negative: Lots of minor damage--particularly body damage. You might want to 'farm out' the actual repairs to the body, if you don't already have experience with that. You do all the prep; someone else does the 'glass' work. Much quicker---eliminates the learning-curve on glass repairs.
Project is very do-able, if you have the facility and tools to accomplish the task. If you can only apply some part-time effort at this [sounds like you are still in the 9-to-5 world], you MAY be able to have this project on the road about the time you retire.
Oh, did I mention that "patience is king"???
P.S. You MUST own a copy of the 1971 Chevrolet Chassis Service Manual and the 1971 Assembly Instruction Manual (AIM), if you want to be relatively efficient and accurate in disassembling and reassembling your car. And, if you want to rebuild your original engine, transmission, and accessory components, the 1971 Chevrolet Chassis Overhaul Manual is "golden".
 I do have the AIM and CSM as well as numerous overhaul & restoration guides so lack of information shouldn't be my problem, especially with the help of forum members.


