
1971 Journey

 01-20-2017, 09:56 PM
#943
Le Mans Master


Hi
I am creating a duplicate of my Australian thread here to cover the Journey I have taken on my 1971 Corvette purchased late in 2009.
Hope it is of some interest to others.
The Car as I picked it up.....

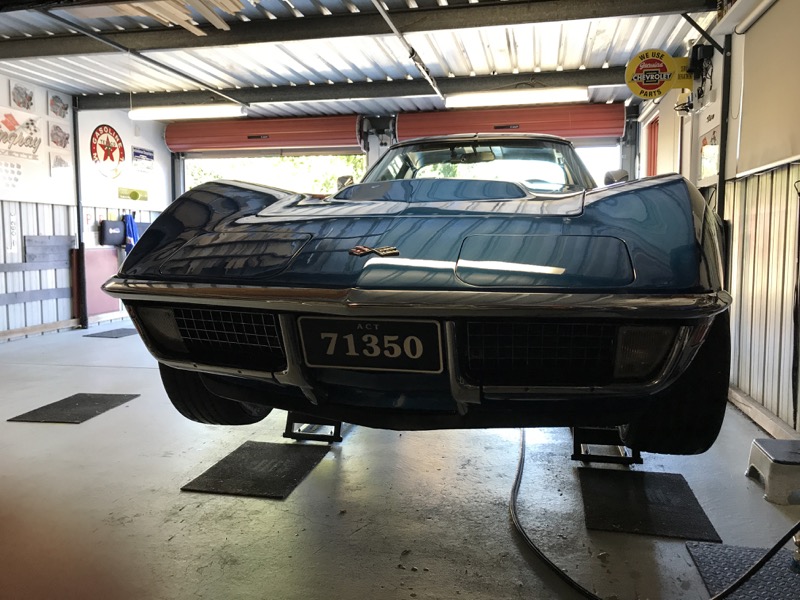
1971 Matching Numbers 350-270hp Bridgehampton Blue Coupe
Index of Pages
Page 1 - December 2009
Page 2 - June 2010
Page 3 - September 2010
Page 4 - October 2010
Page 5 - November 2010
Page 6 - November 2010
Page 7 - December 2010
Page 8 - December 2010
Page 9 - January 2011
Page 10 - March 2011
Page 11 - June 2011
Page 12 - July 2011
Page 13 - July 2013
Page 14 - August 2011
Page 15 - September 2011
Page 16 - September 2011
Page 17 - October 2011
Page 18 - October 2011
Page 19 - November 2011
Page 20 - November 2011
Page 21 - November 2011
Page 22 - November 2011
Page 23 - November 2011
Page 24 - January 2012
Page 25 - March 2012
Page 26 - June 2012
Page 27 - July 2012
Page 28 - August 2012
Page 29 - September 2012
Page 30 - December 2012
Page 31 - March 2013
Page 32 - March 2013
Page 33
Page 34
Page 35
Page 36
Page 37
Page 38
Page 39
Page 40
Page 41
Page 42
Page 43
Page 44
Page 45
Next.....
The Car now.....


There is a thread on the Australian Corvettes forum but I decided to also post it here given the wider audience and experience that exists here.
Will take me a while to copy it all over.
I am creating a duplicate of my Australian thread here to cover the Journey I have taken on my 1971 Corvette purchased late in 2009.
Hope it is of some interest to others.
The Car as I picked it up.....
1971 Matching Numbers 350-270hp Bridgehampton Blue Coupe
Index of Pages
Page 1 - December 2009
- Seats
- Seat Belts
- Seat Tracks
- Under Dash Insulation
- Replace Console
- Dash Air vents
- Air Vent Servo
- Mirrors
- Rear Window Shelf
- A Pillars
- Cowl Water Leaks
- HVAC Duct
- Rear Brake Calipers Clean Refurbish
- Adjust Parking Brake
Page 2 - June 2010
- Rear Brake Calipers Paint
- Brake Rotors
- Brake Rotor Run Out
- Rear Brake Calipers
- Braided Brake Lines
- Body Height Font Back
- Vacuum Tank
- Carb Choke
- Fuel Line Tank
- CEC Solenoid
- Console Gauges
- Temperature Gauge Calibration
- Gauge Bezel
- Dash Pad
- T-Top Stainless Polish
Page 3 - September 2010
- Under Dash Insulation
- Strip Interior
- Auto Shifter Rebuild
- CEC Relays
- Console Trim Plate strip
- HVAC Refurbish
- Dynamat Front Floor
- Dash Pad Speakers
- Lower Dash Pad Cleanup
- Wheel Choices
- Under Dash Wiring
- Oil Gauge Line
- Lower Dash Pad Fit
Page 4 - October 2010
- Stereo Speaker Bass Cut
- Refit Under Console Wiring
- Refit Console
- Door Weatherstrip
- Console HVAC Control
- Battery Box and Terminals
- Rear Cleanup and Dynamat
- Drain Tubes
- A Pillar Cleanup and Paint
- Console Trim Pieces Paint
- A Pillar Stainless CleanUp
- Console Air Vent Trim
- Dynamat Rear
- Drain Tubes
- HVAC Controls
- Stainless Polish
- Finish Console Plate
Page 5 - November 2010
- 18" Coys C5 Wheels Arrive
- Console Trial Fit
- Rear Window Clean Up
- Weatherstrip Removal
- A Pillar Refit
- New Weatherstrip
- A Pillar finish
- Rear Window Weatherstrip Prep
- MP3 Wiring
- Aerial
- Trim Panel Clean Up
- Repair Rear Trim Panels
- Repaint Rear Trim Panels
Page 6 - November 2010
- Repaint Trim Panels .... cont
- T-Top Strip Down
- Repair T-Top Trim Panels
- Rear Window Weatherstip
- Storage Compartment Prep
- Rear Carpet Fitting
- Console Trim Panel Build Up
- Spark Plug Wire Brackets Rebuid
- Trim Panel Fit and Adjustment
Page 7 - December 2010
- Brake Console Rebuild
- Repaint Trim Pieces
- Front Carpet Fit
- T-Top Panel Finish
- Storage Compartment Test Fit
- Surface rust Removal
- T-Top Center Trim Rebuild
- Rear Window Latch Rebuild and Adjustment
- Rear Roof Trim Refit
- Bulkhead Carpet Fit
- A Pillar and Teader Trim
- Sun Visors
- Start T-Top Refinish Inside
Page 8 - December 2010
- T-Top Refinish Inside
- Rebuild and Repaint Mirror
- T-Top Adjustment
- Carpet Seat Bolt Holes
- B Pillar Trim Fit
- Adjust Rear Fit
- Rebuild Storage Lids
- Repaint Seat Backs
- Fire Extinguisher
- Run Spark Plug Wires through Brackets/Clips
- Clean Up Exterior
- Replace Carb Filter
- New Air Cleaner and Decal
- Repair Headlight Trim Rings
- Summernats 2011
Page 9 - January 2011
- Collecting Parts for Under Bonnet
- Temperature Sender Findings
- Wiper Door Actuator
- A-Arm Shims
- Sun Visor Support Pins
- Rear Marker Light
- Paint Chip Repair
- Kick Panel Speaker
- Wiper Door Actuator
- Fender Emblems
Page 10 - March 2011
- New battery
- Rear Shocks
- Battery Drain
- Vacuum Tank Revisit
- TH400 Speedo cable leak
- Differential Snubber cushion
- Ipod integration part II
- The Brake Squeak in reverse
- Vapor Cannister
- T-Top Adjustment
Page 11 - June 2011
- Vapor Cannister....continued
- T-Top Adjustment....continued
- Rear Window Glass Scratches
- Setting Timing
- Distributor Advance
- Choke Linkage
- Removing A/C Evaporator box
- Clean up engine bay
- Start Stripping down engine
- Suspension Removal Starts
- Steering Removal Starts
- Radiator out
Page 12 - July 2011
- Trial fit Semi Coil Overs
- Drain Power Steering
- Remove Steering Linkages
- New Quadrajet
- Front Brake Lines Removed
- Proportioning Valve removed
- Suspension All Out
- Engine Accessories Off
- Disassemble Spindle
Page 13 - July 2013
- Header Test Fit
- Clean Up Front Frame
- Clean Up Front Frame.
- Radiator Support Rust
- Remove Headlight Solenoids and Actuators
- Adjust Front Apron
- Fiberglass repairs
- Front Wiring Harness
- Frame Clean up
- Radiator Repair
- Painting Frame
- Remove Steering Column
- Remove Intake
Page 14 - August 2011
- Remove Wiper Motor
- Remove Firewall Brackets
- Inner Guard Re-Shape
- Firewall Clean Up
- More Firewall Tidy Up
- Painted Firewall
Page 15 - September 2011
- Engine Bay Repair & Paint
- Power Booster & Master Cylinder
- Repaint Block
- Cleaned up fluid lines
- Strip Front Brakes
- Auto Dipstick Tube
- Trans Vacuum Line
- Intake Mock Up
Page 16 - September 2011
- Wiring Harness
- Circuit Breakers
- Radiator Support Trial Fit
- Wiper Motor CleanUp
- Power Steering Pump Disassemble
- Headlight Relays
- Electric Fan Relays
- Refitting Parts to Firewall
- Fitted Borgeson Steering Box
Page 17 - October 2011
- Transmission Cooler
- AC Delete Housing
- New Front Brake Lines
- Compression AN Fittings on Auto Cooler Lines.
- Harness Repair
- Fit AC Delete Housing
- Strip Valve Covers
- Paint Valve Covers
Page 18 - October 2011
- Paint Water Pump
- Rebuild A/C Harness
- Intake Fitted
- Suspension Media Blasted
- Suspension Painted
- Front Brake Calipers Painted
- Heater Wiring
- Radiator & Fans
- Fitted Alternator
- Fitted Water Pump
- Fitted heater Hoses and Vacuum Cutt-off
Page 19 - November 2011
- Cleaned up Throttle cable
- New Springs in Distributor
- Fitted Starter and other Accessories
- Engine Wiring Harness
- Throttle Cable
- Cooler Lines
- Radiator Core
- Thermo Fan Mounting Brackets
- Headlight Actuators
- Radiator Mounted
- Fitted Horn
- Picked up A-Arms
Page 20 - November 2011
- Thermatic Fan Controller
- Trans Cooler Lines
- Power Steering Pump
- Speedo Cable
- Valve Covers
- Fuel Lines
- Remote Start Wiring
- Headers Fitted.
- A-Arms and Spindles started
- Wiper Door Actuator Fitted
Page 21 - November 2011
- A-Arms and Spindles continued
- Electric Fans Fitted
- Radiator Back in Again
- Tie Rods etc.
- Spreader Bar
- Rebuilt Front Calipers
- Packed and Fitted Front Bearings
- Set the Rotor RunOut
- Fitted the Calipers
- Bled Front Brakes
- Front Sway Bar
- Sealed Front Apron
Page 22 - November 2011
- Thematic Fan Controller
- Steering Column
- Front Air Sealing
- Exhaust Fitted
- Repaint Underside of Hood !!!!
- Stripped Underside of Hood Again
- Fitted Hood
- Seals for Radiator
- Grills Repainted
- Grills Aligned.
- Bumperettes Fitted
Page 23 - November 2011
- More Grill and Bumper Alignment
- New Tail Lights
- Charcoal Canister Fitted.
- Vacuum Hoses
- Emission Hoses
- Splash Shields
- Plug Wires and Shields
- Motor Close to Done
- Side Grills Fitted
- Side Sills Fitted
- First Wash in 9 Months
- Power Steering Pump Control Valve O-Ring
- Heat Shields
Page 24 - January 2012
- Wiper Switch
- Summernats 2012
- US Trip 2012
- Now What
- Fan Control Panel
- Caster for large Tires
- Tire Clearances
- AMTops
- Cup Holder
- Ipod Wiring
- Power Distribution
Page 25 - March 2012
- 186 Heads Rebuilt
- Some Photo Shots
- Shielding Mod for Dipstick
- Vacuum Tank Repair
- Garage Floor.
- Start Engine Strip
- Testing Temperature Senders
- Fan Brackets for New Radiator
- Motor Removal
- Charcoal Canister Moved Down
Page 26 - June 2012
- Clean up Mounts and Frame
- Underside of Hood Painted
- Transmission Tunnel Crack
- Vacuum Tanks
- Motor at Builders Shop QIM
- Detail Engine Bay
- Tunnel Insulation
- Engine back from QIM
Page 27 - July 2012
- Cam Choice
- Paint Motor Block
- Rebuild Distributor
- Shim Distributor End Play
- Tested Temperature Senders
- Re Assembly of Motor Externals
Page 28 - August 2012
- Thematic Fans Bracket
- DeWitts radiator
- Motor Rebuild Shots
- Power Steering Adjustment Bolts
- Refinish Car Jack
- Radiator Overflow Tank
Page 29 - September 2012
- Stripped Down Door
- Window Removed
- Regulator and Runners
- Locks and Handles
- Run Wires for Central Locking
- Clean Up Door
- Dynamat Inside Door
- Repaint Edge
- Finished Expansion Tank
- Door locks
- Fitting Power Window Regulator
- Door Outer Trim and Seals
- Glass Fittings
- First Attempt to Allign Glass
- TTop Squeaks !!!!!!!!
- American Car Nationals 2012
- Trial Fit new Door Panel
- Adjusted Head lights
- Fixed Loose Headlight Door
- Polished Wheels
Page 30 - December 2012
- New Brake Pads
- Swapped Back to Original Steering Wheel
- Clean & Detail under Hood
- Summernats 2013
- Carb Accelerator Pump
- Temp Guage & Fan Control
- Car shows
Page 31 - March 2013
- TH400 modulator vacuum hose
- Booster Vacuum Leak
- 5.25" Kick Panel Speakers
- New BB/LT1 Hood
- T-Top Squeaks
Page 32 - March 2013
- Run to Tom's Garage
- Aluminium Tie Rod Sleeves
- Outer Tie Rod end kit - Anti Bump Steer
- Replaced Accelerator Pump Again
- T-Top trim plugs
- Big Block/LT1 Hood
Page 33
- Install Nose Support Bracket
- Prepare Egg Crate Vents for paint
- Engine Bay Glass Repairs
- Replace Rear View Mirror Bracket
- Antique Automobile Radio
- Repainted Egg Crate Side Vents.
- Repainted LT1 Hood
Page 34
- Cleaned up Vette for Summernats
- Summernats 2014 Pictures
- US Trip January 2014
Page 35
- Missfire Issues
- Quadrajet Strip
- Larger Jets and Rods
- Setting the Front Toe
Page 36
- Alligning Trailing Arms to Chasis Rail
- Setting Rear Toe
- Waterless Wash
- Window Regulator Locking Bolt
- Rear Halo Drip Trim Sealing
Page 37
- Power Door Actuators
- Hidden SubWoofer in Storage Box
- Removing Window Glass Scratches
- Passenger Door Mechanism Refurbish
- Strip Old Seats
Page 38
- Restore Seat Frames
- New Seat Covers To Foams
- Covers to Seat Bottoms
Page 39
- Fitted Seat Back Trims
- Final Seat Assembly
- Colour Match Door Pulls
- Fitted Rebuilt Seats to car
Page 40
- Cleaned Garage Floor
- Patched Concrete
- Power Washed Garage Floor
- Etched Concrete
- Painted Garage Floor with 3 Coats
- Wait 3 Days to Dry
- New Clean Garage Ready for Use
- QuickJack 5000 Arrives
Page 41
- Checking Borgeson box is Centred
- Box Now Centred Properly
- Steering Column Now Correctly Centred
- However Steering is Offset !
- Borgeson Advise Box Clocked Incorrectly - Supplied New Free Replacement :-)
Page 42
- Strip Down Headers etc
- Remove Old Borgeson Box
- Fit New Borgeson Box
- Order Cup Head Bolts to Replace Borgeson Bolts
Page 43
- New Bolts Arrive
- Finish Fitting New Borgeson Box
- Replace Valve Cover Gaskets
- Alignment Done
- Add Drain Holes to Radiator Support
- Spray inside of Radiator Support with Rust Protector
Page 44
- Original Ralley Wheels with New Trim Rings
- Global West Upper and Lower Control Arms Arrived
- Removing Original Lower Control Arms
- Removed Original Upper Control Arms
Page 45
- Fitted Global West Upper Arms
- Fitted Global West Lower Arms
- ....
Next.....
The Car now.....
There is a thread on the Australian Corvettes forum but I decided to also post it here given the wider audience and experience that exists here.
Will take me a while to copy it all over.
Thank you.
 03-27-2017, 04:43 AM
#945
Melting Slicks

Thread Starter

I saw a thread earlier "For those afraid to drive your C3" and thought, sure i don't like to leave it parked places but i am ok to drive it.
But have not driven it for a couple of weeks since we got hit by a couple of bottles tossed from an oncoming car.
First bottle hit the hood and bounced over car but covered screen with liquid.
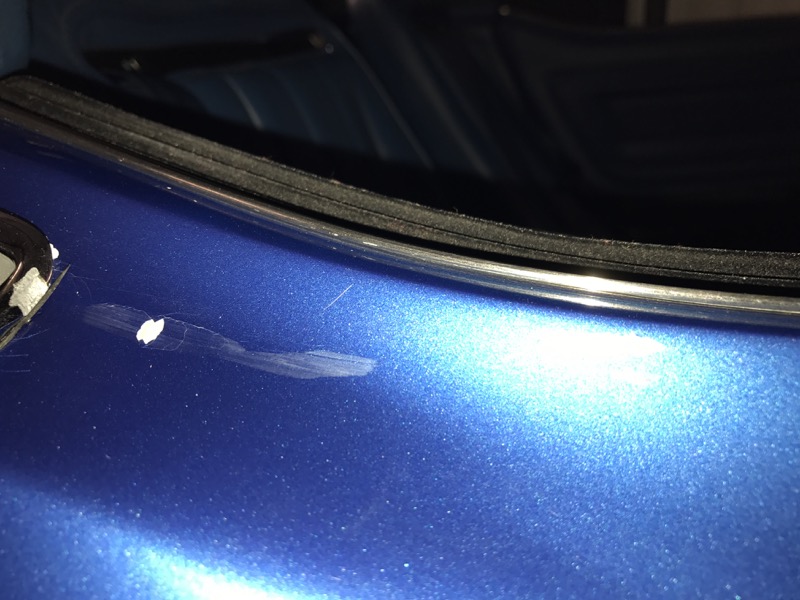
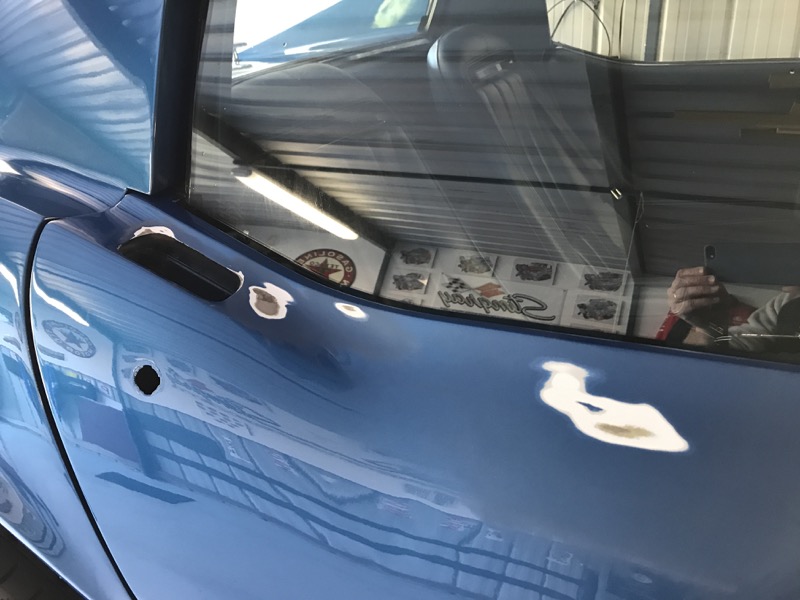
Second bottle hit the door and was hard enough to bend the door handle edge back a 1/4"
What was really scary when I thought about it afterwards was that my sons head was inches away from that second bottle !!!!
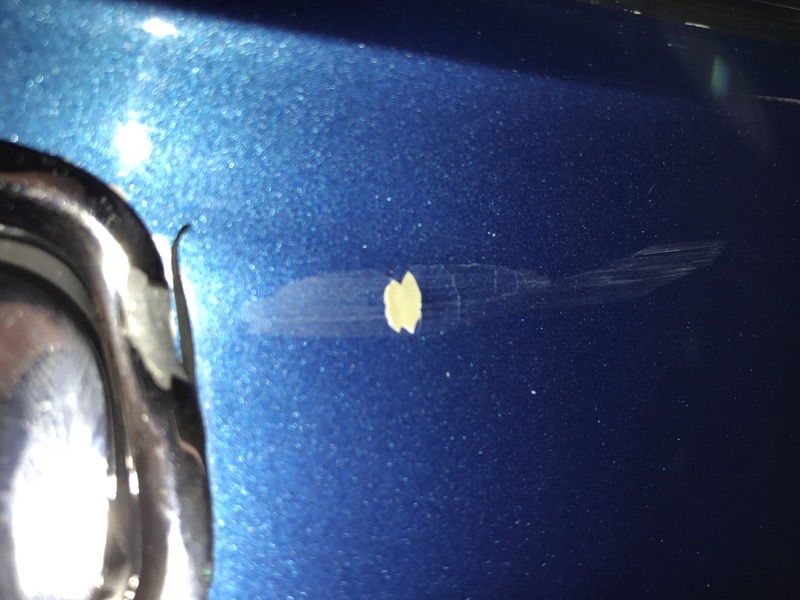
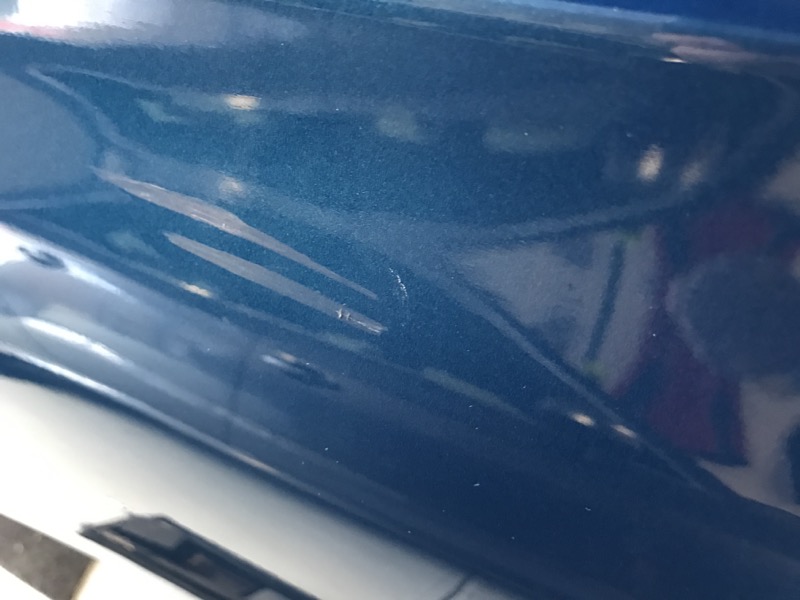
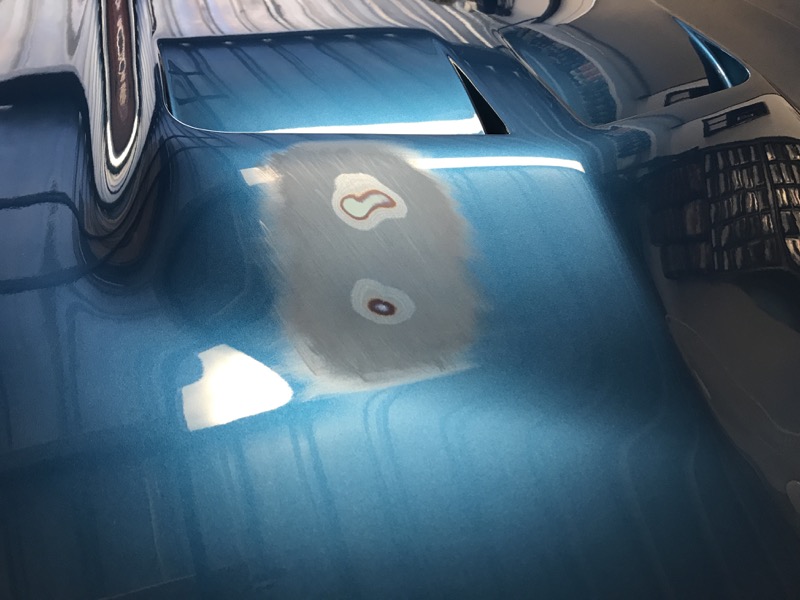
Cracked the hood and stress cracked the door door as well as through to primer or glass in a few spots.
What makes it worse is later that night my youngest sons said he had been hit as well.
Police said I was fourth caller in 30 minutes on same road.
In same week eldest sons car hit a Kangaroo and my wife S3 was broken into by smashing window and then leather seats ruined as they kneeled on glass pieces looking for how to start it.
Was a bad week
But have not driven it for a couple of weeks since we got hit by a couple of bottles tossed from an oncoming car.
First bottle hit the hood and bounced over car but covered screen with liquid.
Second bottle hit the door and was hard enough to bend the door handle edge back a 1/4"
What was really scary when I thought about it afterwards was that my sons head was inches away from that second bottle !!!!
Cracked the hood and stress cracked the door door as well as through to primer or glass in a few spots.
What makes it worse is later that night my youngest sons said he had been hit as well.
Police said I was fourth caller in 30 minutes on same road.
In same week eldest sons car hit a Kangaroo and my wife S3 was broken into by smashing window and then leather seats ruined as they kneeled on glass pieces looking for how to start it.
Was a bad week
Last edited by CraigH; 04-10-2023 at 05:28 AM.
03-27-2017, 07:02 AM
#946
Melting Slicks

Member Since: Jul 2010
Location: perth western australia
Posts: 3,098
Received 599 Likes
on
533 Posts

I saw a thread earlier "For those afraid to drive your C3" and thought, sure i don't like to leave it parked places but i am ok to drive it.
But have not driven it for a couple of weeks since we got hit by a couple of bottles tossed from an oncoming car.
Police said I was fourth caller in 30 minutes on same road.
But have not driven it for a couple of weeks since we got hit by a couple of bottles tossed from an oncoming car.
Police said I was fourth caller in 30 minutes on same road.
03-27-2017, 08:11 AM
#948
Team Owner

Member Since: Sep 2006
Location: Westminster Maryland
Posts: 30,173
Likes: 0
Received 2,878 Likes
on
2,515 Posts

Hi Craig,
VERY sorry to read this!
You must have been stunned!!!
I hope you can have the results taken care of without too much trouble!
Jerks everywhere these days.
Regards,
Alan
VERY sorry to read this!
You must have been stunned!!!
I hope you can have the results taken care of without too much trouble!
Jerks everywhere these days.
Regards,
Alan
03-27-2017, 08:39 AM
#949
Melting Slicks
Thread Starter
Absolutely Alan, there are mindless people everywhere. Just have to accept it was a random act and I was just in the wrong place at that time.
Have to say I saw one of the bottles coming and thought it was going to hit the windscreen. With both cars passing at over 80klms per hour it all happens very fast.
Police said just be lucky it was just water or beer in the bottle. They had seen the same thing with acid, brake fluid etc
Last edited by CraigH; 03-28-2017 at 01:15 AM.

 03-28-2017, 01:44 AM
#951
Instructor

Member Since: Dec 2016
Location: Wollongong Great Southern Land
Posts: 184
Received 30 Likes
on
26 Posts
Bastards! so glad you all made it safely through the week. Now the inconvenience of it all and they get away scott free, makes my blood boil. That sort of stuff is always in my mind when we take it out or park it somewhere. Is it just me or is getting more prevalent these days?
03-28-2017, 12:05 PM
#952
Race Director

My other half got them for me (us) for X-mas after an incident last summer.
An idiot decided to turn right from the left turn lane at a light when I had a green light middle lane. She was going to cut across all 3 lanes . Thankfully I had my truck which is a 1980 with steel bumpers and a steel push bar + I was only going 30 when I locked up the brakes. Scratched the heck put of the push bars and bumper. Pushed the BEEMER into the middle of the intersection.
A cop was sitting in the 7-11 and watched the entire incident. She tried to say I cut her off .... NOT. He was so pissed he locked her up for giving false info to a Police officer.
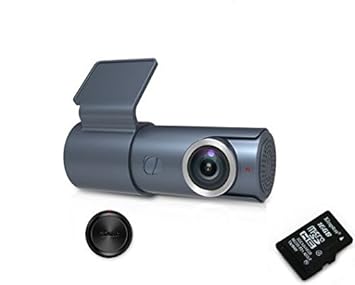
The cameras were under $40 each, Kodak. They mount with a suction cup and plug into the lighter. They have a micro card and loop record for 4 hours. They come in handy for a lot of things. Two friends have used in traffic accidents to prove they were in the right when hit.
An idiot decided to turn right from the left turn lane at a light when I had a green light middle lane. She was going to cut across all 3 lanes . Thankfully I had my truck which is a 1980 with steel bumpers and a steel push bar + I was only going 30 when I locked up the brakes. Scratched the heck put of the push bars and bumper.
Pushed the BEEMER into the middle of the intersection. A cop was sitting in the 7-11 and watched the entire incident. She tried to say I cut her off .... NOT. He was so pissed he locked her up for giving false info to a Police officer.
The cameras were under $40 each, Kodak. They mount with a suction cup and plug into the lighter. They have a micro card and loop record for 4 hours. They come in handy for a lot of things. Two friends have used in traffic accidents to prove they were in the right when hit.
04-17-2017, 04:24 AM
#953
Melting Slicks
Thread Starter
My other half got them for me (us) for X-mas after an incident last summer.
An idiot decided to turn right from the left turn lane at a light when I had a green light middle lane. She was going to cut across all 3 lanes . Thankfully I had my truck which is a 1980 with steel bumpers and a steel push bar + I was only going 30 when I locked up the brakes. Scratched the heck put of the push bars and bumper. Pushed the BEEMER into the middle of the intersection.
A cop was sitting in the 7-11 and watched the entire incident. She tried to say I cut her off .... NOT. He was so pissed he locked her up for giving false info to a Police officer.
The cameras were under $40 each, Kodak. They mount with a suction cup and plug into the lighter. They have a micro card and loop record for 4 hours. They come in handy for a lot of things. Two friends have used in traffic accidents to prove they were in the right when hit.
An idiot decided to turn right from the left turn lane at a light when I had a green light middle lane. She was going to cut across all 3 lanes . Thankfully I had my truck which is a 1980 with steel bumpers and a steel push bar + I was only going 30 when I locked up the brakes. Scratched the heck put of the push bars and bumper.
Pushed the BEEMER into the middle of the intersection. A cop was sitting in the 7-11 and watched the entire incident. She tried to say I cut her off .... NOT. He was so pissed he locked her up for giving false info to a Police officer.
The cameras were under $40 each, Kodak. They mount with a suction cup and plug into the lighter. They have a micro card and loop record for 4 hours. They come in handy for a lot of things. Two friends have used in traffic accidents to prove they were in the right when hit.
Started with my daily driver Mazda CX3 and mounted front and rear cameras with parking mode etc.
Went for some Goluk T3's , reasonably priced, good review and you access them from your phone to download videos, get a live view or configure them.
http://en.goluk.com/pages/t3-overview.html

Last edited by CraigH; 04-17-2017 at 04:28 AM.
06-24-2017, 02:27 AM
#954
Melting Slicks
Thread Starter
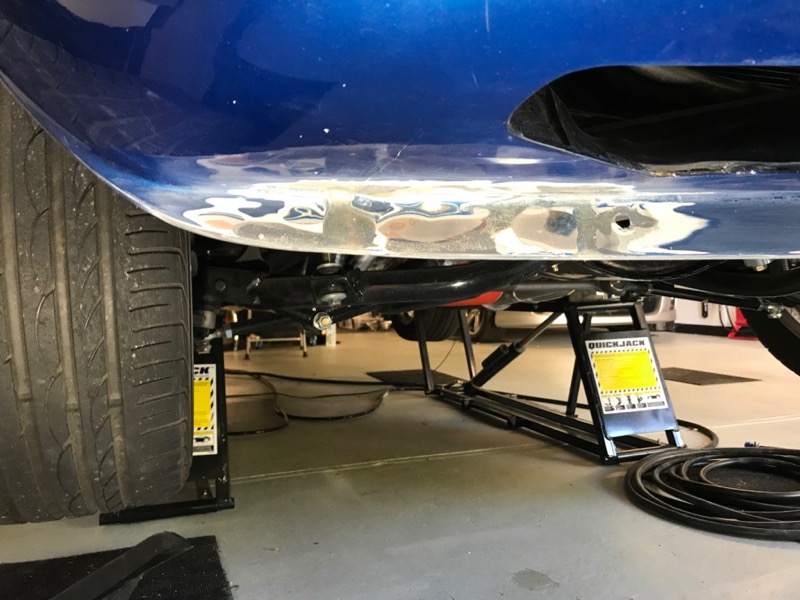
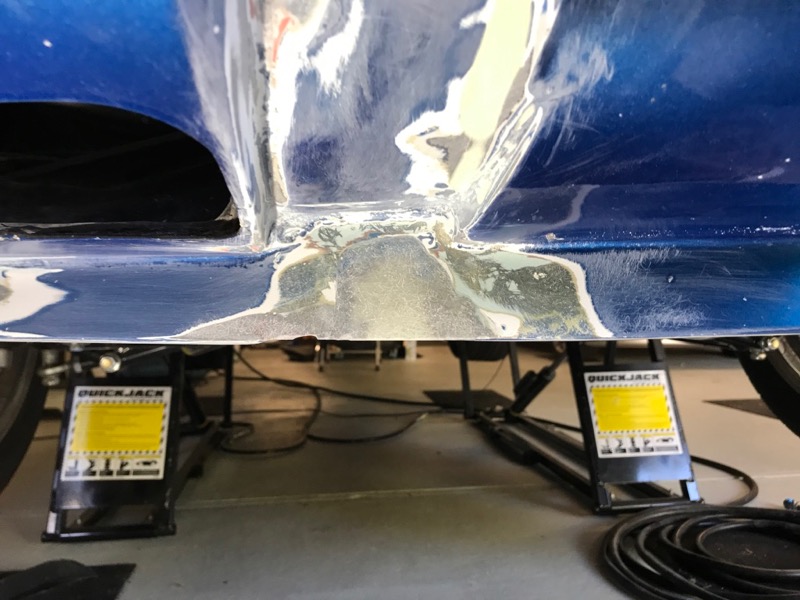
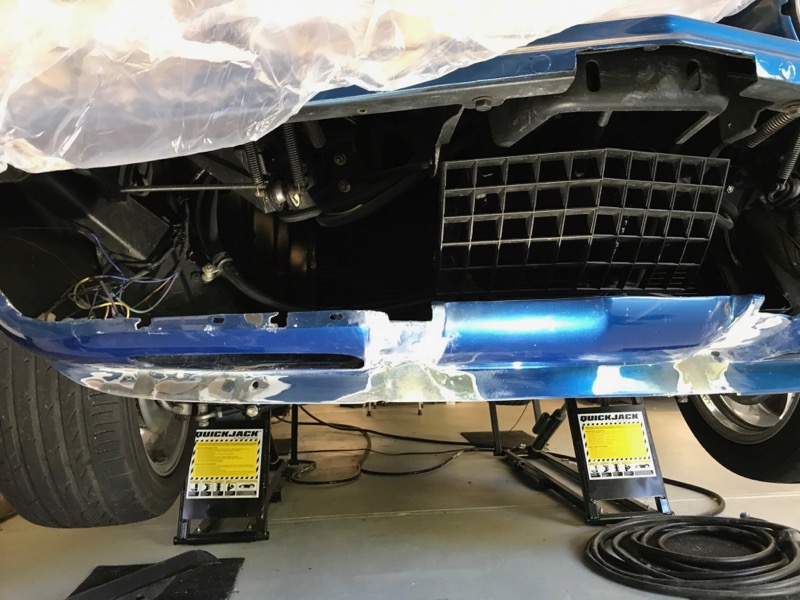
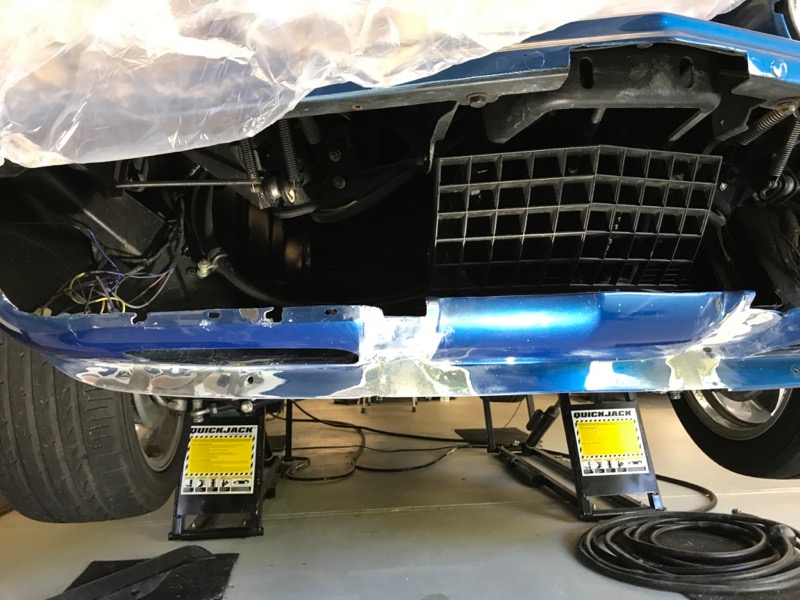
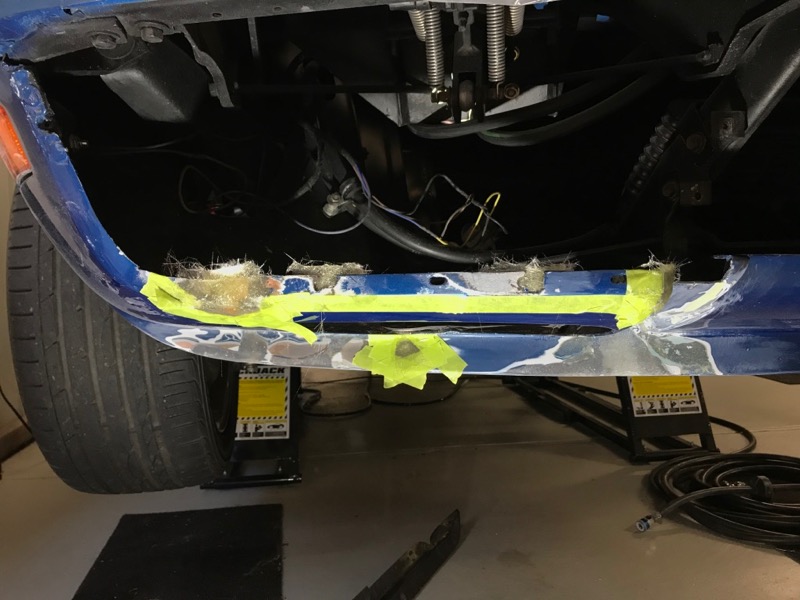
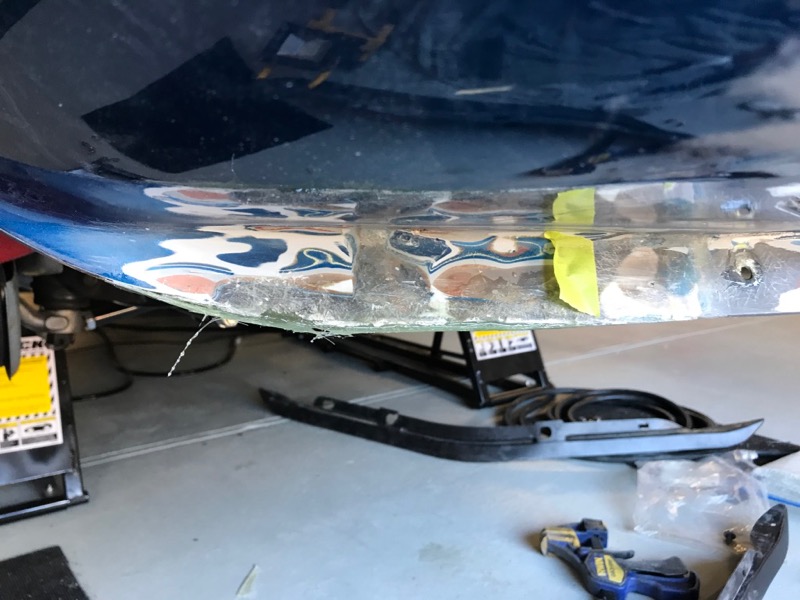
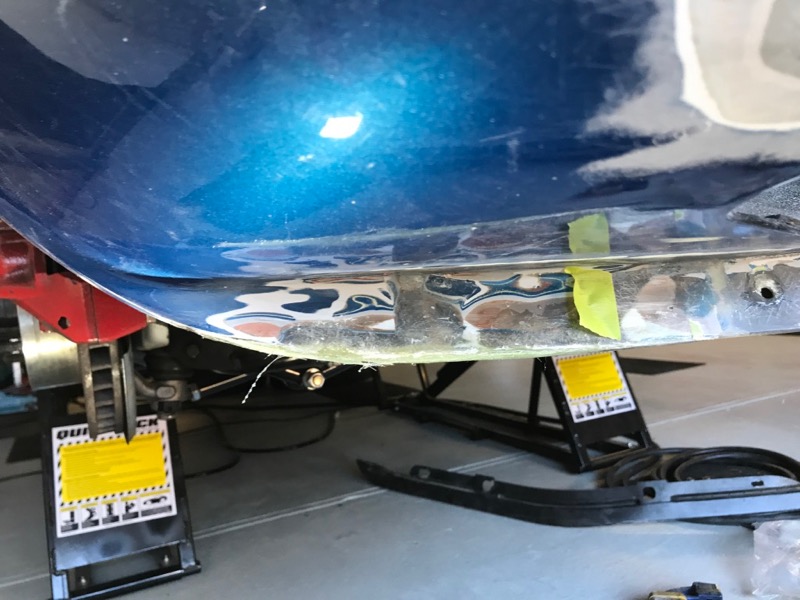
So I have started to doing some of the repair work before getting the Vette's paint done.
Insurance is covering the work but as i wanted to get a few extra things done as well as ensure the glass repair was done how i wanted it I started doing some prep work.
Painter is a friend so he is happy with me starting the work (in fact he was me technical College teacher for painting and panel beating that i did at night when i was 18 :-)
Started by washing Vette down with a citrus cleaner to help take some polish off then used Prepsol Wax and Grease remover.
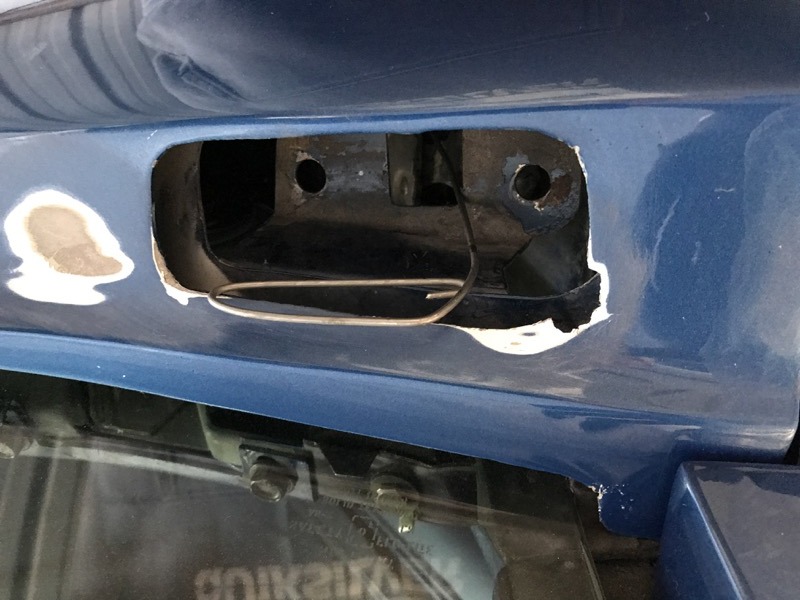
Sanded out the door damage but found the glass at rear of handle got shattered a bit so will need to lay some glass underneath and then repair.
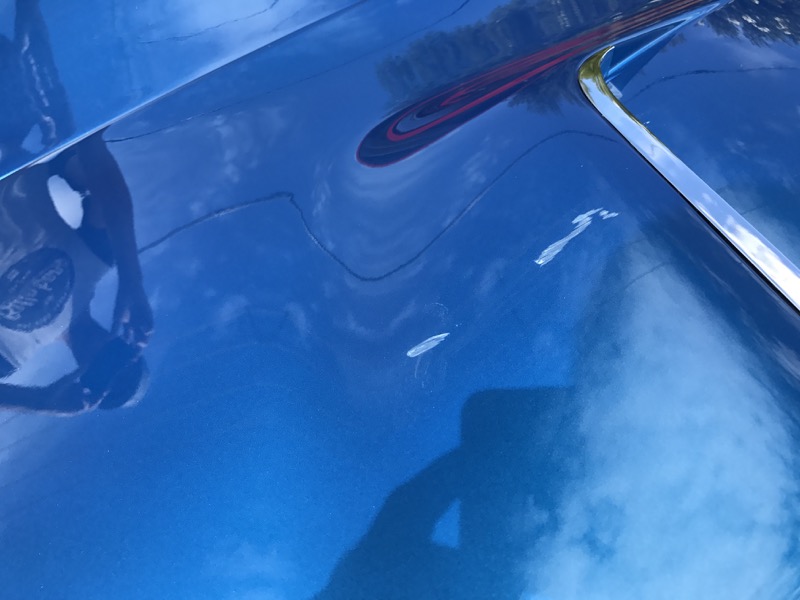
Hood has been sanded out but there is a crack on the crest of the scoop i will need to look at to see if its just in the paint or goes further.
I had a few little cracks on the front corner where the bumper bolts on so i wanted to have a closer look so I dismantled all the grills, bumpers etc.
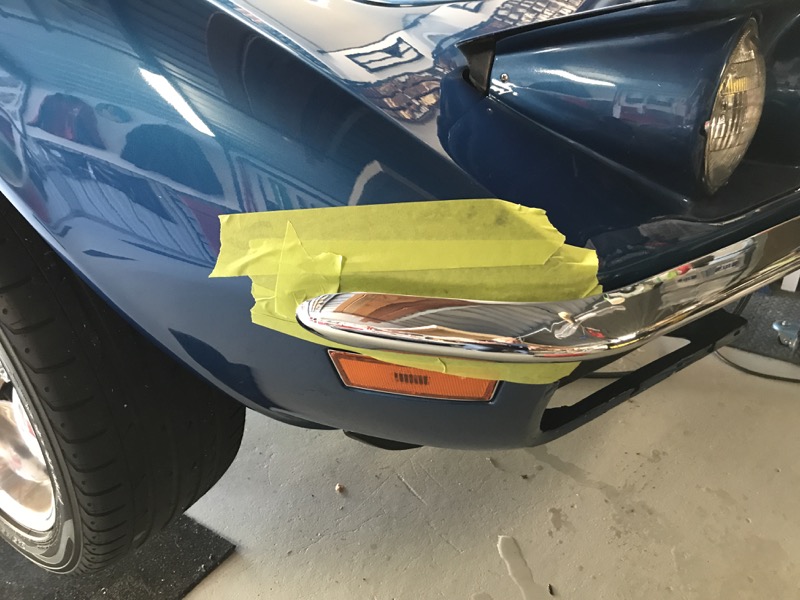
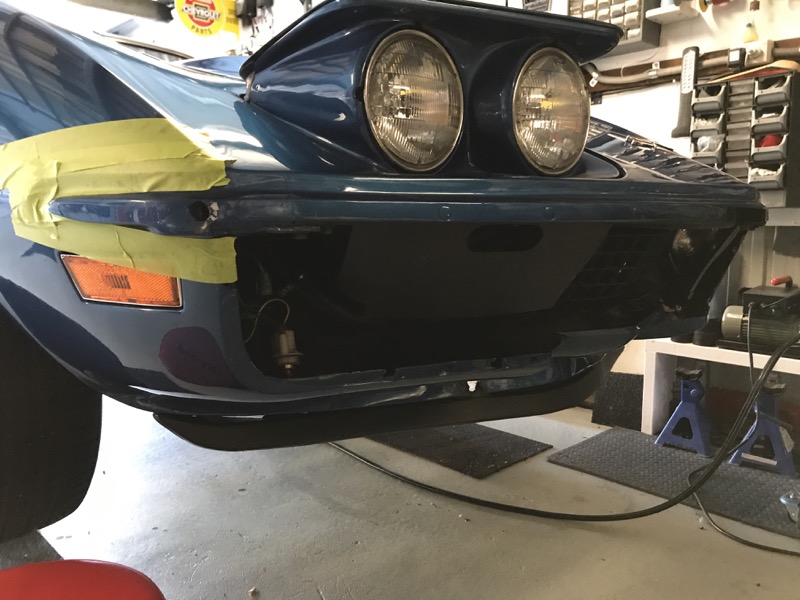
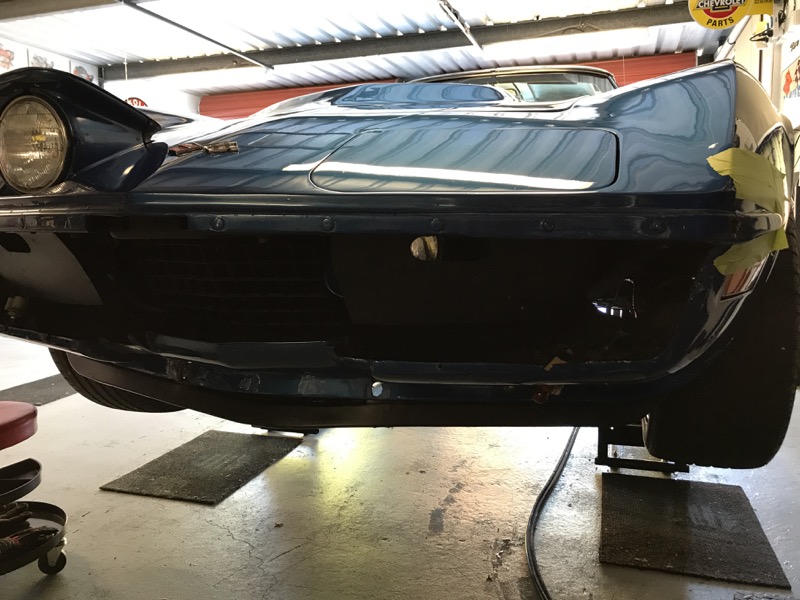
When i had it all off there was a chunk of filler from behind the bolt pad that came off. So I decided to grind out all the filler in the corner and found why it is cracking.
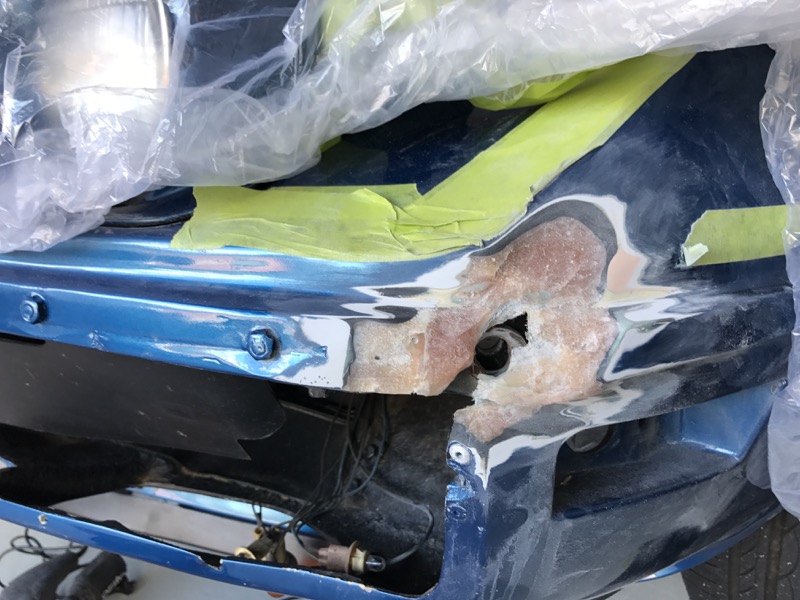
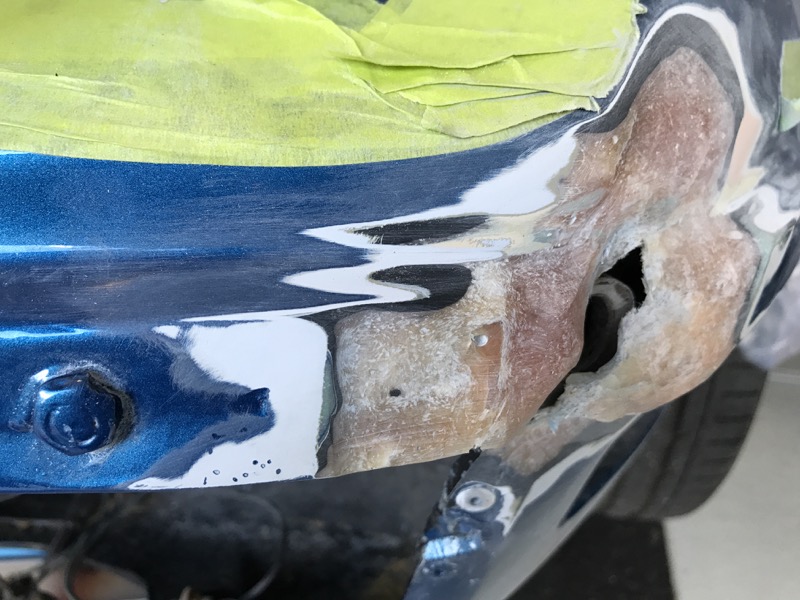
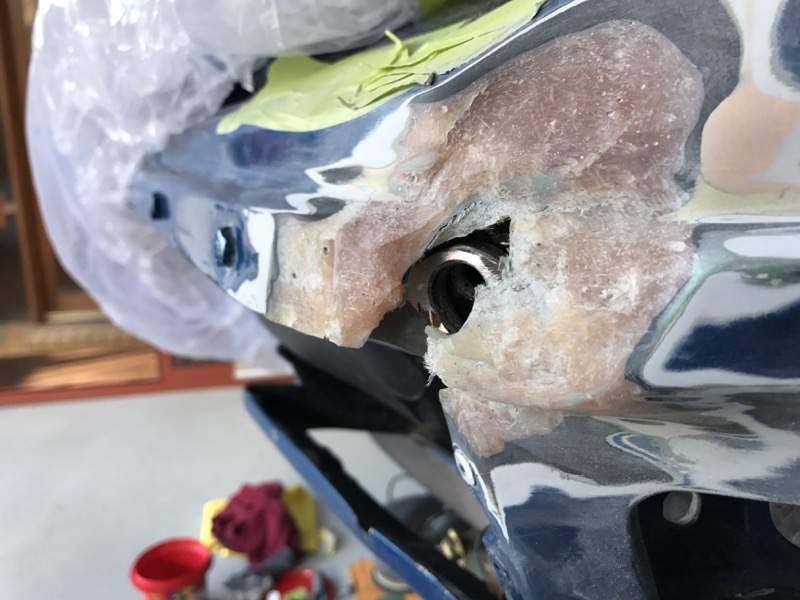
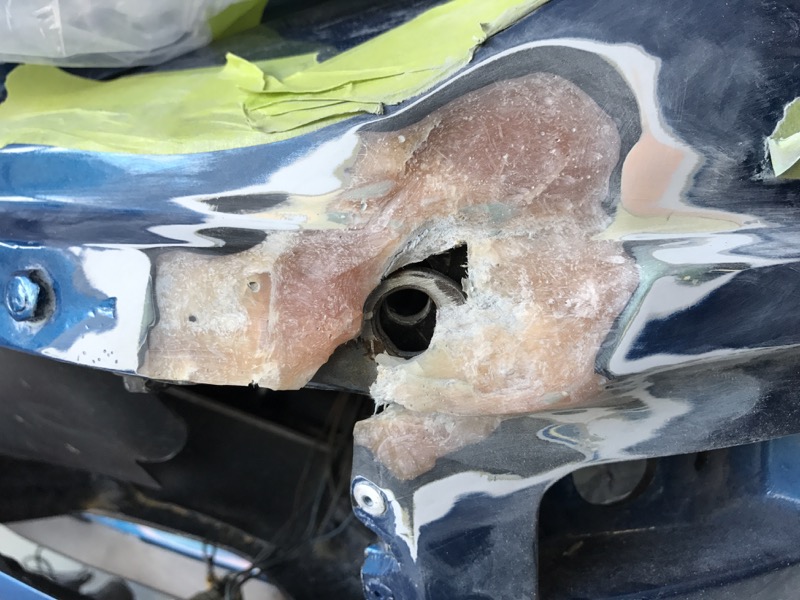
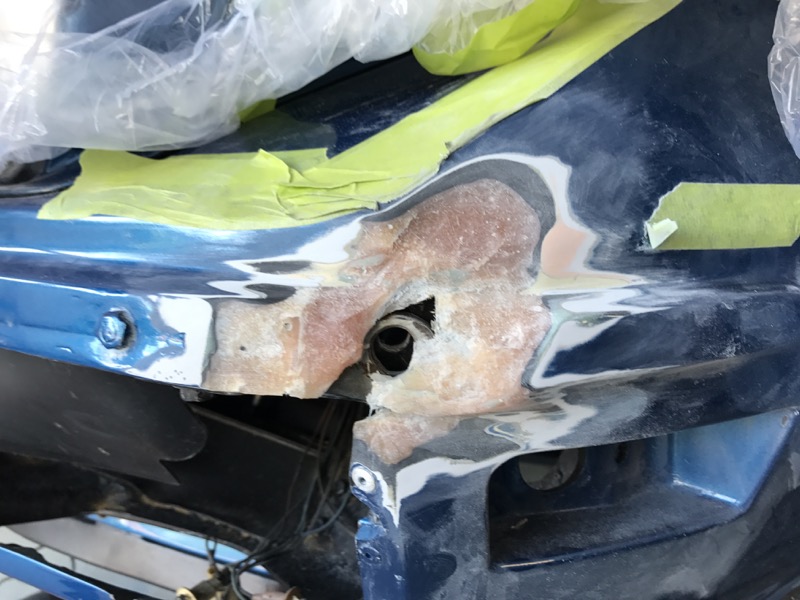

Needs to be glassed together a bit better than this ! At least i now have a point to work from. Not one of my favourite things to do but I can at least build it up with glass then contour it to shape.
Insurance is covering the work but as i wanted to get a few extra things done as well as ensure the glass repair was done how i wanted it I started doing some prep work.
Painter is a friend so he is happy with me starting the work (in fact he was me technical College teacher for painting and panel beating that i did at night when i was 18 :-)
Started by washing Vette down with a citrus cleaner to help take some polish off then used Prepsol Wax and Grease remover.
Sanded out the door damage but found the glass at rear of handle got shattered a bit so will need to lay some glass underneath and then repair.
Hood has been sanded out but there is a crack on the crest of the scoop i will need to look at to see if its just in the paint or goes further.
I had a few little cracks on the front corner where the bumper bolts on so i wanted to have a closer look so I dismantled all the grills, bumpers etc.
When i had it all off there was a chunk of filler from behind the bolt pad that came off. So I decided to grind out all the filler in the corner and found why it is cracking.
Needs to be glassed together a bit better than this ! At least i now have a point to work from. Not one of my favourite things to do but I can at least build it up with glass then contour it to shape.
Last edited by CraigH; 06-24-2017 at 03:24 AM.
08-26-2017, 12:18 AM
#955
Melting Slicks
Thread Starter
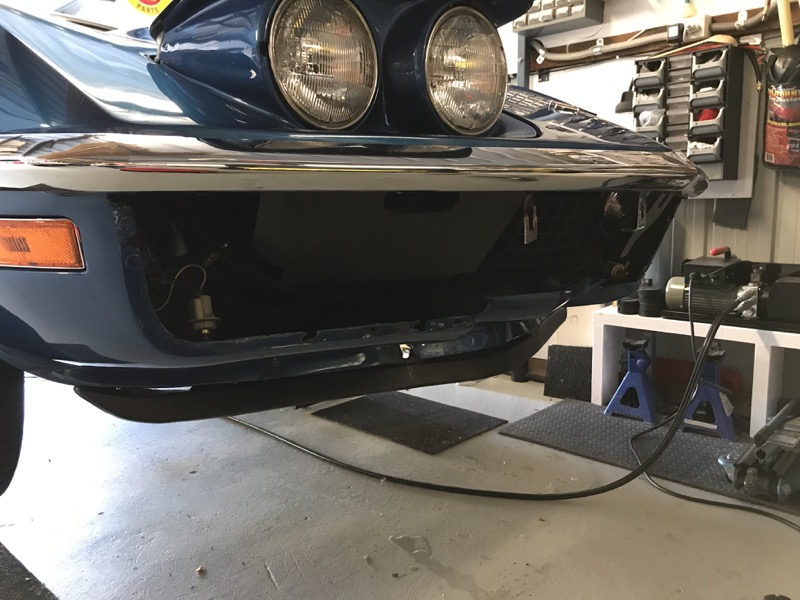
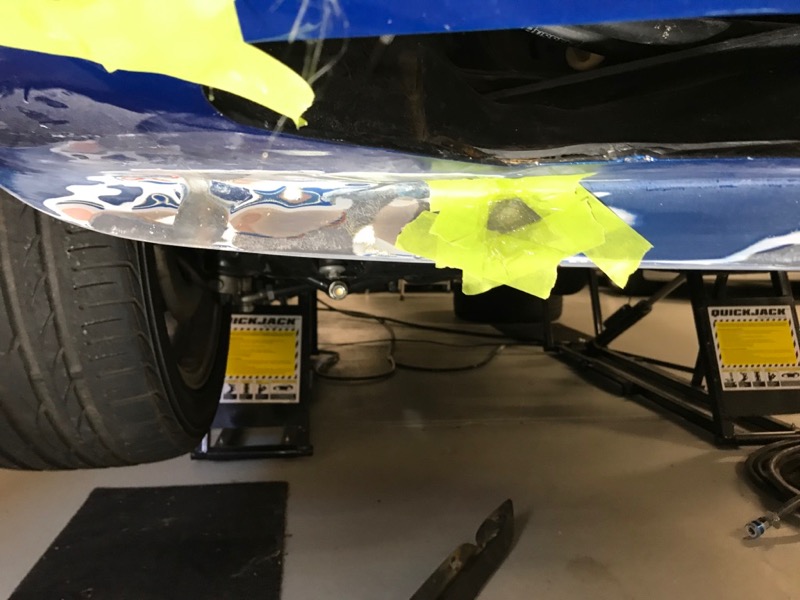
So before I tackle the front corner and door handle i decided to work on the front chin and the area around the front grills.
There was a number of fine cracks as well as some oversize holes for the bumperettes etc.
Grind down back and front the build up with layers of glass matt then grind it back. Spin and repeat :-)
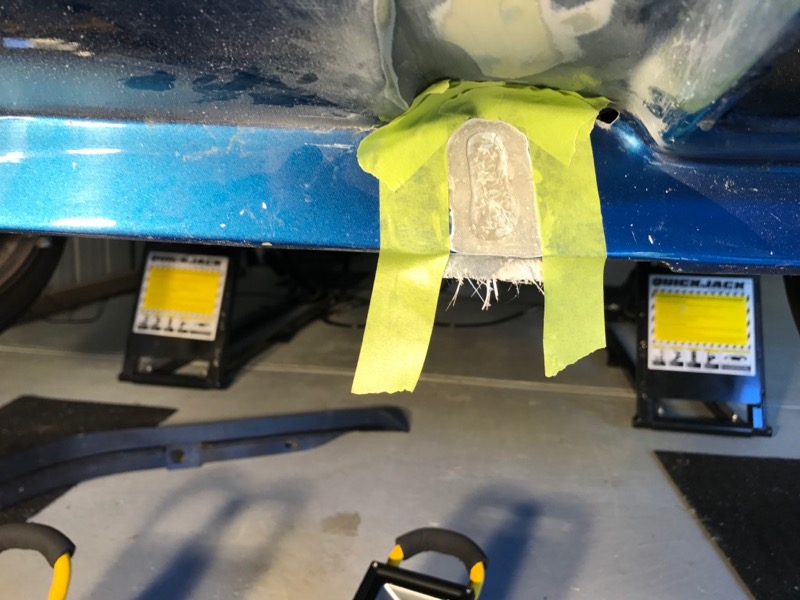
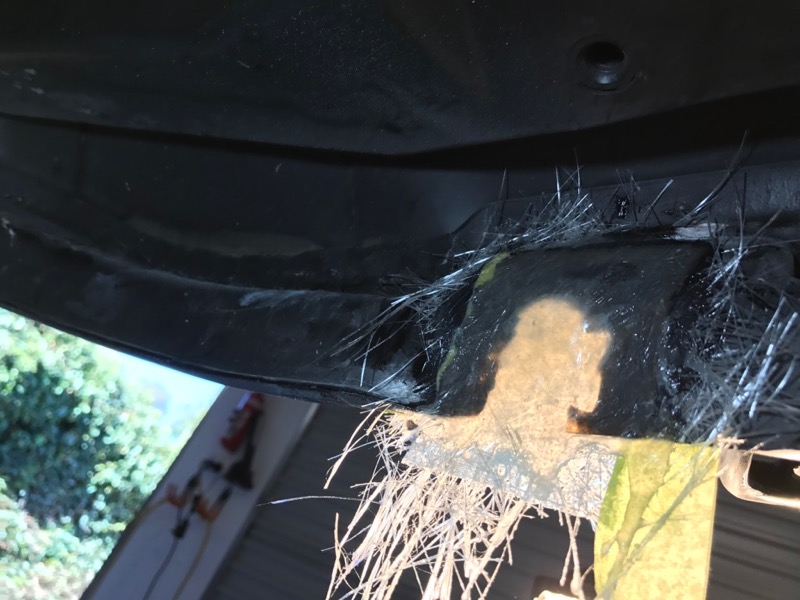
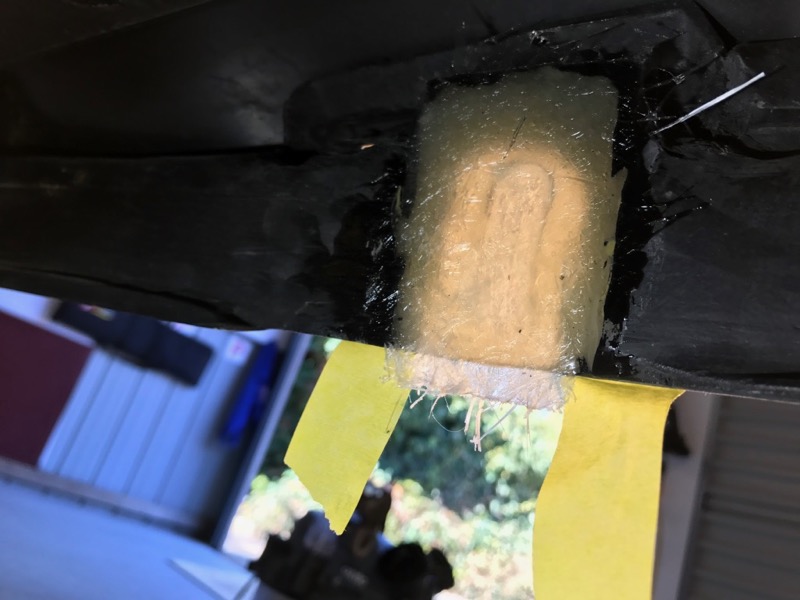
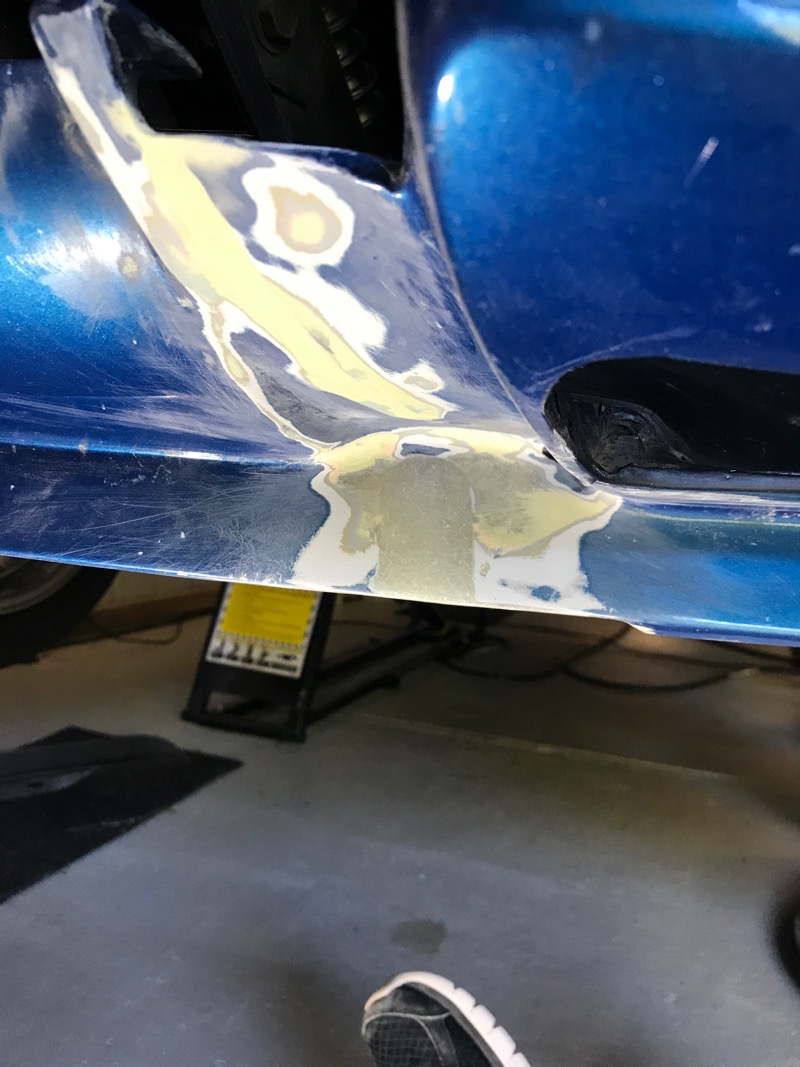
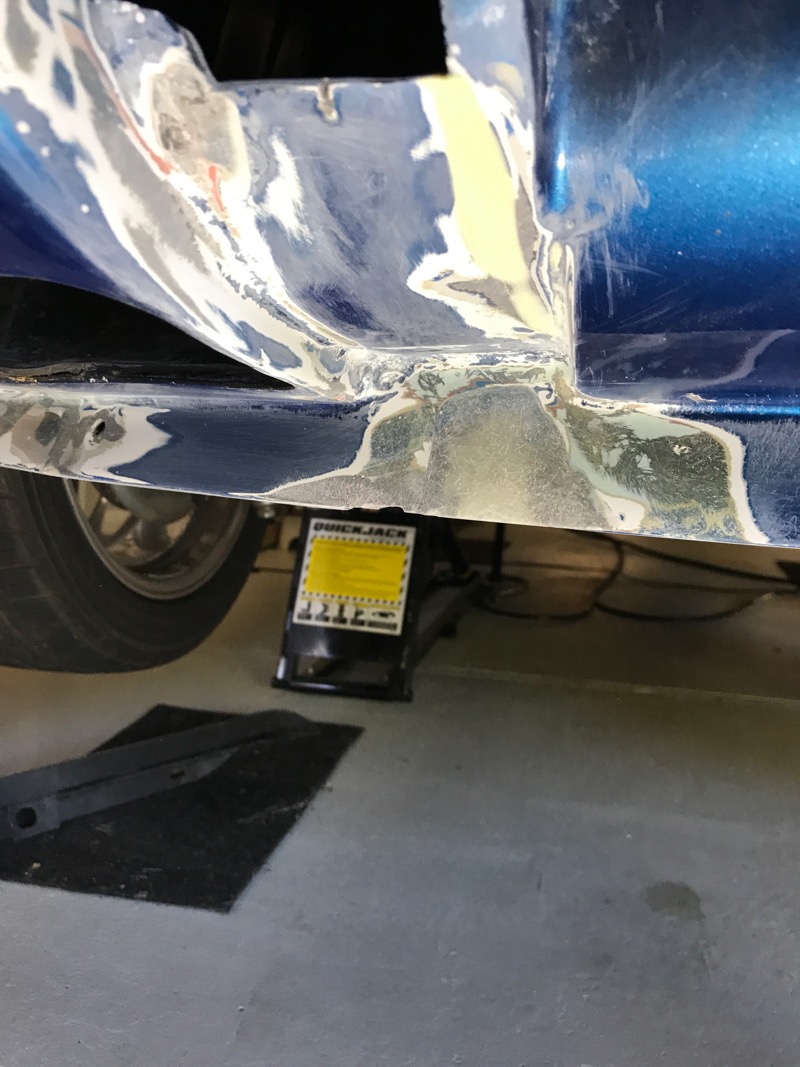
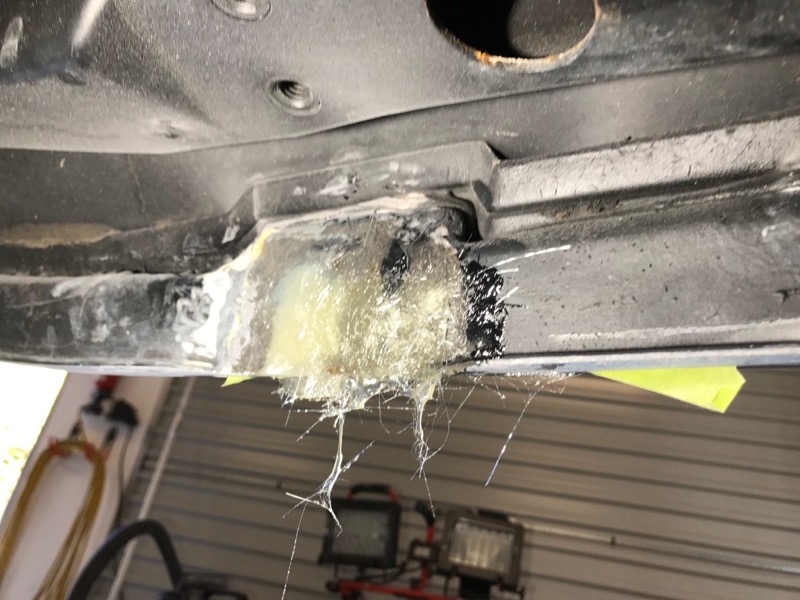
The bolt hole for the spoiler was 1/4" too high so that got ground out, filled then re-drilled lower. Centre pan tip had a slight crack as well.
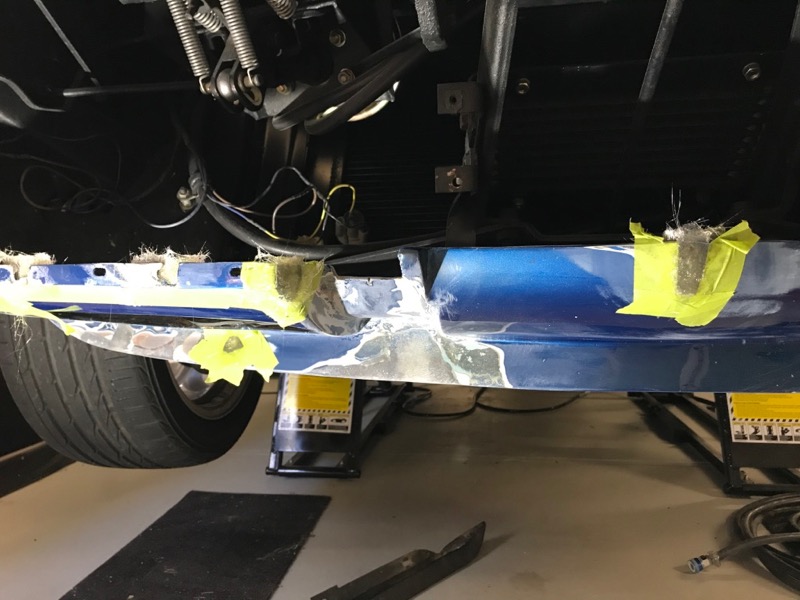
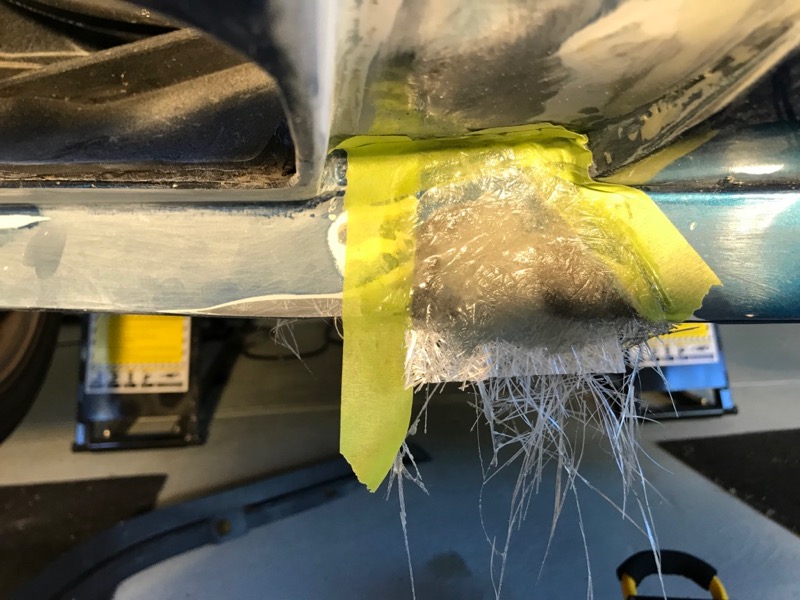
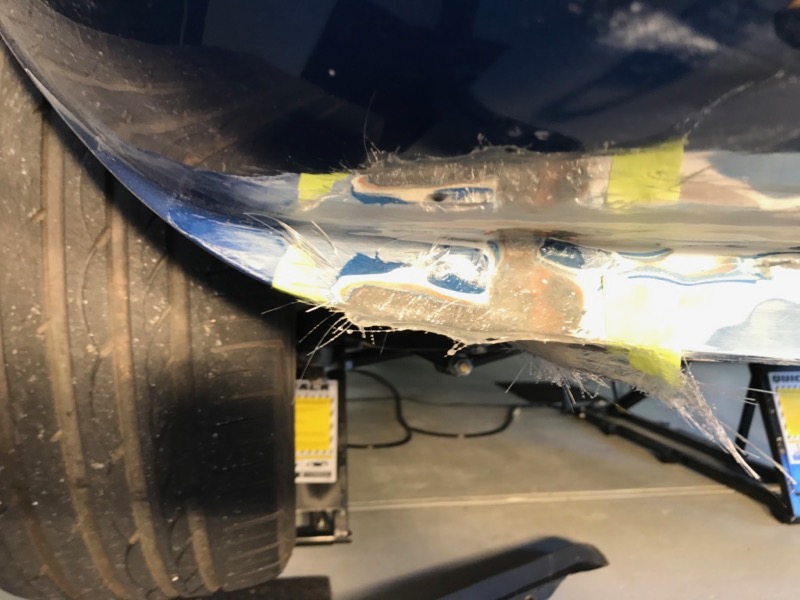
Now to reshape the end of the chin so it fits the spoiler better. Both sides were slightly different as the front of the drivers guard and chin had been replaced at some time in its past. This is the second glass build up in the last 10" inches of the chin to get the chin spoiler to sit better.
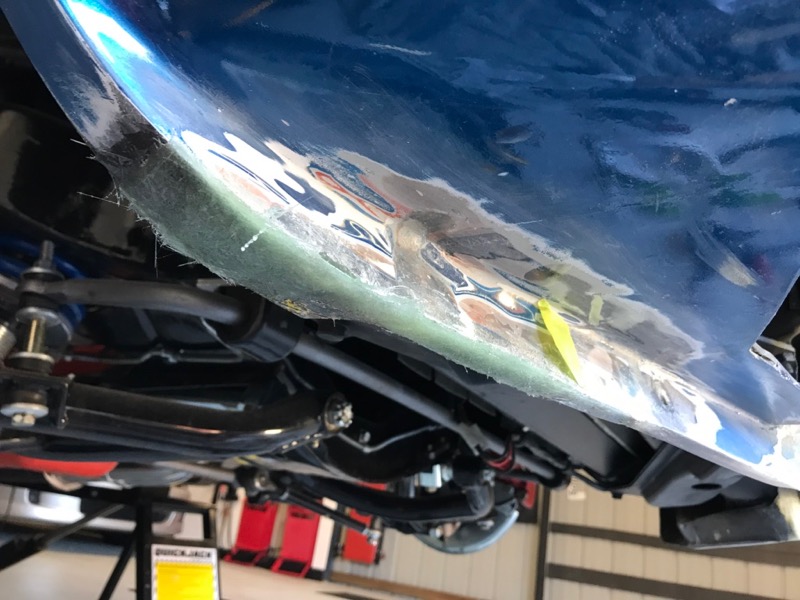
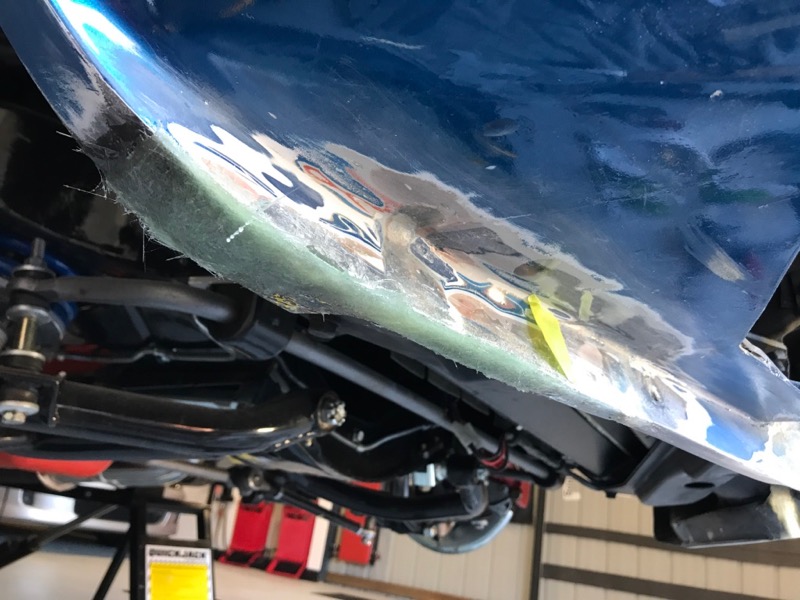
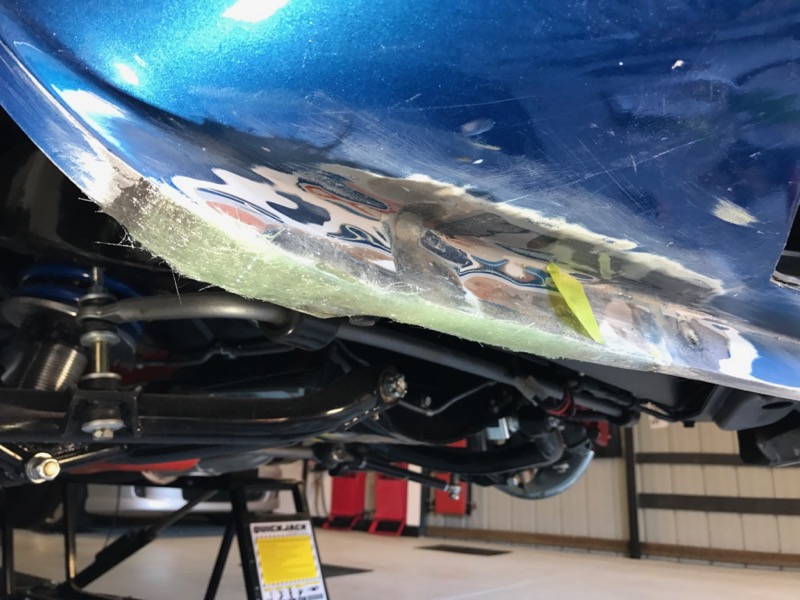
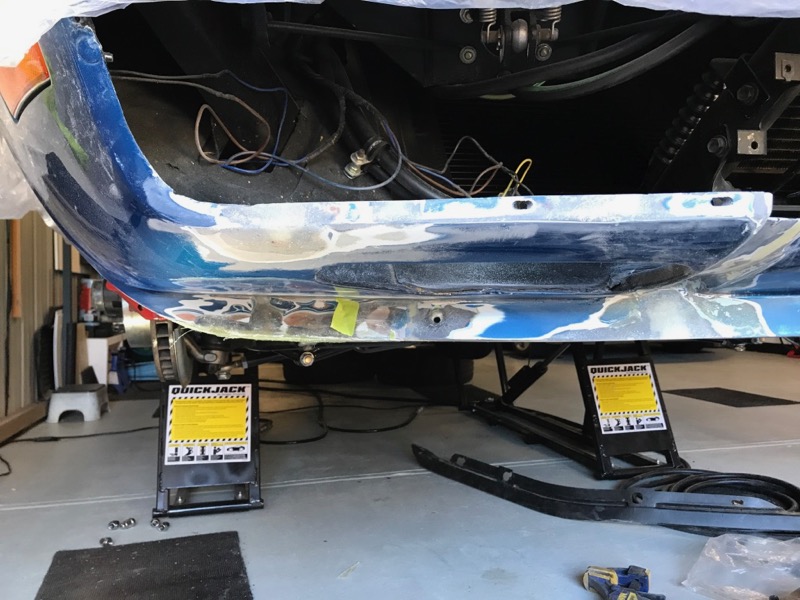
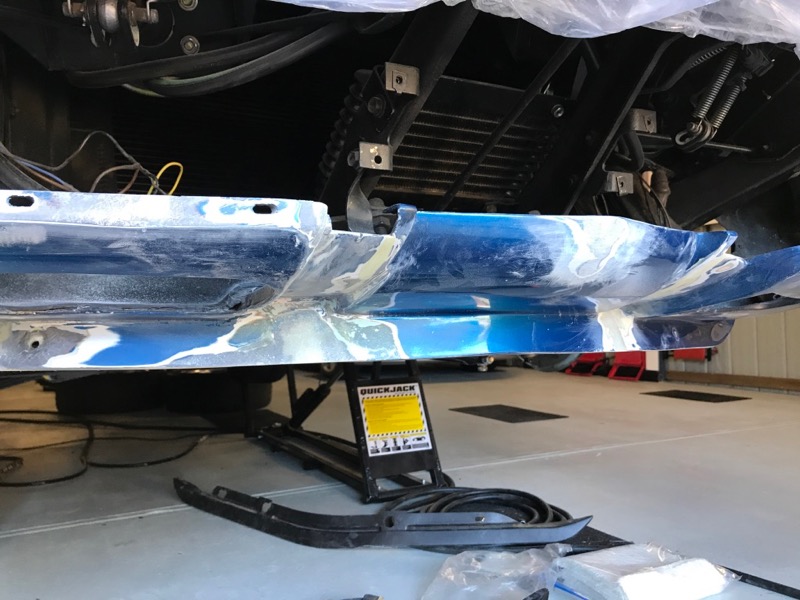
Some more grinding to do after this last lot of glass but the front chin spoiler now sits a lot better, certainly not perfect with some small gaps at each end but that a spoiler issue.
There was a number of fine cracks as well as some oversize holes for the bumperettes etc.
Grind down back and front the build up with layers of glass matt then grind it back. Spin and repeat :-)
The bolt hole for the spoiler was 1/4" too high so that got ground out, filled then re-drilled lower. Centre pan tip had a slight crack as well.
Now to reshape the end of the chin so it fits the spoiler better. Both sides were slightly different as the front of the drivers guard and chin had been replaced at some time in its past. This is the second glass build up in the last 10" inches of the chin to get the chin spoiler to sit better.
Some more grinding to do after this last lot of glass but the front chin spoiler now sits a lot better, certainly not perfect with some small gaps at each end but that a spoiler issue.
Last edited by CraigH; 04-10-2023 at 05:27 AM.
08-26-2017, 05:03 AM
#957


That was a terrible situation to have happen. Plenty of stupid people out their. I thought the anti rattling post is a great idea for those door rattles. I also think you are doing a nice job on those repairs. Picked up another tip with the tape to hold the material in place while doing the resin. I guess you are right saying wrong place at the wrong time. Glad your son was also safe. Carry on!
RVZIO
RVZIO
Last edited by SB64; 08-26-2017 at 05:04 AM.
08-26-2017, 05:36 AM
#958
Le Mans Master
So before I tackle the front corner and door handle i decided to work on the front chin and the area around the front grills.
There was a number of fine cracks as well as some oversize holes for the bumperettes etc.
Grind down back and front the build up with layers of glass matt then grind it back. Spin and repeat :-)


The bolt hole for the spoiler was 1/4" too high so that got ground out, filled then re-drilled lower. Centre pan tip had a slight crack as well.


Now to reshape the end of the chin so it fits the spoiler better. Both sides were slightly different as the front of the drivers guard and chin had been replaced at some time in its past. This is the second glass build up in the last 10" inches of the chin to get the chin spoiler to sit better.


Some more grinding to do after this last lot of glass but the front chin spoiler now sits a lot better, certainly not perfect with some small gaps at each end but that a spoiler issue.
There was a number of fine cracks as well as some oversize holes for the bumperettes etc.
Grind down back and front the build up with layers of glass matt then grind it back. Spin and repeat :-)
The bolt hole for the spoiler was 1/4" too high so that got ground out, filled then re-drilled lower. Centre pan tip had a slight crack as well.
Now to reshape the end of the chin so it fits the spoiler better. Both sides were slightly different as the front of the drivers guard and chin had been replaced at some time in its past. This is the second glass build up in the last 10" inches of the chin to get the chin spoiler to sit better.
Some more grinding to do after this last lot of glass but the front chin spoiler now sits a lot better, certainly not perfect with some small gaps at each end but that a spoiler issue.

 08-26-2017, 08:13 AM
#960
Melting Slicks
Thread Starter
Thanks guys, I feel really slack as it got damaged late March and I have still not got all the small repairs done.
Was a little shocked when it happened. Probably more when i sat back and thought about what could have happened.
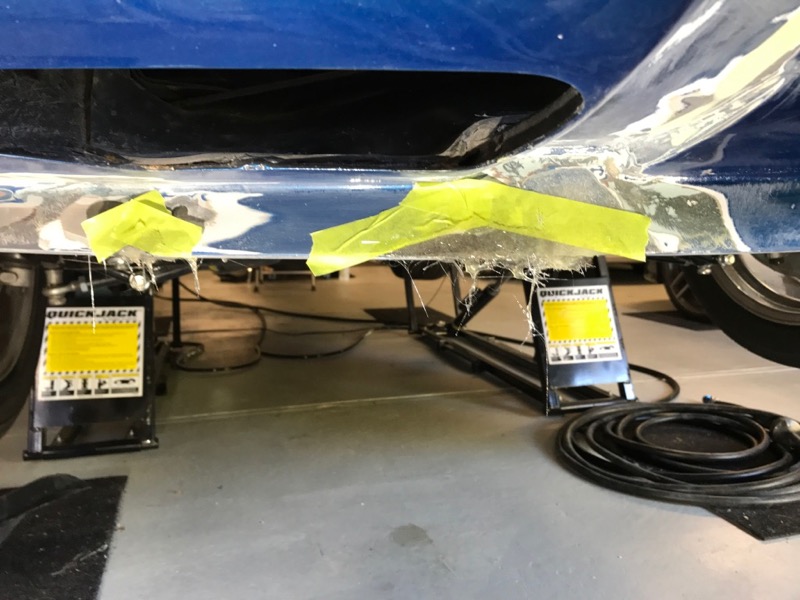
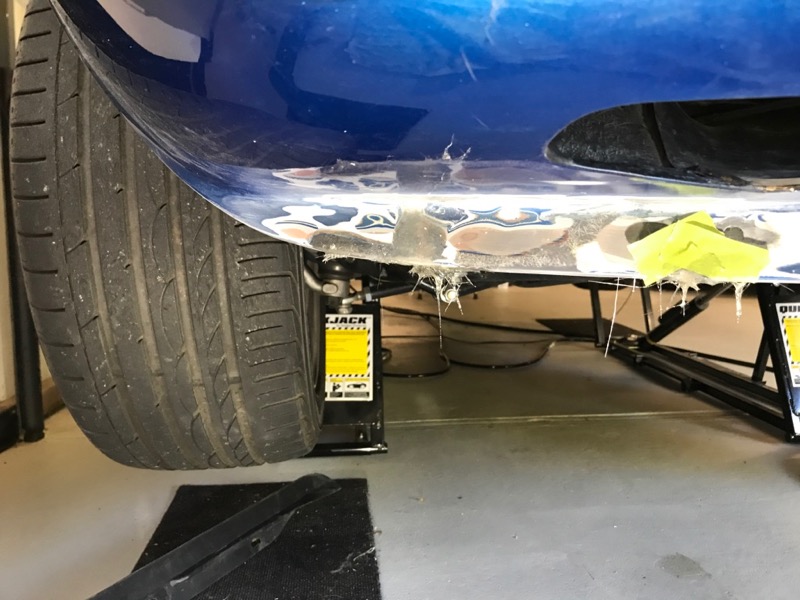
My painter and insurance company don't seem to be in a big rush so....Vette has been sitting up in the air for a number of months.
Really wanted to have ripped out the rear suspension and put my VanSteel coilovers in but that project has been pushed back a bit. :-(
Has been winter down here and fibreglassing in cold weather is not recommended so now its warming up I need to get in and finish the remainder of the repairs.
I got some Evercoat FiberTech filler delivered this morning so I can finish some of the areas. Was hard to track it down around here and you cant get it shipped from the US because it cant go in airline freight any more.
Don't need a lot of filler but wanted to use that in critical areas then Evercoat Rage for final smoothing.
Was a little shocked when it happened. Probably more when i sat back and thought about what could have happened.
My painter and insurance company don't seem to be in a big rush so....Vette has been sitting up in the air for a number of months.
Really wanted to have ripped out the rear suspension and put my VanSteel coilovers in but that project has been pushed back a bit. :-(
Has been winter down here and fibreglassing in cold weather is not recommended so now its warming up I need to get in and finish the remainder of the repairs.
I got some Evercoat FiberTech filler delivered this morning so I can finish some of the areas. Was hard to track it down around here and you cant get it shipped from the US because it cant go in airline freight any more.
Don't need a lot of filler but wanted to use that in critical areas then Evercoat Rage for final smoothing.