
1971 Journey


 01-27-2014, 10:45 PM
#682
Melting Slicks

Thread Starter

Thanks guys, really appreciate your comments.
This is my first Vette and in fact my fist attempt at anything like this.
The main reason I document it all is that I got so much help from other peoples posts along the way that I want to pass it on in case my experiences can help others.....also the older I get I think I will this more and more to remind me how how i did stuff in case I need to repair later on :-)
Started knowing nothing about it in 2009 and have come a long way but have a huge amount still to learn..
01-28-2014, 07:53 PM
#683
Terrorizing Orange Cones


Just came across this thread also. How did I miss your work until now? My fault but will continue to re-read and to follow.
Thanks for sharing. Outstanding effort! Beautiful results!
 02-20-2014, 11:43 PM
#684
Racer

Great thread, I've enjoyed every page I'm doing the same with my 72 with not as much talent and detail as yourself. When I'm doing a project I have to tell myself to "Take your time" here in Canada the weather isn't corvette weather until April.
My wife and I are traveling to Sydney in April we hope to see a few stingrays
Cheers,Barry
My wife and I are traveling to Sydney in April we hope to see a few stingrays
Cheers,Barry
02-21-2014, 08:00 AM
#685
Melting Slicks
well bout an hr's drive out of the city, "vette's in the vines"
sorry, dont mean to hijack your thread craig
Last edited by riverracer au; 02-21-2014 at 08:03 AM.
02-21-2014, 04:48 PM
#686
Melting Slicks
Thread Starter
Not at all Alan, I was going to look up the dates for it myself and suggest it to Barry.
Additionally looking at the NSW Corvette Clubs web site may be valuable if your going to be in Sydney.
http://nswcorvettes.com.au/forum/index.php
Also thanks for the nice comments on the thread guys, I feel like I have been a bit slack recently so need to get back into doing more stuff on the vette.
Craig
03-12-2014, 12:05 AM
#687
Instructor
[QUOTE=CraigH;1585766935]Gave all the chrome work and wheels a polish.
Wheels were wet sanded first 1000, 1500, 2000 as below, ready for Powerball
What kind of polish do you use on your wheels? I used Adams 2 part metal polish today and am not very happy with the results.
On my factory wheels I used Bush Super Aluminum Shine Polish and it did a very good job so I am thinking of getting some again to see if it works well with the Coys.
03-14-2014, 07:58 PM
#688
Melting Slicks
Thread Starter
[QUOTE=vetteman1981;1586382312]
Ok I waited till I was back from Work traveling to answer this.
Mothers
Power metal polish
Mag and metal polish
meguirs
All metal polish
Billet polish
autosol
Metal polish
Brilliant
Chrome polish
Aluminium polish
Ok so I found the alloy used in coys wheels can be got a to good if not great shine but not a real high shine like chrome.
So starting with something fairly abrasive like wet and dry work through the tough marks then move to an abrasive polish like Autosol or one of the Mothers ones.
Finish it off with mothers billet or the brilliant polishes.
It's a lot of work for a good result but it's not an amazing difference.
Biggest thing for me next time is to use a yellow power ball to start with the more abrasive polishes rather than a red one.
Remember less polish is better than more - I found this many times when I clogged up the power ***** and they stopped working well.
Gave all the chrome work and wheels a polish.
Wheels were wet sanded first 1000, 1500, 2000 as below, ready for Powerball
What kind of polish do you use on your wheels? I used Adams 2 part metal polish today and am not very happy with the results.
On my factory wheels I used Bush Super Aluminum Shine Polish and it did a very good job so I am thinking of getting some again to see if it works well with the Coys.
Mothers
Power metal polish
Mag and metal polish
meguirs
All metal polish
Billet polish
autosol
Metal polish
Brilliant
Chrome polish
Aluminium polish
Ok so I found the alloy used in coys wheels can be got a to good if not great shine but not a real high shine like chrome.
So starting with something fairly abrasive like wet and dry work through the tough marks then move to an abrasive polish like Autosol or one of the Mothers ones.
Finish it off with mothers billet or the brilliant polishes.
It's a lot of work for a good result but it's not an amazing difference.
Biggest thing for me next time is to use a yellow power ball to start with the more abrasive polishes rather than a red one.
Remember less polish is better than more - I found this many times when I clogged up the power ***** and they stopped working well.
Last edited by CraigH; 03-14-2014 at 11:52 PM.
03-15-2014, 07:45 PM
#689
Instructor
[QUOTE=CraigH;1586406707]
Ok I waited till I was back from Work traveling to answer this.
Mothers
Power metal polish
Mag and metal polish
meguirs
All metal polish
Billet polish
autosol
Metal polish
Brilliant
Chrome polish
Aluminium polish
Ok so I found the alloy used in coys wheels can be got a to good if not great shine but not a real high shine like chrome.
So starting with something fairly abrasive like wet and dry work through the tough marks then move to an abrasive polish like Autosol or one of the Mothers ones.
Finish it off with mothers billet or the brilliant polishes.
It's a lot of work for a good result but it's not an amazing difference.
Biggest thing for me next time is to use a yellow power ball to start with the more abrasive polishes rather than a red one.
Remember less polish is better than more - I found this many times when I clogged up the power ***** and they stopped working well.
By wet and dry are you referring to sanding? If so I will have to get some help on that as I am sure I will screw them up.
The wheels for the most part look pretty good. I was hoping to get them to shine like my factory wheels but now I think that will not happen because of the differences in the aluminum. I can live with that but there is a small area on one for the wheels that has some hazing or something that I couldn't get out. You have your face about a foot away to see it, so it not that bad I just want to get that off.
03-15-2014, 09:53 PM
#690
Melting Slicks
Thread Starter
[QUOTE=vetteman1981;1586413703]
By wet and dry are you referring to sanding? If so I will have to get some help on that as I am sure I will screw them up.
The wheels for the most part look pretty good. I was hoping to get them to shine like my factory wheels but now I think that will not happen because of the differences in the aluminum. I can live with that but there is a small area on one for the wheels that has some hazing or something that I couldn't get out. You have your face about a foot away to see it, so it not that bad I just want to get that off.
You only need sanding with wet and dry paper if thee are marks in them, so sounds like you can skip that step and just polish them.
I would suggest a powerball or powercone to do the job and it will get a good shine and remove the haze.
By wet and dry are you referring to sanding? If so I will have to get some help on that as I am sure I will screw them up.
The wheels for the most part look pretty good. I was hoping to get them to shine like my factory wheels but now I think that will not happen because of the differences in the aluminum. I can live with that but there is a small area on one for the wheels that has some hazing or something that I couldn't get out. You have your face about a foot away to see it, so it not that bad I just want to get that off.
I would suggest a powerball or powercone to do the job and it will get a good shine and remove the haze.
03-16-2014, 01:24 PM
#691
Melting Slicks
Wonderful thread Craig, as most I've enjoyed it right from page one. I spent two years in your wonderful country from 2002-2004. I lived/worked in Adelaide, Brisbane and Surfer's Paradise. Would go back in a heartbeat. Keep enjoying your beautiful ride, and keep us updated with any changes.
I noticed earlier on you had ordered a new rear spring. Has this been installed yet?
I noticed earlier on you had ordered a new rear spring. Has this been installed yet?
03-17-2014, 12:46 AM
#692
Melting Slicks
Thread Starter
Wonderful thread Craig, as most I've enjoyed it right from page one. I spent two years in your wonderful country from 2002-2004. I lived/worked in Adelaide, Brisbane and Surfer's Paradise. Would go back in a heartbeat. Keep enjoying your beautiful ride, and keep us updated with any changes.
I noticed earlier on you had ordered a new rear spring. Has this been installed yet?
I noticed earlier on you had ordered a new rear spring. Has this been installed yet?
Have not got to doing the rear suspension fully yet, I am told I need to leave some till I retire.... :-)
Its on my list but the list is so long.
03-27-2014, 12:40 AM
#693
Melting Slicks
Thread Starter
Had a very frustrating daya a week back.
Took the 71 out for a run and all was good but I started to notice a slight hesitation on exiting a circle when I came back onto the throttle.
Over the next day it developed into a signifigant missfire when you got onto the throttle.
Went for a run with a mate and convinced ourselves it was electricat - how wrong were we :-)
So I spent the morning doing each of these to pinpoint it.
- Replaced plugs
- Replaced leads
- Replaced coil
- Checked voltages
- Checked timing
- Checked advance springs and changed them
- Changed electronic ignition module
No better !!!!!
- Checked fuel flow through pump fine.
- Changed filter in carb
- Checked all vacuum lines
No better !!!!!
- Changed carbs
All fine ....as I said how wrong were we.
So now I have to work out what is wrong with my carb, working one day missfire under light acceleration the next.
Idles fine.
Out came the papers from lars etc
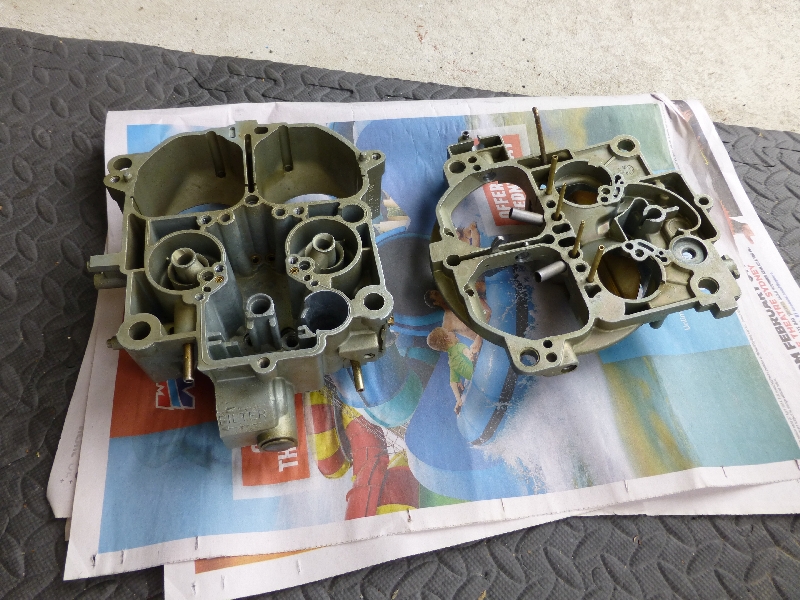
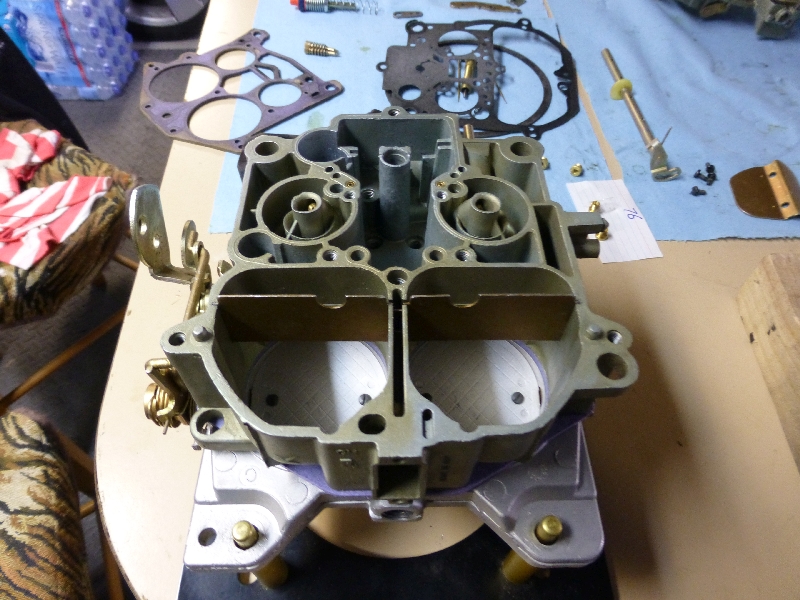
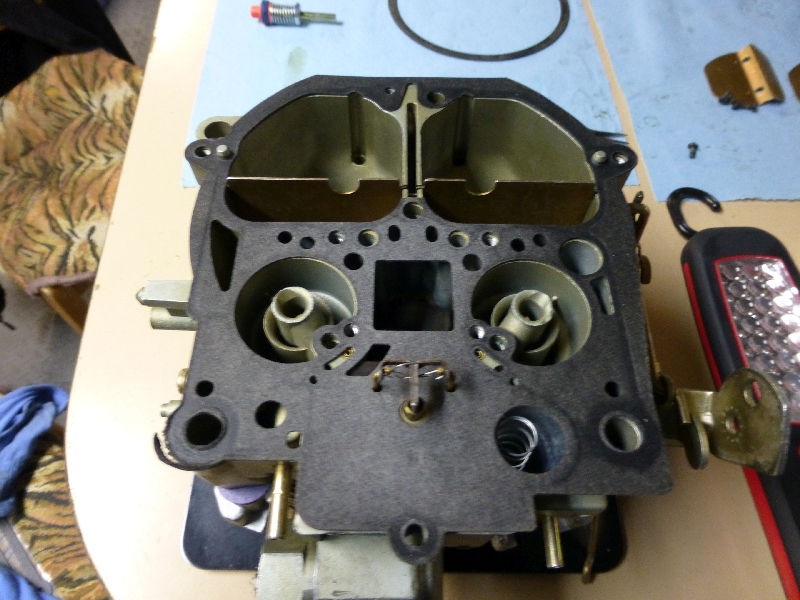
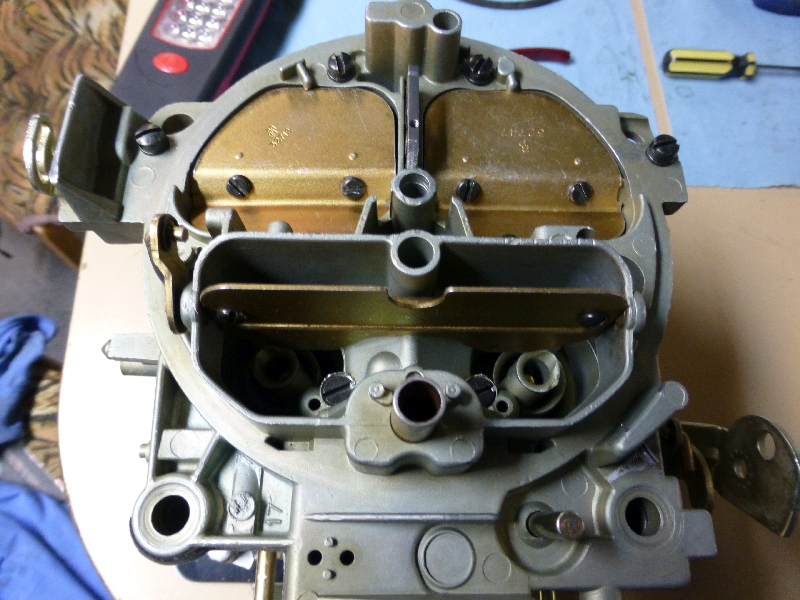
I decided this is as good a time as any to rejet the carb for the new motor so I stripped the carb down.
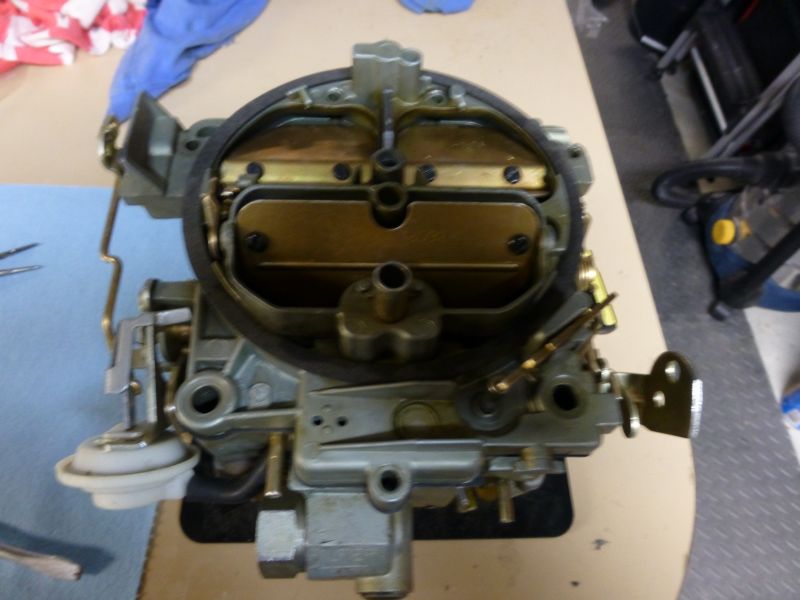
Removed seconday hangers etc.
Removed all the top bolts.

Remove bolt that holds Choke assembly.
Remove roll pin from accelerator pump lever.
Lift top off carb.
Remove accelerator pump.
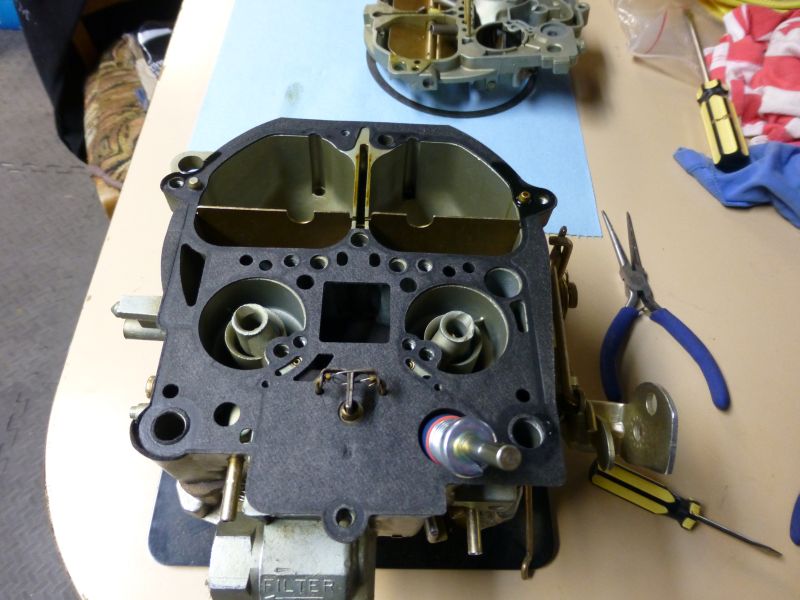
Remove top gasket.
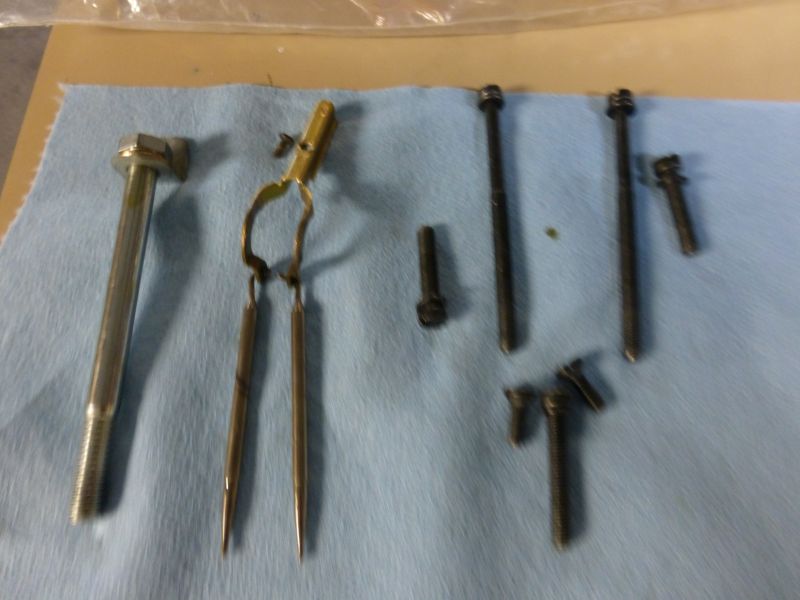
Remove rods and assembly.

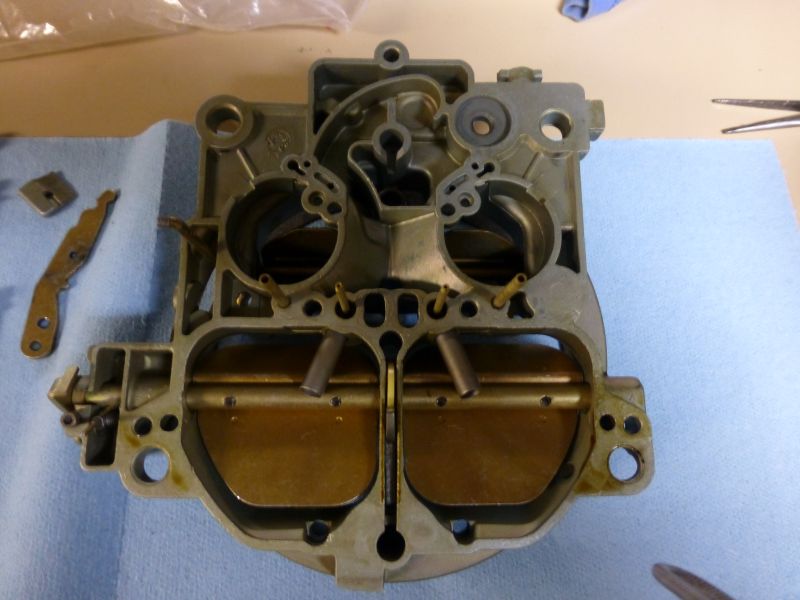
Remove float bowl cover then float.
Remove jets, accelerator pump check valve ball bearing and fuel inlet parts.
Turn over and remove 2 bolts that gold bottom plate on and split it.


Done, now I can clean it up and put back together with new gaskets jets, rods etc.
Hopefully missfre will be gone.
Took the 71 out for a run and all was good but I started to notice a slight hesitation on exiting a circle when I came back onto the throttle.
Over the next day it developed into a signifigant missfire when you got onto the throttle.
Went for a run with a mate and convinced ourselves it was electricat - how wrong were we :-)
So I spent the morning doing each of these to pinpoint it.
- Replaced plugs
- Replaced leads
- Replaced coil
- Checked voltages
- Checked timing
- Checked advance springs and changed them
- Changed electronic ignition module
No better !!!!!
- Checked fuel flow through pump fine.
- Changed filter in carb
- Checked all vacuum lines
No better !!!!!
- Changed carbs
All fine ....as I said how wrong were we.
So now I have to work out what is wrong with my carb, working one day missfire under light acceleration the next.
Idles fine.
Out came the papers from lars etc
I decided this is as good a time as any to rejet the carb for the new motor so I stripped the carb down.
Removed seconday hangers etc.
Removed all the top bolts.
Remove bolt that holds Choke assembly.
Remove roll pin from accelerator pump lever.
Lift top off carb.
Remove accelerator pump.
Remove top gasket.
Remove rods and assembly.
Remove float bowl cover then float.
Remove jets, accelerator pump check valve ball bearing and fuel inlet parts.
Turn over and remove 2 bolts that gold bottom plate on and split it.
Done, now I can clean it up and put back together with new gaskets jets, rods etc.
Hopefully missfre will be gone.
Last edited by CraigH; 04-10-2023 at 04:59 AM.
03-31-2014, 06:43 AM
#695
Melting Slicks
Thread Starter
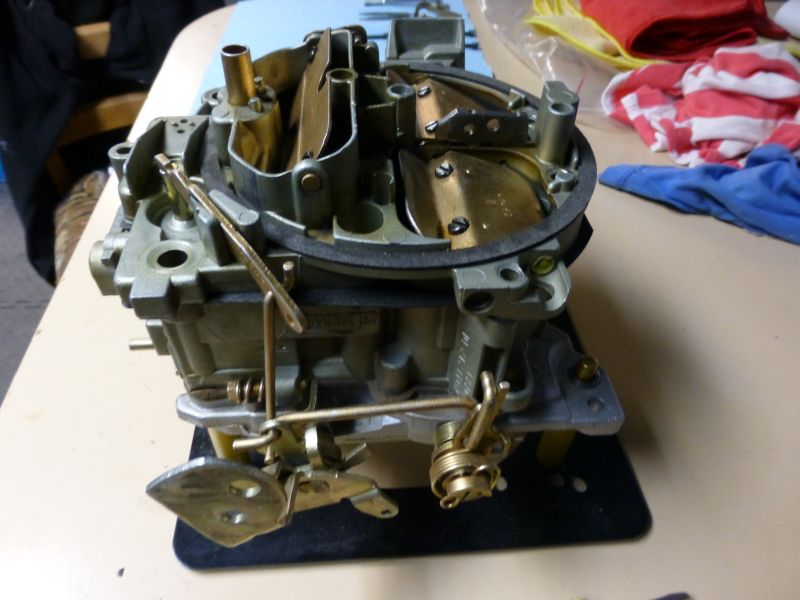
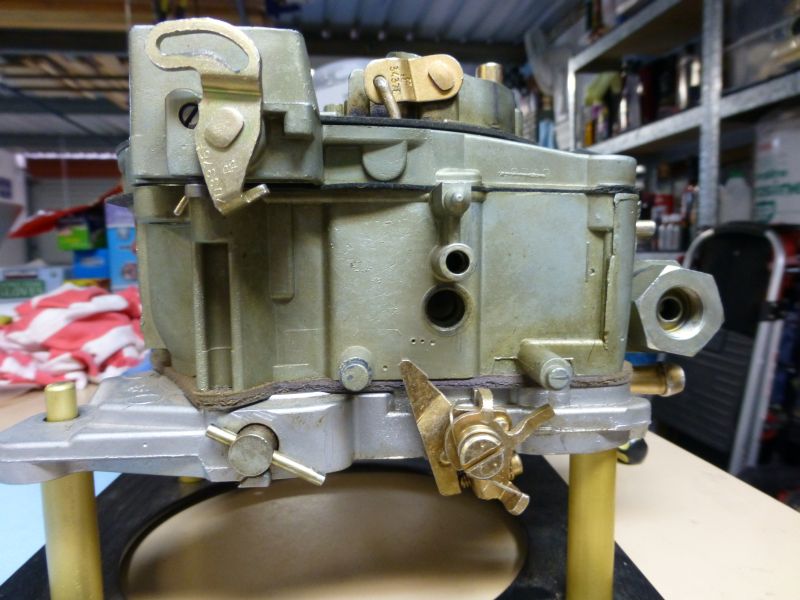
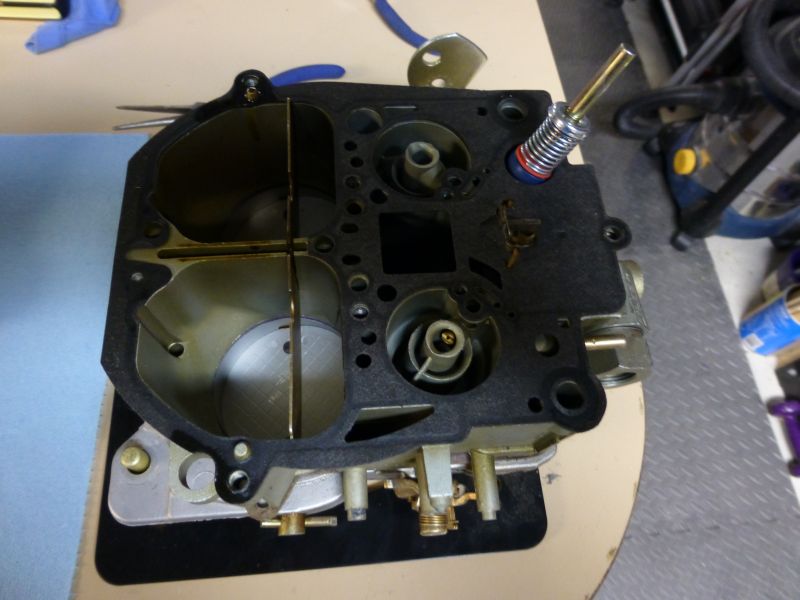
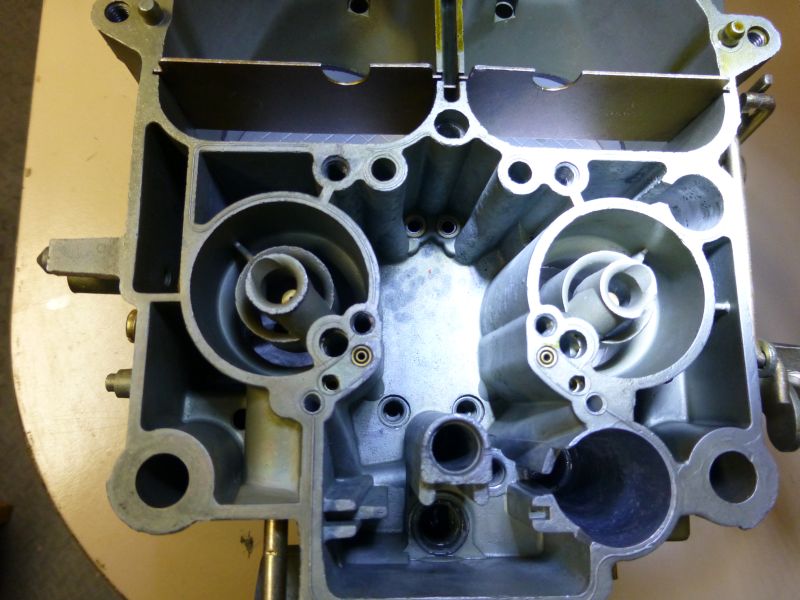
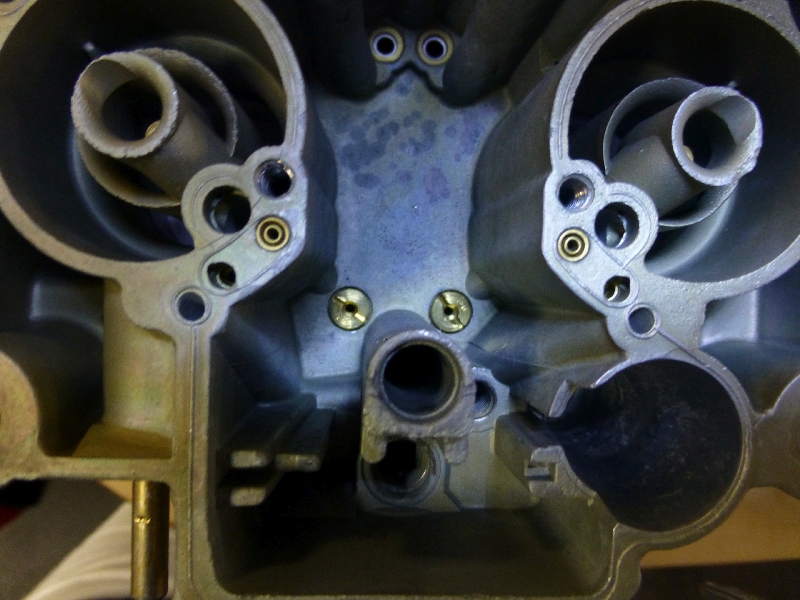
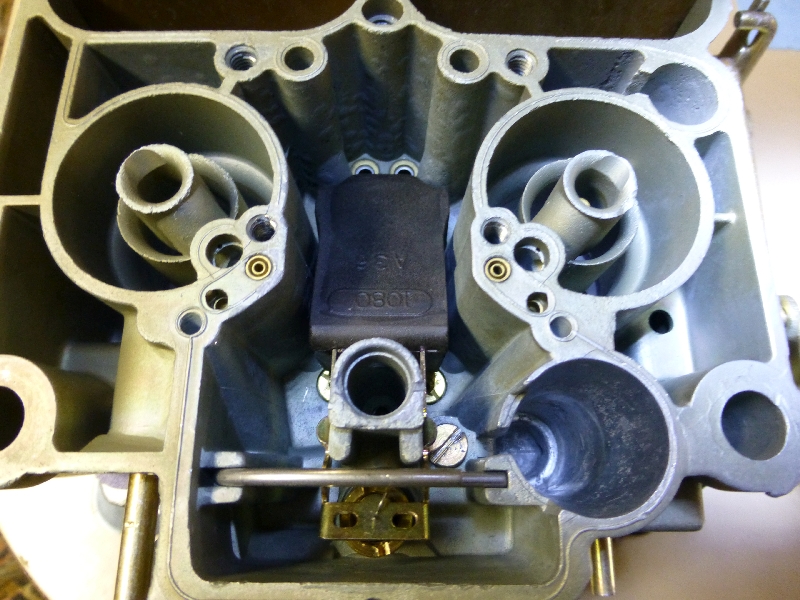
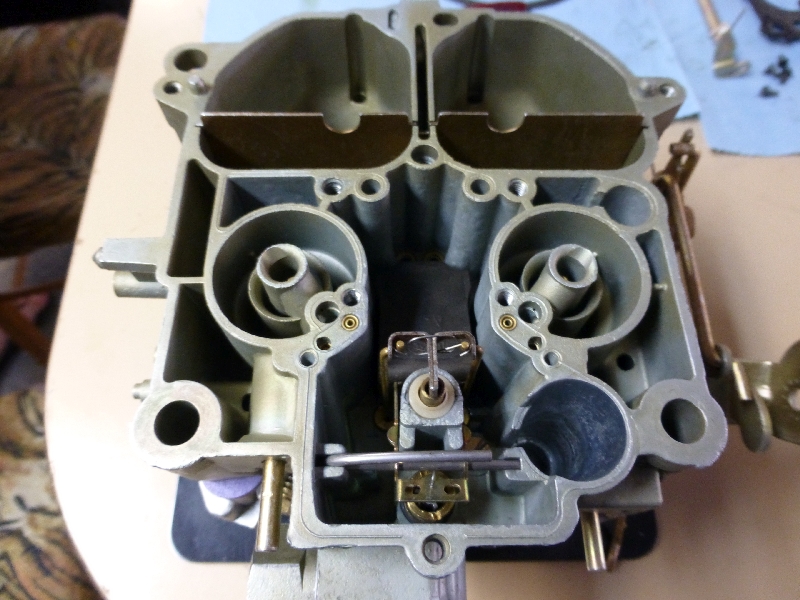
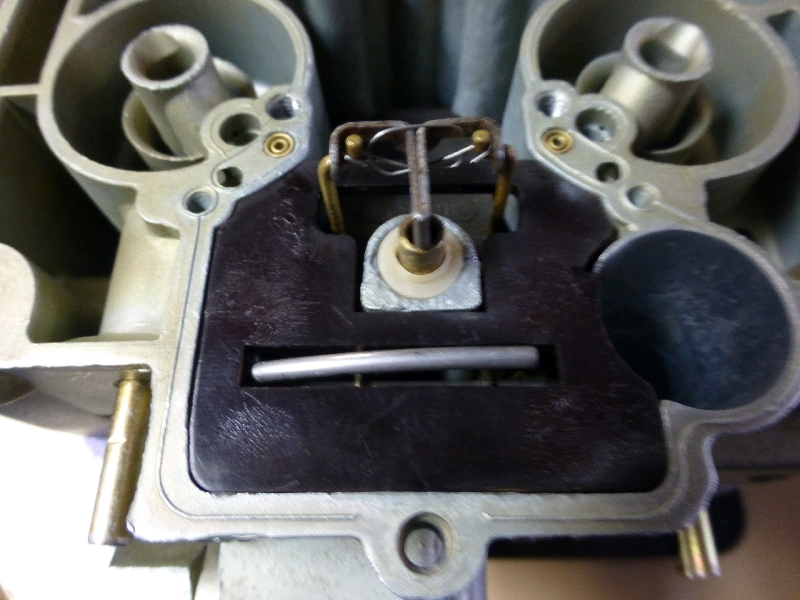
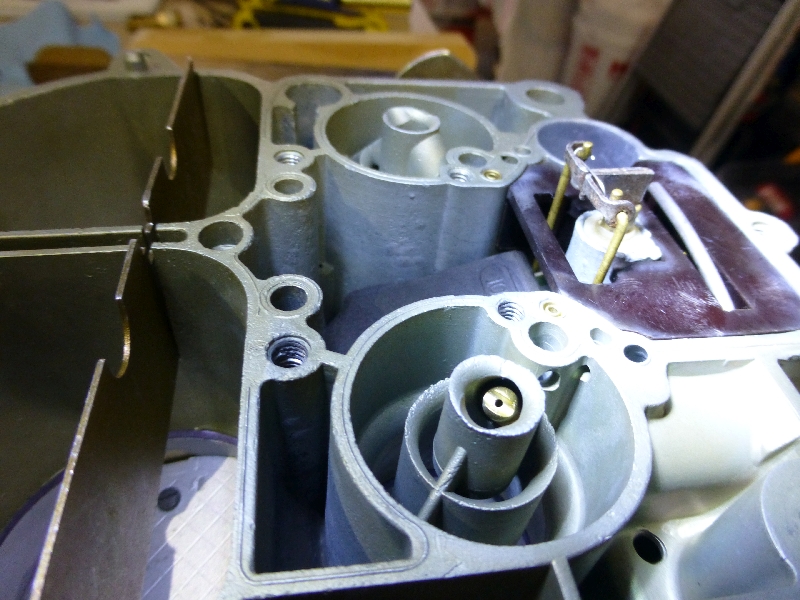
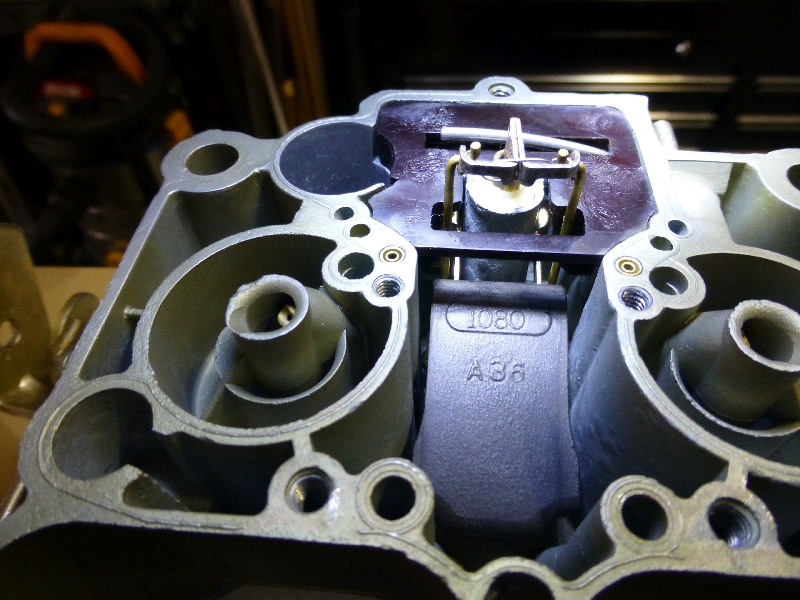
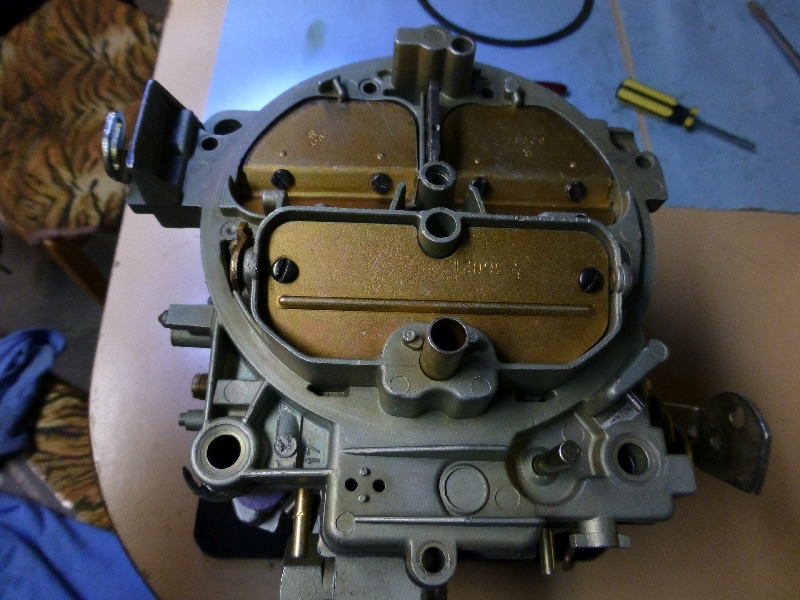
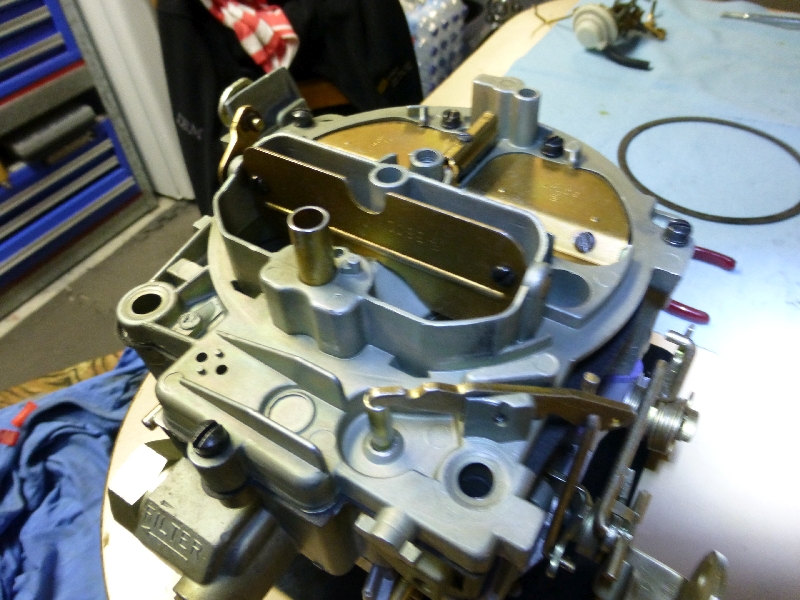
Got some time on the weekend to start reassembly of my quadrajet.
First I cleaned the 3 body parts and let them dry.
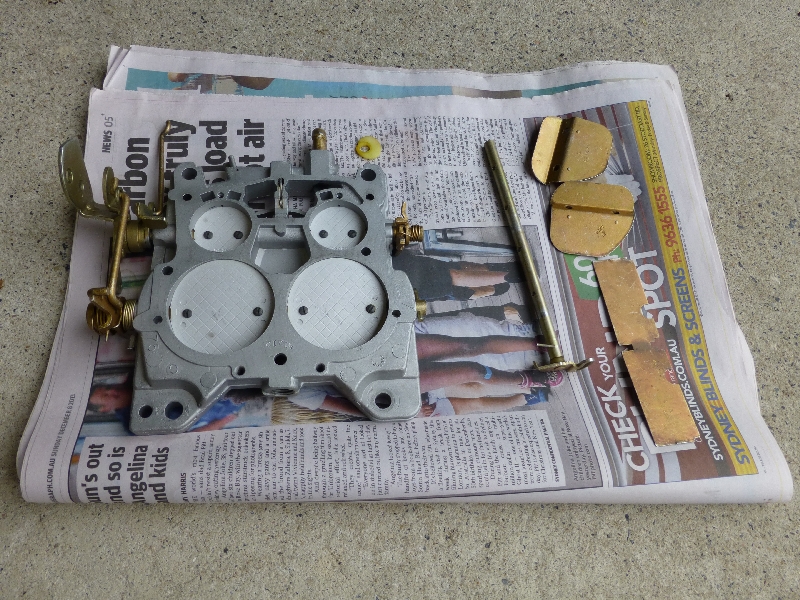
Now take the base and put on stand.
Fit the gasket to the middle section.
And place it on the base.
Flip base and add bolts to hold it together
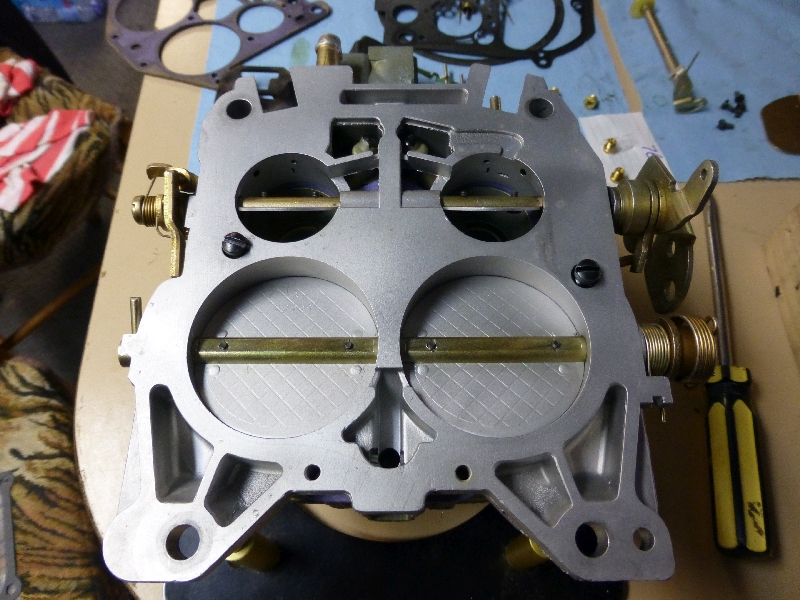
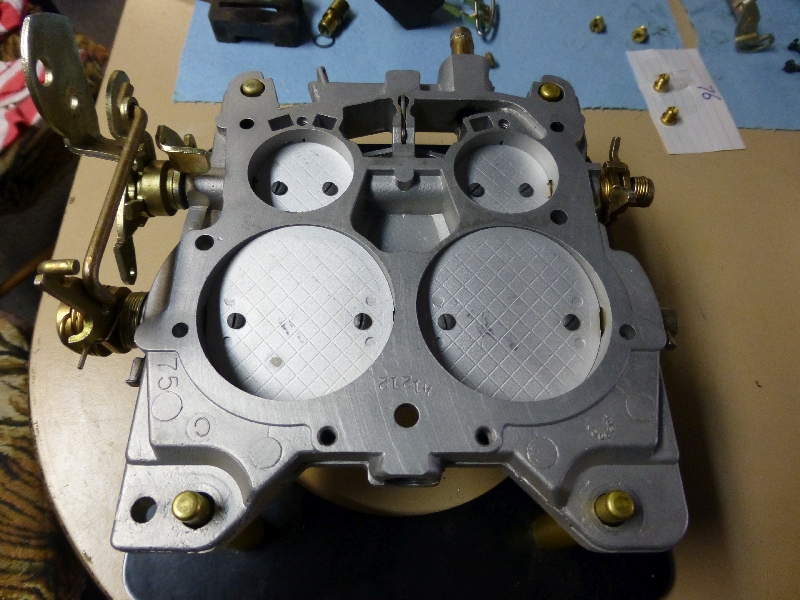
Turn it back over and we can start re fitting parts.
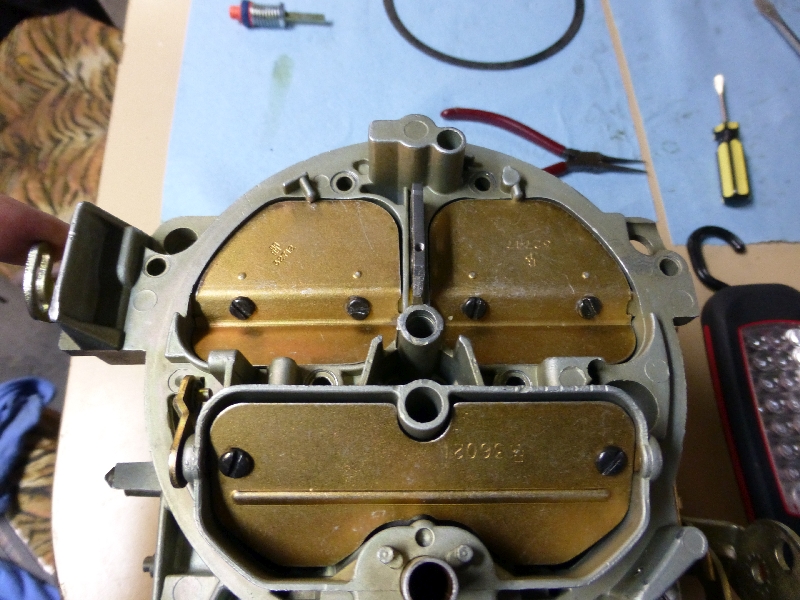
Fitted the main jets, went from size 74 to size 76.
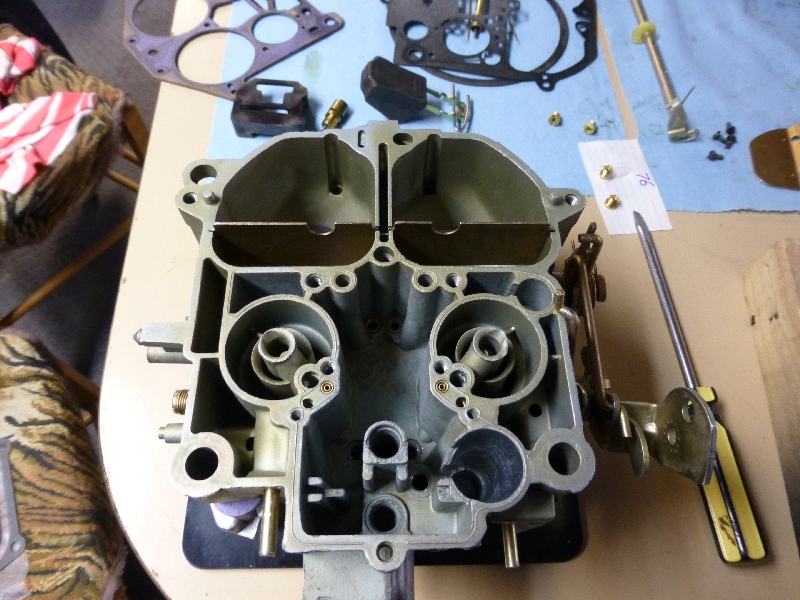
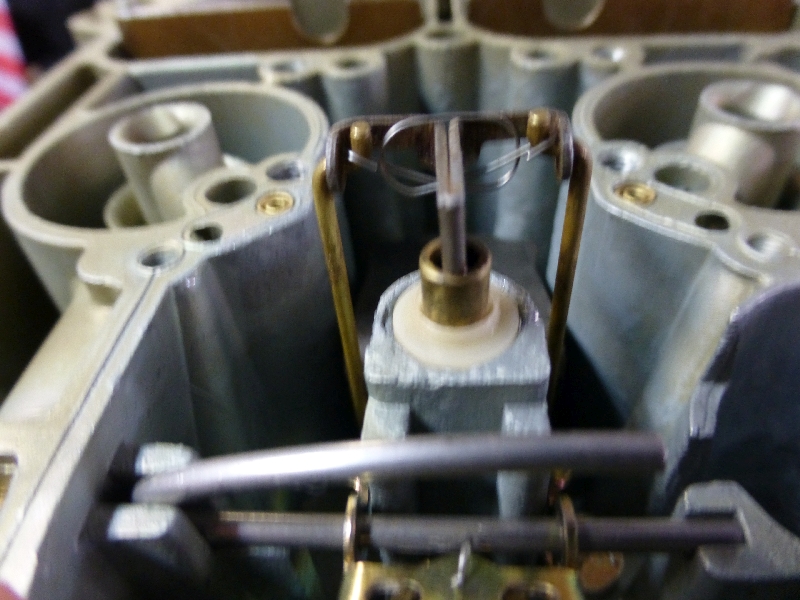
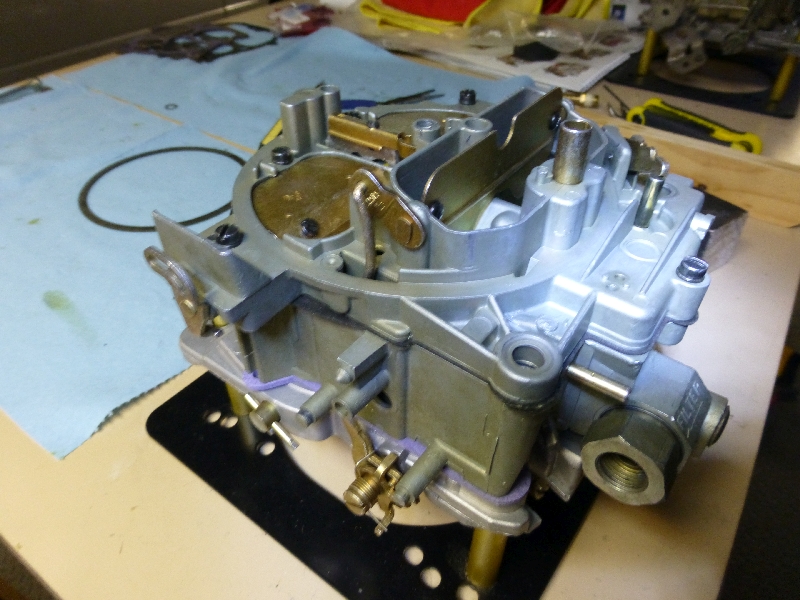
Accelerator Pump check ball.
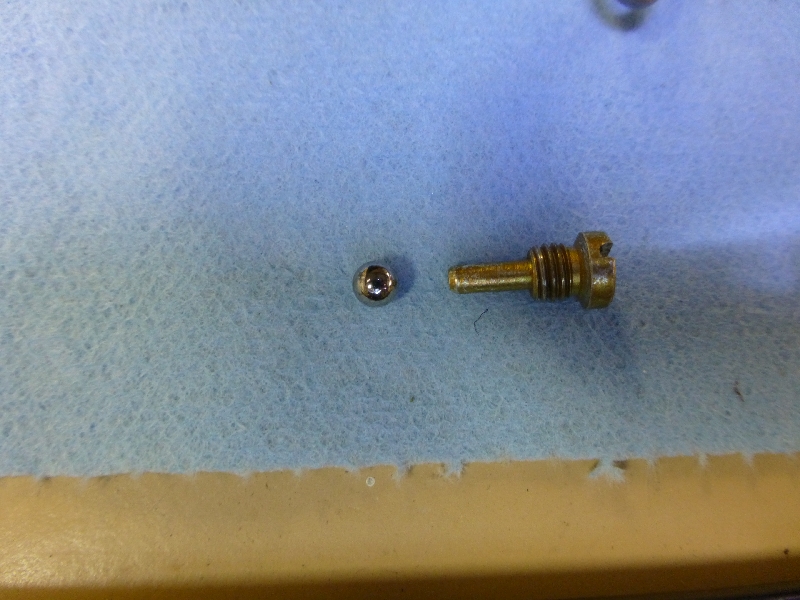
Needle and seat.

Float.
Rods and assembly.

Cover.
 \
\
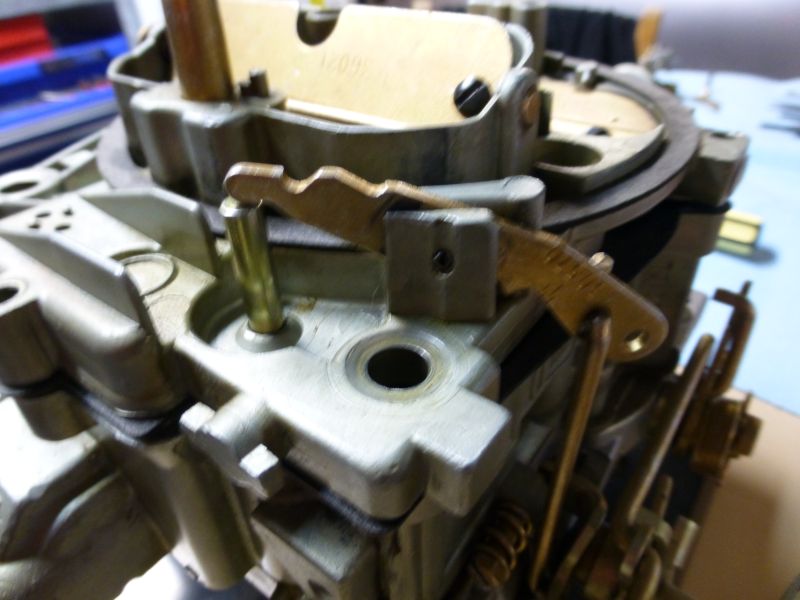
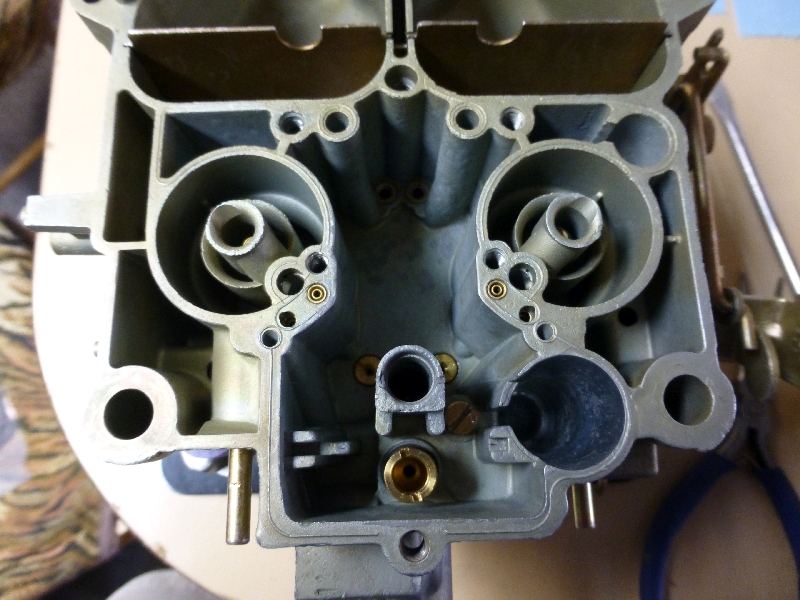
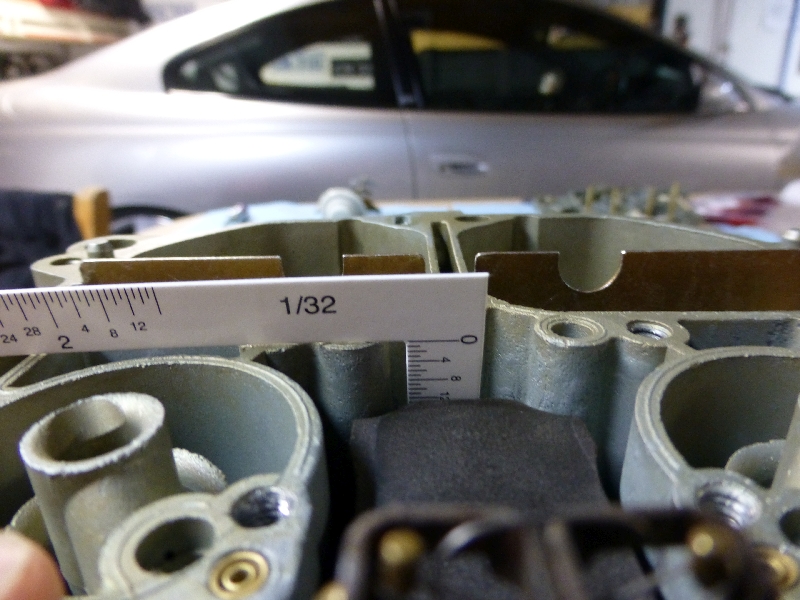
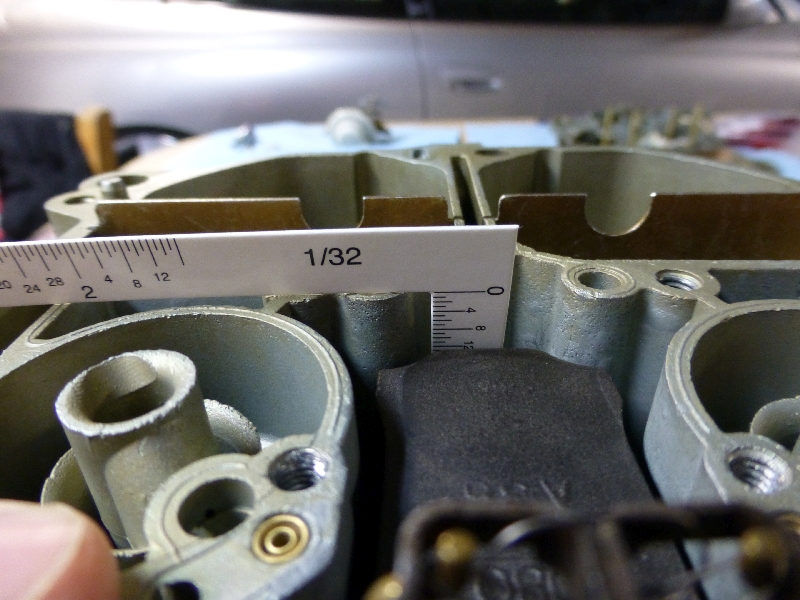
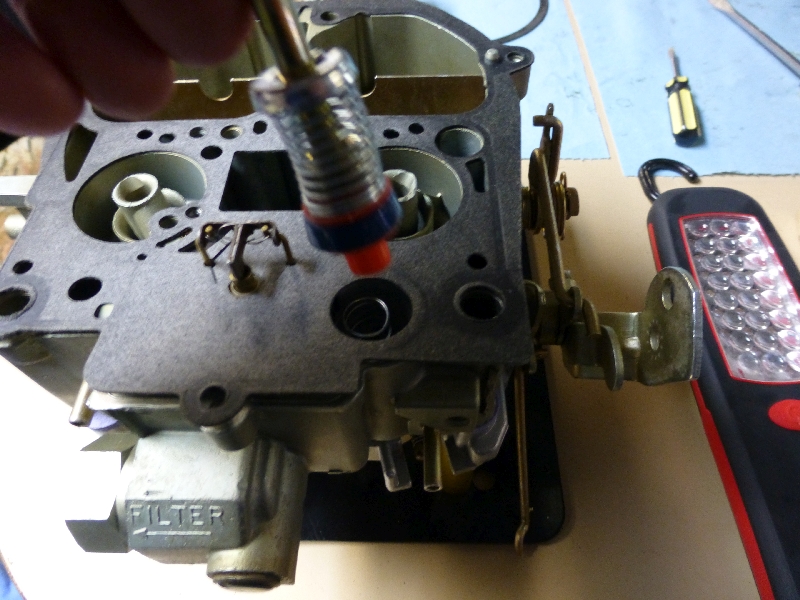
Checked the float level by holding float in upper position and measuring against scale.
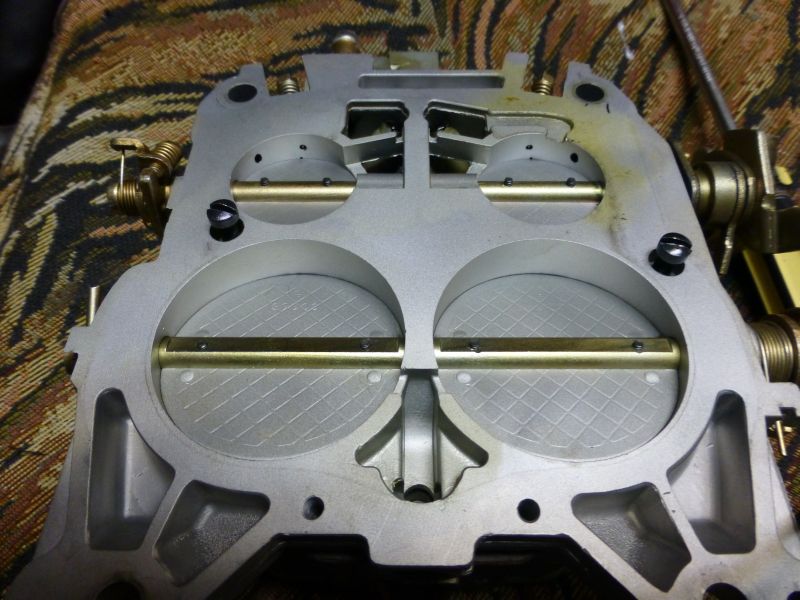
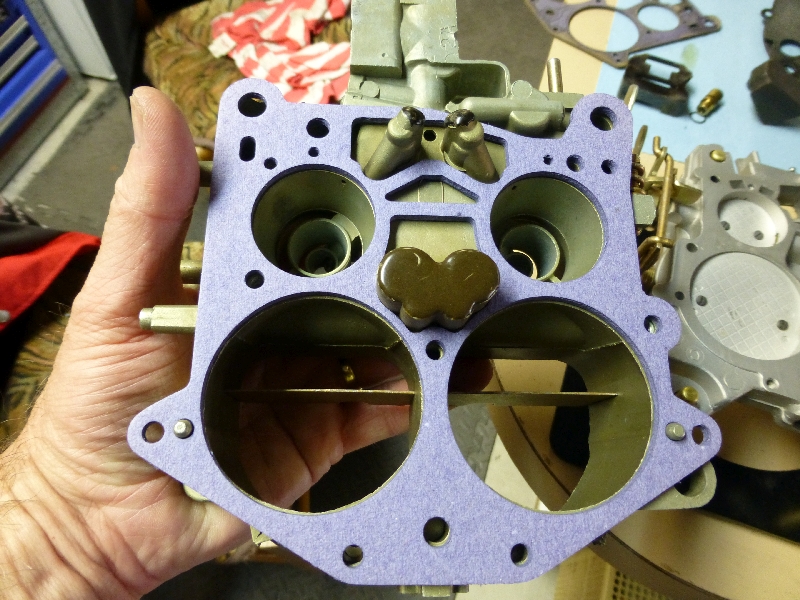
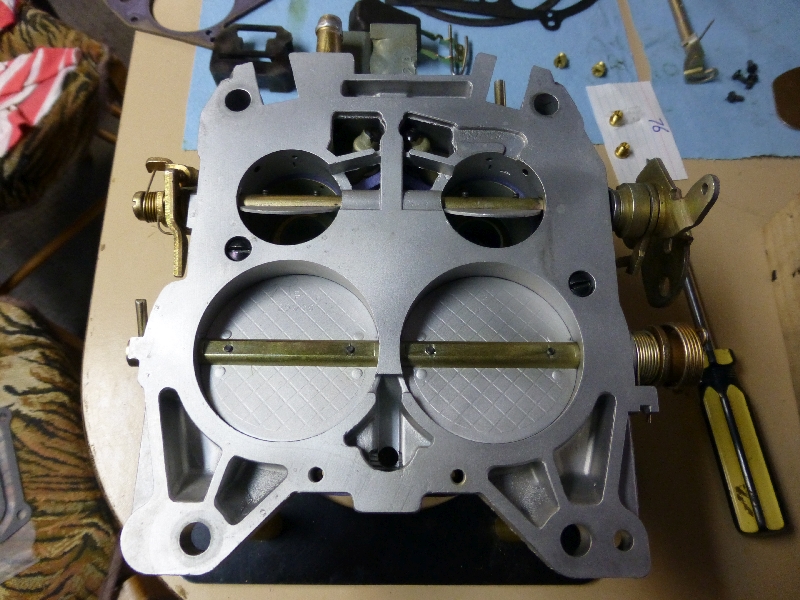
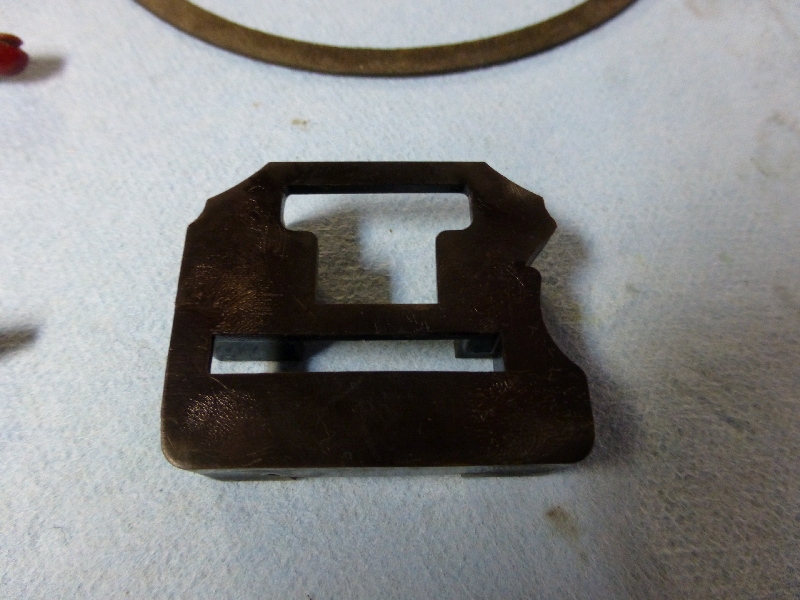
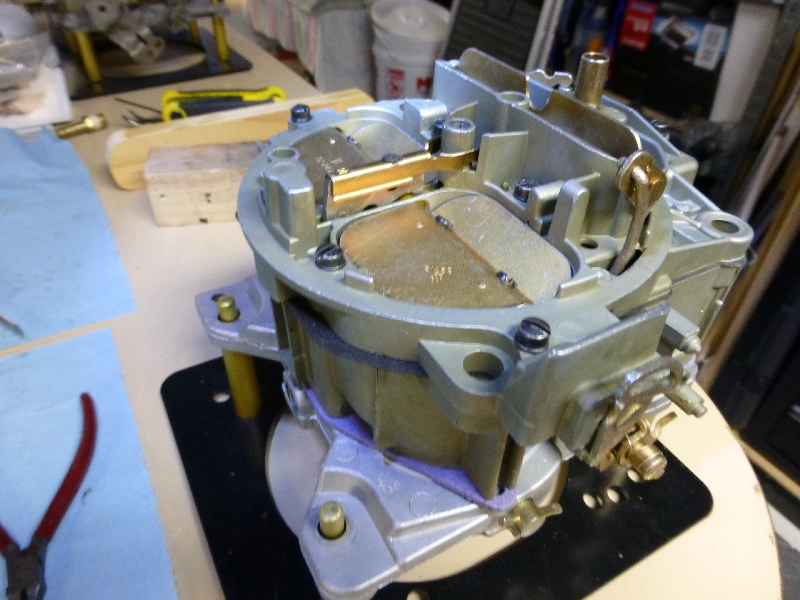
I had earlier found binding in my secondary butterflies so I removed them and sanded the problem areas smooth. So this step may not be needed on other carbs.
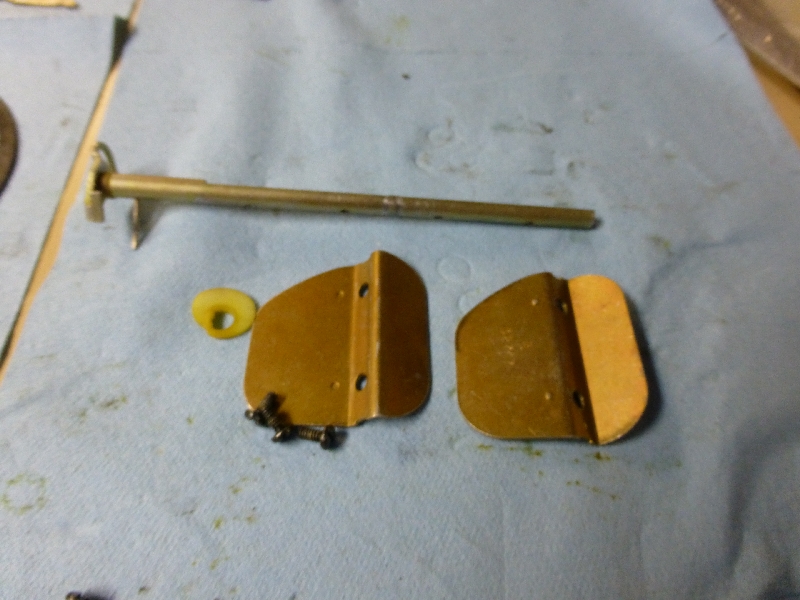
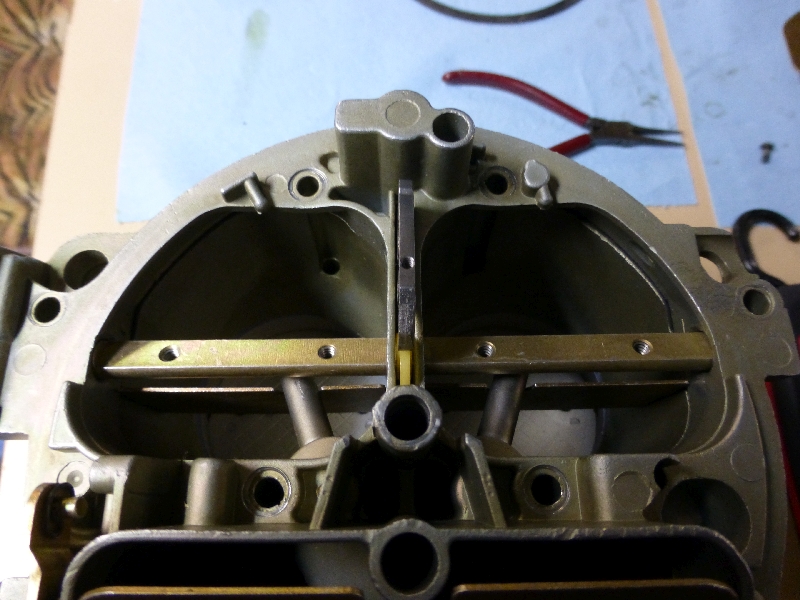
Temporarily placed top of carb on to work on butterflies then fitted shaft and flaps.
Then remove top and flip it over to allow the return spring to be pulled up and wrapped around the metal shaft.
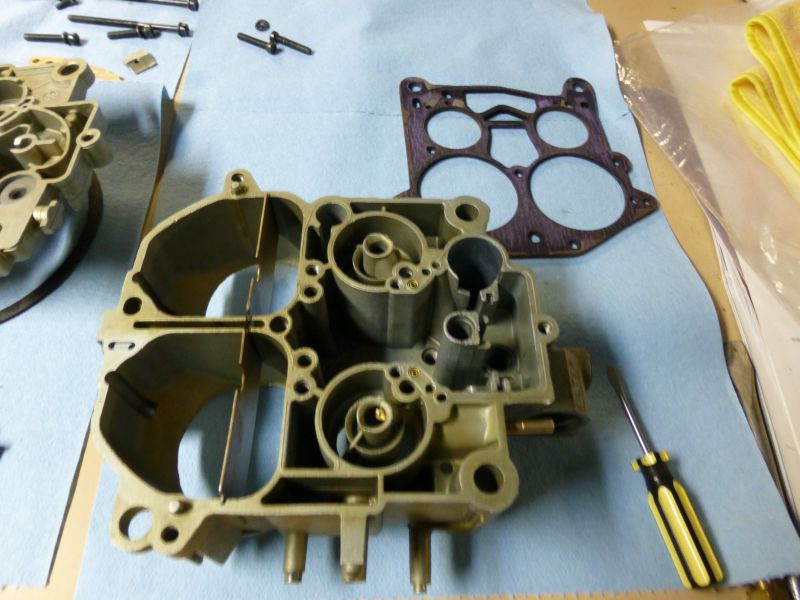
Place gasket on carb and carefully pass rod assembly through it.
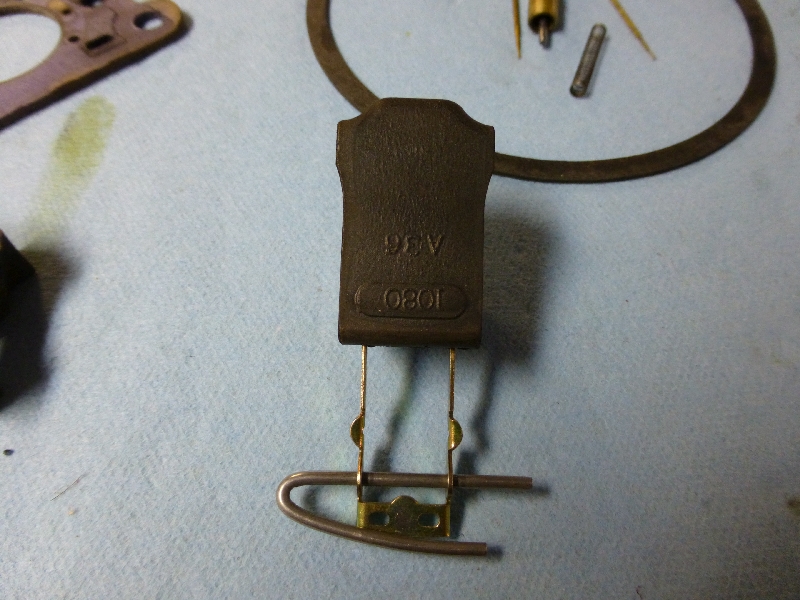
Fit accelerator pump after some silicone lube.
Fit the choke lever to shaft on carb top and fit it to the base carefully aligning all tubes etc.
Bolt the top on.
Add accelerator pump lever and roll pin.
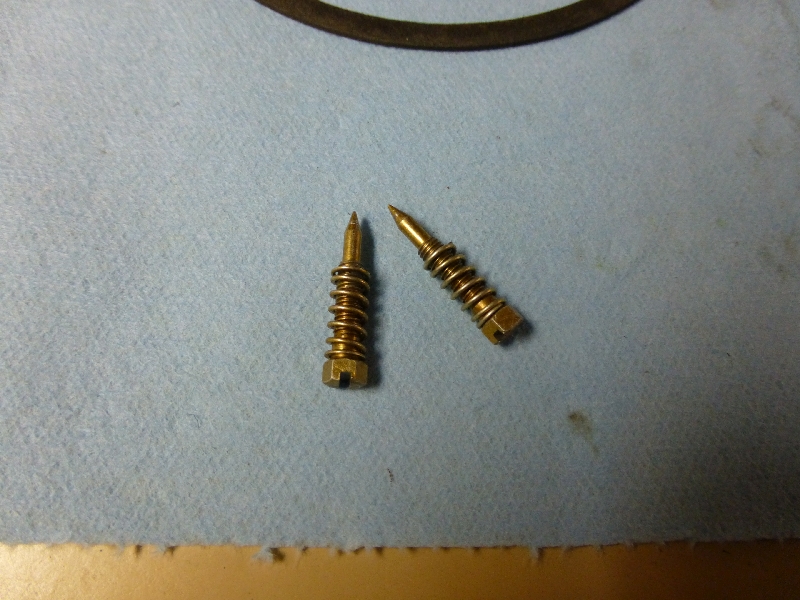
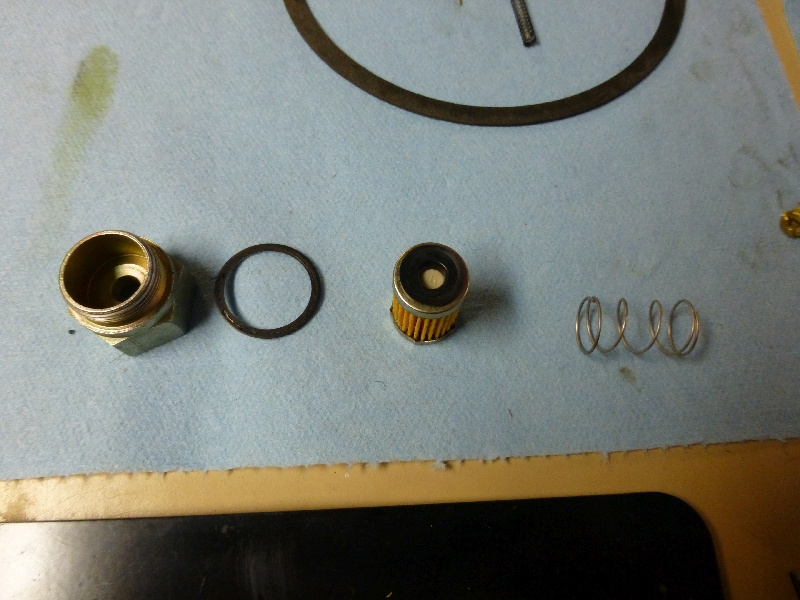
Fit idle needles and fuel filter parts.
All done apart from fitting choke assembly which requires the carb being placed on side and aligning the lever so we can slide the choke assembly on. (Will show this later but ran out of time before I needed to head to airport for work trip)
First I cleaned the 3 body parts and let them dry.
Now take the base and put on stand.
Fit the gasket to the middle section.
And place it on the base.
Flip base and add bolts to hold it together
Turn it back over and we can start re fitting parts.
Fitted the main jets, went from size 74 to size 76.
Accelerator Pump check ball.
Needle and seat.
Float.
Rods and assembly.
Cover.
\Checked the float level by holding float in upper position and measuring against scale.
I had earlier found binding in my secondary butterflies so I removed them and sanded the problem areas smooth. So this step may not be needed on other carbs.
Temporarily placed top of carb on to work on butterflies then fitted shaft and flaps.
Then remove top and flip it over to allow the return spring to be pulled up and wrapped around the metal shaft.
Place gasket on carb and carefully pass rod assembly through it.
Fit accelerator pump after some silicone lube.
Fit the choke lever to shaft on carb top and fit it to the base carefully aligning all tubes etc.
Bolt the top on.
Add accelerator pump lever and roll pin.
Fit idle needles and fuel filter parts.
All done apart from fitting choke assembly which requires the carb being placed on side and aligning the lever so we can slide the choke assembly on. (Will show this later but ran out of time before I needed to head to airport for work trip)
Last edited by CraigH; 04-10-2023 at 04:59 AM.
04-19-2014, 02:58 AM
#698
Melting Slicks
Thread Starter
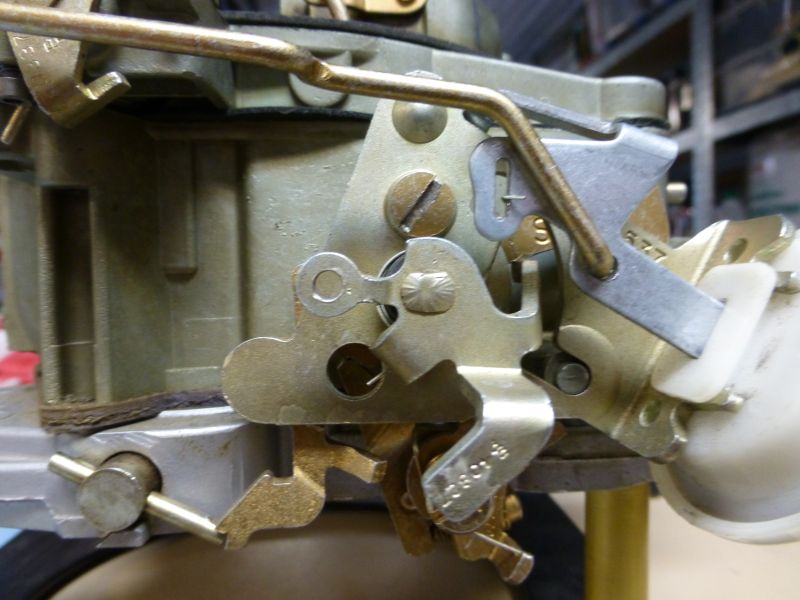
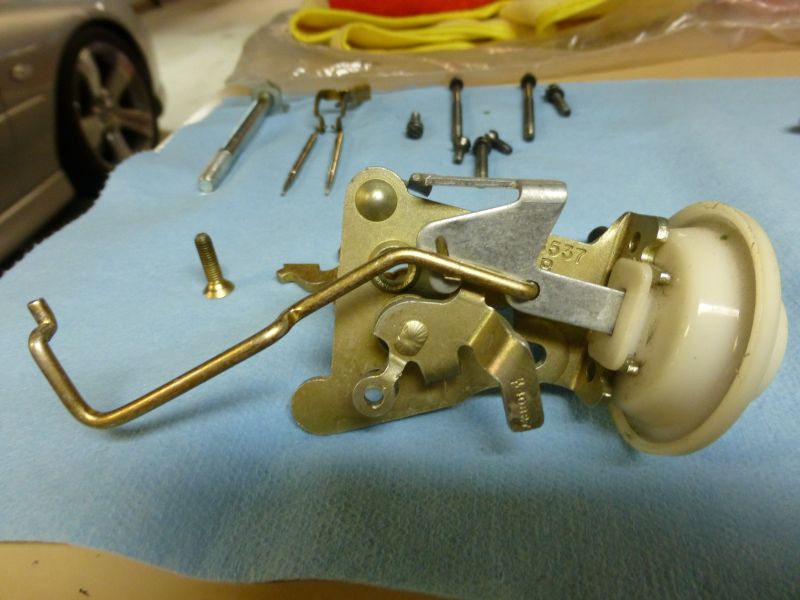
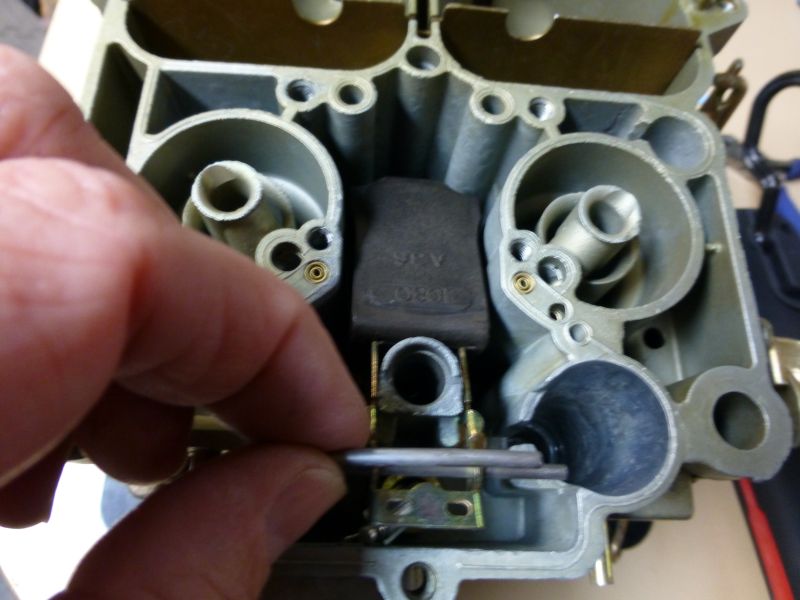
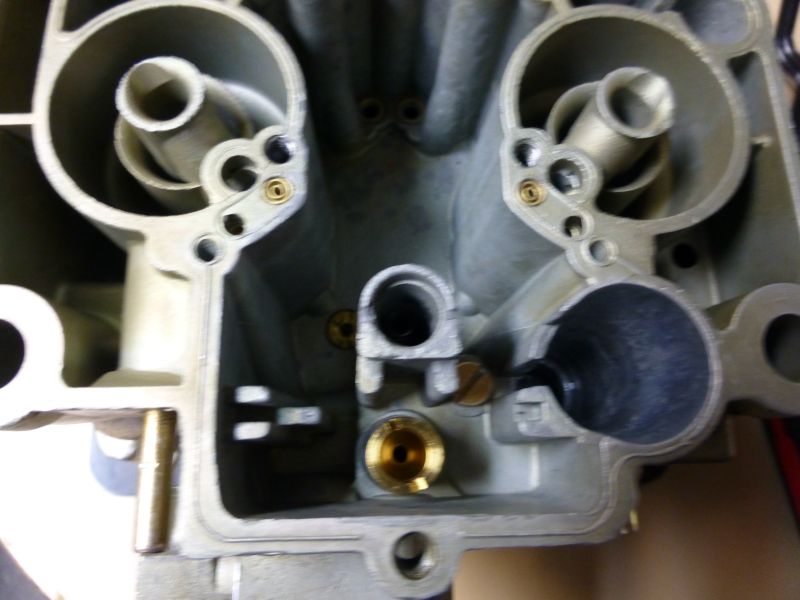
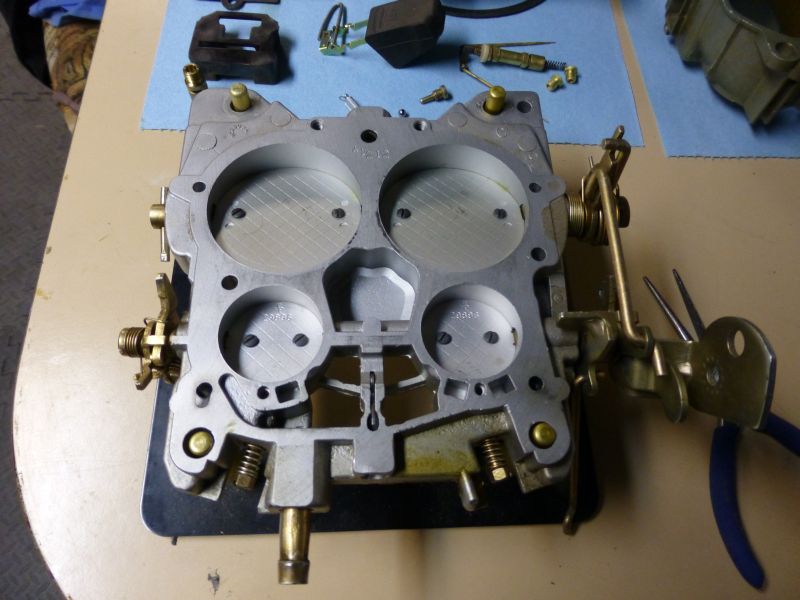
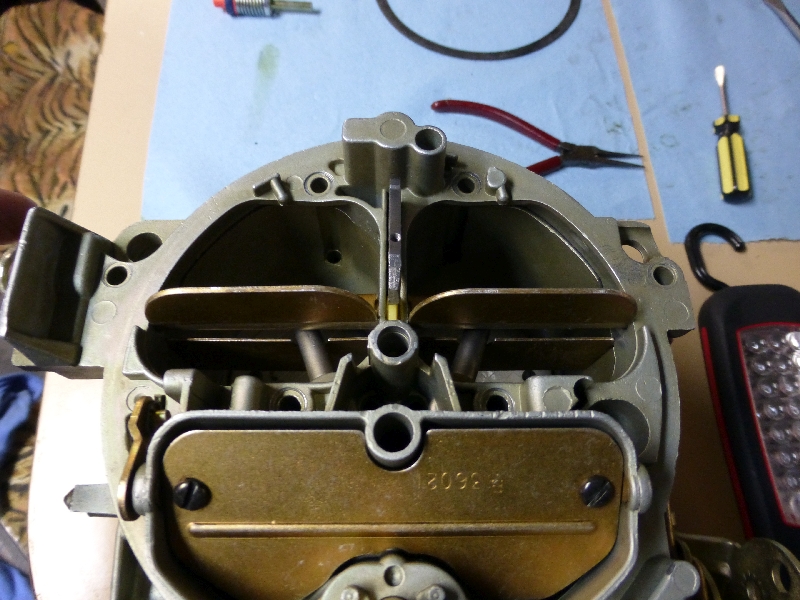
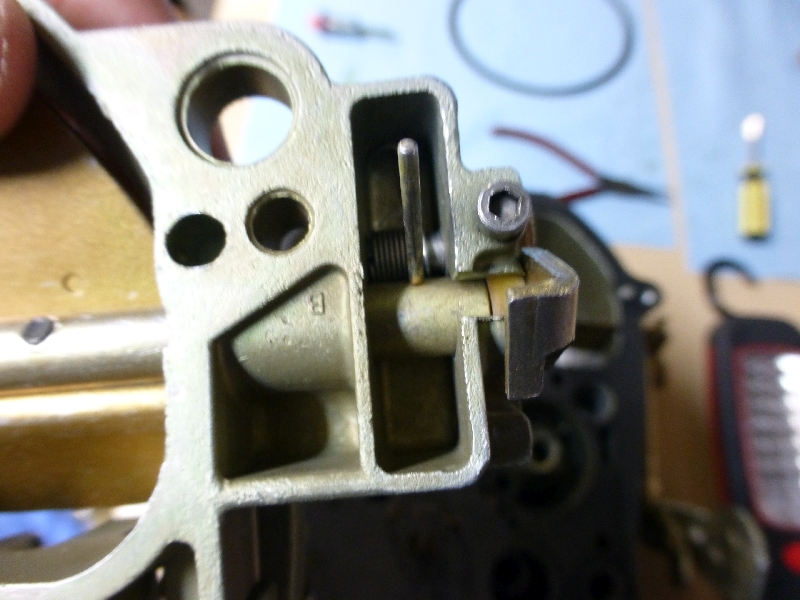
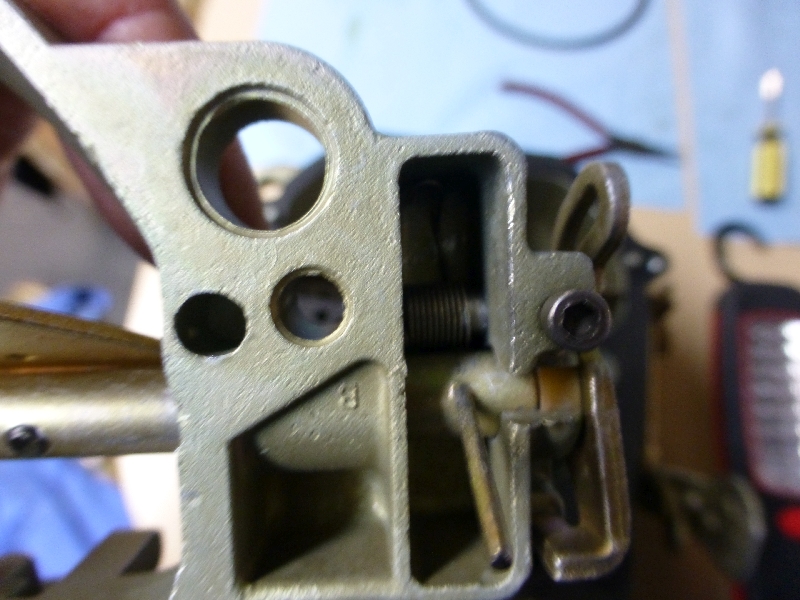
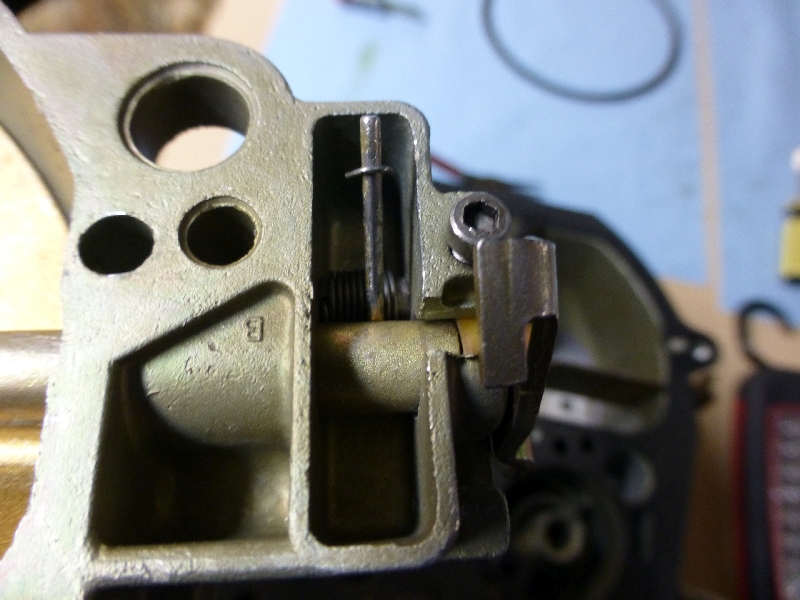
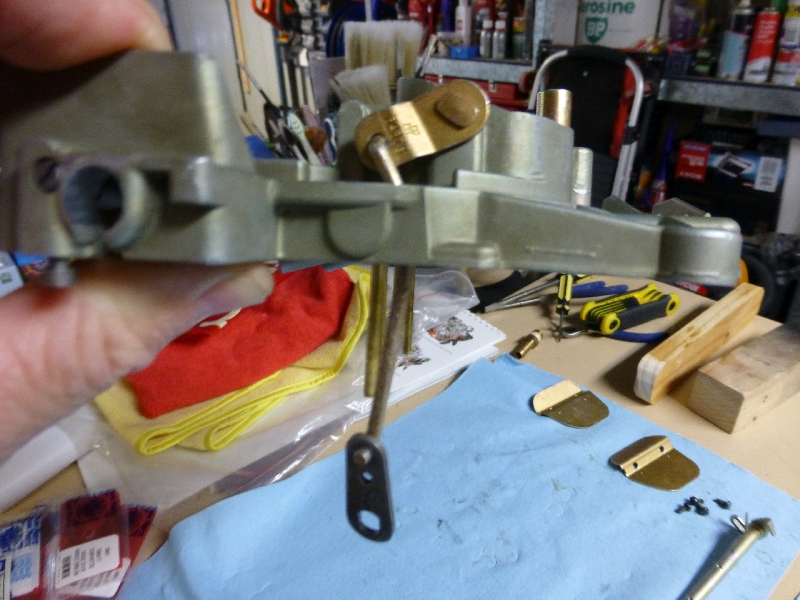
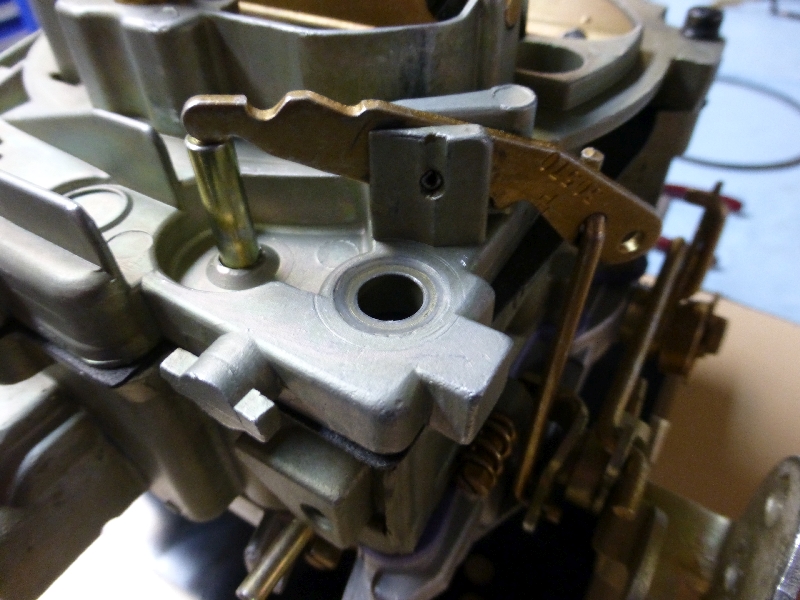
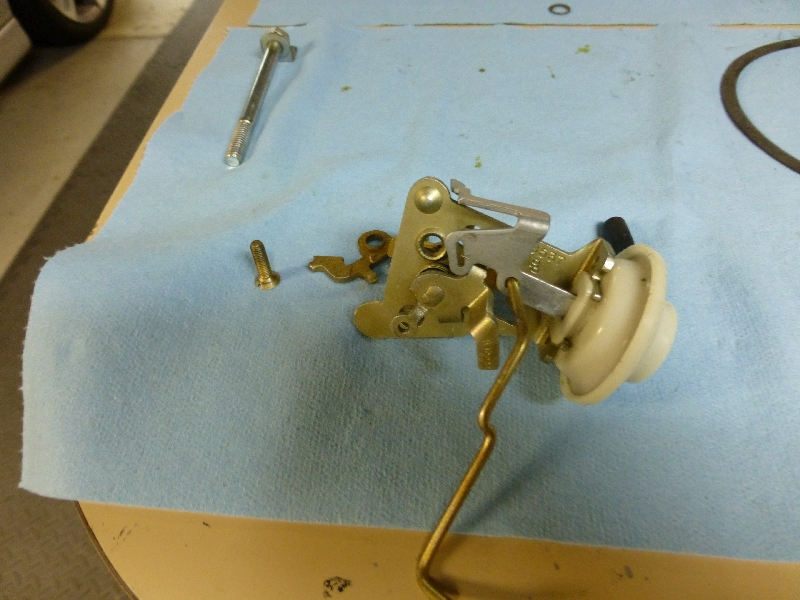
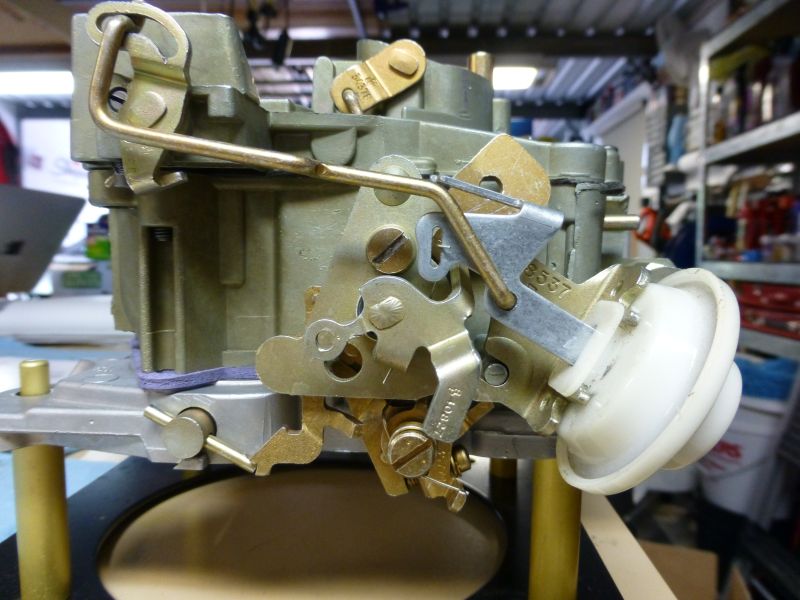
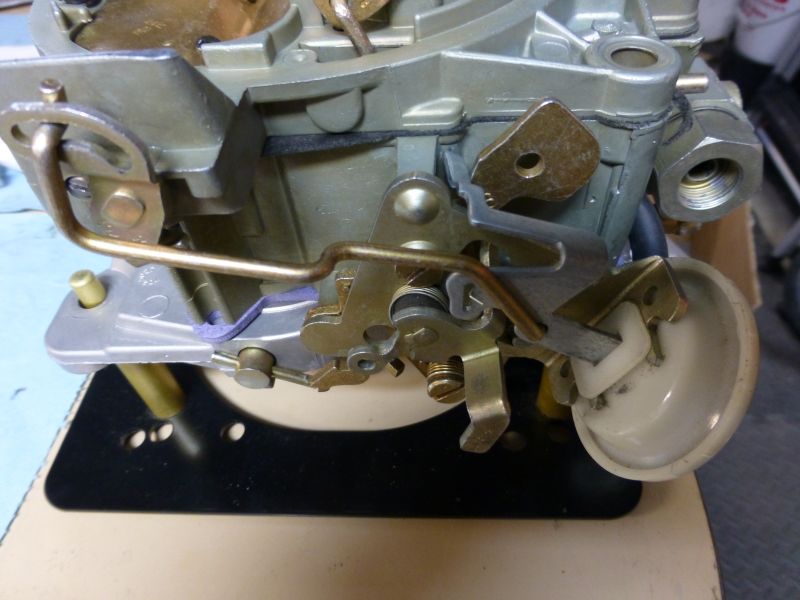
Choke mechanism going back on the carb.
Easiest to do by putting carb on its side and alligning the little crank for the choke inside.
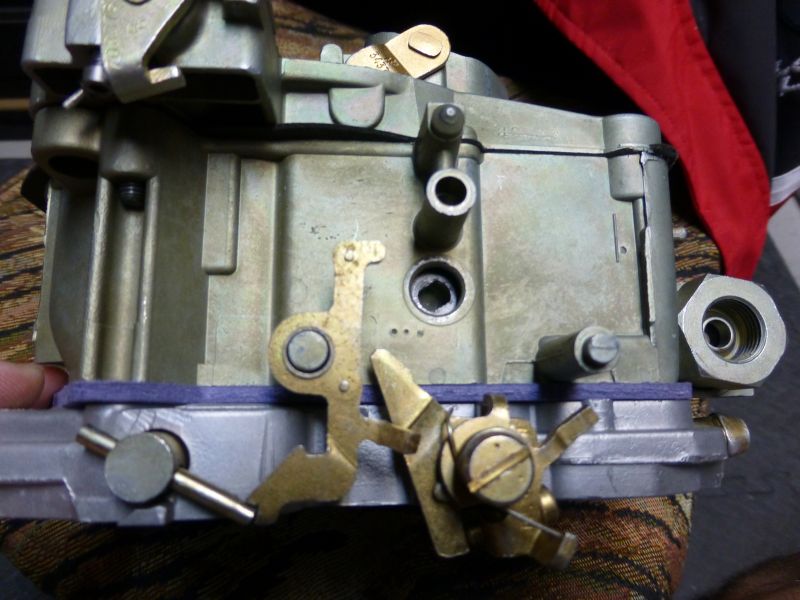
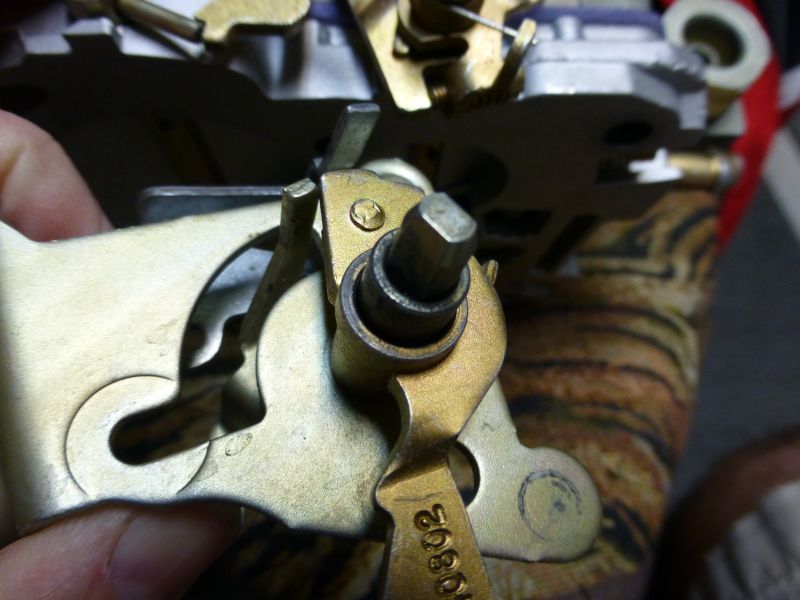
Then link up the seconday lockout lever and slide the mechanism on. You may need to rotate it a little to get the inner cam connected.
Dont worry if it takes a few goes.
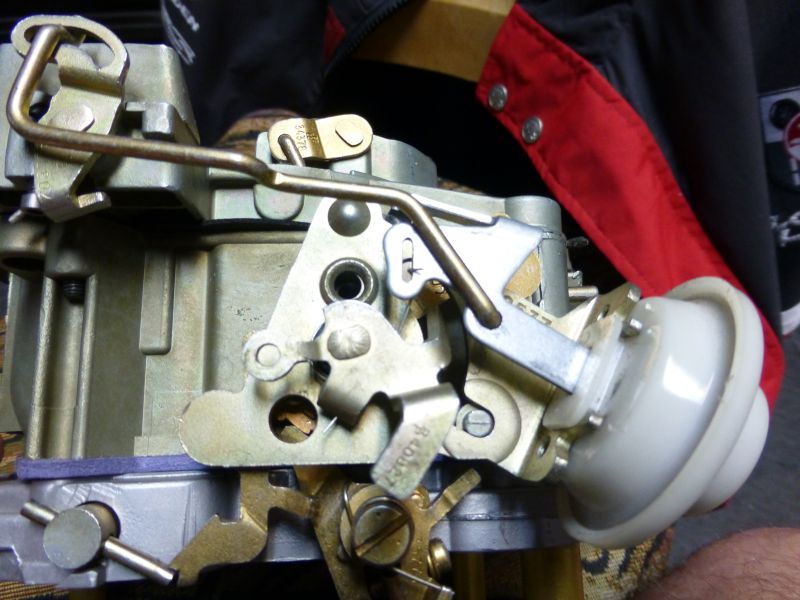
Bolt it up and then connect the pull off vacuum.

Easiest to do by putting carb on its side and alligning the little crank for the choke inside.
Then link up the seconday lockout lever and slide the mechanism on. You may need to rotate it a little to get the inner cam connected.
Dont worry if it takes a few goes.
Bolt it up and then connect the pull off vacuum.
Last edited by CraigH; 04-10-2023 at 04:59 AM.
04-19-2014, 03:08 AM
#699
Melting Slicks
Thread Starter
I have been playing with my front alignment as the car handles great but has a tendancy to tramline a bit on worn roads.
May just be the 245 front tires but I thought I would add a bit more caster.
I had shims in the front A-Arms are as follows.
Front 1 x 1/8 + 1 x 1/16
Rear 5 x 1/8
New setup
Front 1 x 1/32
Rear 4 x 1/8 + 1 x 1/16
So that should have added some more positive caster and possibly lowered the negative camber a little. (have heaps of neg camber anyway)
So I needed to check the toe each time to see roughly what changed.
Knocked up a couple of these to allow 2 tape measures between the wheels.
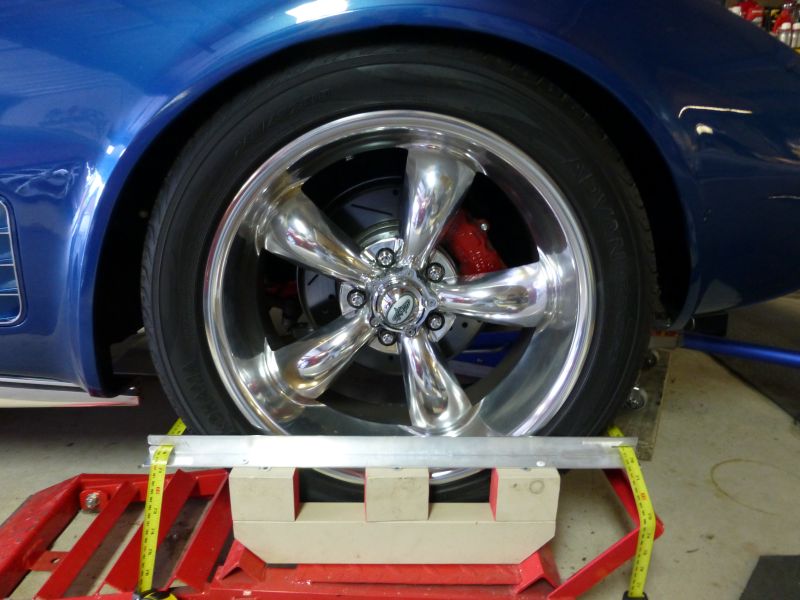
Accurate enough for testing.
Saw it on a Porsche site and though was a good idea.
May just be the 245 front tires but I thought I would add a bit more caster.
I had shims in the front A-Arms are as follows.
Front 1 x 1/8 + 1 x 1/16
Rear 5 x 1/8
New setup
Front 1 x 1/32
Rear 4 x 1/8 + 1 x 1/16
So that should have added some more positive caster and possibly lowered the negative camber a little. (have heaps of neg camber anyway)
So I needed to check the toe each time to see roughly what changed.
Knocked up a couple of these to allow 2 tape measures between the wheels.
Accurate enough for testing.
Saw it on a Porsche site and though was a good idea.
Last edited by CraigH; 04-10-2023 at 04:59 AM.
04-28-2014, 05:56 AM
#700
1st Gear

Member Since: Oct 2013
Posts: 1
Likes: 0
Received 0 Likes
on
0 Posts
Hi
I am creating a duplicate of my Australian thread here to cover the Journey I have taken on my 1971 Corvette purchased late in 2009.
Hope it is of some interest to others.
The Car as I picked it up.....

1971 Matching Numbers 350-270hp Bridgehampton Blue Coupe
Index of Pages
Page 1 - December 2009
Page 2 - June 2010
Page 3 - September 2010
Page 4 - October 2010
Page 5 - November 2010
Page 6 - November 2010
Page 7 - December 2010
Page 8 - December 2010
Page 9 - January 2011
Page 10 - March 2011
Page 11 - June 2011
Page 12 - July 2011
Page 13 - July 2013
Page 14 - August 2011
Page 15 - September 2011
Page 16 - September 2011
Page 17 - October 2011
Page 18 - October 2011
Page 19 - November 2011
Page 20 - November 2011
Page 21 - November 2011
Page 22 - November 2011
Page 23 - November 2011
Page 24 - January 2012
Page 25 - March 2012
Page 26 - June 2012
Page 27 - July 2012
Page 28 - August 2012
Page 29 - September 2012
Page 30 - December 2012
Page 31 - March 2013
Page 32 - March 2013
Page 33
Page 34
Page 35
Next.....
The Car now.....


There is a thread on the Australian Corvettes forum but I decided to also post it here given the wider audience and experience that exists here.
Will take me a while to copy it all over.
I am creating a duplicate of my Australian thread here to cover the Journey I have taken on my 1971 Corvette purchased late in 2009.
Hope it is of some interest to others.
The Car as I picked it up.....
1971 Matching Numbers 350-270hp Bridgehampton Blue Coupe
Index of Pages
Page 1 - December 2009
- Seats
- Seat Belts
- Seat Tracks
- Under Dash Insulation
- Replace Console
- Dash Air vents
- Air Vent Servo
- Mirrors
- Rear Window Shelf
- A Pillars
- Cowl Water Leaks
- HVAC Duct
- Rear Brake Calipers Clean Refurbish
- Adjust Parking Brake
- Rear Brake Calipers Paint
Page 2 - June 2010
- Brake Rotors
- Brake Rotor Run Out
- Rear Brake Calipers
- Braided Brake Lines
- Body Height Font Back
- Vacuum Tank
- Carb Choke
- Fuel Line Tank
- CEC Solenoid
- Console Gauges
- Temperature Gauge Calibration
- Gauge Bezel
- Dash Pad
- T-Top Stainless Polish
Page 3 - September 2010
- Under Dash Insulation
- Strip Interior
- Auto Shifter Rebuild
- CEC Relays
- Console Trim Plate strip
- HVAC Refurbish
- Dynamat Front Floor
- Dash Pad Speakers
- Lower Dash Pad Cleanup
- Wheel Choices
- Under Dash Wiring
- Oil Gauge Line
- Lower Dash Pad Fit
Page 4 - October 2010
- Stereo Speaker Bass Cut
- Refit Under Console Wiring
- Refit Console
- Door Weatherstrip
- Console HVAC Control
- Battery Box and Terminals
- Rear Cleanup and Dynamat
- Drain Tubes
- A Pillar Cleanup and Paint
- Console Trim Pieces Paint
- A Pillar Stainless CleanUp
- Console Air Vent Trim
- Dynamat Rear
- Drain Tubes
- HVAC Controls
- Stainless Polish
Page 5 - November 2010
- Wheels
- Console Trial Fit
- Rear Window Clean Up
- Weatherstrip Removal
- A Pillar Refit
- New Weatherstrip
- A Pillar finish
- Rear Window Weatherstrip Prep
- MP3 Wiring
- Aerial
- Trim Panel Clean Up
- Repair Trim Panels
- Repaint Trim Panels
Page 6 - November 2010
- Repaint Trim Panels .... cont
- T-Top Strip Down
- Repair T-Top Trim Panels
- Rear Window Weatherstip
- Storage Compartment Prep
- Rear Carpet Fitting
- Console Trim Panel Build Up
- Spark Plug Wire Brackets Rebuid
- Trim Panel Fit and Adjustment
Page 7 - December 2010
- Brake Console Rebuild
- Repaint Trim Pieces
- Front Carpet Fit
- T-Top Panel Finish
- Storage Compartment Test Fit
- Surface rust Removal
- T-Top Center Trim Rebuild
- Rear Window Latch Rebuild and Adjustment
- Rear Roof Trim Refit
- Bulkhead Carpet Fit
- A Pillar and Teader Trim
- Sun Visors
Page 8 - December 2010
- T-Top Refinish Inside
- Rebuild and Repaint Mirror
- T-Top Adjustment
- Carpet Seat Bolt Holes
- B Pillar Trim Fit
- Adjust Rear Fit
- Rebuild Storage Lids
- Repaint Seat Backs
- Fire Extinguisher
- Run Spark Plug Wires through Brackets/Clips
- Clean Up Exterior
- Replace Carb Filter
- New Air Cleaner and Decal
- Repair Headlight Trim Rings
- Summernats 2011
Page 9 - January 2011
- Collecting Parts for Under Bonnet
- Temperature Sender Findings
- Wiper Door Actuator
- A-Arm Shims
- Sun Visor Support Pins
- Rear Marker Light
- Paint Chip Repair
- Kick Panel Speaker
- Wiper Door Actuator
- Fender Emblems
- Rear Shocks
Page 10 - March 2011
- New battery
- Rear Shocks
- Battery Drain
- Vacuum Tank Revisit
- TH400 Speedo cable leak
- Differential Snubber cushion
- Ipod integration part II
- The Brake Squeak in reverse
- Vapor Cannister
Page 11 - June 2011
- Vapor Cannister....cont
- T-Top Adjustment
- Rear Window Glass Scratches
- Setting Timing
- Distributor Advance
- Choke Linkage
- Removing A/C Evaporator box
- Clean up engine bay
- Start Stripping down engine
- Suspension Suspension Removal Starts
- Steering Removal Starts
- Radiator out
Page 12 - July 2011
- Trial fit Semi Coil Overs
- Drain Power Steering
- Remove Steering Linkages
- New Quadrajet
- Front Brake Lines Removed
- Proportioning Valve removed
- Suspension All Out
- Engine Accessories Off
- Disassemble Spindle
Page 13 - July 2013
- Header Test Fit
- Clean Up Front Frame
- Clean Up Front Frame.
- Radiator Support Rust
- Remove Headlight Solenoids and Actuators
- Adjust Front Apron
- Fiberglass repairs
- Front Wiring Harness
- Frame Clean up
- Radiator Repair
- Painting Frame
- Remove Steering Column
- Remove Intake
- Remove Wiper Motor
Page 14 - August 2011
- Remove Firewall Brackets
- Inner Guard Re-Shape
- Firewall Clean Up
- More Firewall Tidy Up
- Painted Firewall
Page 15 - September 2011
- Engine Bay paint
- Power Booster & Master Cylinder
- Repaint Block
- Cleaned up fluid lines
- Strip Front Brakes
- Auto Dipstick Tube
- Trans Vacuum Line
- Intake Mock Up
Page 16 - September 2011
- Wiring Harness
- Circuit Breakers
- Radiator Support Trial Fit
- Wiper Motor CleanUp
- Power Steering Pump Disassemble
- Headlight Relays
- Electric Fan Relays
- Refitting Parts to Firewall
Page 17 - October 2011
- Borgeson Steering Box
- Transmission Cooler
- AC Delete Housing
- New Front Brake Lines
- Compression AN Fittings on Auto Cooler Lines.
- Harness Repair
- Fit AC Delete Housing
- Strip Valve Covers
- Paint Valve Covers
Page 18 - October 2011
- Paint Water Pump
- Rebuild A/C Harness
- Intake Fitted
- Suspension Media Blasted
- Suspension Painted
- Front Brake Calipers Painted
- Heater Wiring
- Radiator & Fans
- Fitted Water Pump
- Fitted heater Hoses and Vacuum Cutt-off
- Fitted Alternator
Page 19 - November 2011
- Cleaned up Throttle cable
- New Springs in Distributor
- Fitted Starter and other Accessories
- Engine Wiring Harness
- Throttle Cable
- Cooler Lines
- Radiator Core
- Thermo Fan Mounting Brackets
- Headlight Actuators
- Radiator Mounted
- Fitted Horn
Page 20 - November 2011
- Thermatic Fan Controller
- Trans Cooler Lines
- Power Steering Pump
- Speedo Cable
- Valve Covers
- Fuel Lines
- Remote Start Wiring
- Headers Fitted.
- A-Arms and Spindles started
- Wiper Door Actuator Fitted
Page 21 - November 2011
- A-Arms and Spindles continued
- Electric Fans Fitted
- Radiator Back in Again
- Tie Rods etc.
- Spreader Bar
- Rebuilt Front Calipers
- Packed and Fitted Front Bearings
- Set the Rotor RunOut
- Fitted the Calipers
- Bled Front Brakes
- Front Sway Bar
Page 22 - November 2011
- Thematic Fan Controller
- Steering Column
- Front Air Sealing
- Exhaust Fitted
- Repaint Underside of Hood !!!!
- Stripped Underside of Hood Again
- Fitted Hood
- Seals for Radiator
- Grills Repainted
- Grills Aligned.
- Bumperettes Fitted
Page 23 - November 2011
- More Grill and Bumper Alignment
- New Tail Lights
- Charcoal Canister Fitted.
- Vacuum Hoses
- Emission Hoses
- Splash Shields
- Plug Wires and Shields
- Motor Close to Done
- Side Grills Fitted
- Side Sills Fitted
- First Wash in 9 Months
- Power Steering Pump Control Valve O-Ring
- Heat Shields
Page 24 - January 2012
- Wiper Switch
- Summernats 2012
- US Trip 2012
- Now What
- Fan Control Panel
- Caster for large Tires
- Tire Clearances
- AMTops
- Cup Holder
- Ipod Wiring
- Power Distribution
Page 25 - March 2012
- 186 Heads Rebuilt
- Some Photo Shots
- Shielding Mod for Dipstick
- Vacuum Tank Repair
- Garage Floor.
- Start Engine Strip
- Testing Temperature Senders
- Fan Brackets for New Radiator
- Motor Removal
- Charcoal Canister Moved Down
Page 26 - June 2012
- Clean up Mounts and Frame
- Underside of Hood Painted
- Transmission Tunnel Crack
- Vacuum Tanks
- Motor at Builders Shop QIM
- Detail Engine Bay
- Tunnel Insulation
- Engine back from QIM
Page 27 - July 2012
- Cam Choice
- Paint Motor Block
- Rebuild Distributor
- Shim Distributor End Play
- Tested Temperature Senders
- Re Assembly of Motor Externals
Page 28 - August 2012
- Thematic Fans Bracket
- DeWitts radiator
- Motor Rebuild Shots
- Power Steering Adjustment Bolts
- Refinish Car Jack
- Radiator Overflow Tank
Page 29 - September 2012
- Stripped Down Door
- Window Removed
- Regulator and Runners
- Locks and Handles
- Run Wires for Central Locking
- Clean Up Door
- Dynamat Inside Door
- Repaint Edge
- Finished Expansion Tank
- Door locks
- Fitting Power Window Regulator
- Door Outer Trim and Seals
- Glass Fittings
- First Attempt to Allign Glass
- TTop Squeaks !!!!!!!!
- American Car Nationals 2012
- Trial Fit new Door Panel
- Adjusted Head lights
- Fixed Loose Headlight Door
- New Brake Pads
- Polished Wheels
Page 30 - December 2012
- New Brake Pads
- Swapped Back to Original Steering Wheel
- Clean & Detail under Hood
- Summernats 2013
- Carb Accelerator Pump
- Temp Guage & Fan Control
Page 31 - March 2013
- Car shows
- TH400 modulator vacuum hose
- Booster Vacuum Leak
- 5.25" Kick Panel Speakers
- New BB/LT1 Hood
- T-Top Squeaks
Page 32 - March 2013
- Run to Tom's Garage
- Aluminium Tie Rod Sleeves
- Outer Tie Rod end kit - Anti Bump Steer
- Replaced Accelerator Pump Again
- T-Top trim plugs
- Big Block/LT1 Hood
Page 33
- Install Nose Support Bracket
- Prepare Egg Crate Vents for paint
- Engine Bay Glass Repairs
- Replace Rear View Mirror Bracket
- Antique Automobile Radio
- Repainted Egg Crate Side Vents.
- Repainted LT1 Hood
Page 34
- Install Nose Support Bracket
- Cleaned up Vette for Summernats
- Summernats 2014 Pictures
- US Trip January 2014
Page 35
- Missfire Issues
- ......
Next.....
The Car now.....
There is a thread on the Australian Corvettes forum but I decided to also post it here given the wider audience and experience that exists here.
Will take me a while to copy it all over.
I am in awe of your talent and patience (neither of which I possess) and your rebuild is fantastic.
I am new to corvettes and this forum and would appreciate
I have recently purchased a 1971 C3 454 corvette for my wife which has a rebuilt engine.
I need to fit some thermo fans to it as it gets too hot when sitting in traffic.
What type of car did the thermo fans that you fitted to your C3 come out of?
I think your fan controller design is great how can I get one.
Ray