
1971 Journey
 02-18-2013, 01:43 AM
#21
Melting Slicks

Thread Starter


June 2010
This weekend I have been working on a few things other than the Brakes Rotors etc.
I have been investigating the vacuum system and had found a few parts that leaked down a bit more than I liked so I ordered a new solenoid as well as the valve that goes in the wiper area on C3's with wiper doors.
It all worked fine but when I started the car the wiper door would pop for a second.
So as the new parts had arrived I did some testing and found the new wiper safety value still had some issues (seems common place)
Not happy so I pulled it apart and fitted some o-ring seals to flare the ends to get a better fit (saw reference to similar thing on US C3 forum.
Will post some pictures when I have my main PC at home working again (Computer fair next weekend :-D
Last edited by CraigH; 02-19-2013 at 12:31 AM.
 02-18-2013, 01:43 AM
#22
Melting Slicks
Thread Starter
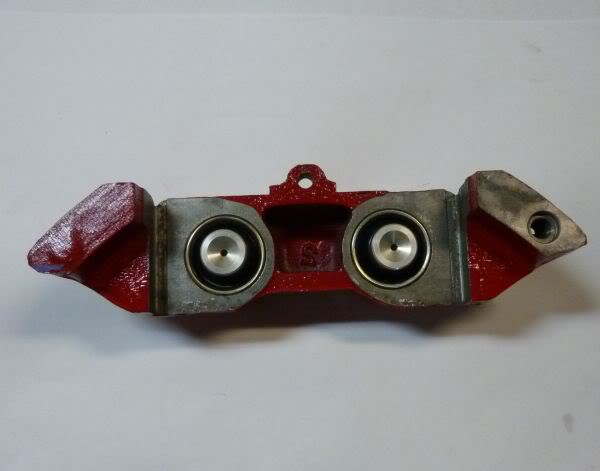
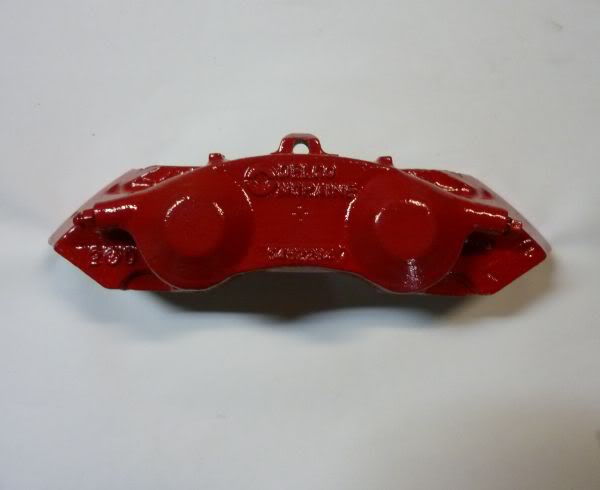
Last weekend I acid washed the calipers and masked them up.
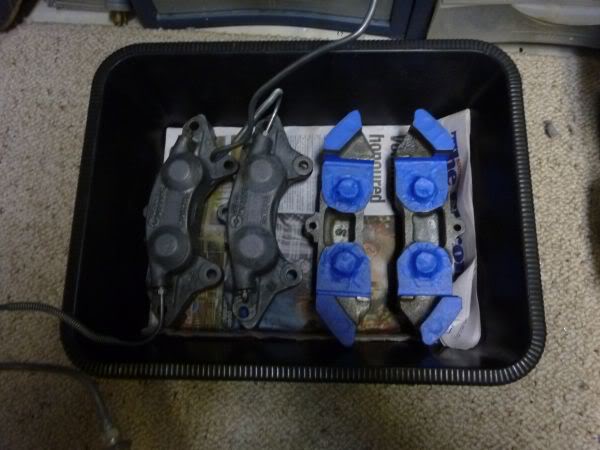
Painted them with 3M caliper paint.
Last night I put the handbrake cables back on and adjusted the tension etc. Will probably need to do some fine adjustments once back on road.
Today I started with rotor run-out and the drivers side out of the box was about .003.
After a couple of shims it was 0.0005 - That should be fine :-D
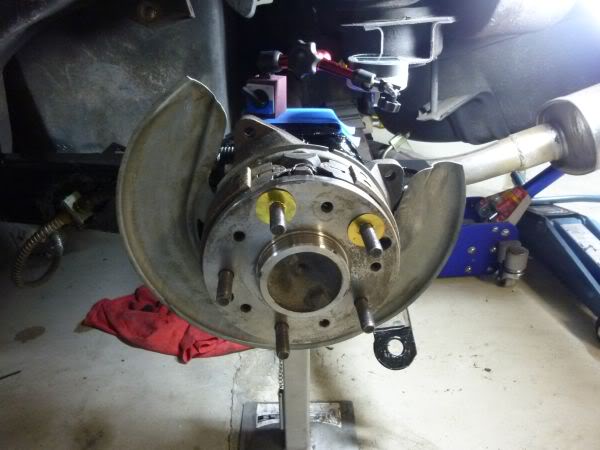
On to the passenger side. (I got it to .0015 - not as good but still fine)
Painted them with 3M caliper paint.
Last night I put the handbrake cables back on and adjusted the tension etc. Will probably need to do some fine adjustments once back on road.
Today I started with rotor run-out and the drivers side out of the box was about .003.
After a couple of shims it was 0.0005 - That should be fine :-D
On to the passenger side. (I got it to .0015 - not as good but still fine)
Last edited by CraigH; 04-09-2023 at 05:55 AM.
02-18-2013, 01:44 AM
#23
Melting Slicks
Thread Starter
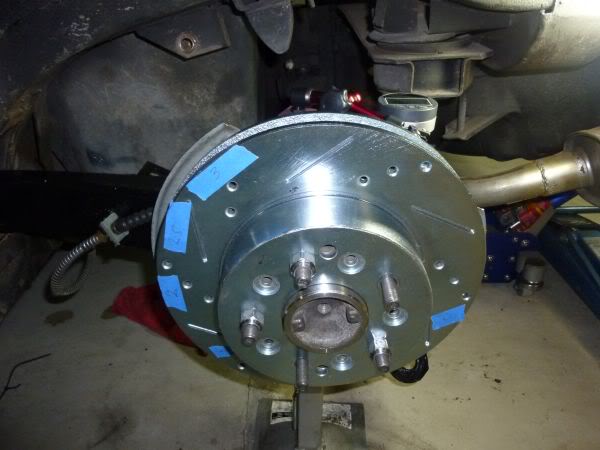
Calipers back together with new bolts, bleeders etc.

Calipers on, all new SS lines and braided flexible ones.
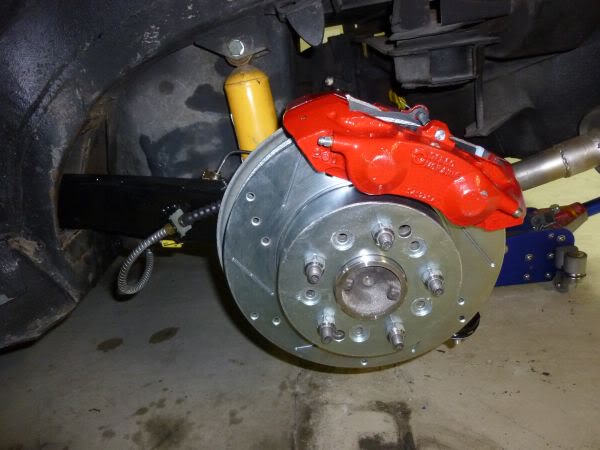
(And yes know the clip holding handbrake cable is not correct one but mickey mouse ear ones both broke when I tried to use them.)
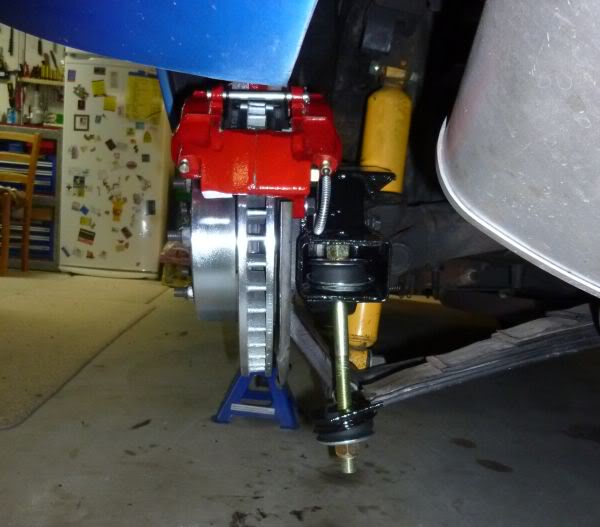
8" spring bolts so I can adjust the car to level and get rid of some of the rear height.

Bled them now just need to take car for a run and bleed again.
But its raining in Canberra.
Calipers on, all new SS lines and braided flexible ones.
(And yes know the clip holding handbrake cable is not correct one but mickey mouse ear ones both broke when I tried to use them.)
8" spring bolts so I can adjust the car to level and get rid of some of the rear height.
Bled them now just need to take car for a run and bleed again.
But its raining in Canberra.
Last edited by CraigH; 04-09-2023 at 05:56 AM.
02-18-2013, 01:45 AM
#24
Melting Slicks
Thread Starter
Originally Posted by shipy59
Did you make the shims from stock sheet?
Cut out the circle, folded in half and then cut out the hole and flattened back out.
I had some brass sheets in various thicknesses from a hobby shop.
02-18-2013, 01:46 AM
#25
Melting Slicks
Thread Starter
Took it for a run today to bed in the brakes
They worked great - no more squeaks, rattles etc etc.
Almost wore off the plating on the friction surface as well.
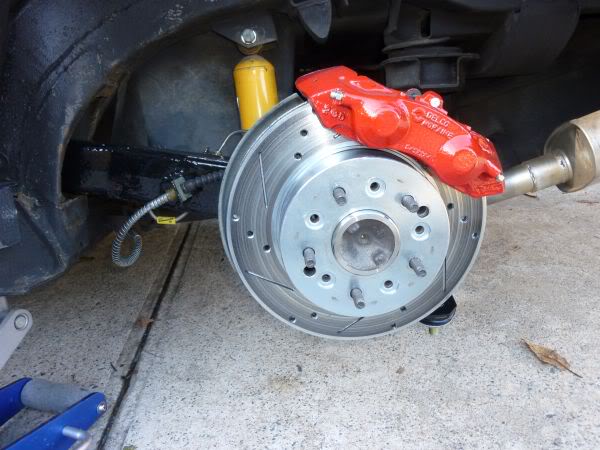
The 8" spring bolts have brought the back down to perfectly level at 27" on each corner. Very happy with that.
And it still has at least another inch to go if I want it lower later to match possible front spring changes.
They worked great - no more squeaks, rattles etc etc.
Almost wore off the plating on the friction surface as well.
The 8" spring bolts have brought the back down to perfectly level at 27" on each corner. Very happy with that.
And it still has at least another inch to go if I want it lower later to match possible front spring changes.
Last edited by CraigH; 04-09-2023 at 05:56 AM.
02-18-2013, 01:46 AM
#26
Melting Slicks
Thread Starter
What Next....hmm
I Think I will continue on the vacuum system to see if I can work out why my wiper door opens and closes on startup.
Or start on the interior stereo install then refit, repaint trim, new carpets etc etc.
Or I could just enjoy it for a while and drive it :-D
I Think I will continue on the vacuum system to see if I can work out why my wiper door opens and closes on startup.
Or start on the interior stereo install then refit, repaint trim, new carpets etc etc.
Or I could just enjoy it for a while and drive it :-D
02-18-2013, 01:46 AM
#27
Melting Slicks
Thread Starter
Some views of the level of the car with 8" spring bolts - close to 27" on each corner.
It is filthy - needs a wash - has all the dirt from the trailing arms all over it. - sorry
It is filthy - needs a wash - has all the dirt from the trailing arms all over it. - sorry
Last edited by CraigH; 04-09-2023 at 05:57 AM.
02-18-2013, 01:47 AM
#28
Melting Slicks
Thread Starter
I had been looking into the vacuum system and have rectified most things but a couple are outstanding.
The actuator for the wiper door needs new seals - ordered.
The most critical though is there is no vacuum tank....
The cost of a real one is too high and also to get it in needs the power booster etc to be removed so another plan was needed....
So I decided to build one from PVC pipe.
A quick test one built and inserted in the system and huge improvement.
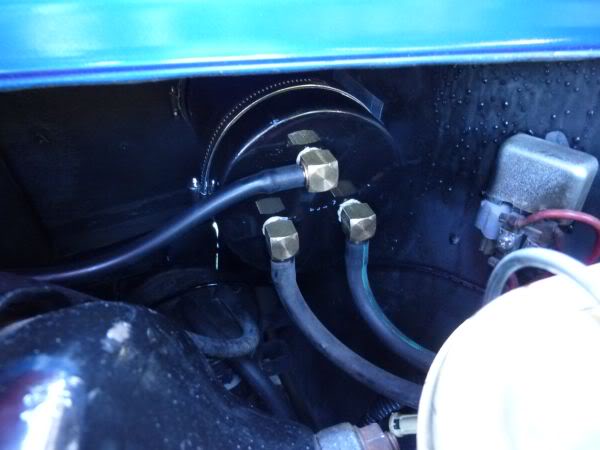
So now I started on a proper one to mount in a similar place to the stock one.
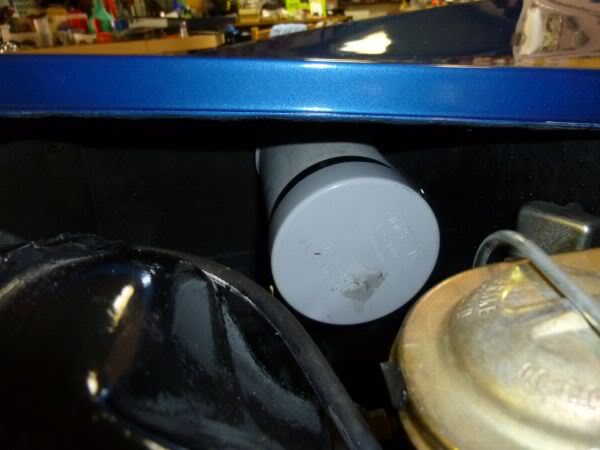
Here it is trial fitted with no fittings but a bracket to align it with the other items.
Now some fittings added.
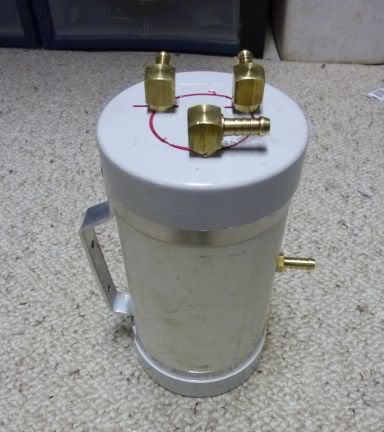
Next to seal it properly, paint it and final fit.
It will then be fairly invisible under the guard.
The actuator for the wiper door needs new seals - ordered.
The most critical though is there is no vacuum tank....
The cost of a real one is too high and also to get it in needs the power booster etc to be removed so another plan was needed....
So I decided to build one from PVC pipe.
A quick test one built and inserted in the system and huge improvement.
So now I started on a proper one to mount in a similar place to the stock one.
Here it is trial fitted with no fittings but a bracket to align it with the other items.
Now some fittings added.
Next to seal it properly, paint it and final fit.
It will then be fairly invisible under the guard.
Last edited by CraigH; 04-09-2023 at 05:57 AM.
02-18-2013, 01:48 AM
#29
Melting Slicks
Thread Starter
Originally Posted by Bazzas77
looks like you went to a lot of work there. I hope it lasts ,I say this because ....I went through a similar path as you as my original is cracked right through ,so I made a similar one as that in steel which imploded :-x not long after putting it on .
I realise that not having one to start with makes it hard to see just how strong they need to be , which is why the originals ARE so heavy .
I since bought a new one from Chris Mills racing over here . Their web site is useless to find it so I cant give you a pic . Another alternative is to get an 1980 or 1981/82 ? corvette vacuum tank which fits in the gap without dismantling that corner of the car.
just my thoughts here .If you want I can take a pic and show you my set up .......
I have seen that the later C3 ones are now available again but after talking to a few guys in the US who are the vacuum gurus (seems almost derogatory) they said one made out of a ribbed coffee can or PVC will hold up ok. The ribs stop the metal imploding. PVC is fairly strong - I hope.
Is the one from Chris Mills similar to this one I found.
http://cgi.ebay.com.au/VACUUM-TANK-B...item3a5ca3b428.
If the PVC one collapses I will have a few choices :-)
My test one seemed to work fine for a week or so with lots of testing.
02-18-2013, 01:48 AM
#30
Melting Slicks
Thread Starter
Tank is now ready to go into the car.
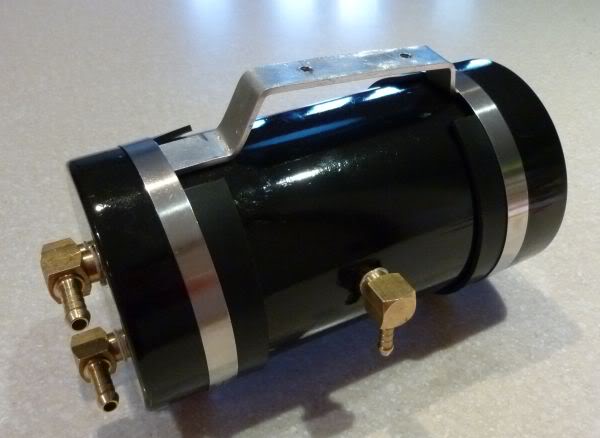
Then the real test is does it hold up over time given Bazzas77's experience.
Then the real test is does it hold up over time given Bazzas77's experience.
Last edited by CraigH; 04-09-2023 at 06:00 AM.
02-18-2013, 01:49 AM
#31
Burning Brakes

Lovely looking car, almost makes me want to take my '71 back to it's original Bridgehampton Blue. 
Can you give us specifics on the rims and tires you used? Look like Torque Thrust, but me and I'm sure others are going to want to know exactly which ones and size, as well as the tire specs.


Can you give us specifics on the rims and tires you used? Look like Torque Thrust, but me and I'm sure others are going to want to know exactly which ones and size, as well as the tire specs.
02-18-2013, 01:49 AM
#32
Melting Slicks
Thread Starter
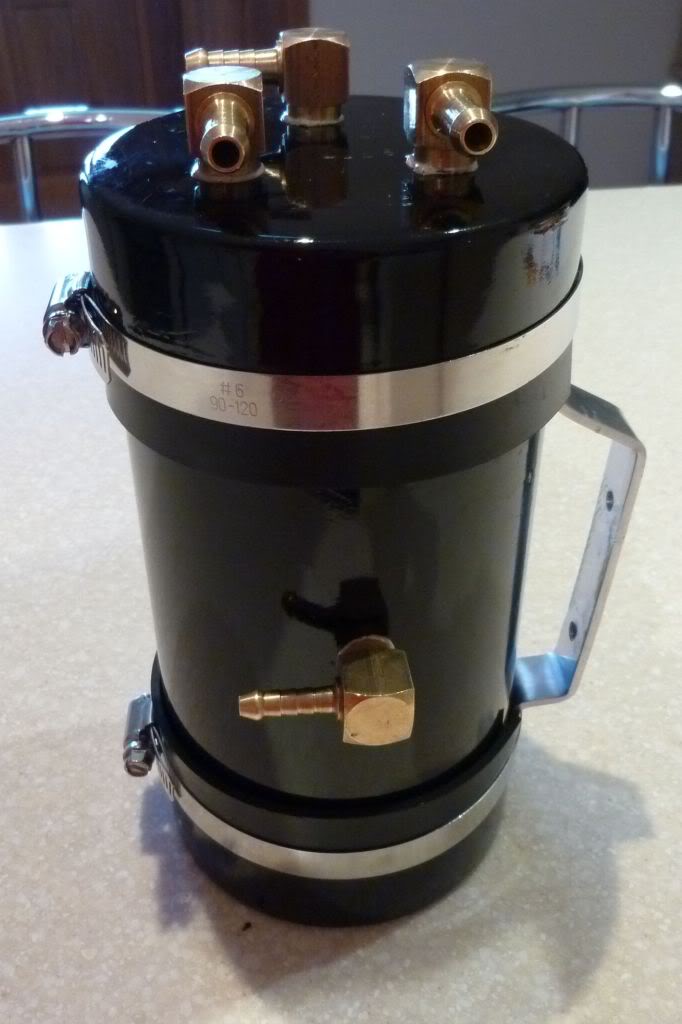
In and operational
Worked fine in a test run (20 minutes)
No more wiper door opening on hard acceleration.
Can close them down after car stops (cant wait too long :-)
I ended up doing 3 outlets (2 headlight and 1 wiper door) and 1 inlet
Worked fine in a test run (20 minutes)
No more wiper door opening on hard acceleration.
Can close them down after car stops (cant wait too long :-)
I ended up doing 3 outlets (2 headlight and 1 wiper door) and 1 inlet
Last edited by CraigH; 04-09-2023 at 06:02 AM.
The following users liked this post:
Primoz (04-29-2021)
02-18-2013, 01:50 AM
#33
Melting Slicks
Thread Starter
Its fairly cold in Canberra so I found out quickly the choke was not working properly on the Quadrajet.
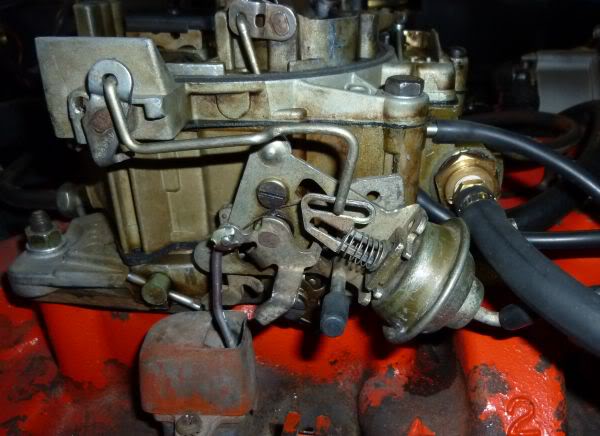
Advice from Lars and others was that there were a few parts missing and or incorrect on the choke side.
So I purchased a couple of old Quadrajets on ebay to get the parts I needed and one turned up yesterday with most of what I needed.
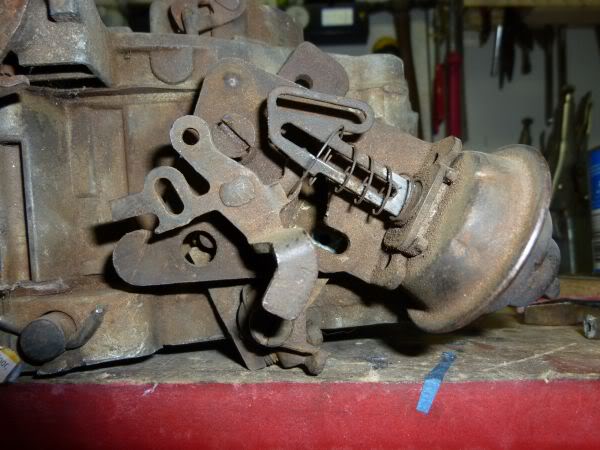
last night I pulled all the linkages etc off and cleaned them up.
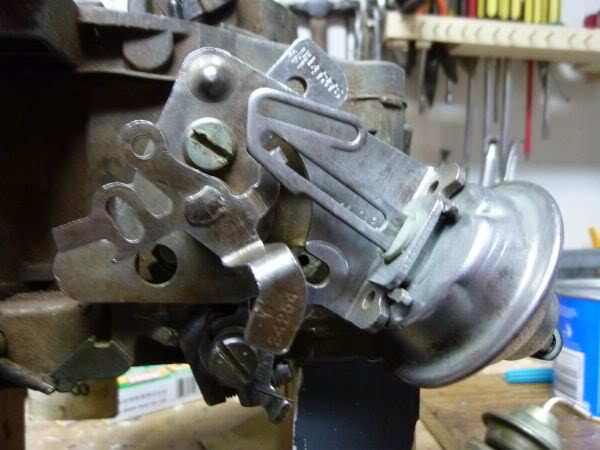
Put them back on the old Quadrajet to test it out and I seem to have the mechanical parts working ok.
The
- fast idle cam is engaging properly
- secondary lockout is working
- Vacuum pull-off is working
Now I need to add a few springs and transfer it all to the Quadrajet on the car.
Only one link to get and hopefully it will be on the next one to arrive (else I will make one from wire).
Advice from Lars and others was that there were a few parts missing and or incorrect on the choke side.
So I purchased a couple of old Quadrajets on ebay to get the parts I needed and one turned up yesterday with most of what I needed.
last night I pulled all the linkages etc off and cleaned them up.
Put them back on the old Quadrajet to test it out and I seem to have the mechanical parts working ok.
The
- fast idle cam is engaging properly
- secondary lockout is working
- Vacuum pull-off is working
Now I need to add a few springs and transfer it all to the Quadrajet on the car.
Only one link to get and hopefully it will be on the next one to arrive (else I will make one from wire).
Last edited by CraigH; 04-09-2023 at 06:02 AM.
02-18-2013, 01:50 AM
#34
Melting Slicks
Thread Starter
I have a tick/tap noise from the rear right of the car that I have been trying to track down.
Is not drive train as it can be heard "slightly" by revving car standing still.
Worse when tank is empty. When tank is full its is hard to hear at all.
I thought it may have been line hammer from the fuel pump echoing through the tank.
but who knows...exhaust noise etc etc.
Have replaced the front fuel line from hard pipe to pump but need the proper molded "s" line to do it properly.
Had a look at rear fuel lines and return was fine but main one was very tight with a kink where the bracket holds it to frame. Almost squashing the rubber hose.
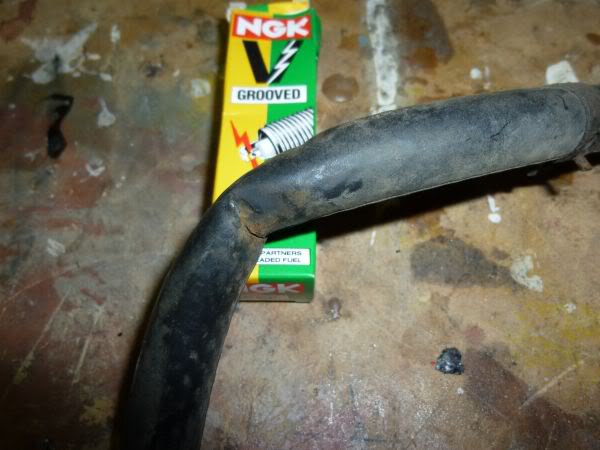
May explain why you could feel a pulse through the fuel line if you touch it.
Drained tank, new line in, just waiting for brackets to dry to put it all back.

Is not drive train as it can be heard "slightly" by revving car standing still.
Worse when tank is empty. When tank is full its is hard to hear at all.
I thought it may have been line hammer from the fuel pump echoing through the tank.
but who knows...exhaust noise etc etc.
Have replaced the front fuel line from hard pipe to pump but need the proper molded "s" line to do it properly.
Had a look at rear fuel lines and return was fine but main one was very tight with a kink where the bracket holds it to frame. Almost squashing the rubber hose.
May explain why you could feel a pulse through the fuel line if you touch it.
Drained tank, new line in, just waiting for brackets to dry to put it all back.
Last edited by CraigH; 04-09-2023 at 06:02 AM.
02-18-2013, 02:07 AM
#35
Melting Slicks
Thread Starter
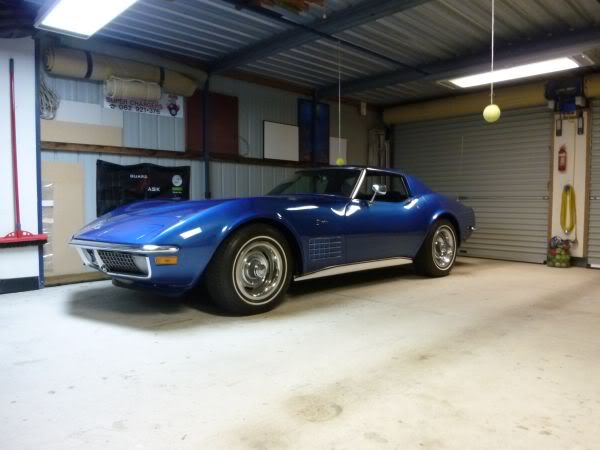
Lovely looking car, almost makes me want to take my '71 back to it's original Bridgehampton Blue.
Can you give us specifics on the rims and tires you used? Look like Torque Thrust, but me and I'm sure others are going to want to know exactly which ones and size, as well as the tire specs.
Can you give us specifics on the rims and tires you used? Look like Torque Thrust, but me and I'm sure others are going to want to know exactly which ones and size, as well as the tire specs.
Coys C5's 18"x 8 - 4" backspace.
245/45/18
255/45/18
02-18-2013, 02:09 AM
#36
Melting Slicks
Thread Starter
Been fairly busy last weeks but have had a little time to look at a few things.
I was curious as to how the CEC emission system (TCS) works on a 71 as it is unique for that year and could not find any doco that was correct.
The AIM is incorrect and a few docs were written post that but none fully explained it (or at least not enough for me :-)
So I took it all apart including the relays etc and reverse engineered how it worked.
This was the final outcome
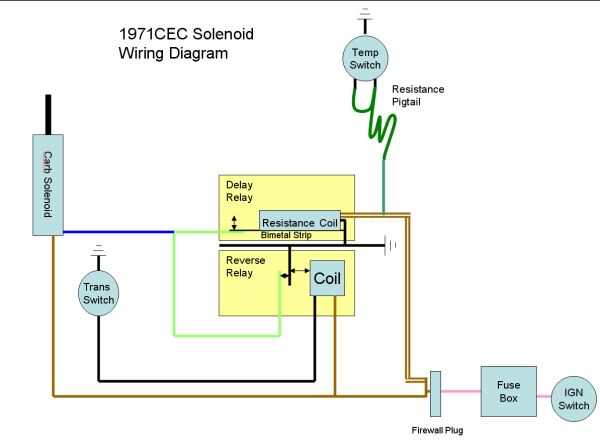
The full discussion is on
http://forums.corvetteforum.com/c3-t...id-wiring.html
Have media blasted all the relay tops and will clear coat them and put them back in.
I dont want the CEC solenoid interfering with my vacuum advance but I needed to know how what and why.
When it all goes back it will work but not be detrimental - if I needed it to be 100% all I would need to do is route the advance through the solenoid.
I was curious as to how the CEC emission system (TCS) works on a 71 as it is unique for that year and could not find any doco that was correct.
The AIM is incorrect and a few docs were written post that but none fully explained it (or at least not enough for me :-)
So I took it all apart including the relays etc and reverse engineered how it worked.
This was the final outcome
The full discussion is on
http://forums.corvetteforum.com/c3-t...id-wiring.html
Have media blasted all the relay tops and will clear coat them and put them back in.
I dont want the CEC solenoid interfering with my vacuum advance but I needed to know how what and why.
When it all goes back it will work but not be detrimental - if I needed it to be 100% all I would need to do is route the advance through the solenoid.
Last edited by CraigH; 04-09-2023 at 06:03 AM.
02-18-2013, 02:10 AM
#37
Melting Slicks
Thread Starter
I started some work on the gauge cluster.
The bezel was broken so I had a new one to put in.
First to clean up the existing gauges and replace the clock with a quartz one.
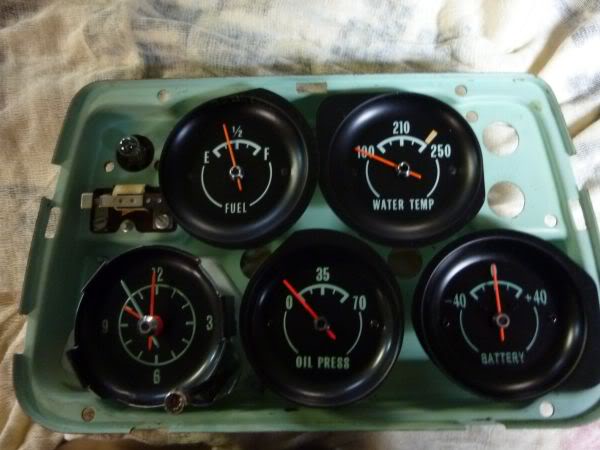
Then I removed the 90 ohm resistor from the temperature gauge.
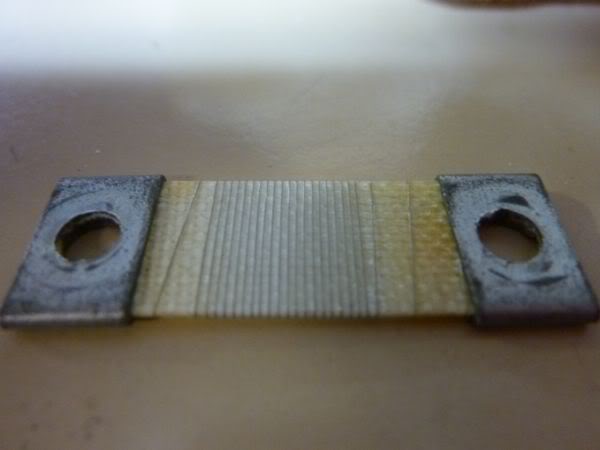
It has always read on the low side so I assumed it was running nice and cool but after a bit of research I found it needs to be properly calibrated as any replacement sender will not read 100%. In fact it appears you cant get any that will work properly any more.
A few of the cars I looked at the owners said it always runs cool - well hmm that may not be 100% correct :-)
Here is the discussion around this and the solution that was worked out.
http://forums.corvetteforum.com/c3-t...e-success.html
Added the new wiring lead to allow calibration.

Have ordered an ir heat reader so will do full calibration with gauges back in the bezel.
Repainted the white letters in the switches and just need to respray the bezel and its a bit uneven and do final assembly.
The bezel was broken so I had a new one to put in.
First to clean up the existing gauges and replace the clock with a quartz one.
Then I removed the 90 ohm resistor from the temperature gauge.
It has always read on the low side so I assumed it was running nice and cool but after a bit of research I found it needs to be properly calibrated as any replacement sender will not read 100%. In fact it appears you cant get any that will work properly any more.
A few of the cars I looked at the owners said it always runs cool - well hmm that may not be 100% correct :-)
Here is the discussion around this and the solution that was worked out.
http://forums.corvetteforum.com/c3-t...e-success.html
Added the new wiring lead to allow calibration.
Have ordered an ir heat reader so will do full calibration with gauges back in the bezel.
Repainted the white letters in the switches and just need to respray the bezel and its a bit uneven and do final assembly.
Last edited by CraigH; 04-09-2023 at 06:04 AM.
02-18-2013, 02:10 AM
#38
Melting Slicks
Thread Starter
New bezel repainted as I was not happy with the finish.
Gauges mounted.
Turned out aftermarket clock was not built to as good a tolerance as the original and needed the mount holes opened up and the time adjuster moved slightly to fit properly.
Radio installed as well. It a modern deck that looks like the original but has an input for ipods etc.
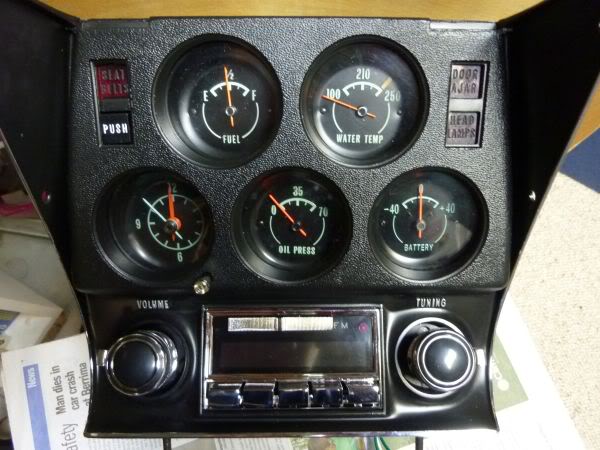
Was not happy with how far the shafts came out so I dismantled the radio and set them back about 8mm more than normal.
Just need to fix the ***** on a bit tighter and it will be good to go back.
The radios memory line will jump off the back of the clock so it has power all the time.
Gauges mounted.
Turned out aftermarket clock was not built to as good a tolerance as the original and needed the mount holes opened up and the time adjuster moved slightly to fit properly.
Radio installed as well. It a modern deck that looks like the original but has an input for ipods etc.
Was not happy with how far the shafts came out so I dismantled the radio and set them back about 8mm more than normal.
Just need to fix the ***** on a bit tighter and it will be good to go back.
The radios memory line will jump off the back of the clock so it has power all the time.
Last edited by CraigH; 04-09-2023 at 06:04 AM.
02-18-2013, 02:11 AM
#39
Melting Slicks
Thread Starter
Went to put the cluster back in but first had to return the radio plug back to how it was originaly.
The original end was found under the carpet from when previous owner chopped it off.
Ends back on.
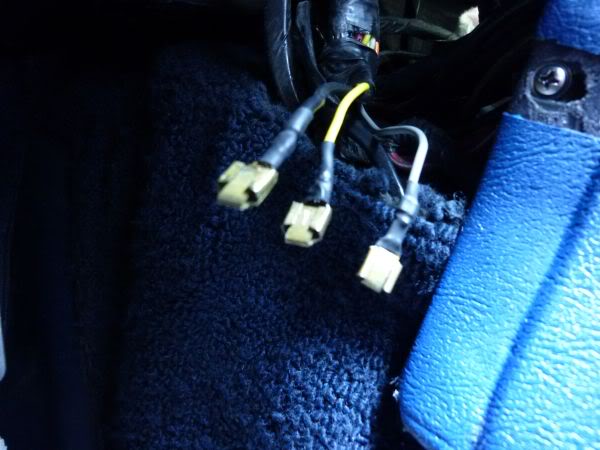
Plug refitted.
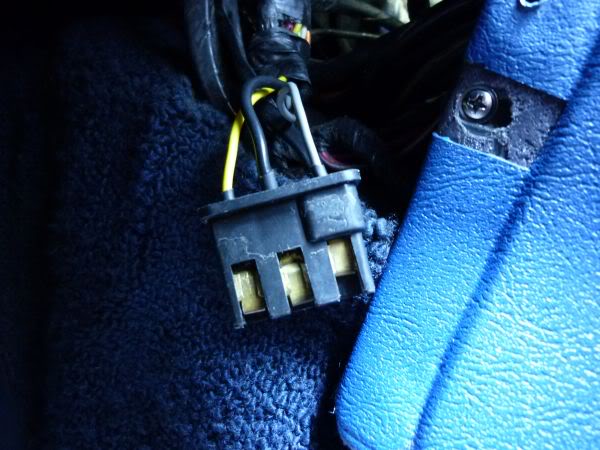
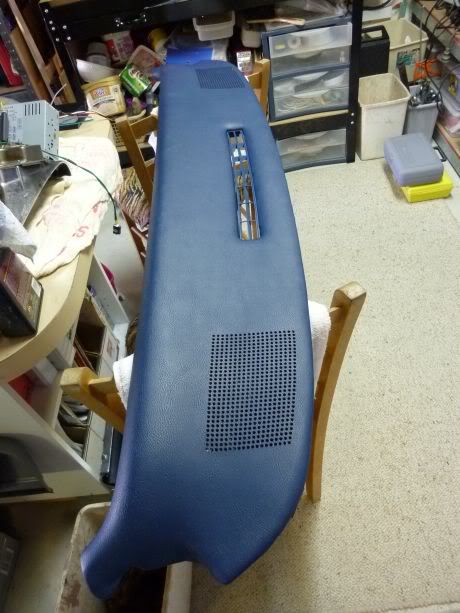
Given I need to remove the console to fit the bezel properly I decided to do a bit more work behind the dash first.
Removing the Dash pad was much easier than I thought, just get one side out first while lifting slightly.
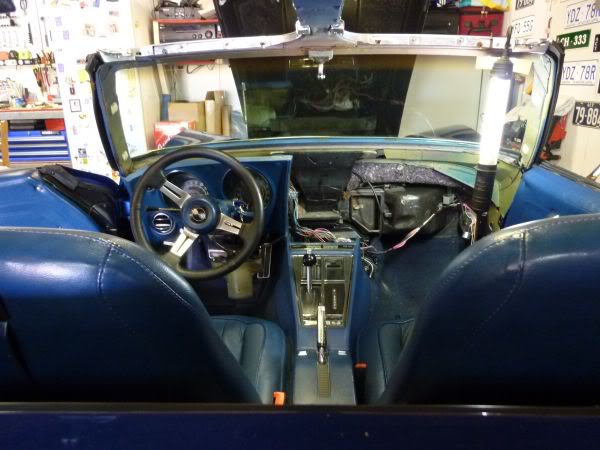
Dash pad cleaned up great
I can now fit my new Polk speakers in the original spots.
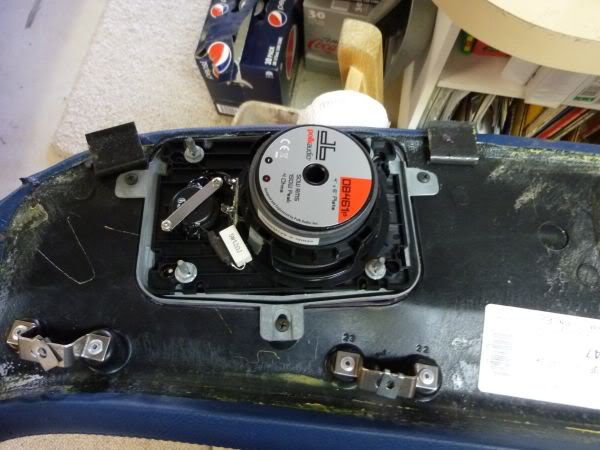
Am missing one of the speaker mount frames but hopefully I can pick one up on ebay over night.
Also I can replace all the upper trim panels t-trim etc. I have had them since January, so may as well use them.
The original end was found under the carpet from when previous owner chopped it off.
Ends back on.
Plug refitted.
Given I need to remove the console to fit the bezel properly I decided to do a bit more work behind the dash first.
Removing the Dash pad was much easier than I thought, just get one side out first while lifting slightly.
Dash pad cleaned up great
I can now fit my new Polk speakers in the original spots.
Am missing one of the speaker mount frames but hopefully I can pick one up on ebay over night.
Also I can replace all the upper trim panels t-trim etc. I have had them since January, so may as well use them.
Last edited by CraigH; 04-09-2023 at 06:04 AM.
The following users liked this post:
Primoz (05-13-2021)
02-18-2013, 02:12 AM
#40
Melting Slicks
Thread Starter
A bit of a clean up of the T-Top stainless.
Bigger marks 800 wet and dry then 1200 then 2000.
1200 then 2000 for the remainder followed by 000 steel wool with metal polish.
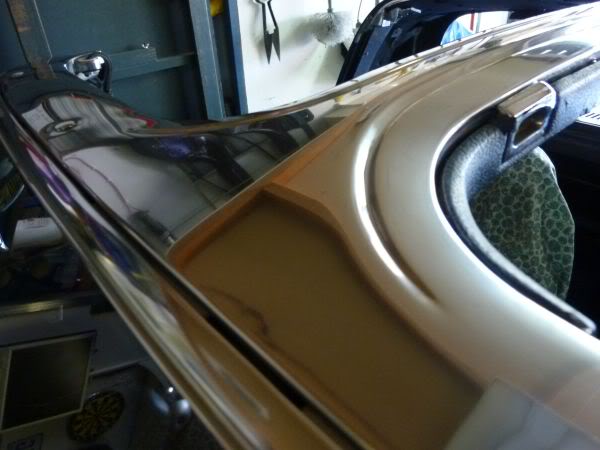
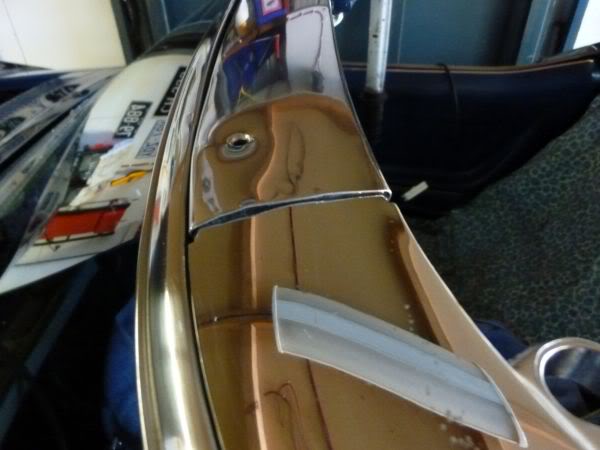
Looking at it under a flouro is probably showing too many small scratches so will see what daylight looks like before doing some more.
But overall fairly happy with it.
Bigger marks 800 wet and dry then 1200 then 2000.
1200 then 2000 for the remainder followed by 000 steel wool with metal polish.
Looking at it under a flouro is probably showing too many small scratches so will see what daylight looks like before doing some more.
But overall fairly happy with it.
Last edited by CraigH; 04-09-2023 at 06:05 AM.
The following users liked this post:
Primoz (06-02-2017)