
Tips for Cleaning/Prepping undercarriage
 01-27-2013, 01:09 AM
#1
Advanced

Thread Starter

Member Since: Jul 2011
Posts: 56
Likes: 0
Received 0 Likes
on
0 Posts
Hello,
I'm in the process of rebuilding the suspension on my '76. I'm just now starting to remove the exhaust, mufflers, leaf spring, strut rods, etc., and will be ordering new parts in the upcoming weeks.
The original leaf spring is in good shape but similar to the rest of the undercarriage, it's dirty, greasy and just "ugly."
I'm likely going to keep my old leaf spring, as it's still in good condition. However, is there a way to make it look new again? Also, the same goes for some of the other old parts....
I just figured that while I'm under here, I'd like to do something to make things look a bit better instead of just putting new strut rods, shocks, etc, into a sea of dirt, grease and rust.
I also noticed that there is also a ton of dirt and grease on the right side of the rear differential. In fact I had to dig just to see the red label on the diff. Not sure if this signals a leak or just 35 years of use.
Thanks in advance for any tips/suggestions.
 01-27-2013, 08:41 AM
#2
Team Owner


Member Since: Jun 2000
Location: Southbound
Posts: 38,928
Likes: 0
Received 1,470 Likes
on
1,249 Posts
Cruise-In II Veteran

A steam cleaner or a power washer will clean things up.

01-27-2013, 09:18 AM
#3

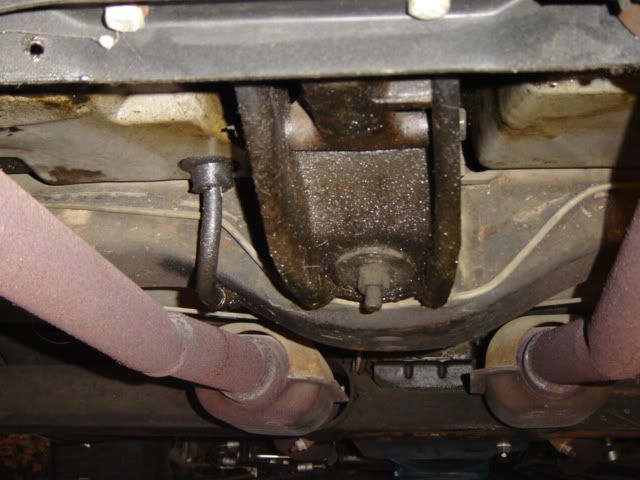
I went from this,

to this,
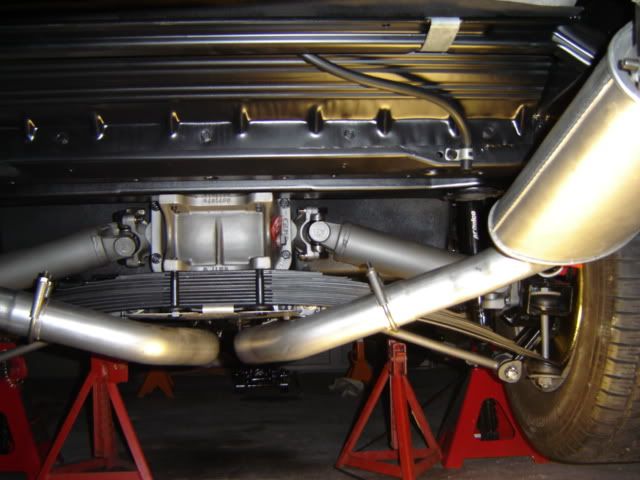
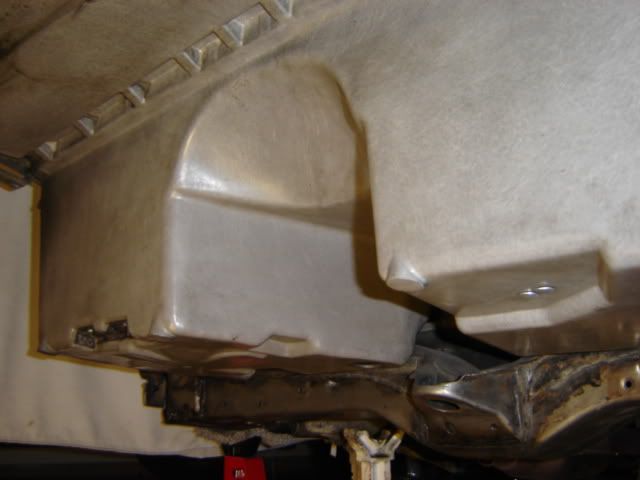
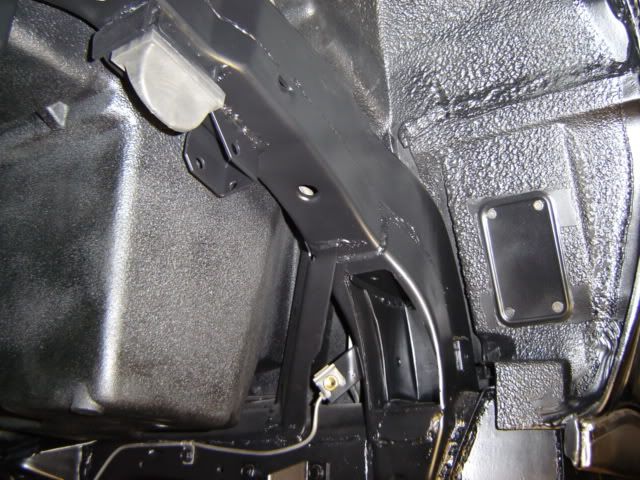
using low odor mineral spirits, coarse scotch brite pads and wire brushes. It takes a while but can be done. I cleaned the fiberglas with laquer thinner. I disassembled the spring and used a 1/4 sheet pad sander to take it down to bare metal. New spring liners are available. It is not NCRS but is not rusting and still looks good. Eye protection and numerous jack stands are needed for safety. mike...
to this,
using low odor mineral spirits, coarse scotch brite pads and wire brushes. It takes a while but can be done. I cleaned the fiberglas with laquer thinner. I disassembled the spring and used a 1/4 sheet pad sander to take it down to bare metal. New spring liners are available. It is not NCRS but is not rusting and still looks good. Eye protection and numerous jack stands are needed for safety. mike...
Last edited by mds3013; 01-27-2013 at 09:27 AM.


 01-27-2013, 11:28 AM
#6
Former Vendor
Member Since: Aug 2006
Location: Jeffersonville Indiana 812-288-7103
Posts: 76,656
Received 1,813 Likes
on
1,458 Posts
St. Jude Donor '08-'09-'10-'11-'12-'13-'14-'15

Remove the center bolt from the rear spring, buy a new liner kit and a center bolt and then rebuild it yourself. The rear spring is a different color than the rest of the suspension too. We are doing a car right now in our shop (we have some good pics on facebook).
http://www.facebook.com/media/set/?s...6912924&type=1
http://www.facebook.com/media/set/?s...6912924&type=1
The spring below is the original spring from this car.

Here are before and afters on the 65 and the spring in this is not an original it is new.. (and not the correct color)


Cleaning the frame is not easy with the body on, we are doing this on another car (dunn) and high speed wire wheels, scrapers, lacquer thinner and rags, and a spot blaster are all being used.
We use the acid etching black primer and when finished we top it off with a color coat.
Willcox
http://www.facebook.com/media/set/?s...6912924&type=1
http://www.facebook.com/media/set/?s...6912924&type=1
The spring below is the original spring from this car.
Here are before and afters on the 65 and the spring in this is not an original it is new.. (and not the correct color)
Cleaning the frame is not easy with the body on, we are doing this on another car (dunn) and high speed wire wheels, scrapers, lacquer thinner and rags, and a spot blaster are all being used.
We use the acid etching black primer and when finished we top it off with a color coat.
Willcox
Last edited by Willcox Corvette; 01-27-2013 at 11:33 AM.
 01-27-2013, 01:59 PM
#8
Melting Slicks


I am smack in the middle of doing this on my 70.
I have been using a combination of paint remover on the fiberglas with a plastic body filler applicator to scrape of the paint and junk. Then I use 000 steel wool to get down to the fiberglass. Do not rub hard or it will leave scotches on the fiberglass.
Found the red scotch brite pad that fits in a drill is perfect for 80-90% of the frame paint and rust removal.
I use emory cloth to get at places the scotch brite pad cannot reach. You will go through quite a few pads. Also have used different sized wire brushes.
I like simple green for getting the oil residue off frame and other areas.
For the spring, disassemble as others have said. The closest paint for the gray on the spring is cold galvanizing in a spray can. (Home Depot) It has a very high zinc content which helps the lubricity as the spring travels. Rather than buy all new liners, I moved all my liners up one location and cut to match. Original liners are different than repros. You will need one repro for the longest/bottom liner.
Hope that helps.
Bill
Last edited by 1974ta; 01-27-2013 at 02:00 PM. Reason: spelling
01-27-2013, 03:58 PM
#10
Safety Car

Tried this method on my friend's '73 454 coupe back in the day. Worked great. One suggestion though - skin and eye protection is a must. Surprisingly, it is a wonder I still have vision today. Ahhh, the things I did went I was young and stupid.
 01-27-2013, 04:25 PM
#11
Team Owner
Member Since: Sep 2006
Location: Westminster Maryland
Posts: 30,173
Likes: 0
Received 2,878 Likes
on
2,515 Posts
Hi,
I believe in order to do a really good job you need to get so dirty that your wife won't let you come in the house with out hosing yourself off outside.
Good Luck!
Regards,
Alan
I believe in order to do a really good job you need to get so dirty that your wife won't let you come in the house with out hosing yourself off outside.
Good Luck!
Regards,
Alan

 01-27-2013, 08:23 PM
#14
Former Vendor
Member Since: Aug 2006
Location: Jeffersonville Indiana 812-288-7103
Posts: 76,656
Received 1,813 Likes
on
1,458 Posts
St. Jude Donor '08-'09-'10-'11-'12-'13-'14-'15
Guys.. most of what you'll find on the fiberglass will be grease and not paint. And if you find paint it will usually be bubba rattle can vs something with a bite. In most cases thinner soaked rags will work nicely. Brake cleaner works good as a high pressure spray that won't leave a residue on the glass.
And yes.. this is a very messy job so stay protected 100 percent of the time. The cheap wire wheels work great but wait till you catch one in the arm... and yes if you are workign with them in a die grinder you'll have one stick you like a needle if you are not careful.
IMHO,
Willcox
And yes.. this is a very messy job so stay protected 100 percent of the time. The cheap wire wheels work great but wait till you catch one in the arm... and yes if you are workign with them in a die grinder you'll have one stick you like a needle if you are not careful.
IMHO,
Willcox
 01-27-2013, 09:45 PM
#16
Advanced
Thread Starter
Member Since: Jul 2011
Posts: 56
Likes: 0
Received 0 Likes
on
0 Posts
Wow! Some of these photos are just amazing. What a huge difference. Simply epitomizes hard work and "elbow grease."
How do you remove this much dirt and grease and not destroy your garage floor? I assume you must be placing a plastic cover/catch on the floor?
Also, are there companies out there that specialize in cleaning undercarriages? I might be better off outsourcing this if at all possible. I did a search here in Denver, but found no one offering these services.
I've noticed that just using something as simple as PB Blaster on a regular basis creates a lot of fumes that seem to find their way from the garage into the house. My concern is using all these other chemicals, cleaners, lacquers, etc., would make both my house and garage smell like an industrial site. Not to mention, I think my HOA and neighbors might frown upon me washing all this crud down my driveway and into the street/gutter.
Thanks!
Last edited by '76stingraycolorado; 01-27-2013 at 11:47 PM.
01-28-2013, 07:57 AM
#17
Wow! Some of these photos are just amazing. What a huge difference. Simply epitomizes hard work and "elbow grease."
How do you remove this much dirt and grease and not destroy your garage floor? I assume you must be placing a plastic cover/catch on the floor?
Also, are there companies out there that specialize in cleaning undercarriages? I might be better off outsourcing this if at all possible. I did a search here in Denver, but found no one offering these services.
I've noticed that just using something as simple as PB Blaster on a regular basis creates a lot of fumes that seem to find their way from the garage into the house. My concern is using all these other chemicals, cleaners, lacquers, etc., would make both my house and garage smell like an industrial site. Not to mention, I think my HOA and neighbors might frown upon me washing all this crud down my driveway and into the street/gutter.
Thanks!
How do you remove this much dirt and grease and not destroy your garage floor? I assume you must be placing a plastic cover/catch on the floor?
Also, are there companies out there that specialize in cleaning undercarriages? I might be better off outsourcing this if at all possible. I did a search here in Denver, but found no one offering these services.
I've noticed that just using something as simple as PB Blaster on a regular basis creates a lot of fumes that seem to find their way from the garage into the house. My concern is using all these other chemicals, cleaners, lacquers, etc., would make both my house and garage smell like an industrial site. Not to mention, I think my HOA and neighbors might frown upon me washing all this crud down my driveway and into the street/gutter.
Thanks!
01-28-2013, 08:46 AM
#18
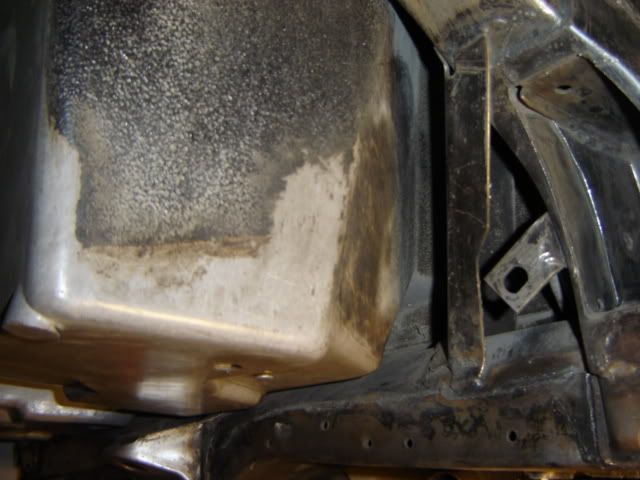
mds3013.. re: the pic of the fiberglass in the area of the footwells. Do you have a before pic of that? It looks super good now and I'm wondering how bad it was to start with. Mine is covered with undercoating, circa the late 70's. I don't see how I would ever get it to look as clean as yours.