
**Mike's 72 Coupe Restoration Kickoff**
 01-13-2013, 12:59 PM
#1
Instructor

Thread Starter
On advice, I figured I should start a main restoration post here as I'm beginning a restoration on a 72 coupe.
 TL;DR: History of car, plans for rebuild, can you answer my questions?
Photo album of the car currently: 1972 Corvette Restoration
(because everyone always wants pictures first! Tons of pics too!)
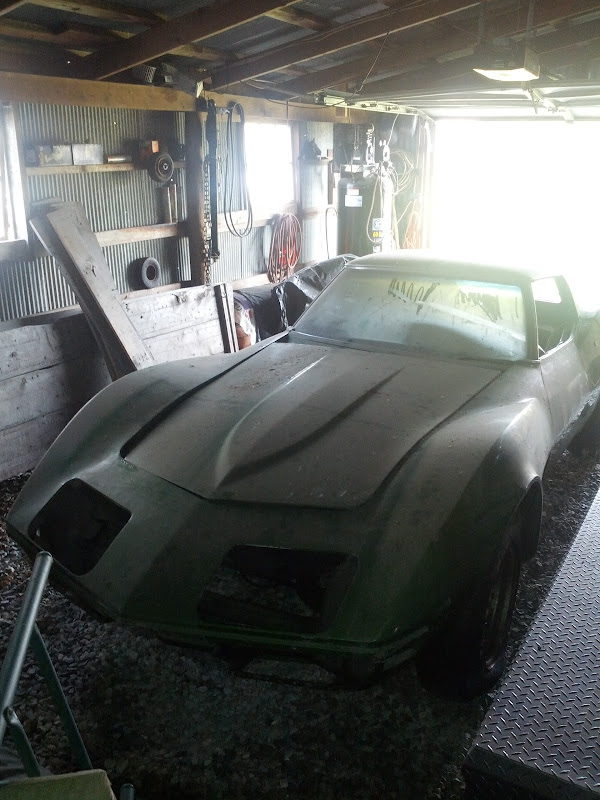
My 3 brothers and I received it as a Christmas gift from our dad along with a 10k-12k bank roll behind it! My dad bought it about 23 years ago from a guy in Indiana. He tracked down about the last 6 or so owners to get as much information on it as possible when he purchased it. When he bought it the motor ran fine and overall was an intact, fun driving car with just a few problems. It had some really bad carpet, faded/hard leather seats, a broken headlight assembly, and the paint job/body was a little dinged and cracked in a few places. He thought he'd start a restoration on it and started disassembling it but then my brothers and I came along and that put the brakes on the project. It has sat in a garage/barn for about 23 years disassembled with the parts around/in it, a few in a storage unit.
According to dad, it's got every option available in 72 except that it's got the base 200hp engine. It's got an automatic but I'm not sure if it's the THM-400 or the K-19. He said he's pretty sure mostly everything is original, doesn't look like its been in any wrecks, and probably hasn't been restored, just a pure driver's car based on all the chips in front of the rear wheels. The engine has had work done to it as the date code on one of the headers is incorrect and it doesn't have the original carburetor. It's also been re-painted at some point, but the color is just a bit off from the factory Elkhart Green, almost just a smidge too "bright".
Here's what it looked like when dad bought it:

Here's what it looks like today:

We know corvette parts can be pricey so right off the top I'm not entirely sure how far $10k will get us. The goal of the project is to get it back into a driver's car that can be enjoyed. We definitely don't have the money for an NCRS type job. And we don't want to go crazy on performance modifications that'd turn it into a track car. The initial plan was to take the body off as it's about 80% of the way there. I'm personally not sure if we want to do that as since I've joined the forum and been reading a lot of posts from other members, taking the body off "opens a can of worms" and can add thousands of dollars to the restoration along with lots and lots of time if you get cases of "while we're here". However, assuming the body comes off, we'd pull the engine and get it running. Clean it up, maybe some new parts here and there, but probably nothing extreme; just leaving it as is since it ran fine before being decommissioned. Depending on opinions from forum members, time, and cash, maybe track down a more date appropriate head for one side and an original carburetor.
Moving on, we plan to clean the chassis up, paint or some type of covering to protect (I see a lot of members like POR15), and then dig into updating the suspension and drive components. Typical cleaning of half shafts, transmission, diff, etc, paint, new bushings all around. Again, depending on the suggestion of forum members, either update to a composite rear spring or clean and re-use stock pack for originality. It seems the trailing arms are a big "to-do" around the forum. I'll need some pointers from the forum on whether or not they'll need re-built and whether to do it ourselves or have them sent out for rebuilding. Hopefully that'll finish up the chassis and we can begin work on the body.
Right now we're planning to strip out a lot of the interior (actually most of it's already gone!), remove the windshield, clean and paint the birdcage, and then have the body sent somewhere for fiberglass repairs and paint. I think we're planning to keep it Elkhart Green. Based on what I've seen around the forum, I'm wondering if we'll need to remove the old inner fender skirts and get new ones. They appear broken but I'm not entirely sure what I'm looking at (new to corvettes still!) and if they need replaced or can be repaired. Bumpers and other parts need re-chromed as well.
Finally, after we've got the chassis and body reconditioned, we'll move on to the interior. Right off the start I'm thinking we'll be better off with completely new door panels. I've read that re-skinning them is a PITA and most members here seem to say just get new ones as they're money well spent. The dash pad looks to be in good shape. The seats are a faded and hard. I've read about conditioners that will get them soft again but haven't yet dived into how to re-color them with dye. We'll get new carpets throughout as well as re-paint and restore the interior trim, plastics, etc.
Finally with all that done, hopefully just re-assemble the car and have a nice driver to enjoy that's been restored tastefully and within our budget, allowing the car to live on until perhaps its next owner hopefully has the financial capacity and time to do her proper. At this point in time, I think it's about time for me to ask all the beginner/noob questions!
1. Are we in over our head as far as the budget is concerned? Do-able with $12k?
2. Should we leave the body on or take it off since it's about ready to come?
3. Opinions on the birdcage condition? Is it pretty obvious we've probably got holes in the lower corners?
4. Mod it with a composite rear spring, possibly look at making headlights electric, LT1 valve covers? Or keep it as close to stock as possible since it's a chrome bumper?
5. Any estimates as to its current value as is? What you'd pay if you wanted it for a project?
6. Any tips on how to successfully and fairly split a car between 4 brothers so there's no bad taste later on down the road?
7. What's the H13 on the trim/color tag mean?
8. Could it be possible to still have page 1 of the 2 page tank sticker up there if page 2 fell down and my dad has it? Is there also a copy behind the radio/cluster or stuffed into the seat back?
I'm sure I'll have plenty of other questions and about a million more "HELP!" threads as we go. Hopefully as we go along and reach certain milestones I can be helpful to other members about to embark on their journey! Also thanks to the members who've already weighed in on some questions in my introduction thread, much appreciated. This place is so active and helpful, it's great!
Also, sorry for the book of a post! Just trying to get most details in so I can get good input from other members!
Thanks!
Mike

TL;DR: History of car, plans for rebuild, can you answer my questions? Photo album of the car currently: 1972 Corvette Restoration
(because everyone always wants pictures first! Tons of pics too!)
My 3 brothers and I received it as a Christmas gift from our dad along with a 10k-12k bank roll behind it! My dad bought it about 23 years ago from a guy in Indiana. He tracked down about the last 6 or so owners to get as much information on it as possible when he purchased it. When he bought it the motor ran fine and overall was an intact, fun driving car with just a few problems. It had some really bad carpet, faded/hard leather seats, a broken headlight assembly, and the paint job/body was a little dinged and cracked in a few places. He thought he'd start a restoration on it and started disassembling it but then my brothers and I came along and that put the brakes on the project. It has sat in a garage/barn for about 23 years disassembled with the parts around/in it, a few in a storage unit.
According to dad, it's got every option available in 72 except that it's got the base 200hp engine. It's got an automatic but I'm not sure if it's the THM-400 or the K-19. He said he's pretty sure mostly everything is original, doesn't look like its been in any wrecks, and probably hasn't been restored, just a pure driver's car based on all the chips in front of the rear wheels. The engine has had work done to it as the date code on one of the headers is incorrect and it doesn't have the original carburetor. It's also been re-painted at some point, but the color is just a bit off from the factory Elkhart Green, almost just a smidge too "bright".
Here's what it looked like when dad bought it:
Here's what it looks like today:
We know corvette parts can be pricey so right off the top I'm not entirely sure how far $10k will get us. The goal of the project is to get it back into a driver's car that can be enjoyed. We definitely don't have the money for an NCRS type job. And we don't want to go crazy on performance modifications that'd turn it into a track car. The initial plan was to take the body off as it's about 80% of the way there. I'm personally not sure if we want to do that as since I've joined the forum and been reading a lot of posts from other members, taking the body off "opens a can of worms" and can add thousands of dollars to the restoration along with lots and lots of time if you get cases of "while we're here". However, assuming the body comes off, we'd pull the engine and get it running. Clean it up, maybe some new parts here and there, but probably nothing extreme; just leaving it as is since it ran fine before being decommissioned. Depending on opinions from forum members, time, and cash, maybe track down a more date appropriate head for one side and an original carburetor.
Moving on, we plan to clean the chassis up, paint or some type of covering to protect (I see a lot of members like POR15), and then dig into updating the suspension and drive components. Typical cleaning of half shafts, transmission, diff, etc, paint, new bushings all around. Again, depending on the suggestion of forum members, either update to a composite rear spring or clean and re-use stock pack for originality. It seems the trailing arms are a big "to-do" around the forum. I'll need some pointers from the forum on whether or not they'll need re-built and whether to do it ourselves or have them sent out for rebuilding. Hopefully that'll finish up the chassis and we can begin work on the body.
Right now we're planning to strip out a lot of the interior (actually most of it's already gone!), remove the windshield, clean and paint the birdcage, and then have the body sent somewhere for fiberglass repairs and paint. I think we're planning to keep it Elkhart Green. Based on what I've seen around the forum, I'm wondering if we'll need to remove the old inner fender skirts and get new ones. They appear broken but I'm not entirely sure what I'm looking at (new to corvettes still!) and if they need replaced or can be repaired. Bumpers and other parts need re-chromed as well.
Finally, after we've got the chassis and body reconditioned, we'll move on to the interior. Right off the start I'm thinking we'll be better off with completely new door panels. I've read that re-skinning them is a PITA and most members here seem to say just get new ones as they're money well spent. The dash pad looks to be in good shape. The seats are a faded and hard. I've read about conditioners that will get them soft again but haven't yet dived into how to re-color them with dye. We'll get new carpets throughout as well as re-paint and restore the interior trim, plastics, etc.
Finally with all that done, hopefully just re-assemble the car and have a nice driver to enjoy that's been restored tastefully and within our budget, allowing the car to live on until perhaps its next owner hopefully has the financial capacity and time to do her proper. At this point in time, I think it's about time for me to ask all the beginner/noob questions!
1. Are we in over our head as far as the budget is concerned? Do-able with $12k?
2. Should we leave the body on or take it off since it's about ready to come?
3. Opinions on the birdcage condition? Is it pretty obvious we've probably got holes in the lower corners?
4. Mod it with a composite rear spring, possibly look at making headlights electric, LT1 valve covers? Or keep it as close to stock as possible since it's a chrome bumper?
5. Any estimates as to its current value as is? What you'd pay if you wanted it for a project?
6. Any tips on how to successfully and fairly split a car between 4 brothers so there's no bad taste later on down the road?
7. What's the H13 on the trim/color tag mean?
8. Could it be possible to still have page 1 of the 2 page tank sticker up there if page 2 fell down and my dad has it? Is there also a copy behind the radio/cluster or stuffed into the seat back?
I'm sure I'll have plenty of other questions and about a million more "HELP!" threads as we go. Hopefully as we go along and reach certain milestones I can be helpful to other members about to embark on their journey! Also thanks to the members who've already weighed in on some questions in my introduction thread, much appreciated. This place is so active and helpful, it's great!
Also, sorry for the book of a post! Just trying to get most details in so I can get good input from other members!
Thanks!
Mike
Last edited by Mike7143; 10-15-2013 at 09:56 AM. Reason: No longer a kickoff haha
 01-13-2013, 01:14 PM
#2
Safety Car


I just wandered in this section for the first time, but I've always loved the C3 years and a thread like this can only add to my knowledge base. I've got a C6, so I can't be of much help to you from a technical standpoint.
Good luck with the project and I'll be looking forward to the updates!
Good luck with the project and I'll be looking forward to the updates!
01-13-2013, 02:08 PM
#3
Drifting

Great story on the car! If you are doing the work yourselves it will Probably still cost more money. Parts ain't cheap. If you are paying someone to do it get ready to write some big checks. With a standard engine and auto these cars usually go for 18-30k. Have fun though getting it back together! I had a frame on pretty much done but had someone to do it. It wasn't cheap either but worth the time and fun getting new parts, rechroming etc.
01-13-2013, 04:07 PM
#4
Drifting

Heres my take on some of your questions.
By all means take the body off when restoring. If you dont you will double up on your work to the engine bay, frame, and most any other work you do to the car based on how much detail to want to do to the frame or what kind of shape it's in.
You can keep the cost way down by cleaning the original parts and re-using and or re-building them and installing the parts. If theres four of you guys to do the work on the car that will help out getting the job done more efficiently and save time, that is if you all dont rip each others heads off during the restoration. For instance, my brother and I can work together very well, but my dad and I butt heads over the smallest thing.
Splitting the jobs between you and your brothers is going to be your job. Try not to get burnt out on the restoration.
I'd keep the original rear spring. Why do you think you need a different rear spring?
Keep the parts on the car that you take off and re-use. Once the car is restored to your liking and or budget then you can replace the rear spring and or valve covers down the road once you can throw more money at it.
Check the parts and forsale section on this forum. You dont have to buy new to get the job done.
Can you restore this car for 12K? Yea maybe if you re use most of your old parts that can be re used and do most of the work yourself.
Letting someone do the body work on the car will eat your lunch in cost. Research how to do the body work here on this forum and I bet you and the other three brothers could whip it out in no time, then decide if you want to let someone paint it for you.
The tank sticker could very well still be there. Once you drop the tank, you'll know for sure.
Good luck and keep the restore alive.
By all means take the body off when restoring. If you dont you will double up on your work to the engine bay, frame, and most any other work you do to the car based on how much detail to want to do to the frame or what kind of shape it's in.
You can keep the cost way down by cleaning the original parts and re-using and or re-building them and installing the parts. If theres four of you guys to do the work on the car that will help out getting the job done more efficiently and save time, that is if you all dont rip each others heads off during the restoration.
For instance, my brother and I can work together very well, but my dad and I butt heads over the smallest thing.Splitting the jobs between you and your brothers is going to be your job. Try not to get burnt out on the restoration.
I'd keep the original rear spring. Why do you think you need a different rear spring?
Keep the parts on the car that you take off and re-use. Once the car is restored to your liking and or budget then you can replace the rear spring and or valve covers down the road once you can throw more money at it.
Check the parts and forsale section on this forum. You dont have to buy new to get the job done.
Can you restore this car for 12K? Yea maybe if you re use most of your old parts that can be re used and do most of the work yourself.
Letting someone do the body work on the car will eat your lunch in cost. Research how to do the body work here on this forum and I bet you and the other three brothers could whip it out in no time, then decide if you want to let someone paint it for you.
The tank sticker could very well still be there. Once you drop the tank, you'll know for sure.
Good luck and keep the restore alive.
01-13-2013, 04:38 PM
#5

Salvage as much as you can. Clean, refinish as necessary, and reuse all that you can. Leave well enough alone. Obviously, if something looks unsafe, you will have to replace it. You will most likely burn through that budget very quickly anyway.
When your car was new, it certainly ran well. By saving as much of it as possible, you might be able to dupicate what Chevrolet did.
Over the years, I spent a BUNCH of time and money swapping in trick parts. Most of them are now gone, and the stock parts have been reinstalled.
You can spend a lot of money at the speed shop, and make your car different. But it's not so easy to make it better.
Last edited by gcusmano74; 01-13-2013 at 04:41 PM.
01-14-2013, 09:43 AM
#6
Instructor
Thread Starter
Thanks for the input everyone! As far as the budget goes, it sounds like we're going to have to re-use as much as possible so that we have money for parts we truly can't fix and for final paint. I suppose a new rear spring isn't necessary; just a good clean/rebuild of suspension with all new rubber bushings should provide a good ride. Any thoughts on the rust I'm seeing on the windshield frame and the lower exterior corner?

Everything so far is looking manageable with the exception of the front nose body work. I don't know how it got that way as the 1st picture in my OP doesn't look like it's cracked. Are the pieces cracked part of the inner fender skirts? Can those be un-bonded and replaced with new without removing the entire front clip? Or perhaps they're repairable?


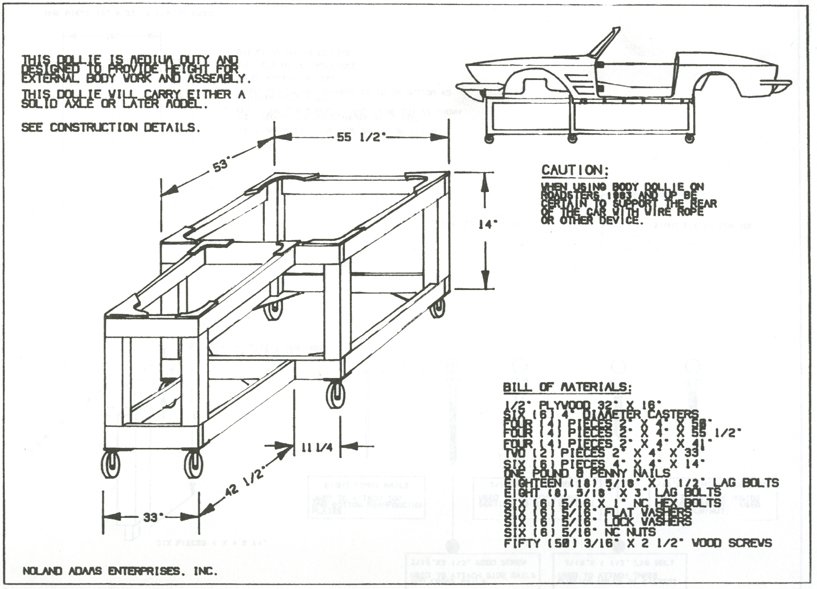
Otherwise, I'm ready to get to work! Currently looking to buy a body dolly in the Indianapolis area, but will build one soon if I can't locate one.
Mike
Everything so far is looking manageable with the exception of the front nose body work. I don't know how it got that way as the 1st picture in my OP doesn't look like it's cracked. Are the pieces cracked part of the inner fender skirts? Can those be un-bonded and replaced with new without removing the entire front clip? Or perhaps they're repairable?
Otherwise, I'm ready to get to work! Currently looking to buy a body dolly in the Indianapolis area, but will build one soon if I can't locate one.
Mike
01-14-2013, 10:19 AM
#7
Melting Slicks

Welcome Mike, and your Elkhart green 72.
I'd remove the body for the easiest way to access everything. Being as though I am in the reassembly stage on my Elkhart green 72, I think you've got a great car to work on.
You should be able to get it done close to your budget if you don't invest heavily in engine mods or suspension mods.
I would completely disassemble the car and chassis and take the majority of the frame and associated parts to a powder coater. It will save you a lot of of work and cost only a grand.
To stay on budget, stick with stock rubber suspension parts, original coil springs and leaf.
You are going to need to learn about fiberglass. New parts are expensive, and assembling them has their own problems. On the other hand, you can buy enough resin and glass mat to do all your repairs for the cost of 1 door skin. visit west systems epoxy website for great repair techniques. Great product too.
As for your carb, my car came with a quadrajet correct date for the the car, but coded for an auto. I have a manual trans. I will list it for sale soon.
Your project should be fun, I'm sure a couple of you will end up doing the majority of the work, but try and have fun and learn from it.
01-14-2013, 10:39 AM
#8
Le Mans Master

I wouldn't powder coat..
use POR15 or something similar on the frame and suspension after sandblasting, it's MUCH cheaper than powder coating!
if you're looking to save money ANYWHERE you can here.
it cost me $275.00 to have the frame and just about everything else I could bring with me to get sandblasted, another $150.00 to POR15 the frame and everything else.. you only need 1 quart to do the frame and suspension.
01-14-2013, 12:10 PM
#9
Melting Slicks
I wouldn't powder coat..
use POR15 or something similar on the frame and suspension after sandblasting, it's MUCH cheaper than powder coating!
if you're looking to save money ANYWHERE you can here.
it cost me $275.00 to have the frame and just about everything else I could bring with me to get sandblasted, another $150.00 to POR15 the frame and everything else.. you only need 1 quart to do the frame and suspension.
use POR15 or something similar on the frame and suspension after sandblasting, it's MUCH cheaper than powder coating!
if you're looking to save money ANYWHERE you can here.
it cost me $275.00 to have the frame and just about everything else I could bring with me to get sandblasted, another $150.00 to POR15 the frame and everything else.. you only need 1 quart to do the frame and suspension.
01-14-2013, 12:26 PM
#10
Le Mans Master
Member Since: May 2002
Location: Lebanon Township New Jersey
Posts: 5,005
Received 706 Likes
on
401 Posts

Good luck with your project. BTW there are a couple body off restoration threads going in this forum for the last 5 or 6 years that you might want to refer to.
01-14-2013, 12:46 PM
#11
Instructor
Thread Starter
Quite honestly we'll probably just paint the chassis and components with Rustoleum; not rattle can, but with a quart or so. Powder coat would be cool and all, but I feel like with a $10k budget, we're going to be going down a path that restores it to a good solid running condition and at least offers some protection and refurbishing so a future owner isn't left with an additional 20+ years of "decay" on top of the existing 40+ haha!
We have a home built sandblast cabinet, just need a new reed valve for our big compressor. It's big enough to do small parts, but nowhere near big enough for the chassis. We'll probably look at having it sandblasted outside, ourselves in the open, or just wire wheel it with a bunch of hours.
I'm thinking I'd like to save money on the chassis details and burn up "free" man hours there so that later down the road I can blow money on new parts you'll see and touch every time you drive it and are too fragile to restore such as door panels and etc. I'd rather end up with a lesser quality chassis paint job for cheap than aim for a cheap and good looking door panel re-skin that may turn out ugly anyway! Perhaps another way to put it, I'm more skilled with a Dewalt than with heat guns and glue!
So far all really great suggestions and items to think about! I love this place! I can't wait to get going on it! I'll have to definitely read up on body work/repair to see if it's something we want to tackle. If I can save enough money on the chassis section, perhaps I'll have plenty to just let a pro do it! Keep it coming guys and gals!
Thanks,
Mike
01-14-2013, 12:48 PM
#12
Instructor
Thread Starter
 01-14-2013, 09:50 PM
#13
Melting Slicks
Mike I don't have a restoration page. I have 1 1/2 yrs into my project. There are some knowledgeable folks on this website, but like any advice given for free, take some of it for what it's worth. Get yourself the aim, assembly instruction manual, and the factory repair manual which sort of sucks because it covers several other cars as well. But it has enough useful information in it to have it. I have overhauled everything myself so far. Except the engine. I farmed that out to a local rebuilder known for the quality of his work. My goal is a stock appearing but strong running car I can cruise to car shows in. So my money is spent accordingly. The key is to read and learn from experts. Or those considered to be highly regarded. Visit digital corvette website too. You will find some good tutorials in the technical area on rebuilding trailing arms and differentials. I've gone through at least 10k so far, but 5k was in the engine, and 1500 or so in suspension upgrades. I only use the higher grade parts when available. You mention you cannot do fiberglass. I'd learn how. Otherwise your 10k budget will be gone on the paint and body alone. Not every shop knows how to work with glass, so finding someone who works cheap may not be your best option. From your pics your birdcage looks to be in worse shape then I had. Mine was a desert car, paint and interior destroyed by the sun, but frame in great shape. You better address that area soon. A rotted out birdcage turns a project car into a parts car real quick. Good luck, hope you and your brothers learn a lot and stick with it.
01-15-2013, 06:24 PM
#14
Instructor
Thread Starter
Ok no post or page, but the photo album is a help!
I know that down there it's probably got holes
I don't know if we can tackle un-bonding the front clip and firewall. I assume those 2 things are necessary to properly fix the lower corners? And there's no way to check it out first is there?
Part of me feels that if there is rust, no matter the time it takes, it needs fixed. It makes no sense to put a $$$ paint job on the car and fix everything else just to know there's cancer. Not to mention it'd be rude not to do it now for the next owner who'd have to tackle it.
Then again, if it's never sold, would it matter? Maybe we'd just rather get it driving again, let it be a driver, and when it finally rusts in half, that's the end and it'll have had a wonderful 60+ year life?
I guess this is going to be a decision we have to make pretty soon too. I don't think I'm nervous about getting the clip and firewall off; it's getting it all back on correctly and properly aligned, not to mention that it may be big money if we crack something and end up having to buy a new front clip.

 01-19-2013, 09:54 PM
#17
Instructor
Thread Starter
I'm back with more pictures!!!
Spent most the day getting the parts out of it and moving it from the barn to the garage. Flat spotted tires and pushing through soft turf isn't fun by yourself, had to get out the tow strap, truck, and forklift. Up on jack stands off its suspension to get some better pics.

Interesting to find out my cell phone could take pictures of what I think is the top of the tank! Dad said he has page 2 of the 2-page build sheet, always hoped page 1 was still up there, but based on the pictures, it's not looking that way unless the tank top slops and I'm not seeing it all. Also got pics of the frame/underside for better opinions on the condition. Pics of #2 and #3 mounts I believe. Trailing arm pics.


Regarding the rotors, are these the factory rotors or have they been changed? I've read the factory riveted them on. So are these drilled or still riveted?

Finally, and forgot to take a picture of this last time, but it's the driver door sticker. Top left says 3-72. Does that mean the car was rolled off the assembly line in March of 72? Any links as to find out last VIN of February and final VIN of March to get an approximate build date?

If anyone gets a chance, please take a look through my pictures, trying to get a better handle on my project. I began thinking it was a reasonable restoration, but now I'm being told it's a parts car, terribly rusted, and not worth the restoration. Would be very much appreciated!
Doubtful I'll work on it tomorrow. Got lucky today with temps in the low 50's. Bottom falls out and will be 20s tomorrow. Hurray Indiana!
Spent most the day getting the parts out of it and moving it from the barn to the garage. Flat spotted tires and pushing through soft turf isn't fun by yourself, had to get out the tow strap, truck, and forklift. Up on jack stands off its suspension to get some better pics.
Interesting to find out my cell phone could take pictures of what I think is the top of the tank! Dad said he has page 2 of the 2-page build sheet, always hoped page 1 was still up there, but based on the pictures, it's not looking that way unless the tank top slops and I'm not seeing it all. Also got pics of the frame/underside for better opinions on the condition. Pics of #2 and #3 mounts I believe. Trailing arm pics.
Regarding the rotors, are these the factory rotors or have they been changed? I've read the factory riveted them on. So are these drilled or still riveted?
Finally, and forgot to take a picture of this last time, but it's the driver door sticker. Top left says 3-72. Does that mean the car was rolled off the assembly line in March of 72? Any links as to find out last VIN of February and final VIN of March to get an approximate build date?
If anyone gets a chance, please take a look through my pictures, trying to get a better handle on my project. I began thinking it was a reasonable restoration, but now I'm being told it's a parts car, terribly rusted, and not worth the restoration. Would be very much appreciated!
Doubtful I'll work on it tomorrow. Got lucky today with temps in the low 50's. Bottom falls out and will be 20s tomorrow. Hurray Indiana!
Last edited by Mike7143; 10-15-2013 at 09:57 AM.
01-20-2013, 10:22 AM
#18
Instructor
Thread Starter
Looks like a bubba'd fix there, can you spot it?

Also, as pointed out by another forum member, what would cause this to pull out? What could potentially be damaged inside?

Hopefully today I can get the body dolly built, provided I don't freeze myself into a cube! Going to go with this design:
Also, as pointed out by another forum member, what would cause this to pull out? What could potentially be damaged inside?
Hopefully today I can get the body dolly built, provided I don't freeze myself into a cube! Going to go with this design:
Last edited by Mike7143; 01-20-2013 at 10:25 AM.
01-20-2013, 11:21 AM
#20
Your build date of your car is March 13, 1972.
The aluminum tag has the code H13. H is the tenth letter of the alphabet; March is the tenth month of production, since they often began building in August. The 13 means, of course, the 13th of the month. The blue sticker shows 3-72. March is the third month of the calendar year. Of course, the 72 stands for 1972.
Elementary, my dear Watson.