
Buffing lacquer paint? Need an expert's opinion
 09-22-2012, 10:31 PM
#1
Burning Brakes

Thread Starter


I got a small dull spot on a very good shiny red lacquer...probably from me leaning over the fender with sweaty arms. Cleaning the surface does nothing. How safe is it to buff or use a polish/rubbing compound on these lacquer finishes?
Will it even do anything? These are not scratches, its a dull spot resulting from some weird interaction with my skin/sweat/mosquito spray.
Thanks
Will it even do anything? These are not scratches, its a dull spot resulting from some weird interaction with my skin/sweat/mosquito spray.
Thanks
 09-22-2012, 10:58 PM
#2
Race Director

No downside if you do it by hand.
Try polishing/swirl remover first, if no go, then go to next abrasive level and then back up.
People only run into problems with lacquer with inexperienced buffer use.
Try polishing/swirl remover first, if no go, then go to next abrasive level and then back up.
People only run into problems with lacquer with inexperienced buffer use.


 09-23-2012, 10:03 AM
#4
Team Owner

Member Since: Sep 2006
Location: Westminster Maryland
Posts: 30,173
Likes: 0
Received 2,878 Likes
on
2,515 Posts

Hi r,
I agree with noonie... use the finest compound you can find.
You will have to work harder but it will remove the minimal amount of paint you need to in order to get the shine back.
I'd try swirl remover first, and if that doesn't work I'd go to Meguires #3 which is their finest compound.... #1 on their scale of 1 to 10.
Use very clean cloths and turn to a clean place on the cloth often because as the cloth starts to absorb the material it can start to put minute scratches in the paint.
One question... can you FEEL the dull spot, or just see it?
Regards,
Alan
09-23-2012, 06:33 PM
#5
Burning Brakes
Thread Starter
Alan,
Yes I can feel the difference. The lacquer is smooth when running my finger on it then when the dull spot starts, there is more resistance and finger does not slide over it as easy.
I will try the buffing suggestions and hopefully get the nice finish back. BTW here is a pic....
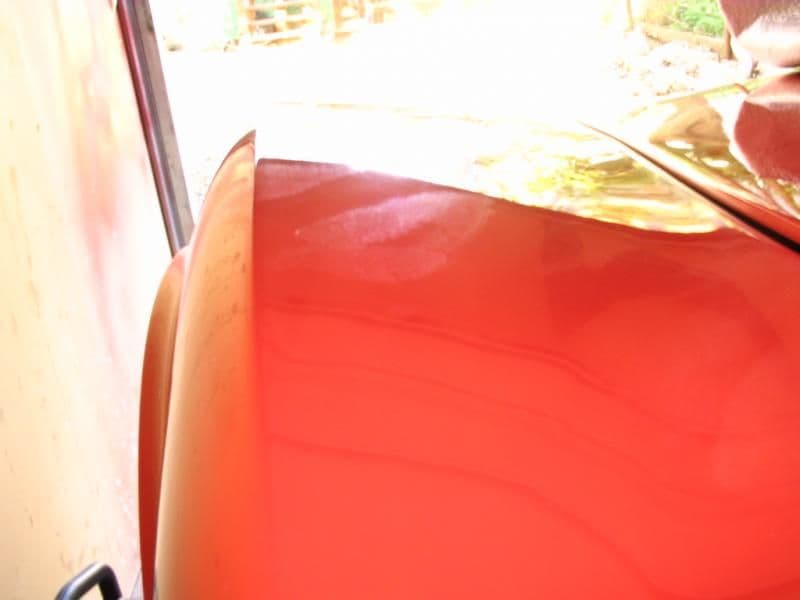
Yes I can feel the difference. The lacquer is smooth when running my finger on it then when the dull spot starts, there is more resistance and finger does not slide over it as easy.
I will try the buffing suggestions and hopefully get the nice finish back. BTW here is a pic....
09-23-2012, 07:20 PM
#6
Burning Brakes
Thread Starter
Worked like a charm! Back to a beautiful finish. Used Turtle wax polishing compound.
Lesson learned....never work on the engine bay without fender covers no matter how small or quick the job!
Lesson learned....never work on the engine bay without fender covers no matter how small or quick the job!
09-24-2012, 08:35 AM
#7
Team Owner
Member Since: Sep 2006
Location: Westminster Maryland
Posts: 30,173
Likes: 0
Received 2,878 Likes
on
2,515 Posts
Hi r,
That's GOOD news!
Regards,
Alan
That's GOOD news!
Regards,
Alan
09-24-2012, 09:01 AM
#8
Burning Brakes
3-4 years ago I smelled the guy next to me at a car show spraying himself with bug spray. 2-3 days later I had small dull spots all over the rear of my 63. Cleaned up with swirl removed and a bit of elbow grease.
Gary
Gary


 09-24-2012, 02:03 PM
#11
Team Owner
Member Since: Sep 2006
Location: Westminster Maryland
Posts: 30,173
Likes: 0
Received 2,878 Likes
on
2,515 Posts
Hi,
The up-side of lacquer is that it's pretty easy to touch-up stone chips with excellent results.
Regards,
Alan
The up-side of lacquer is that it's pretty easy to touch-up stone chips with excellent results.
Regards,
Alan
09-24-2012, 03:12 PM
#12
Burning Brakes
Thread Starter
Have you had any good experiences with any vendor for touch up paint? I purchased the touch up pen that was advertised on this forum last month or so but the paint is not an exact match...close but you can tell the difference.
Anything else i should try? Anybody selling PPG touch up paint? Any good results?
Thanks
09-24-2012, 03:44 PM
#13
Team Owner
Member Since: Sep 2006
Location: Westminster Maryland
Posts: 30,173
Likes: 0
Received 2,878 Likes
on
2,515 Posts
Hi r,
I'm fortunate enough to have some paint left from when my car was painted.
For chip touch up I think the method you use is as important as the exact shade of paint you have.
First off I try to not get any additional paint on the area surrounding the chip.
Next I put multiple coats of the paint in the chip to build it up until it's slightly above the surrounding paint. This takes several days or maybe a week. If you don't wait long enough between coats your brush will pull the paint back out of the chip.
I then wait a couple of weeks for the new paint to dry and shrink.
Then I use a tiny piece of 1000 paper to sand down the slight hump that is the paint in the chip until it's level with the surrounding paint. I strive to not remove any of the surrounding original paint.
Finally a little polish.
It's an arduous task but worth it.
The paint you use needs to be thin so you can build up the chip, you don't want to fill the chip with one blob of paint. That will spread on to the paint around the chip and you really don't want to touch that existing paint.
Just my method!
Regards,
Alan
09-25-2012, 10:19 AM
#14
Burning Brakes
Thread Starter
Hi r,
I'm fortunate enough to have some paint left from when my car was painted.
For chip touch up I think the method you use is as important as the exact shade of paint you have.
First off I try to not get any additional paint on the area surrounding the chip.
Next I put multiple coats of the paint in the chip to build it up until it's slightly above the surrounding paint. This takes several days or maybe a week. If you don't wait long enough between coats your brush will pull the paint back out of the chip.
I then wait a couple of weeks for the new paint to dry and shrink.
Then I use a tiny piece of 1000 paper to sand down the slight hump that is the paint in the chip until it's level with the surrounding paint. I strive to not remove any of the surrounding original paint.
Finally a little polish.
It's an arduous task but worth it.
The paint you use needs to be thin so you can build up the chip, you don't want to fill the chip with one blob of paint. That will spread on to the paint around the chip and you really don't want to touch that existing paint.
Just my method!
Regards,
Alan
I'm fortunate enough to have some paint left from when my car was painted.
For chip touch up I think the method you use is as important as the exact shade of paint you have.
First off I try to not get any additional paint on the area surrounding the chip.
Next I put multiple coats of the paint in the chip to build it up until it's slightly above the surrounding paint. This takes several days or maybe a week. If you don't wait long enough between coats your brush will pull the paint back out of the chip.
I then wait a couple of weeks for the new paint to dry and shrink.
Then I use a tiny piece of 1000 paper to sand down the slight hump that is the paint in the chip until it's level with the surrounding paint. I strive to not remove any of the surrounding original paint.
Finally a little polish.
It's an arduous task but worth it.
The paint you use needs to be thin so you can build up the chip, you don't want to fill the chip with one blob of paint. That will spread on to the paint around the chip and you really don't want to touch that existing paint.
Just my method!
Regards,
Alan
Seems like a long and pretty involved process but Im sure worth the time and effort.
Do you have any proven DIY fixes for stress cracks?
09-25-2012, 02:31 PM
#15
Team Owner
Member Since: Sep 2006
Location: Westminster Maryland
Posts: 30,173
Likes: 0
Received 2,878 Likes
on
2,515 Posts
Hi r,
Yes, your right, my touch-up method takes a lot of time, but time is what I have lots of!
I guess there's first a question... are the cracks in the paint (usually too many layers of paint that are shrinking and splitting apart)? Or, are the cracks actually stress cracks in the fiberglass (often seen on the hood surround were the hood hinges are and around the door handles)?
Two different problems and two different solutions.
Regards,
Alan
09-25-2012, 02:35 PM
#16
Burning Brakes
Thread Starter
Hi r,
Yes, your right, my touch-up method takes a lot of time, but time is what I have lots of!
I guess there's first a question... are the cracks in the paint (usually too many layers of paint that are shrinking and splitting apart)? Or, are the cracks actually stress cracks in the fiberglass (often seen on the hood surround were the hood hinges are and around the door handles)?
Two different problems and two different solutions.
Regards,
Alan
Thanks
09-30-2012, 08:37 PM
#17
Burning Brakes
Thread Starter
Hi r,
Yes, your right, my touch-up method takes a lot of time, but time is what I have lots of!
I guess there's first a question... are the cracks in the paint (usually too many layers of paint that are shrinking and splitting apart)? Or, are the cracks actually stress cracks in the fiberglass (often seen on the hood surround were the hood hinges are and around the door handles)?
Two different problems and two different solutions.
Regards,
Alan
Yes, your right, my touch-up method takes a lot of time, but time is what I have lots of!
I guess there's first a question... are the cracks in the paint (usually too many layers of paint that are shrinking and splitting apart)? Or, are the cracks actually stress cracks in the fiberglass (often seen on the hood surround were the hood hinges are and around the door handles)?
Two different problems and two different solutions.
Regards,
Alan
Thanks