
72 454 Altenator vs valve cover
 06-10-2012, 08:30 PM
#1
Race Director

Thread Starter
Member Since: Apr 2011
Location: North of Toronto - Ontario
Posts: 10,881
Received 3,150 Likes
on
2,079 Posts

72 454 with power steering, no air.
Just changing the valve covers over on the car to aluminum ones and the alternator is now sitting on the edge of the valve-cover flange.
No problem until I went to put the belt on, too short. Thye alternator is held up higher
I'll just get a longer belt, then I noticed I'm pretty much right at the top of the adjustable bracket slot, only about a 1/4 movement between the down (hitting the valve cover) and the top of the slot.
Before I get into machining the alt-housing or valve cover flange, Is there a smaller diameter alternator that has the same mounting bolt spacing, or one with a shorter (front to back) than might miss the valve cover?
Not really interesting in converting over to a serpentine or anything at this time
Thanks
Mooser
 06-11-2012, 05:55 PM
#2
Melting Slicks


Did you try putting the belt on before you put the valve cover on? That's what I have to do on my small block with tall valve covers. Since you don't change the belt that often it isn't a problem to me.
 06-11-2012, 06:29 PM
#3
Race Director
Thread Starter
Member Since: Apr 2011
Location: North of Toronto - Ontario
Posts: 10,881
Received 3,150 Likes
on
2,079 Posts
I had to rotate the alternator up out of the way just to get the valve cover down into place.
I picked up an inch longer belt today and I'm going to see if it will fit, but like I said, I'm almost at the end of the slot.
I've seen some mini-alternators on street rods etc but don't know if they have stock mounting distances on the ears or not.
Mooser
I picked up an inch longer belt today and I'm going to see if it will fit, but like I said, I'm almost at the end of the slot.
I've seen some mini-alternators on street rods etc but don't know if they have stock mounting distances on the ears or not.
Mooser
06-11-2012, 07:36 PM
#4
Race Director
what side are you mounting the alternator? If you didn't know this, the OE BB`s are mounted on the left and have a great stock fitting cast iron bracket.... that bolts to the head and I do run aluminum valve covers.......
06-11-2012, 08:13 PM
#5
Race Director
Thread Starter
Member Since: Apr 2011
Location: North of Toronto - Ontario
Posts: 10,881
Received 3,150 Likes
on
2,079 Posts
That looks remarkably different than mine. (I've got all stock brackets, correct as per AIM)
My alternator sits quite a bit higher and towards center. I've pulled the covers off to adapt a set of GM wire looms
Does your have power steering?
I tried the next size up that napa had, 1" longer, no go, way outside of the slot (above the bracket even). Have to see if there is something 1/2" longer that I can order.
Pics to follow soon
Mooser
06-11-2012, 10:11 PM
#7
Race Director
Thread Starter
Member Since: Apr 2011
Location: North of Toronto - Ontario
Posts: 10,881
Received 3,150 Likes
on
2,079 Posts
Ok so it's not as far inboard as I thought (similar location I guess, maybe a tad closer) different bracket setup though.
The flanges on these are quite thick, using a normal felpro cork gasket

I'm going to try and find a 1/2" longer belt and hopefully that's it. (don't want to get into machining clearances)
Meanwhile I came across a different problem with the looms, the clearance around the bolt holes is barely 3/8" so the looms I've got now need to be adjusted to fit.


I've got a set of taylor vertical looms in-transit somewhere and there's no way they are going to fit either.
Looks like a few hours on the mill are on the horizon, ah well, they are forecasting some rain this week so might as well use it to my advantage
I've put the chrome covers back on for now until I fit the looms and find another belt.
On the plus side, finished setting my valve lash and now the few little annoying clicks are gone
Further updates when I get the problem sorted out, thanks for the input guys.
Mooser
ps I agree, nice looking covers
The flanges on these are quite thick, using a normal felpro cork gasket
I'm going to try and find a 1/2" longer belt and hopefully that's it. (don't want to get into machining clearances)
Meanwhile I came across a different problem with the looms, the clearance around the bolt holes is barely 3/8" so the looms I've got now need to be adjusted to fit.
I've got a set of taylor vertical looms in-transit somewhere and there's no way they are going to fit either.
Looks like a few hours on the mill are on the horizon, ah well, they are forecasting some rain this week so might as well use it to my advantage
I've put the chrome covers back on for now until I fit the looms and find another belt.
On the plus side, finished setting my valve lash and now the few little annoying clicks are gone
Further updates when I get the problem sorted out, thanks for the input guys.
Mooser
ps I agree, nice looking covers
06-12-2012, 08:37 PM
#8
Race Director
No power steering or power brakes on the Yellow piece.....
a smart move would be to measure the total circumference with a longer old belt and then cut it and overlap the two ends...measure this and go buy a belt, Otherwise drive it to a local parts house and try as many as you need.....that's what we would do to help a customer
a smart move would be to measure the total circumference with a longer old belt and then cut it and overlap the two ends...measure this and go buy a belt, Otherwise drive it to a local parts house and try as many as you need.....that's what we would do to help a customer
06-12-2012, 10:06 PM
#9
Race Director
Thread Starter
Member Since: Apr 2011
Location: North of Toronto - Ontario
Posts: 10,881
Received 3,150 Likes
on
2,079 Posts
That explains it.
Well, 31 is too small, 32-5/8 is too big. They found a 31-7/8 that is a tiny bit wider (.47 vs .44) so it should run slightly higher (and think it's longer)
Once I get the looms sorted out I'll give it another try
Mooser
Well, 31 is too small, 32-5/8 is too big. They found a 31-7/8 that is a tiny bit wider (.47 vs .44) so it should run slightly higher (and think it's longer)
Once I get the looms sorted out I'll give it another try
Mooser
06-21-2012, 09:23 PM
#10
Race Director
Thread Starter
Member Since: Apr 2011
Location: North of Toronto - Ontario
Posts: 10,881
Received 3,150 Likes
on
2,079 Posts
So the Taylor looms came in, same problem, no room around the bolts.
(wonder where they were made?)


The maximum I can fit is .400, the looms are close to .500
Make up a quick fixture and re-machined the area in contact down to the .400 mark (still leaves a decent enough wall for now)


Seems OK, now to do the other side and deal with the belt length
I'll have to make a billet set when I get a chance, (or at least sand off the "CHINA" on the top for now)
Mooser
(wonder where they were made?)
The maximum I can fit is .400, the looms are close to .500
Make up a quick fixture and re-machined the area in contact down to the .400 mark (still leaves a decent enough wall for now)
Seems OK, now to do the other side and deal with the belt length
I'll have to make a billet set when I get a chance, (or at least sand off the "CHINA" on the top for now)
Mooser
Last edited by Mooser; 06-21-2012 at 09:56 PM.
 06-21-2012, 09:53 PM
#12
Race Director
Thread Starter
Member Since: Apr 2011
Location: North of Toronto - Ontario
Posts: 10,881
Received 3,150 Likes
on
2,079 Posts
Yeah the drippers are cast in.
I looked at quite a few different ones but really liked these, not cheap but with the exception of these few little problems, I think they are going to work out well
Mooser
I looked at quite a few different ones but really liked these, not cheap but with the exception of these few little problems, I think they are going to work out well
Mooser
 06-21-2012, 10:14 PM
#14
Race Director
Thread Starter
Member Since: Apr 2011
Location: North of Toronto - Ontario
Posts: 10,881
Received 3,150 Likes
on
2,079 Posts
06-21-2012, 11:14 PM
#15
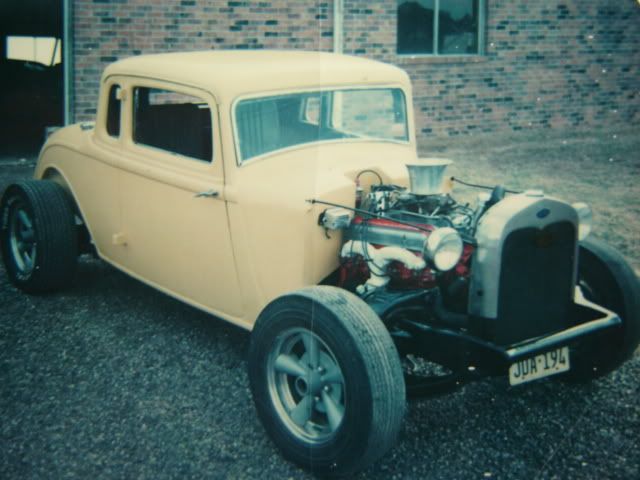
Big surprise. That is a '33 Plymouth coupe. The guys called it Plyamfoch. Plymouth body, American motors dash, Ford radiator and tail lights. Chevy motor and running gear. mike...
mike...
06-22-2012, 06:46 AM
#16
Race Director
Thread Starter
Member Since: Apr 2011
Location: North of Toronto - Ontario
Posts: 10,881
Received 3,150 Likes
on
2,079 Posts
Was wondering about the rounded body (duece) without the frame sides having the body lines. Figured it was just me
Mooser
Mooser
06-27-2012, 07:21 AM
#17
Race Director
Thread Starter
Member Since: Apr 2011
Location: North of Toronto - Ontario
Posts: 10,881
Received 3,150 Likes
on
2,079 Posts
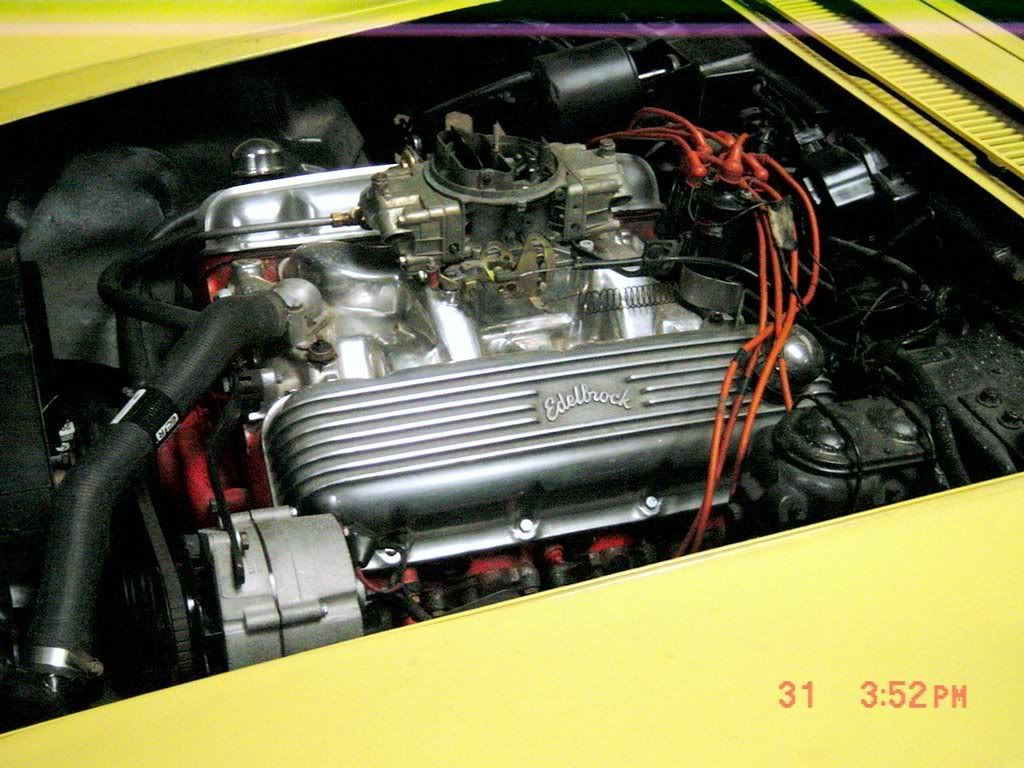
Ok, so finally got back out to the shop and started dealing with the DS cover / alternator problem.
I got a slightly longer belt that is a little smaller section to try.
After much screwing around I got the cover partly installed and had to remove the alt-bolts and put the belt on the pulleys and then bolt everything in place with the belt on.
I'm also not sure how I'm going to get it back off yet (Hmmmmm)
Clearance is minimal (around an 1/8", could still use a slightly longer belt but it would need to be a larger section since the next step up is too long)

Next problem..... The rear loom mount under the booster.
Need an inch of clearance, have about 1/4"

I really like the PML valve covers, the Taylor wire looms work well,

but they were never meant to be together on this car
Arrrrrrggggghhhhhh!!!!!
I got a slightly longer belt that is a little smaller section to try.
After much screwing around I got the cover partly installed and had to remove the alt-bolts and put the belt on the pulleys and then bolt everything in place with the belt on.
I'm also not sure how I'm going to get it back off yet (Hmmmmm)
Clearance is minimal (around an 1/8", could still use a slightly longer belt but it would need to be a larger section since the next step up is too long)
Next problem..... The rear loom mount under the booster.
Need an inch of clearance, have about 1/4"
I really like the PML valve covers, the Taylor wire looms work well,
but they were never meant to be together on this car
Arrrrrrggggghhhhhh!!!!!
06-27-2012, 07:59 AM
#18
Melting Slicks
Member Since: Jul 2001
Location: Massapequa Park NY
Posts: 2,608
Likes: 0
Received 10 Likes
on
8 Posts

I have a very similar set up using Billet Specialties valve covers. Ended up using a small space to move the alternator away from the valve cover, 1/4" IIRC. Also ordered a different length bolt for the pivot. Using all factory brackets.
Can take more pics tonight if you need. You can just see the spacer in this shot, the space helped the belt alignment also.
[IMG] [/IMG]
Jim
Can take more pics tonight if you need. You can just see the spacer in this shot, the space helped the belt alignment also.
[IMG]
[/IMG]Jim
12-15-2012, 10:18 PM
#19
Racer

Member Since: Jun 2010
Posts: 346
Likes: 0
Received 0 Likes
on
0 Posts
Hey guys,
Some of those covers sure look good.
What I am writing about it the original covers.
I would be happy with a set of 71, or 72 covers.
71 covers are:
1. Painted orange
2. Push in oil filler cap
3. Drippers
4. Each cover has a tall spark plug wire tab in back on the inside and one other smaller tab on the top surface that hold plastic clips.
1972 Original Valve Covers:
1. Painted Orange
2. Push in oil filler cap
3. Drippers
4. Each cover has a tall spark plug wire tab in back on the inside and one other smaller tab on the top surface that hold plastic clips, AND ALSO, has a single wire spark plug looms for each spark plug wire as it heads to the plug.
If you guys do not have any,maybe you know someone else who might.
Thanks,