C3 General General C3 Corvette Discussion not covered in Tech
Sponsored by:
Sponsored by:

Headlight assemblies back in but...

Thread Tools
 
Search this Thread
 
Old 04-02-2012, 02:56 PM
  #1  
alconk
Melting Slicks
Thread Starter
 
alconk's Avatar
 
Member Since: Jun 2011
Posts: 2,096
Received 15 Likes on 14 Posts
Default Headlight assemblies back in but...

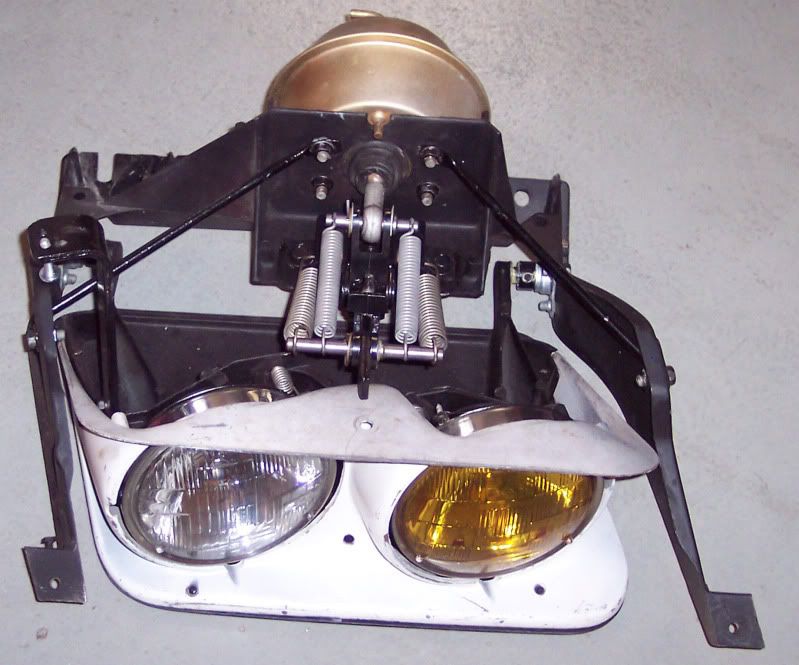
Ok I finished installing both headlight assemblies back in the car and adjusted but the passenger side will not lock up in the up position. I can push up on the bracket that locks it but snaps back. Then I started to adjust the square adjusting bolt to see what that did but snapped it off. Driver's side is fine and don't see any difference between the two. What did I overlook?
Old 04-02-2012, 06:05 PM
  #2  
Alan 71
Team Owner
 
Alan 71's Avatar
 
Member Since: Sep 2006
Location: Westminster Maryland
Posts: 30,173
Likes: 0
Received 2,878 Likes on 2,515 Posts

Default

Hi a,
Were the two mechanisms taken apart or just removed.
You say you 'adjusted' them...was that when you discovered the problem, or was it after you tried to operate them?
ANY chance of a picture? That might help someone spot a problem.
Regards,
Alan
Old 04-02-2012, 09:23 PM
  #3  
alconk
Melting Slicks
Thread Starter
 
alconk's Avatar
 
Member Since: Jun 2011
Posts: 2,096
Received 15 Likes on 14 Posts
Default

Originally Posted by Alan 71
Hi a,
Were the two mechanisms taken apart or just removed.
You say you 'adjusted' them...was that when you discovered the problem, or was it after you tried to operate them?
ANY chance of a picture? That might help someone spot a problem.
Regards,
Alan
I removed the assembly in two pieces, the headlight door with the headlights in them along with the bearings then the framework that bolts to the braces. I didn't remove any mechanism just as a whole unit. And how I adjusted it was with the bearing bolts up and down and the bearing collar for left to right. I did however had to loosen the framework bolts and slide the outer side foward to give me the equal distance from the back of the door to the body. Otherwise when lifted it would scrape.
Old 04-02-2012, 09:26 PM
  #4  
alconk
Melting Slicks
Thread Starter
 
alconk's Avatar
 
Member Since: Jun 2011
Posts: 2,096
Received 15 Likes on 14 Posts
Default

Originally Posted by Alan 71
Hi a,
Were the two mechanisms taken apart or just removed.
You say you 'adjusted' them...was that when you discovered the problem, or was it after you tried to operate them?
ANY chance of a picture? That might help someone spot a problem.
Regards,
Alan
I removed the assembly in two pieces, the headlight door with the headlights in them along with the bearings then the framework that bolts to the braces. I didn't remove any mechanism just as a whole unit. And how I adjusted it was with the bearing bolts up and down and the bearing collar for left to right. I did however had to loosen the framework bolts and slide the outer side foward to give me the equal distance from the back of the door to the body. Otherwise when lifted it would scrape.

I did operate the vacuum pods when they were on the bench determining whether to replace any parts and notice the one I'm having trouble with didn't operate as smooth as the other one. But since I snapped the adjuster bolt head I decided to order some new parts.
Old 04-03-2012, 01:35 AM
  #5  
alconk
Melting Slicks
Thread Starter
 
alconk's Avatar
 
Member Since: Jun 2011
Posts: 2,096
Received 15 Likes on 14 Posts
Default

Originally Posted by alconk
Ok this is what I found out , if I have the two outer larger springs it locks in place. But when I attach the smaller inner springs it will not lock
Opps, wrong picture , this is of the drivers side which locks in.
Old 04-03-2012, 01:37 AM
  #6  
alconk
Melting Slicks
Thread Starter
 
alconk's Avatar
 
Member Since: Jun 2011
Posts: 2,096
Received 15 Likes on 14 Posts
Default

Ok here it is with the two outer larger springs that locks it in place
Old 04-03-2012, 01:38 AM
  #7  
alconk
Melting Slicks
Thread Starter
 
alconk's Avatar
 
Member Since: Jun 2011
Posts: 2,096
Received 15 Likes on 14 Posts
Default

Now here is the smaller springs attached and starts to pull it down and won't lock in place
Old 04-03-2012, 09:45 AM
  #8  
RobRace10
Melting Slicks
 
RobRace10's Avatar
 
Member Since: May 2005
Location: Elkhart Lake, Wisconsin
Posts: 2,486
Received 68 Likes on 20 Posts

Default

Did you check to see if the bearings are worn out. As I recall I had to replace mine as they were shot. Maybe the extra spring pressure is causing the front assembly to move back in the bearings which then does not allow it to travel far enough to lock in.


Last edited by RobRace10; 04-03-2012 at 09:50 AM.
Old 04-03-2012, 12:12 PM
  #9  
alconk
Melting Slicks
Thread Starter
 
alconk's Avatar
 
Member Since: Jun 2011
Posts: 2,096
Received 15 Likes on 14 Posts
Default

Bearings are fine
Old 04-03-2012, 12:43 PM
  #10  
jaki30
Safety Car

 
jaki30's Avatar
 
Member Since: May 2006
Location: Williamsburg VA
Posts: 3,507
Received 530 Likes on 307 Posts
St. Jude Donor '08-'09-'10-'11-'12-'13-'14-'15-'16

Default Outside springs

Looks like the large springs are on the outside of the bracket instead of the inside.
It will make a difference on the over center pull. Try installing the large spring like it is installed on your drivers side.
Old 04-03-2012, 02:41 PM
  #11  
alconk
Melting Slicks
Thread Starter
 
alconk's Avatar
 
Member Since: Jun 2011
Posts: 2,096
Received 15 Likes on 14 Posts
Default

Originally Posted by jaki30
Looks like the large springs are on the outside of the bracket instead of the inside.
It will make a difference on the over center pull. Try installing the large spring like it is installed on your drivers side.
I do have it set up like the other one. I can try it though.
Old 04-03-2012, 06:36 PM
  #12  
alconk
Melting Slicks
Thread Starter
 
alconk's Avatar
 
Member Since: Jun 2011
Posts: 2,096
Received 15 Likes on 14 Posts
Default

Anybody esle have any ideas?? I'd really like to figure this out so I can put it back together
Old 04-03-2012, 07:16 PM
  #13  
jnb5101
Le Mans Master
 
jnb5101's Avatar
 
Member Since: Jul 2006
Location: charlotte north carolina
Posts: 8,117
Likes: 0
Received 100 Likes on 92 Posts

Default

did you try adjusting the number of turns the actuator rod was screwed into the arm? a little extra length might allow the mechanism to fully extend and lock.
Old 04-03-2012, 08:15 PM
  #14  
alconk
Melting Slicks
Thread Starter
 
alconk's Avatar
 
Member Since: Jun 2011
Posts: 2,096
Received 15 Likes on 14 Posts
Default

Originally Posted by jnb5101
did you try adjusting the number of turns the actuator rod was screwed into the arm? a little extra length might allow the mechanism to fully extend and lock.
Oh could that work, I haven't tried that yet. So I want to take extend it a little I take it. I'll try that tonight.
Old 04-04-2012, 04:25 AM
  #15  
alconk
Melting Slicks
Thread Starter
 
alconk's Avatar
 
Member Since: Jun 2011
Posts: 2,096
Received 15 Likes on 14 Posts
Default

Originally Posted by jnb5101
did you try adjusting the number of turns the actuator rod was screwed into the arm? a little extra length might allow the mechanism to fully extend and lock.
Yep that was it, thanks but have a related question. Now when the headlights are turned on you can here them lock in place. Is that normal??
Old 04-04-2012, 12:06 PM
  #16  
jnb5101
Le Mans Master
 
jnb5101's Avatar
 
Member Since: Jul 2006
Location: charlotte north carolina
Posts: 8,117
Likes: 0
Received 100 Likes on 92 Posts

Default

yeah, it's only one of many clanks and bangs these cars make.
Old 04-05-2012, 05:42 AM
  #17  
Rick_V
Instructor
 
Rick_V's Avatar
 
Member Since: Jul 2011
Location: Fort White Florida
Posts: 142
Likes: 0
Received 1 Like on 1 Post
Default

Is there a sticky somewhere on the forum that explains the adjustment procedure?
Old 04-05-2012, 11:00 AM
  #18  
alconk
Melting Slicks
Thread Starter
 
alconk's Avatar
 
Member Since: Jun 2011
Posts: 2,096
Received 15 Likes on 14 Posts
Default

Very happy with the results.

Get notified of new replies

To Headlight assemblies back in but...


Quick Reply: Headlight assemblies back in but...


All times are GMT -4. The time now is 04:04 PM.