
L88 Hood update
 12-28-2011, 10:18 PM
#1
Drifting

Thread Starter
I think I will wait to add more, I am just confusing people that are getting me to question my self. I will post the final when I am done.
Last edited by 81pilot; 12-29-2011 at 09:52 AM.


 12-29-2011, 08:51 AM
#4
Drifting
Thread Starter
No it is 48+ inches long. It is right where it should be. I need to shoot a side view. There really is not that much from the front of it to the front of the hood. I did it in stages because the L88 dip hit the bump on the hood and it needed removed before I could start positioning. Then the back of it goes all the way to the back of the hood. It is on par with the thousands I have looked at in pics to be sure.
Last edited by 81pilot; 12-29-2011 at 09:20 AM.
12-29-2011, 08:55 AM
#5
Drifting
Thread Starter
Oh I think I see what you mean. The scoop fits over the portion at the rear and goes all the way to the back. That uncut portion is the part of the hood that is more structural and will stay.
12-29-2011, 01:45 PM
#6
Burning Brakes

More photos will be helpful. Here are some photos from my L-88 scoop install. I just sprayed the first primer coats. Much more work remains blocking. I used an Ecklers scoop on my short hood. I'll proceed where you ended.
That front cut-out section (removing the hump) is the hardest part of the project. I fiberglassed in a piece from section of the hood removed. The contour matches well. Took several attempts to find the right section. Fiberglass this section before the scoop.

I don't think you should "glue" the piece on. I position the scoop and used pop rivets (highly recommended) for a tight fit. Then flip over the hood and grind out the lip and any excess fiberglass. Then fiberglass in a 2-inch wide followed by a 3-inch wide strips of mat (don't use cloth). The resin will seep into the joint. When cured, grind out and shape.


Flip it over and fiberglass in one 1/4inch strip. Mask with tape to minimize mess. Then use some body filler to finish the contour. Use as little as possible.

Then much sanding, filling, and more sanding. This is hard and not fun. You almost have to be an artist. You absolutely must used Durablocks or a similar sanding block system.
Getting the correct "line" took work. Rough it in. When close tape one side of the line. Block sand. Remove tape and tape other side. Then block again.

More sanding then primer coat. I need to fix that hole in the corner.

Next step for me will be fitting and installing the air chamber. I'm going with the full L-88 cold air induction.

Project is a lot of hard work.
That front cut-out section (removing the hump) is the hardest part of the project. I fiberglassed in a piece from section of the hood removed. The contour matches well. Took several attempts to find the right section. Fiberglass this section before the scoop.
I don't think you should "glue" the piece on. I position the scoop and used pop rivets (highly recommended) for a tight fit. Then flip over the hood and grind out the lip and any excess fiberglass. Then fiberglass in a 2-inch wide followed by a 3-inch wide strips of mat (don't use cloth). The resin will seep into the joint. When cured, grind out and shape.
Flip it over and fiberglass in one 1/4inch strip. Mask with tape to minimize mess. Then use some body filler to finish the contour. Use as little as possible.
Then much sanding, filling, and more sanding. This is hard and not fun. You almost have to be an artist. You absolutely must used Durablocks or a similar sanding block system.
Getting the correct "line" took work. Rough it in. When close tape one side of the line. Block sand. Remove tape and tape other side. Then block again.
More sanding then primer coat. I need to fix that hole in the corner.
Next step for me will be fitting and installing the air chamber. I'm going with the full L-88 cold air induction.
Project is a lot of hard work.
12-29-2011, 04:41 PM
#7
Drifting
Thread Starter

Last edited by 81pilot; 12-29-2011 at 04:52 PM.
12-29-2011, 04:57 PM
#8
Burning Brakes
You got me curious so I laid the hood on the car, and took a pic and compared it to a lot of side shots that I could find, and it is dead on. All of the others have the dip of the scoop even with the center of the wheel well as is mine, so I feel better.
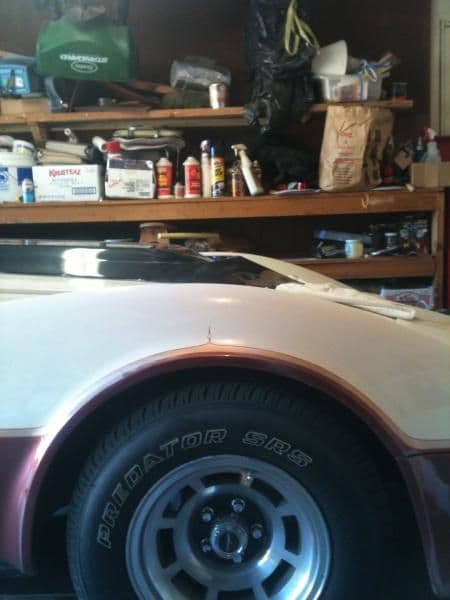 And I remeasured and it is almost exactly 49 inches long which is for a long hood, some claim to be 50, but they have a larger flange area.
12-29-2011, 07:23 PM
#9
Melting Slicks


More photos will be helpful. Here are some photos from my L-88 scoop install. I just sprayed the first primer coats. Much more work remains blocking. I used an Ecklers scoop on my short hood. I'll proceed where you ended.
That front cut-out section (removing the hump) is the hardest part of the project. I fiberglassed in a piece from section of the hood removed. The contour matches well. Took several attempts to find the right section. Fiberglass this section before the scoop.
I don't think you should "glue" the piece on. I position the scoop and used pop rivets (highly recommended) for a tight fit. Then flip over the hood and grind out the lip and any excess fiberglass. Then fiberglass in a 2-inch wide followed by a 3-inch wide strips of mat (don't use cloth). The resin will seep into the joint. When cured, grind out and shape.
Flip it over and fiberglass in one 1/4inch strip. Mask with tape to minimize mess. Then use some body filler to finish the contour. Use as little as possible.
Then much sanding, filling, and more sanding. This is hard and not fun. You almost have to be an artist. You absolutely must used Durablocks or a similar sanding block system.
Getting the correct "line" took work. Rough it in. When close tape one side of the line. Block sand. Remove tape and tape other side. Then block again.
More sanding then primer coat. I need to fix that hole in the corner.
Next step for me will be fitting and installing the air chamber. I'm going with the full L-88 cold air induction.
Project is a lot of hard work.
 Like to see the updates with the cold air box when you get it installed.
12-30-2011, 09:06 AM
Like to see the updates with the cold air box when you get it installed.
12-30-2011, 09:06 AM
#10
Drifting
Thread Starter
Ok, the 2 strips you used are on the back side? And the 1/4 in strip on the top of the hood? If so how do you cover the rivets? Or did you put them right on the leading edge? Did you use the glass impregnated filler? I told my wife last night how much I am enjoying this project. My 69 Chevelle had a glassed in scoop, but my buddy did it in his shop years ago. I have done plenty of custom glasswork on bikes. When I add a custom made glass tank extension for example to a metal tank , I must use glue, and it always holds, but if I could use rivets and be sure they won't pop sometime down the road and crack the paint I will use them instead. Thanks. Jeff
Last edited by 81pilot; 12-30-2011 at 09:15 AM.
 12-30-2011, 11:00 AM
#12
Burning Brakes
I used rivets because the holes are smaller than screws plus allows tighter fit (less gap). The rivets are just temporary. Remove the rivets (drill out) after bonding with fiberglass. A much later step would be to fill rivet holes with body filler.
The rivets will hold the parts together and allow you to grind the excess old fiberglass before fiberglassing in the new strips. The overlap (after grinding) will be about a 1/16 of an inch or less (except where rivits are located). The resin (when fiberglassing the new strips) will seep in fill this small gap. Glue may separate. But as I described, the bond will be entirely fiberglass and strong. At this stage remove the rivets and then to grind the new fiberglass to the same width as the rest of the hood/scoop.
After fiberglassing, I used Evercoat Extreme filler but regular Bondo would also work. Fiberglass filler is for structural strength. Not needed as you are just making minor contouring corrections and using very little filler. Fiberglass (Kitty hair, etc) filler seems to have more holes and is harder to work with.
You're having fun? Just wait and see.
Last edited by Clubby99; 12-30-2011 at 09:00 PM.
12-30-2011, 11:37 AM
#13
Senior Member since 1492

You should install the chamber with the engine in the car & the hood installed. Why do you want to rivet the chamber?
12-30-2011, 12:53 PM
#14
Burning Brakes
I'm going to fiberglass in the air chamber. That is the next step. But the chamber is going to have to be placed exactly dead center over the air cleaner base. So I need to mount the hood and measure. I'm going to use the "paint on the end of a longer carb stud" method. I'm the type that measures 5 or 6 times. Then waits an hour to measure again to make sure.
12-30-2011, 06:16 PM
#15
Drifting
Thread Starter
Awesome, thats what I wanted, I am on the right track. And yes it can be a little frustrating, but I do enjoy it. The only thing I was apprehensive about was cutting the hood, the glassing and floating is the easy although tedious part. But thanks for your willingness to share your experience, and I do want to see the finished product. Looks great so far.....and what is the square hole, I just had to ask..
12-30-2011, 08:57 PM
#16
Burning Brakes
My hood was stuck closed on one side when I adjusted it. 
Hint: never be in a hurry and force the hood shut when making adjustments.
After two hours of frustration, I cut the hole to release the hood. I just unscrewed the pin. Not a big deal because I was going to rework the hood anyway. I kept the cut-out and will fiberglass it in when I do the air chamber.
12-30-2011, 09:12 PM
#17
Burning Brakes
I almost forgot. Avoid my mistake. Before fiberglassing, you must remove any paint and/or gel coat at the seam. Be very careful to mask it and sand it away.
I was lazy and used a grinder and gouged up the surface. That created much more work later smoothing everything out. Much, much more work.
Also don't use too many rivets. I used 6 or 7 located wherever there was a gap between the hood and scoop. Use the smallest diameter rivets you can find.
I was lazy and used a grinder and gouged up the surface. That created much more work later smoothing everything out. Much, much more work.
Also don't use too many rivets. I used 6 or 7 located wherever there was a gap between the hood and scoop. Use the smallest diameter rivets you can find.
Last edited by Clubby99; 12-30-2011 at 09:17 PM.
12-31-2011, 09:04 PM
#18
Drifting
Thread Starter
OK, I maybe hard headed, but it sinks in sooner or later, so.....I added 4 inches to the back today, it is final curing and looks perfect. It is hard and as thick as the original, I will add a small strip on the topside tomorrow. Then just shape it. Thanks for the help.
Before the graft:

After:
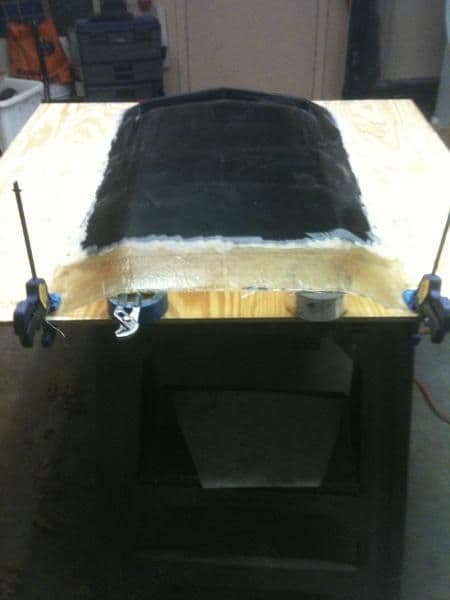
Before the graft:
After:
Last edited by 81pilot; 12-31-2011 at 09:08 PM.
01-01-2012, 06:58 PM
#20
Drifting
Thread Starter
No mold just a template taped to one side with a releasing agent on it. I added one layer on the top today. Hopefully I can work it and shape it to the hood tomorrow and maybe even get it glassed onto the hood. I think the added on portion will be stronger than the original portion, which is fine since the way the hood closes it puts pressure on the rear of the hood when it slams shut.