
Homemade Motive type power bleeder for $14
 09-03-2011, 07:54 AM
#21
Race Director

Thread Starter
The Motive Bleeder releases pressure via it large 5/6 inch screw top...and is exactly what screwed me up as a first time user. I slugged my whole system with air...releasing the pressure for the first time. I made a mental note right then...mine would have some sort of a needle valve release.
If I'm not seeing things...looks like Roger has some sort of needle valve on the side of his unite. Muddy
Muddy
If I'm not seeing things...looks like Roger has some sort of needle valve on the side of his unite.
MuddyStart with the level 1/2" below the top of the master cylinder and if you have a tight seal, when you bleed off the air the level will be 1/2" low. No mess.
Muddy ,Your right my old unit does have an air release. I thought the Motive had a valve to lower the air pressure,that sucks.
Installing a valve in the plastic tank is as easy as drilling a hole ,starting a tap and then wrapping the threads with teflon and screwing it in. The plastic seals up good.
On the $14 unit I found if I'm careful I can slightly loosen the pump top and bleed the air off,just make sure there is no brake fluid around the seal from filling.
 09-03-2011, 08:13 AM
#22
Race Director
Thread Starter
Bench bleed , bench bleed , bench bleed ! ! !
IMO ,one bubble left combined with "pumping" breaks that bubble into a million tiny bubbles (i call it foam),then those tiny bubbles are sent through the system. Once you have formed this foam in the master and sent it into the prop valve and through the threads in all the fittings and lines in the system your screwed.
The Motive type helps immensely with this but in most cases, even the Motive won't take the place of a really good bench bleed.
During the bench bleed IMO there is no substitute for eyes on the holes in the bottom of the master,especially the back cylinder.
09-03-2011, 10:26 AM
#23
Burning Brakes

The stock Metal plate from Motive products is flat with a rubber gasket covering the entire under side which fits on top of the master cylinder..i
.the TUBE does NOT extent at all into the master cylinder...
That said I have never had a mess using mine..25 pounds of pressure is what I pump the tank up with to start...
Bob G.
.the TUBE does NOT extent at all into the master cylinder...
That said I have never had a mess using mine..25 pounds of pressure is what I pump the tank up with to start...
Bob G.
09-03-2011, 10:45 AM
#24
I have bigger problems. No matter how many times I pump the brakes the fronts still produce bubbles in the catch can. Leak somewhere. Oh well, gives me time to make my own bleeder while I trouble shoot the rest.
09-03-2011, 11:04 AM
#25
Team Owner


Two things I can share about bleeding C3 brakes:
1) The caliper castings are designed in such a way that there can be little 'pockets' of air trapped in the calipers...even though you are bleeding to rid it of air. Imagine an underwater cave with several domed chambers that can trap air. You can flow as much water as you want over by those trapped areas, and the air still stays in them. The GM shop manual says that you should use a rubber hammer to rap the calipers as they are being bled...to help 'jostle' those air pockets loose. Sometimes, after bleeding the brakes, you can just drive the car around for a while and the road bouncing can cause that air to release to the "top" of the caliper. Then you can release that air with another quick bleeding procedure.
2) My father taught me the brake bleeding procedure. One of the tips he gave me was to fill the bleed-off tube full of brake fluid, so that the weight of the fluid in the tube provides some amount of suction on the fluid/air in the caliper. You can do this by submerging the tubing in the can/pan you are using to catch the bleeding fluid. Then, put both ends together and keep them higher than the rest of the tubing (to keep the fluid in the tubing). Raise them to the bleeding nipple and put the bleeder wrench and one end of the tube over the nipple. Now you can drop the other end into the 'catch can', which already has at least an inch of brake fluid in the bottom. The bottom end of the tubing MUST be submerged in that fluid.
Reminder: If you have someone pumping the brake pedal during your bleeding process, that person must apply and dis-apply the brake pedal S-L-O-W-L-Y so that the fluid in the master cylinder doesn't get turbulent. Too many folks just 'shoot it to the floor (and back)' and wonder why they can't get the air out of the system. Well, that's why.
Hope that's of some help.
09-03-2011, 05:15 PM
#26


I built a bleeder almost identical to Roger's,but I drilled a hole towards the top of the tank,and used a dial type cheapo tire pressure gauge(threaded it in and used a compression fitting on the inside of the sprayer),bought a rectangular master cyl. adapter with gasket and clamps online and it works fantastic. I tried the "drill a hole in an old master cyl. cap" method but I couldn't get it to hold. I now fill it with fluid,pump it up to about 10 lbs. and bleed away using a catch can. Its a great way to quickly,cleanly.and easily change your brake fluid. It just cycles it right through.All you have to watch is that the bleeder stays full of fluid. The nice thing about the sprayer is that you can twist the pump handle slowly to relieve the pressure.
09-03-2011, 05:29 PM
#27
so.....for the home made bleed dummy...
1. procure home made device
2. fill device with fluid (roger help with the level)
3. hook (1)hose to zerk fitting on caliper
4. other end of (1)hose in fluid catch can
5. hook pump (2)hose to modified cover
6. other end of (2)hose to home made pump
7. pump to 10-15lbs
8. open zerk bleeder fitting at caliper
9. watch the amazing flow
10. cap zerk at caliper
11. slowly release pressure in new pump
12. open master and check level
13. repeat for other fittings.....
00. correct order ?
passenger rear (in/out)
drivers rear (in/out)
passenger front
drivers front
is this the correct order ?
09-03-2011, 05:36 PM
#28
Race Director
Thread Starter
I built a bleeder almost identical to Roger's,but I drilled a hole towards the top of the tank,and used a dial type cheapo tire pressure gauge(threaded it in and used a compression fitting on the inside of the sprayer),bought a rectangular master cyl. adapter with gasket and clamps online and it works fantastic. I tried the "drill a hole in an old master cyl. cap" method but I couldn't get it to hold. I now fill it with fluid,pump it up to about 10 lbs. and bleed away using a catch can. Its a great way to quickly,cleanly.and easily change your brake fluid. It just cycles it right through.All you have to watch is that the bleeder stays full of fluid. The nice thing about the sprayer is that you can twist the pump handle slowly to relieve the pressure.
 09-03-2011, 05:52 PM
#29
Race Director
Thread Starter
so.....for the home made bleed dummy...
1. procure home made device
2. fill device with fluid (roger help with the level)
3. hook (1)hose to zerk fitting on caliper
4. other end of (1)hose in fluid catch can
5. hook pump (2)hose to modified cover
6. other end of (2)hose to home made pump
7. pump to 10-15lbs
8. open zerk bleeder fitting at caliper
9. watch the amazing flow
10. cap zerk at caliper
11. slowly release pressure in new pump
12. open master and check level
13. repeat for other fittings.....
00. correct order ?
passenger rear (in/out)
drivers rear (in/out)
passenger front
drivers front
is this the correct order ?
1. procure home made device
2. fill device with fluid (roger help with the level)
3. hook (1)hose to zerk fitting on caliper
4. other end of (1)hose in fluid catch can
5. hook pump (2)hose to modified cover
6. other end of (2)hose to home made pump
7. pump to 10-15lbs
8. open zerk bleeder fitting at caliper
9. watch the amazing flow
10. cap zerk at caliper
11. slowly release pressure in new pump
12. open master and check level
13. repeat for other fittings.....
00. correct order ?
passenger rear (in/out)
drivers rear (in/out)
passenger front
drivers front
is this the correct order ?
I start with the level in the master cylinder down about 1/2" so when you open it later the fluid isn't running over.
Make sure your clamps are sitting solid and you have a good seal-you don't want a blowout when you pump up the tank.
Start pumping your tank up and listen for leaks.
Once pumped up I cover the master and tank with a couple big towels.
Then bleed your calipers-(I tap lines and fittings while the bleeder is open).
There is no need to remove the master cylinder top until your done the tank will keep the master full of fluid(obviously keep a check on the tank level).
(I also break the 2 master cylinder fittings loose and bleed there.)
Once your done slowly release the pressure and remove the top-if you had a good seal the level in the master will be 1/2" low.
Your order of bleeding is fine.
I think I got it all,if I missed something other should chime in to help.
09-03-2011, 05:59 PM
#30
roger, thanks man. made my own bleeder, ill post pics tomorrow. cant wait to use it. i have not had luck pumping the pedal. i may have a bad component though...this should tell me if it something worse.....
09-03-2011, 06:32 PM
#32
Race Director
Thread Starter
Here is the part I don't get,it would seem if the front fills up and spills over to fill the back,then when you took the top off the front would be fuller than the 1/2" low you started out with-but its not.
 That part I don't get.
  09-03-2011, 06:38 PM
#34
Race Director
Thread Starter
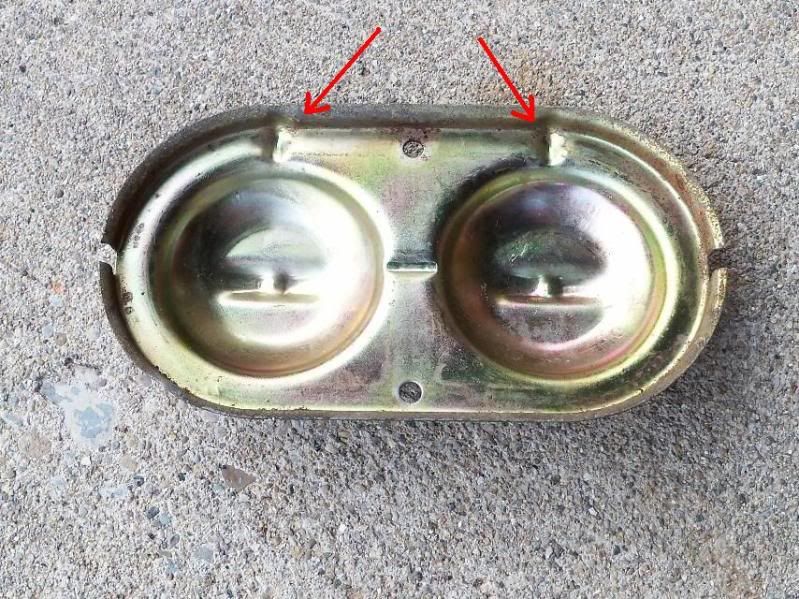
Here's something else I should bring up. Watch the tops that you use,some have air holes that you need to solder shut. This one has its air holes on the side,you can still use this one but you have to fill the 2 grooves the red arrows are pointing to.
09-04-2011, 11:38 AM
#35
I bought a master cyl. adapter like this one..Sorta ruins the "homemade" feel, but it works great... http://www.google.com/url?sa=t&sourc...ABJAtg&cad=rja
09-04-2011, 01:50 PM
#36
a few more questions.....do i need to "bleed" the line of air from the tank to the master first ? my pump bubbles the brake fluid when i pump air in....it's too long isnt it ?
i have one caliper (rear passenger that gives me no bubble from either zerk. it should be at least purging air from the line that goes form the zerk to the catch can.
have i found my issue ?
i have one caliper (rear passenger that gives me no bubble from either zerk. it should be at least purging air from the line that goes form the zerk to the catch can.
have i found my issue ?
09-04-2011, 11:30 PM
#37


Roger...
Could you please define "solder". I see by your excellent pictures that you have been able to fuse the copper tube to the steel MC cover. What type of heat and material did you use with this process?
Thank you....Alex
Could you please define "solder". I see by your excellent pictures that you have been able to fuse the copper tube to the steel MC cover. What type of heat and material did you use with this process?
Thank you....Alex
09-05-2011, 10:35 AM
#38
Burning Brakes
I bought a master cyl. adapter like this one..Sorta ruins the "homemade" feel, but it works great... http://www.google.com/url?sa=t&sourc...ABJAtg&cad=rja
Royal PIA to use... Rogers cap is much much better...
Bob .
09-05-2011, 05:48 PM
#39
Aha ! I found that I was not bleeding long enough. I let I go for a minute and more air came out. How long do you guys bleed each fitting ? And how much flow do you get from The zerk fitting down the caliper ?
09-05-2011, 08:03 PM
#40
Drifting


Made me laugh when I saw this post.  I made a variation of Roger's brake bleeder this weekend === I even used a Walmart sprayer and ACE hardware fittings.

I put in a valve stem to check tank pressure or air up tank with a compressor if so desired. The master cylinder lid is a 1/4" aluminum plate with a rubber gasket. I left the spray handle in to easily relieve pressure from the master cylinder without having to bleed pressure from the tank. I'm not sure if any of the effect of brake fluid on the spray handle. The spray handle can easily be removed if there is a compatibility problem. I do like the idea of the clear hose to verify that fluid and not air is being pushed into the master cylinder.
I made a variation of Roger's brake bleeder this weekend === I even used a Walmart sprayer and ACE hardware fittings. I put in a valve stem to check tank pressure or air up tank with a compressor if so desired. The master cylinder lid is a 1/4" aluminum plate with a rubber gasket. I left the spray handle in to easily relieve pressure from the master cylinder without having to bleed pressure from the tank. I'm not sure if any of the effect of brake fluid on the spray handle. The spray handle can easily be removed if there is a compatibility problem. I do like the idea of the clear hose to verify that fluid and not air is being pushed into the master cylinder.