
Never noticed this before: Turn signals
 06-17-2011, 08:41 PM
#1
Race Director

Thread Starter

While up at Davids house working on Sparty we got to tinkering with the turn signals and lights. The front turn signals and the side marker lights both blink at the same time. Now when you trun on the parking and or headlights the front turn signals and side marker light blink just opposite of each other. Thought this was strange until I tried it on my 72 and it works the same. Are all the C3s like this or just the early ones. The rear marker lights don't blink just the tail lights. Just found this interesting and never noticed this before and why do they do this. .
 06-17-2011, 09:05 PM
#2
Race Director
Some are wired like this. Its actually the side marker that has the odd wiring.
You should notice on both your cars that the side marker wires are brown and blue,brown is parking light hot,blue is turn signal hot-NO black ground wire.
Earlier years like 69 will be brown and black,these will not blink.
You should notice on both your cars that the side marker wires are brown and blue,brown is parking light hot,blue is turn signal hot-NO black ground wire.
Earlier years like 69 will be brown and black,these will not blink.
06-17-2011, 09:11 PM
#3
Race Director
Thread Starter
Just looking at the wire diagram the passenger side is brown and blue and the drivers side is brown and black but just upstream it merges with the light blue wire. I have a ground issue right now with mine that the passenger marker light will not work, traced it to ground so far i have just not peeled back the wire tape yet. Weird wiring.
06-17-2011, 09:24 PM
#4
Race Director
On the pass light if the brown is hot with the parking lights on,then the ground is provided through the blue ,which is the turn signal hot but it is ground when the turn signal is not on. When the turn signal is turned on the blue becomes hot and the ground goes away and the side marker turns off-that's the blinking.
06-17-2011, 09:51 PM
#5
Senior Member


Member Since: Jan 2008
Location: Easton, PA
Posts: 12,154
Received 2,031 Likes
on
1,103 Posts
St. Jude Donor '10

This is David, owner of Sparty, and thank you Gordon for bringing this issue up for us both. Roger appears to be very knowledgable in this area so let me ask this while we have his attention. My passenger side marker light works well, blinks when it is supposed to and runs nice a bright all the time. Well, almost. My front turn signal/parking light does not light when I put a bulb in it. When I remove the buld the side marker light goes dull. Put in the bulb up front and the side marker light goes bright again. The front turn signal bulb does flash when I use the turn signal, but when the running lights and headlights are on it does not light up. Any thoughts on this one? You solve this one Roger and you will have solved the last of my lighting issues with Sparty. 
David
David
06-17-2011, 10:00 PM
#6
Le Mans Master

curious if you have the correct bulbs in all the lights... some are 2 or 3 connections
06-17-2011, 10:03 PM
#7
Race Director
I find most of the time the ground at the park/turn sockets is poor. The first thing I do is take a long piece of wire and attach 1 end at a good ground(alt case)and touch the other end to the turn/park bulb brass case. This will provide a good temp ground,most of the times the lights start to operate normally.
06-17-2011, 10:03 PM
#8
Senior Member
Member Since: Jan 2008
Location: Easton, PA
Posts: 12,154
Received 2,031 Likes
on
1,103 Posts
St. Jude Donor '10
I have 1157NA running in the front directional signal and parking exterior lights, side markers are the 168 push in bulb. Just checked and they appear to be correct bulbs but good idea for me to check.
David
David
06-17-2011, 10:06 PM
#9
Team Owner

...or the right bulb but installed 180* from how it should be...or it has a defective socket....or.....
Roger's method of installing a quick-n-dirty temporary ground...just to see if anything changes...can be used in many situations.
Roger's method of installing a quick-n-dirty temporary ground...just to see if anything changes...can be used in many situations.
Last edited by 7T1vette; 06-17-2011 at 10:08 PM.
06-17-2011, 10:22 PM
#10
Senior Member
Member Since: Jan 2008
Location: Easton, PA
Posts: 12,154
Received 2,031 Likes
on
1,103 Posts
St. Jude Donor '10
I find most of the time the ground at the park/turn sockets is poor. The first thing I do is take a long piece of wire and attach 1 end at a good ground(alt case)and touch the other end to the turn/park bulb brass case. This will provide a good temp ground,most of the times the lights start to operate normally.
David
06-20-2011, 09:30 PM
#11
Race Director
06-21-2011, 02:06 PM
#12
Terrorizing Orange Cones

 06-21-2011, 04:00 PM
#13
Melting Slicks


This is the correct operating sequence for 1971 and 1972 Corvettes (not sure of the sequence after 1972). Front marker lights in unison with the turn signals/hazard warning lights with the lights off and opposite each other with the lights on. The rear marker lights are not integrated and do not flash.
1970 Corvettes did not have the front side marker lights integrated with the turn signals/hazard warning... Just the front and rear turn signal lights.
Regards,
Stan Falenski
06-21-2011, 07:33 PM
#14
Senior Member
Member Since: Jan 2008
Location: Easton, PA
Posts: 12,154
Received 2,031 Likes
on
1,103 Posts
St. Jude Donor '10
Sparty is functioning correctly then as noted by your description of how they are to work, again thanks goes to Gordon for posting that here. I still have that light issue in the right front turn signal and it dims the right front side light when front turn signal bulb is removed. Short maybe? Tried jumping the area but it didn't work for me to test the ground. Other suggestions anyone?
Last issue on the lights, then I can move to the vacuum, oh boy.
Thank you.
David
Last issue on the lights, then I can move to the vacuum, oh boy.
Thank you.
David
06-22-2011, 10:00 AM
#16
Melting Slicks
David,
You're very welcome!
The car looks great... From what I can see, you're getting close to getting it back on the road!
Regards,
Stan Falenski
You're very welcome!
The car looks great... From what I can see, you're getting close to getting it back on the road!
Regards,
Stan Falenski
06-22-2011, 12:18 PM
#17
Race Director
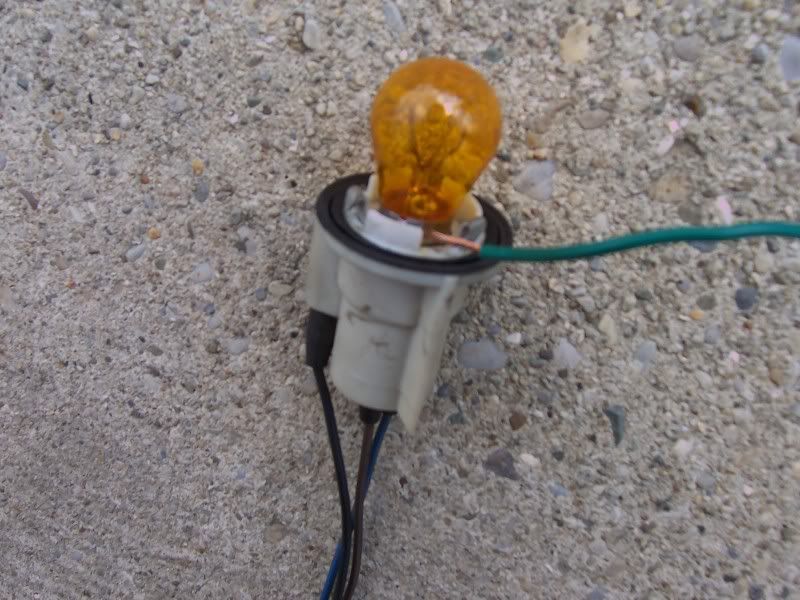
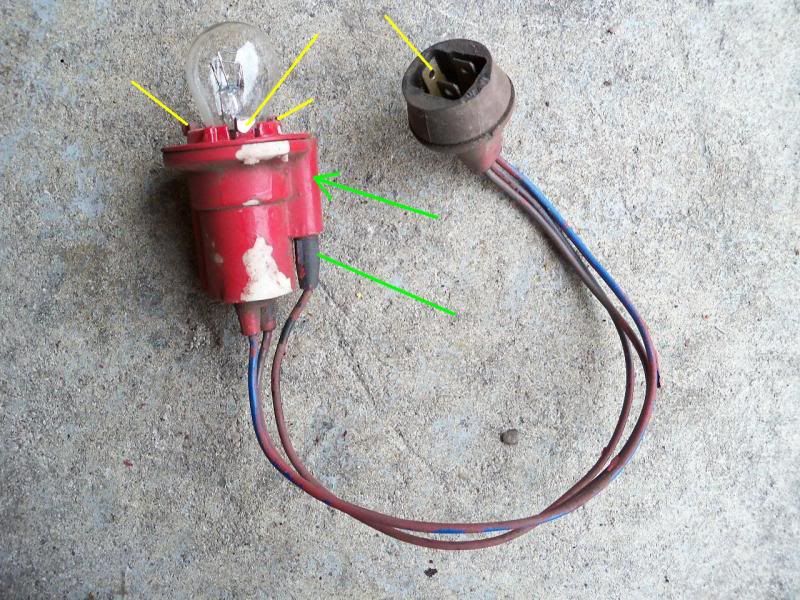
More often than not I find the type problems you guys are describing comes from poor grounds in the front sockets,poor connections in the 3 wire connector or crossed filaments in the bulbs. Here is the pee poor design of the socket ground. Hope this helps some to understand what your fighting.
In the first pic, all 3 yellow arrows are ground and should ohm out zero , original sockets usually don't , even though the lights seem to work ok.
The green line is the ground wire going into the socket,the green arrow is where the pee poor designed connection is internally.
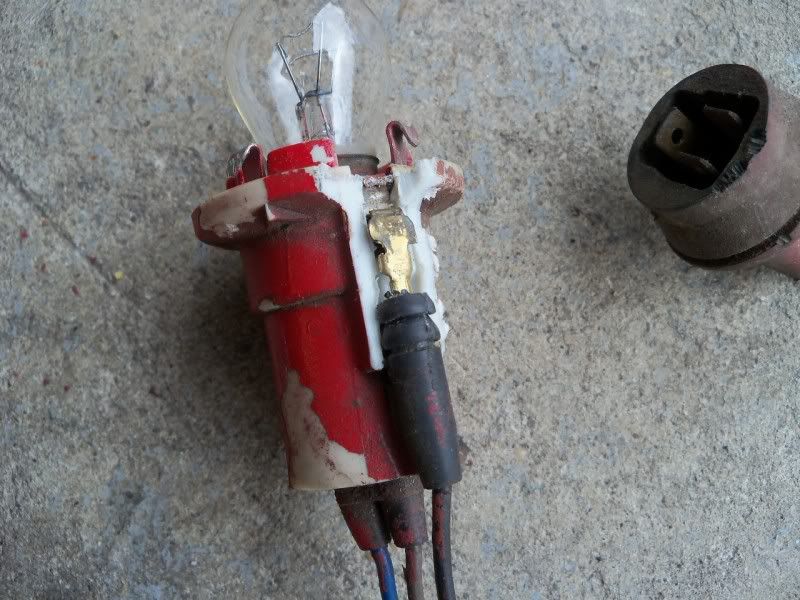
This next pic shows the connection cut away.Note the connection is not a male-female type connection,the one just slides on top of the other.
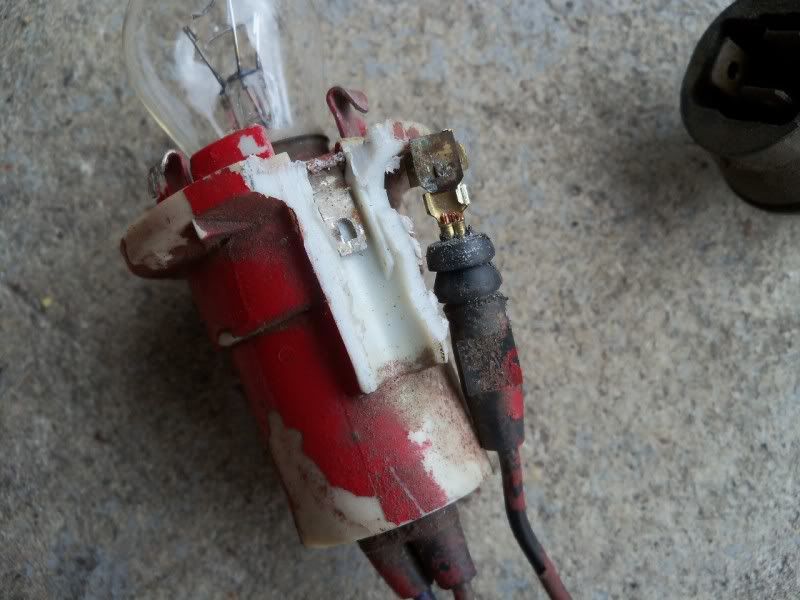
The next pic shows the corrosion built up between the 2 contacts,once this corrosion builds up, the ground starts becoming less than O ohms and the worse it gets the worse your lights operate and the weirder things they do.
In the first pic, all 3 yellow arrows are ground and should ohm out zero , original sockets usually don't , even though the lights seem to work ok.
The green line is the ground wire going into the socket,the green arrow is where the pee poor designed connection is internally.
This next pic shows the connection cut away.Note the connection is not a male-female type connection,the one just slides on top of the other.
The next pic shows the corrosion built up between the 2 contacts,once this corrosion builds up, the ground starts becoming less than O ohms and the worse it gets the worse your lights operate and the weirder things they do.
06-22-2011, 10:01 PM
#18
Senior Member
Member Since: Jan 2008
Location: Easton, PA
Posts: 12,154
Received 2,031 Likes
on
1,103 Posts
St. Jude Donor '10
My son Adam fussed with it today and found the interior of the socket to be loose and when the bulb was allowed to move, contact was lost with the ground. Tomorrow we will change that to eliminate the loose guts and fix the problem permanently. With that fix the electrical issues will be resolved.  Next up is vacuum system and carpet install. Carpets will get some good "sun" time first, soften up nicely, then install the rear section. I'll capture this in pictures when it happens and look forward to continuing the progress.
Thanks to all for support and help.
David
Next up is vacuum system and carpet install. Carpets will get some good "sun" time first, soften up nicely, then install the rear section. I'll capture this in pictures when it happens and look forward to continuing the progress.Thanks to all for support and help.
David
06-22-2011, 10:45 PM
#20
Senior Member
Member Since: Jan 2008
Location: Easton, PA
Posts: 12,154
Received 2,031 Likes
on
1,103 Posts
St. Jude Donor '10
I agree. Now, for that little nonfunctioning vacuum issue...