
Reproduction Dash Pad Comparison PICS
 03-02-2011, 11:32 PM
#1
Pro

Thread Starter
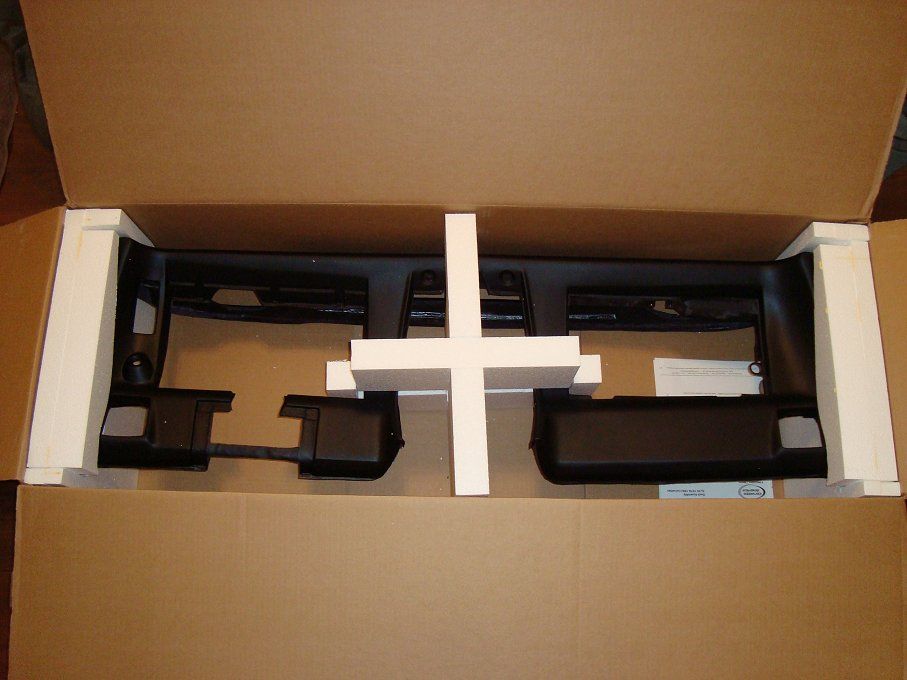
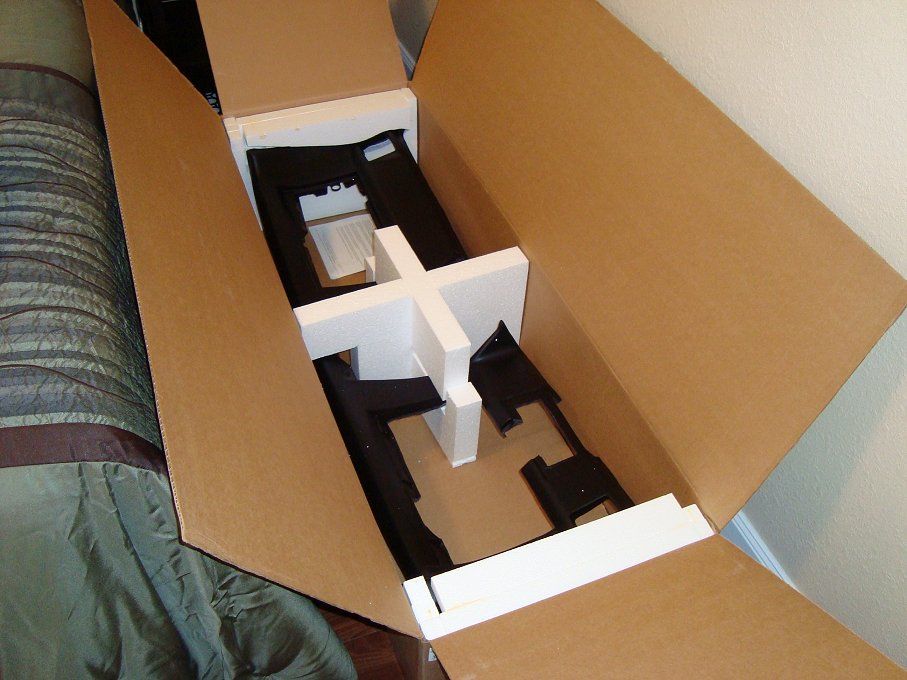
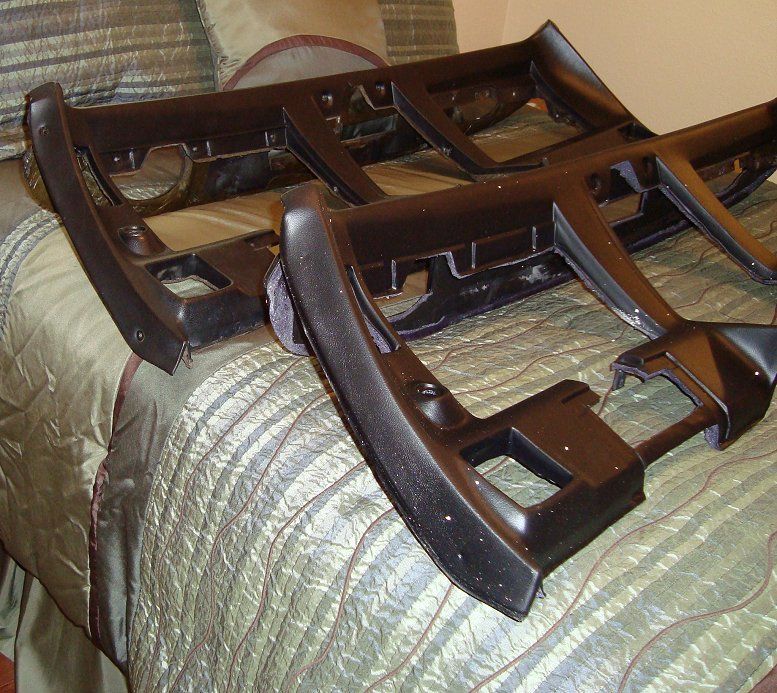
With the dash from my '81 deemed too far gone to repair I took the plunge and dropped $500 for a new reproduction dash pad from Wilcox. I bought it on Ebay, $450 + $54 for S&H. Saved $20 versus buying it on their website. When the box came it had Corvette America's big logo on each side so we know who is truly producing or selling them. I decided to take some pictures to show everyone exactly what you are getting when you buy one of these. I gave each area of interest a grade. Once I get it installed in the car along with the rest of the console I will post updates. Please pardon the white foam dust in the pictures
Packing and Shipping: A+
Probably the best shipped large item I have ever seen. They built a foam support system so the pad never touches the inside of the box. You can tell it was engineered and everything did its job as the pad arrived in perfect condition. Wilcox shipped it fast, came about 5 business days after I ordered it. It is made with a shipping strap at the bottom where the steering column rests. This is to help support the pad during the manufacturing and shipping process. It will be cut off once it is installed in the car.
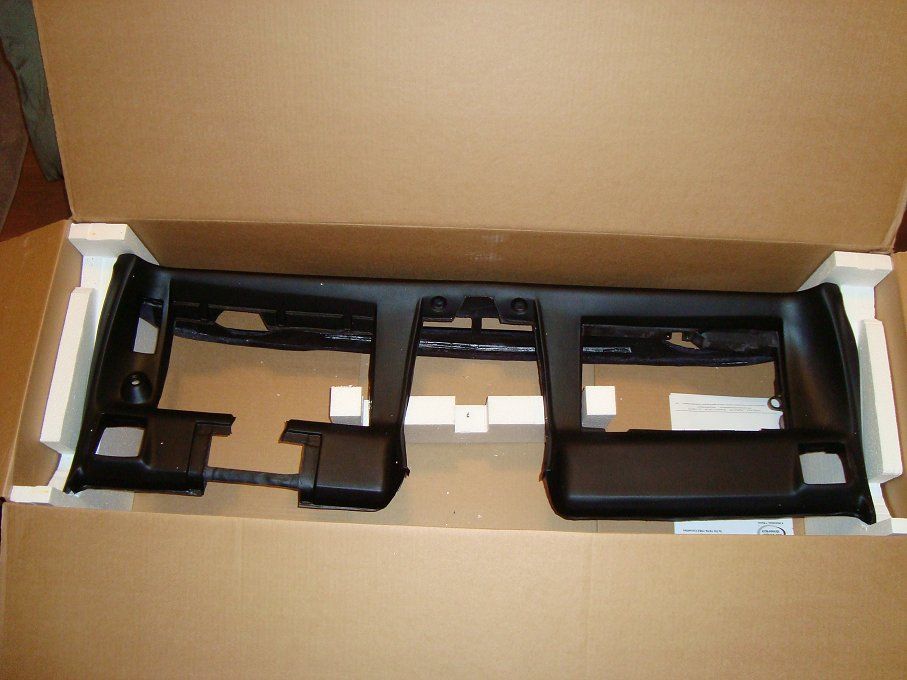
The Dash Pad Itself: B-
It is a little lighter than the original and the plastic backing appears to be made in a hurry. It is definitely not GM but seeing that we do not have many other choices it will pass. The vinyl covering is thinner than the original by about 30%. The biggest draw back to the pad is that you have to drill all the mounting holes for everything. This is somewhat never racking since if your drill gets away from you while working on the back of it you risk drilling a hole all the way through it. I used an electric screw driver that doubles as a drill to help keep this from happening, so far so good. The pad does have dimples in it that offer a guide for some points but some other places it is measure, pre-fit 2x and drill once The fit of the glove box is so-so. I am hoping once I get it in the car the lid will fit more snug against the pad. The instructions say to use a hair dryer to soften the vinyl when installing the AC vents, wiper switch & bezel, and the speaker grills. I did this and the AC vent fit is very tight, almost to the point they do not swivel. I heated the vinyl around them to the point where the vinyl was very soft and to the point I was not comfortable heating it anymore. The same went for the wiper switch and bezel. It is not 100% the way I want it but I dont think it ever will be. I have not tried installing the speaker grills yet. *I will post more pics once everything is installed.
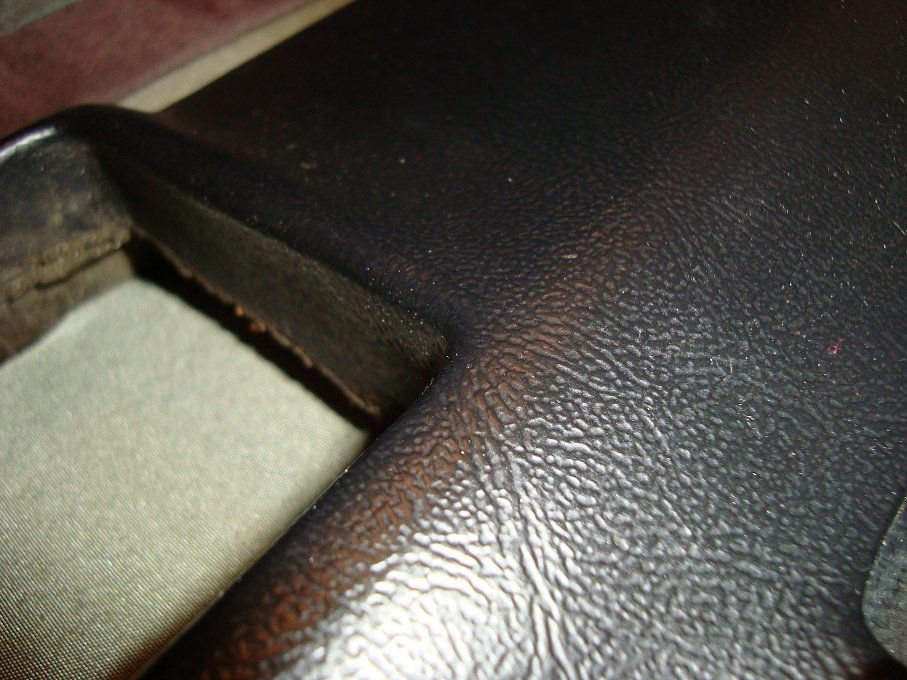
Texture and color: B
Its definitely a reproduction and the texture is copied from the original so the grain is not as deep or as strong. The original dash pad was satin black on the bottom and the top portion going to the windshield was flat black. The new pad is satin black all over. Not a big deal but the contrast between the two areas was kind of nice. The headlight switch protrusion could be better. Hopefully the original bezel will cover it up.
Original pad texture
New pad texture
Original

New
Please post up your comments or experiences with other reproduction dash pads.
Packing and Shipping: A+
Probably the best shipped large item I have ever seen. They built a foam support system so the pad never touches the inside of the box. You can tell it was engineered and everything did its job as the pad arrived in perfect condition. Wilcox shipped it fast, came about 5 business days after I ordered it. It is made with a shipping strap at the bottom where the steering column rests. This is to help support the pad during the manufacturing and shipping process. It will be cut off once it is installed in the car.
The Dash Pad Itself: B-
It is a little lighter than the original and the plastic backing appears to be made in a hurry. It is definitely not GM but seeing that we do not have many other choices it will pass. The vinyl covering is thinner than the original by about 30%. The biggest draw back to the pad is that you have to drill all the mounting holes for everything. This is somewhat never racking since if your drill gets away from you while working on the back of it you risk drilling a hole all the way through it. I used an electric screw driver that doubles as a drill to help keep this from happening, so far so good. The pad does have dimples in it that offer a guide for some points but some other places it is measure, pre-fit 2x and drill once The fit of the glove box is so-so. I am hoping once I get it in the car the lid will fit more snug against the pad. The instructions say to use a hair dryer to soften the vinyl when installing the AC vents, wiper switch & bezel, and the speaker grills. I did this and the AC vent fit is very tight, almost to the point they do not swivel. I heated the vinyl around them to the point where the vinyl was very soft and to the point I was not comfortable heating it anymore. The same went for the wiper switch and bezel. It is not 100% the way I want it but I dont think it ever will be. I have not tried installing the speaker grills yet. *I will post more pics once everything is installed.
Texture and color: B
Its definitely a reproduction and the texture is copied from the original so the grain is not as deep or as strong. The original dash pad was satin black on the bottom and the top portion going to the windshield was flat black. The new pad is satin black all over. Not a big deal but the contrast between the two areas was kind of nice. The headlight switch protrusion could be better. Hopefully the original bezel will cover it up.
Original pad texture
New pad texture
Original
New
Please post up your comments or experiences with other reproduction dash pads.
 03-03-2011, 07:08 AM
#2
Race Director


The 82 CE I am working on Also came with a new dash pad from Corvette America. I have had the same experience you have had. Trying to het everything to fit has been a nightmare. Nothing has gone in easy or fit very well. I finally got t he pad in and secured and it looks ok after many hours with a hair dryer. The driver gauge cluster fit is terrible and after hours of fitting and repositioning it does not look right. The center gauge cluster does not fit right. I still do not have that in. The glove box is an ok fit. The AC vents as you said are in but very tight. The headlight switch is ok but the wiper switch fits like crap. this has been the most time consuming part of this interior rest on this car and I am still not very happy with it but there is not much else to do. The top defroster duct and speaker grills were another trim and fit also. So far nothing has just gone on without a major massage to get it to fit.
03-03-2011, 07:49 AM
#3
Drifting


Just Dashes, makes a good product for some other muscle cars I have. I never looked to see if they do vettes. They'll do your old dash. They ARE proud of their stuff, it's reflected in their prices. Being happy with the outcome is important though.
03-03-2011, 09:55 AM
#4
Pro
Thread Starter
I looked in to Just Dashes and they are also $1000 to redo a dash from our cars. I talked to several Corvette specialty shops as well as interior restoration shops in the Austin area. All said the reproduction dashes are the only way to go. Now that I have my reproduction pad I going to try and experiment on my old dash and see what is possible and what is not.
03-03-2011, 02:55 PM
#5
Team Owner

With the part in an un-assembled state, it is very easy to recolor it to match well with your interior. Just buy some SEM ColorCoat vinyl dye (from a reputable pro auto body paint supplier...NOT from local car parts store or mail order place). Have it mixed to your GM interior color code OR take a part in that you want it matched to. Also buy a $10 PreVal gas/bottle sprayer to apply it...works great.
Be careful with the heating of surface vinyl--especially if it is thin. Heated vinyl wants to SHRINK...not expand. It can easily tear through or melt if you overdo it. I would not recommend doing this on a newly purchased part. If the part quality is poor, call the vendor and ask what can be done.
Be careful with the heating of surface vinyl--especially if it is thin. Heated vinyl wants to SHRINK...not expand. It can easily tear through or melt if you overdo it. I would not recommend doing this on a newly purchased part. If the part quality is poor, call the vendor and ask what can be done.
03-09-2011, 10:03 PM
#6
Pro
Thread Starter
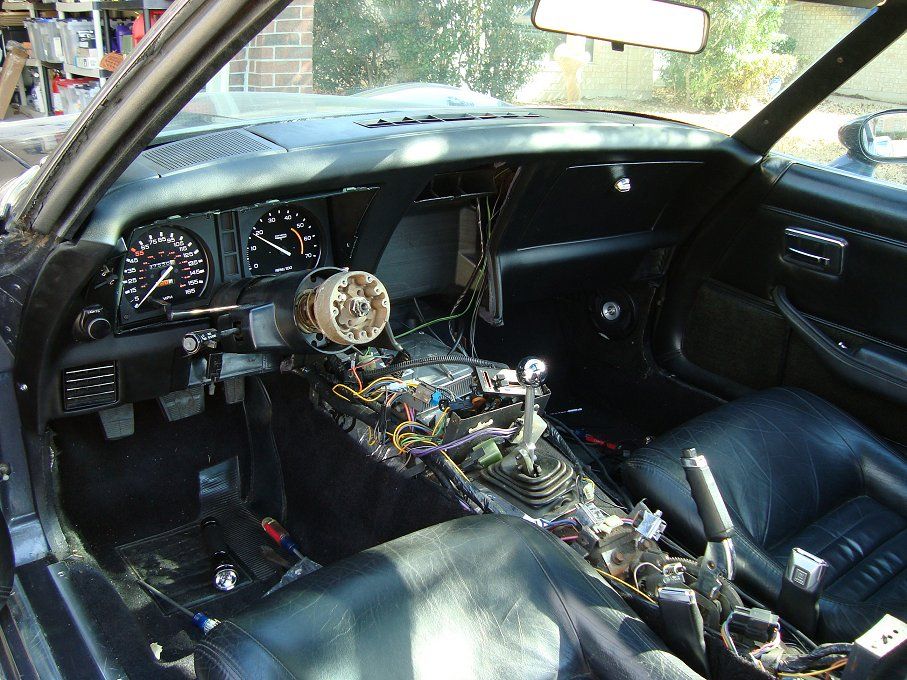
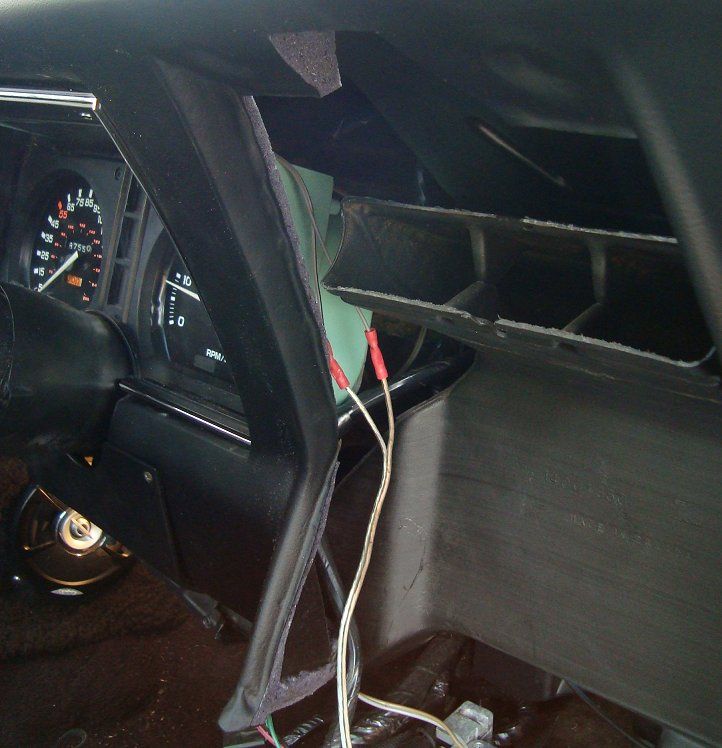
UPDATE: I got the dash in this weekend. What a job to do by yourself! With the glovebox door on and the speakers in the whole unit is very bulky to say the least. I had to install it twice. As mentioned before getting the gauge cluster through hole was a chore. I fear to do any cutting on it so I gently heated it and slowly pulled the cluster through inch by inch. It was very satisfying to hear the clips grab the dash pad and hold on to it. I installed the speaker covers and defrost vent while I still had it out, cleaned them up and shot them with some flat black too. I had to trim the inner edges where the defrost vent goes quite a bit to get the vent to lay flat enough so the center screw could secure it. I used my heat gun to warm up the vinyl on the edges where the speaker covers go. After a little patience and persuasion they went and layed almost flat. From looking at previous pictures of the old dash they are actually laying flatter than they did before. I was also able to get the lower support screws drilled and installed on the sides but I scared to try and drill the upper holes since I cannot see the tabs in which they go in to. I really feel like the dash is not going anywhere and I dont think I would miss the screws. Thoughts? Below is what it looks like so far. This weekend I will be rewiring the radio and re-installing the center console gauge stack and get as far as I can with the rest of the console. Several of my switches need some attention but its all coming together slowly but surely.
03-09-2011, 11:28 PM
#7
Melting Slicks


I've got my windshield out and will wait to put it back in AFTER the new dash has been installed. Thanks for the update on the dash.
Mark G
Mark G
03-10-2011, 09:48 AM
#8
Drifting

looking good!!! thanks for the post i have been toying with the idea of replacing my dash pad, but for now I think I will wait. Seems to be much more work than I thought I would have expected the mounting holes to be drilled for you. BTW nice to see another charcoal vette is yours Bowling Green or St. Louis.
03-10-2011, 05:28 PM
#9
Team Owner
Member Since: Sep 2006
Location: Westminster Maryland
Posts: 30,173
Likes: 0
Received 2,878 Likes
on
2,515 Posts

Hi,
I think your dash pad actually looks very good!
I believe the interior soft trim, and plastic trim parts, are the repro parts that are the least like the originals.
I bought an a-pillar trim piece that I wouldn't use. A repro door panel that's still sitting where I put it 5 years ago. An emergency brake console that I wouln't use. A complete set of carpet that I installed and then took out. Rear compartment doors that I wouldn't use.
Regards,
Alan
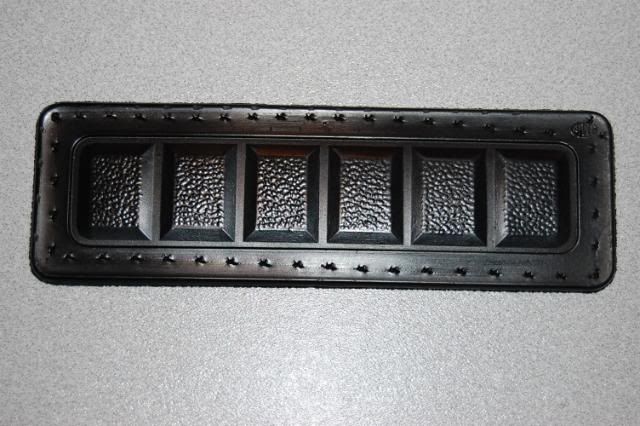
Here's an "EXACT REPRODUCTION" dimmer pad and the original.
Do they think we're completely BLIND!

I think your dash pad actually looks very good!
I believe the interior soft trim, and plastic trim parts, are the repro parts that are the least like the originals.
I bought an a-pillar trim piece that I wouldn't use. A repro door panel that's still sitting where I put it 5 years ago. An emergency brake console that I wouln't use. A complete set of carpet that I installed and then took out. Rear compartment doors that I wouldn't use.
Regards,
Alan
Here's an "EXACT REPRODUCTION" dimmer pad and the original.
Do they think we're completely BLIND!
03-10-2011, 09:21 PM
#11
Melting Slicks

 03-11-2011, 09:22 AM
#13
Pro
Thread Starter
Thank you for the compliments everyone. I will take more pics as I go along and keep posting until it is finished. To answer your question Larryg, my car is a St. Louis car, built in April of '81 if I remember correctly.
I agree with you Alan, some of the parts companies must think we are blind. When I was buying parts for my '69 Camaro several years ago a lot of soft parts are not even close to the originals. Its really sad that better parts cannot be made because I think we would all spend a few extra bucks to get something that is correct. Even "GM Restoration" parts are not even close sometimes.
When it comes to getting stuff from Corvette America, I don't think we have much of a choice. As stated above a lot of the vendors get their stuff from them and just resell it. I have bought parts from other vendors, both direct and via Ebay and they came in Corvette America boxes as well.
03-19-2011, 08:10 PM
#14
Pro
Thread Starter
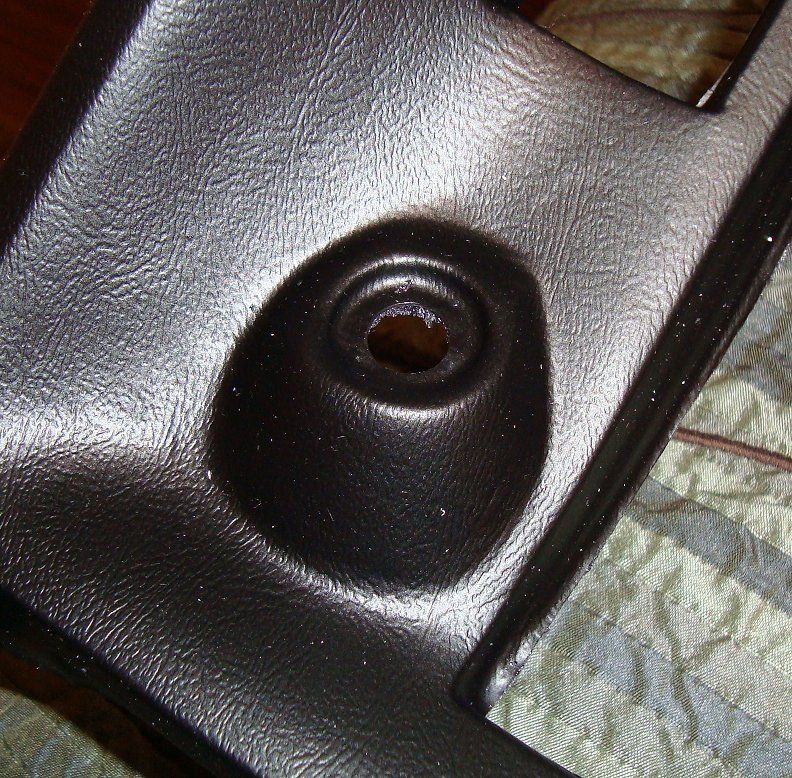
Update. As mentioned above, getting the speedo/tach cluster mounted in the pad is a big challenge. The reason for this as I found is due to the extra materal or flash that is a result of the molding process. See picture below.
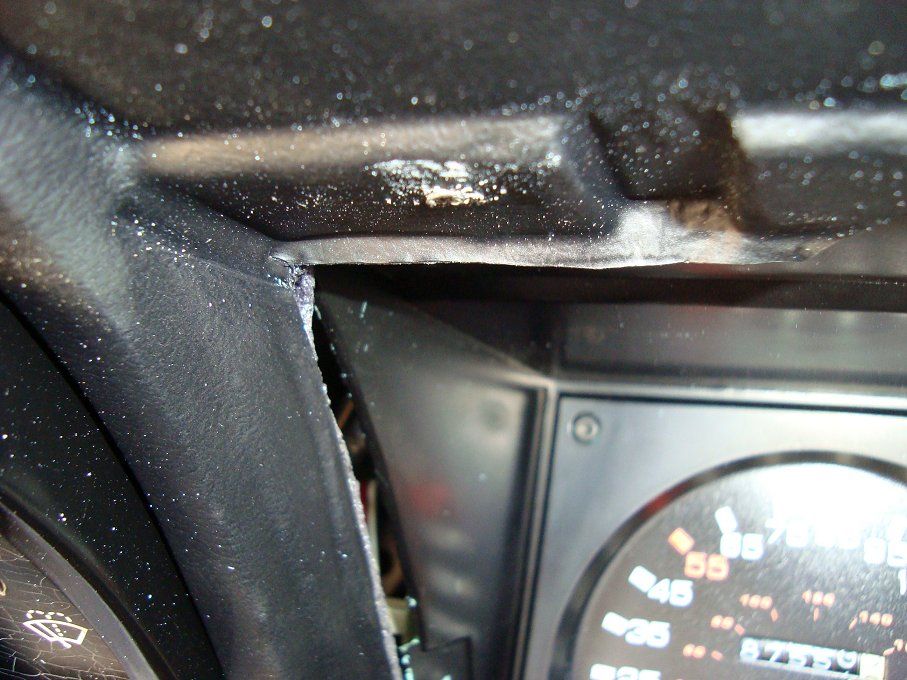
I spent the better part of 2 hours using my Dremel tool with a sanding drum on the end to carefully shave down the vinyl and foam. #1 It is very frustating that this is not better and more ready to use when it is shipped. #2 it makes a HUGE mess. You will get foam debris everywhere, even if you cut and sand it by hand. I finally got the cluster in along with the cluster lens. The fit is not as good as I would like it since there is a noticeable gap between the top of the lens and pad. However I stopped while I was ahead since I did not see it getting any better the more I worked on it.
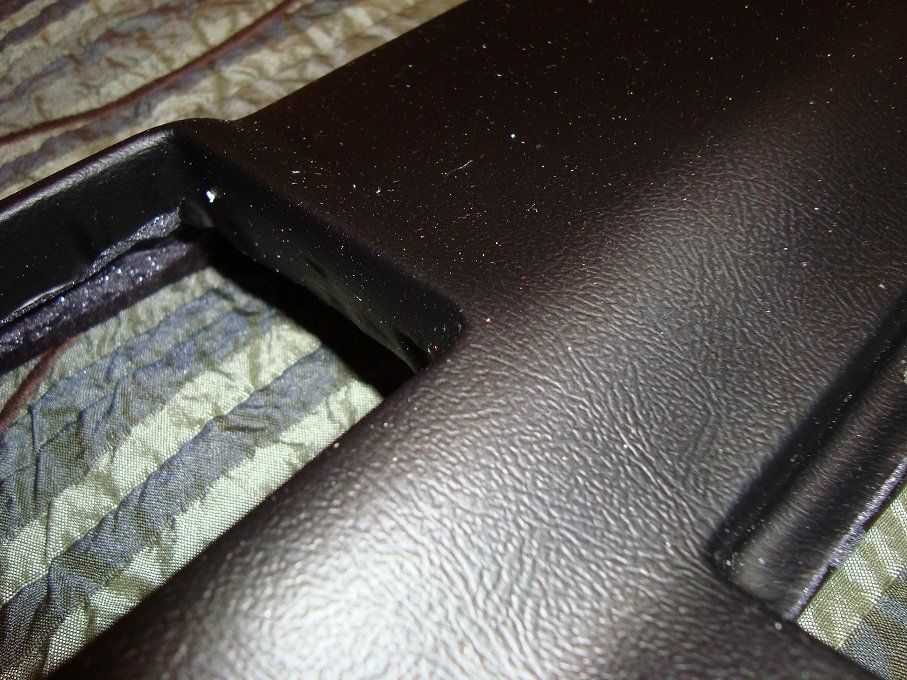
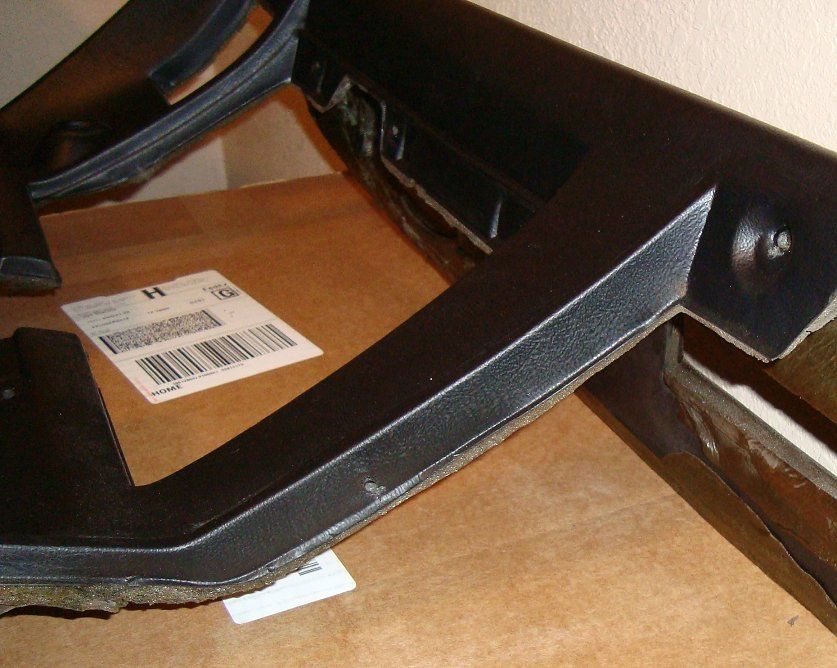
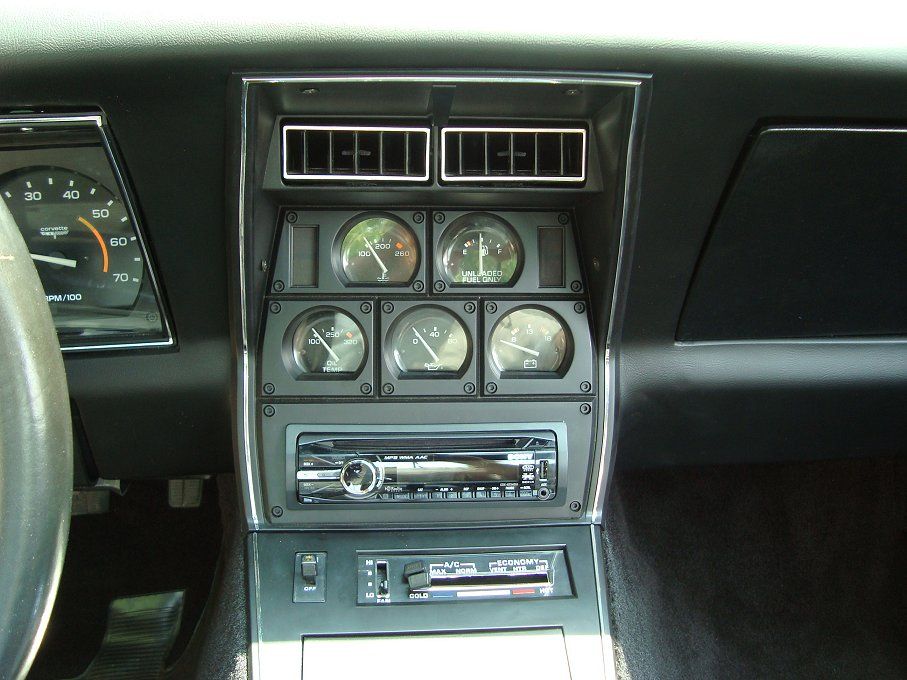
Next part, mounting the center console stack. I bought a new reproduction bezel since my original had been covered in stick on wood trim. The bezel compared very well to the original and everything mounted to it almost perfectly. However, getting two reproduction parts to come together without incident would be asking too much. Again, I had to remove 1/4 inch of flash all around the opening. After several trial fittings and 2 hole drillings I discovered my center AC vent was damaged and not letting the top AC vent seat against the opening in the dash bezel. This is not the dash pad's fault. However what is its fault is that the sides where the bezel mounts to is about 30% thinner as compared to the original pad there is more "meat" and the mounting surface is wider. See pictures below.
Another disappointment, along the top where the 2 screws hold the bezel to the pad, there is not enough plastic for the screws to grip to. I could tell when I was drilling the holes the inner plastic core at that point cant be more than 1/4 inch thick. On the original there is plenty of plastic for the screws to grab on to.
So far, considering how much time I have spent on this pad and I am still not done yet I would have gladly given $1,000 for a true GM "ready to install" dash pad with at least 90% of the holes already drilled. Corvette America has a lot of work to do to make this a quality product. As it sits, IMHO it is only worth about $200 as it is no where near what the original was.
I will keep you posted.
I spent the better part of 2 hours using my Dremel tool with a sanding drum on the end to carefully shave down the vinyl and foam. #1 It is very frustating that this is not better and more ready to use when it is shipped. #2 it makes a HUGE mess. You will get foam debris everywhere, even if you cut and sand it by hand. I finally got the cluster in along with the cluster lens. The fit is not as good as I would like it since there is a noticeable gap between the top of the lens and pad. However I stopped while I was ahead since I did not see it getting any better the more I worked on it.
Next part, mounting the center console stack. I bought a new reproduction bezel since my original had been covered in stick on wood trim. The bezel compared very well to the original and everything mounted to it almost perfectly. However, getting two reproduction parts to come together without incident would be asking too much. Again, I had to remove 1/4 inch of flash all around the opening. After several trial fittings and 2 hole drillings I discovered my center AC vent was damaged and not letting the top AC vent seat against the opening in the dash bezel. This is not the dash pad's fault. However what is its fault is that the sides where the bezel mounts to is about 30% thinner as compared to the original pad there is more "meat" and the mounting surface is wider. See pictures below.
Another disappointment, along the top where the 2 screws hold the bezel to the pad, there is not enough plastic for the screws to grip to. I could tell when I was drilling the holes the inner plastic core at that point cant be more than 1/4 inch thick. On the original there is plenty of plastic for the screws to grab on to.
So far, considering how much time I have spent on this pad and I am still not done yet I would have gladly given $1,000 for a true GM "ready to install" dash pad with at least 90% of the holes already drilled. Corvette America has a lot of work to do to make this a quality product. As it sits, IMHO it is only worth about $200 as it is no where near what the original was.
I will keep you posted.
03-19-2011, 08:18 PM
#15
Burning Brakes


I bought the same dash pad from Full Throttle Corvettes for $398 plus shipping for my 78. Had corvette America on the box. I have bought several interior parts from them and all had Corvette America on the packing. They were way less expensive then the other vendors. I didn't have near the issues with fit as you are having with yours. I used a hair dryer to heat up a few areas that need to be reformed a little.
My buddy that helped me on my vette, worked on the corvette line in St Louis in the late 70's and told me bending, prying and sanding were normal assembly procedures.mo
My buddy that helped me on my vette, worked on the corvette line in St Louis in the late 70's and told me bending, prying and sanding were normal assembly procedures.mo
Last edited by donnie1956; 03-19-2011 at 08:23 PM. Reason: more info
03-21-2011, 12:14 AM
#17
Racer

Member Since: Mar 2005
Location: San Diego CA
Posts: 343
Received 0 Likes
on
0 Posts
St. Jude Donor '05-'07

I just finished my installation of the same dash in my '78...there were some 'fit and finish' issues to overcome but nothing that a little time and tweeking couldn't fix. I was also a bit afraid to cut too much. After much work...it looks really good. If you have a good place to work on your car, plenty of patience, and can leave it in pieces for a couple weeks... I totally recommend it.
05-01-2011, 04:01 PM
#18
Pro
Thread Starter
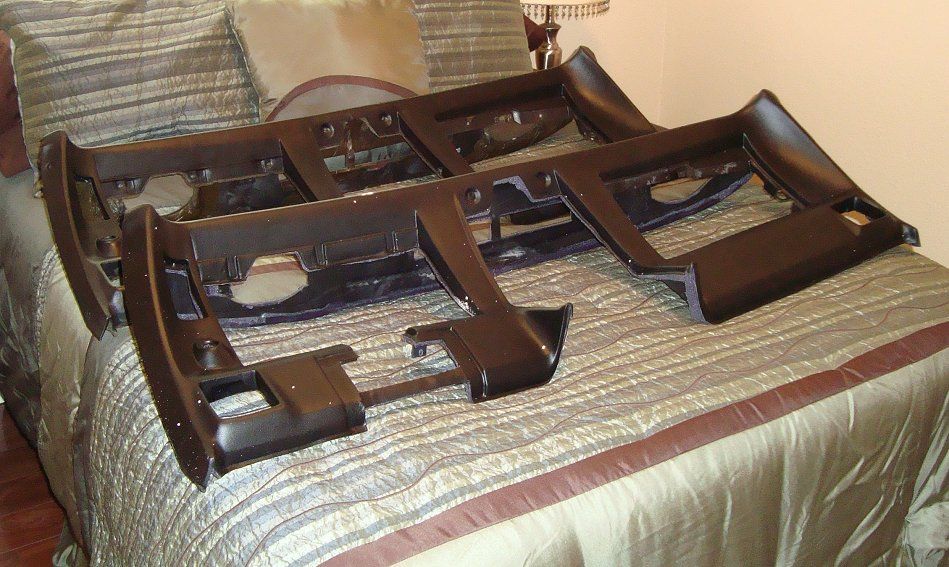
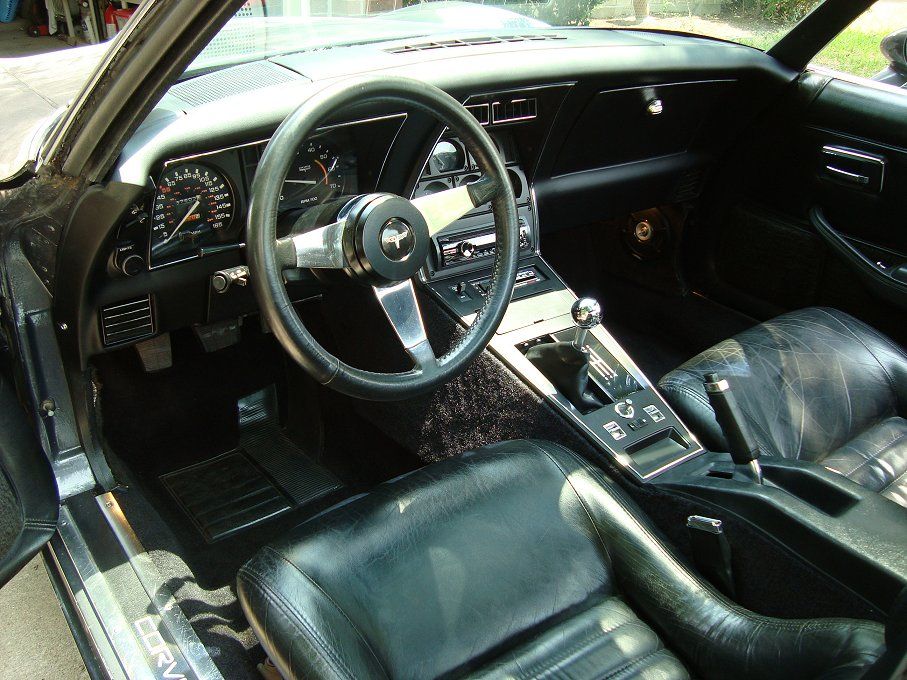
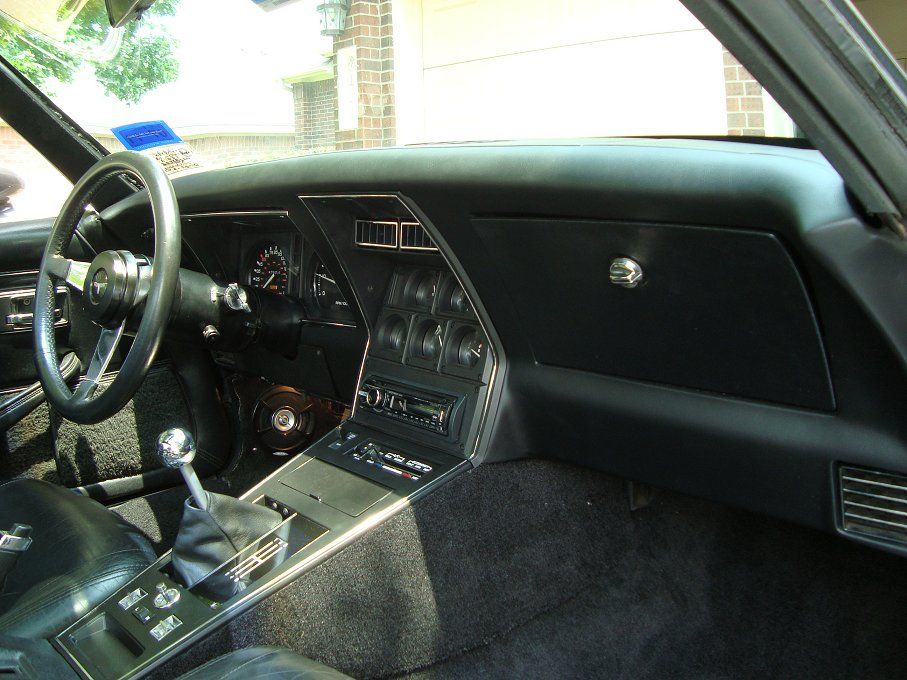
It has been a long road with many delays but I am finally at the end and now I get to enjoy the fruits of my labor. All in all I think it came out great. Since everything was either made in Tawian or China, every single piece required sanding, massaging, tweaking, and persuading to go in to place and line up correctly. These cars were not known for their fit and finish even when they were new. But with time and patience I think the fit and finish of everything is even better than new. The list of new or restored items is below.
New Dashpad, upper and lower center console plastics, leather shift boot, AC control indicator and lens, ash tray door, 5-speed sihft pattern plate, speedo/tach cluster lens, Sony CD/MP3 deck, Pioneer speakers, and carpeted console side panels. I also repaired and restored a lot of things along the way like the wiring, AC duct work, parking brake console cover, and the steering column exterior components.
Next up getting more quotes on getting the front nose and hood repainted. But for now I will be enjoying my time behind the wheel throughout the spring, summer, and fall.
 that was alot of work but it looks AWSOME!!!!! IT LOOKS LIKE BRAND NEW. time to do some cruzing and enjoy it now.

