
My '76 restoration (long post)
 05-02-2011, 02:48 PM
#121
Drifting


Thread Starter
Member Since: Aug 2010
Location: Kanuckistan
Posts: 1,617
Received 127 Likes
on
68 Posts
2022 C3 of the Year Finalist - Modified


What car am I gonna use as reference now?

Don't worry guys, I'll need plenty of hand for the front clip glueing.


 05-07-2011, 10:37 PM
#125
Drifting
Thread Starter
Member Since: Aug 2010
Location: Kanuckistan
Posts: 1,617
Received 127 Likes
on
68 Posts
2022 C3 of the Year Finalist - Modified
This week I've been busy plumbing 
I've started the fuel line :


Still a mockup, nothing is really fasten yet.
Since the card feed line was doing the job, I cut the nipple and had it tapped to NPT fittings. Still waiting for my fuel pressure gauge (non-filled as I read here is was better)

The new fuel pump is installed.


I haven't made up my mind about the orientation of the bowl, right now the -6AN fitting are sticking ou too much, I ordered a pair of those to fix my clearance issue :

I also started recreating the heater hosing, all had been removed by this ******* of PO.

I know those are house plumbing item from Home Depot, and so what, a tad heavier, but does the job fine. right?
Here's a '80 Oldsmobile heater valve, 3.99$ on ebay.

Since nothing is stock in the heater system, all I care is that it works as expected.
I've started the fuel line :
Still a mockup, nothing is really fasten yet.
Since the card feed line was doing the job, I cut the nipple and had it tapped to NPT fittings. Still waiting for my fuel pressure gauge (non-filled as I read here is was better)
The new fuel pump is installed.
I haven't made up my mind about the orientation of the bowl, right now the -6AN fitting are sticking ou too much, I ordered a pair of those to fix my clearance issue :
I also started recreating the heater hosing, all had been removed by this ******* of PO.
I know those are house plumbing item from Home Depot, and so what, a tad heavier, but does the job fine. right?
Here's a '80 Oldsmobile heater valve, 3.99$ on ebay.
Since nothing is stock in the heater system, all I care is that it works as expected.
05-08-2011, 01:56 PM
#126
TheCorvetteBen

Hey the car is looking good! I am glad you found a heater valve after not wanting two of mine. thats ok because I wouldnt have bought them either
05-08-2011, 02:30 PM
#127
Drifting
Thread Starter
Member Since: Aug 2010
Location: Kanuckistan
Posts: 1,617
Received 127 Likes
on
68 Posts
2022 C3 of the Year Finalist - Modified
Still, it's really cool to have people like you around, parting C3 for us to restore our car at fair price.
Keep going Ben
 05-16-2011, 01:55 AM
#128
Drifting
Thread Starter
Member Since: Aug 2010
Location: Kanuckistan
Posts: 1,617
Received 127 Likes
on
68 Posts
2022 C3 of the Year Finalist - Modified
This week a couple of packages decided to finally arrive!!
I received my heater core from Rock Auto, so I could finally put together the heater system.


The "remove ac" box have been made out of a scrapped roofing metal sheet. I made a first cardboard mockup. I assembled the box with rivets and filled all the seams with epoxy resin.
I also changed my mind about the heater valve. This saturday I went to the scrapyard to pick up some hose heat shield, hose clamp and all kind of fasterner. Those cost an arm when bought new.
Then I found what have been searching for month, a useable heater valve.
I decided not to use the one I bought, I do prefer the mechanism of this one, sound more reliable and effective.
Cast iron fitting was a bad idea, I changed for something fancier.

There's now an awfull lot of empty space around the headers, wich is a rather good thing.
I also received two proximity radar kit, one for the front and one for the back, I guess there is a way to get some 12v when and only when the 1st speed is engaged, for the front kit.
I also bought some more reflectix like insulation and redid the firewall. The madvette kit is cool, but is not sufficient for a complete insulation.
As a bonus, here's a general picture of what the car looks like now:
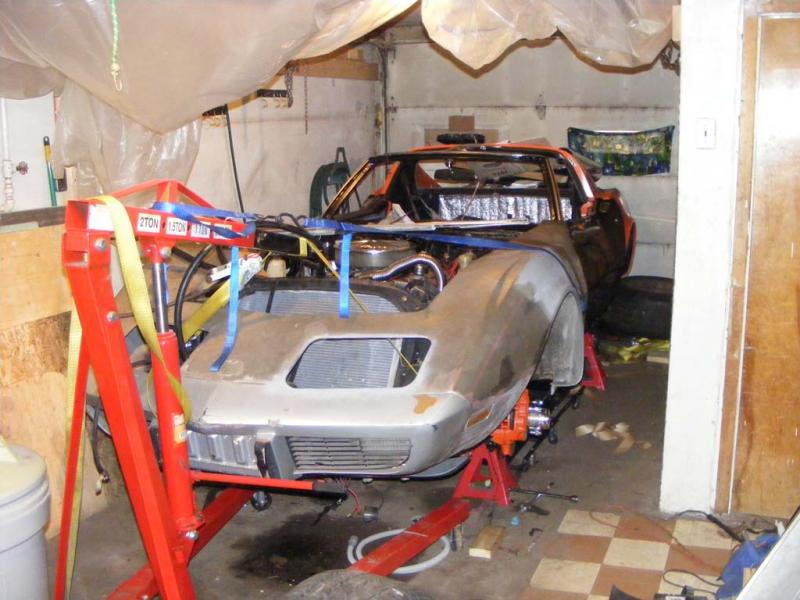
Today I did remove the paint from the doors (not on picture). I'm still struggling with their adjustment, not an easy task.
I received my heater core from Rock Auto, so I could finally put together the heater system.
The "remove ac" box have been made out of a scrapped roofing metal sheet. I made a first cardboard mockup. I assembled the box with rivets and filled all the seams with epoxy resin.
I also changed my mind about the heater valve. This saturday I went to the scrapyard to pick up some hose heat shield, hose clamp and all kind of fasterner. Those cost an arm when bought new.
Then I found what have been searching for month, a useable heater valve.
I decided not to use the one I bought, I do prefer the mechanism of this one, sound more reliable and effective.
Cast iron fitting was a bad idea, I changed for something fancier.
There's now an awfull lot of empty space around the headers, wich is a rather good thing.
I also received two proximity radar kit, one for the front and one for the back, I guess there is a way to get some 12v when and only when the 1st speed is engaged, for the front kit.
I also bought some more reflectix like insulation and redid the firewall. The madvette kit is cool, but is not sufficient for a complete insulation.
As a bonus, here's a general picture of what the car looks like now:
Today I did remove the paint from the doors (not on picture). I'm still struggling with their adjustment, not an easy task.
05-24-2011, 07:13 PM
#129
Burning Brakes

G'day Denpo,
I've just had a quick look through your resto sarga, impressive. One of the very first photo's showed the headlight actuator conversion on your vet, was this done by yourself or by the previous owner?
It looks very neat and tidy and I would be very interested in doing the same conversion to my 69 vert.
Mark
Doh, just read pages 5 & 6 answered most of my questions.
The firebird actuators, what year are they from?
I've just had a quick look through your resto sarga, impressive. One of the very first photo's showed the headlight actuator conversion on your vet, was this done by yourself or by the previous owner?
It looks very neat and tidy and I would be very interested in doing the same conversion to my 69 vert.
Mark
Doh, just read pages 5 & 6
answered most of my questions.The firebird actuators, what year are they from?
Last edited by M A Fry; 05-24-2011 at 07:36 PM.
05-24-2011, 07:33 PM
#130
Drifting
Thread Starter
Member Since: Aug 2010
Location: Kanuckistan
Posts: 1,617
Received 127 Likes
on
68 Posts
2022 C3 of the Year Finalist - Modified
Hi there.
The conversion have been done by myself, in the old good days, when I was confident my car just needed some light cosmetic fixes
I got all the technical details from Mc Speed's Killer light kit webpage .
It contains all the infos you need.
I used a pair of firebird motor found on ebay. I also used the firebird controller module I found at the scrapyard.
I made my own bracket, simpler that Mc Speed ones, because I opted for steel instead of aluminum and didn't need extra reinforcement.
It's working fine, the lights now pop up like a jack-in-the-box, both at the same time. Plus I don't need a running engine to operate them.
Other member already asked me for a detailed post on this, and I will do one eventually, as soon as the headlights are back in the car.
Thanks for watching.
G'day Denpo,
I've just had a quick look through your resto sarga, impressive. One of the very first photo's showed the headlight actuator conversion on your vet, was this done by yourself or by the previous owner?
It looks very neat and tidy and I would be very interested in doing the same conversion to my 69 vert.
Mark
06-14-2011, 02:34 PM
#133
Drifting
Thread Starter
Member Since: Aug 2010
Location: Kanuckistan
Posts: 1,617
Received 127 Likes
on
68 Posts
2022 C3 of the Year Finalist - Modified
To make it short my '80 replacement steering column is no good in current state (it have been collapsed before) and I've dumped my aluminum master cylinder (wrong bore and non matching ports).
I'm still logging 20 to 25h a week on the car on top of my 40h/w job, but devil is in the details, all I got so far is works in progress.
Last edited by Denpo; 06-14-2011 at 03:01 PM.
06-14-2011, 02:42 PM
#134
Drifting
Thread Starter
Member Since: Aug 2010
Location: Kanuckistan
Posts: 1,617
Received 127 Likes
on
68 Posts
2022 C3 of the Year Finalist - Modified
Thanks.
I actually bought a rust bucket with a fiercely engine and some damn cool rims.
So cool they blinded me on all the car's issues.
Those are American "turbine" vector wheels, can be found cheap on ebay or CL, for whom is willing to ride 15" tires.
Too bad there is no such 17" equivalent, I did search and didn't found nothing remotely lookalike.
06-15-2011, 02:17 AM
#135
Drifting
Thread Starter
Member Since: Aug 2010
Location: Kanuckistan
Posts: 1,617
Received 127 Likes
on
68 Posts
2022 C3 of the Year Finalist - Modified
Ok, here's some little update.
Bad news :
-The master cylinder I found at the scrapyard is just too much trouble, vettes have 1/4" rear brake like and 3/16 front. Trying to mate those with a 3/16 front 3/16 rear MC is painfull.
And the bore was just too small anyway, 0.94".
From forum member advice I should aim for a 1.125" bore. Added to the shopping list.
-The '80 steering column I bought last year turned out to be bad.
Here's the story, it's pathetic.
Last weekend I had it cleaned, painted, shroud cut to shea's specification, with a steering wheel a forum member donated. thanks vette81ttop!! (CF) and with the steering U-joint I bought :

Then I proceed to install it in the dash pad (all this was test fit, no final installation)

Everything lined up except the shroud, it was still too deep into the dash.
Ok, maybe Jim Shea's specification aren't that precise (ok, I should have start worrying at that point).
So I try to cut a little more of the shroud. What a mistake, I just destroyed the shroud.
Ok, so where's the problem? Then I remember this picture I posted on another thread.

You see how the mounting ears don't line up ? This difference is exactly what I was missing to get a good fit in the dash.
I then looked closer and found out the column had been collapsed.
Not the shaft at the end, you need to have it collapsed to accommodate a Borgeson, I'm talking about the main body of the column.
Damn!
So back to square one with the column. The old creepy '76 is all I'm gonna use for now. I'll have to reman the whole column to be able to uncollapse it.
-The door
We tried with Sovan two weeks ago to adjust the driver door, without much luck. Even with the 8 bolts loose, the door almost don't move back and forth.
The problem right now is that is doesn't close properly, looks like the weatherstrip is on the way. I compared with the passenger door, this one is closing properly only because the weatherstrip is completely crushed.
Lol, I'm lost at this for now, I'll have to come up with a solution at one point, need to study the subject.
-Cash. Bad season, taxes, insurance renewal, yadada.... by the end of the month not much remains for the project, so things get slower
-Weather. A Canadian who don't make the most out of the summer is a dead Canadian by the next winter. Well, for my wife at least. Rainy weekends are a bless for the project
The good news
-People have been very generous with me. I've been given a pair of steering wheel and a pair of rear wheel spacer.
Sure the wheel are baked, but one is useable, and the other is a good starting point for some custom job. thanks again vette81ttop (CF)
Sure and the spacer are not aluminum, but there are very sturdy with M12 1.5 studs. Thanks a lot Karsten (VM)

-My fuel line can be considered done

I installed a manual cable choke, on the interior side it fits perfectly in place of the now useless vaccum bypass switch. When cold the engine was tricky to keep at idle, this will help. You can also spot the brand new spark cable with the new heat shield. The old one was totally baked, just holding by the metal core of the cable.
On the front, the Mallory pressure regulator
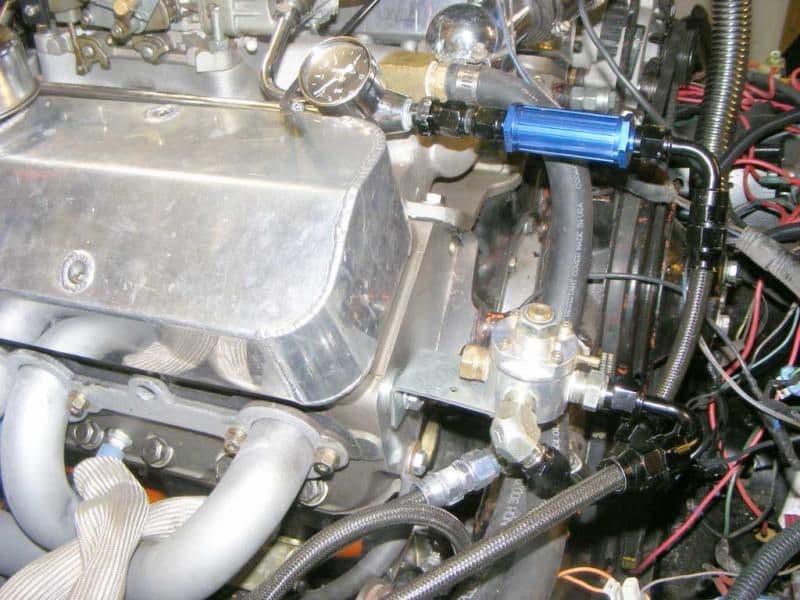
The tubing may look complicated. Two reasons : I changed my mind midway. The regulator was initially installed in the fenders. I decided to fix it to the engine, so the whole system is moving the same way, no forces on the tube.
So I had some tube already made, I didn't what to "reuse" them, once made it stays that way.
Second reason : the teflon braided tube are really stiff, and you can't bend them much.

The lines are routed far enough from the header, but for good measure I added some insulation.

view of the pump while I'm at it.
To finish, a picture of the C4 blower, final install, sealed, with the spacers and the ventilation tube.

That all folks. I'm taking some short vacation soon, so next update may be long to come.
Bad news :
-The master cylinder I found at the scrapyard is just too much trouble, vettes have 1/4" rear brake like and 3/16 front. Trying to mate those with a 3/16 front 3/16 rear MC is painfull.
And the bore was just too small anyway, 0.94".
From forum member advice I should aim for a 1.125" bore. Added to the shopping list.
-The '80 steering column I bought last year turned out to be bad.
Here's the story, it's pathetic.
Last weekend I had it cleaned, painted, shroud cut to shea's specification, with a steering wheel a forum member donated. thanks vette81ttop!! (CF) and with the steering U-joint I bought :
Then I proceed to install it in the dash pad (all this was test fit, no final installation)
Everything lined up except the shroud, it was still too deep into the dash.
Ok, maybe Jim Shea's specification aren't that precise (ok, I should have start worrying at that point).
So I try to cut a little more of the shroud. What a mistake, I just destroyed the shroud.
Ok, so where's the problem? Then I remember this picture I posted on another thread.
You see how the mounting ears don't line up ? This difference is exactly what I was missing to get a good fit in the dash.
I then looked closer and found out the column had been collapsed.
Not the shaft at the end, you need to have it collapsed to accommodate a Borgeson, I'm talking about the main body of the column.
Damn!
So back to square one with the column. The old creepy '76 is all I'm gonna use for now. I'll have to reman the whole column to be able to uncollapse it.
-The door
We tried with Sovan two weeks ago to adjust the driver door, without much luck. Even with the 8 bolts loose, the door almost don't move back and forth.
The problem right now is that is doesn't close properly, looks like the weatherstrip is on the way. I compared with the passenger door, this one is closing properly only because the weatherstrip is completely crushed.
Lol, I'm lost at this for now, I'll have to come up with a solution at one point, need to study the subject.
-Cash. Bad season, taxes, insurance renewal, yadada.... by the end of the month not much remains for the project, so things get slower
-Weather. A Canadian who don't make the most out of the summer is a dead Canadian by the next winter. Well, for my wife at least. Rainy weekends are a bless for the project
The good news
-People have been very generous with me. I've been given a pair of steering wheel and a pair of rear wheel spacer.
Sure the wheel are baked, but one is useable, and the other is a good starting point for some custom job. thanks again vette81ttop (CF)
Sure and the spacer are not aluminum, but there are very sturdy with M12 1.5 studs. Thanks a lot Karsten (VM)
-My fuel line can be considered done
I installed a manual cable choke, on the interior side it fits perfectly in place of the now useless vaccum bypass switch. When cold the engine was tricky to keep at idle, this will help. You can also spot the brand new spark cable with the new heat shield. The old one was totally baked, just holding by the metal core of the cable.
On the front, the Mallory pressure regulator
The tubing may look complicated. Two reasons : I changed my mind midway. The regulator was initially installed in the fenders. I decided to fix it to the engine, so the whole system is moving the same way, no forces on the tube.
So I had some tube already made, I didn't what to "reuse" them, once made it stays that way.
Second reason : the teflon braided tube are really stiff, and you can't bend them much.
The lines are routed far enough from the header, but for good measure I added some insulation.
view of the pump while I'm at it.
To finish, a picture of the C4 blower, final install, sealed, with the spacers and the ventilation tube.
That all folks. I'm taking some short vacation soon, so next update may be long to come.
Last edited by Denpo; 06-15-2011 at 11:50 AM. Reason: typo, layout
06-16-2011, 02:10 PM
#137
Drifting
Thread Starter
Member Since: Aug 2010
Location: Kanuckistan
Posts: 1,617
Received 127 Likes
on
68 Posts
2022 C3 of the Year Finalist - Modified
Anyway I wanted a late C3 column, because they're 2 inch shorter and has the dim switch on the column. Same thing for the wheel, the later are smaller, thus better for me.
If I knew I would have bought your kit car entirely

Let's say for now that whatever you dump you let me know first
06-17-2011, 12:27 AM
#138
Burning Brakes
Member Since: Jun 2008
Location: Salem Ohio
Posts: 827
Likes: 0
Received 0 Likes
on
0 Posts
Thanks.
I actually bought a rust bucket with a fiercely engine and some damn cool rims.
So cool they blinded me on all the car's issues.
Those are American "turbine" vector wheels, can be found cheap on ebay or CL, for whom is willing to ride 15" tires.
Too bad there is no such 17" equivalent, I did search and didn't found nothing remotely lookalike.
I actually bought a rust bucket with a fiercely engine and some damn cool rims.
So cool they blinded me on all the car's issues.
Those are American "turbine" vector wheels, can be found cheap on ebay or CL, for whom is willing to ride 15" tires.
Too bad there is no such 17" equivalent, I did search and didn't found nothing remotely lookalike.
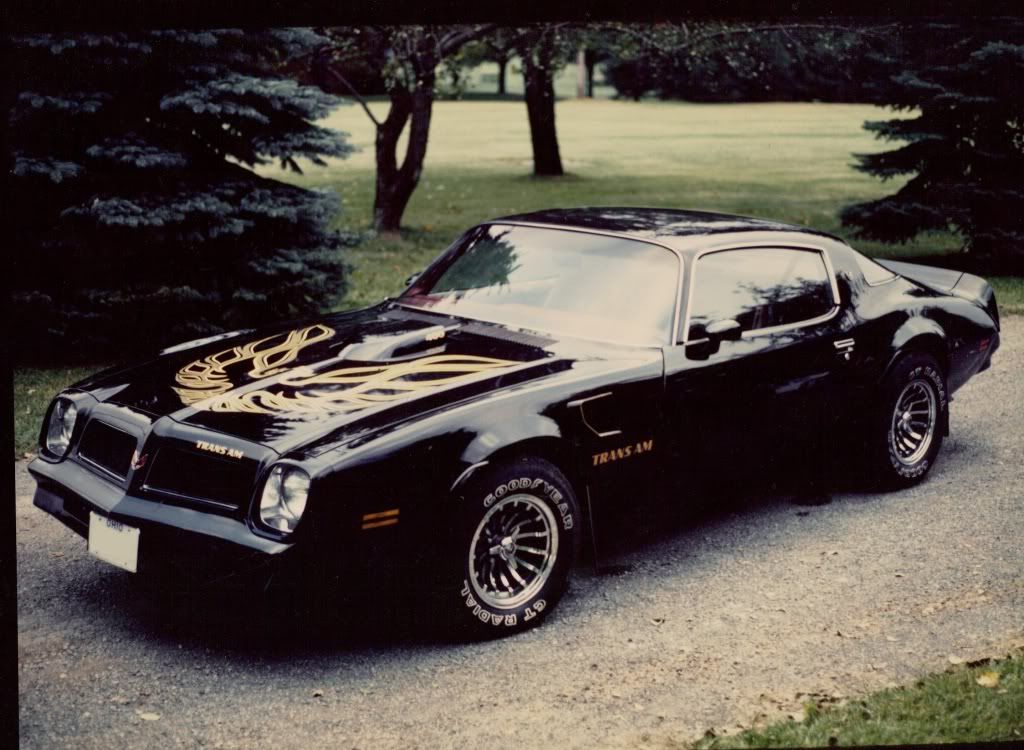
I really like these, but haven't ever been able to find any.
On an old car of my dads.
Hope your car goes smoothly
06-17-2011, 01:40 AM
#139
Drifting
Thread Starter
Member Since: Aug 2010
Location: Kanuckistan
Posts: 1,617
Received 127 Likes
on
68 Posts
2022 C3 of the Year Finalist - Modified
Well, I looked up on ebay right now and a couple popped out.
Search for "turbine rim" or "vector racing rim" or even "general lee rim".
Mine are nice but a bit troublesome. I've been advised to use hub centric centering rings, but the rims' center hole is quiet large (87mm) and I couldn't find any ring that match. I might have to have them machined.
Search for "turbine rim" or "vector racing rim" or even "general lee rim".
Mine are nice but a bit troublesome. I've been advised to use hub centric centering rings, but the rims' center hole is quiet large (87mm) and I couldn't find any ring that match. I might have to have them machined.

