
My '76 restoration (long post)
 01-15-2011, 11:40 PM
#81
Drifting


Thread Starter
Member Since: Aug 2010
Location: Kanuckistan
Posts: 1,617
Received 127 Likes
on
68 Posts
2022 C3 of the Year Finalist - Modified

Thanks I will keep on pushing, even if the "completed by the summer" goal is probably busted with this news.
 01-16-2011, 12:34 AM
#82
Safety Car


http://forums.corvetteforum.com/c3-g...ration-38.html
We do need a table of contents for that thing...I can't even find stuff on there anymore.
Last edited by stinger12; 01-16-2011 at 12:40 AM.
01-17-2011, 02:29 PM
#83
Racer

Member Since: Jul 2010
Location: Manahawkin NJ
Posts: 261
Likes: 0
Received 0 Likes
on
0 Posts
You were a little too late on discovering the front clip problem. I sold a perfect front clip (minus headlights and hood) for $200 a week after I gave you the rear tub.
The package I promised was just put together over the weekend. The post office is closed today so it will go out in the morning.
The package I promised was just put together over the weekend. The post office is closed today so it will go out in the morning.
01-17-2011, 03:00 PM
#84
Drifting
Thread Starter
Member Since: Aug 2010
Location: Kanuckistan
Posts: 1,617
Received 127 Likes
on
68 Posts
2022 C3 of the Year Finalist - Modified
You were a little too late on discovering the front clip problem. I sold a perfect front clip (minus headlights and hood) for $200 a week after I gave you the rear tub.
The package I promised was just put together over the weekend. The post office is closed today so it will go out in the morning.
The package I promised was just put together over the weekend. The post office is closed today so it will go out in the morning.
On the bright side at least my trailing arm are done, I successfully pressed in this weekend the parts Gary machined me, pictures soon.
01-19-2011, 01:12 AM
#85
Drifting
Thread Starter
Member Since: Aug 2010
Location: Kanuckistan
Posts: 1,617
Received 127 Likes
on
68 Posts
2022 C3 of the Year Finalist - Modified
Picture of the TA rebuilt will come later as is turn out I'll have to do it over.
I'll talk about this later once I swallowed my pride, because I've been a flamboyant idiot on this one.
In the meanwhile, here's my seat belt setup, in my usual style : cheaper, newer and safer.


This is the classic mod, using a pair of Camaro '94 (maybe '93) rear seat belt, bought a the scrapyard for 50$.
Basically all F-body of that era make good donors.
As advised by a Vettemod forum member, I searched for 90's GM male buckle, they are compatible with the stock female buckle, so you can still use the seat belt sensor.

This is not the best buckle, but it does the job, I'll search for a better one when I have time to roam the scrapyard.
Here are my reinforcement installed, epoxy glue and rivets, and a grade 8 bolt , maybe overkill, but better stay on the safe side.

It's a one tensioner setup, less fancy, but that make one less device to fail.
My stock system might still work, but it looked so aged I didn't want to take any chance, and given the price of restored one, this was my only option.
I'll talk about this later once I swallowed my pride, because I've been a flamboyant idiot on this one.
In the meanwhile, here's my seat belt setup, in my usual style : cheaper, newer and safer.
This is the classic mod, using a pair of Camaro '94 (maybe '93) rear seat belt, bought a the scrapyard for 50$.
Basically all F-body of that era make good donors.
As advised by a Vettemod forum member, I searched for 90's GM male buckle, they are compatible with the stock female buckle, so you can still use the seat belt sensor.
This is not the best buckle, but it does the job, I'll search for a better one when I have time to roam the scrapyard.
Here are my reinforcement installed, epoxy glue and rivets, and a grade 8 bolt , maybe overkill, but better stay on the safe side.
It's a one tensioner setup, less fancy, but that make one less device to fail.
My stock system might still work, but it looked so aged I didn't want to take any chance, and given the price of restored one, this was my only option.
01-22-2011, 07:32 PM
#86
Drifting
Thread Starter
Member Since: Aug 2010
Location: Kanuckistan
Posts: 1,617
Received 127 Likes
on
68 Posts
2022 C3 of the Year Finalist - Modified
Ok, it's done. My rear spindle assembly is done. phew. That was not a walk in the park, because I made the mistake to install the seal backward. I initialy thought the right way, but a the last minute, just to be sure I check the haynes manual, and what I saw indicated otherwise. I realized that when sending the picture to Gary.
So I had to disassemble everything, extract the outer bearing (thus ruining it), and get a new set of outer bearing.
Hopefully I had a spare pair. Not the original USA made timken bearing, but I'll change them next winter.
I did the jog a Guy's mechanic shop. He's my dedicated mechanist, he's a old wise guy, sorry to see nobody will pick up his business we soon retire. He's using WWII era machines no young mechanic can operate. He gave me tons of advises all along the process, on how to hold tool and to thing the proper way.
So it was a great teaching at the same time.
So, here's the proper procedure when you get the economical way with Gary (sending him only the spindle house and the flange).
Pack your bearings, this is a neat tool Gary talked about in on of his paper


Grease is synthetic Timken, bought from Gary too.
Install the outer bearing

The spindle housing received a generous amount of grease, not filled up to allow expansion.
Install the outer seal (the right way!)

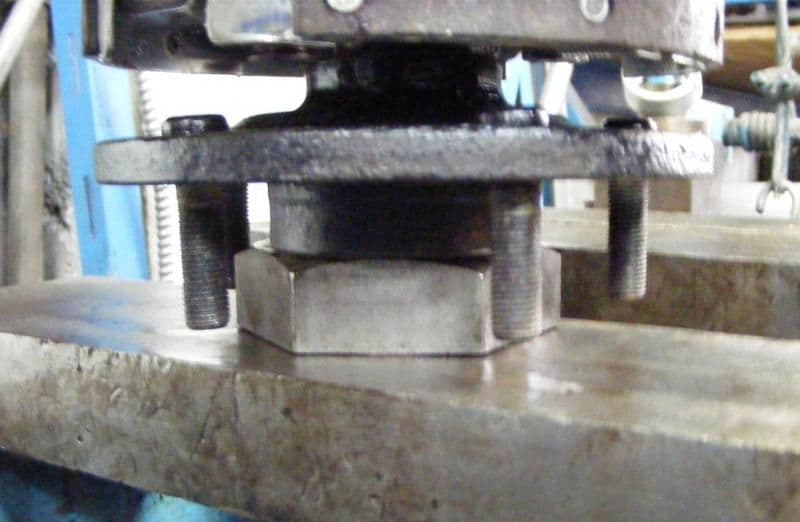
Insert gently the spindle, at put the assembly under the press. I used the tool I talked about a couple of post earlier.

Obviously, don't press onto the studs, there a huge nut found in my mechanic shop.
Back from the press, slide in the spacer

And the shim

And the bearing

Your bearing might need some pressing, not really mine, I just had to press by hand with a metal tube. Never hammer!
Instal the seal

The spindle shield

I changed all the little pieces like the flange Shield

Put the flange

Then torque the nut at 100lbs. The nut didn't lined up with the cotter pin hole, to I remove the nut and grind it a little with some sanding paper on a flat surface. In two attempts I was good.
Put the cotter pin, et voila

The spindle can be turned with a finger, I feel no play at all, well done M. Ramadei.
So I had to disassemble everything, extract the outer bearing (thus ruining it), and get a new set of outer bearing.
Hopefully I had a spare pair. Not the original USA made timken bearing, but I'll change them next winter.
I did the jog a Guy's mechanic shop. He's my dedicated mechanist, he's a old wise guy, sorry to see nobody will pick up his business we soon retire. He's using WWII era machines no young mechanic can operate. He gave me tons of advises all along the process, on how to hold tool and to thing the proper way.
So it was a great teaching at the same time.
So, here's the proper procedure when you get the economical way with Gary (sending him only the spindle house and the flange).
Pack your bearings, this is a neat tool Gary talked about in on of his paper
Grease is synthetic Timken, bought from Gary too.
Install the outer bearing
The spindle housing received a generous amount of grease, not filled up to allow expansion.
Install the outer seal (the right way!)
Insert gently the spindle, at put the assembly under the press. I used the tool I talked about a couple of post earlier.
Obviously, don't press onto the studs, there a huge nut found in my mechanic shop.
Back from the press, slide in the spacer
And the shim
And the bearing
Your bearing might need some pressing, not really mine, I just had to press by hand with a metal tube. Never hammer!
Instal the seal
The spindle shield
I changed all the little pieces like the flange Shield
Put the flange
Then torque the nut at 100lbs. The nut didn't lined up with the cotter pin hole, to I remove the nut and grind it a little with some sanding paper on a flat surface. In two attempts I was good.
Put the cotter pin, et voila
The spindle can be turned with a finger, I feel no play at all, well done M. Ramadei.
 01-25-2011, 02:04 AM
#88
Drifting
Thread Starter
Member Since: Aug 2010
Location: Kanuckistan
Posts: 1,617
Received 127 Likes
on
68 Posts
2022 C3 of the Year Finalist - Modified
Thanks Michel, feels good too.
By the way checkout the Johnny Joint installed.

I drilled and NPT-tapped the JJ shell, and made a slightly bigger hole for the zerk.
With the greasing zerk here, no need to use a drilled ta bolt. I didn't feel good about having hollow bolts on trailing arms.
I shimmed the rotor down to 0.003" which is more than enough with o-ring calipers, and while at it checked the rotor play : 0.002", good job Gary.
Once done, the way for putting back the TA was clear.
The TA bolt received a generous dab of antiseize in order to exorcise my TA removal nightmares
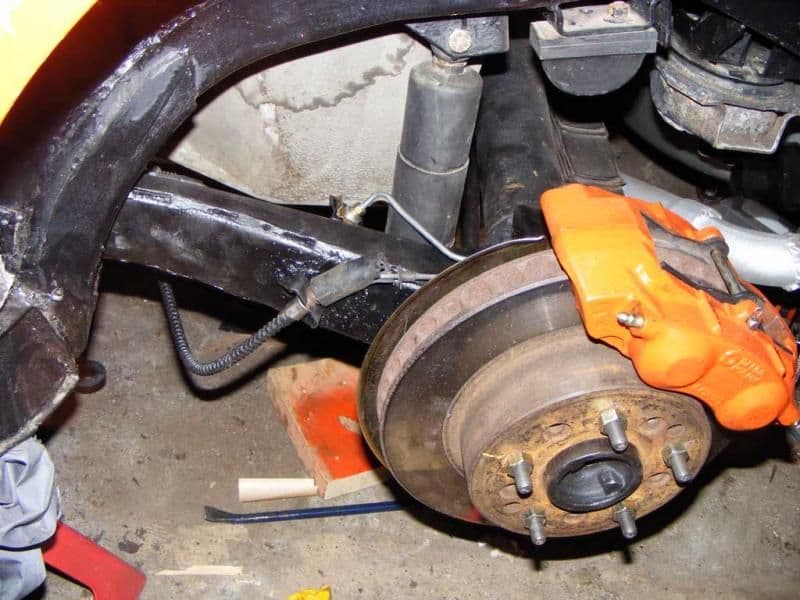
I'm adding to my buy list a pair of rubber ebrake protection and a pair of rear rotor.
I don't even try to clean then, they're done, good enough for now but will be changed soon. As soon as payroll permits.
Disclaimer, I'm really not sure the calipers purge valves are at the right place, I haven't check that yet.
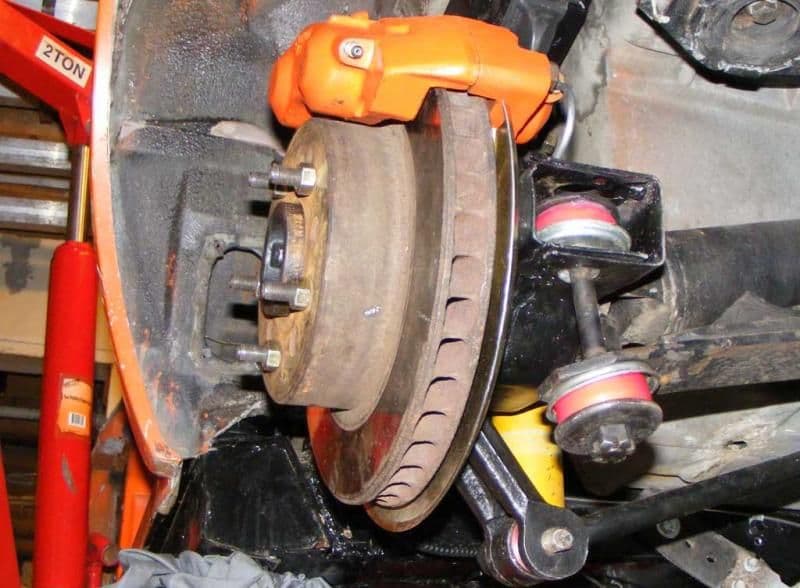
I can now see the time the car is going to seat on its tires, when the suspension will feel the car weight for the first time.
Can't wait.

By the way checkout the Johnny Joint installed.
I drilled and NPT-tapped the JJ shell, and made a slightly bigger hole for the zerk.
With the greasing zerk here, no need to use a drilled ta bolt. I didn't feel good about having hollow bolts on trailing arms.
I shimmed the rotor down to 0.003" which is more than enough with o-ring calipers, and while at it checked the rotor play : 0.002", good job Gary.
Once done, the way for putting back the TA was clear.
The TA bolt received a generous dab of antiseize in order to exorcise my TA removal nightmares
I'm adding to my buy list a pair of rubber ebrake protection and a pair of rear rotor.
I don't even try to clean then, they're done, good enough for now but will be changed soon. As soon as payroll permits.
Disclaimer, I'm really not sure the calipers purge valves are at the right place, I haven't check that yet.
I can now see the time the car is going to seat on its tires, when the suspension will feel the car weight for the first time.
Can't wait.
Last edited by Denpo; 02-04-2011 at 12:48 AM. Reason: stoopid typos
01-31-2011, 01:54 AM
#89
Drifting
Thread Starter
Member Since: Aug 2010
Location: Kanuckistan
Posts: 1,617
Received 127 Likes
on
68 Posts
2022 C3 of the Year Finalist - Modified
Not much accomplished on the car itself this week, it was time for finding a bunch of missing/broken parts.
Hoppefully I found someone who go to Summit Racing quiet often. Those guys have choice and decent price, but each time the shipping (to Canada) cost was killing the deal.
Not anymore!
So I spent quiet a lot of time making my shopping list.
Heater core, rear rotors, a steering U-joint to replace the archaic ragjoint, and all it take to redo my fuel and steering lines.
All teflon stainless braided and -6AN fitting.
All fuel lines were rotten, the pump to carb line was rubber , the fuel return line was not even connected, nor the vapor line *facepalm*
Turned out that for the price of regular stainless fuel line set, you can have something that will last forever and get rid of ALL rubbers.
For the steering the question was to connect the hydroboost to the existing setup, this week's thread contains a good summary of the needed plumbing:
http://forums.corvetteforum.com/c3-t...ro-brakes.html
Some my have noticed in my previous post than the nut on the rear shock mount was not there. I installed it soon afterward, and torque a 70ft/lbs as says the AIM. The threads died at maybe 50. Damn.
Hopefully a forum member was selling a pair at good price... never say is done for good....
Still I could spend few hour in the garage, preparing the hydroboost.
Cut the existing connection to install the new clevis. Made sure it has the same overall lenght than the vacuum booster.


This one won't break for sure
Made an adapter plate, put a small bead of weld

Grinded it....

Painted the hydroboost after sandblast, gutted it (so simple inside), the rebuilt kit is on its way.

Hoppefully I found someone who go to Summit Racing quiet often. Those guys have choice and decent price, but each time the shipping (to Canada) cost was killing the deal.
Not anymore!
So I spent quiet a lot of time making my shopping list.
Heater core, rear rotors, a steering U-joint to replace the archaic ragjoint, and all it take to redo my fuel and steering lines.
All teflon stainless braided and -6AN fitting.
All fuel lines were rotten, the pump to carb line was rubber
, the fuel return line was not even connected, nor the vapor line *facepalm*Turned out that for the price of regular stainless fuel line set, you can have something that will last forever and get rid of ALL rubbers.
For the steering the question was to connect the hydroboost to the existing setup, this week's thread contains a good summary of the needed plumbing:
http://forums.corvetteforum.com/c3-t...ro-brakes.html
Some my have noticed in my previous post than the nut on the rear shock mount was not there. I installed it soon afterward, and torque a 70ft/lbs as says the AIM. The threads died at maybe 50. Damn.
Hopefully a forum member was selling a pair at good price... never say is done for good....
Still I could spend few hour in the garage, preparing the hydroboost.
Cut the existing connection to install the new clevis. Made sure it has the same overall lenght than the vacuum booster.
This one won't break for sure
Made an adapter plate, put a small bead of weld
Grinded it....
Painted the hydroboost after sandblast, gutted it (so simple inside), the rebuilt kit is on its way.
The following users liked this post:
Pegan2261 (08-10-2021)
02-04-2011, 12:33 AM
#90
Drifting
Thread Starter
Member Since: Aug 2010
Location: Kanuckistan
Posts: 1,617
Received 127 Likes
on
68 Posts
2022 C3 of the Year Finalist - Modified
Good news, I"ve found a front clip at good price from a Vette salvage in Ontario.
This renew my faith the beast will be back on the road for the summer.

This renew my faith the beast will be back on the road for the summer.
02-04-2011, 10:32 AM
#91
TheCorvetteBen

thats GREAT news! but dont worry, because of the weather around most of the US, even if we have a running and driving car, we cant drive it anyways
02-18-2011, 01:24 AM
#92
Drifting
Thread Starter
Member Since: Aug 2010
Location: Kanuckistan
Posts: 1,617
Received 127 Likes
on
68 Posts
2022 C3 of the Year Finalist - Modified
I received my hydroboost rebuild kit.
Here's what went in:

And that's what went out:

I would have love to make picture of the rebuilt, but I just don't have the time. One word of caution: the yellow reservoir (a pressure backup) can potentially be under pressure, make sure to clamp it with a wise before you attempt to remove the retaining clip. Mine was not, didn't prevent me for stressing.
Here the hydrobeast rebuilt, matted to the replacement mc I found at the scrapyard. It fit well, but the reservoir is designed with and angle. As advised on forum I'll got look for a replacement reservoir.

Here's what went in:
And that's what went out:
I would have love to make picture of the rebuilt, but I just don't have the time. One word of caution: the yellow reservoir (a pressure backup) can potentially be under pressure, make sure to clamp it with a wise before you attempt to remove the retaining clip. Mine was not, didn't prevent me for stressing.
Here the hydrobeast rebuilt, matted to the replacement mc I found at the scrapyard. It fit well, but the reservoir is designed with and angle. As advised on forum I'll got look for a replacement reservoir.
02-18-2011, 01:56 AM
#93
Drifting
Thread Starter
Member Since: Aug 2010
Location: Kanuckistan
Posts: 1,617
Received 127 Likes
on
68 Posts
2022 C3 of the Year Finalist - Modified
Allrigth, I think I'm all set.
Today Sovan and I went to a truck company terminal pick my new front clip.
I bought the part from Ken's Corvette Part, front the Toronto area.
He made me a really cool price, and took great care to make sure the part arrive in good shape.
It's in really good shape, and it's already stripped, so no hidden surprise.

I only asked for only the front clip and the rad support, and Ken priced it accordingly, still, since he wanted to piece to stay in good shape, he left the front bumper

AND the firewall, with the pedals!!

So big to Ken.
Here's his website: http://www.corvetteparts.ca/
I also received the lastest body part I need for my resto.
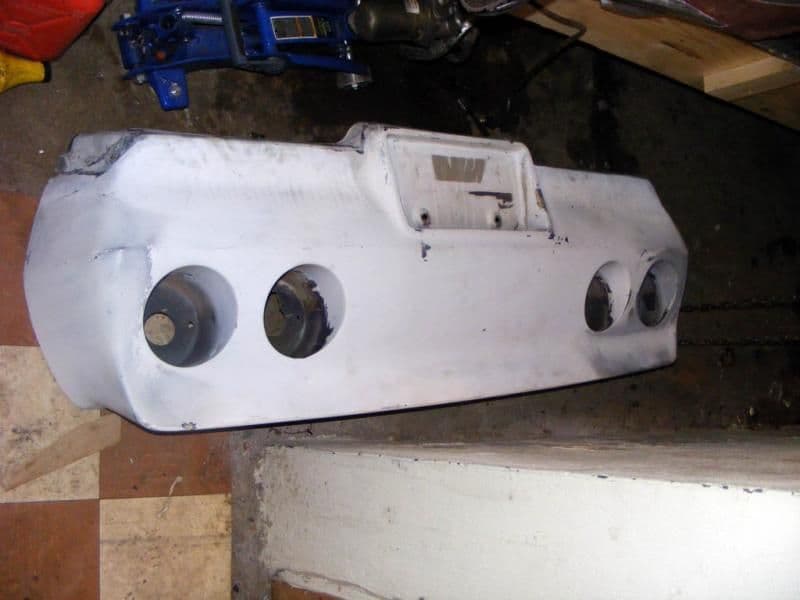
The '80 fiberglass rear bumper, that cause a fair amount of trouble, I may talk about that another time.
I'm not fan of the '76 bumper, like lot of people actually.
Today Sovan and I went to a truck company terminal pick my new front clip.
I bought the part from Ken's Corvette Part, front the Toronto area.
He made me a really cool price, and took great care to make sure the part arrive in good shape.
It's in really good shape, and it's already stripped, so no hidden surprise.
I only asked for only the front clip and the rad support, and Ken priced it accordingly, still, since he wanted to piece to stay in good shape, he left the front bumper
AND the firewall, with the pedals!!
So big
to Ken.Here's his website: http://www.corvetteparts.ca/
I also received the lastest body part I need for my resto.
The '80 fiberglass rear bumper, that cause a fair amount of trouble, I may talk about that another time.
I'm not fan of the '76 bumper, like lot of people actually.
Last edited by Denpo; 06-11-2014 at 06:14 PM.
02-18-2011, 01:48 PM
#96
Drifting
Thread Starter
Member Since: Aug 2010
Location: Kanuckistan
Posts: 1,617
Received 127 Likes
on
68 Posts
2022 C3 of the Year Finalist - Modified
Bring it on, it almost feels like spring today.
02-19-2011, 04:40 AM
#97
Drifting
Thread Starter
Member Since: Aug 2010
Location: Kanuckistan
Posts: 1,617
Received 127 Likes
on
68 Posts
2022 C3 of the Year Finalist - Modified
Yeah, after all the horror stories I heard, I though I won't not make it.
Wrong! Tonight I'm been able to remove my windshield without damaging it.

Well, thing is the windshield was actually already cracked, but the crack starts at the top and make half a circle back to the edge so it couldn't grow any anymore.
Sovan suggested we could fix it with resine injection, we gonna give it a shoot, I have nothing to loose anyway.

So let's say I didn't aggravate the situation
After cutting the rubber spacer away from the pillars I could just pull it almost entirely, then with a thin steel wire I cut the lower part, where the spacer is much wider.
All along the operation I make sure I never ever touch the edges of the windshield.
It's my first windshield, but I found suspicious that the bonding was still all sticky and gooy. Is that normal?

I expected something more solid, like a glue that would have cured.
I wonder if it's not another "Bubba was here" moment when I see so little surface contact


You tell me.
Wrong! Tonight I'm been able to remove my windshield without damaging it.
Well, thing is the windshield was actually already cracked, but the crack starts at the top and make half a circle back to the edge so it couldn't grow any anymore.
Sovan suggested we could fix it with resine injection, we gonna give it a shoot, I have nothing to loose anyway.
So let's say I didn't aggravate the situation
After cutting the rubber spacer away from the pillars I could just pull it almost entirely, then with a thin steel wire I cut the lower part, where the spacer is much wider.
All along the operation I make sure I never ever touch the edges of the windshield.
It's my first windshield, but I found suspicious that the bonding was still all sticky and gooy. Is that normal?
I expected something more solid, like a glue that would have cured.
I wonder if it's not another "Bubba was here" moment when I see so little surface contact
You tell me.
Last edited by Denpo; 02-19-2011 at 04:50 AM. Reason: changing title
02-20-2011, 04:24 AM
#98
Drifting
Thread Starter
Member Since: Aug 2010
Location: Kanuckistan
Posts: 1,617
Received 127 Likes
on
68 Posts
2022 C3 of the Year Finalist - Modified
Tonight I could finish the front wheels.
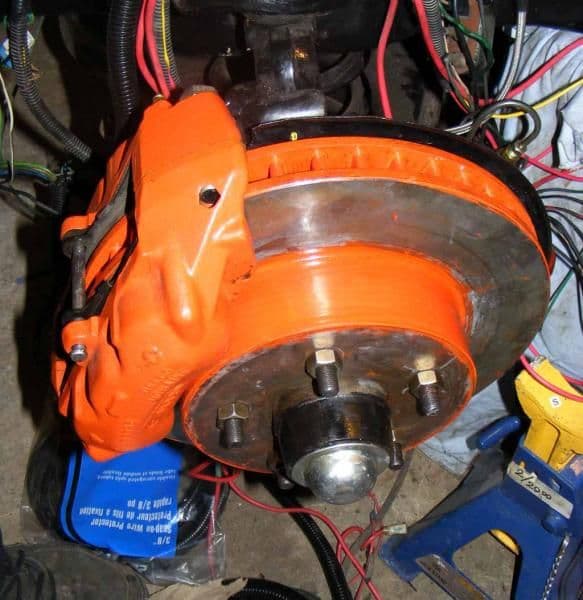
Cleaned the rotors and put some hi temp paint.
Shimmed the rotors down to .002 runout with calibrated .001 bronze foil.
That's overkill with the o-ring piston but won't hurt.
I just need to tight the bleeder and I can put the wheel back on.
Cleaned the rotors and put some hi temp paint.
Shimmed the rotors down to .002 runout with calibrated .001 bronze foil.
That's overkill with the o-ring piston but won't hurt.
I just need to tight the bleeder and I can put the wheel back on.
02-23-2011, 08:35 PM
#99
Drifting
Thread Starter
Member Since: Aug 2010
Location: Kanuckistan
Posts: 1,617
Received 127 Likes
on
68 Posts
2022 C3 of the Year Finalist - Modified
Ok, done refreshing the headlights

Took all the part in a CLR bath, then evaporust, then phosphoric acid.
Painted some, covered the other with WD40.
Lithium white grease in all axes and antiseize wherever steal meets aluminum.
I could not remove the long fine thread ajusting bolt, I had to drill and retap it 3/8-24.
Nobody showed up to pick up the body, so this weekend we gonna cut it in pieces and store whatever can be saved.
Finally I'm gonna reclaim some of my precious space