My '76 restoration (long post)
 05-27-2012, 11:29 AM
#221
Drifting


 05-27-2012, 01:14 PM
#222
Drifting

Thread Starter
Member Since: Aug 2010
Location: Kanuckistan
Posts: 1,617
Received 127 Likes
on
68 Posts
2022 C3 of the Year Finalist - Modified

I will try contact him.
I say "try" because while my English is decent when writing or speaking with someone in person but when at the phone I start to suck big time.
Jeremy, I saw your project is heading to the shop, after all those year, it must feel fantastic.
Rogman, I saw you're moving at a neck-breaking pace, respect man.
05-30-2012, 08:18 PM
#223
Drifting
Thread Starter
Member Since: Aug 2010
Location: Kanuckistan
Posts: 1,617
Received 127 Likes
on
68 Posts
2022 C3 of the Year Finalist - Modified
So I thought bleeding the brakes would be a walk in the park. How wrong I was.
It's surely partly my fault for not checking everything before starting the bleed, only if I knew I've been sold a set of junk part.
Turned out one front caliper had a damaged seat, but that one could be repair with a drill bit and some caution.
The rear calipers were another story. The seat of the bleeder were actually gone for good. They actually had been drilled out, no kidding.
See for yourself :
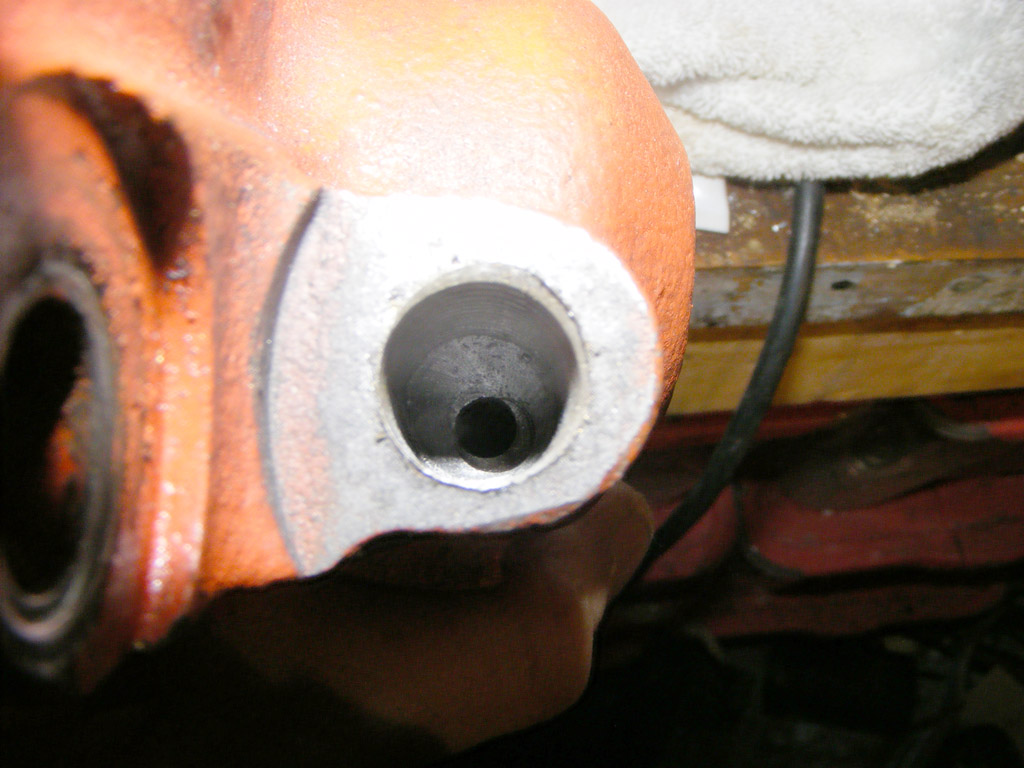
This is the caliper after we redrilled it to accept a 1/4 NTP repair fitting, you see that crescent shape in the bottom, that's the remain of the bubba's drilling.
I don't know what was the idea, and I don't want to....
Here's the bleeder once repaired :
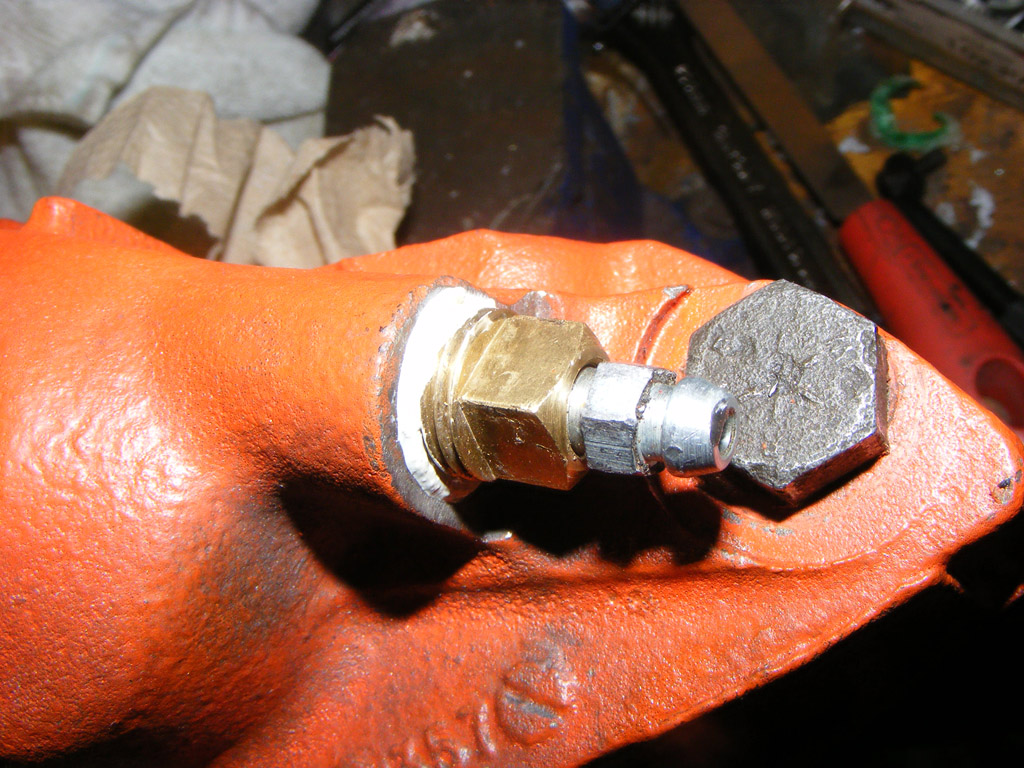
The repair fitting is machined out of a regular NTP plug, couldn't find one locally and didn't to wait for an online order.
Worked well.
So now I can actually start the build.
Make a "ghetto" speed bleeder :
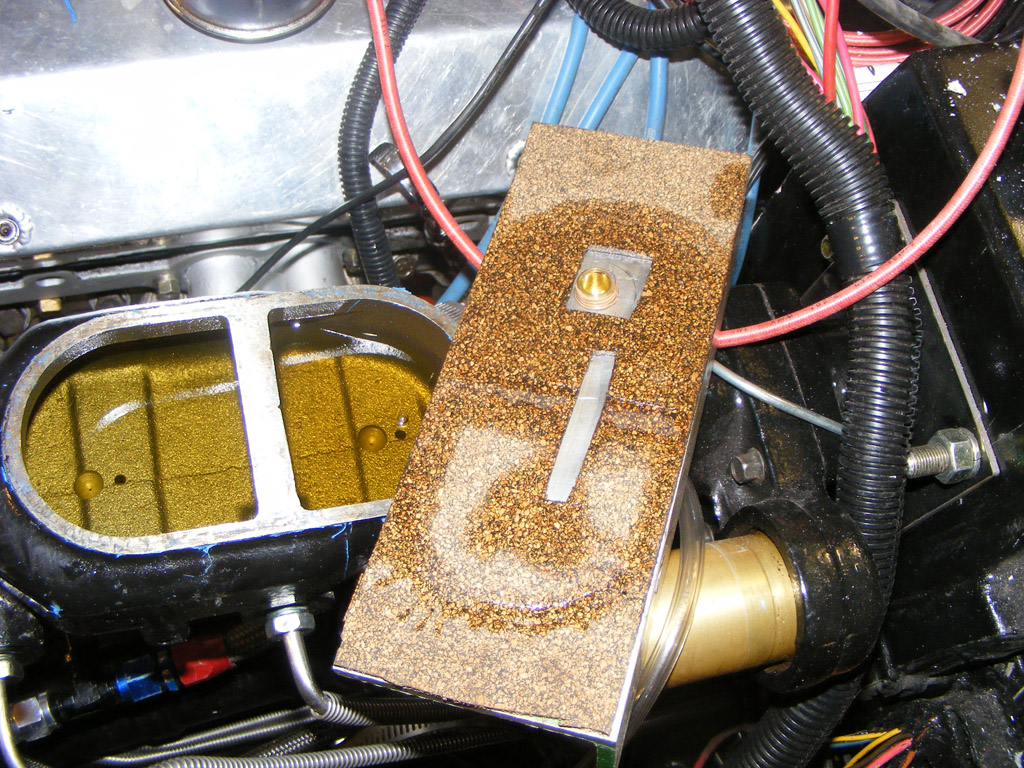
The cutout in the middle is for the pression to go in both reservoir, saves me a fitting.
All went nicely.
The whole system was empty dry so as advised by forum member I will do a second bleed. I first let it sit for a while, will then gently whack all the lines to remove any air bubble, then bleed again.
I also filled my PS pump, and started to "prime" the system with that :
Sure I can't get much pressure with it, but still I can make the fluid circulate. I'll wait to have someone around to operate the steering box and the hydroboost while I do that.
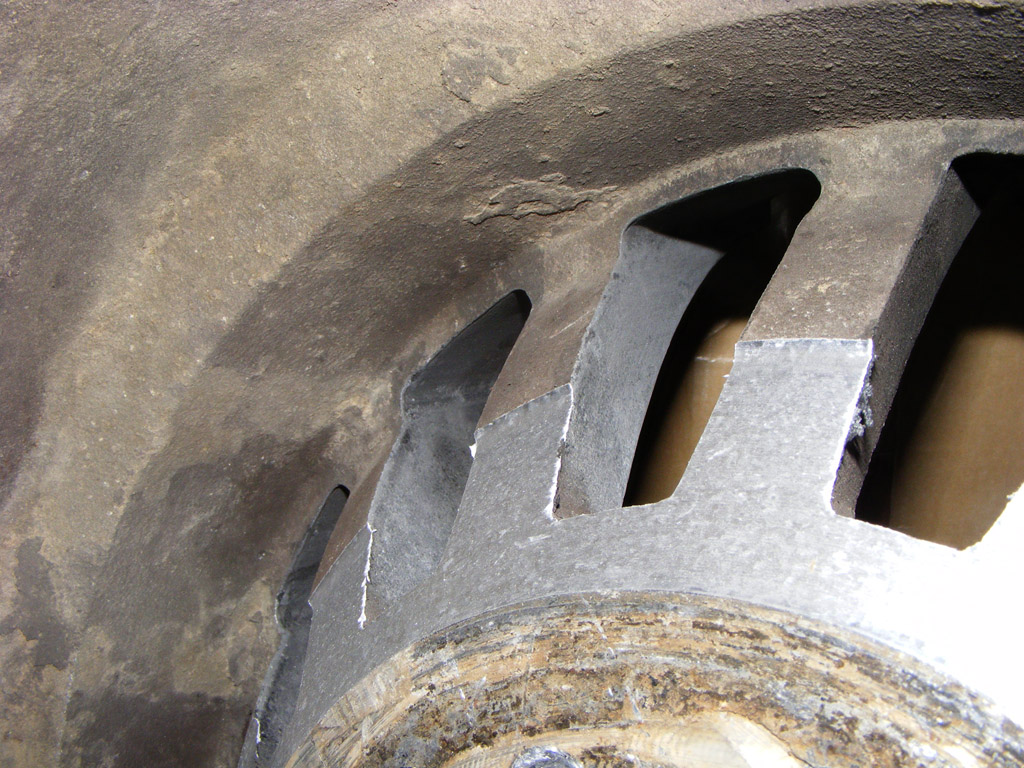
Last problem solving : my rear rims.
I have 10.5" rim at the back (8" at the front). Originally it was mounted with a small Mr Gasket 1/4" spacer. I was told it's not the best setup, so I looked for proper wheel adapter.
I was given a set of 1" adapter, nice and sturdy but is made my wheels really sticking out of the body : I would need a flare job.
So I decided to rethink from the start : why the 1/4" spacer? Because otherwise the rims would hit the calipers. I checked and it was hitting by not much, 0.15" at worst.
So I took the wheels to my best machinist and I had this 0.15" removed from the wheel itself.
Now the rims are fitting much better, barely sticking out, I can live with that, and I'm saving months of fiberglassing.
Never like flares on Vette anyway.
That also gave me the occasion to learn how to operate that antique tire changing machine he had in a corner of his shop, and did put my summer tires on my DD while I was there.
It's surely partly my fault for not checking everything before starting the bleed, only if I knew I've been sold a set of junk part.
Turned out one front caliper had a damaged seat, but that one could be repair with a drill bit and some caution.
The rear calipers were another story. The seat of the bleeder were actually gone for good. They actually had been drilled out, no kidding.
See for yourself :
This is the caliper after we redrilled it to accept a 1/4 NTP repair fitting, you see that crescent shape in the bottom, that's the remain of the bubba's drilling.
I don't know what was the idea, and I don't want to....
Here's the bleeder once repaired :
The repair fitting is machined out of a regular NTP plug, couldn't find one locally and didn't to wait for an online order.
Worked well.
So now I can actually start the build.
Make a "ghetto" speed bleeder :
The cutout in the middle is for the pression to go in both reservoir, saves me a fitting.
All went nicely.
The whole system was empty dry so as advised by forum member I will do a second bleed. I first let it sit for a while, will then gently whack all the lines to remove any air bubble, then bleed again.
I also filled my PS pump, and started to "prime" the system with that :
Sure I can't get much pressure with it, but still I can make the fluid circulate. I'll wait to have someone around to operate the steering box and the hydroboost while I do that.
Last problem solving : my rear rims.
I have 10.5" rim at the back (8" at the front). Originally it was mounted with a small Mr Gasket 1/4" spacer. I was told it's not the best setup, so I looked for proper wheel adapter.
I was given a set of 1" adapter, nice and sturdy but is made my wheels really sticking out of the body : I would need a flare job.
So I decided to rethink from the start : why the 1/4" spacer? Because otherwise the rims would hit the calipers. I checked and it was hitting by not much, 0.15" at worst.
So I took the wheels to my best machinist and I had this 0.15" removed from the wheel itself.
Now the rims are fitting much better, barely sticking out, I can live with that, and I'm saving months of fiberglassing.
Never like flares on Vette anyway.
That also gave me the occasion to learn how to operate that antique tire changing machine he had in a corner of his shop, and did put my summer tires on my DD while I was there.
Last edited by Denpo; 08-17-2017 at 08:44 PM.
06-03-2012, 07:18 PM
#224
Drifting
Thread Starter
Member Since: Aug 2010
Location: Kanuckistan
Posts: 1,617
Received 127 Likes
on
68 Posts
2022 C3 of the Year Finalist - Modified
New batch of stuffs :
Bought that for later:
May I'll put them inside out, � la Balwin-Motion. We'll see.
If I manage to do the also BM-style real window mod I'm thinking about, that would be coherent.
And I took the fiberglass dust issue that's coming seriously :
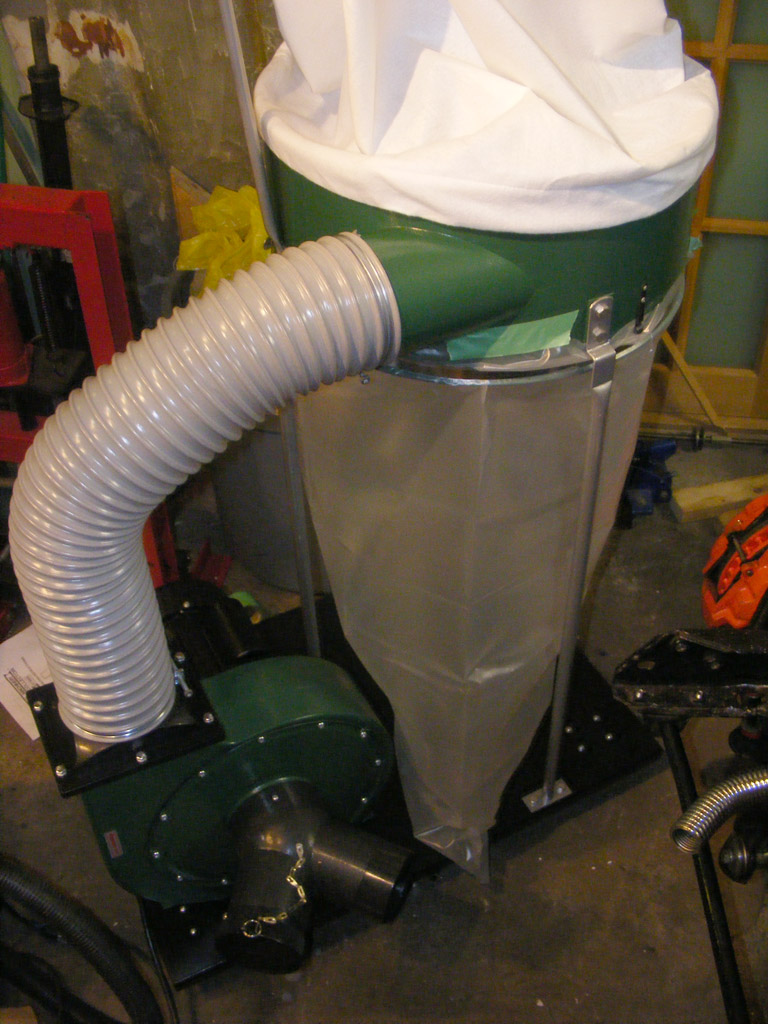
That's the Harbor Freight dust collector, 110v 2HP.
I could get it even cheaper on Ebay.
Bought that for later:
May I'll put them inside out, � la Balwin-Motion. We'll see.
If I manage to do the also BM-style real window mod I'm thinking about, that would be coherent.
And I took the fiberglass dust issue that's coming seriously :
That's the Harbor Freight dust collector, 110v 2HP.
I could get it even cheaper on Ebay.
Last edited by Denpo; 08-17-2017 at 08:45 PM.
06-03-2012, 08:40 PM
#225
Drifting
Member Since: Jun 2011
Location: iowa city iowa
Posts: 1,540
Received 253 Likes
on
139 Posts
2020 Corvette of the Year Finalist (appearance mods)
C3 of Year Winner (appearance mods) 2019
I have followed your build for a long time. Looking good as always.
I have the same HF dust collector in my wood shop. It has seen a LOT of use over the past ten years or so and has never had any problems. You can't beat the price. I am not sure if they now ship with the same bags as they did back then, but mine was not very good at catching the really fine stuff, which is what you really need to capture. The bigger stuff will fall to the floor but the finer stuff that is blown through the bag floats around waiting for you to breath it.
You can upgrade to a cartridge filter fairly cheaply and I think it makes a world of difference. Most of the wood guys (including me) got mine from Wynn filter.
If you are interested here is a link to the conversion:http://www.wynnenv.com/9e300bl_conversion.htm
Yikes: I just looked and the prices went up since I got mine. Even if you don't upgrade the bag, make sure you look into how well it is catching the fine stuff. I ran a bunch of stuff through mine with the lights off and a flash light. you could see dust coming right back out of the bag and knew it needed to go. YMMV since they may have improved since then.
Anyhow.... keep up the good work!
-brent
06-04-2012, 07:20 PM
#226
Drifting
Thread Starter
Member Since: Aug 2010
Location: Kanuckistan
Posts: 1,617
Received 127 Likes
on
68 Posts
2022 C3 of the Year Finalist - Modified
I have followed your build for a long time. Looking good as always.
I have the same HF dust collector in my wood shop. It has seen a LOT of use over the past ten years or so and has never had any problems. You can't beat the price. I am not sure if they now ship with the same bags as they did back then, but mine was not very good at catching the really fine stuff, which is what you really need to capture. The bigger stuff will fall to the floor but the finer stuff that is blown through the bag floats around waiting for you to breath it.
You can upgrade to a cartridge filter fairly cheaply and I think it makes a world of difference. Most of the wood guys (including me) got mine from Wynn filter.
If you are interested here is a link to the conversion:http://www.wynnenv.com/9e300bl_conversion.htm
Yikes: I just looked and the prices went up since I got mine. Even if you don't upgrade the bag, make sure you look into how well it is catching the fine stuff. I ran a bunch of stuff through mine with the lights off and a flash light. you could see dust coming right back out of the bag and knew it needed to go. YMMV since they may have improved since then.
Anyhow.... keep up the good work!
-brent
I have the same HF dust collector in my wood shop. It has seen a LOT of use over the past ten years or so and has never had any problems. You can't beat the price. I am not sure if they now ship with the same bags as they did back then, but mine was not very good at catching the really fine stuff, which is what you really need to capture. The bigger stuff will fall to the floor but the finer stuff that is blown through the bag floats around waiting for you to breath it.
You can upgrade to a cartridge filter fairly cheaply and I think it makes a world of difference. Most of the wood guys (including me) got mine from Wynn filter.
If you are interested here is a link to the conversion:http://www.wynnenv.com/9e300bl_conversion.htm
Yikes: I just looked and the prices went up since I got mine. Even if you don't upgrade the bag, make sure you look into how well it is catching the fine stuff. I ran a bunch of stuff through mine with the lights off and a flash light. you could see dust coming right back out of the bag and knew it needed to go. YMMV since they may have improved since then.
Anyhow.... keep up the good work!
-brent
The collector I bought has a 5 micron bag, not sure it would catch all the dust to be sincere, the one in the link you provide are 1 to 0.5 micron.
You're right, they're not cheap.
Those collectors are very common and lot of people hack them, I'll dig for alternatives.
My work area is entirely wrapped and I have a full face respiratory mask, so I know at least nobody is gonna breath this dust.
06-04-2012, 09:41 PM
#227
Drifting
Member Since: Jun 2011
Location: iowa city iowa
Posts: 1,540
Received 253 Likes
on
139 Posts
2020 Corvette of the Year Finalist (appearance mods)
C3 of Year Winner (appearance mods) 2019
I hacked mine up too :-)
I made a hillbilly version of a cyclone with it, and believe it or not, it actually works really well. I have emptied the large barrel below many times (maybe 6 or 8 times since the filter was added) and there is almost nothing inside the filter. Nothing large, only a small amount of dust that made it through. Score one for bubba.
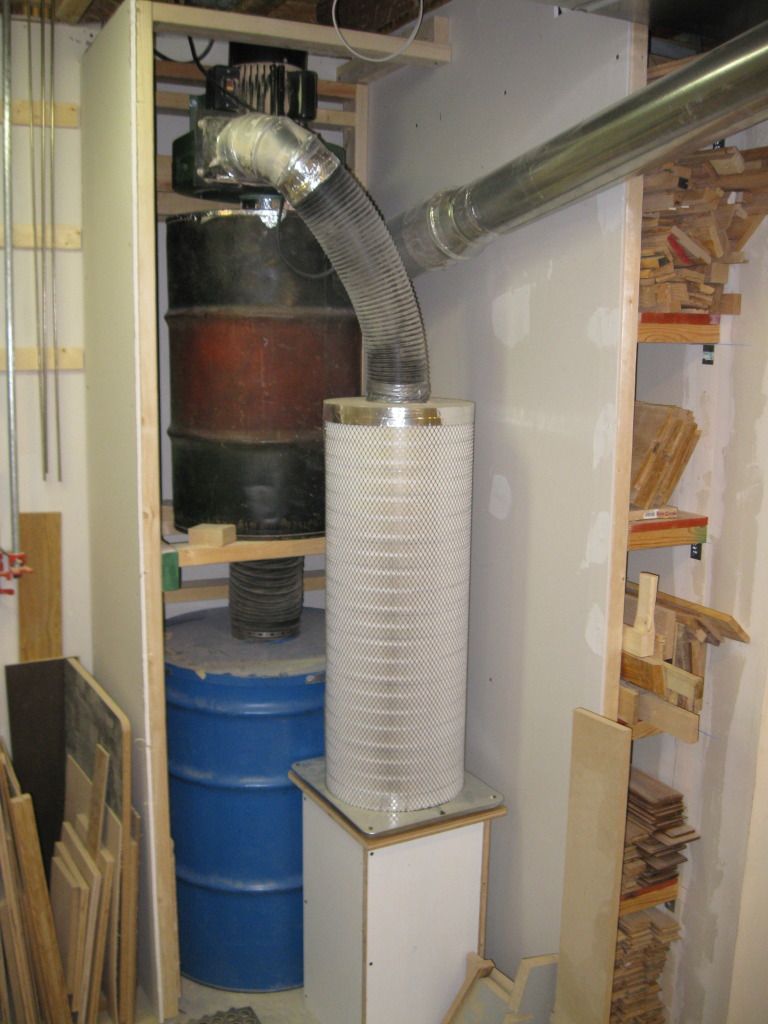
As long as you are aware of it, and it sounds like you are, then I think you will enjoy the unit. Can't beat the price either.
Now back to your regularly scheduled corvette stuff:
I made a hillbilly version of a cyclone with it, and believe it or not, it actually works really well. I have emptied the large barrel below many times (maybe 6 or 8 times since the filter was added) and there is almost nothing inside the filter. Nothing large, only a small amount of dust that made it through. Score one for bubba.
As long as you are aware of it, and it sounds like you are, then I think you will enjoy the unit. Can't beat the price either.
Now back to your regularly scheduled corvette stuff:
06-05-2012, 03:22 PM
#230
Drifting
Thread Starter
Member Since: Aug 2010
Location: Kanuckistan
Posts: 1,617
Received 127 Likes
on
68 Posts
2022 C3 of the Year Finalist - Modified
I hacked mine up too :-)
I made a hillbilly version of a cyclone with it, and believe it or not, it actually works really well. I have emptied the large barrel below many times (maybe 6 or 8 times since the filter was added) and there is almost nothing inside the filter. Nothing large, only a small amount of dust that made it through. Score one for bubba.
As long as you are aware of it, and it sounds like you are, then I think you will enjoy the unit. Can't beat the price either.
Now back to your regularly scheduled corvette stuff:
Found a bunch of MERV10 (1-3 micron) filter with enough transfert surface to match the blower CFM for a fraction of the Wynn filter price.
I just got to figure if going from MERV15 to MERV10 is worth the saving...
 06-06-2012, 01:43 PM
#232
Heel & Toe


Member Since: Mar 2012
Posts: 17
Likes: 0
Received 0 Likes
on
0 Posts
I'll be buying my dad's '76 from a friend of his. 45k mi, silver L82, t-tops. Been in a barn for about 10 years. So I'm going to have to do a good inspection of rust before I get it. Sat in dad's driveway for about 10 years also.
I'm not sure what I'm going to as far as restoration, but we'll see.
I'm not sure what I'm going to as far as restoration, but we'll see.
06-28-2012, 01:01 AM
#233
Drifting
Thread Starter
Member Since: Aug 2010
Location: Kanuckistan
Posts: 1,617
Received 127 Likes
on
68 Posts
2022 C3 of the Year Finalist - Modified
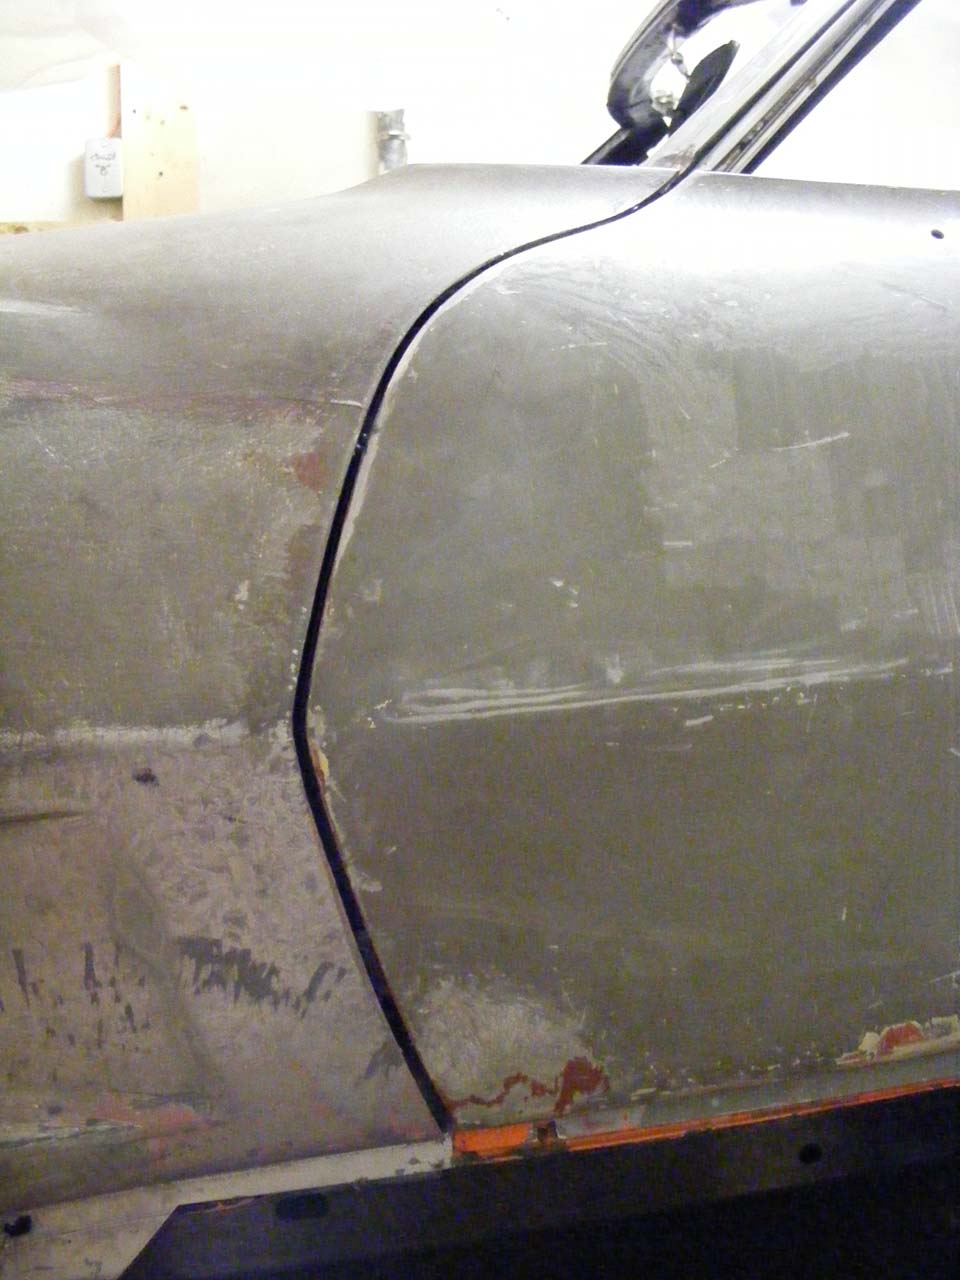
After all the whining I decided to act and show the door who's boss 
Jacked up the door with a piece of wood to distribute load (not on picture, bare with me it's a re-enactement), and hammered the corner of the metal frame of the door down approx. 1/4".

Then I reajusted the door higher, and here's the result.
The area that have been previously repaired is sticking out, an the frame behind looks bended, I'm gonna separate them, reajust the frame and then rebuild the skin area. Anyway the current repair is really crappy, dunno what resin they used, but the result is awfully brittle.
The bottom looks good too. The rear looks a little lower but it's because the bond cracked.
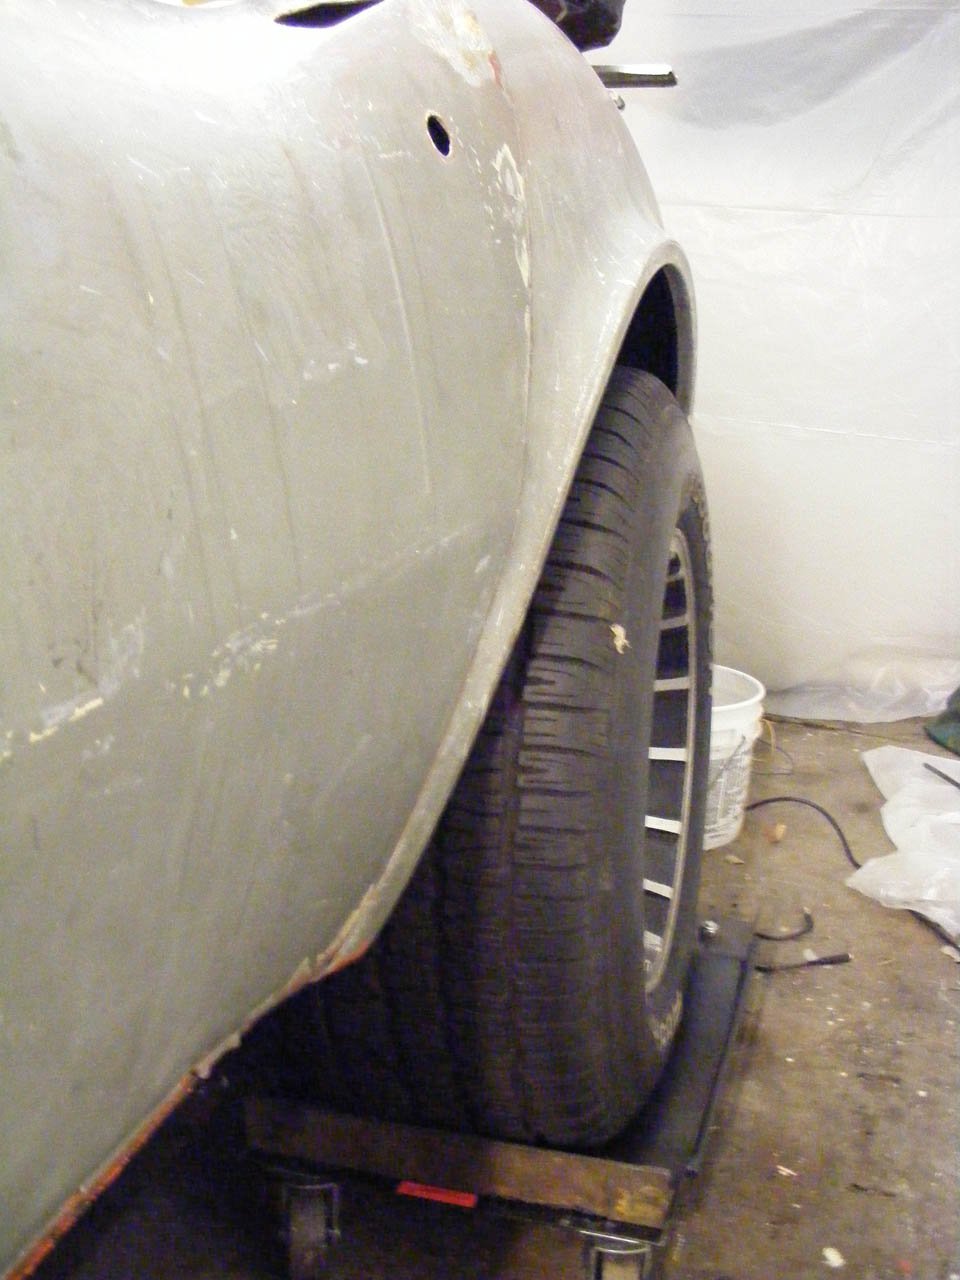
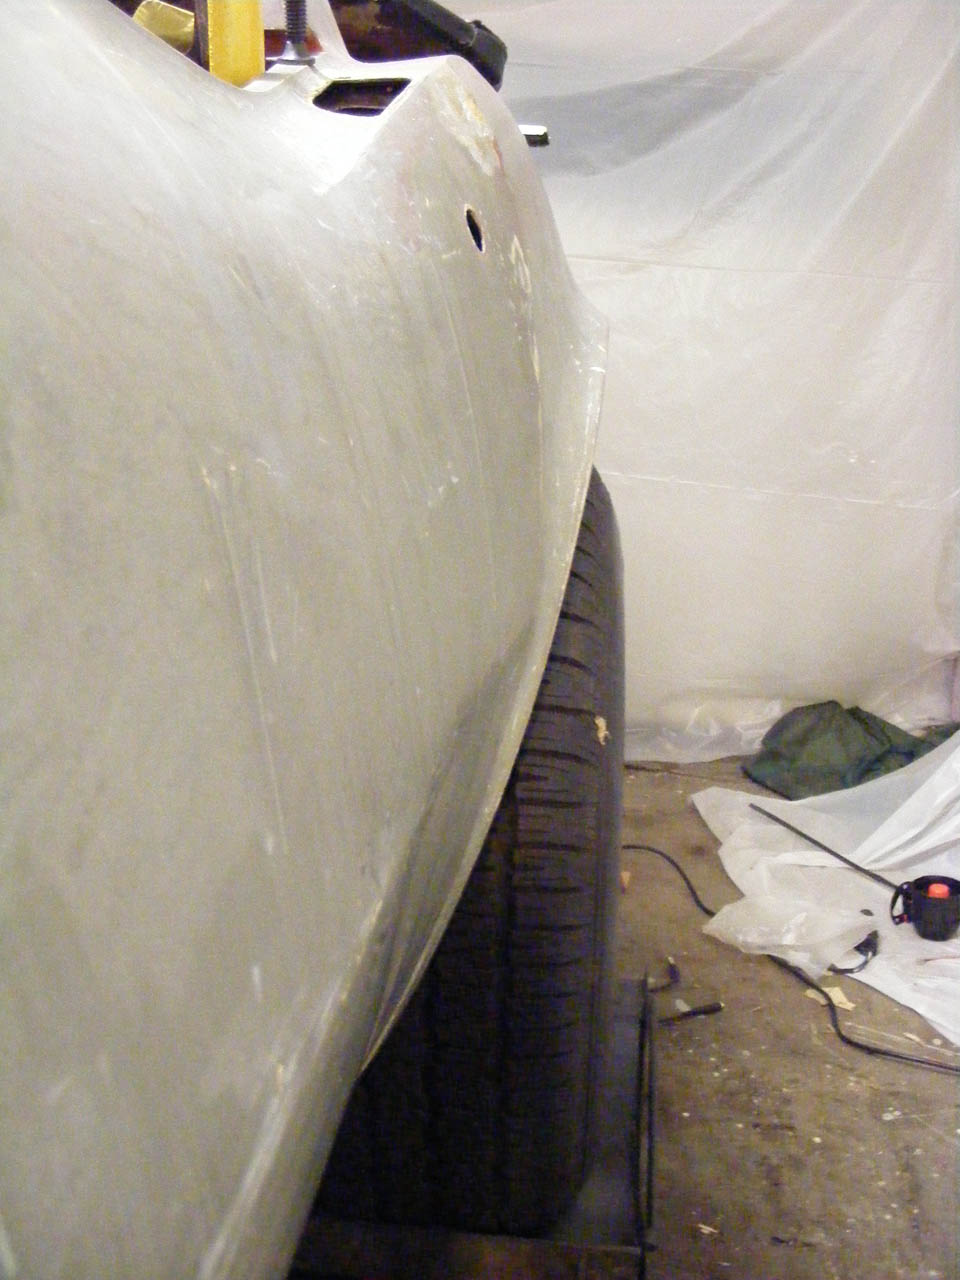
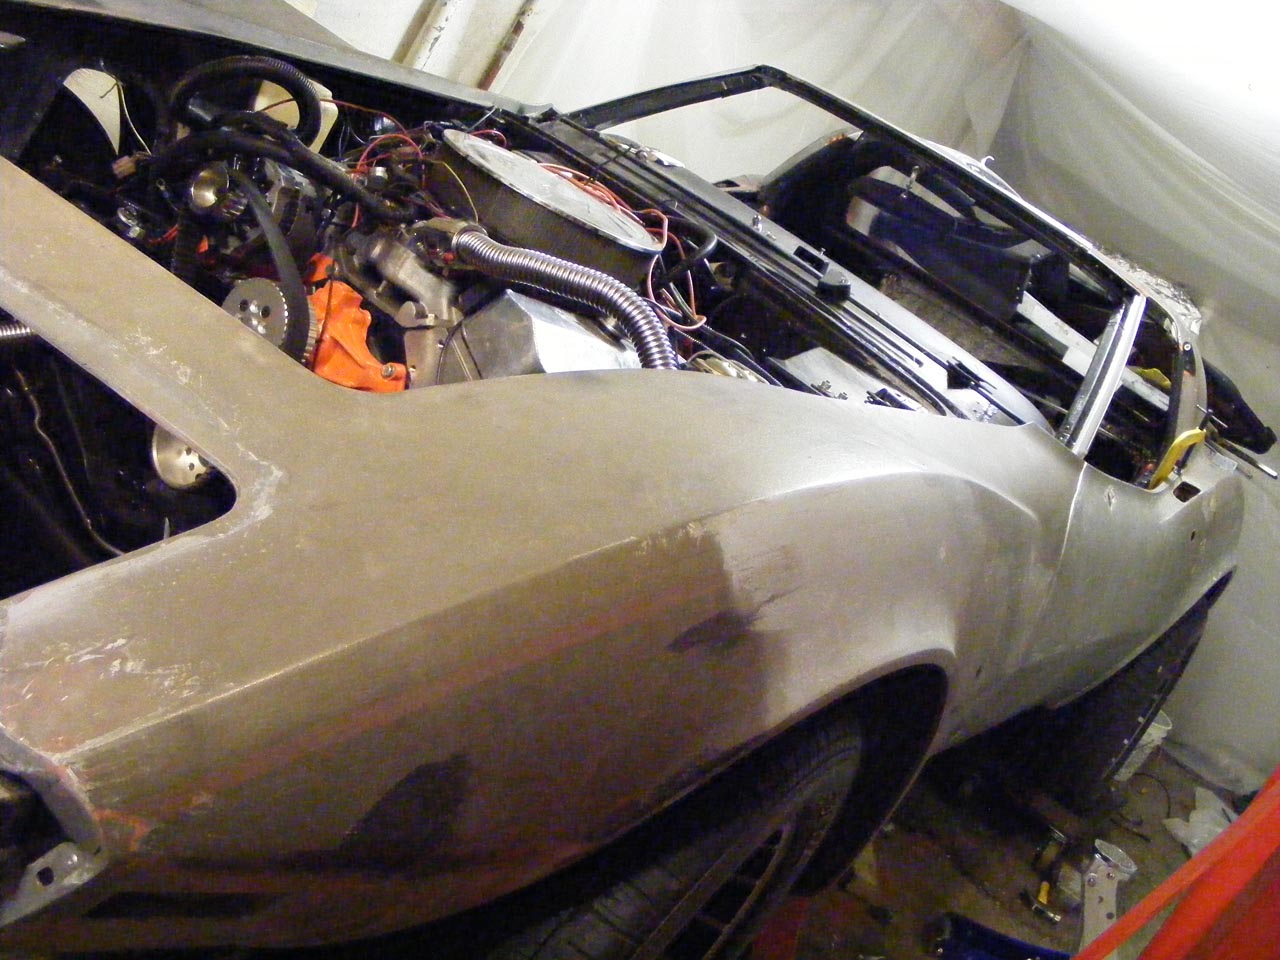
While I'm at it, here's the machined wheels installed without the spacers, good enouch for me.
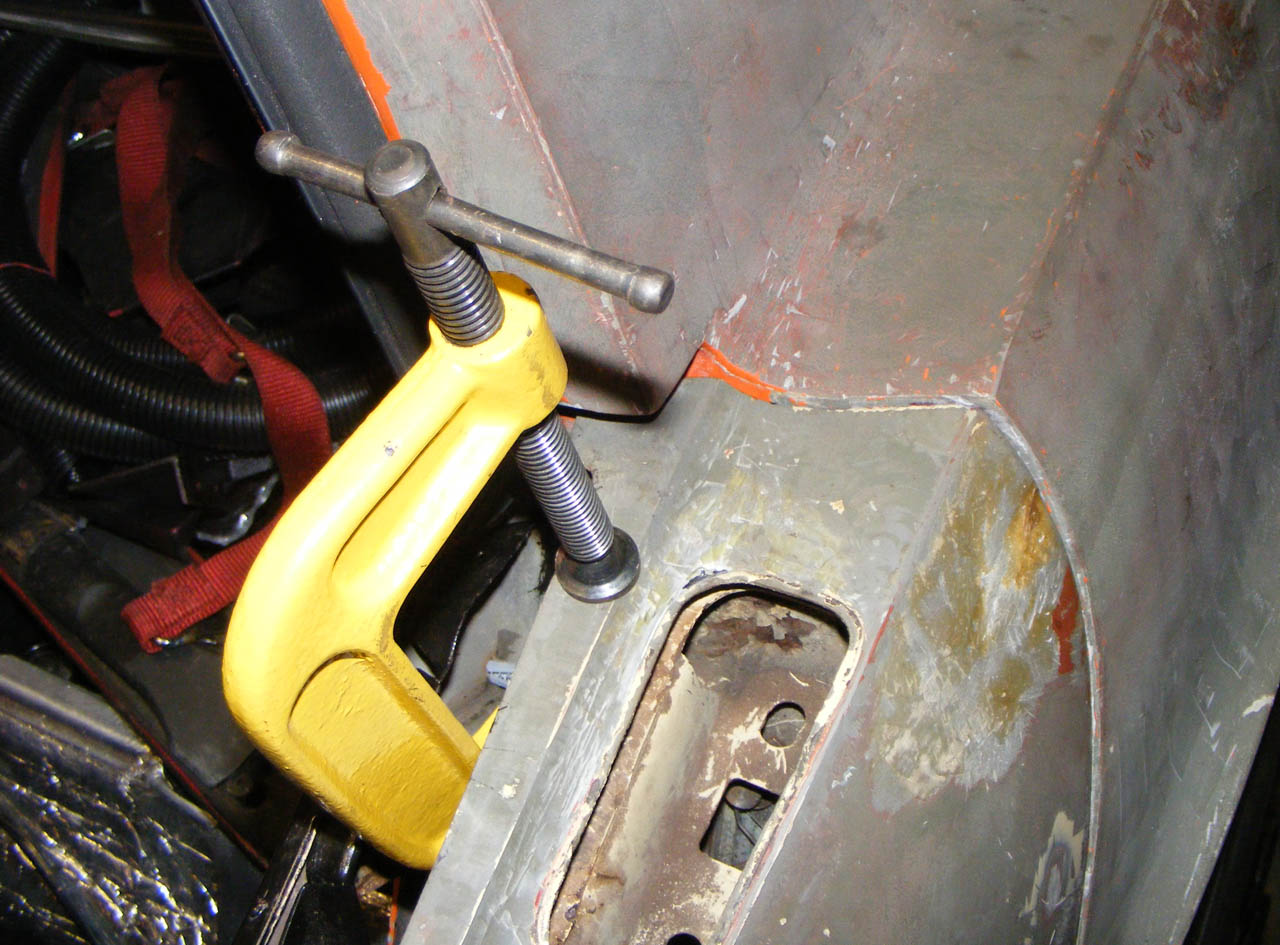
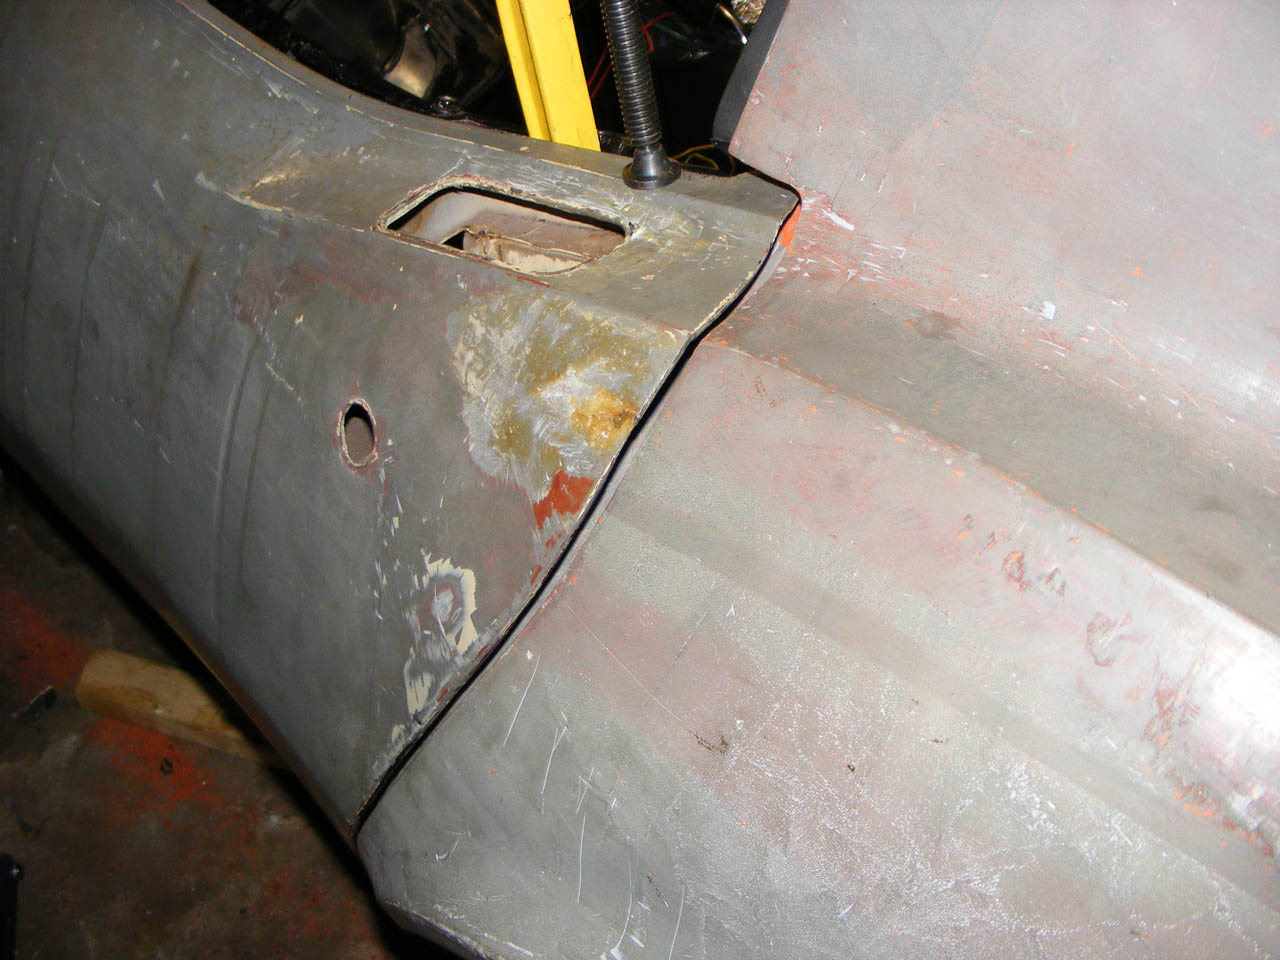
I also put the front clip on *again*, and decided it was time to remove the bumper assy that came with it. I've left it on so far to avoid any deformations, but now I'm nearing the final installation.
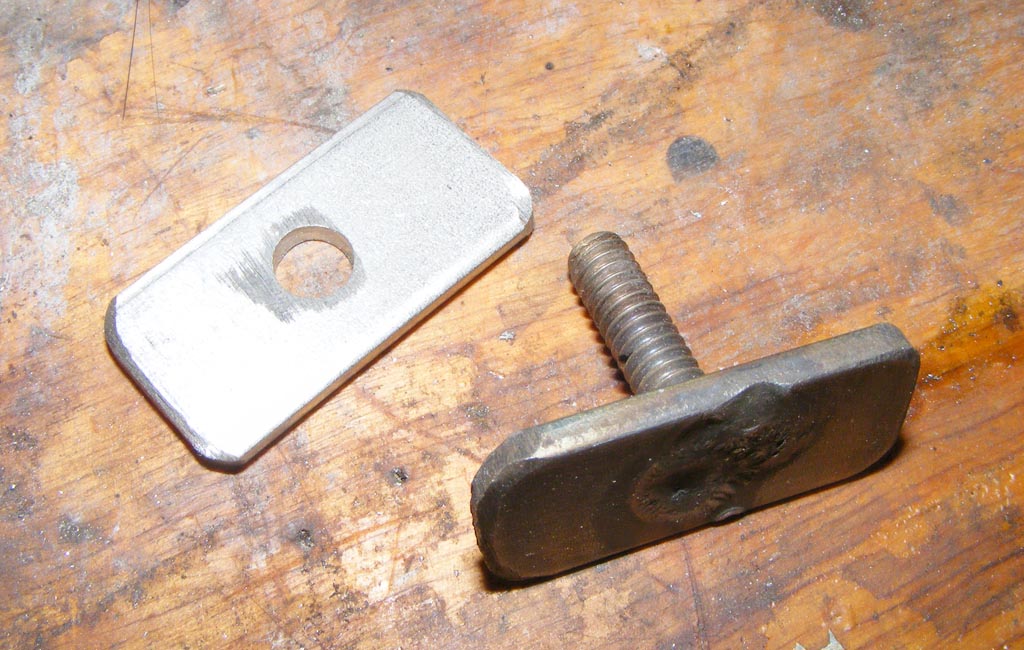
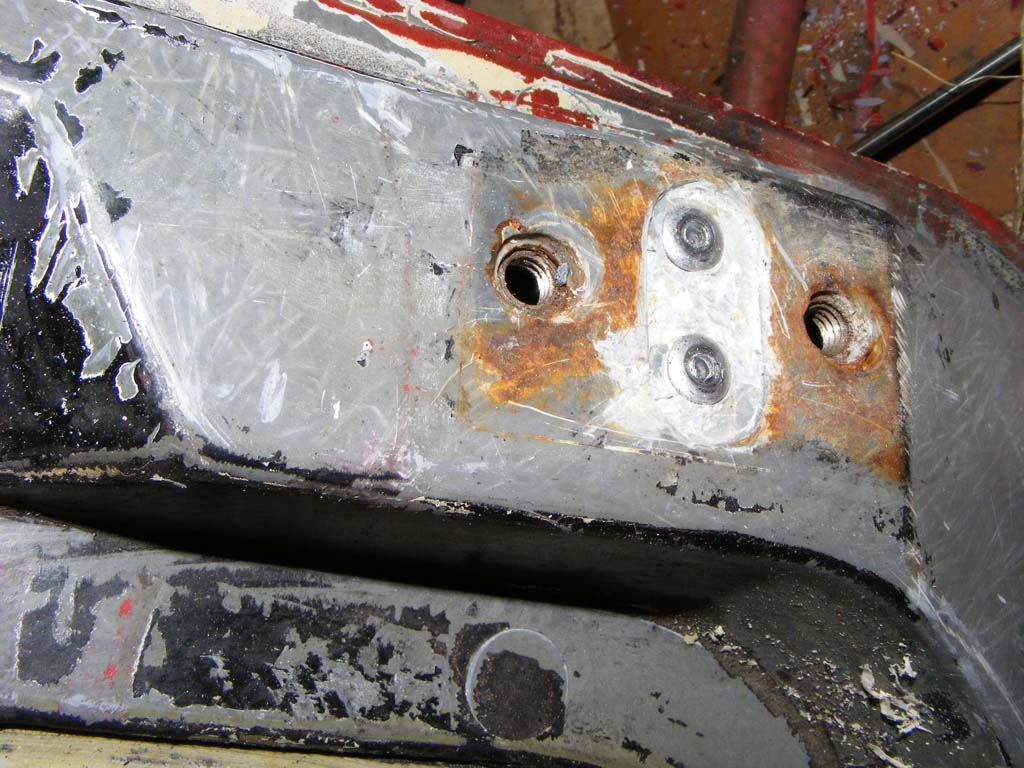
Turned out the driver fender bracket had rusted out
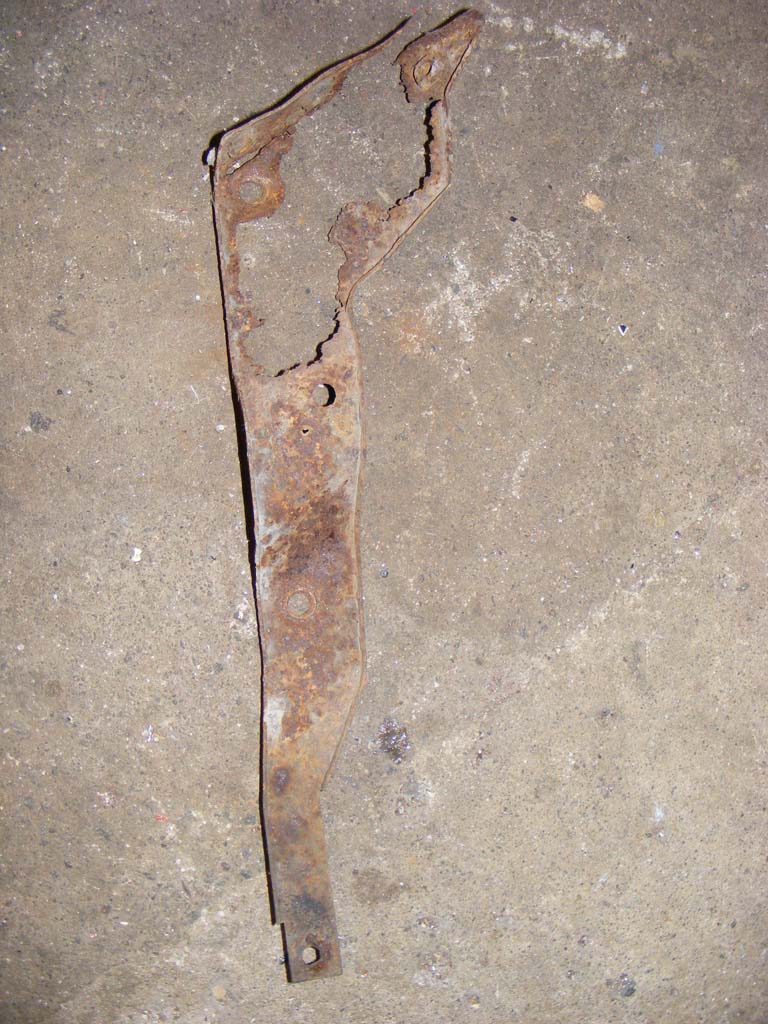
For those, if any, wondering the function of those bracket, here's the consequences :
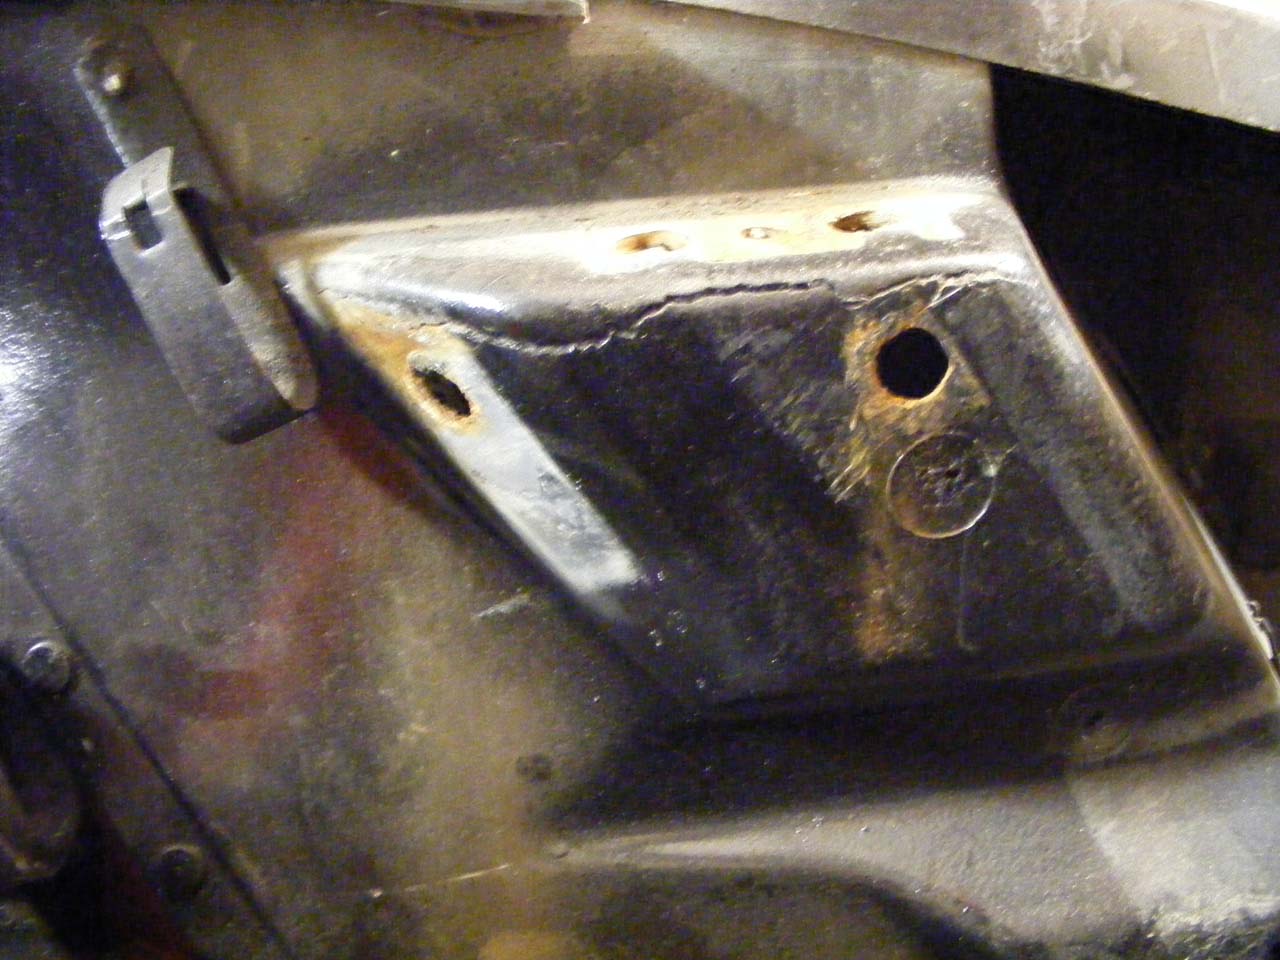
Important note: Ken's told me about the crack before selling it to me. I knew the crack, I just didn't know the reason.
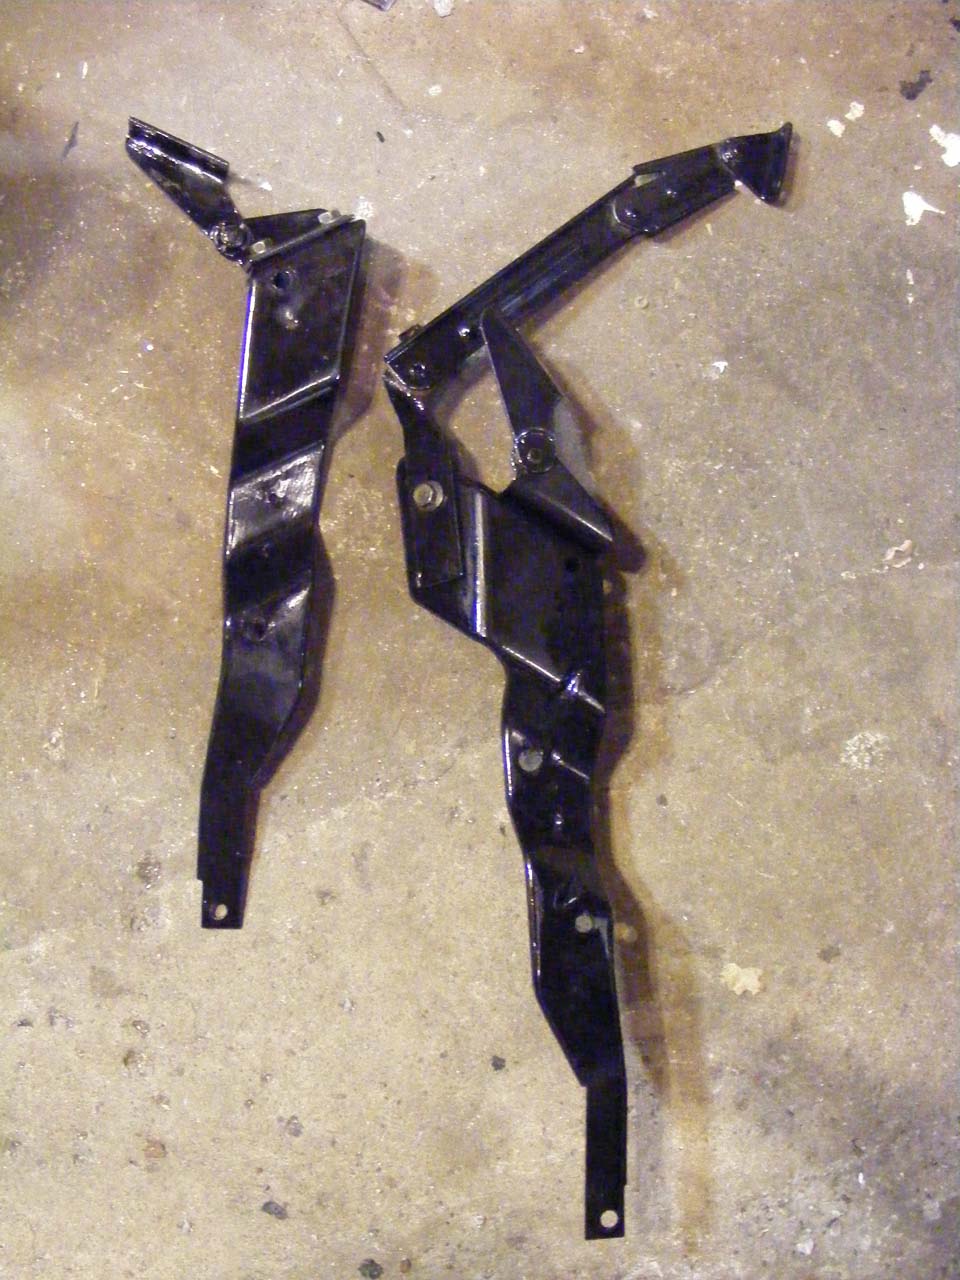
So bought a new bracket.
It was a NOS GM part, clean paint, still the GM sticker on.
Some would call blasphemy, but I stripped off the original paint only to discover light rust under !
Then the usual treatment.
I actually POR15ed the crap out of these parts.
mission codename "never again"
I could them proceed to install my own bumper assy on the frame
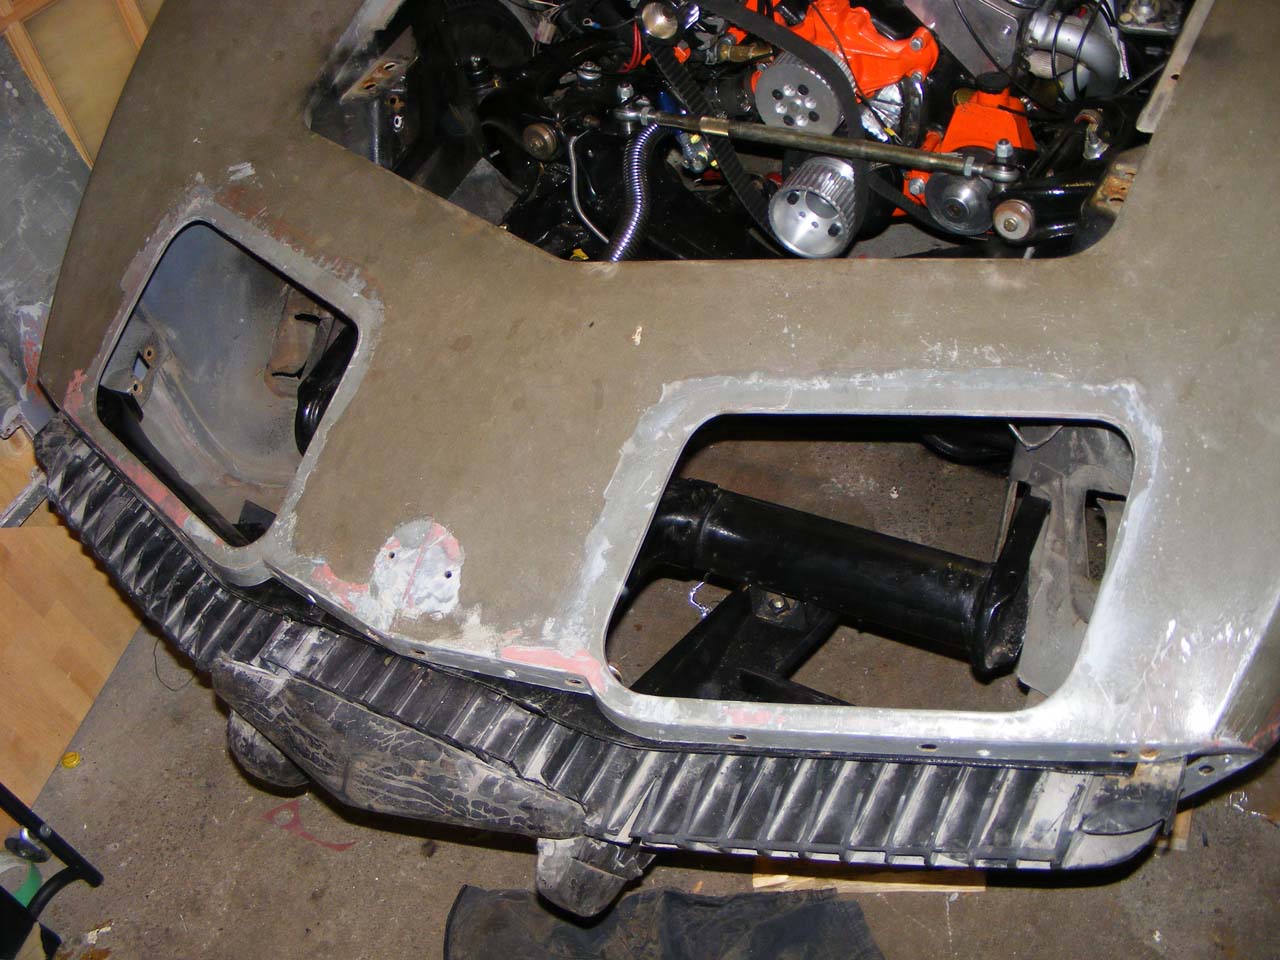
It felt weird, it's probably the very first part I restored.
Poor dude spent 2 years outside on a balcony.
It helps me support the front of the clip and start adjusting things.
So far, so good :
Took me a lot of trial to get the number of shim behind the hinges right.
Next step: fix the front clip crack then put the hood back on.
Jacked up the door with a piece of wood to distribute load (not on picture, bare with me it's a re-enactement), and hammered the corner of the metal frame of the door down approx. 1/4".
Then I reajusted the door higher, and here's the result.
The area that have been previously repaired is sticking out, an the frame behind looks bended, I'm gonna separate them, reajust the frame and then rebuild the skin area. Anyway the current repair is really crappy, dunno what resin they used, but the result is awfully brittle.
The bottom looks good too. The rear looks a little lower but it's because the bond cracked.
While I'm at it, here's the machined wheels installed without the spacers, good enouch for me.
I also put the front clip on *again*, and decided it was time to remove the bumper assy that came with it. I've left it on so far to avoid any deformations, but now I'm nearing the final installation.
Turned out the driver fender bracket had rusted out
For those, if any, wondering the function of those bracket, here's the consequences :
Important note: Ken's told me about the crack before selling it to me. I knew the crack, I just didn't know the reason.
So bought a new bracket.
It was a NOS GM part, clean paint, still the GM sticker on.
Some would call blasphemy, but I stripped off the original paint only to discover light rust under !
Then the usual treatment.
I actually POR15ed the crap out of these parts.
mission codename "never again"
I could them proceed to install my own bumper assy on the frame
It felt weird, it's probably the very first part I restored.
Poor dude spent 2 years outside on a balcony.
It helps me support the front of the clip and start adjusting things.
So far, so good :
Took me a lot of trial to get the number of shim behind the hinges right.
Next step: fix the front clip crack then put the hood back on.
Last edited by Denpo; 08-17-2017 at 08:55 PM.
06-28-2012, 10:13 AM
#234
Drifting
Denpo--
You are doing amazing work... That fender bracket was toast... Newly painted parts look fantastic... Guessing you are going to be bonding the front clip in the next week or so??? That will be a huge milestone...
Rogman
You are doing amazing work... That fender bracket was toast... Newly painted parts look fantastic... Guessing you are going to be bonding the front clip in the next week or so??? That will be a huge milestone...
Rogman
06-28-2012, 02:24 PM
#235
Drifting
Thread Starter
Member Since: Aug 2010
Location: Kanuckistan
Posts: 1,617
Received 127 Likes
on
68 Posts
2022 C3 of the Year Finalist - Modified
Front clip installed next week?
Maybe, but I'm taking all my time, bonding the front is not the thing you want to undo.
You betcha it's a milestone....
 07-09-2012, 03:18 AM
#236
Drifting
Thread Starter
Member Since: Aug 2010
Location: Kanuckistan
Posts: 1,617
Received 127 Likes
on
68 Posts
2022 C3 of the Year Finalist - Modified
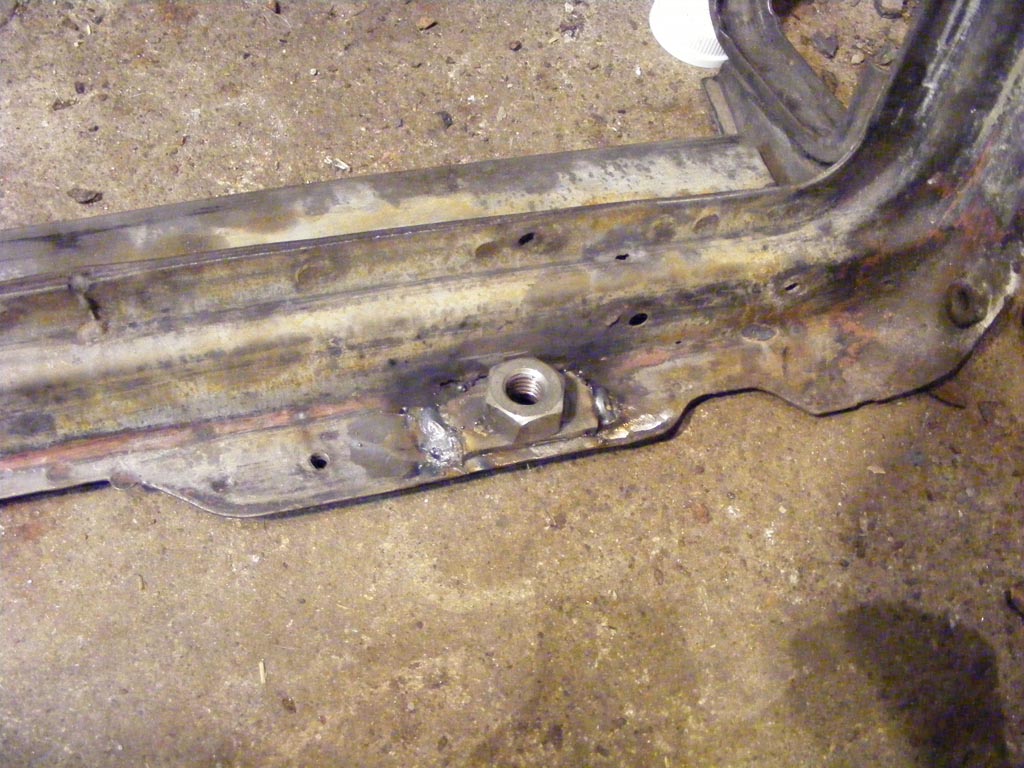
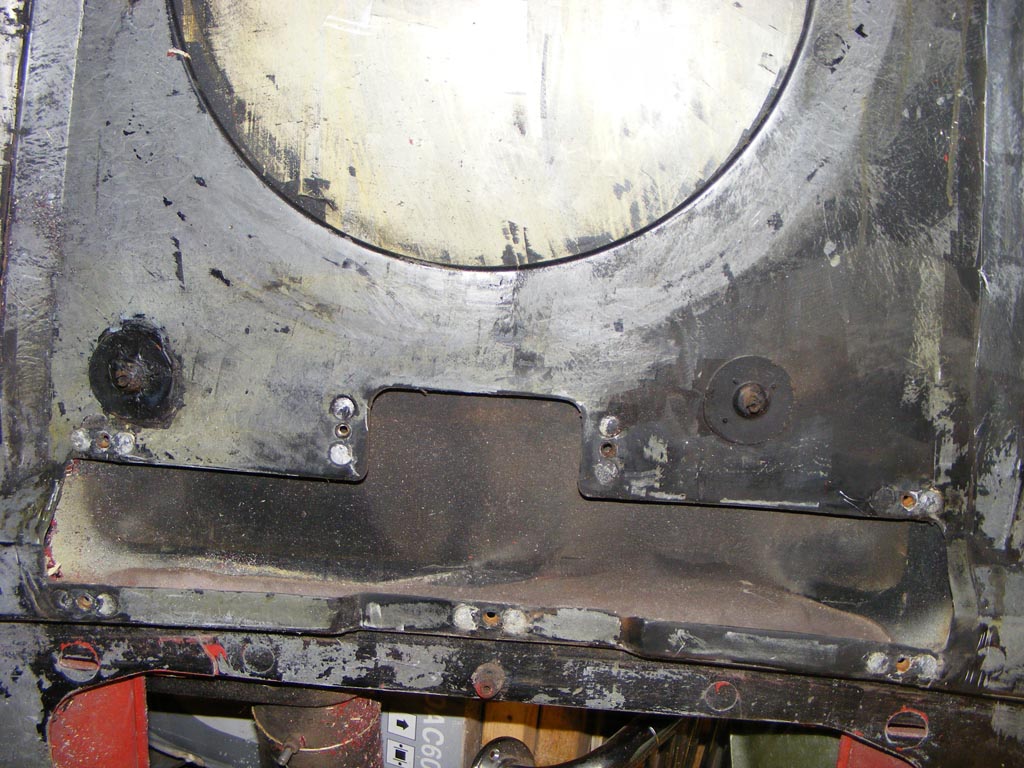
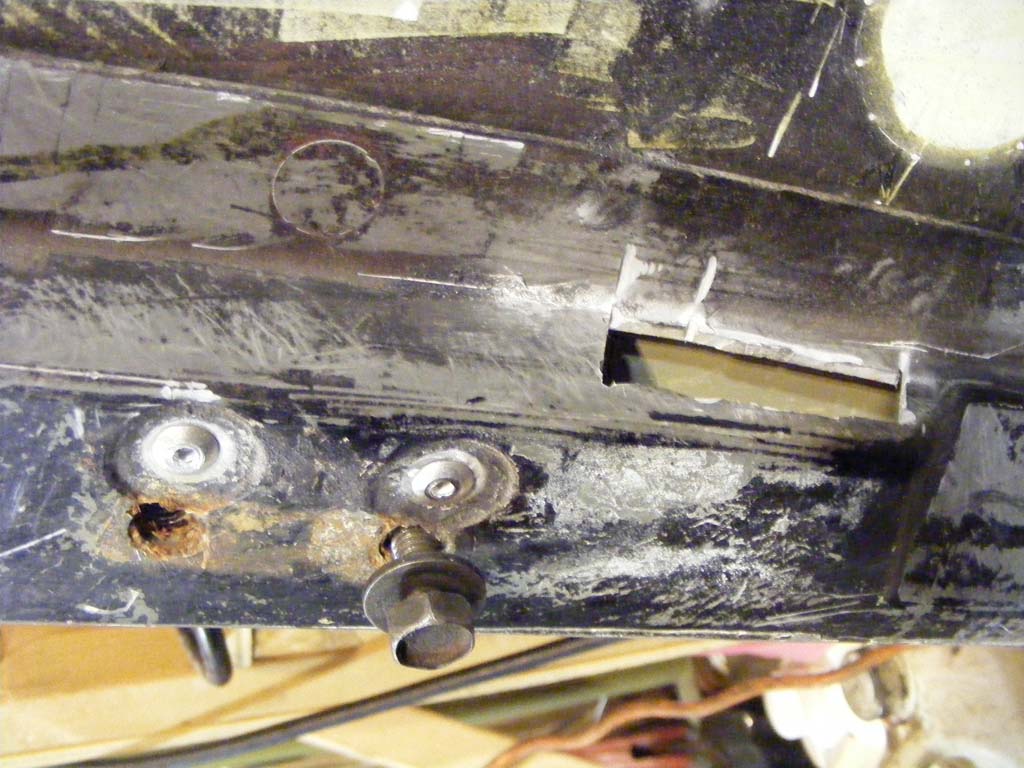
This week I took care of my radiator support.
Cut the rotten bottom, and weld in some thick replacement.
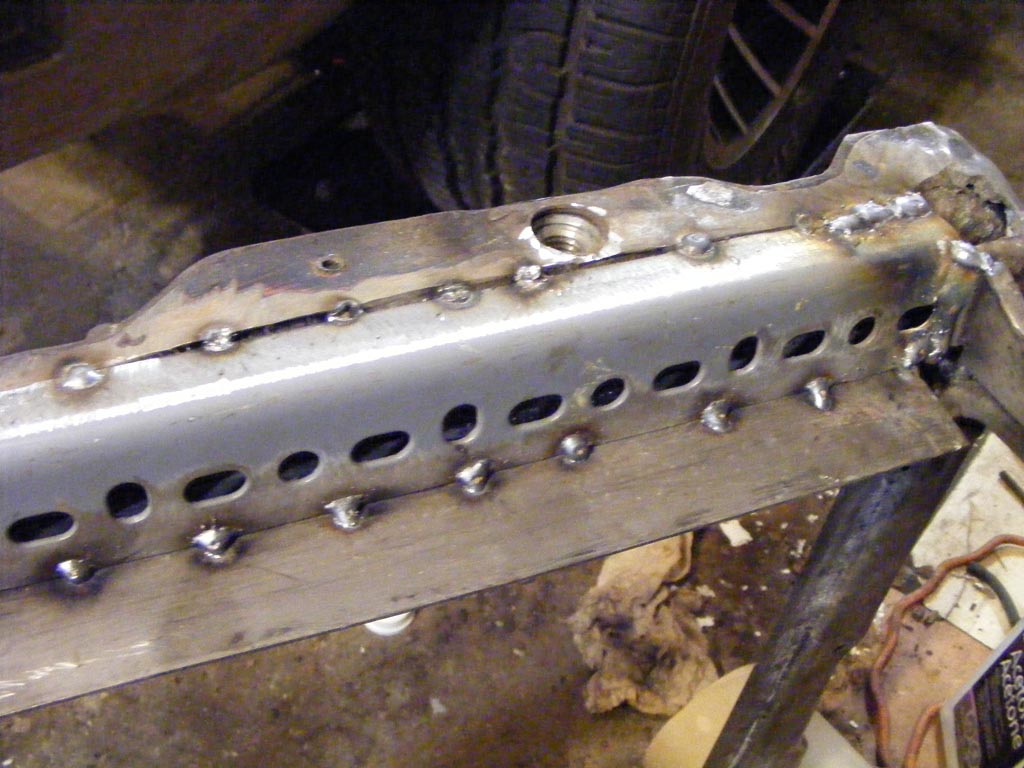
I had those broken bolts at the bottom... fixed
With a piece of sponge tied to some wire I could POR15 the inside of the frame.
Here is the beast back in place for the test fit.
Now, in the logical following, I tried to put my hood back on the front clip, and so started to have a closer look at it and start removing all this bondo at the edge...
Well, I should have guessed it.
It also have been broken, and again fixed with this brittle low quality resin. all the fiberglass patched looked like dry straw.
So I decided to throw the towel on this, I'm not gonna try to repair a broken hood, its shape is too critical to the car aesthetic.
Contacted a corvette local hoarder (in the good sense of the term) and found a hood in perfect shape for 150$. It had a functional hood cowl flap :
My previous hood didn't have those. So far I'm thinking about keeping it and putting a switch in the dash to control it. Probably the only possible reason for closing the door would be heavy rain.
Here's the flap mechanism after a little cleaning/derust/repaint.
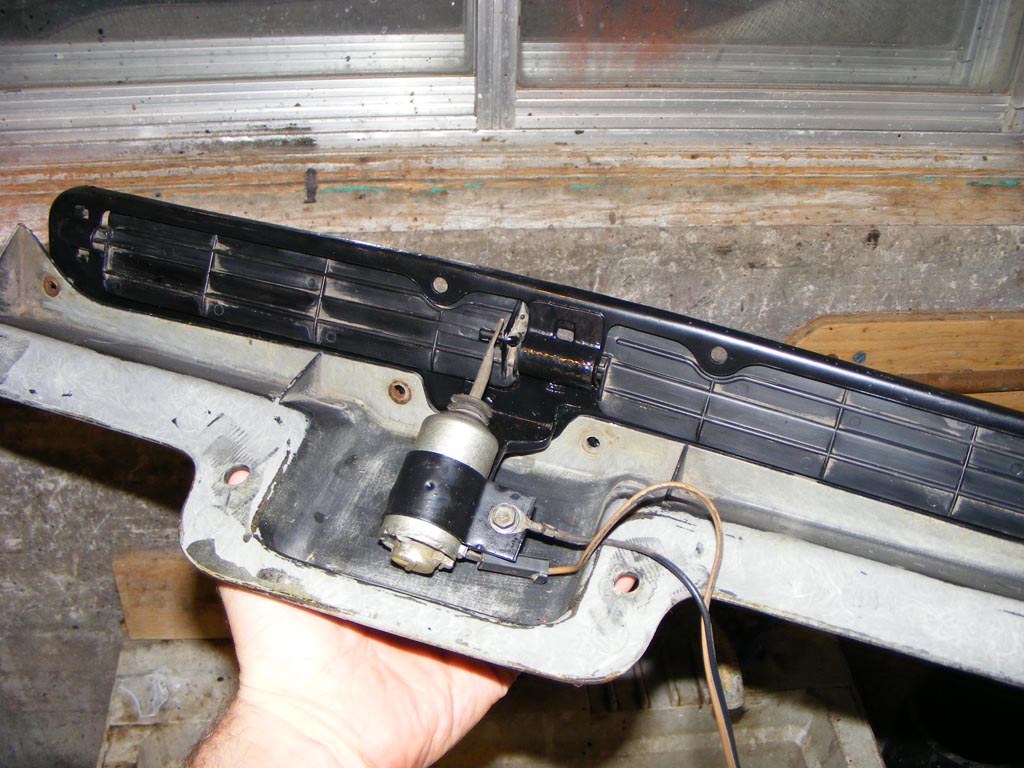
Little cleaning on the hood latches
Next step is to redo the hood metal insert for the hinges, without unbounding the hood frame... gotta make some holes...
Cut the rotten bottom, and weld in some thick replacement.
I had those broken bolts at the bottom... fixed
With a piece of sponge tied to some wire I could POR15 the inside of the frame.
Here is the beast back in place for the test fit.
Now, in the logical following, I tried to put my hood back on the front clip, and so started to have a closer look at it and start removing all this bondo at the edge...
Well, I should have guessed it.
It also have been broken, and again fixed with this brittle low quality resin. all the fiberglass patched looked like dry straw.
So I decided to throw the towel on this, I'm not gonna try to repair a broken hood, its shape is too critical to the car aesthetic.
Contacted a corvette local hoarder (in the good sense of the term) and found a hood in perfect shape for 150$. It had a functional hood cowl flap :
My previous hood didn't have those. So far I'm thinking about keeping it and putting a switch in the dash to control it. Probably the only possible reason for closing the door would be heavy rain.
Here's the flap mechanism after a little cleaning/derust/repaint.
Little cleaning on the hood latches
Next step is to redo the hood metal insert for the hinges, without unbounding the hood frame... gotta make some holes...
Last edited by Denpo; 08-17-2017 at 08:59 PM.
07-11-2012, 06:44 PM
#237
Drifting
Thread Starter
Member Since: Aug 2010
Location: Kanuckistan
Posts: 1,617
Received 127 Likes
on
68 Posts
2022 C3 of the Year Finalist - Modified
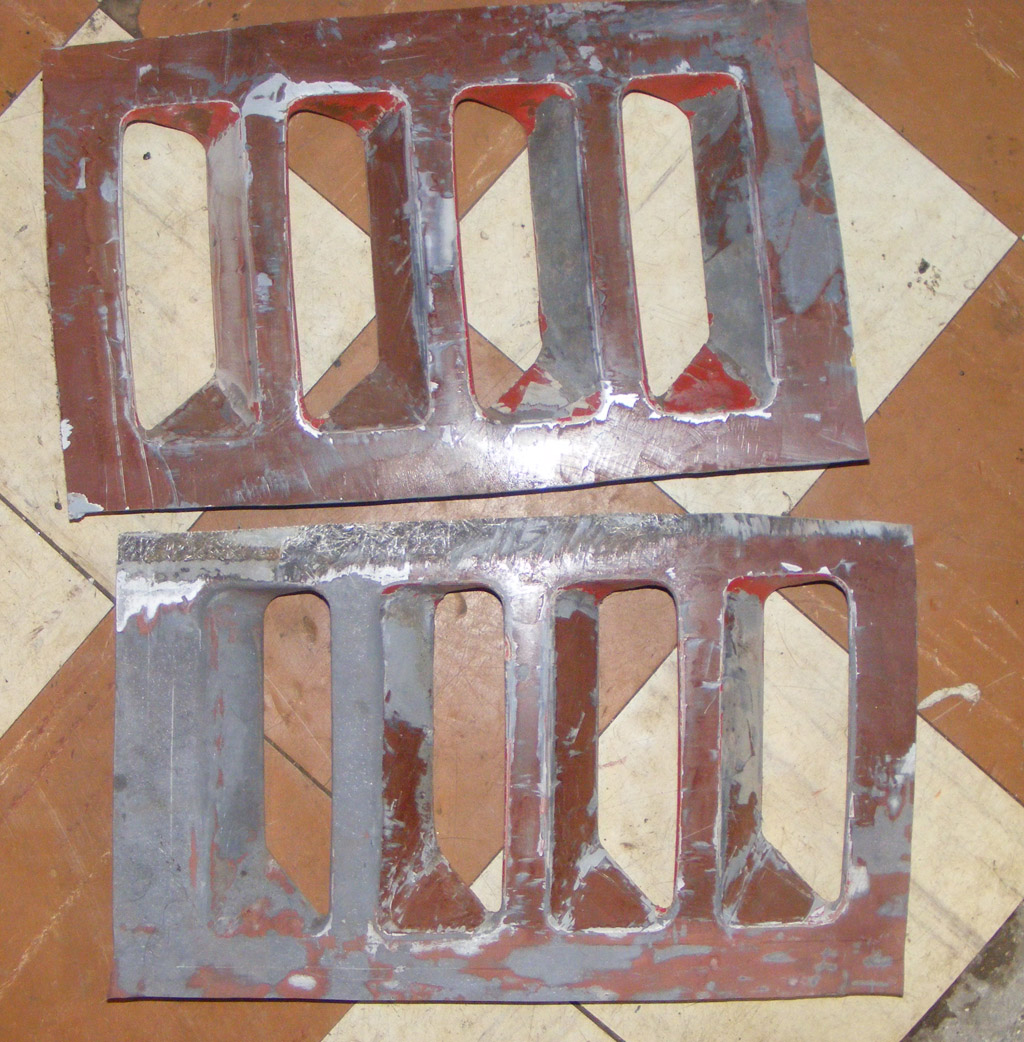
Ok, so the hood support plate where shoot, I decided to redo them in SS, no less
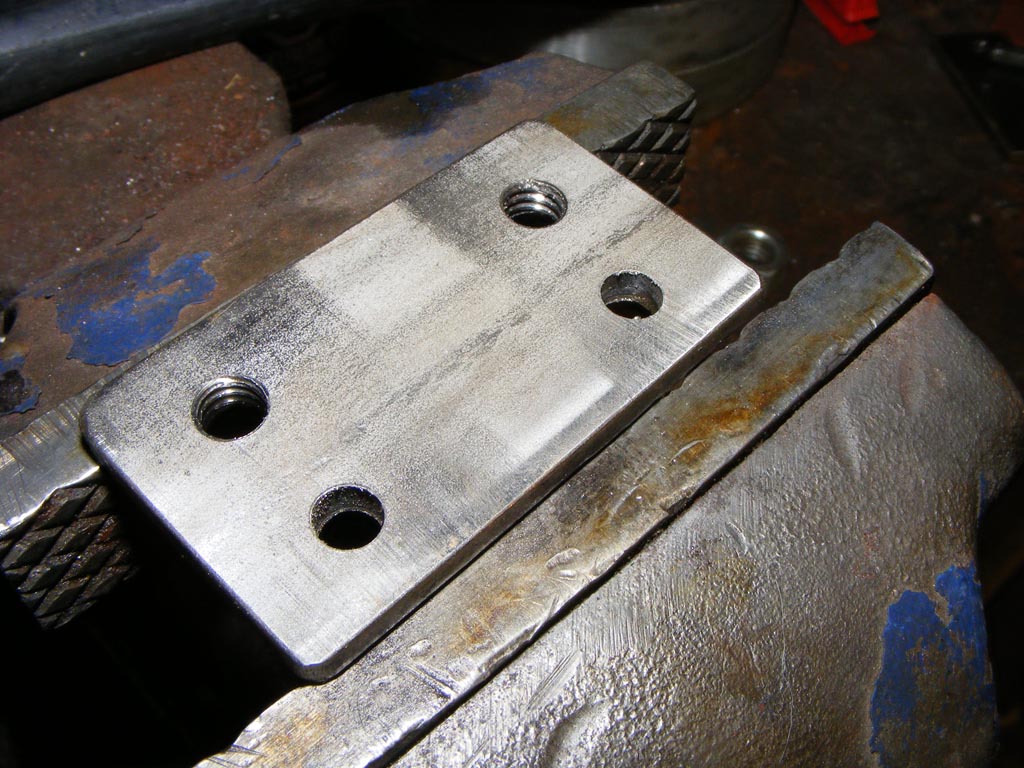
This was my first foray into making SS part, boy it's another world, special drill bit, special tap, and the thing is hard as hell.
I made a hole in the front to retreive et reinsert the plates
Or course I had to use pop rivets to put the new plate back in, my car probably already has a negative NCRS score anyway.

The hood support plate required its own hole
I don't think the holes really affects the structural strength of the hood, so I'm gonna leave them for now. Just like the inner fender crack, I'll take care of this when the car enters the bodywork/fiberglassing stage, the garage is not setup for this yet.
Now time to install the hood and make final front clip adjustments.
This was my first foray into making SS part, boy it's another world, special drill bit, special tap, and the thing is hard as hell.
I made a hole in the front to retreive et reinsert the plates
Or course I had to use pop rivets to put the new plate back in, my car probably already has a negative NCRS score anyway.
The hood support plate required its own hole
I don't think the holes really affects the structural strength of the hood, so I'm gonna leave them for now. Just like the inner fender crack, I'll take care of this when the car enters the bodywork/fiberglassing stage, the garage is not setup for this yet.
Now time to install the hood and make final front clip adjustments.
Last edited by Denpo; 08-17-2017 at 09:03 PM.
07-18-2012, 09:51 PM
#238
Drifting
Thread Starter
Member Since: Aug 2010
Location: Kanuckistan
Posts: 1,617
Received 127 Likes
on
68 Posts
2022 C3 of the Year Finalist - Modified
Here's what you do when you only got a couple of hours :
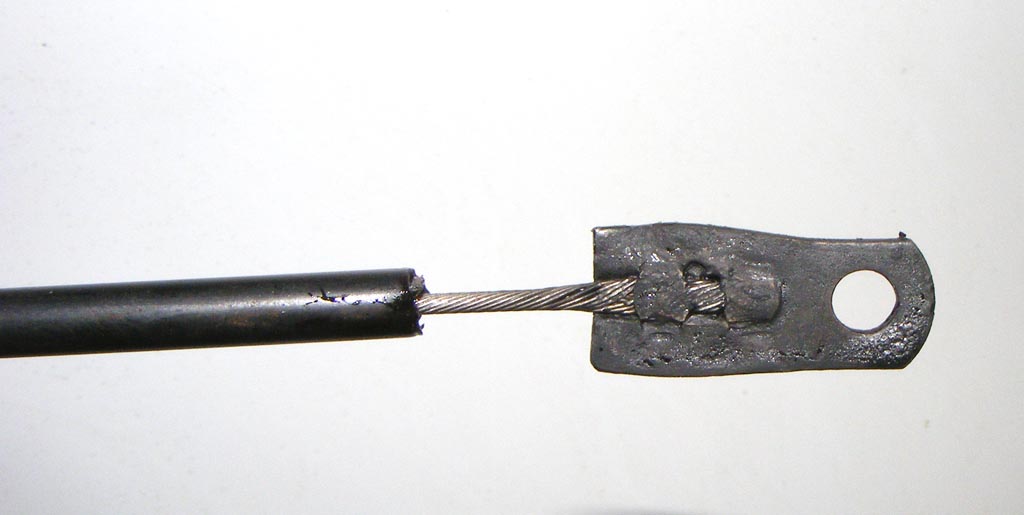
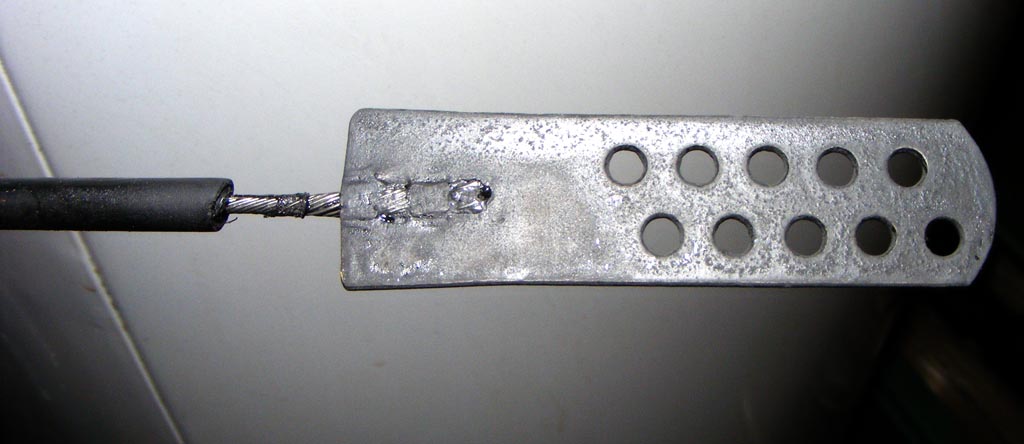
I Salvaged the original plates, SS cable and teflon lined sheath are from the local by store.
I heated the plates to avoid breaking the small notches, but I pressed the new cable in hard while too hot, they got wider. lol.
When a rusted cable break, you're in trouble, I just bought myself more peace of mind.
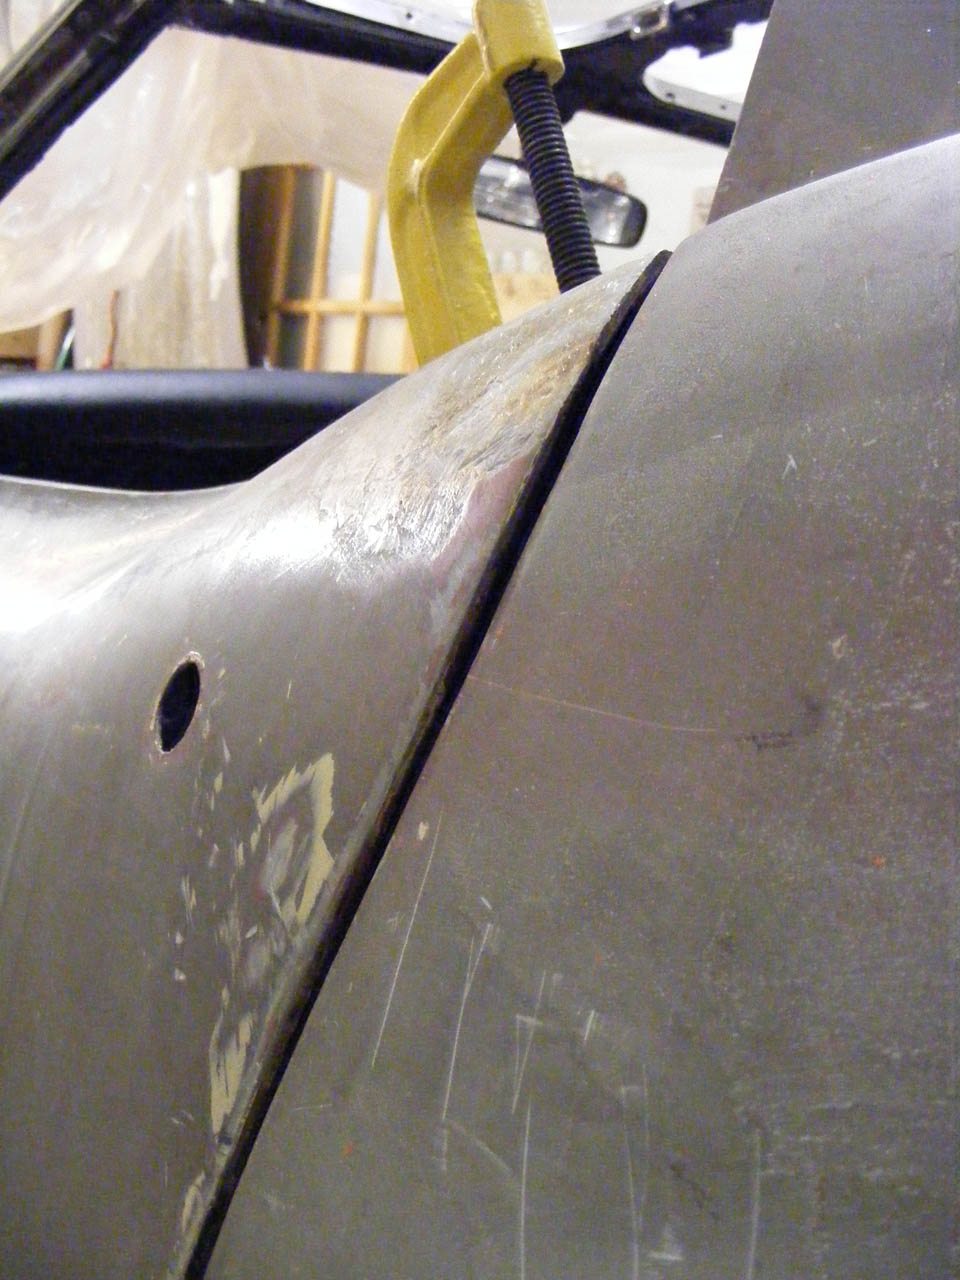
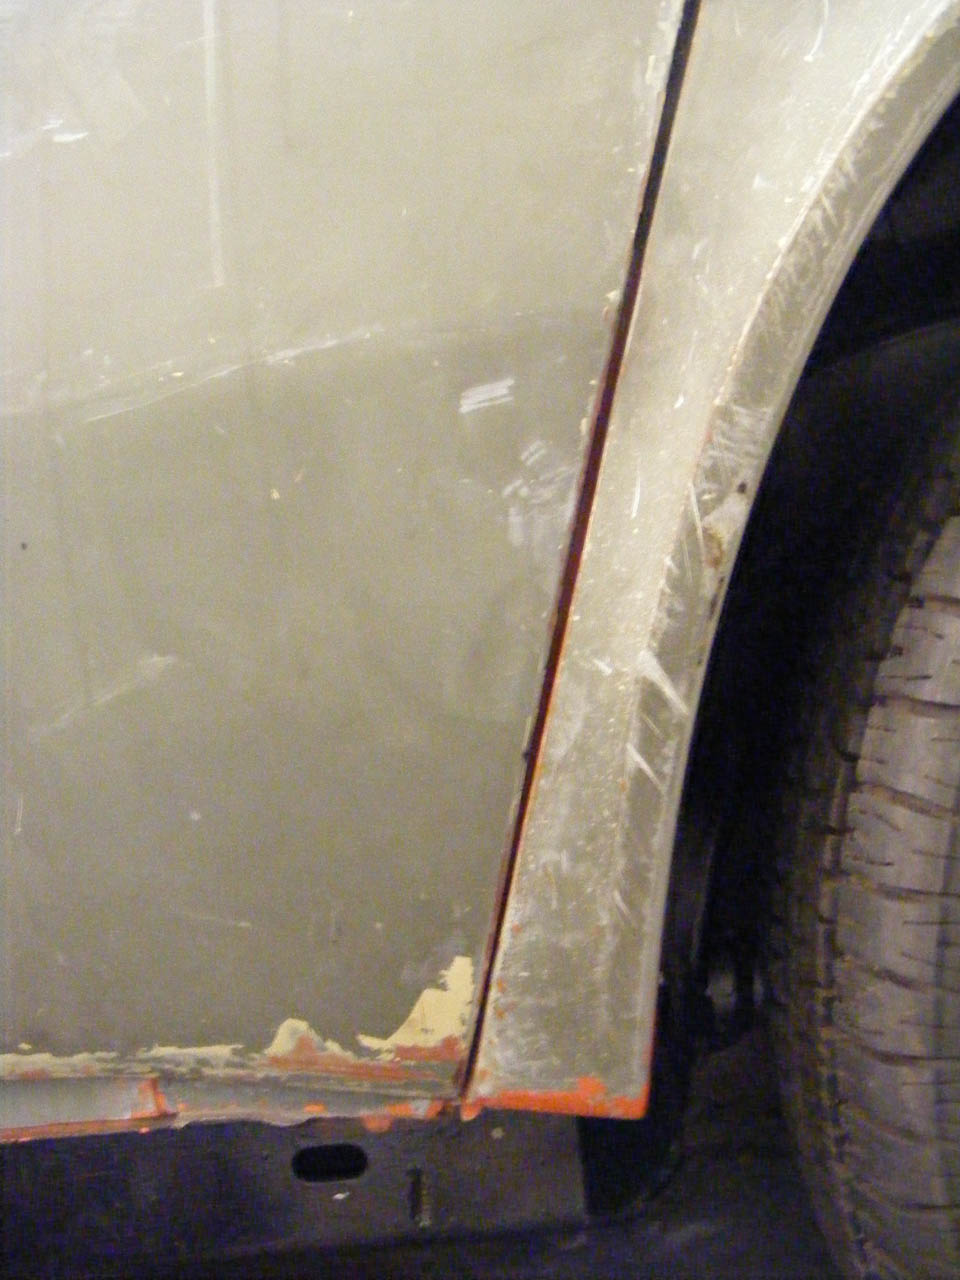
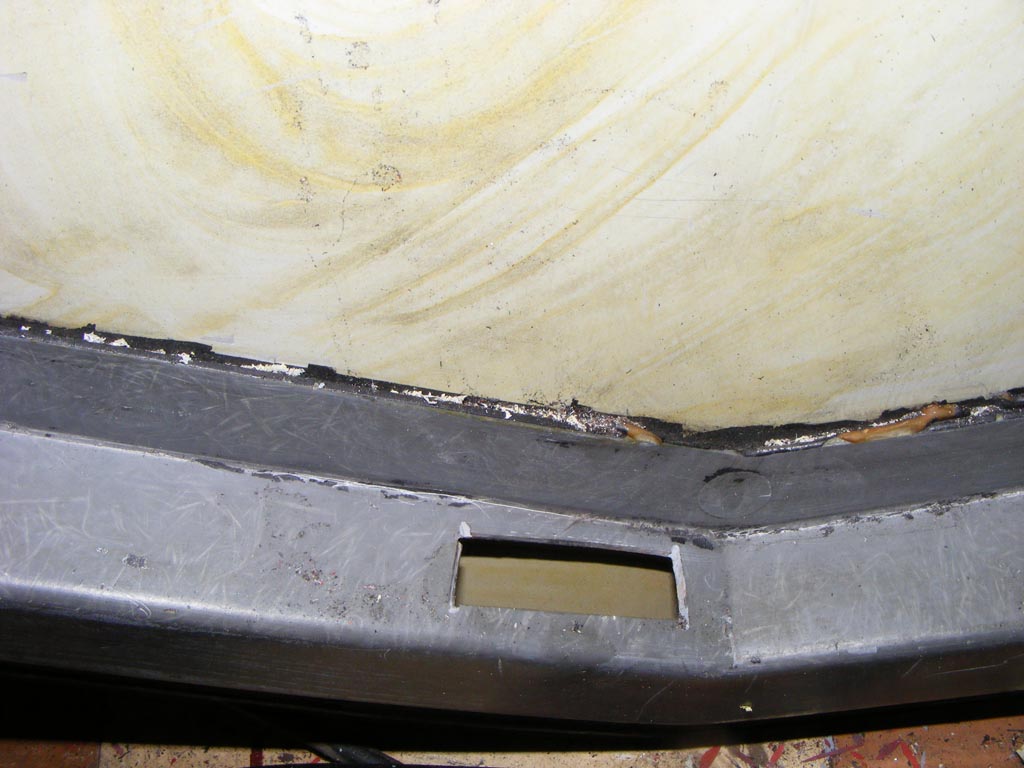
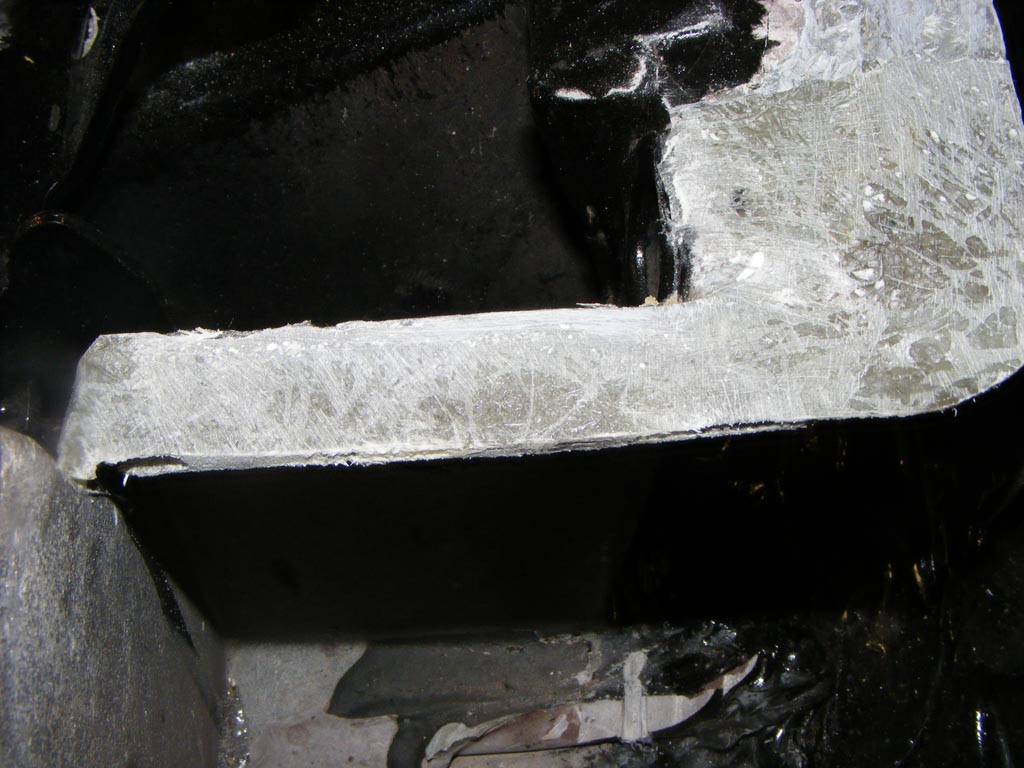
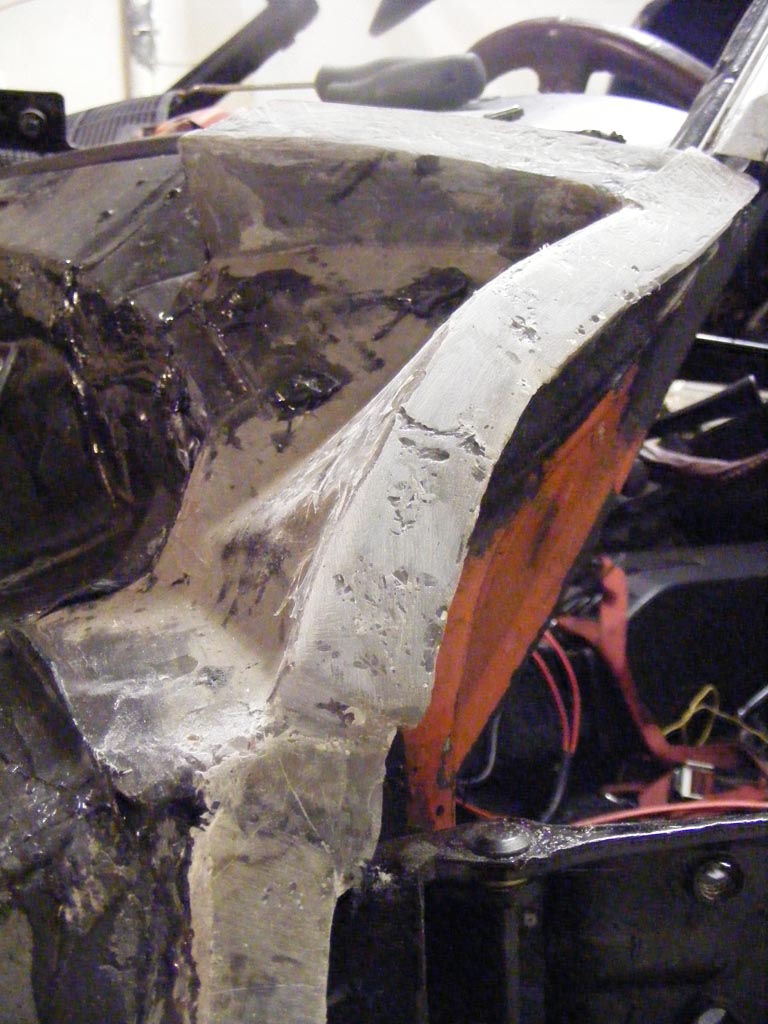
I've removed the front clip again because something was worrying me : the contact surfaces.
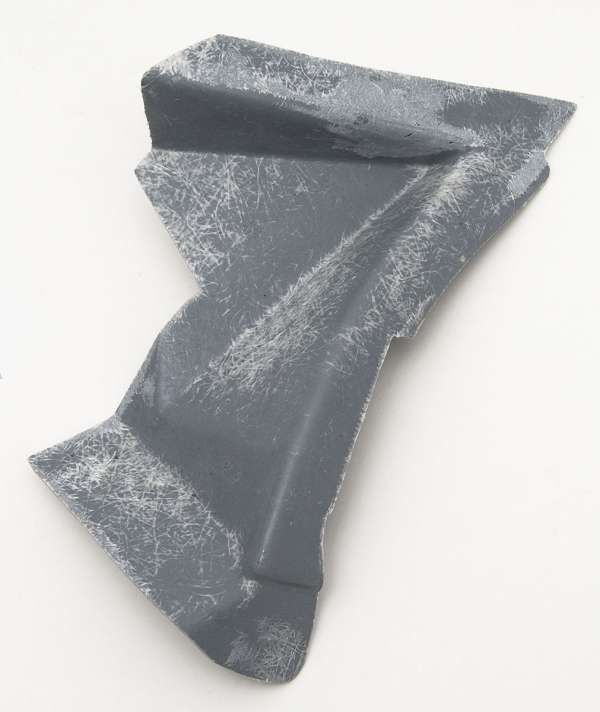
Most of them are good, thickness from 0.08" to 0.14". Like this area:

But near the door front edge, that's another story:
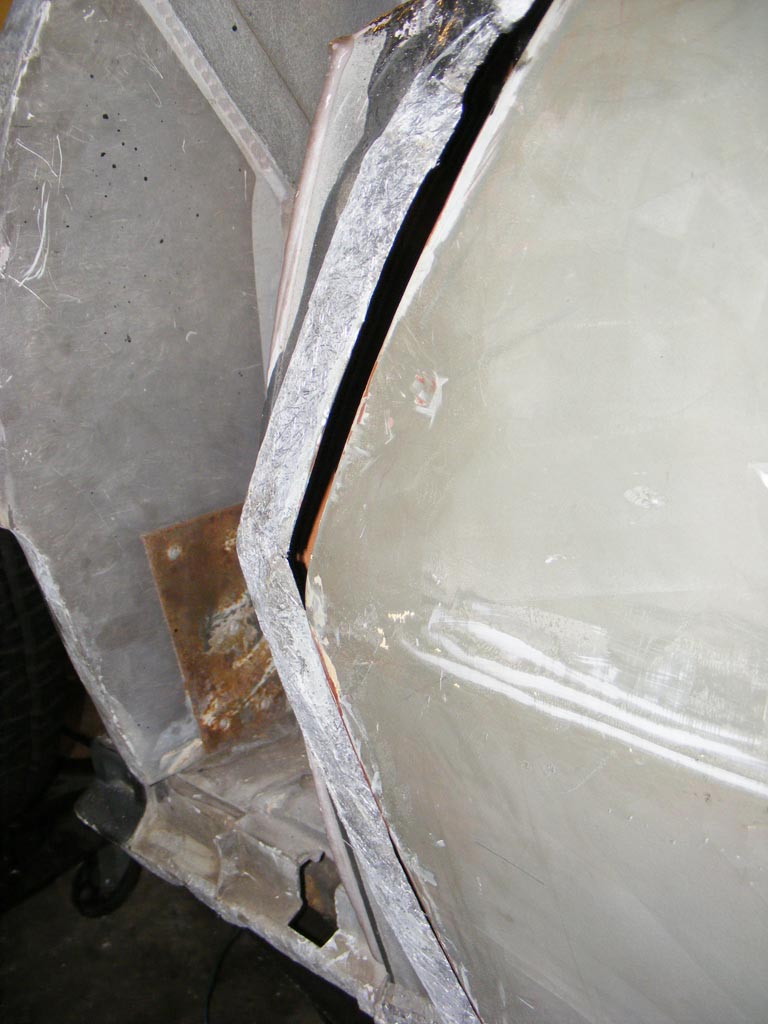
, I got 0.05" and it thins out to nothing toward the edge. I'm gonna reinforce it before moving on.
I Salvaged the original plates, SS cable and teflon lined sheath are from the local by store.
I heated the plates to avoid breaking the small notches, but I pressed the new cable in hard while too hot, they got wider. lol.
When a rusted cable break, you're in trouble, I just bought myself more peace of mind.
I've removed the front clip again because something was worrying me : the contact surfaces.
Most of them are good, thickness from 0.08" to 0.14". Like this area:
But near the door front edge, that's another story:
, I got 0.05" and it thins out to nothing toward the edge. I'm gonna reinforce it before moving on.
Last edited by Denpo; 08-17-2017 at 09:05 PM. Reason: typo
07-22-2012, 08:43 PM
#239
Drifting
Thread Starter
Member Since: Aug 2010
Location: Kanuckistan
Posts: 1,617
Received 127 Likes
on
68 Posts
2022 C3 of the Year Finalist - Modified
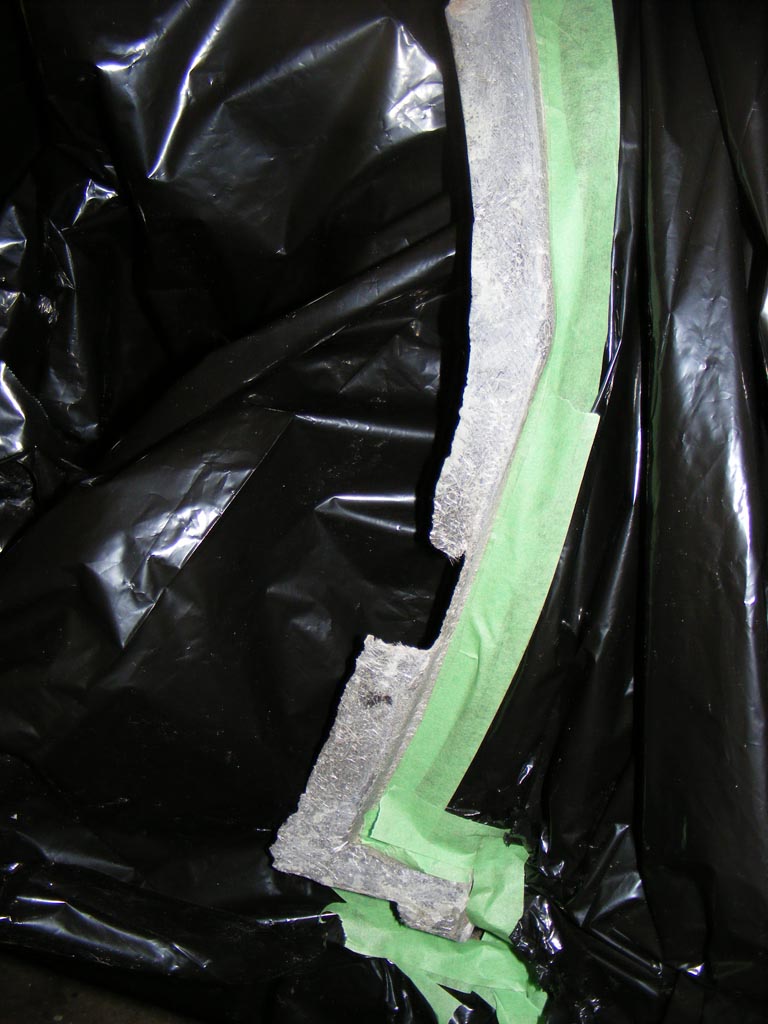
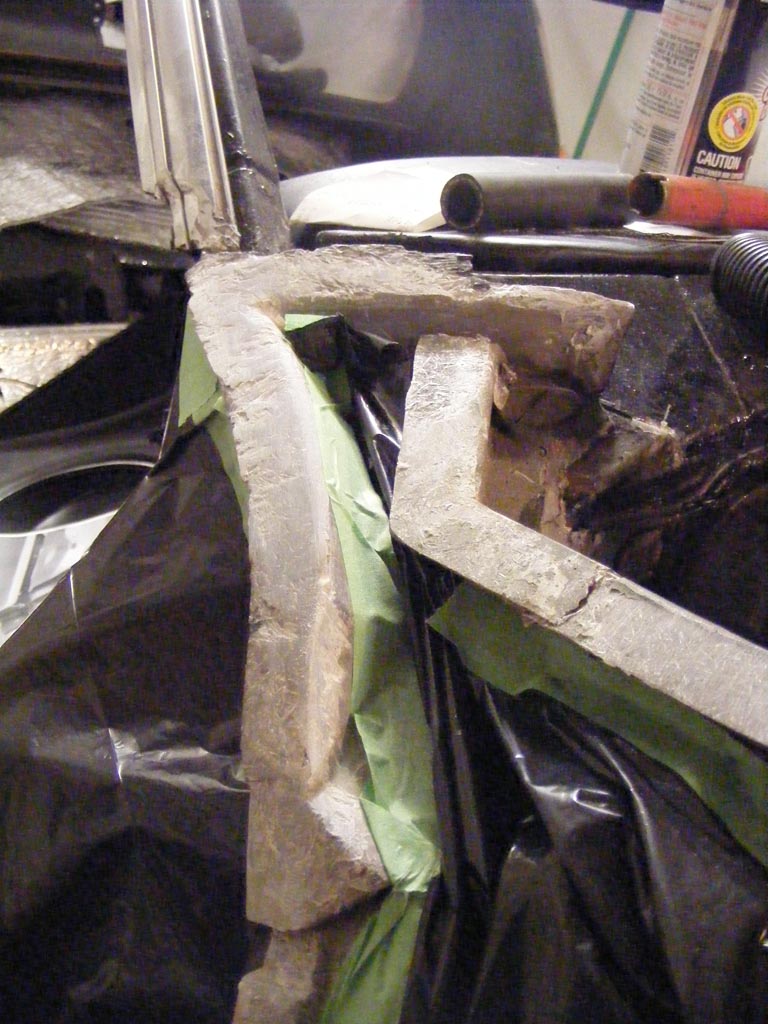
So I glassed those weak areas
I use vaccum glassing technique to use as little resin as possible.
Over the fiberglass I've put this plastic film with tiny holes then an absorbing mat, and wood shims then clamps.
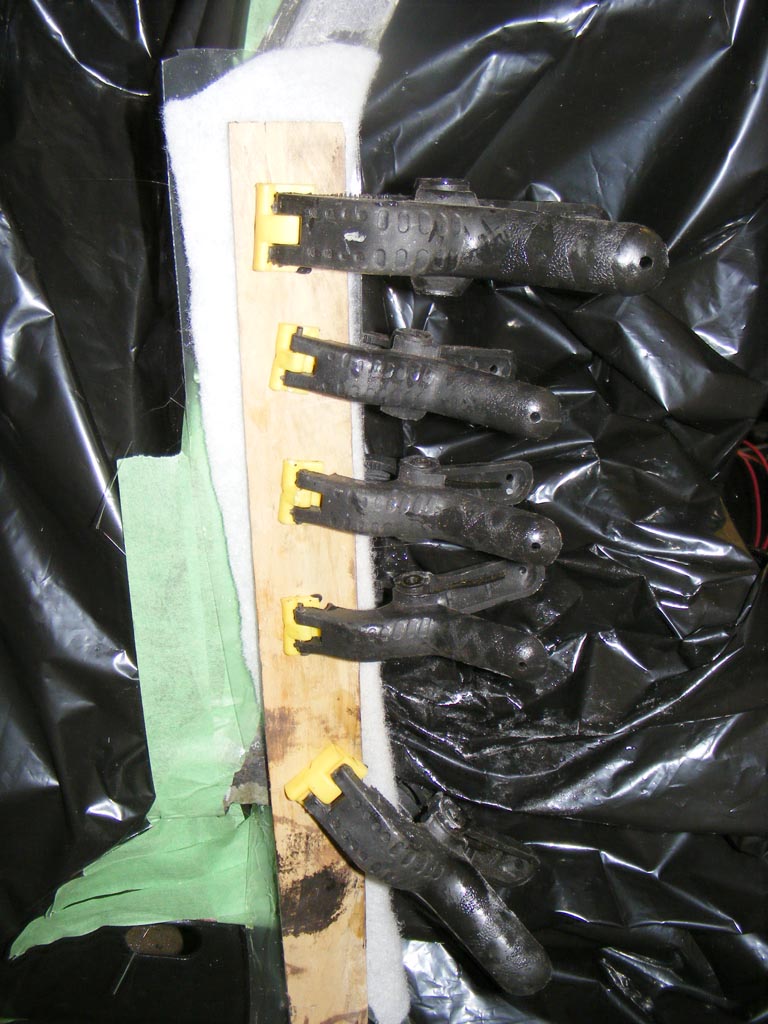
Is saved me some sanding time, but not sure it's really worth the effort.
I used the thinnest fiberglass mat I could get, I don't want my glassing to ruins my hood fitting, still I was some meat to put screws for final aligment.

Now time for the passenger side, I've some area to recreate.
By the way, does anyone go a picture of what this hood corner support look like when it's it's complete.
I think I'm gonna love bodywork, really.
I use vaccum glassing technique to use as little resin as possible.
Over the fiberglass I've put this plastic film with tiny holes then an absorbing mat, and wood shims then clamps.
Is saved me some sanding time, but not sure it's really worth the effort.
I used the thinnest fiberglass mat I could get, I don't want my glassing to ruins my hood fitting, still I was some meat to put screws for final aligment.
Now time for the passenger side, I've some area to recreate.
By the way, does anyone go a picture of what this hood corner support look like when it's it's complete.
I think I'm gonna love bodywork, really.
Last edited by Denpo; 08-17-2017 at 09:10 PM.