
Is this rust normal...?
 09-07-2010, 08:25 PM
#1
Burning Brakes

Thread Starter

Member Since: Dec 2007
Posts: 889
Likes: 0
Received 0 Likes
on
0 Posts
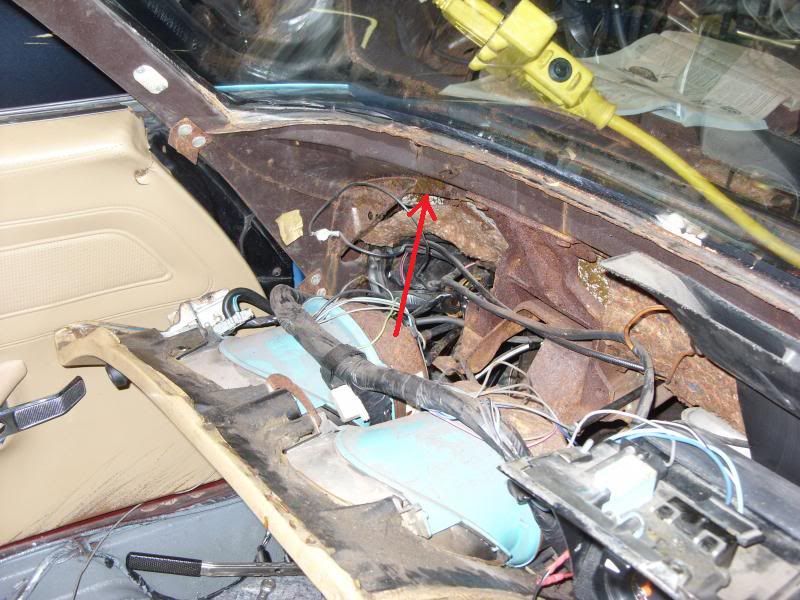
Removed the dash during my minor restoration process and noticed some very minor rust along the lower edge of the windshield framing. Looks like I can get rid of it out and paint over it with POR15 or Krylon. I hate to open up a quart of POR-15 though - it does not keep. (Luckily I used an entire quart to do the floor pan front & back) Maybe I can find a pint. Thoughts?

 09-07-2010, 09:21 PM
#4
Race Director

Water test and find where its coming in.
Probably coming in at the top of the windshield,going inside the channel around windshield and then running down.
Check the trim screws at the top and see if they have had rusty water dripping from them.
Probably coming in at the top of the windshield,going inside the channel around windshield and then running down.
Check the trim screws at the top and see if they have had rusty water dripping from them.
09-07-2010, 09:44 PM
#5
Le Mans Master


from what i can see it appears to be just light surface rust.........but it's really hard to see from those photos !!!
 09-07-2010, 10:52 PM
#7
Melting Slicks

I agree that it is difficult to judge the condition of the rust from pictures. Ensure structural integrity.
A tip for getting more life from the POR15, is to use a piece of plastic laid on top of the can then sandwiched between the can and the lid when finished. Tightly sealed the plastic forms an air tight seal. Replace the plastic after every use.

A tip for getting more life from the POR15, is to use a piece of plastic laid on top of the can then sandwiched between the can and the lid when finished. Tightly sealed the plastic forms an air tight seal. Replace the plastic after every use.
09-07-2010, 10:53 PM
#8
Drifting

hey real quick, try putting a piece of plastic wrap over the can of por-15 first and then putting the metal lid on. i do that and then put it in the fridge and it as kept a long time.
09-08-2010, 12:00 AM
#9
Melting Slicks
Here's a tip I know works for regular paint. I see no reason it shouldn't work for POR-15.
Seal the top very well. For POR-15 I would still use the plastic wrap. When you put it on the shelf, put it upside down. That way you have liquid paint at the removable lid and the air pocket at the bottom of the can. When you turn it over and reopen it, the skin will have formed on what is now the bottom of the paint in the can and the top should be liquid. As long as you don't poke a hole in the skin as you stir, you should have kept most of the leftover pain usable.
Now for the hard part. You have to remember to do it. I've known this trick for years and I rarely remember to do it.
09-08-2010, 12:36 AM
#10
Team Owner

The under-dash [bare] metal framework will rust if left in a damp environment and/or if there are leaks in the window seal/birdcage area. You need to find which it is. The rust you have on those parts in the picture is not a bad situation. But, if that rust occurred from birdcage leakage, the birdcage is probably in bad shape.
 09-08-2010, 09:51 AM
#12
Team Owner

Member Since: Jun 2000
Location: Southbound
Posts: 38,928
Likes: 0
Received 1,470 Likes
on
1,249 Posts
Cruise-In II Veteran

What I see looks "normal." I've seen worse.

09-08-2010, 02:59 PM
#13
Pro

mar, look at the reinforcement bracket between the tach and the speedo. It is under the dash and protected from windshield leaks. it looks to be as rusted as the area on the birdcage. So I would say for the environment that the car has lived in it is normal. Mine looked much the same and the upper birdcage only had slight surface rust.
As long as you're this far, why don't you....? Eventually you will be able to put your entire car in little boxes just like me.
As long as you're this far, why don't you....? Eventually you will be able to put your entire car in little boxes just like me.
09-08-2010, 06:17 PM
#14
Burning Brakes
Thread Starter
Member Since: Dec 2007
Posts: 889
Likes: 0
Received 0 Likes
on
0 Posts
"I'm not listening...I'm not listening...I'm not listening..."
Yep - everytime I take a step I think "Hmmmm - it would be easy to do....while I'm at it..."
I almost bit the bullet and threw a set of heads and headers on it recently. Thank god I resisted the urge.
How do you say "Cha - ching!" The folks at VISA love me.
Yep - everytime I take a step I think "Hmmmm - it would be easy to do....while I'm at it..."
I almost bit the bullet and threw a set of heads and headers on it recently. Thank god I resisted the urge.
How do you say "Cha - ching!" The folks at VISA love me.
mar, look at the reinforcement bracket between the tach and the speedo. It is under the dash and protected from windshield leaks. it looks to be as rusted as the area on the birdcage. So I would say for the environment that the car has lived in it is normal. Mine looked much the same and the upper birdcage only had slight surface rust.
As long as you're this far, why don't you....? Eventually you will be able to put your entire car in little boxes just like me.
As long as you're this far, why don't you....? Eventually you will be able to put your entire car in little boxes just like me.
09-09-2010, 02:19 PM
#15
Drifting
Removed the dash during my minor restoration process and noticed some very minor rust along the lower edge of the windshield framing. Looks like I can get rid of it out and paint over it with POR15 or Krylon. I hate to open up a quart of POR-15 though - it does not keep. (Luckily I used an entire quart to do the floor pan front & back) Maybe I can find a pint. Thoughts?
09-09-2010, 02:44 PM
#16
Burning Brakes
Thread Starter
Member Since: Dec 2007
Posts: 889
Likes: 0
Received 0 Likes
on
0 Posts
Thx for the tip - the Permatex stuff requires you to wash it off with water. Don't really want to be spashing around water in that area!
Hey Im re-doing a 944 and found some good stuff at the Sherwin Williams Totally by accident.Little white bottle goes along way you simply brush it on it turns the metal black and is paintable after 24 hrs of drying time I did not even sand on the rust jsut blew it off with high pressure air gun .the brush cleaned up with soap and water.It recommends you do it twice to get the metal completly covered. try it it should make it look like you prepped for days before painting.
09-09-2010, 03:56 PM
#17
Team Owner
The stuff you describe sounds like an acid to me. Some acids will turn a steel surface black (or blue, like on gun barrels). But that stuff has to be neutralized to prevent further rusting due to the presence of the acid! Rust converter is a different chemical action. It chemically changes iron oxide [rust] into any inert material that will no longer rust. {Of course, any 'open' metal will still be able to rust.} Get some 'rust converter' and brush it onto the rusted areas. Let it work, then dry thoroughly. If you want permanent rust protection on those parts, you then want to shoot them with zinc chromate, self-etching primer. That will protect them for many years.
09-09-2010, 04:40 PM
#18
Drifting
The stuff you describe sounds like an acid to me. Some acids will turn a steel surface black (or blue, like on gun barrels). But that stuff has to be neutralized to prevent further rusting due to the presence of the acid! Rust converter is a different chemical action. It chemically changes iron oxide [rust] into any inert material that will no longer rust. {Of course, any 'open' metal will still be able to rust.} Get some 'rust converter' and brush it onto the rusted areas. Let it work, then dry thoroughly. If you want permanent rust protection on those parts, you then want to shoot them with zinc chromate, self-etching primer. That will protect them for many years.
If it was on the 75 not the Porsche I would post some pics.
09-09-2010, 06:13 PM
#19
Melting Slicks
Member Since: May 2006
Location: Nashville TN
Posts: 2,511
Received 347 Likes
on
253 Posts
St. Jude Donor '09

 I've had mine in the fridge for 2 years now and it's still good. I also buy new empty quart cans from the hardware store and pour leftover into if I mess the lid up getting it off the existing can; that is some strong stuff!!! I like the plastic idea . . . will have to try that.
MAR - thanks for the pics. I've been wanting to see exactly where the ground wires attach to the birdcage and your pic shows it perfectly!!
09-09-2010, 06:25 PM
#20
Race Director
Good catch , it does show the grounds. It also shows how in later years the harness runs over the top of the tach and speedo , big improvement.