
Polk DB651 Kick Panel Speaker Installation Guide
 07-31-2010, 01:21 PM
#1
Advanced

Thread Starter
Here's a guide to installing Polk DB651 speakers in the kick panels of a 1968-1977 Corvette, a mod that many others have suggested and done before. I'm always hesitant to embark on projects without a thorough guide so maybe this will help someone.
There are many ways to do this and other methods should certainly be considered, this is just how I did it.
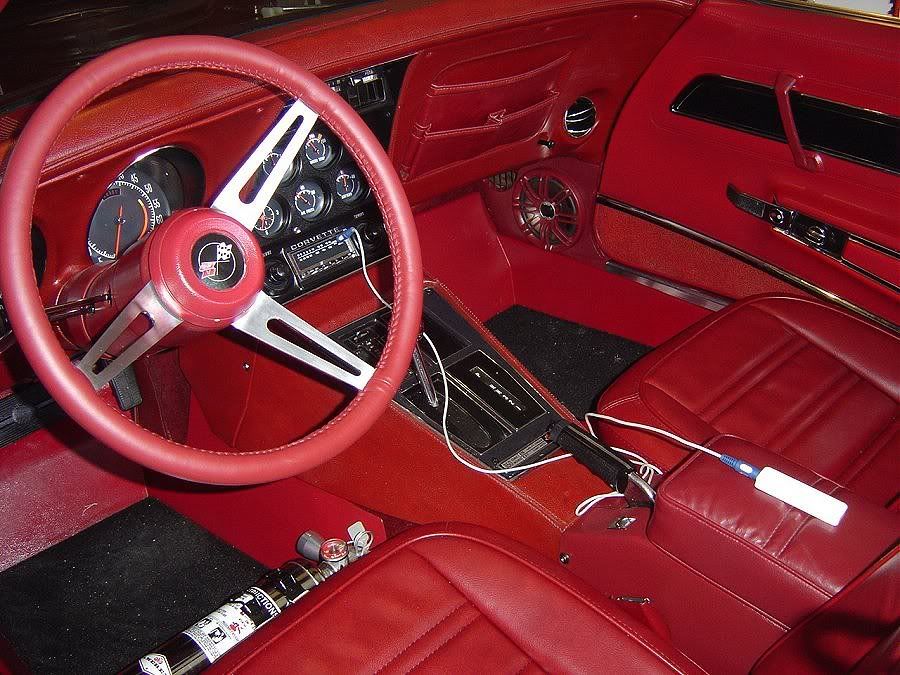
I should note that I'm not all that impressed with this arrangement's sound quality, so I'm not totally sure why I'm writing this! Although I'm driving these speakers with a 60 watt RMS per channel amplifier, they do not produce a lot of bass. The speakers sound overdamped on bass-heavy songs, presumably because of the lack of space behind the speaker. I'm really not sure how anyone else's system sounds or if anyone can get a lot of bass out of their speakers in these positions, but right now I think I have to put crossovers on these front speakers to eliminate the bass and run some sort of a sub in the back, maybe a bass tube. Maybe smaller speakers would have actually worked better. If anyone else gets a really good sound out of just their front speakers, I'd listen to them first! Post any suggestions here please. They still sound a heck of a lot better than those dash speakers.
OK on to the installation..
I ordered the cheapest reproduction kick panels I could find for the sake of keeping my originals. Others have had success with used kick panels but I figure the plastic would be more brittle and with my luck the speakers would shake them and crack them apart.
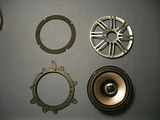
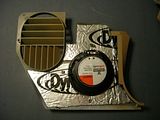
This is what's included with the speakers: Speaker gasket, cover, speaker, mounting plate. The mounting plate will only be used as a template. Not shown are mounting screws.
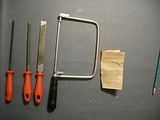
Here are the tools you'll need: A coping saw, file, and any medium grit sand paper. This coping saw blade can be loosened and rotated to any angle, which made cutting a lot easier.
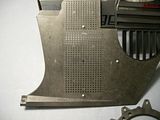
You basically want to mount the speaker in the center of the vent hole pattern. Take one of the included mounting screws and thread it into the kick panel vent hole that's 13 holes down and 8 from the left (on the drivers' kick panel). This is the center of the vent, 8 holes in from either side when counting the wider area of the vent hole pattern. The screw should be the right size to thread it right in. Test-fit the speaker cover to the kick panel to make sure it fits.
Mount the speaker cover with that single screw and line up the bottom screw hole vertically with the top screw, following along the center line of vent holes. Mark the center of the cover hole and drill a hole here in the kick panel the same size as the others. I think it was a 7/64" drill bit. Thread in the bottom screw. Do the same thing with the two remaining mounting holes.
Remove the screws and cover. Thread the screws in from the back so the ends are pointing out the front of the kick panel.
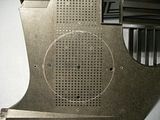
Place the mounting plate over the screws and use this as a template to draw your speaker cutout circle with a pencil. It only fits in one direction because of all those weird protrusions.
Drill some starter holes for the coping saw. You should really try to make them closer to the circle than I did.
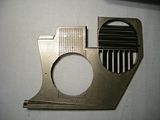
Cut out the speaker hole with your coping saw. Cut right along the circle or slightly outside. Test-fit the speaker and do any more cutting or filing you need for the speaker to sit flat against the kick panel. Use a file and sandpaper to smooth the edges of your cut.
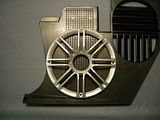
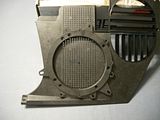
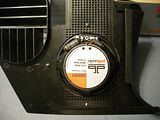
Mount the speaker to the kick panel. The speaker mounts to the front. The gasket goes on first, then the speaker, then the cover. I used machine screws to finally mount the speaker and did not have to put a nut on the back. I think they were #6.
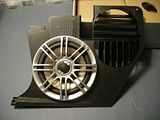
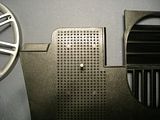
And here it is from the back. Keep the terminals facing up so there's plenty of room for the connectors in the birdcage.
Test-fit the kick panels and speakers before doing any painting. It's a little harder to get the kick panels in with the speakers mounted but they'll go in there.
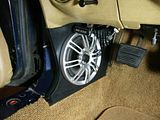
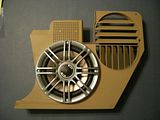
All painted and ready to install. I used some dye primer before painting. Maybe I'll paint those covers one day.
Put some sound deadener on the back because everyone else does it and everything's better with sound deadener. I wired them with 16 gauge speaker wire. You'll need female quick disconnect crimp-on terminals, they measured 1/8" for the negative terminals and 3/16" for the positive.
Again, the speakers and kick panels all fit together well with this method, and they sound clear above say 100 Hz, but they don't handle contemporary bass-heavy recordings very well. I'm interested in any suggestions or others' experiences with this speaker arrangement.
There are many ways to do this and other methods should certainly be considered, this is just how I did it.
I should note that I'm not all that impressed with this arrangement's sound quality, so I'm not totally sure why I'm writing this! Although I'm driving these speakers with a 60 watt RMS per channel amplifier, they do not produce a lot of bass. The speakers sound overdamped on bass-heavy songs, presumably because of the lack of space behind the speaker. I'm really not sure how anyone else's system sounds or if anyone can get a lot of bass out of their speakers in these positions, but right now I think I have to put crossovers on these front speakers to eliminate the bass and run some sort of a sub in the back, maybe a bass tube. Maybe smaller speakers would have actually worked better. If anyone else gets a really good sound out of just their front speakers, I'd listen to them first! Post any suggestions here please. They still sound a heck of a lot better than those dash speakers.
OK on to the installation..
I ordered the cheapest reproduction kick panels I could find for the sake of keeping my originals. Others have had success with used kick panels but I figure the plastic would be more brittle and with my luck the speakers would shake them and crack them apart.
This is what's included with the speakers: Speaker gasket, cover, speaker, mounting plate. The mounting plate will only be used as a template. Not shown are mounting screws.

Here are the tools you'll need: A coping saw, file, and any medium grit sand paper. This coping saw blade can be loosened and rotated to any angle, which made cutting a lot easier.

You basically want to mount the speaker in the center of the vent hole pattern. Take one of the included mounting screws and thread it into the kick panel vent hole that's 13 holes down and 8 from the left (on the drivers' kick panel). This is the center of the vent, 8 holes in from either side when counting the wider area of the vent hole pattern. The screw should be the right size to thread it right in. Test-fit the speaker cover to the kick panel to make sure it fits.

Mount the speaker cover with that single screw and line up the bottom screw hole vertically with the top screw, following along the center line of vent holes. Mark the center of the cover hole and drill a hole here in the kick panel the same size as the others. I think it was a 7/64" drill bit. Thread in the bottom screw. Do the same thing with the two remaining mounting holes.

Remove the screws and cover. Thread the screws in from the back so the ends are pointing out the front of the kick panel.

Place the mounting plate over the screws and use this as a template to draw your speaker cutout circle with a pencil. It only fits in one direction because of all those weird protrusions.

Drill some starter holes for the coping saw. You should really try to make them closer to the circle than I did.

Cut out the speaker hole with your coping saw. Cut right along the circle or slightly outside. Test-fit the speaker and do any more cutting or filing you need for the speaker to sit flat against the kick panel. Use a file and sandpaper to smooth the edges of your cut.

Mount the speaker to the kick panel. The speaker mounts to the front. The gasket goes on first, then the speaker, then the cover. I used machine screws to finally mount the speaker and did not have to put a nut on the back. I think they were #6.

And here it is from the back. Keep the terminals facing up so there's plenty of room for the connectors in the birdcage.

Test-fit the kick panels and speakers before doing any painting. It's a little harder to get the kick panels in with the speakers mounted but they'll go in there.

All painted and ready to install. I used some dye primer before painting. Maybe I'll paint those covers one day.

Put some sound deadener on the back because everyone else does it and everything's better with sound deadener. I wired them with 16 gauge speaker wire. You'll need female quick disconnect crimp-on terminals, they measured 1/8" for the negative terminals and 3/16" for the positive.

Again, the speakers and kick panels all fit together well with this method, and they sound clear above say 100 Hz, but they don't handle contemporary bass-heavy recordings very well. I'm interested in any suggestions or others' experiences with this speaker arrangement.
 07-31-2010, 02:43 PM
#2
Team Owner


"RC", very nice write up!
One thing to consider, 6.5" speakers, no matter how good they are (and Polks are), will not give you slammin' bass response. They're just not big enough. You need at least a 6x9 for decent bass.
One thing to consider, 6.5" speakers, no matter how good they are (and Polks are), will not give you slammin' bass response. They're just not big enough. You need at least a 6x9 for decent bass.
07-31-2010, 02:44 PM
#3
Team Owner


A very thorough and well-documented article for which many readers will thank you.
I am quite pleased with the sound but my needs are 1960s and 1970s when bass was not as prevalent as today. I do have Pioneer 4x6s in the upper dash as well.
I also have a little help in the back but quite frankly that boom-boom sound gives me a headache. It is toned down.
I am quite pleased with the sound but my needs are 1960s and 1970s when bass was not as prevalent as today. I do have Pioneer 4x6s in the upper dash as well.
I also have a little help in the back but quite frankly that boom-boom sound gives me a headache. It is toned down.
Last edited by Paul L; 07-31-2010 at 02:50 PM.
07-31-2010, 07:36 PM
#4
Team Owner
It seems that this subject has run its course. It goes back to Durango Boy's days but he was banned from here many moons ago. So despite your noble efforts I would not expect an enthusiastic series of responses. But again, I appreciate your efforts.
Despite what you say, that system will give a very quality sound and with a subwoofer the bass will rattle the seats and rear deck in a convertible. Just depends on how you balance the system.
http://forums.corvetteforum.com/c3-g...ck-panels.html
Despite what you say, that system will give a very quality sound and with a subwoofer the bass will rattle the seats and rear deck in a convertible. Just depends on how you balance the system.
http://forums.corvetteforum.com/c3-g...ck-panels.html
Last edited by Paul L; 07-31-2010 at 07:54 PM.
07-31-2010, 10:11 PM
#5
Advanced
Thread Starter
It seems that this subject has run its course. It goes back to Durango Boy's days but he was banned from here many moons ago. So despite your noble efforts I would not expect an enthusiastic series of responses. But again, I appreciate your efforts.
Despite what you say, that system will give a very quality sound and with a subwoofer the bass will rattle the seats and rear deck in a convertible. Just depends on how you balance the system.
http://forums.corvetteforum.com/c3-g...ck-panels.html
Despite what you say, that system will give a very quality sound and with a subwoofer the bass will rattle the seats and rear deck in a convertible. Just depends on how you balance the system.
http://forums.corvetteforum.com/c3-g...ck-panels.html
I'm going to leave the speakers there and install a sub in the rear somewhere & play around with crossovers, that should be all I need.
Thanks Paul.
08-01-2010, 02:03 AM
#6
Safety Car

Interesting...I have the Polk Audio 4x6s and I mounted them behind the kick panel so that they don't show...I like how my interior looks completely stock, but is all new and updated. I also have a retrosound receiver which I love..
Good writeup though!
Good writeup though!


 08-02-2010, 06:27 PM
#11
Instructor
Member Since: Aug 2009
Location: Colorado Springs Colorado
Posts: 147
Likes: 0
Received 2 Likes
on
1 Post

awesome write up, I'm going to be adding some speakers but they will be the RE 6.5FR's, so they will be coaxial, however I wasn't sure what tools I would need. thanks for the parts list.