
Front Crossmember Dent Repair
 04-26-2010, 08:12 PM
#1
Safety Car

Thread Starter
Member Since: Jun 2004
Location: Beecher Illinois
Posts: 4,236
Likes: 0
Received 170 Likes
on
137 Posts

I know how some guys don't care about dents underneath their Vettes, but for me it's an eyesore!
Thought about buying one of those crossmember repair tools, but considering the size of my dent, the $150 cost for the tool, and the fact that a front spring needs to be removed, I figured I'd leave it be. But Saturday night I started poking around my shop looking for ideas to do the repair in a simpler way.
This is what I came up with.....
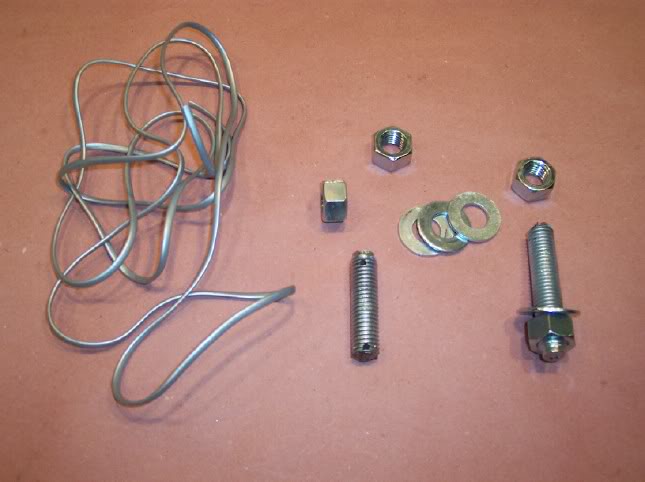
The key part is the 2 1/2" long X 5/8" threaded rod with the holes drilled in each end. The other threaded rod is an extension. It can be longer but this was all I had. The wire in the pic is a bit heavier than ideal but was what I had.
The short rod gets a nut on one end and gets guided through the inside of the crossmember.

HOW?
I used a length of 5/16" clear vinyl hose(my gas siphoning hose) and fed that in between the coils of the spring along side the shock absorber. With a hook made from stiff wire, I was able to reach up through the hole in the crossmember and snag the end of the hose pulling it through the hole. To the hose I attached a thin gauge wire and pulled the hose back through replacing it with the wire. I attached each end of the stud/nut to each end of the wire and pulled it back through. It practically dropped into the hole. Of course the nut on the stud goes to the top inside the crossmember. Remove the wire from the exposed end and add a washer and nut and snug it up. Then add the extension rod, I simply used another nut to connect them.
Then assemble the 2X3 wooded bridgework and insert the stud through the 5/8" hole drilled into the bottom piece. Add a washer and nut and crank it tight....
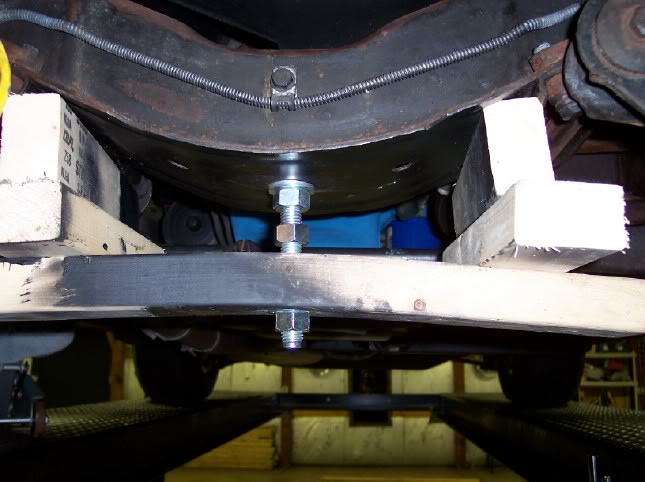
When satisfied, remove everything below the frame, reattach the wire to the stud, and guide it out of the way.
There were several gouges and scratches from the jack that did the original dent, plus hammer marks from me, so I applied a skim coat of bondo. Several sandings and primings and it eventually came out like this....
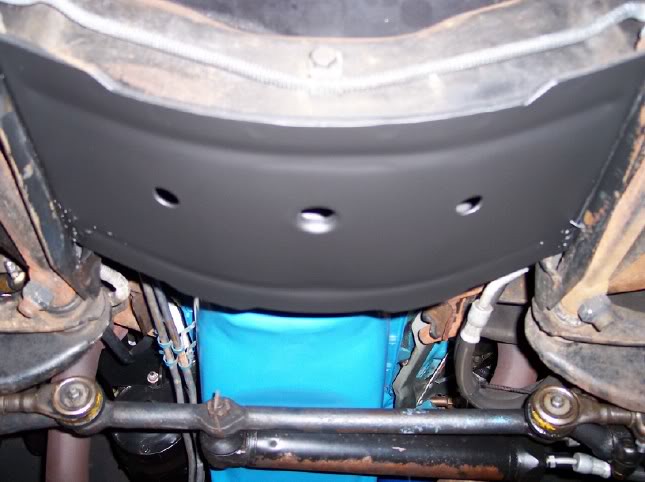
Keep in mind, this was a relatively small dent. Don't know how it would work with a major crushed crossmember.
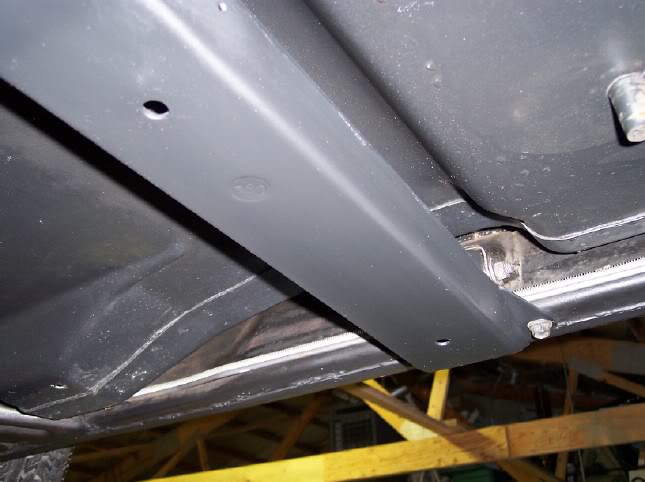
I also did my trans crossmember last week. Pretty major dents on both ends. Removed it from the car and used my 'port-a-power' jack with a mini 10ton jack head inserted into the channel. Several jackings and hammer bangings produced a straight but rough looking final product. Again, a skim coat of bondo and many sandings and primings and I came out with this.....
edit.see post 12 for additional info!!
Thought about buying one of those crossmember repair tools, but considering the size of my dent, the $150 cost for the tool, and the fact that a front spring needs to be removed, I figured I'd leave it be. But Saturday night I started poking around my shop looking for ideas to do the repair in a simpler way.
This is what I came up with.....
The key part is the 2 1/2" long X 5/8" threaded rod with the holes drilled in each end. The other threaded rod is an extension. It can be longer but this was all I had. The wire in the pic is a bit heavier than ideal but was what I had.
The short rod gets a nut on one end and gets guided through the inside of the crossmember.
HOW?
I used a length of 5/16" clear vinyl hose(my gas siphoning hose) and fed that in between the coils of the spring along side the shock absorber. With a hook made from stiff wire, I was able to reach up through the hole in the crossmember and snag the end of the hose pulling it through the hole. To the hose I attached a thin gauge wire and pulled the hose back through replacing it with the wire. I attached each end of the stud/nut to each end of the wire and pulled it back through. It practically dropped into the hole. Of course the nut on the stud goes to the top inside the crossmember. Remove the wire from the exposed end and add a washer and nut and snug it up. Then add the extension rod, I simply used another nut to connect them.
Then assemble the 2X3 wooded bridgework and insert the stud through the 5/8" hole drilled into the bottom piece. Add a washer and nut and crank it tight....
When satisfied, remove everything below the frame, reattach the wire to the stud, and guide it out of the way.
There were several gouges and scratches from the jack that did the original dent, plus hammer marks from me, so I applied a skim coat of bondo. Several sandings and primings and it eventually came out like this....
Keep in mind, this was a relatively small dent. Don't know how it would work with a major crushed crossmember.
I also did my trans crossmember last week. Pretty major dents on both ends. Removed it from the car and used my 'port-a-power' jack with a mini 10ton jack head inserted into the channel. Several jackings and hammer bangings produced a straight but rough looking final product. Again, a skim coat of bondo and many sandings and primings and I came out with this.....
edit.see post 12 for additional info!!
Last edited by KapsSA; 11-19-2017 at 10:48 PM.

The following users liked this post:
general ike (11-20-2017)


 04-26-2010, 10:09 PM
#4


Ingenious Mike...
And here I thought all four of your Vettes were perfect both top and bottom.
I'm getting a four post lift so i'll be spending a lot of time under my 78 and its frame dents are going to be bugging me so i'm printing your technique.
You would'nt happen to have any spare 78 power antenna bezels would you?
Alex/plus (Rich)
04-26-2010, 10:22 PM
#5
Safety Car
Thread Starter
Member Since: Jun 2004
Location: Beecher Illinois
Posts: 4,236
Likes: 0
Received 170 Likes
on
137 Posts
Ingenious Mike...
And here I thought all four of your Vettes were perfect both top and bottom.
I'm getting a four post lift so i'll be spending a lot of time under my 78 and its frame dents are going to be bugging me so i'm printing your technique.
You would'nt happen to have any spare 78 power antenna bezels would you?
Alex/plus (Rich)
And here I thought all four of your Vettes were perfect both top and bottom.
I'm getting a four post lift so i'll be spending a lot of time under my 78 and its frame dents are going to be bugging me so i'm printing your technique.
You would'nt happen to have any spare 78 power antenna bezels would you?
Alex/plus (Rich)
The pics above are of my 1400 mile 78SA. Apparently a previous owner spent more time setting it up on jack stands than driving it.
Wish I had taken some before pics.
I DID have an extra power antenna bezel, but I included it with a NOS antenna I sold a few months ago.

 04-28-2010, 01:00 AM
#10
Team Owner

OK. But now you have to clean up the rest of the undercarriage! 
I like your creative approach and it looks very nice.
I like your creative approach and it looks very nice.
04-28-2010, 02:11 AM
#11
Safety Car
Thread Starter
Member Since: Jun 2004
Location: Beecher Illinois
Posts: 4,236
Likes: 0
Received 170 Likes
on
137 Posts
 No can do! Low mile original survivor. Don't want a 'restored' low mile original. It's actually spotless underneath, cleanwise.....
And the camera flash really magnifys things. I wish there was a way to 'age' the repairs I just did! I hated that I 'needed' to sandblast and paint the oil pan when I replaced the gaskets a few years ago.
Last edited by KapsSA; 05-08-2010 at 01:55 AM. Reason: remove unnecessary pics
05-08-2010, 02:09 AM
#12
Safety Car
Thread Starter
Member Since: Jun 2004
Location: Beecher Illinois
Posts: 4,236
Likes: 0
Received 170 Likes
on
137 Posts
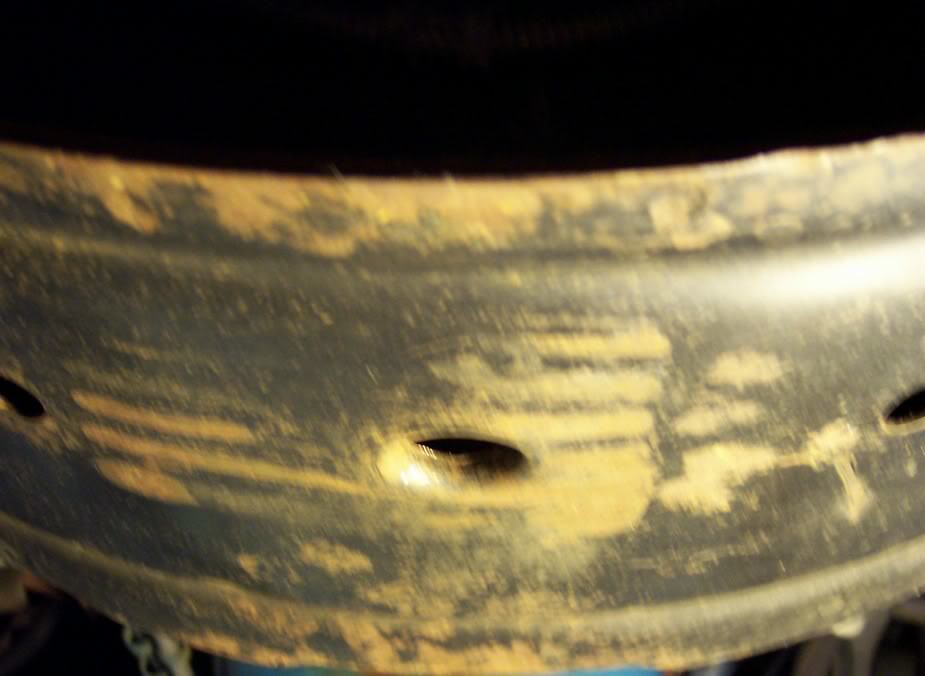
Pulled the dent in my pace Car tonight. Again, not severe, but noticeable. About 3/4" deep but 'clean'. Pretty much reversed the contour up instead of down.
Anyway, took some before pics but most didn't look too good, but in this one you can see the creases at the bottom both sides.
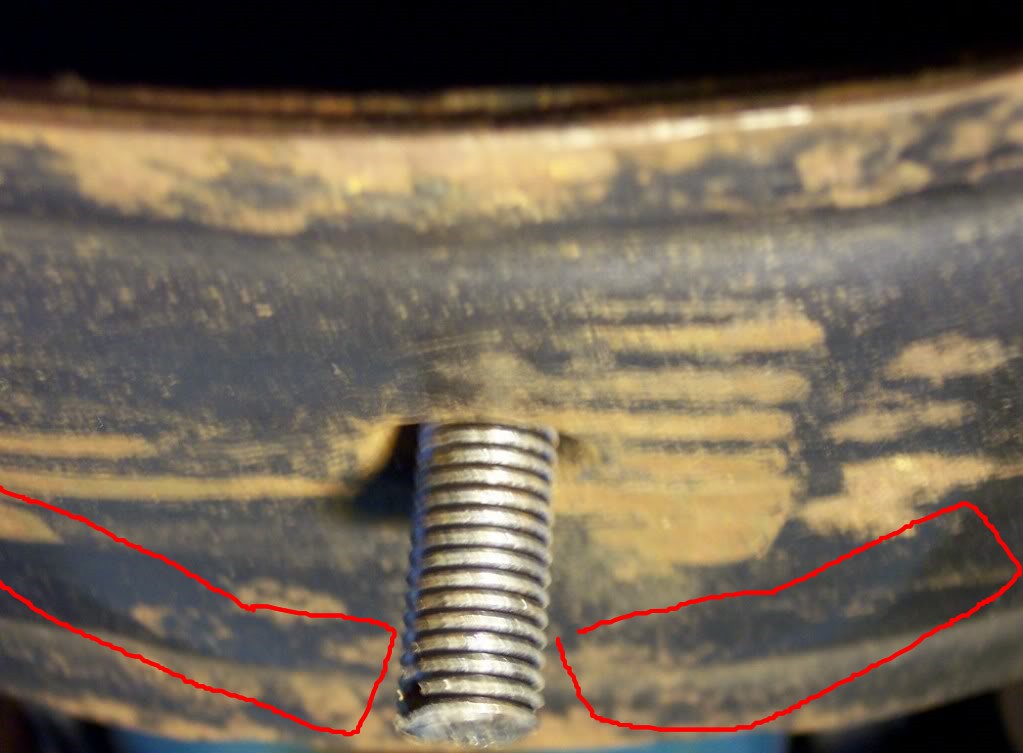
After, still needs paint but probably won't bondo this one unless that tiny remaining dent(lower right)shows up too bad.
Also ran into a bit of a problem. Seems the non gymkhana springs are coiled a little tighter and I was unable to get the stud/nut through the coils.
Ended up jacking that corner of the car up to relax the spring a bit and ground 2 flats on the nut down about halfway. Took some manuervering to get the stud/nut through but got it!
Pretty much fed it through to the outside of the spring where the openings were bigger and slid it around the front of the spring/spring pocket before getting it into the crossmember.
Anyway, took some before pics but most didn't look too good, but in this one you can see the creases at the bottom both sides.
After, still needs paint but probably won't bondo this one unless that tiny remaining dent(lower right)shows up too bad.
Also ran into a bit of a problem. Seems the non gymkhana springs are coiled a little tighter and I was unable to get the stud/nut through the coils.
Ended up jacking that corner of the car up to relax the spring a bit and ground 2 flats on the nut down about halfway. Took some manuervering to get the stud/nut through but got it!
Pretty much fed it through to the outside of the spring where the openings were bigger and slid it around the front of the spring/spring pocket before getting it into the crossmember.
Last edited by KapsSA; 11-19-2017 at 10:59 PM.

 05-11-2010, 02:34 AM
#15
Safety Car
Thread Starter
Member Since: Jun 2004
Location: Beecher Illinois
Posts: 4,236
Likes: 0
Received 170 Likes
on
137 Posts
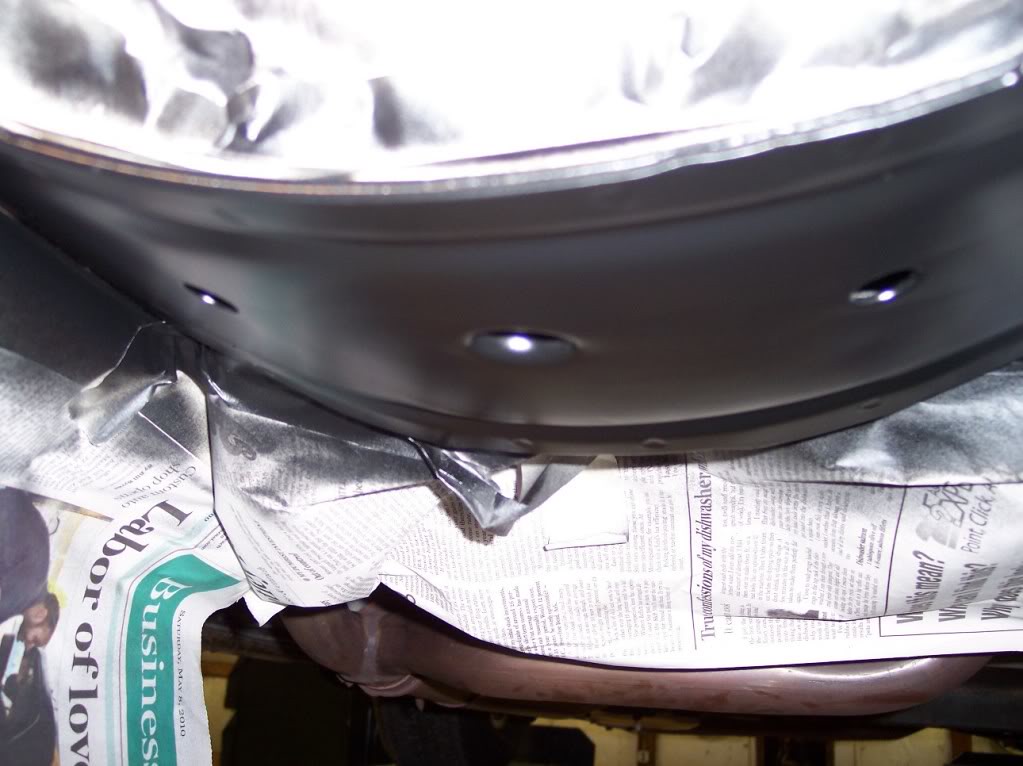
Finished up
After block sanding in preparation for paint a couple small hammer ding size dents became noticeable so I did use a little bondo.
Sand/prime X 3 and paint.....
After block sanding in preparation for paint a couple small hammer ding size dents became noticeable so I did use a little bondo.
Sand/prime X 3
and paint.....
Last edited by KapsSA; 11-19-2017 at 10:54 PM.


