
Whatcha think about them lights?
 05-19-2009, 09:59 PM
#1
Drifting

Thread Starter
Member Since: May 2007
Location: North Royaton Ohio
Posts: 1,491
Likes: 0
Received 2 Likes
on
2 Posts

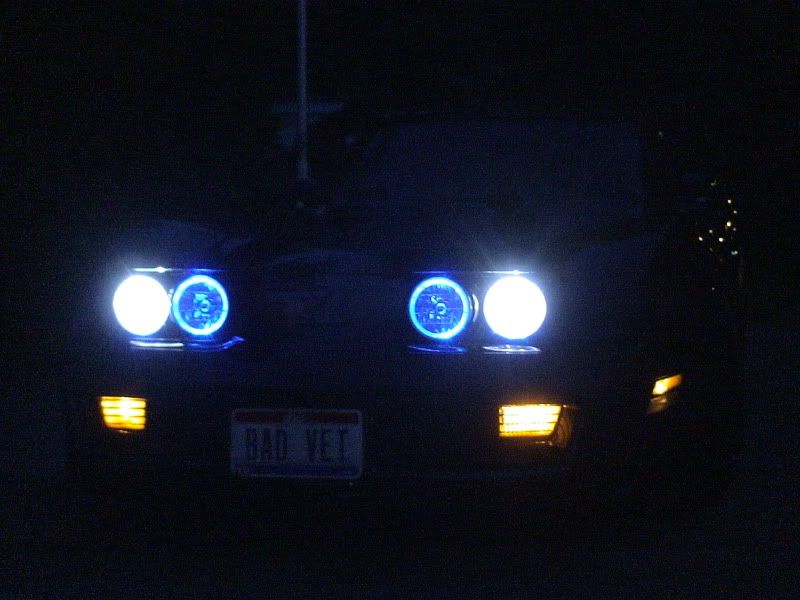
Just realized today that I never posted pictures up of my recent headlight job. 6000K H4 Halogens with blue Halos.
I put in a set of Ebay special lights a few weeks ago. I think they came out pretty well. The difference between stock and these is ridiculous. I honestly can't see how any lights could be brighter than these and still be legal, especially the brights. Haven't gotten a picture of the brights yet, they just flood out my camera. The halos are on a separate circuit than the low/high beams, so I can run them independently if I want. I also have diagrams if anyone's interested.
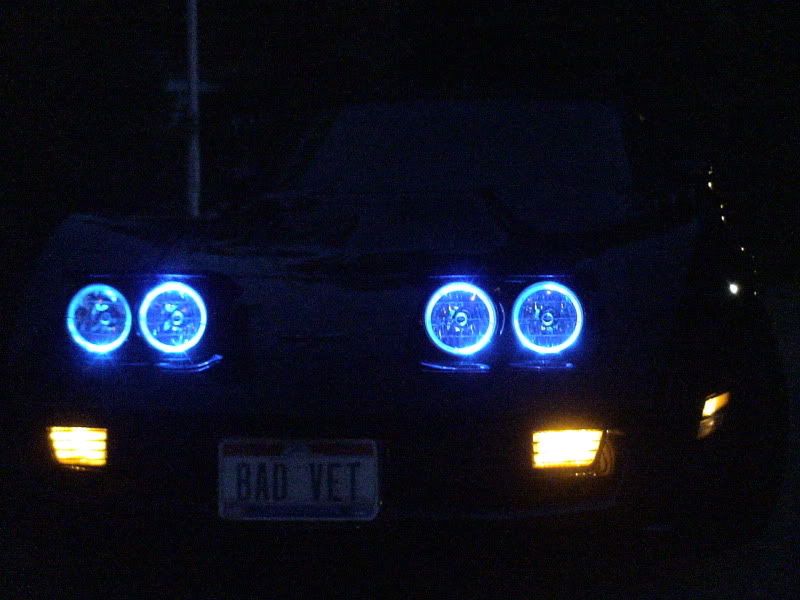
I put in a set of Ebay special lights a few weeks ago. I think they came out pretty well. The difference between stock and these is ridiculous. I honestly can't see how any lights could be brighter than these and still be legal, especially the brights. Haven't gotten a picture of the brights yet, they just flood out my camera.
The halos are on a separate circuit than the low/high beams, so I can run them independently if I want. I also have diagrams if anyone's interested.


 05-19-2009, 10:39 PM
#5
Race Director


 The lights look great and there is plenty of interest. Just post the info already.
  We're all waiting.


 05-20-2009, 02:10 AM
#11
Instructor

Member Since: Nov 2007
Location: Corpus Christi TX
Posts: 183
Likes: 0
Received 0 Likes
on
0 Posts

OMG that is SICK  where on ebay did you find them ive been searching up and down wondering if there was such an H4 halo animal for vettes. Im totally interested since me a pm
where on ebay did you find them ive been searching up and down wondering if there was such an H4 halo animal for vettes. Im totally interested since me a pm
 05-20-2009, 08:34 AM
#13
Race Director

Member Since: Oct 2004
Location: Cape Cod, Mass.
Posts: 18,765
Received 4,560 Likes
on
2,161 Posts
2023 C3 of the Year Finalist - Unmodified
2021 C8 of the Year Finalist Unmodified
2020 Corvette of the Year Finalist (performance mods)
2019 C1 of Year Winner (performance mods)
2017 Corvette of the Year Finalist
2016 C2 of Year
2015 C3 of Year Finalist
My opinion on those is they are great if you are the driver and blinding if you're the guy driving in the other direction 

 05-20-2009, 11:08 AM
#17
Racer
Member Since: Jan 2009
Location: portland or
Posts: 422
Likes: 0
Received 0 Likes
on
0 Posts
i've got the same setup  havent hooked them all up yet but here's a pic before the car was painted and everything was done:
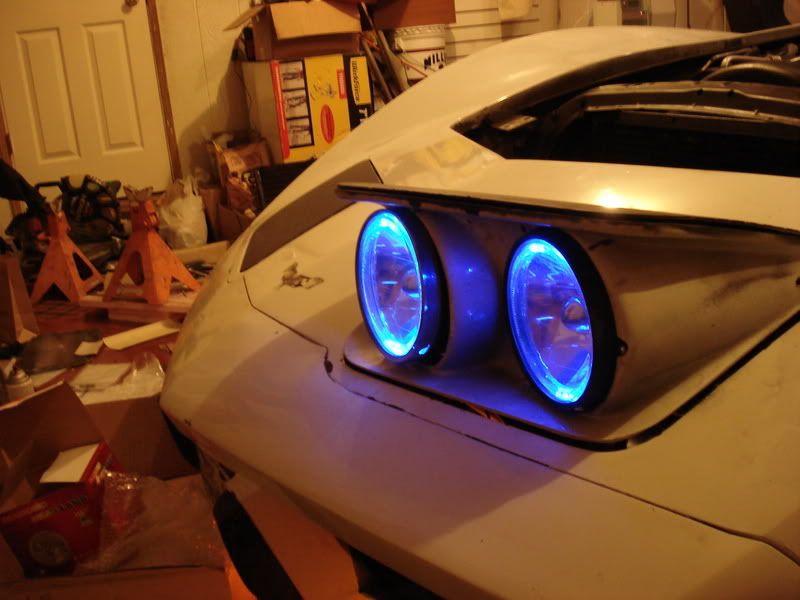
 its a cool project but i kinda wish i'd bought the white halos instead of the blue
but yeah, they ARE ALOT brighter. im definitely happy i went with these. as for the highbeams, im putting in more bright bulbs (i've had some sitting around for a while now lol)
havent hooked them all up yet but here's a pic before the car was painted and everything was done: its a cool project but i kinda wish i'd bought the white halos instead of the bluebut yeah, they ARE ALOT brighter. im definitely happy i went with these. as for the highbeams, im putting in more bright bulbs (i've had some sitting around for a while now lol)
Last edited by mrmarchuk; 05-20-2009 at 11:12 AM.
 05-20-2009, 12:21 PM
#19
Drifting
Thread Starter
Member Since: May 2007
Location: North Royaton Ohio
Posts: 1,491
Likes: 0
Received 2 Likes
on
2 Posts
Alright, there's no way I'm doing a separate PM write up to everyone, so I'll so it right here. Unfortunately, I don't have pictures of everything, but I'll write this out as clearly as I can so if you decide to do it, these should serve as instructions pretty well.
Here are the actual headlights themselves-> http://cgi.ebay.com/ebaymotors/58-82...ht_1884wt_1183
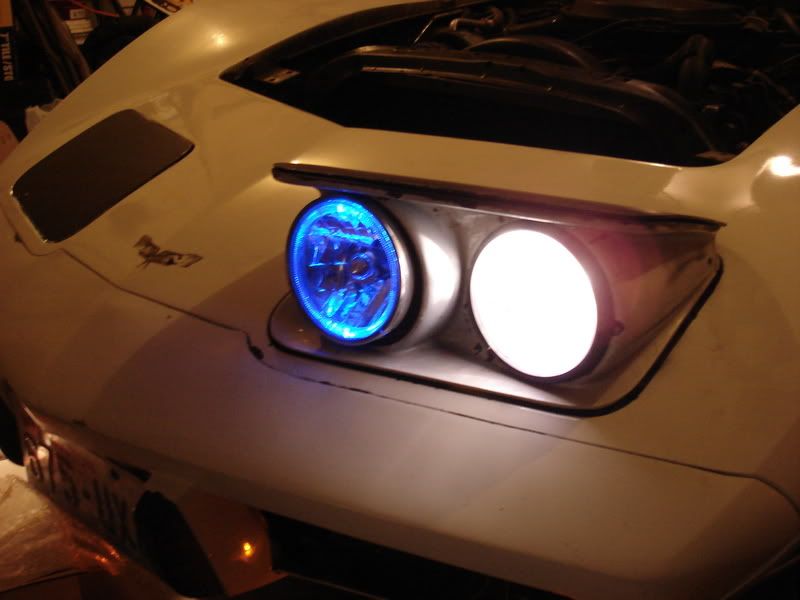
This kit includes the headlight housings, 4 Fezo 6000k H4 bulbs, and some rubber housings on the back that you're going to throw away because the headlights would never fit if you used them.
First thing you need to know, these lights do not bolt right in. You WILL need to do some cutting and grinding on your headlight housings (not the painted bezels, but the actual headlight flippy object itself) to get them to fit. If you don't like the idea of doing that, stop reading now. The reason you need to cut is because these housings are quite a bit deeper than a stock bulb (which doesn't have a housing). Step one is to remove the headlight bezels and the original bulbs. Then refer to the diagram below.
This diagram should be useful:
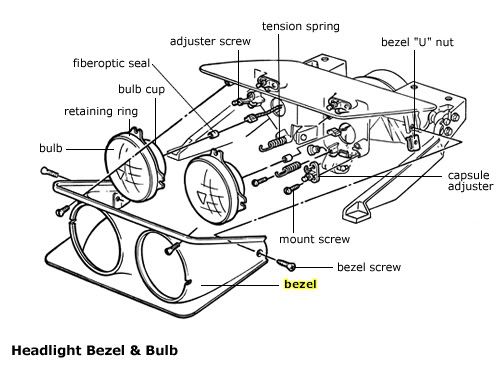
As you can see, the stock bulb is just that, a bulb with no housing.
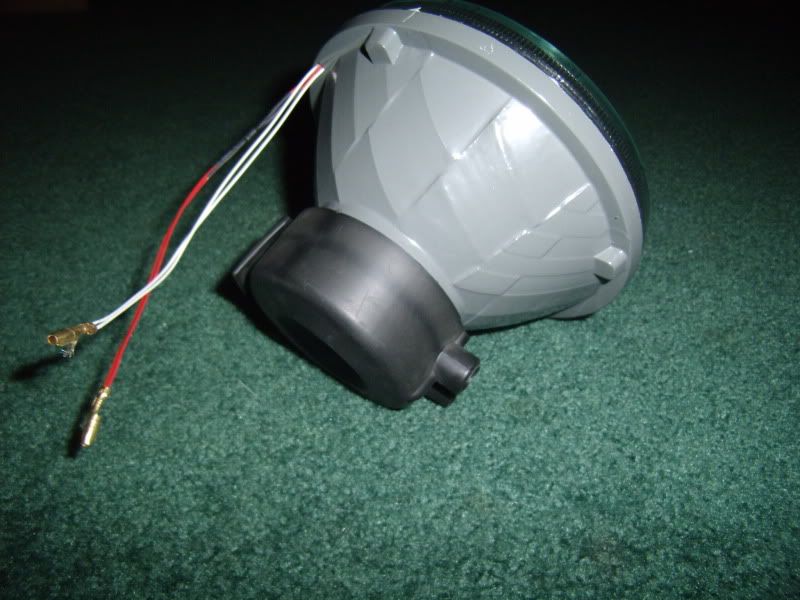
This is what we'll be trying to mount there. Remember, we're not using the black rubber thing. You'll never get it to fit that way:
Looking at the exploded diagram, you can see the two holes in the actual headlight assembly that the plugs come through. Those two holes need to be expanded in diameter to at least the size of the back of the new housings. This is without a doubt the hardest part of the job. I tried using a die grinder, but the material was too soft and ended up melting in between the blades on the grinder. The best technique I found was to trace the diameter of the new housings onto the headlight assembly with a marker, then drill out as many holes as I could using a hand drill, and then come through with a combination of the die grinder and a hand file to clear out what was left. This part is up to you. Do whatever you think would work best. This will take some time, sweat, and patience.
After you have the holes drilled, it's now a wiring game. We'll tackle the low/high beams first.
You could probably run the headlights off of the existing harness, but i didn't want to risk a fire since these pull so much more current, so I put in some separate relays. This is the diagram for the low/high beams:
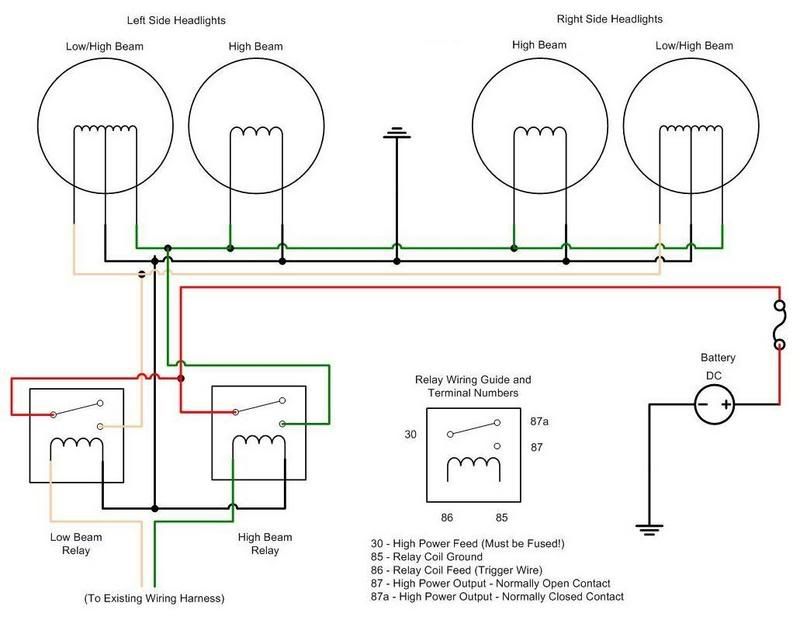
You can pick up the relay at any parts store. They're just standard fog light / accessory relays. You'll need 3 for the whole job. You'll also need butt connectors, crimpers, strippers, an in-line fuse holder with a 20 Amp fuse, 12 gauge and 18 gauge wire on a spool, 12 and 18 gauge female terminals, and 12 gauge ring terminals. Lots of electrical tape helps, too.
What you need to find is the bundle of wires coming through the firewall on the drivers side that goes all the way up the inner fender to the headlights. Inside this bundle you'll find a beige wire and a green wire (see the diagram). Pull these two wires out of the plastic tube that they are in far enough to be able to work on them. The best place to pull them is right next to the alternator, since that's where you'll be pulling your power from. Cut these two wires, strip them, and place female terminals on all of the ends (you should have 4).
::NOTE:: For the next two steps, I tell you to splice your lines into 3 sections. 2 are for the low/high beam relays, and the third is for the halos. Just plan on having one extra positive and ground lead for now.
Next, you'll need to get your power source. We'll be getting it from the battery terminal on the alternator. For this, attach a 12 gauge ring terminal to your 12 gauge wire, and attach it to the alternator. This wire is also where you'll want to splice in your 20 amp fuse. On the other side of the fuse, you need to splice the single wire into 3 separate wires (to give power to all 3 of your relays). There are a few techniques for this. I ran one long wire and spliced in 2 shorter leads coming off of it, for a total of 3. Attach a female terminal at the end of each wire.
Next, we need a ground. I got mine from a bolt on the core support just in front of the hood prop. Any ground will work, but this one was the closest. Again, take your 12 gauge wire, attach a ring terminal, and put it under the bolt. Do the same thing with the other end of the wire, splicing it into 3 leads for all 3 relays.
Now it's just a matter of following the diagram and plugging everything in. The factory harness's plugs that go into the bulbs are the same for the new ones, so no cutting or splicing there.
Now we can do the halos. Here is the diagram:
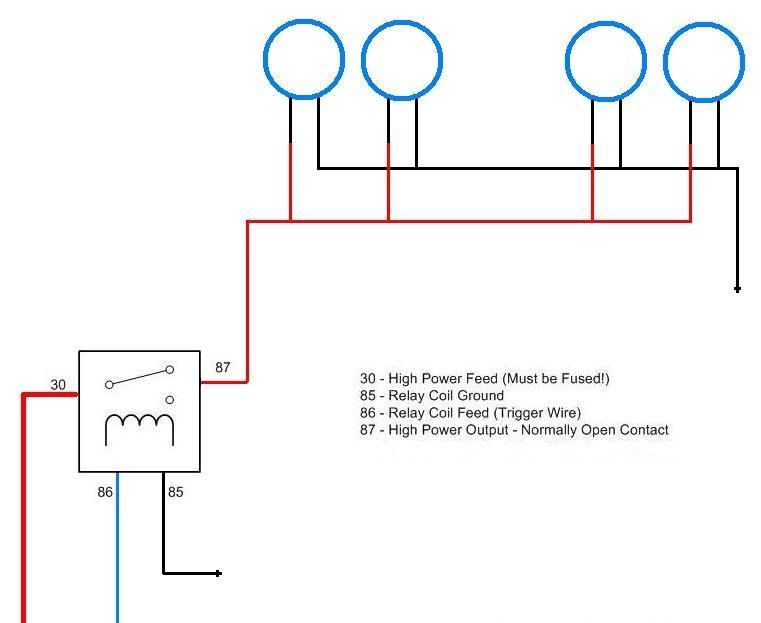
This harness is a bit different, because you need to create your own, since there is no existing one. You'll also need a switch to trigger the halos.
This is the one I used:
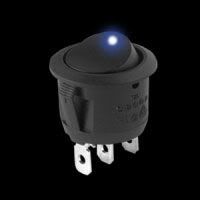
You can buy it here:
http://cgi.ebay.com/ebaymotors/ws/eB...#ht_500wt_1198
I mounted my switch in the consul in between the window switches (where power mirror switch would normally be, but I don't have that option). You can put it wherever you want, really. That was the best spot for me.
Okay, so we already have our existing power source and ground from the previous steps, so we can connect those to the third relay. Next you need to run your trigger wire (18 gauge. Halos don't pull much current) from wherever you mount the switch to the relay. Attach an 18 gauge female terminal on both ends of this wire. One will connect to the relay, the other to the switch. Since mine was mounted in the consul, I ran it along the trans tunnel and through the firewall. This allowed me to put the wire in the same bundle as the other headlight wires.
Next, run another 18 gauge wire from the trigger output on the relay (connected with a female terminal) to all of the positive leads on the halos. Just a bunch of cutting, splicing, and crimping here. You also need to run all of the negatives from all of the halos. I ran mine to the same ground we used before. Again, just 18 gauge here with a ring terminal.
Okay, the last thing we need to do is give power and ground to the switch. Since mine was mounted in the consul, it was right next to the harness for the rear window defogger. You can draw your power and ground from wherever you want. That's up to you.
I think that's about it. Good luck!
05-20-2009, 01:37 PM
#20
Le Mans Master

i hate bright lights that are on on-coming cars.... there should be a law against the brightness....sometimes i drive with yellow safety glasses on just to make the lights easier on the eyes