
Some Bodywork Progress


 12-06-2009, 10:27 AM
#63
Melting Slicks

Thread Starter
Nothing really special just basic fiberglass work.
I ground the surrounding areas, made a mold from some cardboard and covered that with wax paper as a release. Then used a number of layers of fiberglass cloth and mat to blend the good fiberglass to the new.
I ground the surrounding areas, made a mold from some cardboard and covered that with wax paper as a release. Then used a number of layers of fiberglass cloth and mat to blend the good fiberglass to the new.
12-23-2009, 11:41 PM
#64
Melting Slicks
Thread Starter
Well I haven't gotten much done lately, was in Germany for 8 days and doing projects for the wife, but I got back to it today. I started to install the carpeting, doing the rear wheel wells first a few weeks ago and messed up the first one I tried. I was trying to get the drivers side piece to fit the passenger side....Dohhhhh!
FYI, You can buy the rear fender pieces from Willcox though I did have to buy the pair but at least I didn't have to buy a complete carpet set.
With the new piece in hand, I got the fender wheels done the other day and today I did the back flat piece, storage compartment doors etc and the passenger side. I have been going very slowly to avoid another Faux Pas. Of course I'm missing a few storage door hardware items and I know I have new door pulls for them somewhere, but can't find them anywhere. I'm sure they will turn up sometime.
I should be able to knock out the drivers side tomorrow and the carpet behind the seats. Still have to burn some holes for the bolts and not sure if I should cut the flap for the seat mounts or just leave the brackets above the carpet. I have C5 seats going in and custom brackets, so if I would ever go back to the standard seats it would mean an issue with the flap locations, so I'm leaning towards not cutting the flaps.... Opinions on the flaps?
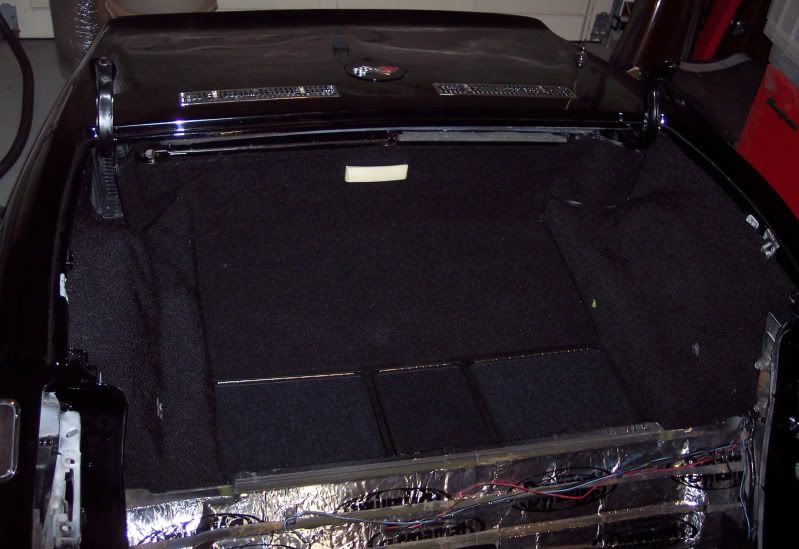
Next up Shark Bar and deck lid install I think.
FYI, You can buy the rear fender pieces from Willcox though I did have to buy the pair but at least I didn't have to buy a complete carpet set.
With the new piece in hand, I got the fender wheels done the other day and today I did the back flat piece, storage compartment doors etc and the passenger side. I have been going very slowly to avoid another Faux Pas. Of course I'm missing a few storage door hardware items and I know I have new door pulls for them somewhere, but can't find them anywhere. I'm sure they will turn up sometime.
I should be able to knock out the drivers side tomorrow and the carpet behind the seats. Still have to burn some holes for the bolts and not sure if I should cut the flap for the seat mounts or just leave the brackets above the carpet. I have C5 seats going in and custom brackets, so if I would ever go back to the standard seats it would mean an issue with the flap locations, so I'm leaning towards not cutting the flaps.... Opinions on the flaps?
Next up Shark Bar and deck lid install I think.
Last edited by RobRace10; 12-24-2009 at 08:45 AM.


 01-13-2010, 01:10 AM
#69
Melting Slicks
Thread Starter
So a few updates:
Really struggled getting the Hot Rod Air into this car. I don't think based on the instruction they (Hot Rod Air) ever actually did a complete install just in theory that this would work.
I think I finally have all the issues covered. No way that the two hoses they have for the center vent could ever be installed as per the instructions and then routing the drivers side vent hose was also a lot of fun. It is a tight fit for sure all the way around from the right side dash to the center gauge cluster.
So I also had a hard time getting the drivers side dash in. While doing this I decided to see where it was by putting the top dash in. Wouldn't you know the top dash slipped out of my hand flipped over, cracked and scratched the paint!
New dash arrived today from Wilcox, but it is still in the box.
I think I finally have the drivers dash and the passenger side so they will fit once I get everything done behind the dash that I need to.
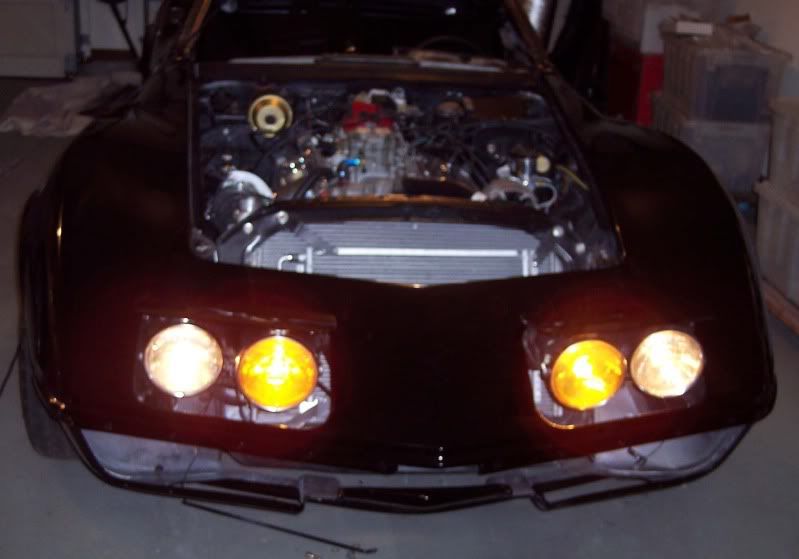
While waiting on the replacement dash I started installing the headlight buckets. Overall that went smoothly accept I find one actuator needs a new seal, so order that tonight. These yellow high beams came with the car, so thought I would keep them as it is a different look.

I also hooked up and tested the new HD radio. Sound pretty good, but I can tell I may need to get some kind of sub woofer in the car at some point.
I do have one concern as the side marker lights aren't working and none of the tail lights or the rear courtesy light. Not sure if it is because I don't have everything hooked up and grounded yet, so I'm not going to panic yet, but should track it down before the dash goes in for good. Since the headlights go on, I don't know why the marker lights wouldn't also. Any ideas?
Really struggled getting the Hot Rod Air into this car. I don't think based on the instruction they (Hot Rod Air) ever actually did a complete install just in theory that this would work.
I think I finally have all the issues covered. No way that the two hoses they have for the center vent could ever be installed as per the instructions and then routing the drivers side vent hose was also a lot of fun. It is a tight fit for sure all the way around from the right side dash to the center gauge cluster.
So I also had a hard time getting the drivers side dash in. While doing this I decided to see where it was by putting the top dash in. Wouldn't you know the top dash slipped out of my hand flipped over, cracked and scratched the paint!
New dash arrived today from Wilcox, but it is still in the box.
I think I finally have the drivers dash and the passenger side so they will fit once I get everything done behind the dash that I need to.
While waiting on the replacement dash I started installing the headlight buckets. Overall that went smoothly accept I find one actuator needs a new seal, so order that tonight. These yellow high beams came with the car, so thought I would keep them as it is a different look.
I also hooked up and tested the new HD radio. Sound pretty good, but I can tell I may need to get some kind of sub woofer in the car at some point.
I do have one concern as the side marker lights aren't working and none of the tail lights or the rear courtesy light. Not sure if it is because I don't have everything hooked up and grounded yet, so I'm not going to panic yet, but should track it down before the dash goes in for good. Since the headlights go on, I don't know why the marker lights wouldn't also. Any ideas?
01-13-2010, 12:25 PM
#71
Melting Slicks
Thread Starter
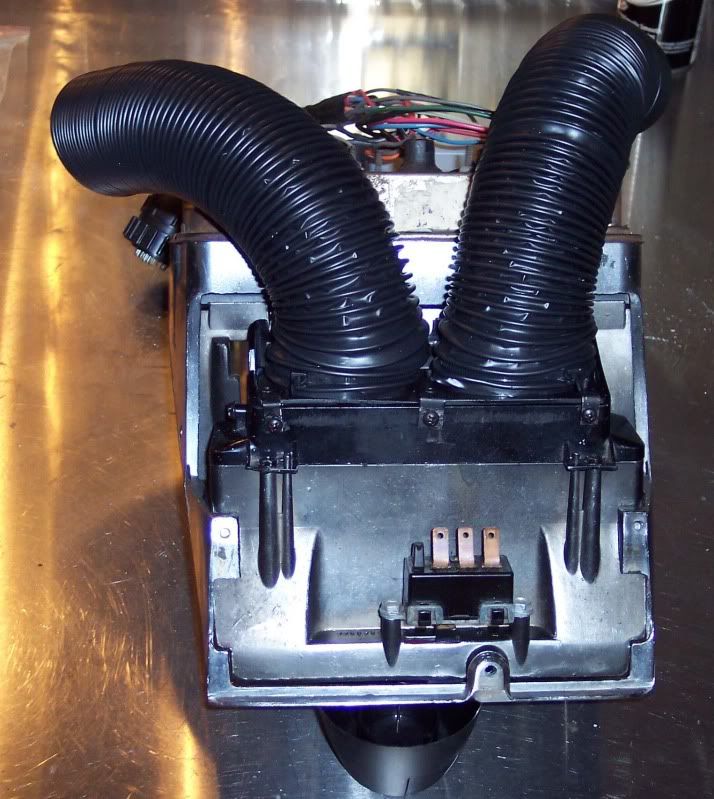
The Hot Rod Air center ducts are a pain. Take a look at this post for some ideas.
http://forums.corvetteforum.com/c3-g...-question.html
http://forums.corvetteforum.com/c3-g...-question.html
Here is when I was naive and figured Hot Rod Air new what they were doing and how the instructions said to install.
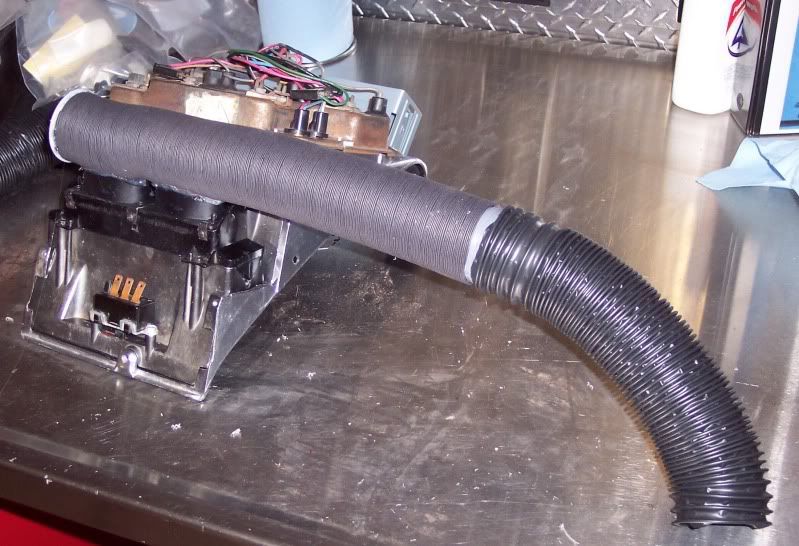
After figuring it wouldn't work and saw the other post you refereed to here is what I did but it to would not fit:
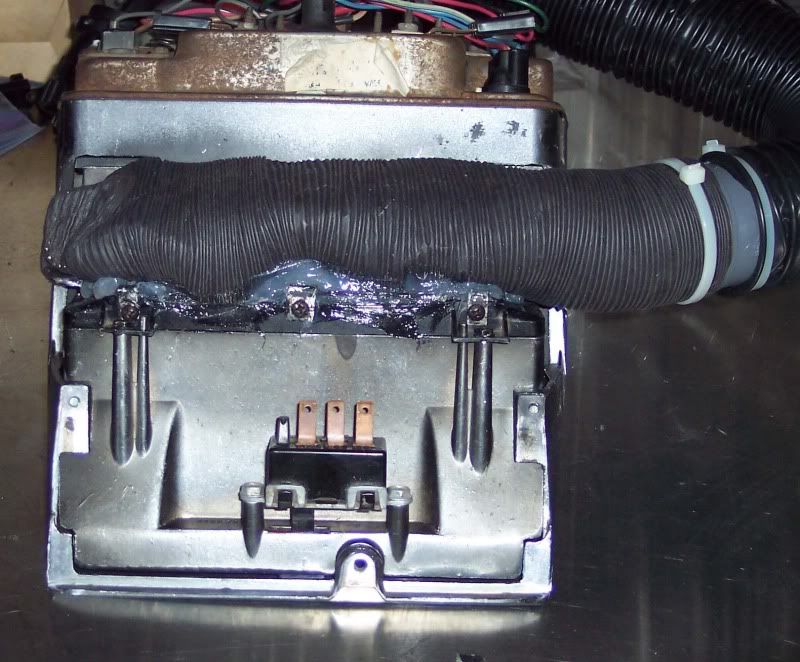
There was a third version and I didn't shoot pics of that as it didn't work either.
Then when I went to actually install this just clears. Doesn't look like what I would typically do, but I was desperate. Its very ugly and I'm not proud of this, but it flows air, fits and seals.
 01-13-2010, 11:53 PM
#73
Melting Slicks
Thread Starter
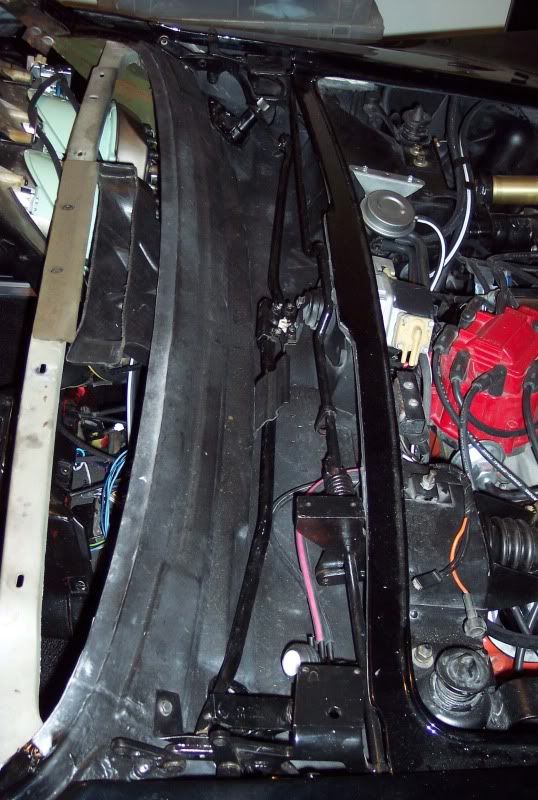
Tonight I put the wiper arm assembly in the wiper tray. You need to get behind the dash to get at the nuts so figured I better do this before I forget. I'm sure glad I spent the time digging out all the factory gunk from the tray last summer. I used Undergone from Eastwood and that softened it up enough to scrape it out. I had some spray on undercoating so did a few layers of that to seal up any seams etc and then some under hood black on top of that. There seems to be some adjustments to the wiper mechanism where it attaches to the wiper motor, so left that loose for now until I get time to read up on setting those up.
Everything is a little dusty from the body shop but a good cleaning in the spring should get rid of a lot of the gray specks etc as everything has new paint.
I know it is kind of mundane posting a pic of a wiper mechanism install, but figured you guys are visual and want pics of stuff.
Everything is a little dusty from the body shop but a good cleaning in the spring should get rid of a lot of the gray specks etc as everything has new paint.
I know it is kind of mundane posting a pic of a wiper mechanism install, but figured you guys are visual and want pics of stuff.
Last edited by RobRace10; 01-13-2010 at 11:56 PM.
01-18-2010, 11:54 PM
#74
Melting Slicks
Thread Starter
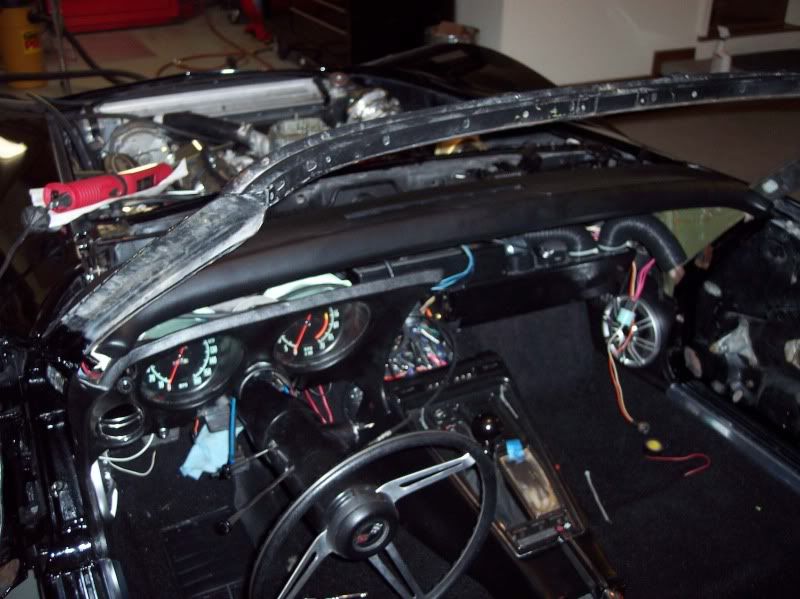
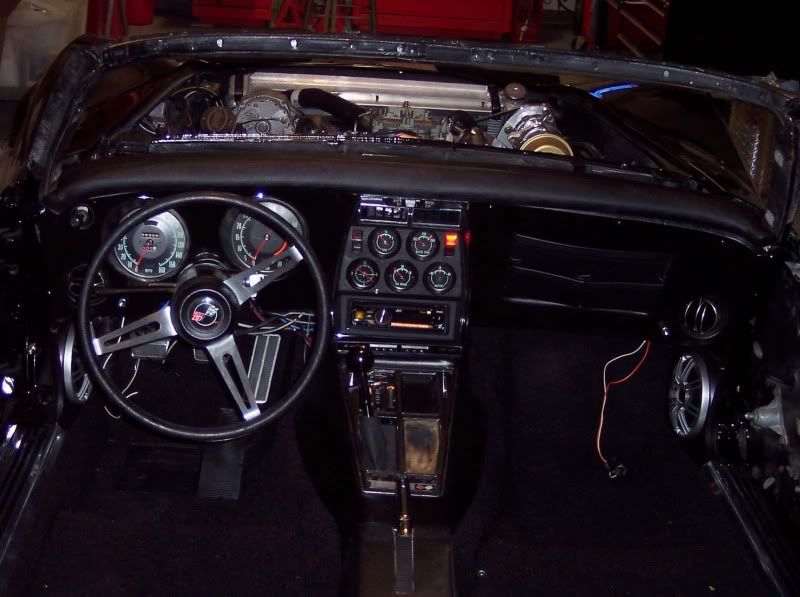
I finally got the dashes in. It has taken me an incredible amount of time and swearing to fit the hot rod air ducting, new stereo, wiring and vac hoses behind the dash and I think everything works except the oil pressure gauge. I did take it out and clean and lube per the instruction on Willcox's website, but it still doesn't work. My hope is the cleaning and lubing will eventually free it up enough to work. It was stuck pretty good and I was able to work the mechanism free, but apparently not free enough.
http://willcoxcorvette.com/instructi...repair_new.pdf
So here is a picture of the dash installed with the new HD radio actually playing some tunes. Again what a pain, of everything I have had to do on this car from the tearing it down to nothing and putting it back together, the dash and HRA install has got to be the worst job! Still have to finish the vac hoses and courtesy light installation, but pretty much the ruff stuff is done here. I'll try getting the seats and seat belts and Shark Bar next after I finish the details on the dash.
01-19-2010, 11:53 AM
#75
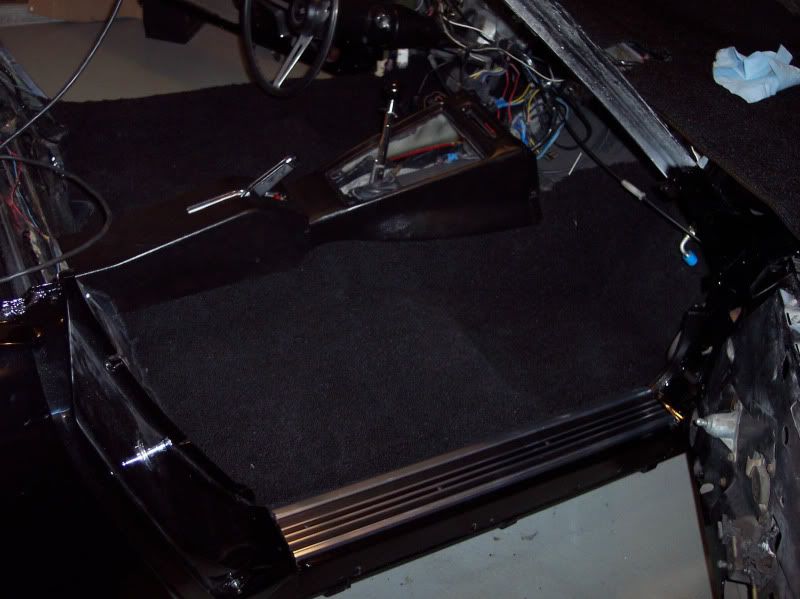
A couple of posts back, you asked for opinions about flaps vs. seat track above carpet. My two cents: I like it when the seat track is exposed. A nicely refinished track in semi-gloss black looks good. I've always thought the cut edge of the flap looks unfinished. It's obviously your choice, and you do fantastic work, so whatever you choose will look great! The devil is in the details!
Temvette72
Temvette72
01-19-2010, 12:34 PM
#76
Melting Slicks
Thread Starter
A couple of posts back, you asked for opinions about flaps vs. seat track above carpet. My two cents: I like it when the seat track is exposed. A nicely refinished track in semi-gloss black looks good. I've always thought the cut edge of the flap looks unfinished. It's obviously your choice, and you do fantastic work, so whatever you choose will look great! The devil is in the details!
Temvette72
Temvette72
Thanks for the post and opinion! I haven't cut the flaps, but the time is coming when I have to decide. Yesterday 69restomod stopped by and that was one of my questions to him also. He also thought either way would be fine. Most likely I will not cut the flaps, partly because the C5 seats I think cover a big portion of the mounting pads and since I have no seat tracks (bolting them direct to the floor), the brackets I made are very low profile, already painted a satin black and should not stand out. It never even occurred to me about doing flaps until I noticed in another thread that this was the standard practice.
If I ever decide to put the original seats in, I can cut them at that point.
01-20-2010, 12:10 AM
#78
Melting Slicks
Thread Starter
I have the non hoop Shark Bar. It should be pretty straight forward of an install at this point. During the body work process I had to install new rear mounts where the factory shoulder belts mount points are as they were removed from my car along with some of the fiberglass to allow for a roll bar to be welded through to the frame. I could tell where they were located and made some heavy duty Z shaped brackets that would go in the same place you should have mounting points in your car.
I will be cutting holes in the backs of the C5 seats and installing bezels for the shoulder belts to go through. I'm a little nervous about this as I don't want to screw up the seat backs.
Last year I found a really nice, high end set of Sabelt 3" belts out of a Porsche track car on eBay. They are past the certification dates for racing, but fine for street use. When I was test fitting them the lap belts were to short, but all I would have to do is order some webbing from Sabelt, to make them work. They are red and recently I decided the red would really stick out, with everything else being black, so I ordered some black no name 2" belts for now until I find what I want and will sell the Sabelts.
I'll certainly post pics of the Shark Bar, seat mods and belt install.
01-20-2010, 09:04 PM
#79
Drifting

I have the non hoop Shark Bar. It should be pretty straight forward of an install at this point. During the body work process I had to install new rear mounts where the factory shoulder belts mount points are as they were removed from my car along with some of the fiberglass to allow for a roll bar to be welded through to the frame. I could tell where they were located and made some heavy duty Z shaped brackets that would go in the same place you should have mounting points in your car.
I will be cutting holes in the backs of the C5 seats and installing bezels for the shoulder belts to go through. I'm a little nervous about this as I don't want to screw up the seat backs.
Last year I found a really nice, high end set of Sabelt 3" belts out of a Porsche track car on eBay. They are past the certification dates for racing, but fine for street use. When I was test fitting them the lap belts were to short, but all I would have to do is order some webbing from Sabelt, to make them work. They are red and recently I decided the red would really stick out, with everything else being black, so I ordered some black no name 2" belts for now until I find what I want and will sell the Sabelts.
I'll certainly post pics of the Shark Bar, seat mods and belt install.
I will be cutting holes in the backs of the C5 seats and installing bezels for the shoulder belts to go through. I'm a little nervous about this as I don't want to screw up the seat backs.
Last year I found a really nice, high end set of Sabelt 3" belts out of a Porsche track car on eBay. They are past the certification dates for racing, but fine for street use. When I was test fitting them the lap belts were to short, but all I would have to do is order some webbing from Sabelt, to make them work. They are red and recently I decided the red would really stick out, with everything else being black, so I ordered some black no name 2" belts for now until I find what I want and will sell the Sabelts.
I'll certainly post pics of the Shark Bar, seat mods and belt install.
 Thanks.