
My Winter Project - Rear Suspension Rebuild
 01-12-2009, 04:12 PM
#1
Melting Slicks

Thread Starter
Member Since: May 2006
Location: Nashville TN
Posts: 2,511
Received 347 Likes
on
253 Posts
St. Jude Donor '09

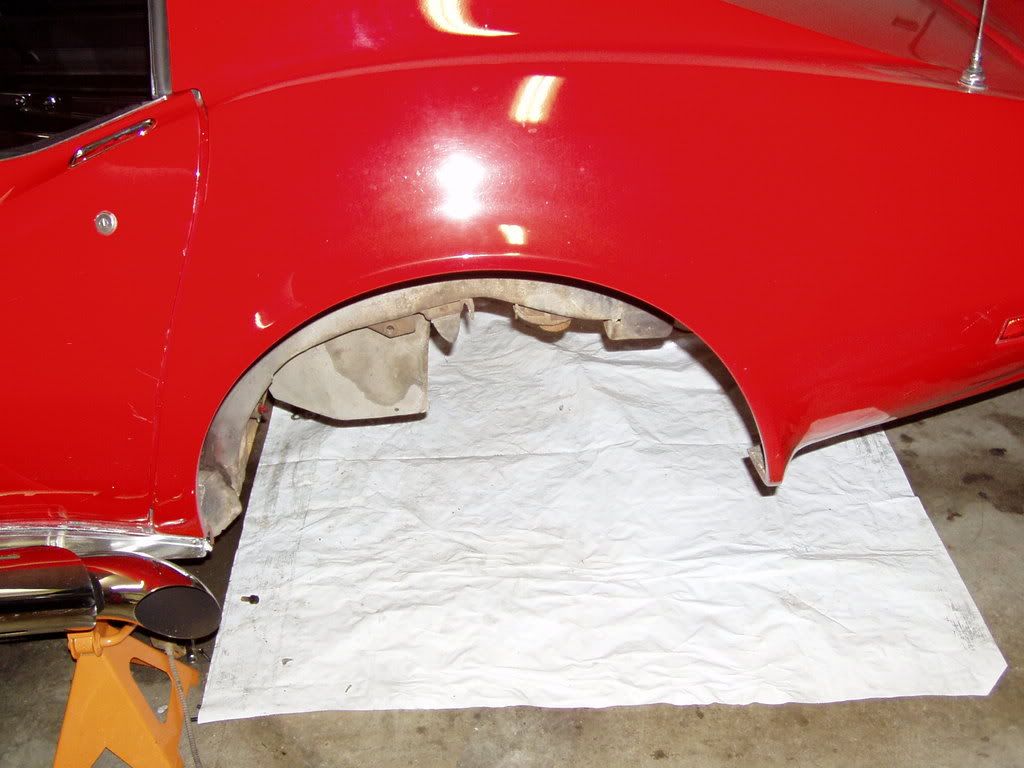
I started my winter project last week . . . rebuilding the rear suspension. I'm replacing everything except for the rear differential. I bought the Street/Slalom suspension package from VanSteel (550lb front, 360lb rear springs), rebuilt/exchange T/As, Spicer solid u-joints . . . everything is poly bushings. Front is completed, now I'm working on the rear. For this project, I'm not getting the differential rebuilt -- will have to do that another project due to $$$. I'll just replace the leaking rear cover gasket, replace the fuild and paint. Everything will get cleaned and a freash coat of paint. This is what it looks like now:
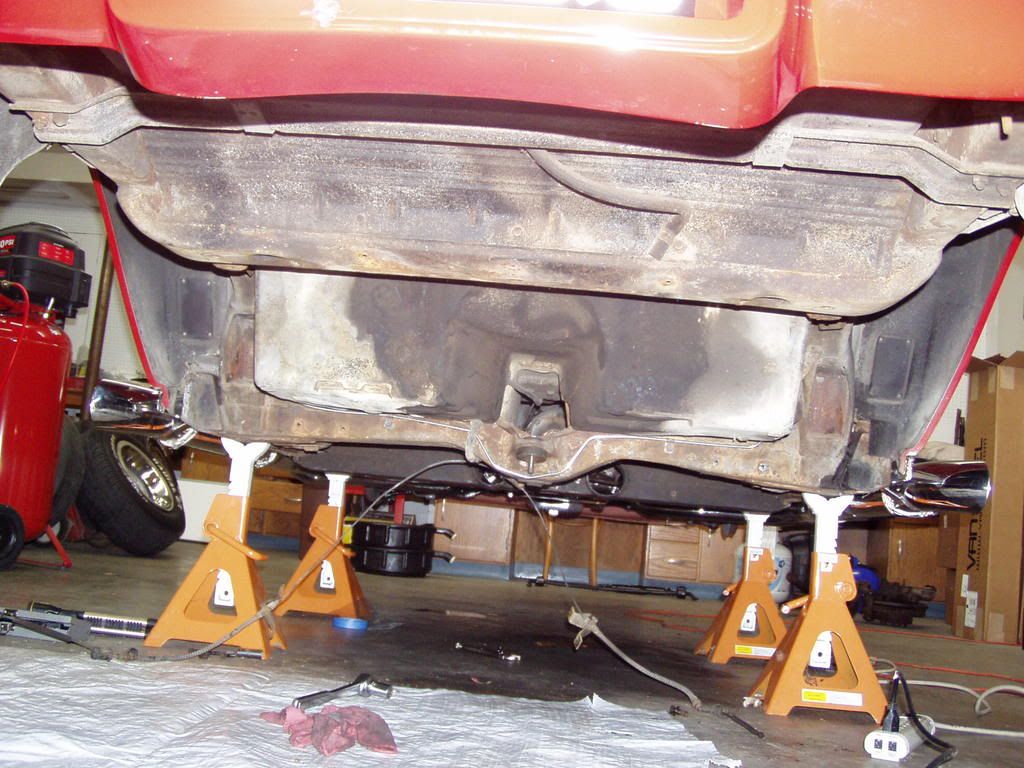
Everything came right out. T/A bolts slid right out; shock mounts popped loose second wack. I think I got pretty lucky so far. I did have one spindle that had a different size nut . . . not a problem, but I thought that was sort of interesting; spindle replaced in the past?

Rear differential came right out. Removed the front mounting bolt and two rear bolts and pulled it back and out.
I'll post more pics as I progress. This is the deepest I've ever dove into a car, so wish me luck. However, with all your help, I have no doubt we'll git-r-done
Everything came right out. T/A bolts slid right out; shock mounts popped loose second wack. I think I got pretty lucky so far. I did have one spindle that had a different size nut . . . not a problem, but I thought that was sort of interesting; spindle replaced in the past?
Rear differential came right out. Removed the front mounting bolt and two rear bolts and pulled it back and out.
I'll post more pics as I progress. This is the deepest I've ever dove into a car, so wish me luck. However, with all your help, I have no doubt we'll git-r-done
Last edited by redman76; 04-13-2009 at 11:36 AM.
 01-12-2009, 04:22 PM
#2
Terrorizing Orange Cones


Excellent progress, Redman. Looks and sounds like you haven't had to fight like some of us did, wrestling that rascal out from under the car.
From your description, you are on top of the situation and it's only a matter of time to do the cleaning, painting and reassembly.
Keep us posted with the fine images and shout out if you run into any delay.
You've got a good grip on it, Man.
From your description, you are on top of the situation and it's only a matter of time to do the cleaning, painting and reassembly.
Keep us posted with the fine images and shout out if you run into any delay.
You've got a good grip on it, Man.
01-12-2009, 04:31 PM
#3
Safety Car


Did you spray down the front pinion seal area with penetrating oil?
I saw a picture here of a rear pumpkin and cover done with a glossy GM engine orange and everything else in semi black. It looked spectacular.
Good luck and keep posting pics
I saw a picture here of a rear pumpkin and cover done with a glossy GM engine orange and everything else in semi black. It looked spectacular.
Good luck and keep posting pics
01-12-2009, 04:41 PM
#4
Safety Car
Good luck on getting your project done. I just finished working on my 75 and I replaced the TA from Vansteel. But from there the project escalated into replacing more parts than I intended.
You will be happy with the end result when you see a nice, clean fresh area. I repainted the chassis with Eastwood chassis black, and degreased a lot of the other areas. It really looks good.
You are way ahead of me with removing the rear end though.
That may make your restoration job a lot easier.
kdf
01-12-2009, 05:02 PM
#5
Melting Slicks
Thread Starter
Member Since: May 2006
Location: Nashville TN
Posts: 2,511
Received 347 Likes
on
253 Posts
St. Jude Donor '09
Yeah, PB Blaster . . . trying to get a couple of subborn u-joints loose. I'm still trying to figure out what color to paint everything, but that's an interesting suggestion . . . will think about.

 01-12-2009, 09:23 PM
#8
Le Mans Master

I was just under the back of mine a 1/2 hour ago trying to decide what to do as far as the differrential on mine is concerned. I too would like to drop mine and get in there to clean and repaint.
 01-20-2009, 11:50 PM
#11
Melting Slicks
Thread Starter
Member Since: May 2006
Location: Nashville TN
Posts: 2,511
Received 347 Likes
on
253 Posts
St. Jude Donor '09
Made some progress tonight. I finally got all my u-joints out . . . figured out what the problem was -- I wasn't using a big enough BFH  I put the 3 pounder on it and knocked them right out. I'm getting my final parts list together and selecting paints/colors. I'm thinking there will be an orange pumpkin in my future with matching brake calipers . . .
I put the 3 pounder on it and knocked them right out. I'm getting my final parts list together and selecting paints/colors. I'm thinking there will be an orange pumpkin in my future with matching brake calipers . . .
01-30-2009, 11:43 AM
#12
Melting Slicks
Thread Starter
Member Since: May 2006
Location: Nashville TN
Posts: 2,511
Received 347 Likes
on
253 Posts
St. Jude Donor '09
While I'm waiting on some of my parts to arrive and for the temps to warm up a little, I've been playing around a little bit with cleaning parts. Originally, I was thinking about buying a sand blaster, but decided I didn't want to spend that kind of money for the few parts I have. I've also been reading about tumblers for cleaning parts. Got me to thinking . . . I have my kids old rock tumbler, why not try that for grins. It's small, but it worked good. I used sand as my abrasive and then used my zinc plating kit to put a nice metallic finish on them. It's not practical since I can only do small stuff, but fun to play with. Here is the before and after shot:

03-02-2009, 04:46 PM
#13
Melting Slicks
Thread Starter
Member Since: May 2006
Location: Nashville TN
Posts: 2,511
Received 347 Likes
on
253 Posts
St. Jude Donor '09
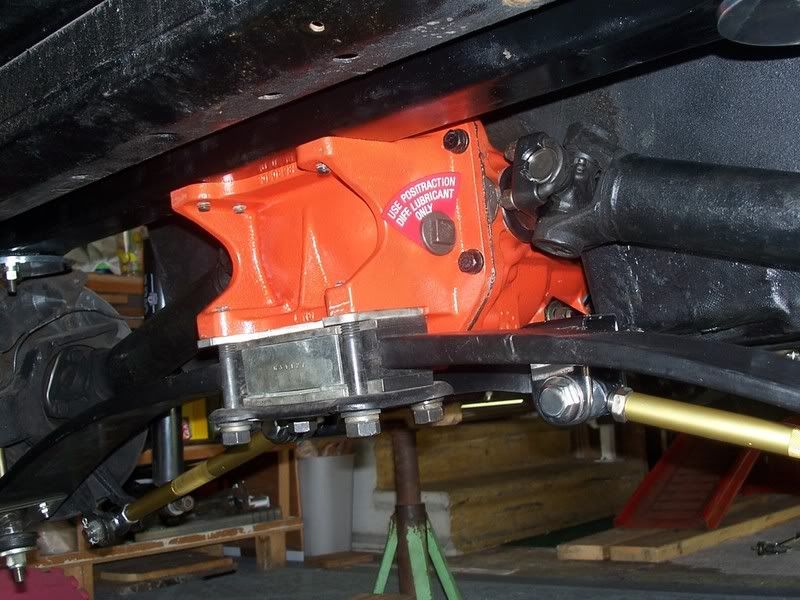
Making steady progress . . . all my parts are in now including rebuilt O-ring piston calipers. I painted them with a 2-part high temp enamel. I'm using the same color on the differiential which I just finished painting; I'll post pics of that in a couple of days after everything dries good and I get the rear cover back on.


 03-05-2009, 10:28 AM
#15
Melting Slicks
Thread Starter
Member Since: May 2006
Location: Nashville TN
Posts: 2,511
Received 347 Likes
on
253 Posts
St. Jude Donor '09
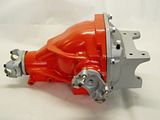
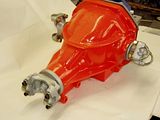
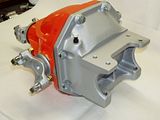
Here are some pics of the rearend. I had to replace the rear cover -- it's been leaking and upon inspection, looked liked someone had patched inside and out with some type of epoxy. For paint I used POR15. I've read a lot about others using POR15, so thought I would give it a try. That stuff is amazing! I brushed on the POR and brushed engine enamel for the orange topcoat. The aluminum color is sprayed. Weather is supposed to be good here this weekend, so the plan is to paint all the other miscellaneous hardware and finish cleaning the area under the car for paint. My goal is to have the car back on the road by the end of March.


 03-05-2009, 12:07 PM
#16
Melting Slicks
yer pumpkin is a thing of beauty. when i did my rear i coated everything w/por-15. lookn forward to the finished product.
. when i did my rear i coated everything w/por-15. lookn forward to the finished product.
03-05-2009, 12:56 PM
#17
Le Mans Master
Man, you're lucky everything came out so easily. Every time I read a rear suspension rebuild thread, I dread the day I do mine. Especially getting the TA arms out. You're doing beautiful work!
Glenn
Glenn
 03-05-2009, 05:05 PM
#19
Team Owner

Member Since: Sep 2006
Location: Westminster Maryland
Posts: 30,173
Likes: 0
Received 2,878 Likes
on
2,515 Posts
Hi RM,
It looks like you're having a good time on your project. I enjoy seeing your pictures. Good luck as you carry on!!!
Regards,
Alan
It looks like you're having a good time on your project. I enjoy seeing your pictures. Good luck as you carry on!!!
Regards,
Alan

