
custom fiberglass interior (many pics)

 07-30-2008, 11:40 AM
#122
Drifting

Member Since: Dec 2004
Location: Edgewater (20 miles south of Daytona) Florida
Posts: 1,321
Likes: 0
Received 0 Likes
on
0 Posts
I've been following your project with keen interest. I've done a lot of 'modifications' to my car both outside as well as designing the entire interior also.
Isn't the fun in the fabrication? I love taking an idea from the head and creating it in fiberglass. YOur project is awesome and I love all the progress photos and notes. Please keep taking photos and posting. (2 thumbs up!) Glenn
Isn't the fun in the fabrication? I love taking an idea from the head and creating it in fiberglass. YOur project is awesome and I love all the progress photos and notes. Please keep taking photos and posting.
(2 thumbs up!) Glenn
07-30-2008, 01:23 PM
#123
Racer


Member Since: Aug 2007
Location: Spokane WA
Posts: 289
Likes: 0
Received 0 Likes
on
0 Posts
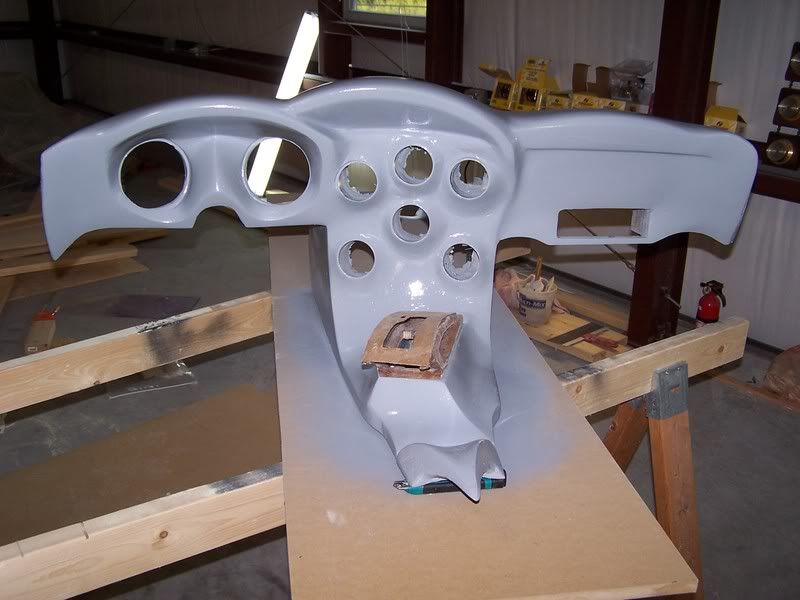
The work is without question very creative and of a high caliber in terms of quality. It seems that the design and shape of the dash has created a lot of unused surface area. I can understand that you are trying to create a unified look or theme throughout the interior, but it looks to me like the location for the center guages is not as balanced and that you have a great deal of unsed surface area above and below the guages. The center hump appears to be just stuck on top of the dash for no other purpose than to have the curve there. Perhaps the paint work will break up the open areas and pull the layout and desing together a bit more. I can't wait to see where it will go from here. I applaud the effort and forethought that you have taken. This is such a huge undertaking, especially for someone that has never done anything like it before. Your finished product will certainly stand out in a crowd. Congrats!
08-10-2008, 01:02 PM
#124
Melting Slicks

Thread Starter
Member Since: Jul 2005
Location: winter haven florida
Posts: 2,052
Likes: 0
Received 40 Likes
on
35 Posts
St. Jude Donor '12

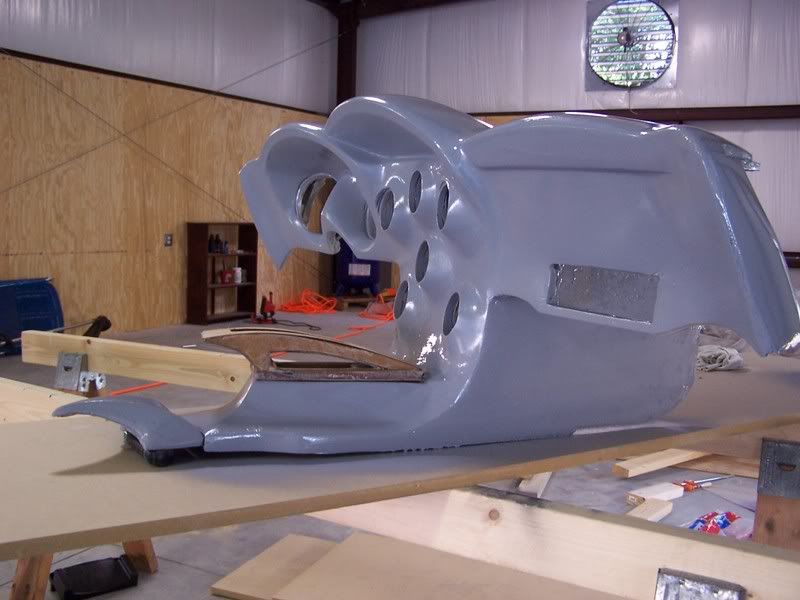
a few more pics. the dash has been sealed with spi epoxy primer . this stuff is great. it lets you see every line and imperfection so it makes the finish work easier. i also used a product called evercoat fiber tech for the area around the guages. it is very strong and is much better to work with than duraglass. tuesday the the sanding and final filling with the rage gold will start and the fabrication of the shifter area will be the next project to finish. there is quite a bit of work left on it such as frosting some plexiglass and cutting it to fit then the lettering. the dash will have inlays in paint and meatal work to help add to and break up some of the lines. when sitting in the seat with my hands on the wheel, the open space goes away in the lower part, my hands take up that area. also the shifter sits inside the two lower guages when sitting in the car so it blends. i wanted the guages to have an unobstructed view with a straight line of sight to the driver. it seems to work when in the car. once the switches and controls go in it will help take up some of the now unused area. funny how the last post cought a mistake that was made early in the design stage. the center hump was part of the original guage layout, but for several reasons that layout did not work like i had plannned so it had to be redone. good catch on that one. the paint and some inlay work should help to blend it better in the end though. thanks for all the kind words to everyone that has been following in my learning process. i will post more pics tuesday when the filler has been done and sealed with epoxy again.


 i'm following along and i like what i see
08-10-2008, 04:34 PM
i'm following along and i like what i see
08-10-2008, 04:34 PM
#128
Burning Brakes

Isnt the stock shifter opening straight and centered to the dash? unless you have your trans shifted in a weird orientation to the tunnel ...I think you may have a shifting problem 

And with the lower portion shaped like that you are giving up a lot of space. you could put 2 cup holders or a space for your I-pod or a covered pocket for things and a place to put spare change. If I was that far into the design I would utilize the space from the bottom guages all the way back to the bulkhead behind the seats. you should add a power point or 2 in the console for charging your phone and also to power the navigation if you use one. I would put in a nice big armrest betwean the seats with storage inside since you did away with the right dash compartment and put your head unit there. Just some things to consider before you call it ready for PAINT !!!!!!!!!
Hammadown
Last edited by hammadown; 08-10-2008 at 04:47 PM.
08-10-2008, 06:25 PM
#129
Melting Slicks
Thread Starter
Member Since: Jul 2005
Location: winter haven florida
Posts: 2,052
Likes: 0
Received 40 Likes
on
35 Posts
St. Jude Donor '12
Isnt the stock shifter opening straight and centered to the dash? unless you have your trans shifted in a weird orientation to the tunnel ...I think you may have a shifting problem
And with the lower portion shaped like that you are giving up a lot of space. you could put 2 cup holders or a space for your I-pod or a covered pocket for things and a place to put spare change. If I was that far into the design I would utilize the space from the bottom guages all the way back to the bulkhead behind the seats. you should add a power point or 2 in the console for charging your phone and also to power the navigation if you use one. I would put in a nice big armrest betwean the seats with storage inside since you did away with the right dash compartment and put your head unit there. Just some things to consider before you call it ready for PAINT !!!!!!!!!
Hammadown
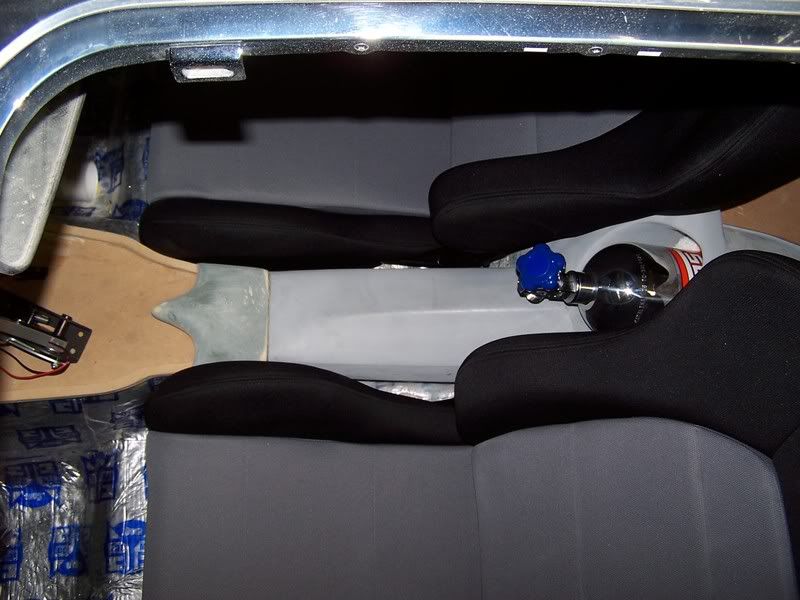
this shows the head unit and the nos set up. it is very hard to show the correct view and angle in the pics as it is in real life, but once sitting in the actual seat the set up and how everything is arranged for me as the driver makes a lot more sense. this car is not going to be a d/d as everything except the interior has been set up for high performance. the interior is ment to be functional art. the design is ment to be simple yet has complex curves. it has everything that i want in it and it has been set up for how i sit behind the wheel when i drive. i had considered everything i wanted before it was built. it is built for what i want. the nice thing about a custom is it can be built however you want it to be. it can have as much or as little as you want in it. it can be set up so things are where you want them. it will not be long distance friendly as the gas will be consumed at a very quick rate. i am running a 3.73 gear, bto stage 3 2004r trans, 396 s.b. with afr heads and a custom crower roller cam. i also have lightened up the car by close to 400 lbs. it has a vbp suspension with dual mount springs front and rear. it will do more than just look good, it sould perform quite well also. there will be a lot more to come in the future. the interior is only just part of what is being done to the car.

Last edited by 2000FRCZ19; 08-10-2008 at 07:15 PM.
08-10-2008, 07:33 PM
#130
Burning Brakes
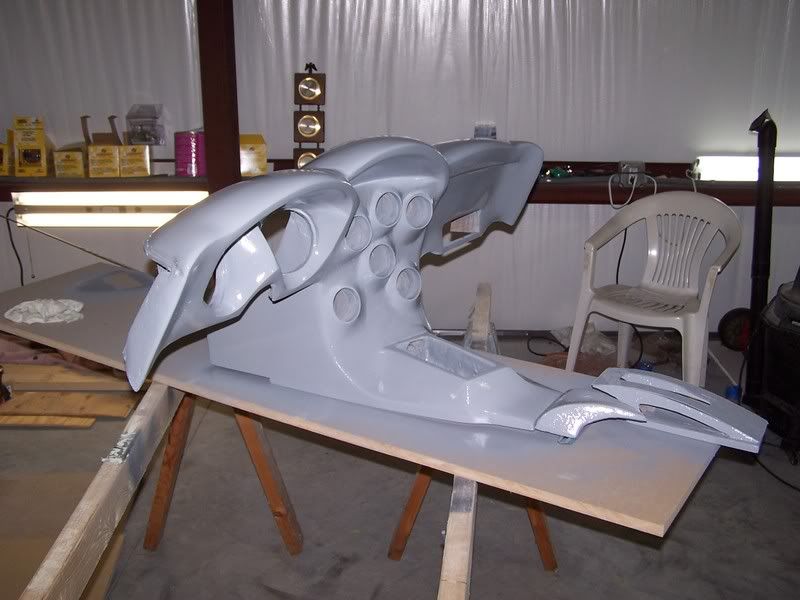
I really admire what you've achieved here. I stared at this photo for ages in wonder:
It's a really impressive structure. I never imagined it would end up looking this smooth when I saw how the shape was constructed. Thanks for sharing the process with us.
I'm fascinated to find out how you're going to detail this with paint and metal in the way you hint above.
It's a really impressive structure. I never imagined it would end up looking this smooth when I saw how the shape was constructed. Thanks for sharing the process with us.
I'm fascinated to find out how you're going to detail this with paint and metal in the way you hint above.

 08-10-2008, 08:38 PM
#133
Melting Slicks
Thread Starter
Member Since: Jul 2005
Location: winter haven florida
Posts: 2,052
Likes: 0
Received 40 Likes
on
35 Posts
St. Jude Donor '12
lol no talent here, i just came up with some of the basic ideas and some of the design. i do most of the grunt work ( glass, cut and sand and sand and sand and sand ). my friend dan that has been teaching me everything is the true talent. there are some things that i wanted but have no idea how to do and he has taken the time to show me how to do it. he also thinks ahead during the design and keeps me from forgetting things that will need to be done in the future of the project. i wish i could take all the creadit for this but without dan i would be lost and confused. once the metal work begins on the car his true tallents will come out.
 08-11-2008, 09:31 AM
#136

Again: awesome! Both you and Dan are doing great work: I just barely managed to fab some decent looking speaker housings for the kick-panels. Respect! 
 08-11-2008, 10:12 AM
#138
Race Director

Member Since: May 2008
Location: Houston (NW of) Texas
Posts: 17,140
Likes: 0
Received 2 Likes
on
2 Posts

I have been watching for a while ... and it just keeps getting better and better. Just a killer design and great work!
(I don't mean to hijack your thread but do you mind sharing what seats those are? Did you have to narrow the center console to get them to fit?)
(I don't mean to hijack your thread but do you mind sharing what seats those are? Did you have to narrow the center console to get them to fit?)
08-11-2008, 05:14 PM
#139
Melting Slicks
Thread Starter
Member Since: Jul 2005
Location: winter haven florida
Posts: 2,052
Likes: 0
Received 40 Likes
on
35 Posts
St. Jude Donor '12
this is a thread for info for everyone that is interested. 
they are e-bay seats i found about a year ago. the brand name is bride. they fit with no problems. i am having the seats recovered with a nice leather in a two tone and i will be shaving some of the foam off the sides on the upper backs ( bolsters ) about an inch and i will have the height cut down about 3 inches. they fit fine but for the look i am wanting they will be modded. kind of funny to buy a seat and then recover and mod it isnt it. they are very light and feel very comfortable. they were $280 shipped for the pair.
