FYI Tremec 5 speed
#1
Cruising


Thread Starter
Hi all ! Finished 5 speed install in 63 . Just an fyi if you are thinking about doing it ! In stall with engine in place is just about impossible. I'm sure some have experienced this ? Instructions stated it being tricky !! Recommend pulling engine ! Love the tranny with my 4:11s but what a SOB! Have Fun !

Popular Reply
04-06-2024, 06:00 PM
Drifting


@GearheadJoe did a nice write up on installing a Tremec with the engine in. It can be done, but isn't intuitive
I recall that I have stated in other threads that I think it's easier to install a Tremec TKO-600 with the engine in the car, but I can't recall whether I ever posted a detailed description of the process. I'm going to elaborate here with some text and photos that show the basic process.
When I bought my Tremec TKO-600 from Keisler back in 2008, Keisler included a written procedure for installing the TKO with the engine in the car. A copy of those instructions is attached. I simply followed those instructions step-by-step, and the TKO-600 went right in. The process is not at all intuitive and requires patience for some tedious steps, but it works well. While I have not done a TKX installation, I suspect that the TKO method would work for that too. Overall, I think it's a lot less work than pulling the engine.
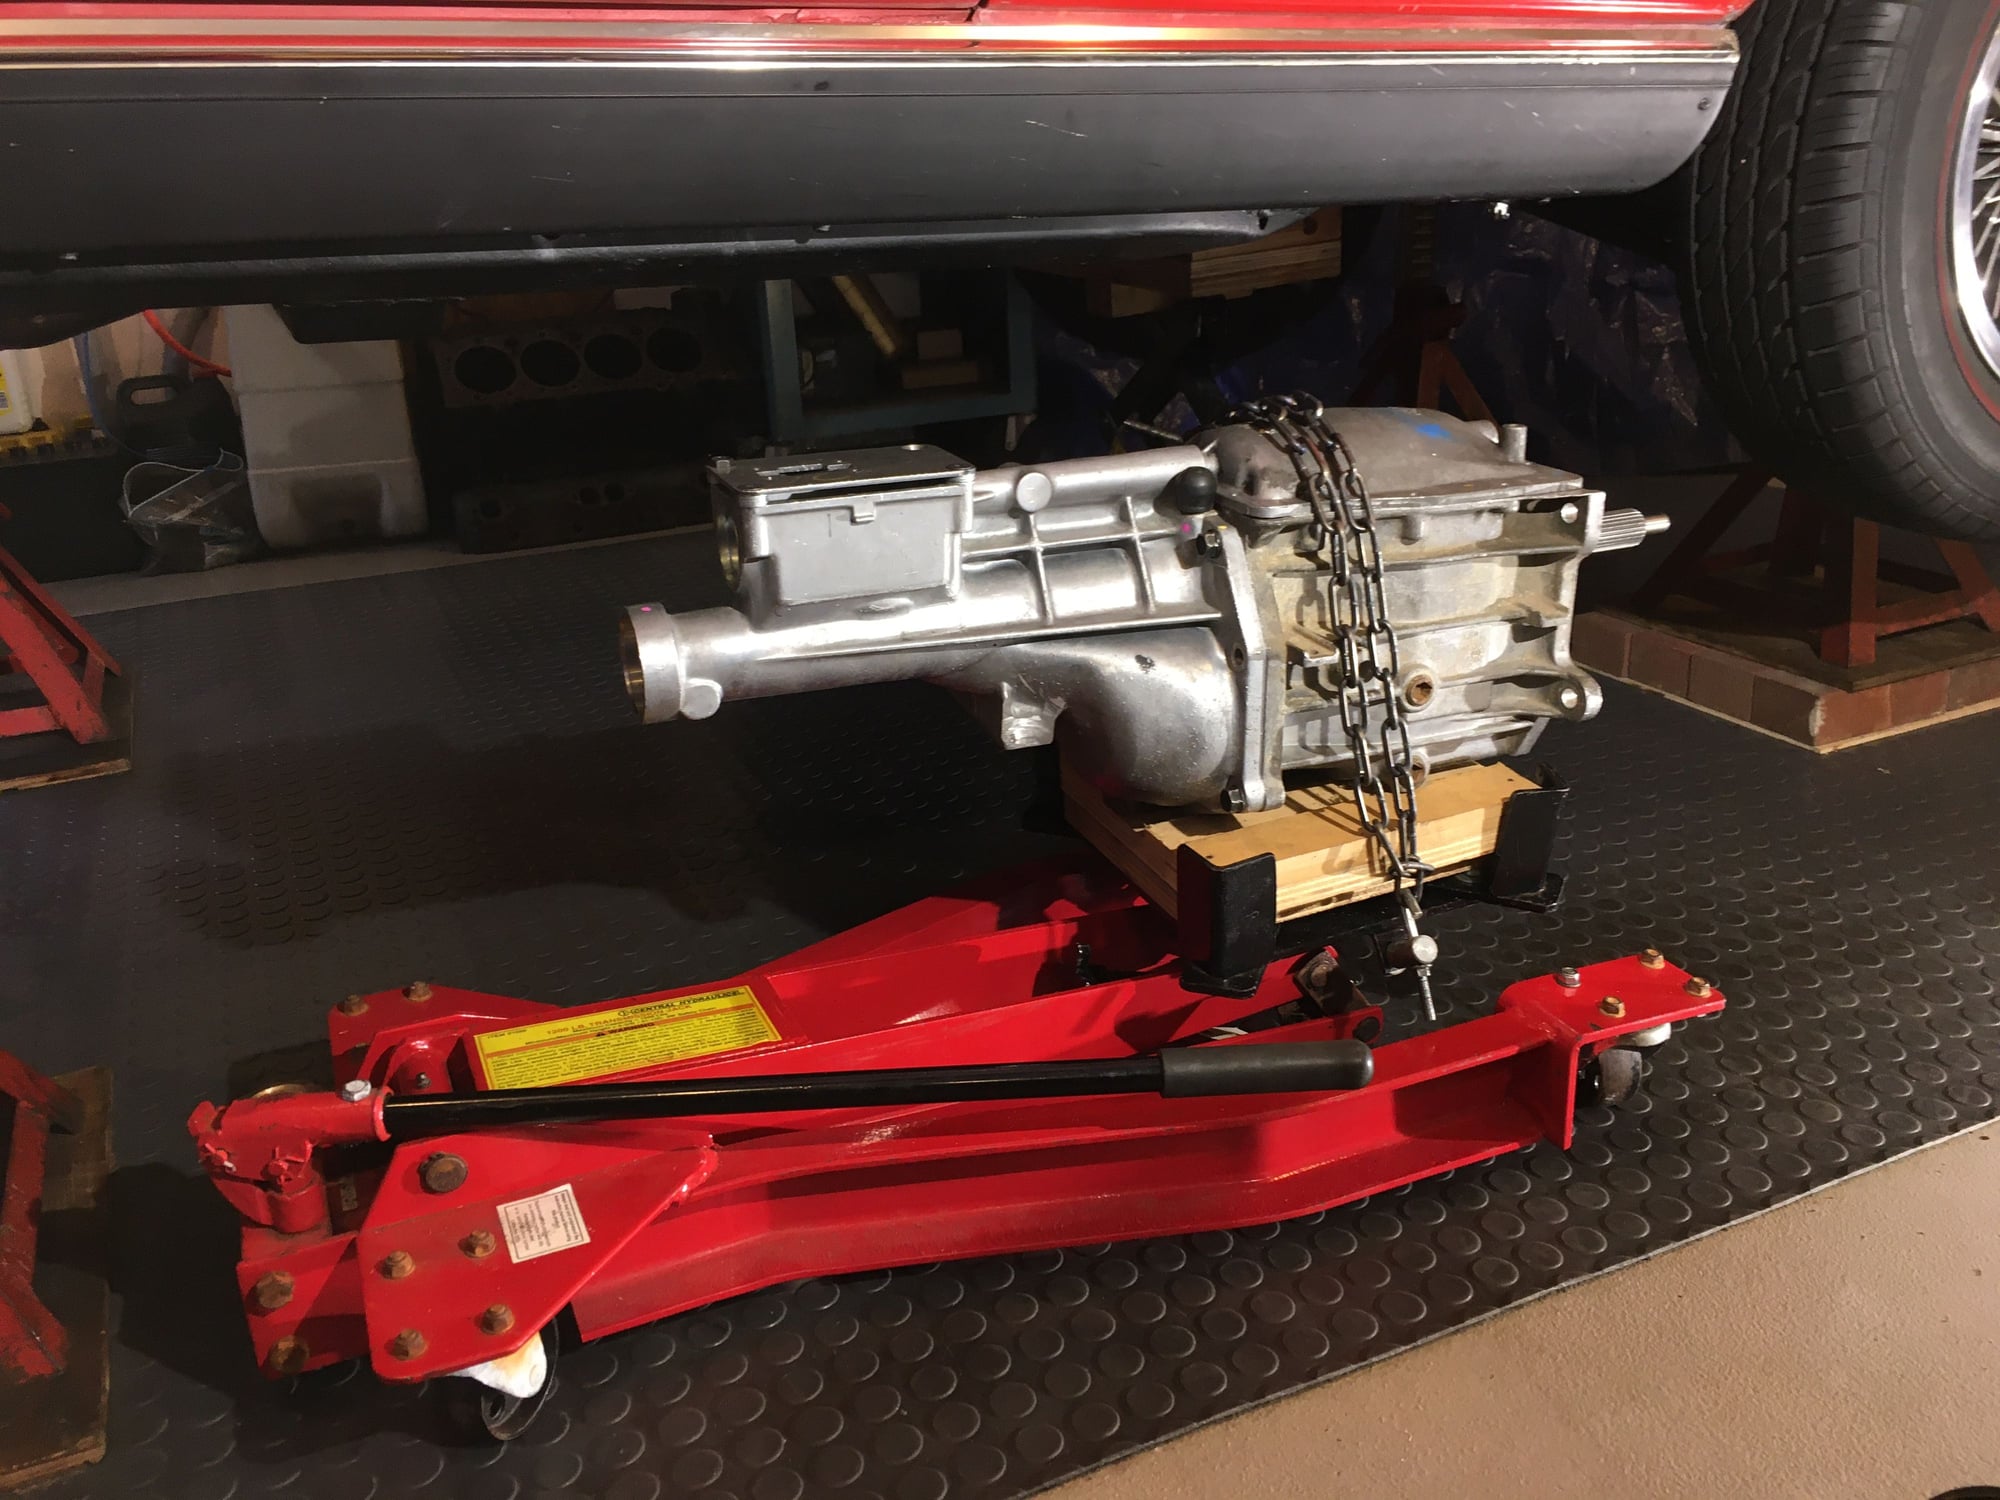
The only caveat is that you really need to have a 3-axis transmission jack that allows you lift the transmission, tilt it left or right, and tilt it front-to-back. Some of the steps require that the transmission be held a specific position while you perform other tasks. The 3-axis transmission jack allowed me to install the transmission by myself, with the engine in the car.
I'm currently writing some detailed instructions for installing a Tremec T5 5-speed with the engine in the car (wrapping up my T5 conversion project described in this thread):
Article on installing a T5 5-speed in a C2 - CorvetteForum - Chevrolet Corvette Forum Discussion.
Since I have better photos of my T5 installation than my TKO installation, I will be using the T5 photos in this thread. The process for the T5 is similar to the TKO, but slightly easier. I will explain the added step for the TKO after first explaining the method for the T5.
The basic method is what I have seen called the "clamshell" method. It requires that you tilt both the engine and the transmission downward and then gradually raise each of them a little bit at a time. The following photos illustrate the clamshell method.
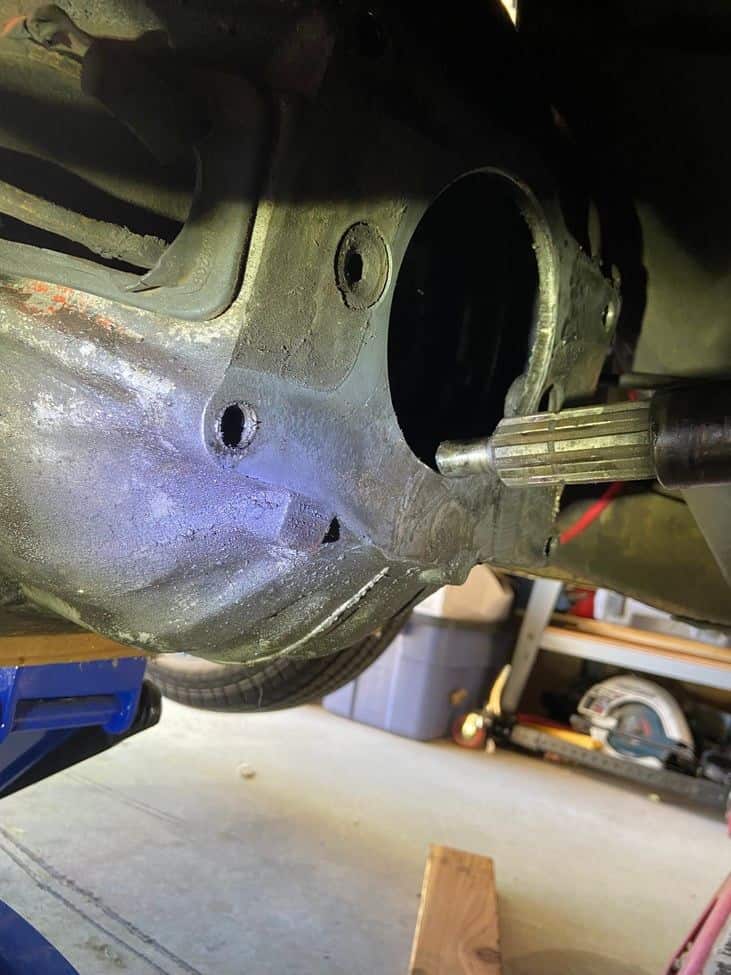
Following is a photo (copied from a post here on CF) of a Muncie being installed using the clamshell method described in the GM shop manual for a C2. Note that both the engine and the transmission have to be pointed downward to get the input shaft past the bellhousing:
Note that if the Muncie was just a little bit longer, the Muncie input shaft would not clear the bellhousing. All of the Tremec 5-speeds are longer than a Muncie. However, for the Tremec T5, if the bellhousing is unbolted from the engine and hung loosely on the input shaft, the tip of the input shaft only has to clear the clutch pressure plate assembly. The following series of photos show a T5 going in.

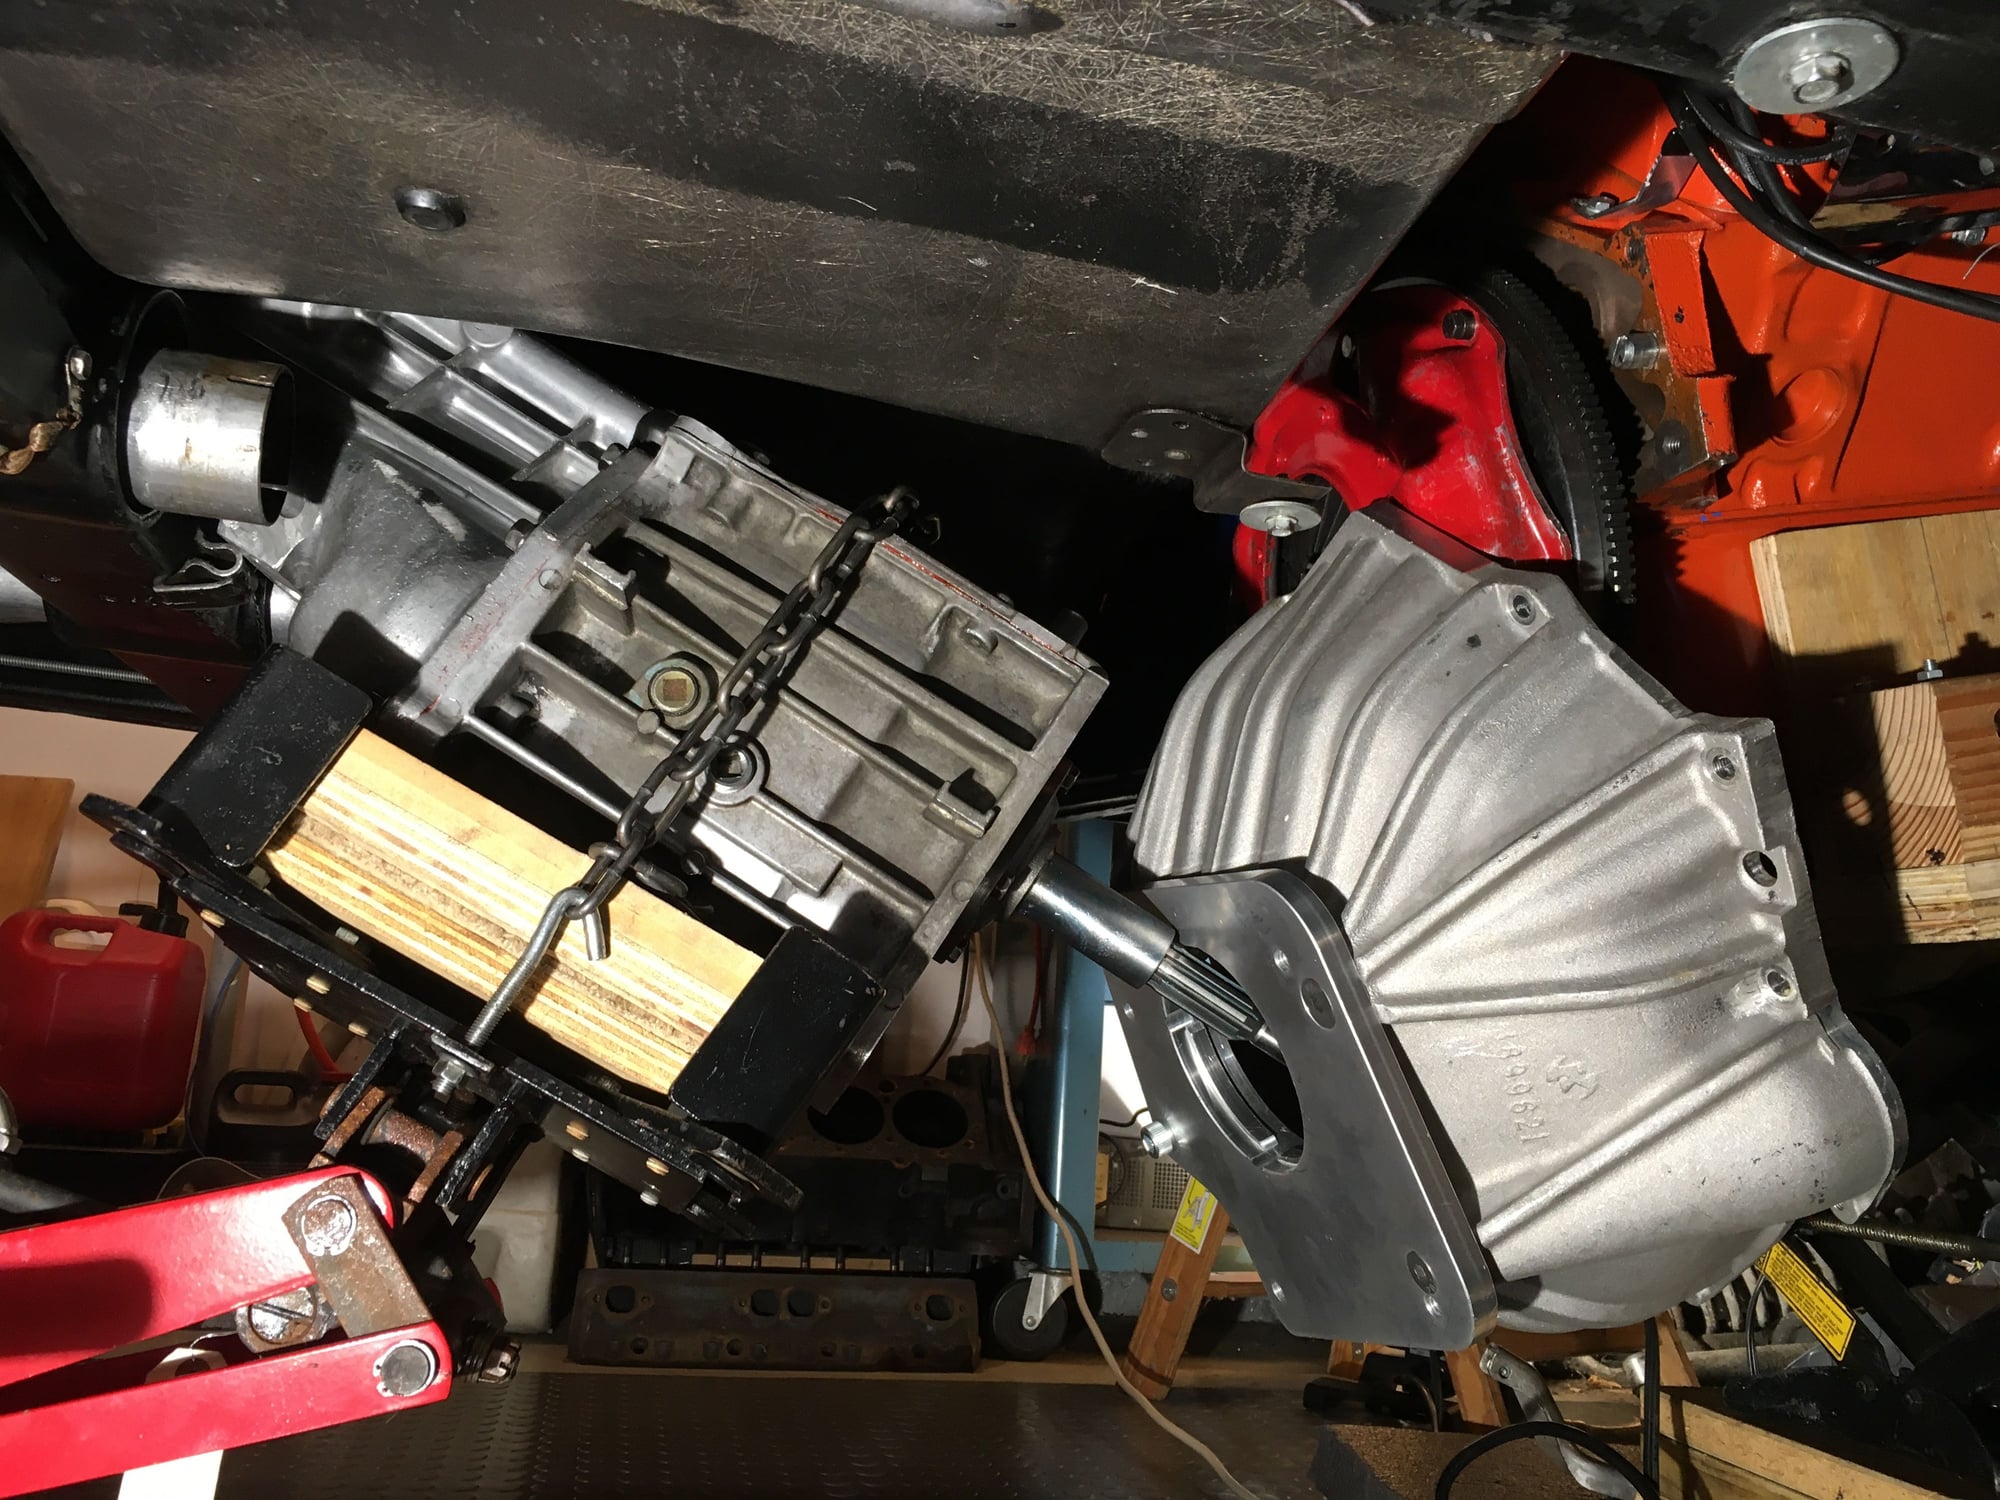

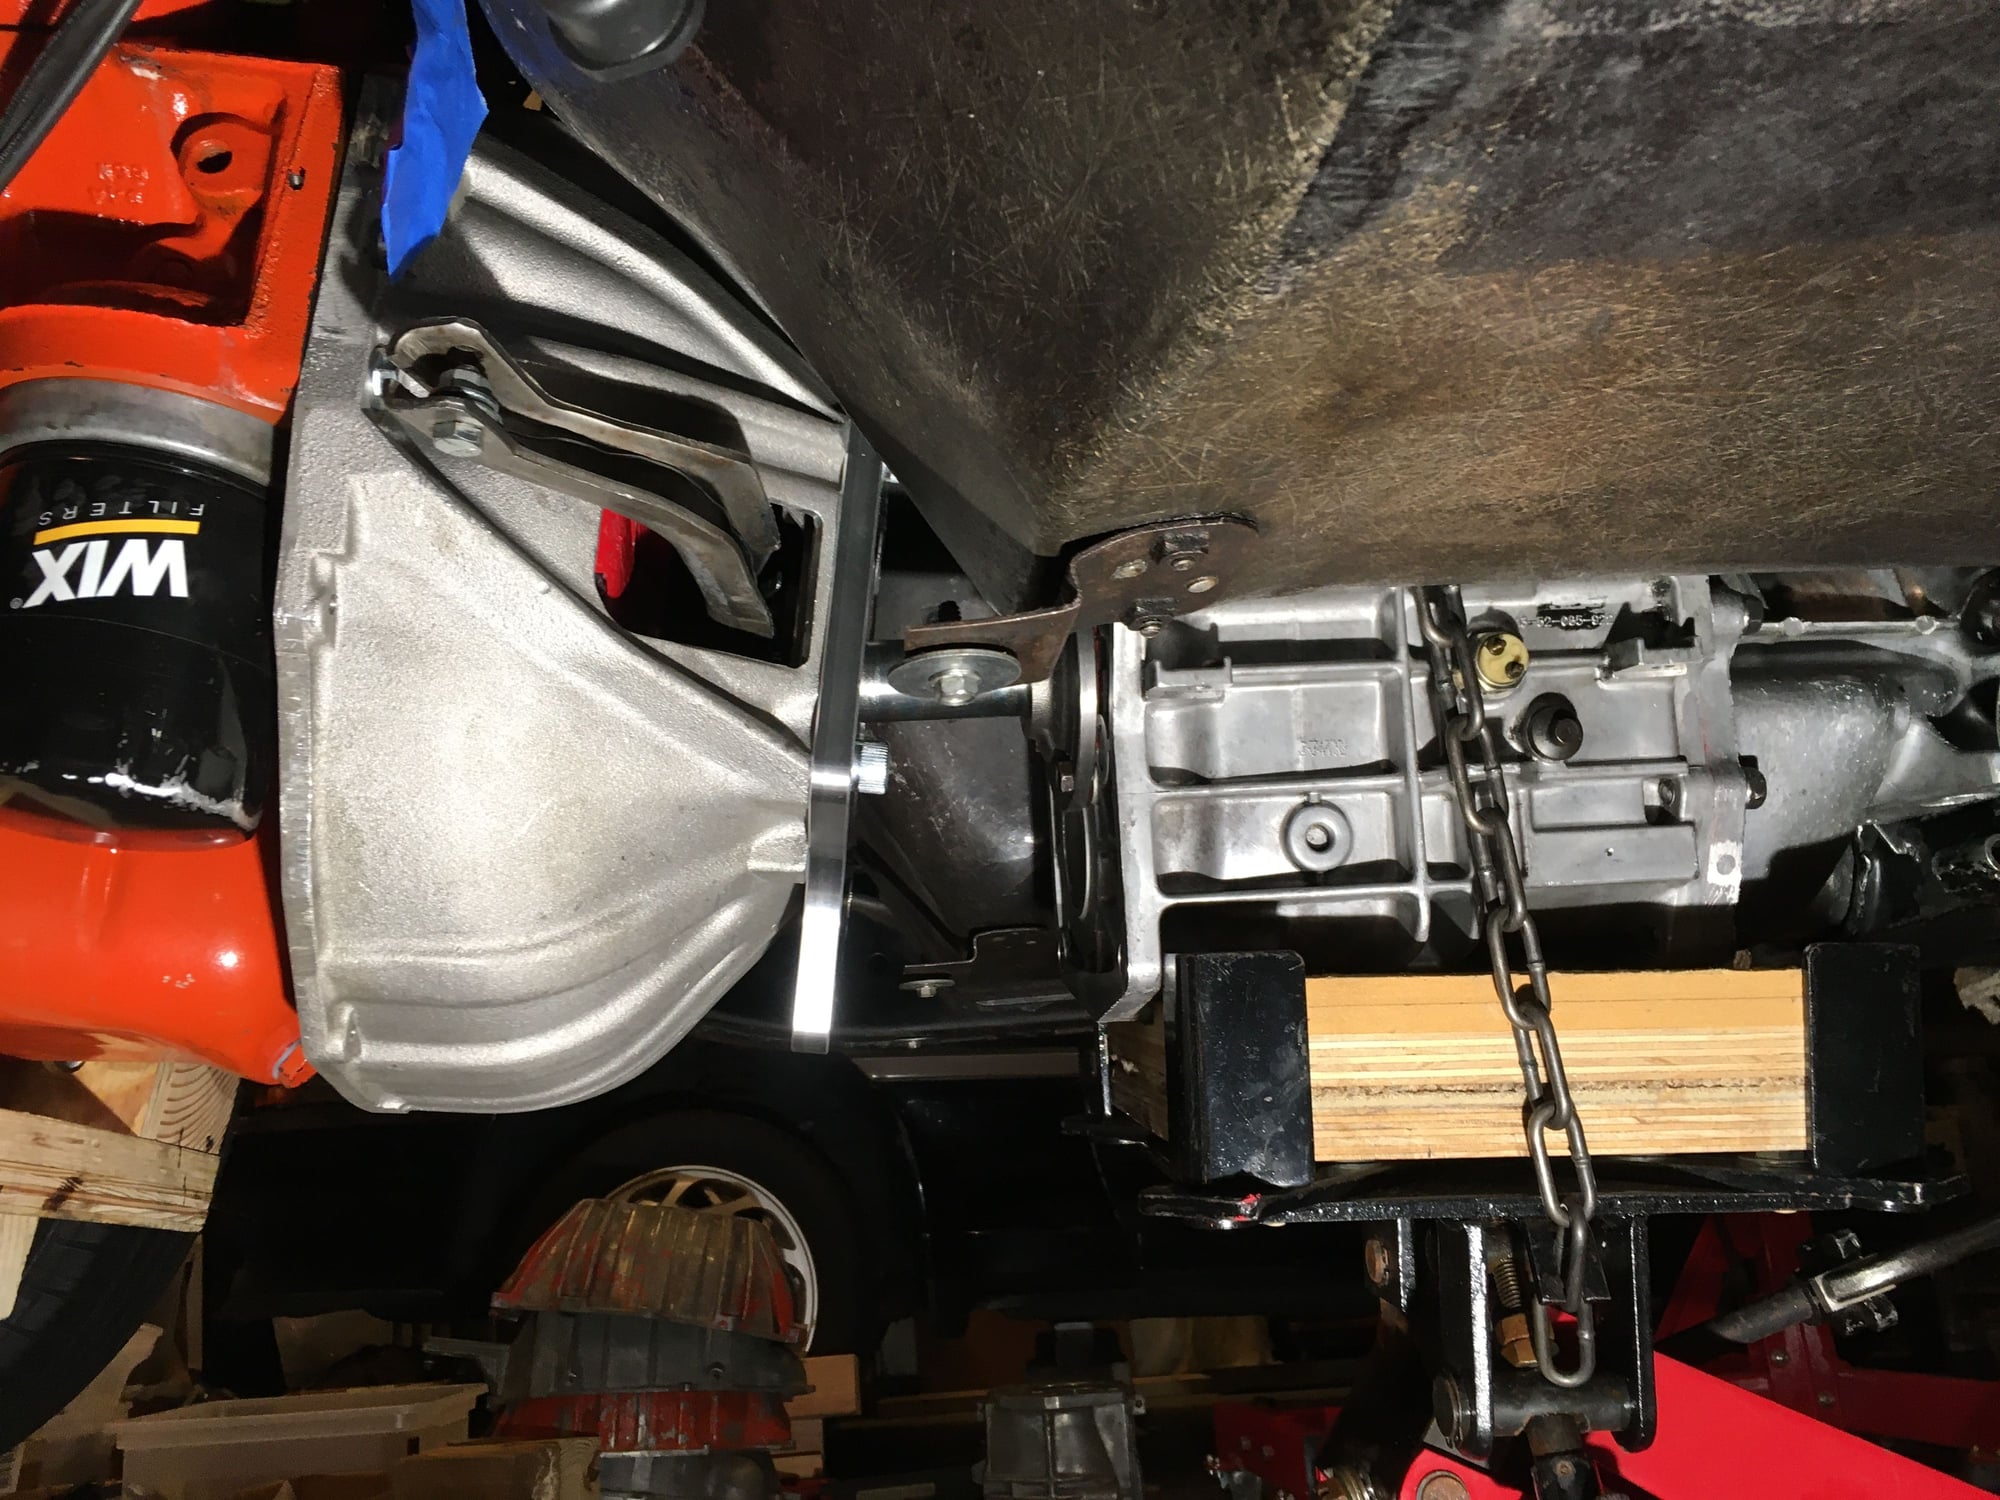
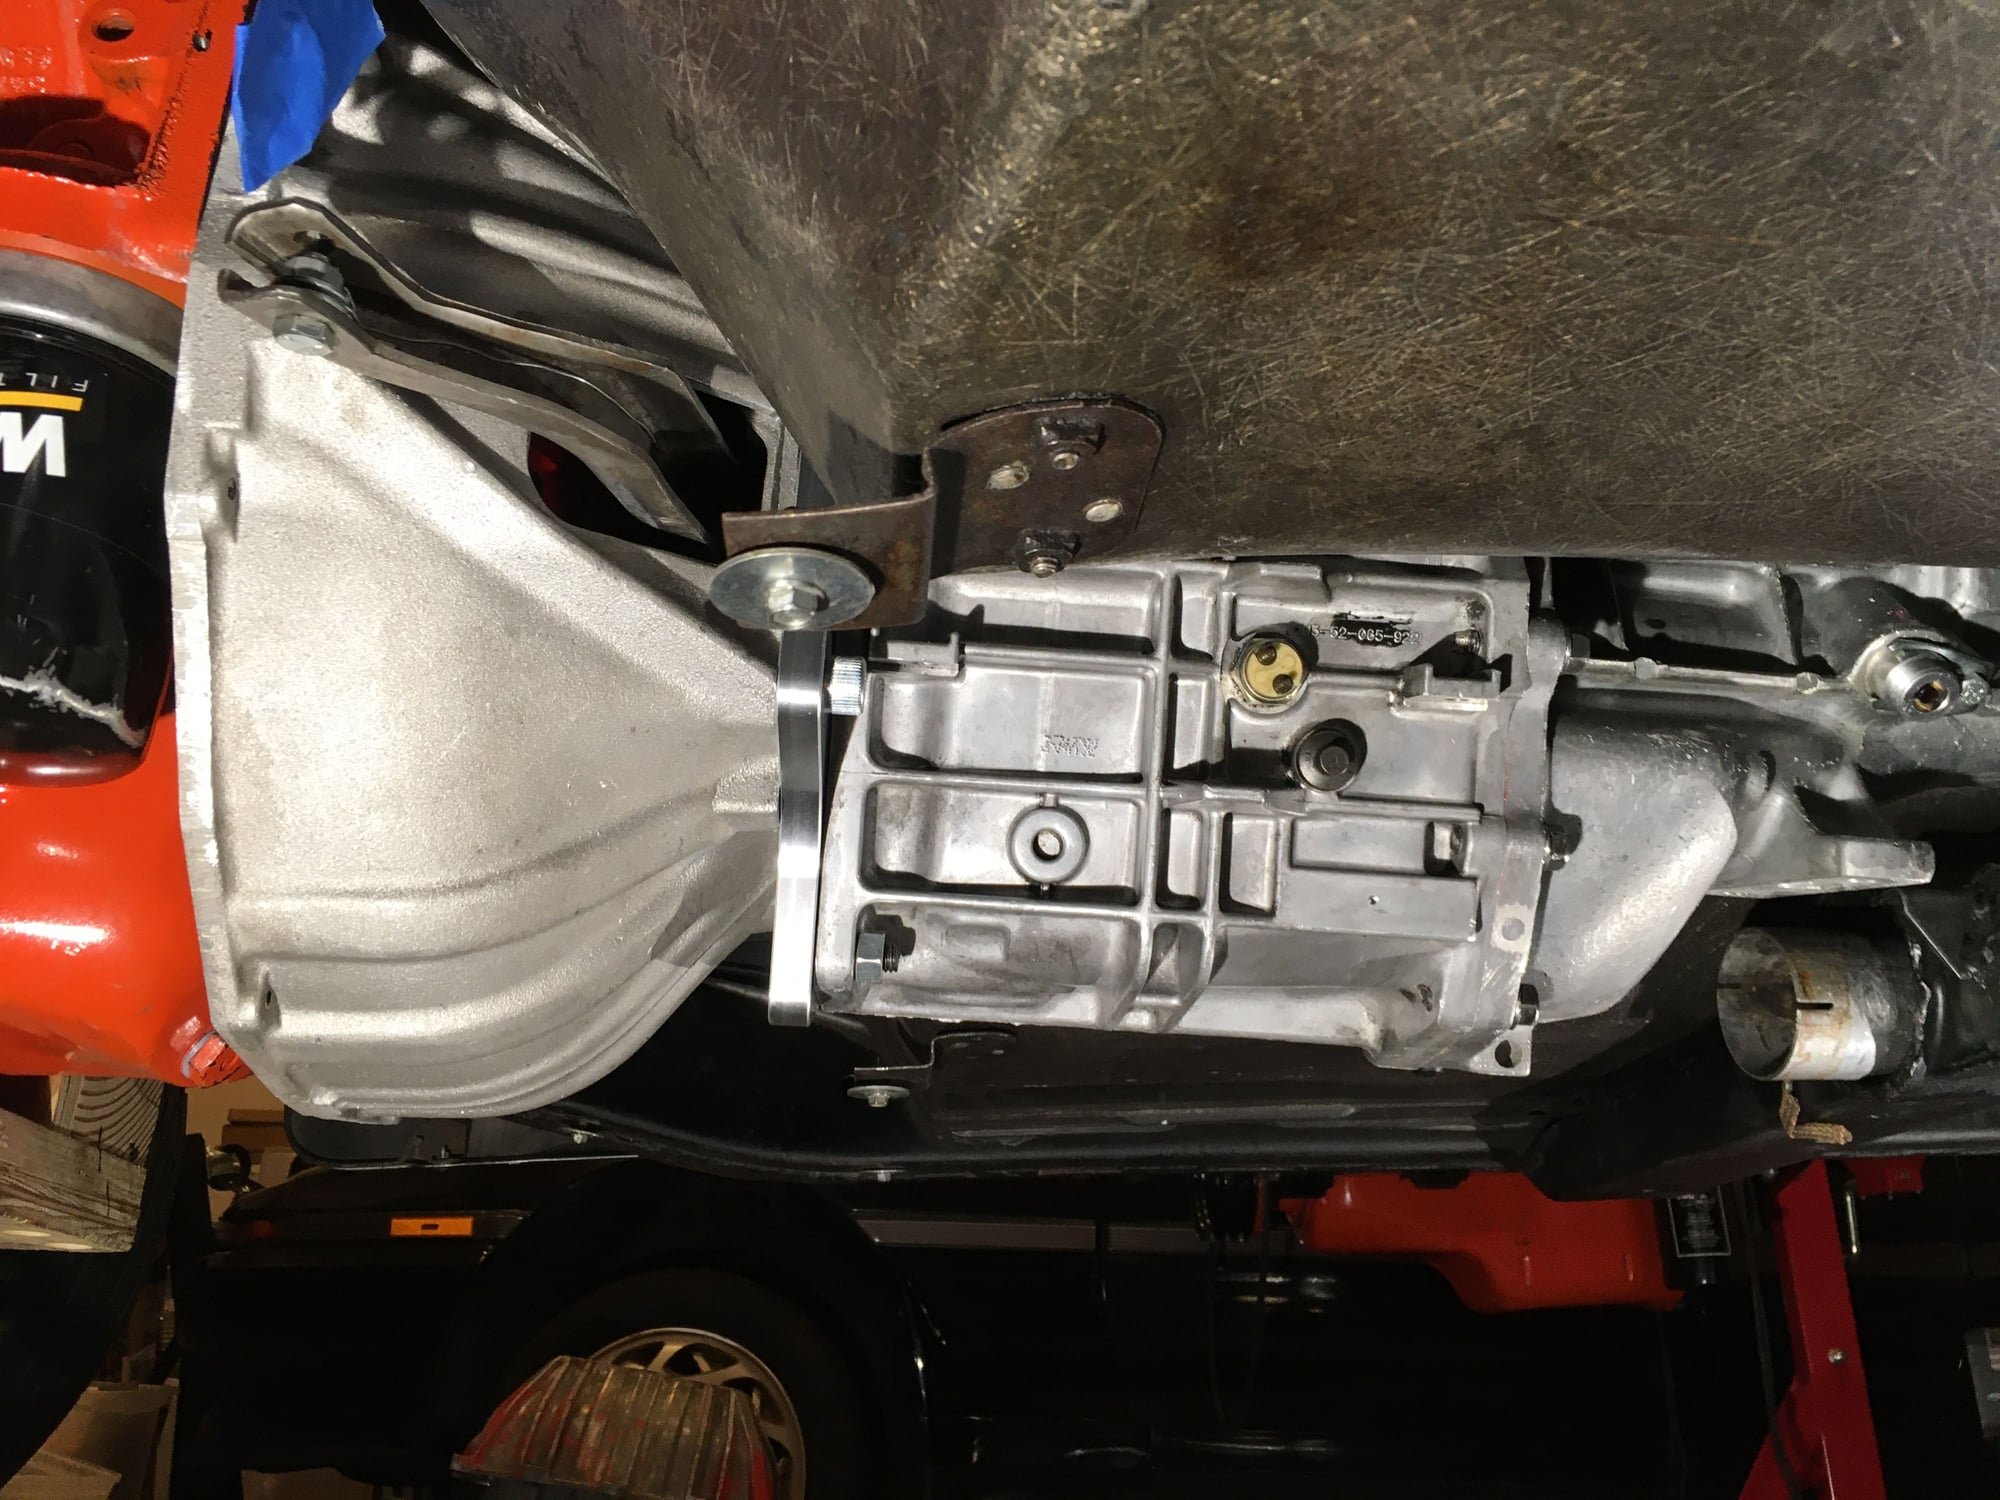
For the Tremec TKO (and presumably the TKX), even the "bellhousing trick" shown above does not provide enough room. However, if you ALSO hang the clutch pressure plate assembly loosely on the input shaft, there is enough room to get the tip of the input shaft past the flywheel as you raise both the engine and transmission together.
This requires bolting the pressure plate to the flywheel AFTER the transmission and engine have been raised so that the transmission input shaft is pointed directly at the crankshaft. This step is tedious because you have to progressively rotate the flywheel a few times as you install and torque the bolts that attach the clutch pressue plate to the flywheel.
Even with this added step, I think the clamshell installation is a lot less work than pulling the engine. Pulling the engine requires draining the coolant and removal of the hood, fan, radiator shroud, and radiator, plus disconnecting everything that attaches to the engine, such as the heater hoses, fuel line, throttle linkage, and harness connections. If your car has options such as power steering and A/C (as my car does), there is even more stuff to disconnect and move aside.
I hope the above description and photos illustrate how the clamshell method can be used to put a Tremec 5-speed in a C2 Corvette without removing the engine. If you look at the first T5 photo above, it looks hopeless for getting the transmission in. However, as Keisler and others have worked out, the basic clamshell method that GM described for the Muncie can be adapted for the Tremec 5-speeds. For the T5, the only change is that the bellhousing has to be loosely hung on the input shaft while the engine and transmission are each raised. For the TKO (and presumably the TKX), both the bellhousing and the clutch have to be loosely hung on the input shaft.
#4
64's Rock!
@GearheadJoe did a nice write up on installing a Tremec with the engine in. It can be done, but isn't intuitive
#5
Tech Contributor
Member Since: Jun 2004
Location: I tend to be leery of any guy who doesn't own a chainsaw or a handgun.
Posts: 18,389
Received 774 Likes
on
555 Posts

BTDT. Would have been nice if Chevrolet had standardized the frame and put the removable crossmember (and cross shaft bracket) on all the frames. 

The following users liked this post:
Factoid (04-06-2024)
#6
Le Mans Master


Since the original engine, transmission and rear were gone before I got my 66, I am sorry I did not install a removable crossmember when I did a frame off. My 68 has the same crossmember as the 66. At least you can remove the Muncie with just a little cursing and bleeding. Jerry
The following users liked this post:
Factoid (04-06-2024)
#9
Drifting


Member Since: Mar 2018
Location: Oklahoma
Posts: 1,608
Received 420 Likes
on
247 Posts
C1 of Year Finalist (appearance mods) 2019
Same set-up in the 62. 1st gear is a little short, but it jumps like a frog and having the .68 (OD) 5th gear really makes the 4:11 livable on the highway.....best of both worlds. I just wish they didn't shift so mechanically/choppy.............hoping that changes as it ages.
#10
Le Mans Master


My shifting got smooth and precise after about 500 plus miles. Give it some time and miles. I agree about 1st., it's good for pulling tree stumps and not much else. Jerry
The following users liked this post:
Dreaming60’s (04-07-2024)
#11
Drifting


@GearheadJoe did a nice write up on installing a Tremec with the engine in. It can be done, but isn't intuitive
I recall that I have stated in other threads that I think it's easier to install a Tremec TKO-600 with the engine in the car, but I can't recall whether I ever posted a detailed description of the process. I'm going to elaborate here with some text and photos that show the basic process.
When I bought my Tremec TKO-600 from Keisler back in 2008, Keisler included a written procedure for installing the TKO with the engine in the car. A copy of those instructions is attached. I simply followed those instructions step-by-step, and the TKO-600 went right in. The process is not at all intuitive and requires patience for some tedious steps, but it works well. While I have not done a TKX installation, I suspect that the TKO method would work for that too. Overall, I think it's a lot less work than pulling the engine.
The only caveat is that you really need to have a 3-axis transmission jack that allows you lift the transmission, tilt it left or right, and tilt it front-to-back. Some of the steps require that the transmission be held a specific position while you perform other tasks. The 3-axis transmission jack allowed me to install the transmission by myself, with the engine in the car.
I'm currently writing some detailed instructions for installing a Tremec T5 5-speed with the engine in the car (wrapping up my T5 conversion project described in this thread):
Article on installing a T5 5-speed in a C2 - CorvetteForum - Chevrolet Corvette Forum Discussion.
Since I have better photos of my T5 installation than my TKO installation, I will be using the T5 photos in this thread. The process for the T5 is similar to the TKO, but slightly easier. I will explain the added step for the TKO after first explaining the method for the T5.
The basic method is what I have seen called the "clamshell" method. It requires that you tilt both the engine and the transmission downward and then gradually raise each of them a little bit at a time. The following photos illustrate the clamshell method.
Following is a photo (copied from a post here on CF) of a Muncie being installed using the clamshell method described in the GM shop manual for a C2. Note that both the engine and the transmission have to be pointed downward to get the input shaft past the bellhousing:

Note that if the Muncie was just a little bit longer, the Muncie input shaft would not clear the bellhousing. All of the Tremec 5-speeds are longer than a Muncie. However, for the Tremec T5, if the bellhousing is unbolted from the engine and hung loosely on the input shaft, the tip of the input shaft only has to clear the clutch pressure plate assembly. The following series of photos show a T5 going in.


For the Tremec TKO (and presumably the TKX), even the "bellhousing trick" shown above does not provide enough room. However, if you ALSO hang the clutch pressure plate assembly loosely on the input shaft, there is enough room to get the tip of the input shaft past the flywheel as you raise both the engine and transmission together.
This requires bolting the pressure plate to the flywheel AFTER the transmission and engine have been raised so that the transmission input shaft is pointed directly at the crankshaft. This step is tedious because you have to progressively rotate the flywheel a few times as you install and torque the bolts that attach the clutch pressue plate to the flywheel.
Even with this added step, I think the clamshell installation is a lot less work than pulling the engine. Pulling the engine requires draining the coolant and removal of the hood, fan, radiator shroud, and radiator, plus disconnecting everything that attaches to the engine, such as the heater hoses, fuel line, throttle linkage, and harness connections. If your car has options such as power steering and A/C (as my car does), there is even more stuff to disconnect and move aside.
I hope the above description and photos illustrate how the clamshell method can be used to put a Tremec 5-speed in a C2 Corvette without removing the engine. If you look at the first T5 photo above, it looks hopeless for getting the transmission in. However, as Keisler and others have worked out, the basic clamshell method that GM described for the Muncie can be adapted for the Tremec 5-speeds. For the T5, the only change is that the bellhousing has to be loosely hung on the input shaft while the engine and transmission are each raised. For the TKO (and presumably the TKX), both the bellhousing and the clutch have to be loosely hung on the input shaft.
The following 10 users liked this post by GearheadJoe:
63 340HP (04-06-2024),
C2Dude (04-07-2024),
C2Scho (04-09-2024),
kjbuster1 (04-09-2024),
leif.anderson93 (04-06-2024),
and 5 others liked this post.
#12
Le Mans Master


Joe,
Excellent blow by blow write-up and very descriptive pictures
Excellent blow by blow write-up and very descriptive pictures

#13
Drifting


Thanks. I agree that photos are very helpful for conveying information like this. Since the clamshell method is very non-intuitive, I don't think any number of words can fully convey the procedure.
#15
Drifting


looks like this was done in a garage so many of us could do this very same change-did the throw out bearing get put onto the shaft and then while both the engine and trans lifted put into the fork?
#16
Drifting


Thanks again for sharing
Chalie
#17
Burning Brakes


My only experience was clutch,flywheel replacement on my L79/Muncie. Used the clam shell method Joe outlines and had no issues sliding the Muncie in or out, were talking just a few minutes. Due to the motor mount position, the motor is tail heavy. Build a supporting jig as Joe did. Lars also once depicted one where the side pieces were supporting the motor at the oil pan bolts/flange. I just used (2) short pieces of 3/4 ply screwed together and two layers of that floor shock mat that HF sells cheap to spread the load to the pan. That is located toward the back of the oil pan with a scissors jack under it. Using a 4 post lift, the jack sat in the jacking tray. Once you disassemble the transmission mount the motor will drop at the back as you lower the jack, basically twisting in the motor mounts (check the condition of those when your done, mine were old and the rubber failed on one due to the twist. Not a problem while installing the transmission but I had to replace them as a separate maintenance job). As you lower the motor check that the coil does not hit the firewall.
#18
Drifting


Regarding your remark that it looks like this was done in a (home) garage, that is correct. I did this completely by myself in my home garage with the car lifted 24" off the floor using four jackstands. However, considerable attention was given to comfort and convenience during the setup procedure:
1) The 24" clearance is necessary to clear the height of the transmission sitting on the transmission jack, so that the transmission can be rolled under the car while mounted on the jack.
2) The front jackstands were placed in the frame arches next to the front wheels. The goal was to get the jack stands completely away from the work area near the transmission. I highly recommend getting the jackstands out of your way. If you put them on the frame rail under the doors, they will be in your way every time you go under the car or come out.
3) To be able to easily lower and lift the back of the engine in small increments, I put a scissor jack under the engine. The wood fixture around the oil pan puts the weight of the engine on the pan rails of the block, rather than the bottom of the oil pan. I'm not sure this is necessary but I did not want to risk denting my pan. I suspect that a thick pad of dense foam rubber would spread the load sufficiently to allow the load to be carried on the bottom of the pan.
4) Another thing I highly recommend is good lighting. I like the Stanley lights shown below because they can be set to have the light at any angle from facing straight up to facing straight forward.
For me, the setup described above worked very well, despite the fact that it was done without having the car on a lift. To do the job using just jackstands, I think it is worth some extra effort to prepare the workspace.
The way that I would describe the engine-in-the-car method is that it consists of a large number of small steps that must be performed in a specific order. None of the steps are difficult, but some of them are a bit tedious. To make the process easier to tolerate, it's important to have a comfortable work space under the car and good lighting. And, don't forget to add some of your favorite music for the final touch!
I've given a lot of thought to what sort of experience someone should have before taking on this kind of project. Certainly, anyone who has previously removed a Muncie and replaced the clutch would have the necessary experience. This job just has more details that need to be be addressed. And, even if a person has never removed a Muncie and replaced the clutch, I think that someone who is mechanically inclined, patient and careful could do this if they have good instructions. I'm currently drafting detailed instructions for the T5 swap.
For someone who wants to install a Tremec TKX 5-speed, the process is similar to the both the Keisler TKO instructions that I posted earlier, and also similar to the T5 process that I have described here. I'm not sure whether Silver Sport offers engine-in-the-car instructions for the TKX. I recall that a few years ago, they stopped offering the their TKO instructions (basically an edited version of the Keisler TKO instructions). When I asked them why, they said that too many customers were having trouble with the engine-in-the-car method described in their instructions.



#19
Drifting


GREAT right up/pics…. The wooden cradle u have under the engine is very interesting ? How is that being supported/tilted at that engine angle? Is that a bolt I see going up thru it/pan into bottom of engine block? Some great engineering thought went into this process….
Thanks again for sharing
Chalie
Thanks again for sharing
Chalie
In post #18 I added a description of the wooden cradle and how it is used. As I describe in the post, the cradle might be overkill. My guess that that a thick piece of high density foam rubber (supported with a board) would be sufficient for preventing the oil pan from getting deformed. If you decide to use that approach, use a scissor jack rather than a hydraulic jack. The hydraulic jack won't provide enough feedback about how much pressure is being applied to the pan.
The following users liked this post:
C2Dude (04-08-2024)
#20
Race Director


Member Since: Apr 2005
Location: Wesley Chapel, FL Las Vegas, NV
Posts: 10,053
Received 2,117 Likes
on
990 Posts

6 C2s and a C3 TKX installations.
All done and installed a removable crossmember. Easily done body on.
Makes the tranny install a breeze and you’ll be super happy if you ever have to pull it to change a clutch or TOB
All done and installed a removable crossmember. Easily done body on.
Makes the tranny install a breeze and you’ll be super happy if you ever have to pull it to change a clutch or TOB


