When you click on links to various merchants on this site and make a purchase, this can result in this site earning a commission. Affiliate programs and affiliations include, but are not limited to, the eBay Partner Network.
I ordered the LS2 oil pan and it was $500 list from GM dealers, our shop cost still $378 and there are two companies at ($178 & $170) that sell the part when I searched Amazon. I went with the least expensive.
The baffles make it look rigid and the depth of the pan is the height of a short oil filter and since it has the same depth on the front part as my 'muscle car" (Hummer) oil pan, I will not have to notch the windage tray already with my engine.
I'm going to change the oil pickup either Amazon or OEM from GM when I figure out which fits. There are also nice oil pickup hold down brackets available.
Thank you Loren Smith:
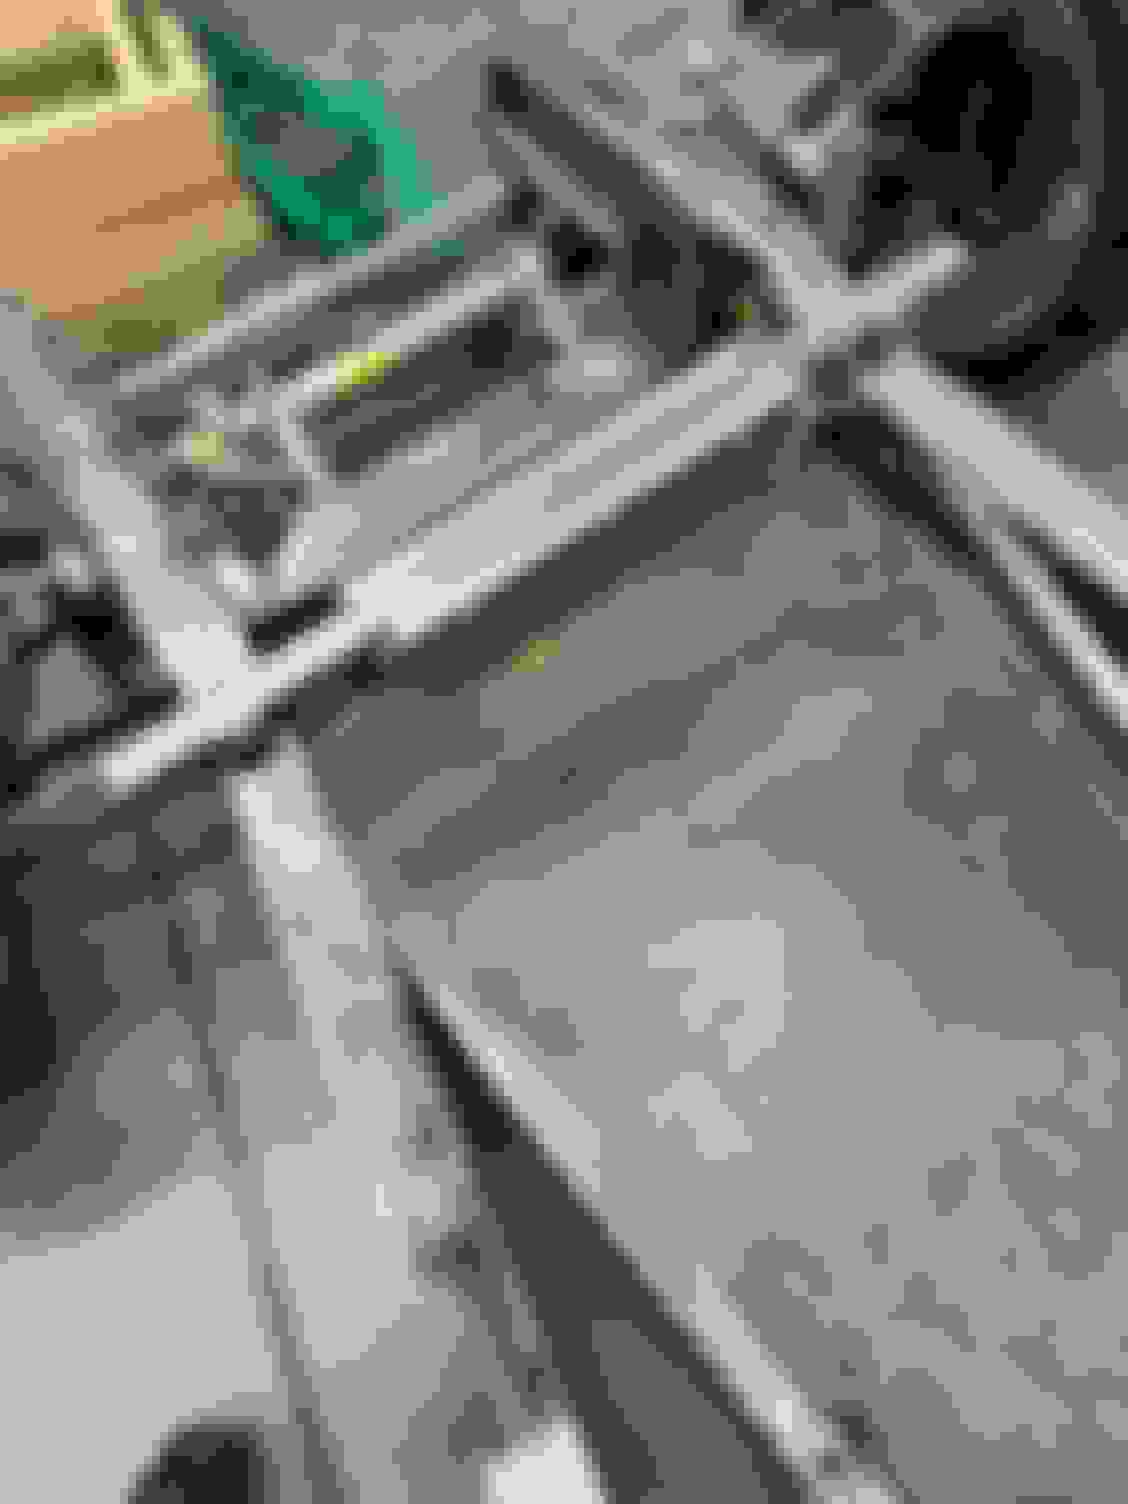
The rack I used is from Flaming River and it is a universal front steer with pillow block mounting. Says 41.69in OAL, must be the width. Plain (PLN) came in silver painted and cost $862.09 ordered directly from FR.
We had to use a router to trim one of the pillow blocks as the passenger side had a little obstruction where we wanted to mount it so it is centered.
For the bracket, we used square tubing and I had it coming out from the crossmember 2"(later trimmed to one inch) then another piece welded to it (6") sloping down at exactly 45*. The second piece had a taper and we drilled two holes to match the mounting holes on the pillow block. We used the same tie rod ends from the Cobra/MG manual rack.
I hope this helps, we are also here getting tips and information from other members.
Last edited by Blown62; 12-13-2023 at 01:36 PM.
Reason: address answer to writer
can't make the full exhaust still waiting on the headers, tied in all the way to the back now
the new pan will help if we have to lower the engine mount bracket but the body is shimmed up with 1/4" aluminum and the intake clears gaining ground clearance with the new oil pan we can weld out the back exhaust except the tie-in to the headers have to wait had enough bends and pie cuts to make it to the back
That car is going to be so pretty. Show car or driver?
Thank you!
I'm going to drive the car every chance I get when it is nice out. Really would like to go to rod runs and just once maybe twice to the drag strip to see a quarter mile time but I promised my buddy he drives it first at the track since he is a drag racer.
Ordered the Vintage Air AC, the power brake booster/master cylinder and we are moving the motor mount bracket and reinforcing the underside of the hood panel. my buddy had me order 2-3 yards of carbon fiber he didn't like the look of the notched brace so he took it out the LS2 oil pan gave us 5 1/8" ground clearance compared to the 'muscle car' and (Hummer H2) oil pan we had with only 2 1/2" clearance ordered the correct oil pick up tube from the Chevrolet dealer and a nice hold down bracket from Amazon made by ICT Billet buddy made a jig so we can put the cut off motor mount brackets same location just dropping the bolt hole 5/8" the inside the frame fuel line fitting is in the way so probably going away. was installed by the previous car owner
what a difference the oil pan made glad you have that problem solved I bet. Hope you get the headers soon. I am anxiously waiting to see the completed exhaust. What a great thread
no supercharger this time around, also no cowl vent and 'CORVETTE' letters.
383 stroker, 6-speed manual, 4:56 12-bolt later switched to 3:42 gears
I was 35 years old when I owned this 'wild cherry' House of Kolor candy painted '62!
This time around, I'm 70 years old and eliminated certain things but the modernized engine dyno'd at 566hp!
Car will have silver paint (no candies), LS3, 4L65E automatic, AC, power brakes, power steering, digital dash and cup holders, LOL What a trade-off!
Last edited by Blown62; 12-23-2023 at 07:31 PM.
Reason: added wording
You are building one of the nicest 62 's ever. It features state of the art fabrication and incredible fit and finish.
I wouldn't go that far, LOL.
My buddy and I are just hobbyists who happen to like muscle cars. He is a great fabricator and likes to dabble with different things being a finish carpenter.
He will do plumbing, electrical and tackle all the household projects including taking care of their 5 acre property which is a lot of work.
The guy helped build his own house but hired professional framers, HVAC people, carpenters and roofers but had his hands on just about everything. He even built the crawl space about 5' tall thinking he didn't want to actually crawl if he needed to work under the house for anything, LOL.
Being a supervisor on yachts over 220', he knows a lot about molds, fiberglass work, welding etc. Everything on a power boat is custom and not store bought. I give him the credit for this build!
I think you are modest . Your car will be special.
I spent 40 years in the geotechnical engineering field as a technician and then a field manager of inspectors.
I also spent 10 years as a superintendent for a residential development co. We built about 6000 homes in the bay area, so I appreciate your friends skill and experience,.
I enjoy your updates very much.
My first Corvette was a 60 and had friends back in the day with 56 through 62 cars . I love them all .
I used to be into Mopars and had about 5 Super Bees in the mid 70's. The first one in 1969 my dad bought when I was 16! One was a 1969 1/2 Six Pack Bee only a little over 500 made.
My other cars were a 1969 Dart GTS 383, '70 440 GTX, '70 340 Duster, '68 440 Charger R/T, '70 383 Challenger R/T and I used to street race the 440 6pack Super Bee w/4:10 Dana 60 and got beat by a 1962 Corvette with a 350/370hp LT1.
I became friends with the '62 Corvette owner and also met my buddy who is helping me with my '62 and he had a 340 Duster he raced. The Corvette was the fast street racer back then probably ran in the 11's and I put the 6pack engine in the '69 Dart and ran 12.05-114mph. Liked my friends '62 so much because he got all the girls, I had to get one, LOL!
The '62 Corvette owner now has an LS5 crate motor 454 in his car and it has been sitting for 25-26 years but he would never sell it. He does want to re-do it but he dislikes Seattle and wants to move to the eastern part of the state so his build is on hold. I would help him in a heartbeat! He still has his 1962 Corvette and I'm on my second '62 but both are in different stages.
Last edited by Blown62; 12-31-2023 at 01:50 PM.
Reason: added to post reply
Making adjustments:
put 3 layers of carbon fiber on hood underside, moved the motor mount bracket down, centered the rear tire in the wheelwell and moved it back about 5/8", moved the shock mount crossmember back 5/8" and started welding on the exhaust.
fitted the aluminum radiator in and removed the 1/4" aluminum body/frame shims.
my buddy fitted the exhaust, now he gets to weld it too, LOL ....it's hard for me to see that tiny tig weld puddle. only running about 40-50 amps. Adjusted suspension and moved the rear wheels 5/8". Now looks more centered My buddy getting it done. purged the exhaust pipe with argon gas I like these hangers and silicone insulators cross brace taken out and added 3 layers of carbon fiber checked the hood clearance with clay and we had 15/16" at first so we removed the aluminum shims and now have about 5/8" need a different fitting for the power steering pump, either a 45* or 90* have to move the upper shock crossmember back 5/8" because we moved the suspension back to center the wheels in the wheelwell lowered the motor mount brackets 5/8" and back 1/16"-1/8" on one of the two brackets, it centered the transmission tailshaft which was an inch out of center
You and your buddy are hobbyists but more than that, automotive artists and perfectionists. Your attention to detail is over the top. Really enjoy your updates and look forward to them. Keep em coming.
The power brake set up came in and the Vintage Air AC could be here in a week. This set up hangs out 22� from the firewall. I liked that my buddy set the one motor mount back 1/8� and it corrected the transmission tail shaft misalignment an inch offset to one side before. The exhaust routing is really centered in the exhaust cutouts. My buddy is able to take out engine and car body all by himself I finally got to see how he does it.
 12-13-2023, 12:50 PM