1965 corvette windshield install
 02-18-2013, 05:00 PM
#1
Safety Car


Thread Starter
Member Since: Nov 2000
Location: Clinton Township MI
Posts: 4,750
Received 118 Likes
on
97 Posts
Cruise-In III Veteran

Folks,
I know this has been documented by a few here...Hitch for one as well as BlackMagic. My hats off to you guys for detailing out the pitfalls as well as your approach to getting this done.
At first I planned on just deinstalling the windshield and cleaning up the frame as well as POR15'ng that along with installing all new clips. As I accomplished that task and waited for a vacancy at a trusted collision shop near me who has tons of experience working with older cars, I was given encouragement by my neighbor to install the glass myself. Well, what the hell, I decided to take on doing this myself with the help of my neighbor and fellow Vette lover Jim Minton.
What helped me out a lot was just getting going reading about Hitch's efforts and BlackMagic's detailed approach. I further did searches on YOUTUBE and came across 2 good videos by a Mustang shop. The fact that the early Mustangs (65-68) used this rubber seal around the glass (I know there are other makes that did it this way as well) like our Vettes.
Here's the first:
and here's the 2nd:
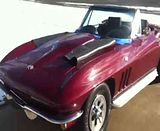
All I can say is: What a freegin' mess it creates. My saving grace was mineral spirits. I still have to clean up the exterior. Right now she's just curing (did this Saturday afternoon). As mentioned I had cut the rubber surrounding the old windshield and just sat in the car, placing both feet up against the glass and gently pushed...Voila!! Out she came.
Here's some pics with the glass out and the clips removed but before I cleaned up the frame.
Regards,
Jim
In God We Trust!
I know this has been documented by a few here...Hitch for one as well as BlackMagic. My hats off to you guys for detailing out the pitfalls as well as your approach to getting this done.
At first I planned on just deinstalling the windshield and cleaning up the frame as well as POR15'ng that along with installing all new clips. As I accomplished that task and waited for a vacancy at a trusted collision shop near me who has tons of experience working with older cars, I was given encouragement by my neighbor to install the glass myself. Well, what the hell, I decided to take on doing this myself with the help of my neighbor and fellow Vette lover Jim Minton.
What helped me out a lot was just getting going reading about Hitch's efforts and BlackMagic's detailed approach. I further did searches on YOUTUBE and came across 2 good videos by a Mustang shop. The fact that the early Mustangs (65-68) used this rubber seal around the glass (I know there are other makes that did it this way as well) like our Vettes.
Here's the first:
and here's the 2nd:
All I can say is: What a freegin' mess it creates. My saving grace was mineral spirits. I still have to clean up the exterior. Right now she's just curing (did this Saturday afternoon). As mentioned I had cut the rubber surrounding the old windshield and just sat in the car, placing both feet up against the glass and gently pushed...Voila!! Out she came.
Here's some pics with the glass out and the clips removed but before I cleaned up the frame.
Regards,
Jim
In God We Trust!
 02-18-2013, 05:10 PM
#2
Safety Car
Thread Starter
Member Since: Nov 2000
Location: Clinton Township MI
Posts: 4,750
Received 118 Likes
on
97 Posts
Cruise-In III Veteran
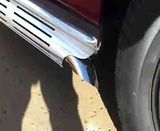
Here are a couple of pics of the stainless before I have them professionally buffed and polished. They actually took out 95% of the dings as well. Really nice work. Also, all the interior trim, rear view mirror, 3rd latch and visors had to come out as well.
Jim
In God We Trust!
Jim
In God We Trust!
02-18-2013, 05:19 PM
#3
Safety Car
Thread Starter
Member Since: Nov 2000
Location: Clinton Township MI
Posts: 4,750
Received 118 Likes
on
97 Posts
Cruise-In III Veteran
Here's some pics of the tools and supplies I used. Of course, the 3M Glazing Compound is the sealer you want to use on the windshield frame as well as the outer edge of the rubber when the rubber seal is mounted onto the glass. I also used this product liberally around where the fiberglass mates up against the birdcage. This stuff will always remain pliable/soft. The "glue" I used between the glass and the rubber seal, once it was installed and in place on the frame of the Vette is 3M Window Weld. This is a urethane and will cure up bonding the glass to the rubber seal. I also used some 3M strip caulk in the areas inside the cowl openings where the glass meets up to the bird cage.
Jim
In God We Trust!
Jim
In God We Trust!
02-18-2013, 05:45 PM
#4
Safety Car
Thread Starter
Member Since: Nov 2000
Location: Clinton Township MI
Posts: 4,750
Received 118 Likes
on
97 Posts
Cruise-In III Veteran
Here's pics of the windshield frame after POR15 was applied and new clips installed. I also put in the 3M 8509 glazing compound as well. On my convertible there were 12 clips at the base of the cowl. Paragon sells these American made, better clips as a kit...only 11 come in the kit. I was fortunate to be able to remove all 12 clips so I ended up using one of those.
Jim
In God We Trust!
Jim
In God We Trust!
Last edited by 6T5RUSH; 02-18-2013 at 05:56 PM.
02-18-2013, 06:22 PM
#5
Safety Car
Thread Starter
Member Since: Nov 2000
Location: Clinton Township MI
Posts: 4,750
Received 118 Likes
on
97 Posts
Cruise-In III Veteran
Here's a list with pics of the retainers/clips I purchased from Paragon:
11044K-11-Windshield Retainer - 11 pcs 64-67
My old clips...yup I can count...I had to snap one off that is probably still sailing around in the garage.
6840-K-Spacers (2 needed)
119K-11-Screws for Windshield Retainers
1121K-Windshield Retainers
12698-Windshield Side Molding Retainers-2 req'd
More to follow
Jim
In God We Trust!
02-18-2013, 06:29 PM
#6
Le Mans Master


Looking good Jim, mine is currently in the same spot as yours. Let me know when you figure out how to get that lower trim piece fully locked into place with the new gasket. I totally fudged up my lower trim pressing on it too hard trying to get it in place. Just got it back from dent removal and polishing again!
02-18-2013, 06:47 PM
#7
Safety Car
Thread Starter
Member Since: Nov 2000
Location: Clinton Township MI
Posts: 4,750
Received 118 Likes
on
97 Posts
Cruise-In III Veteran
Here's what those 12698 retainers look like:
8972K-Windshield Upper Molding Retainer w/Nut (6 req'd)
Also, here's the Corvette Rubber windshield rubber I purchased. I took this pic which shows the new one on top with the old one below. That is one small rubber band compared to the old one. Also, here's a closeup of that new rubber installed on the windshield, taped down to give it some "memory".
I had a helluva' time keeping the rubber gasket on the windshield. I'm not so sure it was wise to use dishwasher soap inside the groove of the rubber for the glass. Every time we were slapping the hell out of the glass to bring it down into the cowl groove, we found the rubber actually rolled outside the glass on 2 places at the cowl when we finally got her in. We had already installed the cowl trim piece as suggested by Hitch and BlackMagic but we had to remove it in order to roll the rubber back around the glass on the inside.
Now the task is to reinstall it (lots of practice here I guess) along with the rest of the trim, then clean up the body of the car.
Here's a walk around video I took yesterday of her.
Hope this helps you DIY on this.
Regards,
Jim
In God We Trust!
Last edited by 6T5RUSH; 02-18-2013 at 06:51 PM.
02-18-2013, 06:56 PM
#8
Safety Car
Thread Starter
Member Since: Nov 2000
Location: Clinton Township MI
Posts: 4,750
Received 118 Likes
on
97 Posts
Cruise-In III Veteran
Lastly, a couple of shots of the buffed, dented out and polished 48 year old stainless. Let's hope I can install these jewels without denting/scratching them.
Thanks for reading this long post. Again, I hope it does get you guys who don't mind getting dirty off dead center and attempt this.
Regards,
Jim
In God We Trust!
Thanks for reading this long post. Again, I hope it does get you guys who don't mind getting dirty off dead center and attempt this.
Regards,
Jim
In God We Trust!


 02-18-2013, 08:26 PM
#11
Melting Slicks

Thanks for the detailed write up and pictures

 Got it bookmarked for the future!!
 02-18-2013, 11:25 PM
#15
Burning Brakes


I did my 63 vert solo a few years ago. Lower moulding eventually popped out a bit on the right side. I had prepped like you did and even read the shop manual about using shim stock to assist the lower moulding. Not using the shims was my downfall. I strongly suggest getting some shim stock and cutting it wider than the clip and install them into every lower clip. As you install the lower moulding the profile of the moulding is guided under the shim and into the clip. Without the shim the profile will miss and go on top of the clip. Wet sealant will hold for a while but eventually mine popped. I will redo mine in the future. Good luck and looking good!
Brgds;
Rene
Brgds;
Rene
02-19-2013, 03:10 AM
#17
Burning Brakes
Scott; I am at work now. I will reference the 63 manual wording when I get home. Shim stock is called out. Brass comes to mind as it is generally available.
Brgds;
Rene
Brgds;
Rene
02-19-2013, 06:04 AM
#18
Burning Brakes
Scott; The shop manual states "If difficulty is met in engaging molding flange with retaining clips, a piece of shim stock may be used as a 'shoe horn' to place flange behind clips". Brass stock would be my choice as to the thickness..........
Brgds;
Rene
Brgds;
Rene
02-20-2013, 06:10 PM
#20
Safety Car
Thread Starter
Member Since: Nov 2000
Location: Clinton Township MI
Posts: 4,750
Received 118 Likes
on
97 Posts
Cruise-In III Veteran
I've had several inquiries regarding who did the buffing, tapping out of dents and polishing of all my stainless.
Here's the shop that does nothing but this...working 2 shifts 6 days a week:
PATMAI COMPANY INC.
31425 FRASER DRIVE
FRASER, MICHIGAN 48026-2584
Phone: 586-294-0370
Fax: 586-294-9621
Email: patmai123@wowway.com
They specialize in production & custom buffing & polishing...all types of metal
Right now they are hot and heavy preparing trim for cars that will be in the Autorama in March at Cobo Hall in Detroit.
Give Sam Mattox or Jim, the owners a call.
Regards,
Jim
In God We Trust!