Body Off Restoration on a 66 427 Coupe
 09-10-2012, 02:56 PM
#1
Safety Car

Thread Starter

The Body off restoration, or frame off as some like to say, has begun on my father's 66 427/390hp maroon coupe. I listed info on the car and restoration at the bottom of the thread for those that like to read details as well as look at pictures.
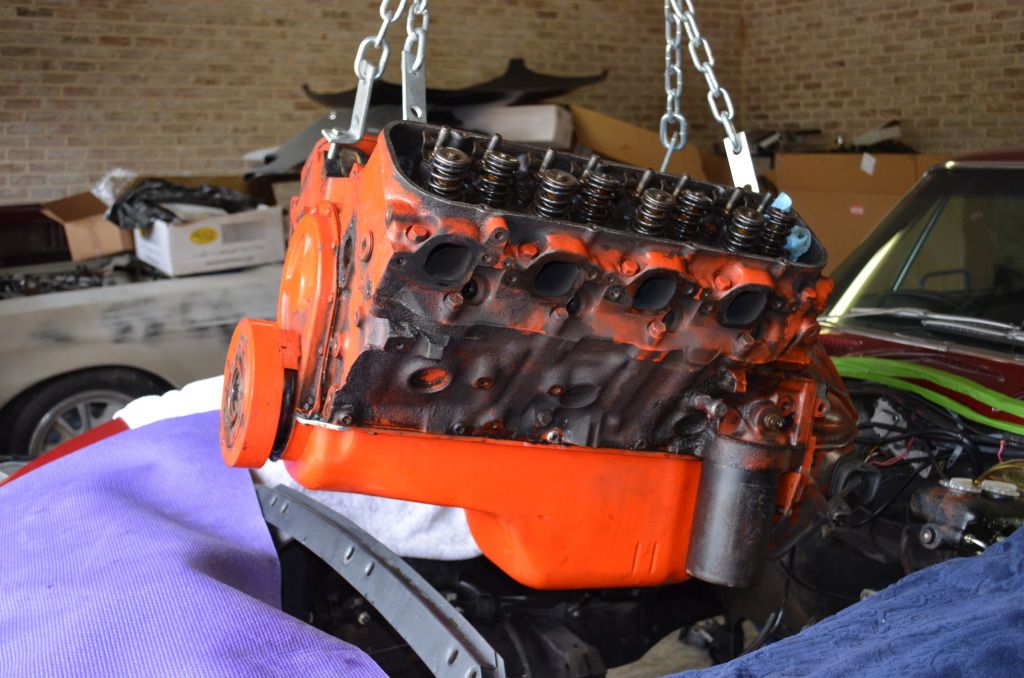
This all started as a simple check of the engine to fix what i thought was a sticky lifter. However, one thing led to another and we quickly realized that we might as well go ahead and pull the body and restore the frame while we had so much of the car apart.

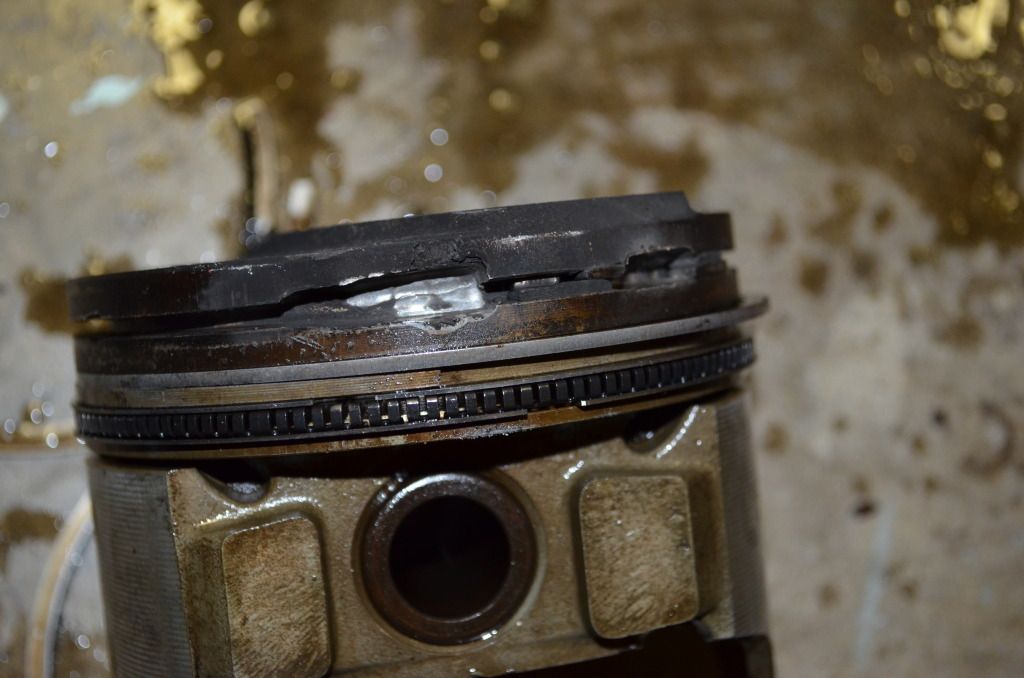
The damaged Piston
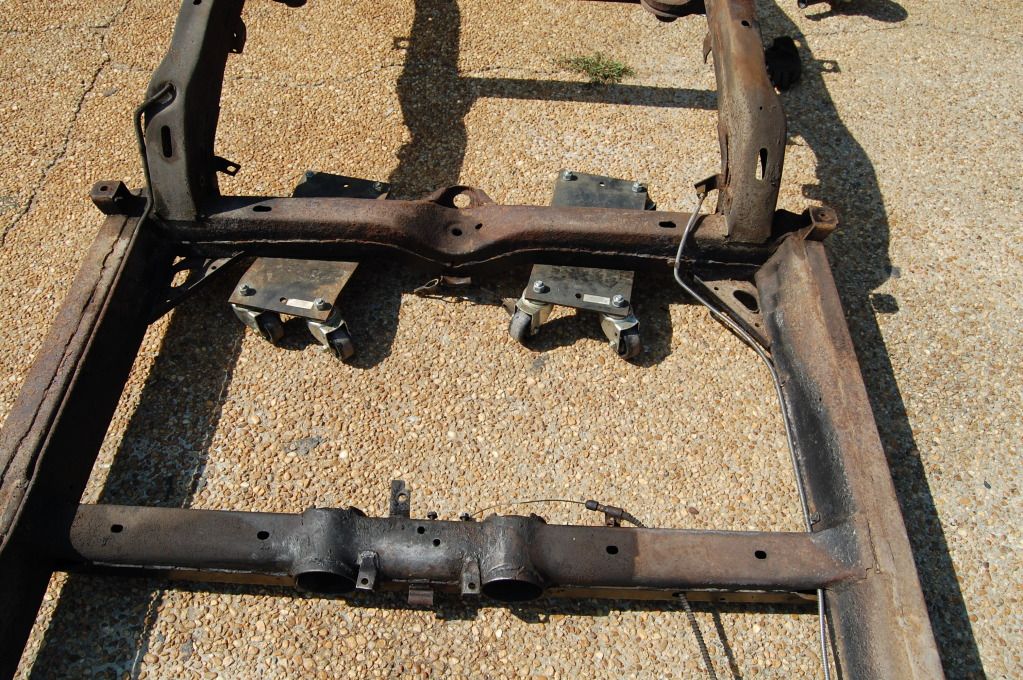
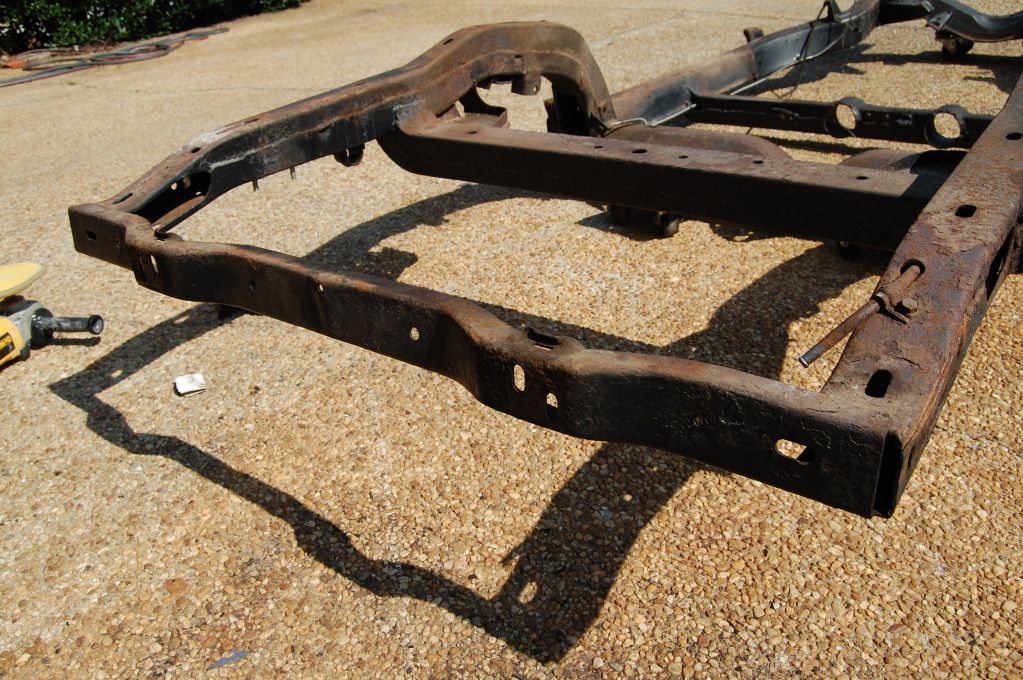
Frame
I busted the rust body mounts loose two weeks ago and found a mouse nest in the passenger side #3 body mount location behind the access panel. The nest was made of the upper firewall insulation. I found another large portion of the upper firewall insulation in the drain location of the birdcage below the driver's footbox vent. I always wondered why someone removed the upper firewall insulation from the car, but now i know it was mice, not humans that removed it.
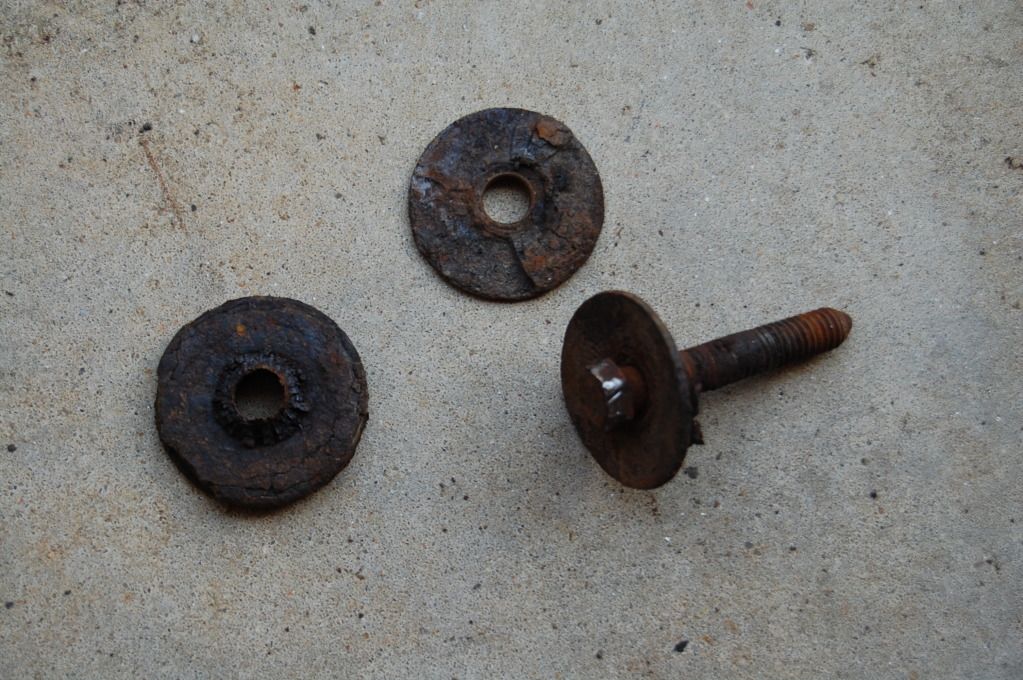
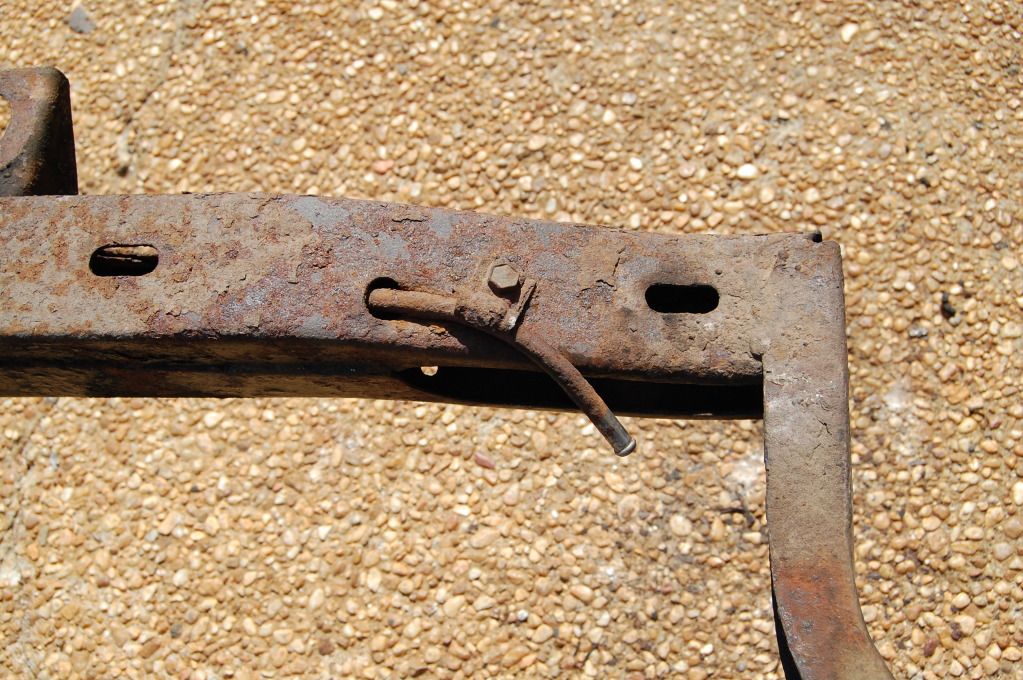
Body mount bolts. A few days of soaking the bolt threads in penetrating oil and then an irwin stripped bolt head socket set helped to remove all the body mount bolts without cutting.
Here you can see the condition of the #3 body mount bolts. The rest were in much better shape, but i did break one of the #2 bolts.
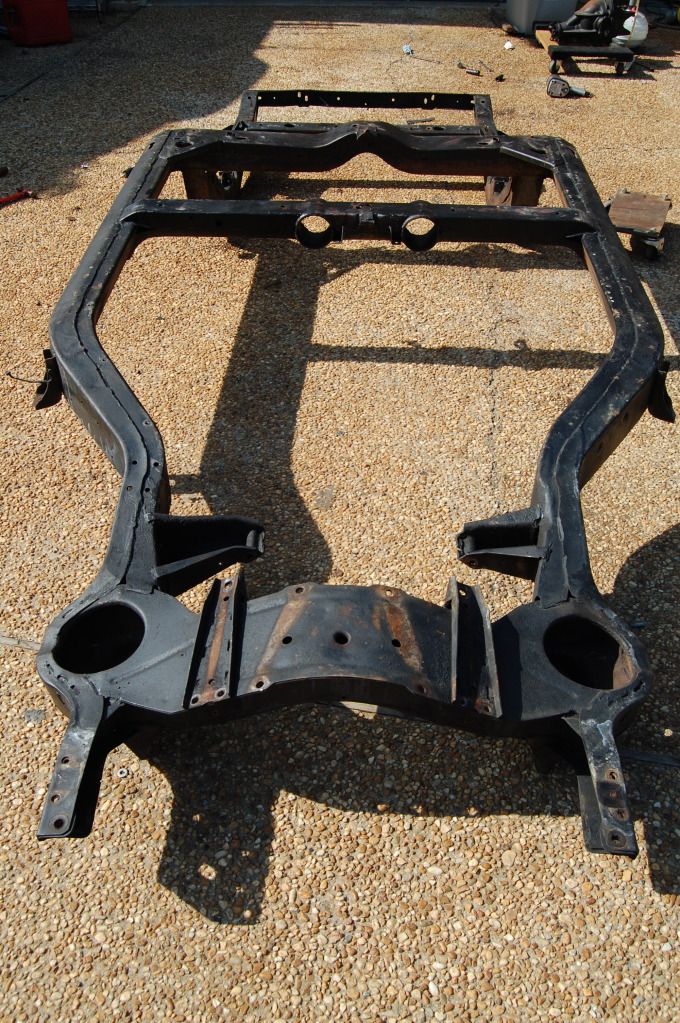
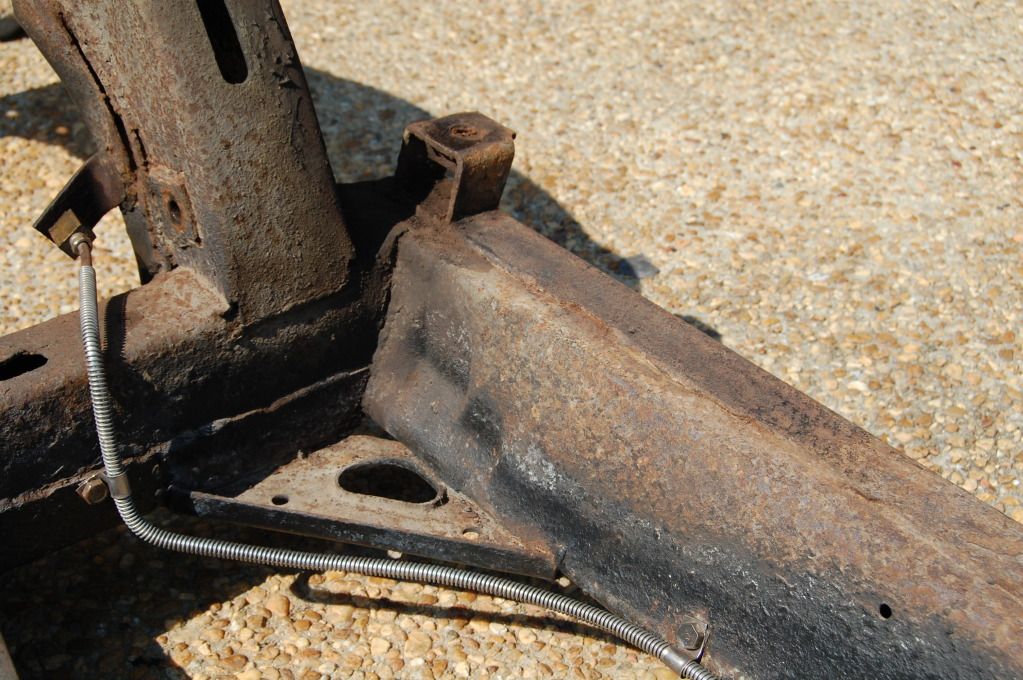
I knew the frame was rusty, but it was a bit more pitted in some areas than i expected. However, I checked the frame for weak spots in the worst spots and from what i can tell, it is still very solid.

Area of concern
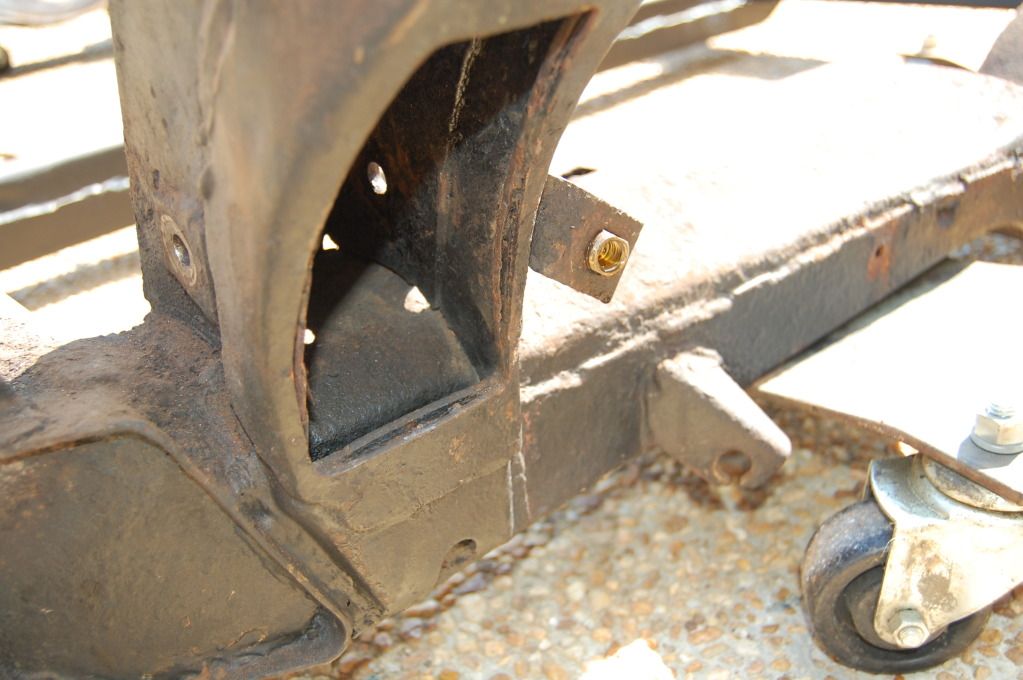
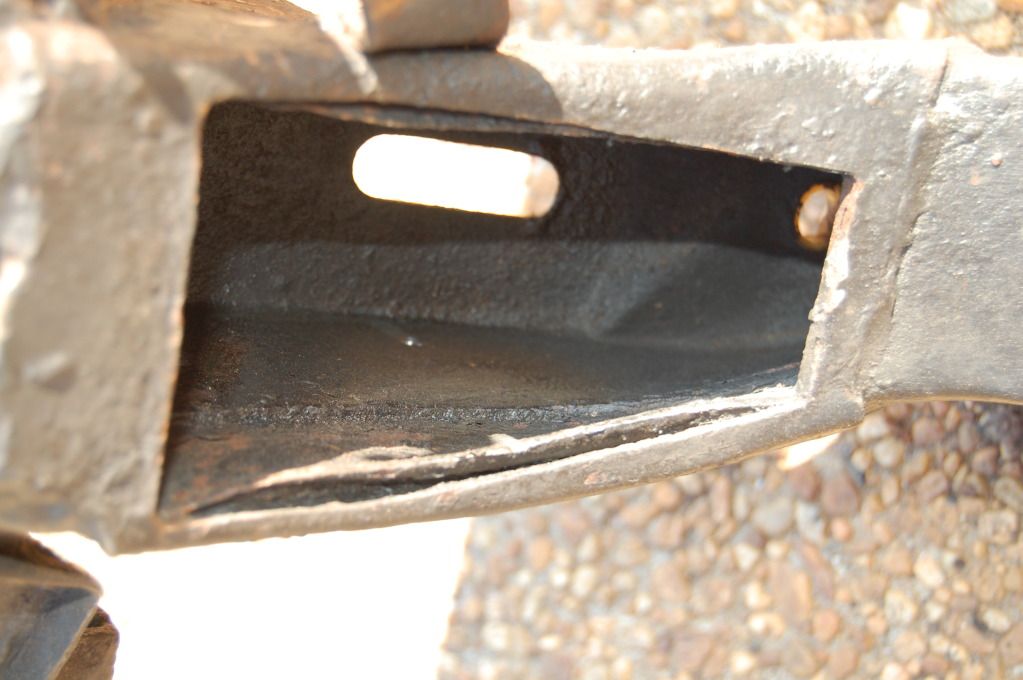
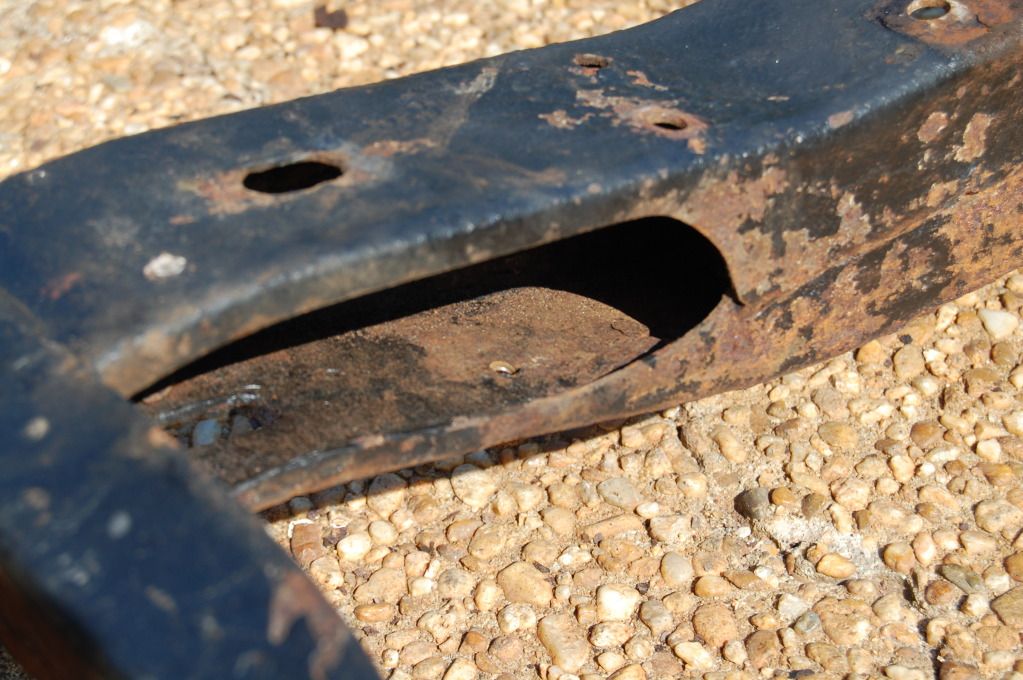
The metal has separated inside of the trailing arm mounting locations. I assume they placed extra metal in these areas for more rigidity and structural support. I was going to sand the areas down and weld them together unless someone suggests against that or has a better idea.
Info on the car.
My father bought this car almost 4 years ago. It was a polished turd and he bought the car out of excitement and for its nice paint and interior. A week after he brought it home he called me to tell me about a heavy gas odor coming from the car and garage. I went over and found that the car had a pin hole in the gas tank in the area where the removable gas tank crossmember and pad support the tank. I had to break all 4 bolts to remove the support crossmember due to rust. I replaced the tank and while doing so noted a good amount of rust in the rear kick ups, but nothing that was cause for any structural concerns.
Next, the transmission went out. The bolts that hold the input shaft unit in place had not been tightened correctly and the unit started to wobble, which elongated the threads. We replaced the case with a newer upgraded heavy duty unit, but i dont remember the brand name at the moment. I could not help him with this at the time, so we had muncie4speed swap the guts into the new case and set the transmission up correctly.
I rebuilt the front suspension about a 18 months ago. It was a simple rebuild with new performance front springs, which ended up lowering the car too much, new rubber bushings, and a quick blast and paint job on the somewhat pitted front control arms.
I also added power brakes and new brake lines to the car shortly after he purchased it.
The engine started making a clacking noise this past April and the vette has been sitting unused since then. About 3 weeks ago i decided to pull the intake to take a look at the lifters. The noise did not turn out to be just a lifter, but instead I found that the rings had come apart on the #1 piston and damaged the bore. I pulled the engine and one thing led to another and now we are doing a frame off restoration. Fortunately, the paint and interior are in good shape, so this should be a pretty quick turn around.
This all started as a simple check of the engine to fix what i thought was a sticky lifter. However, one thing led to another and we quickly realized that we might as well go ahead and pull the body and restore the frame while we had so much of the car apart.
The damaged Piston
Frame
I busted the rust body mounts loose two weeks ago and found a mouse nest in the passenger side #3 body mount location behind the access panel. The nest was made of the upper firewall insulation. I found another large portion of the upper firewall insulation in the drain location of the birdcage below the driver's footbox vent. I always wondered why someone removed the upper firewall insulation from the car, but now i know it was mice, not humans that removed it.
Body mount bolts. A few days of soaking the bolt threads in penetrating oil and then an irwin stripped bolt head socket set helped to remove all the body mount bolts without cutting.
Here you can see the condition of the #3 body mount bolts. The rest were in much better shape, but i did break one of the #2 bolts.
I knew the frame was rusty, but it was a bit more pitted in some areas than i expected. However, I checked the frame for weak spots in the worst spots and from what i can tell, it is still very solid.
Area of concern
The metal has separated inside of the trailing arm mounting locations. I assume they placed extra metal in these areas for more rigidity and structural support. I was going to sand the areas down and weld them together unless someone suggests against that or has a better idea.
Info on the car.
My father bought this car almost 4 years ago. It was a polished turd and he bought the car out of excitement and for its nice paint and interior. A week after he brought it home he called me to tell me about a heavy gas odor coming from the car and garage. I went over and found that the car had a pin hole in the gas tank in the area where the removable gas tank crossmember and pad support the tank. I had to break all 4 bolts to remove the support crossmember due to rust. I replaced the tank and while doing so noted a good amount of rust in the rear kick ups, but nothing that was cause for any structural concerns.
Next, the transmission went out. The bolts that hold the input shaft unit in place had not been tightened correctly and the unit started to wobble, which elongated the threads. We replaced the case with a newer upgraded heavy duty unit, but i dont remember the brand name at the moment. I could not help him with this at the time, so we had muncie4speed swap the guts into the new case and set the transmission up correctly.
I rebuilt the front suspension about a 18 months ago. It was a simple rebuild with new performance front springs, which ended up lowering the car too much, new rubber bushings, and a quick blast and paint job on the somewhat pitted front control arms.
I also added power brakes and new brake lines to the car shortly after he purchased it.
The engine started making a clacking noise this past April and the vette has been sitting unused since then. About 3 weeks ago i decided to pull the intake to take a look at the lifters. The noise did not turn out to be just a lifter, but instead I found that the rings had come apart on the #1 piston and damaged the bore. I pulled the engine and one thing led to another and now we are doing a frame off restoration. Fortunately, the paint and interior are in good shape, so this should be a pretty quick turn around.
Last edited by 65silververt; 09-10-2012 at 02:59 PM.

 09-10-2012, 04:56 PM
#3
Safety Car
Thread Starter
I took the chassis apart while it was still under the body so that i could utilize the weight of the body and just use jacks to remove the front and rear springs, so i dont have any great shots of the suspension before. Even after rinsing the frame out several times, small flakes kept appearing when i would work on the car. Those small flakes were coming from the top of the frame.
Here is what i do have.
Somebody had cleaned the frame up and repainted it black, so the underside did not look book. The trailing arms had been rebuilt and the differential and half shafts had been blacked out as well.
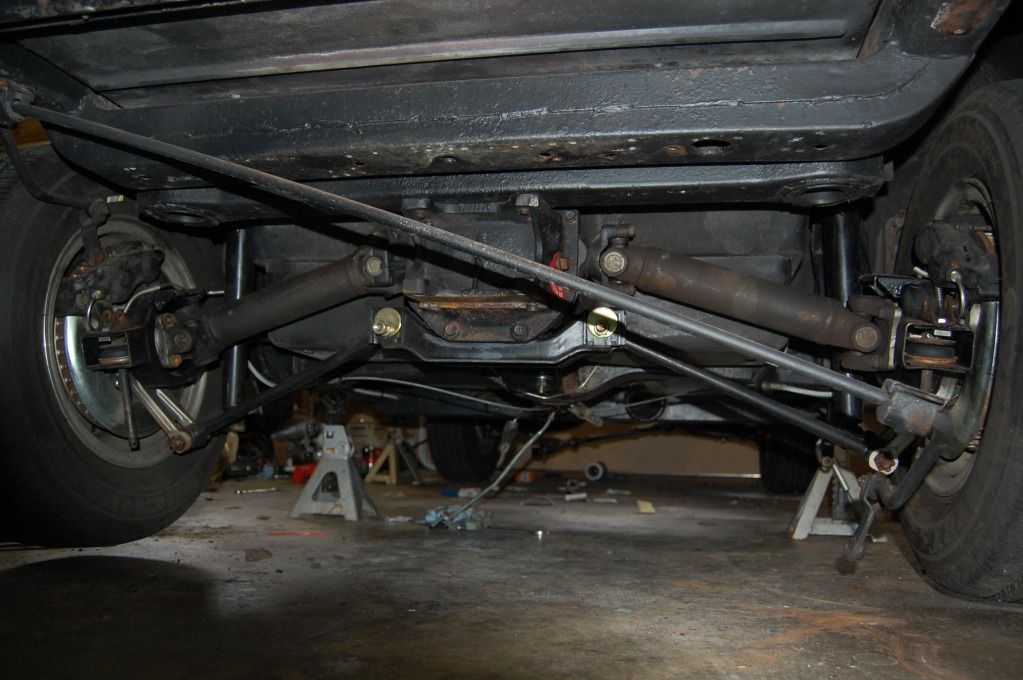
Here you can see the underside of the frame. It really doesnt look bad at all, but the top side is a stark contrast from the bottom.
Here is what i do have.
Somebody had cleaned the frame up and repainted it black, so the underside did not look book. The trailing arms had been rebuilt and the differential and half shafts had been blacked out as well.
Here you can see the underside of the frame. It really doesnt look bad at all, but the top side is a stark contrast from the bottom.
09-10-2012, 06:25 PM
#5
Team Owner


That frame is in good shape, sand blast, primer and paint will make it look like a new dime. Or Power Coat it.
 09-10-2012, 06:36 PM
#7
Safety Car
Thread Starter
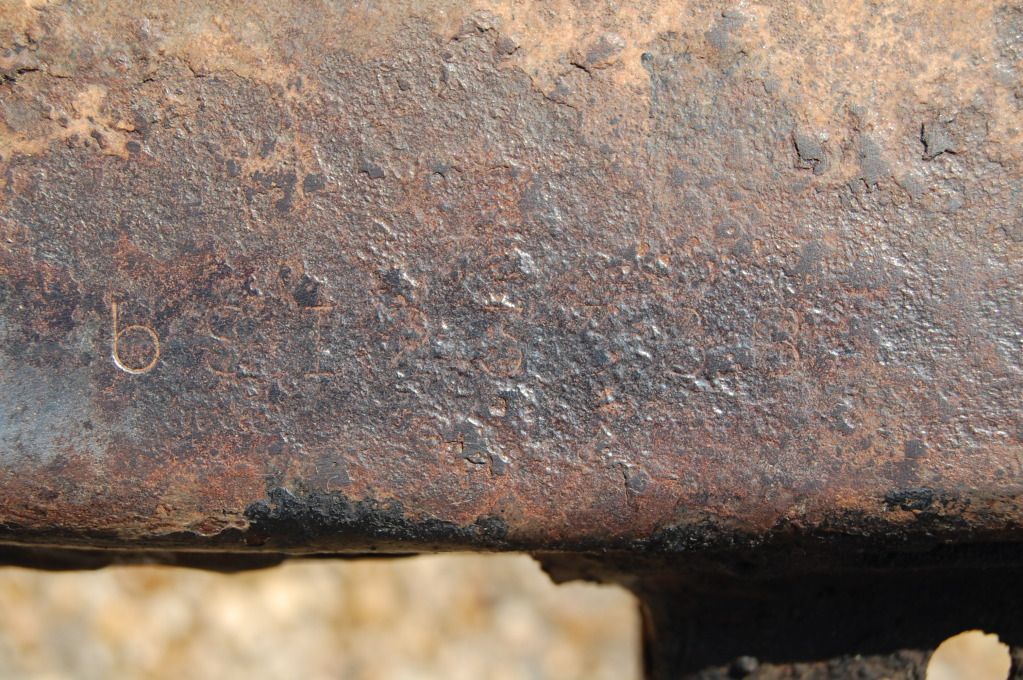
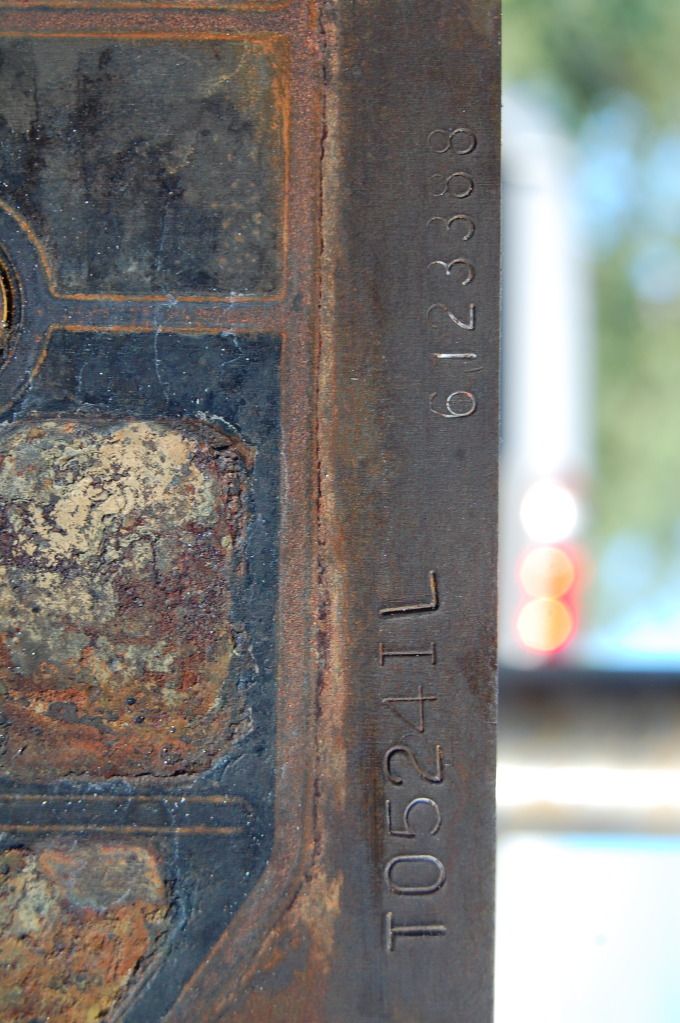
I would say it is in decent shape. The numbers were almost gone from the upper frame rail, but they were still visible enough to get a few pictures after wire brushing. The numbers that were located on the driver's side main rail are no longer present.
Here are some more pictures of the frame.
 09-10-2012, 06:40 PM
#8
Safety Car
Thread Starter
The numbers game.
The stamp pad looks good to me. It appears the 2 skipped and stamped twice, but that is not unusual from what i have seen in person and on pads that others have posted here.
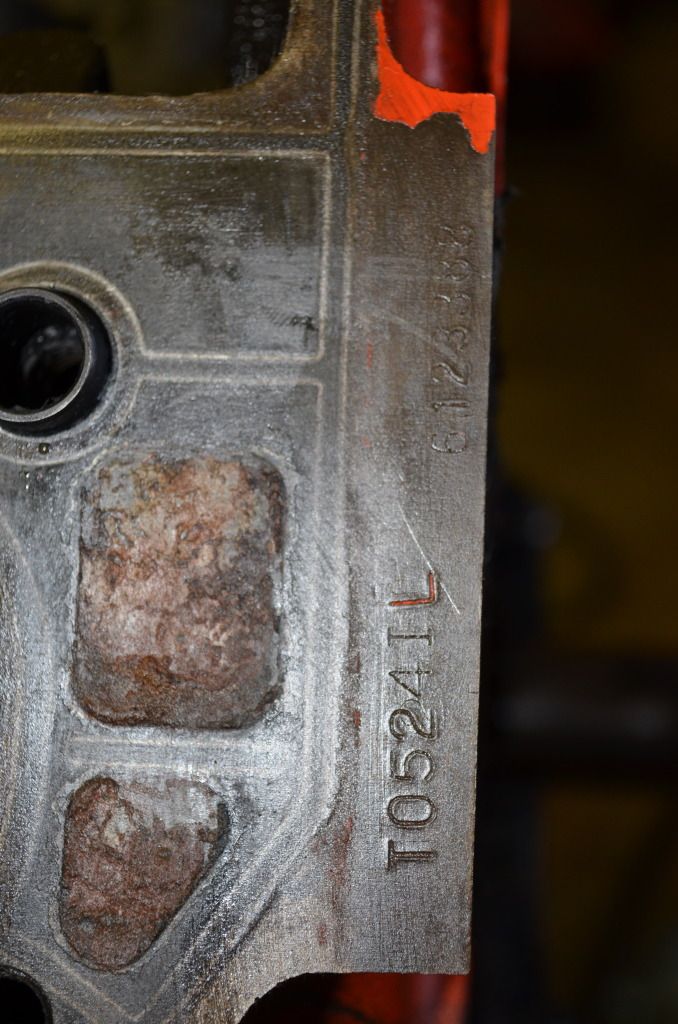
The stamp pad looks good to me. It appears the 2 skipped and stamped twice, but that is not unusual from what i have seen in person and on pads that others have posted here.
09-10-2012, 06:42 PM
#9
Drifting


Member Since: Aug 2010
Location: Charlotte Area North Carolina
Posts: 1,513
Received 213 Likes
on
152 Posts

Great pictures, thanks for posting. Frame looks likes she's in pretty good shape. Agree with Mr. D, a little sand or media blasting and new frame paint or powder coating will do wonders. Amazing how one small little task can turn into a significant overhaul. We're all guilty of "scope creep" from time-to-time. 
Kevin
Kevin
09-10-2012, 08:44 PM
#10
Race Director


Tough call on the frame condition. Mine didn't look much, if any worse than that until I had it dipped by Redi Strip. When it came back I had several areas of perferation around the kick up. One good sign is that you are able to make out the serial number. Mine was gone. Considering the mention of the flaking inside I would consider having it dipped (but not in acid). If in solid shape it will clean up the inside so it can be rust proofed. If thin in some areas, you will probably find out about that also.
09-10-2012, 11:03 PM
#11
Safety Car
Thread Starter
My father is taking the frame to be dipped, e-coated, and powdercoated tomorrow. I took an ice pick and a hammer and went over all of the metal from the mid frame section back, so i believe it is still pretty solid despite the flaking. However, i could be wrong. I guess time will tell.
http://www.metalfinishings.com/index.html
Metal Finishing Service uses a non-destructive alkaline electro-chemical derusting process. No metal loss or hydrogen embrittlement results, unlike processes using acids or abrasive cleaning. Parts up to 20' feet long and 10 tons can be handled.
http://www.metalfinishings.com/index.html
Metal Finishing Service uses a non-destructive alkaline electro-chemical derusting process. No metal loss or hydrogen embrittlement results, unlike processes using acids or abrasive cleaning. Parts up to 20' feet long and 10 tons can be handled.
Last edited by 65silververt; 09-10-2012 at 11:08 PM.
09-10-2012, 11:10 PM
#12
Safety Car
Thread Starter
The engine was dropped off at the machine shop tonight and it turns out that it has a Standard Bore. I was really excited to hear that despite the fact that the engine had a pathetic quickie rebuild at some point since it left the factory.

 09-11-2012, 01:17 PM
#15
Safety Car
Thread Starter
Here are some shots from yesterday evening before the engine went to the machine shop. As i stated earlier, the engine turned out to have a standard bore, which is very good news even though the #1 will need a sleeve from the piston rings breaking apart.
I pressured washed the block for about an hour one day a few weeks ago. It cleaned up pretty well, but there is still some funk baked onto the block. I am sure the hot tank will manage to get the rest of the crud off.
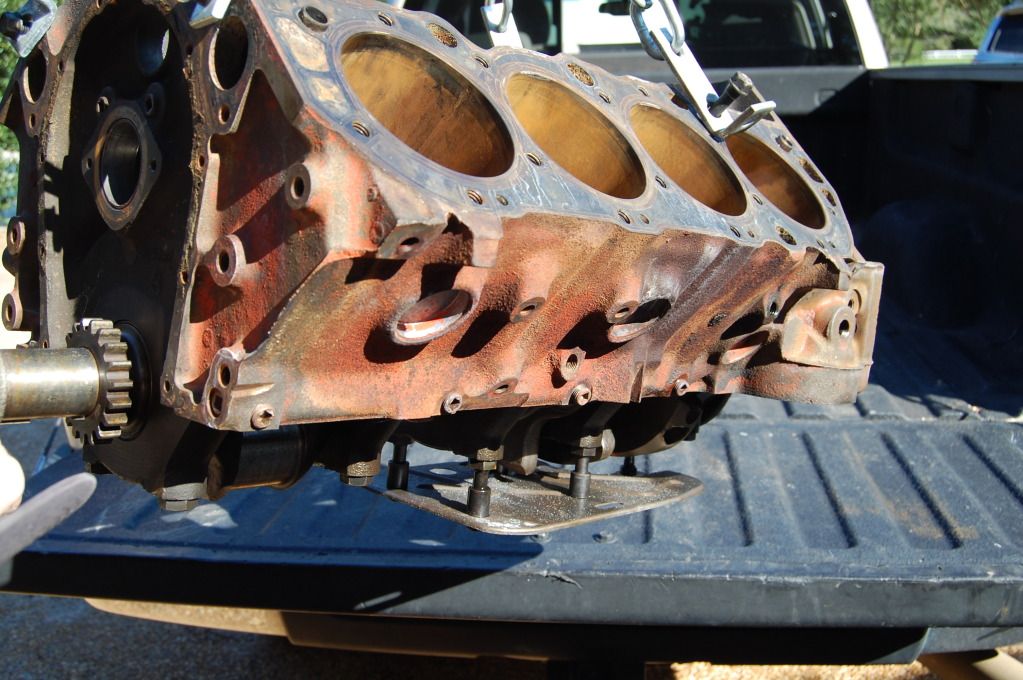
I pressured washed the block for about an hour one day a few weeks ago. It cleaned up pretty well, but there is still some funk baked onto the block. I am sure the hot tank will manage to get the rest of the crud off.

 09-11-2012, 01:36 PM
#17
Safety Car
Thread Starter
Last night i spent about 4 hours disassembling the half shafts, driveshaft, and removing the bushings from the sway bar and differential crossmember.
One bushing came right out of the differential crossmember with no problem at all, but i had to beat the other one for a solid 40 minutes before it finally popped loose. Needless to say, my shoulders and hands are a little tender today. Why did i give my press away two years ago???
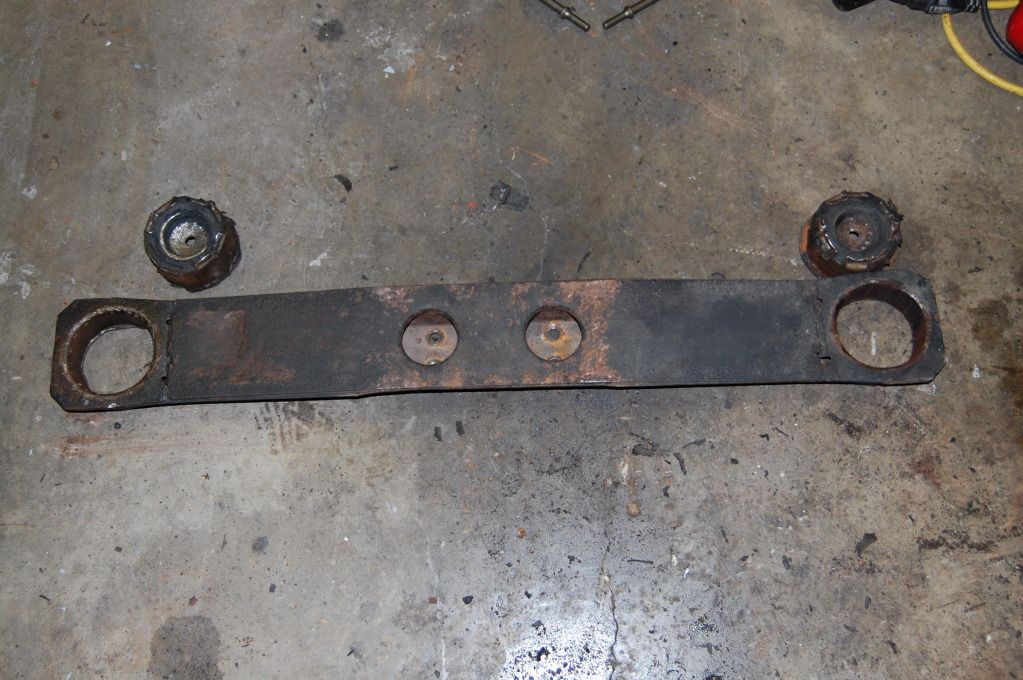
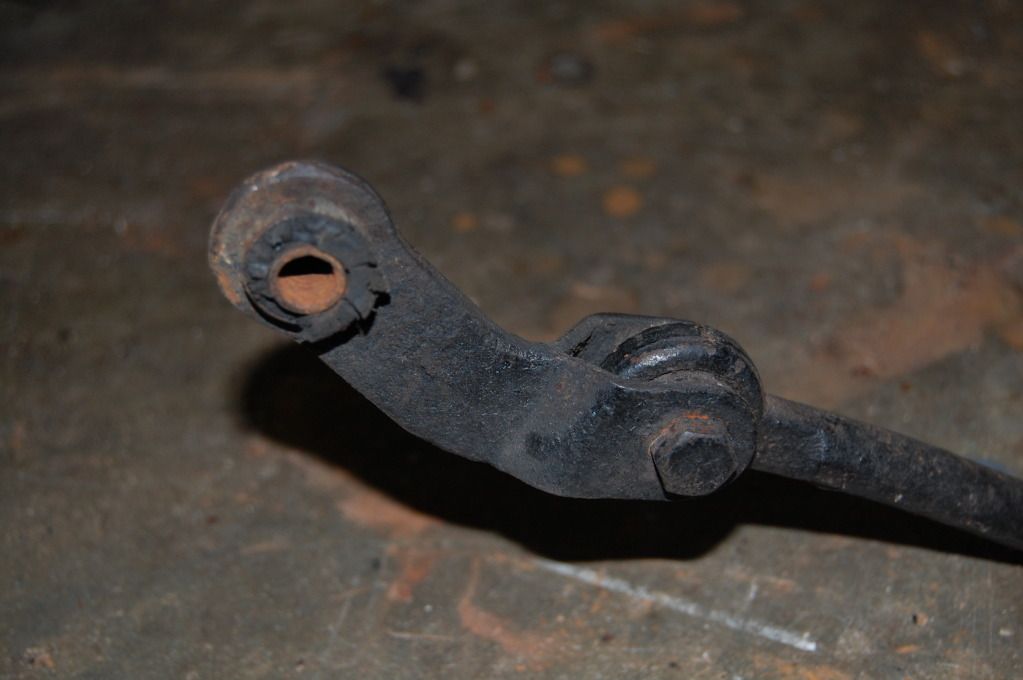
Condition of BB rear sway bar bushings.
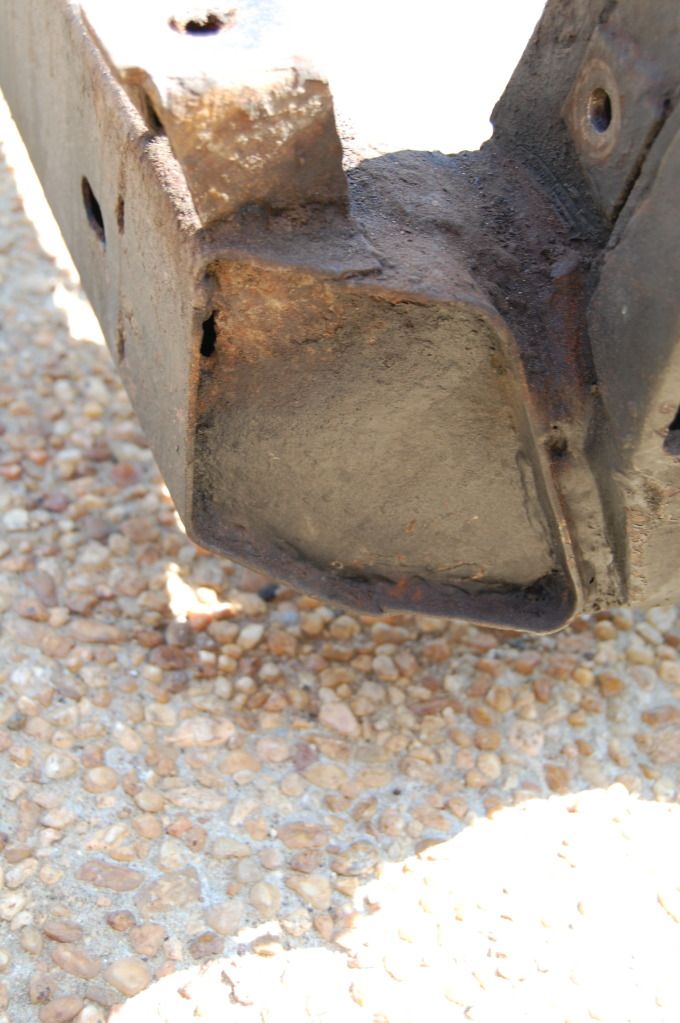
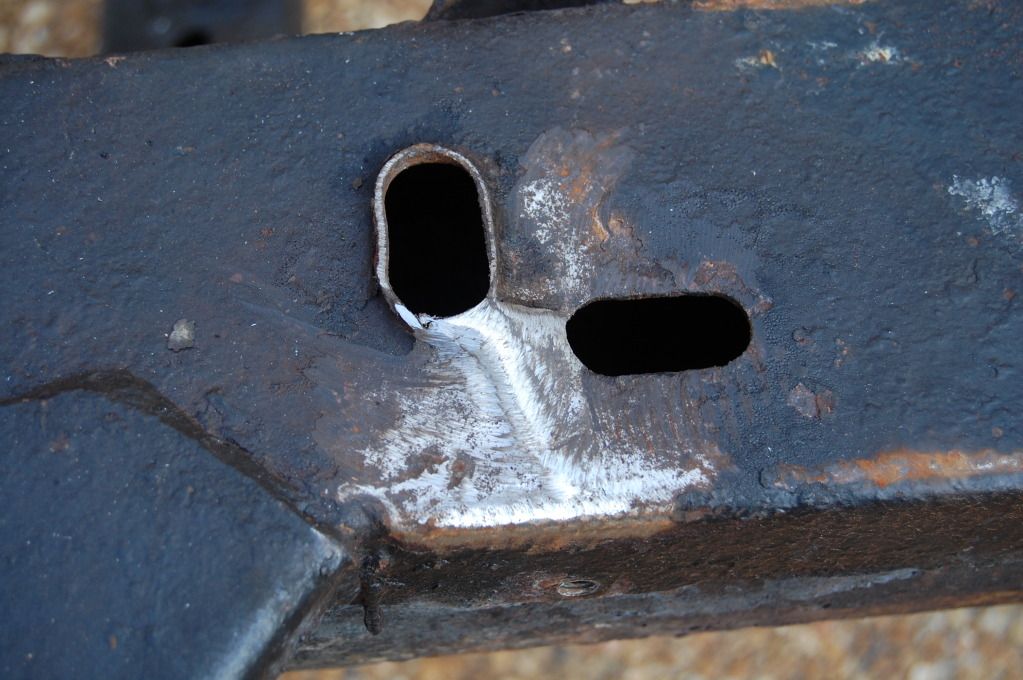
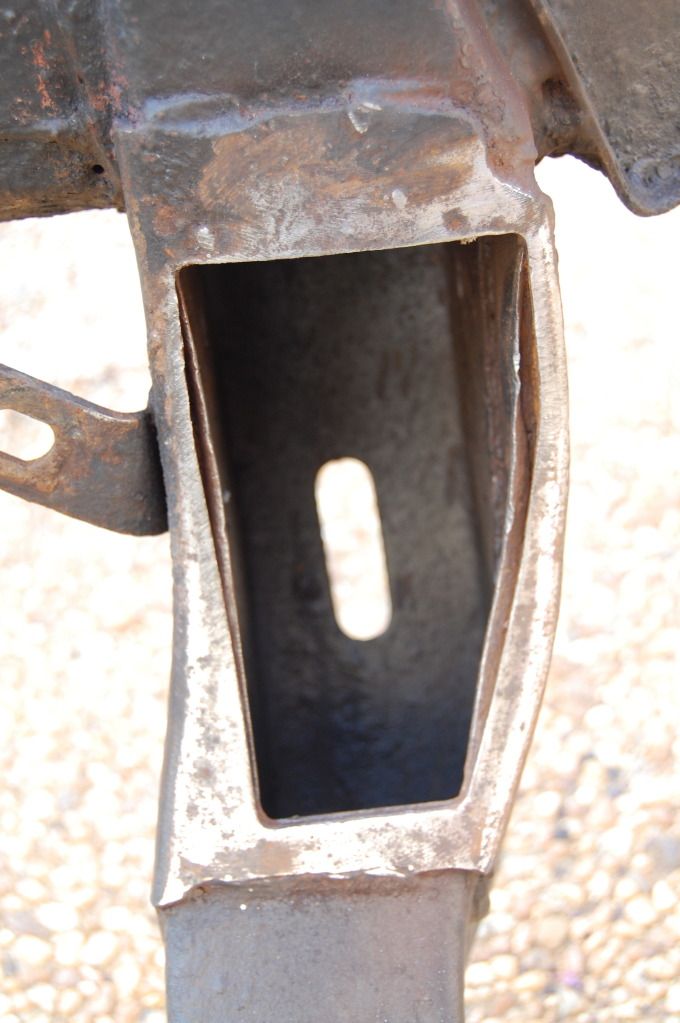
Anybody want to take a wild guess at why there is extra metal in these areas on this particular frame? I looked at the frames on two other 66 vettes last night and neither of them have this extra metal. I sanded the metal last night and attempted to make the holes look more uniform.
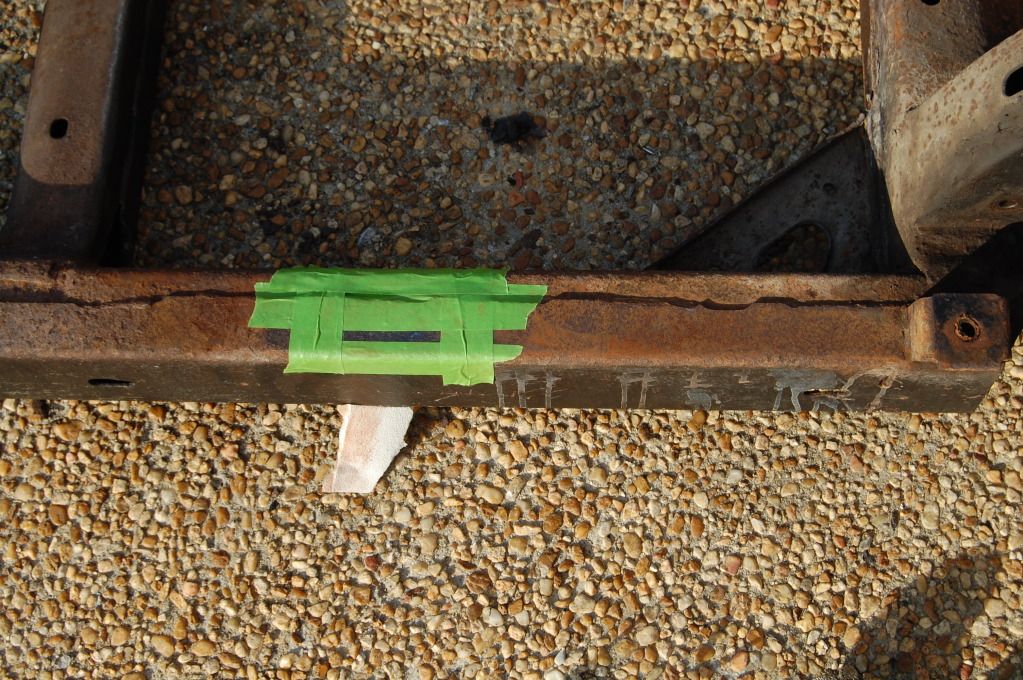
Found the numbers on the driver's main frame rail, sort of. The majority of the digits were barely visible after cleaning the rust off.
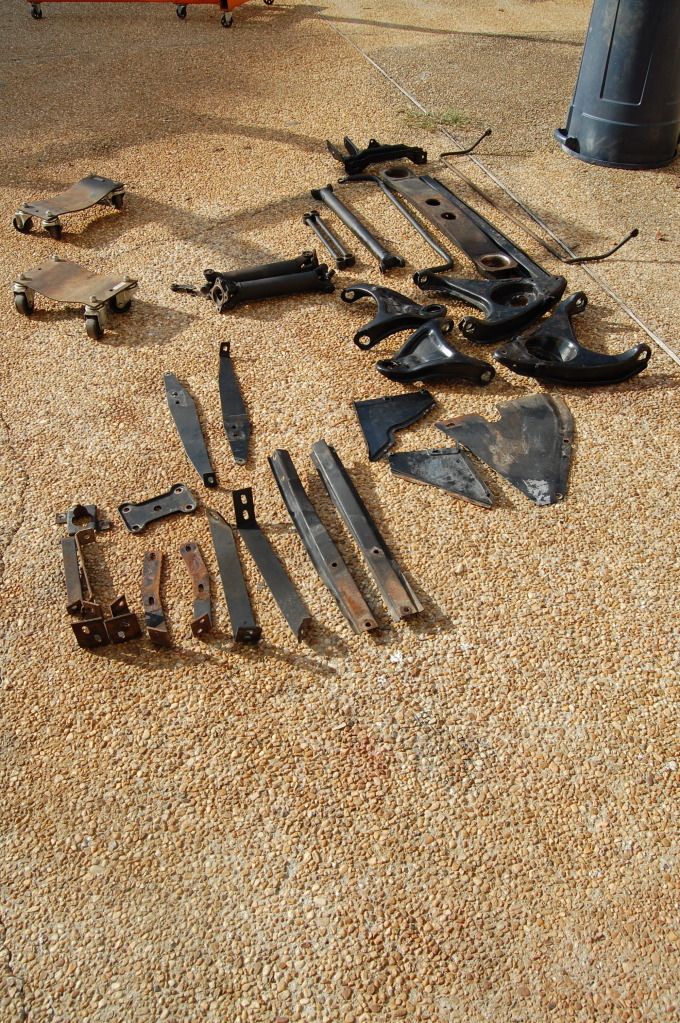
Parts ready to be dipped and powdercoated.
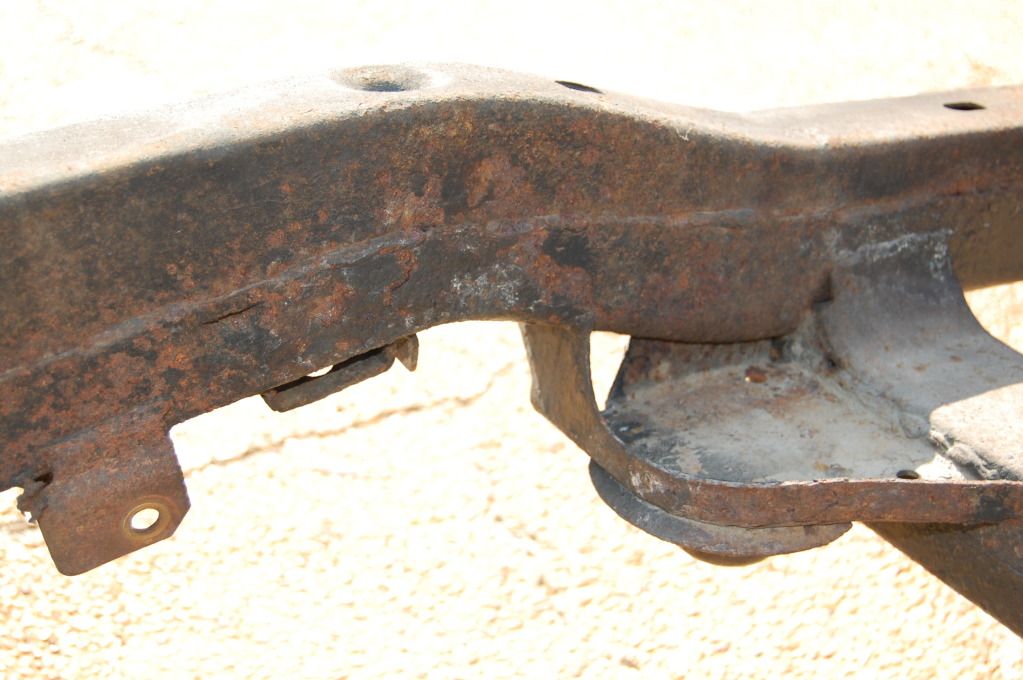
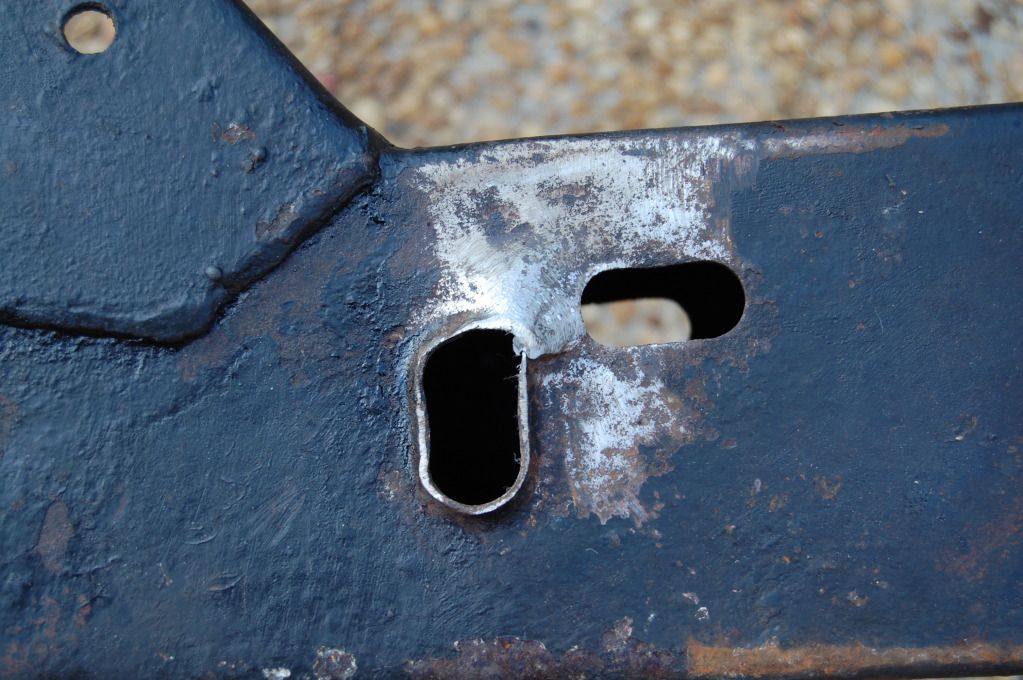
I cleaned the trailing arm area of the frame up a little more. I left the reinforcement sleeve pulled away from the main rail so that the chemicals will dissolve the rust inside. Hopefully i can just crimp the metal back into place once the frame returns.
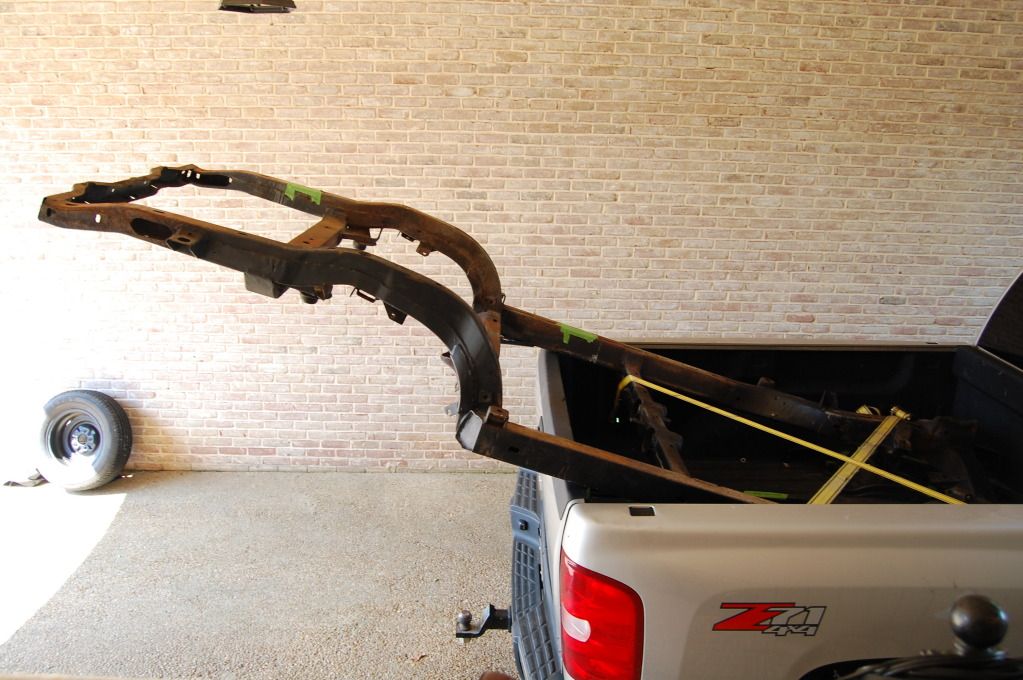
The frame is loaded and ready to make its trip to be dipped, e-coated, and powdercoated. It's not the best way to transport the frame, but my trailer is occupied with the 66 restomod project currently.
One bushing came right out of the differential crossmember with no problem at all, but i had to beat the other one for a solid 40 minutes before it finally popped loose. Needless to say, my shoulders and hands are a little tender today. Why did i give my press away two years ago???
Condition of BB rear sway bar bushings.
Anybody want to take a wild guess at why there is extra metal in these areas on this particular frame? I looked at the frames on two other 66 vettes last night and neither of them have this extra metal. I sanded the metal last night and attempted to make the holes look more uniform.
Found the numbers on the driver's main frame rail, sort of. The majority of the digits were barely visible after cleaning the rust off.
Parts ready to be dipped and powdercoated.
I cleaned the trailing arm area of the frame up a little more. I left the reinforcement sleeve pulled away from the main rail so that the chemicals will dissolve the rust inside. Hopefully i can just crimp the metal back into place once the frame returns.
The frame is loaded and ready to make its trip to be dipped, e-coated, and powdercoated. It's not the best way to transport the frame, but my trailer is occupied with the 66 restomod project currently.
Last edited by 65silververt; 09-11-2012 at 01:39 PM.
09-11-2012, 04:29 PM
#19
Team Owner


Member Since: Oct 2000
Location: Washington Michigan
Posts: 38,899
Received 1,859 Likes
on
1,102 Posts

Anybody want to take a wild guess at why there is extra metal in these areas on this particular frame? I looked at the frames on two other 66 vettes last night and neither of them have this extra metal. I sanded the metal last night and attempted to make the holes look more uniform.
09-11-2012, 06:09 PM
#20
Safety Car
Thread Starter
Thanks John! Your really do have a picture of everything! Perhaps they put the chains going towards the front of the body for some reason since the repairs are on the front portion of the crossmember.