Will be doing a body off on my '64 coupe
 08-04-2012, 10:36 PM
#41
Burning Brakes

Thread Starter


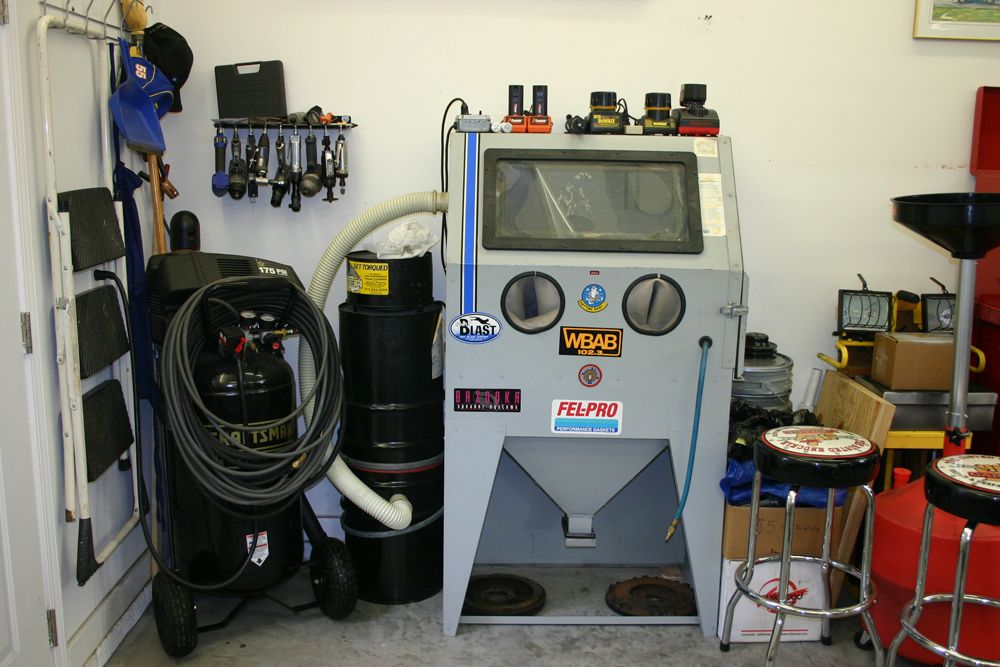
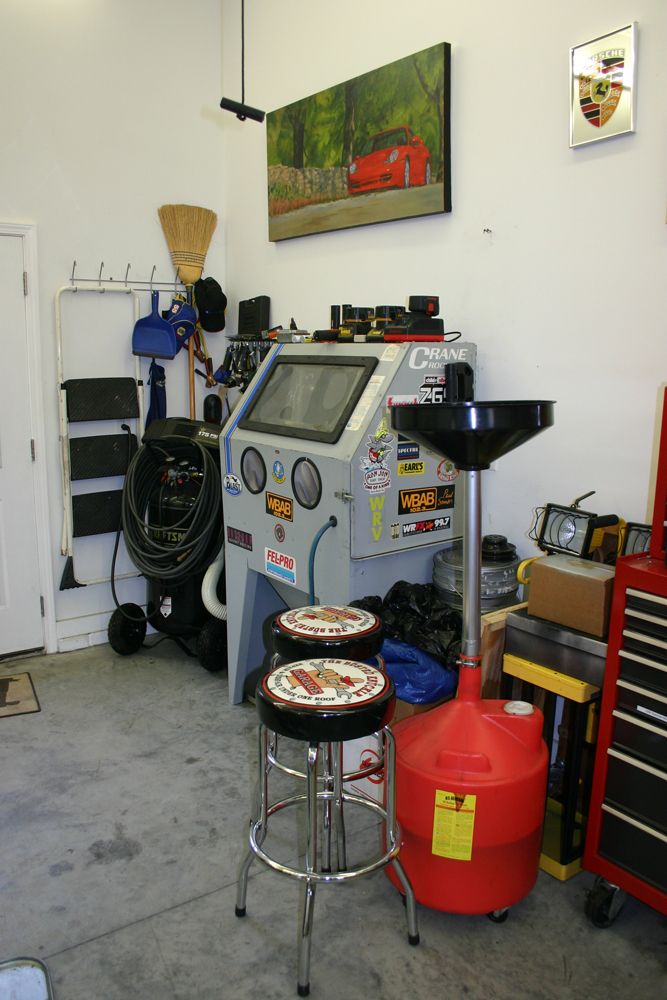
Earlier I mentioned that my buddy let me use his bead blaster cabinet. I hate borrowing things from people so I checked Craigslist for a used blaster cabinet. I found one very similar to my buddie's. The guy I bought it from had a neat shop with lathes and about any other metal working machines you could think of. He and his son drag race a Neon SRT. 557HP to the wheels and 10.22 quarter!!! Very fast car and well done.
After getting the cabinet home, I spent an entire afternoon cleaning it up, making room for it and cleaning out one of my toolboxes that will be going to my son. Notice that it already came with a full supply of stickers!!
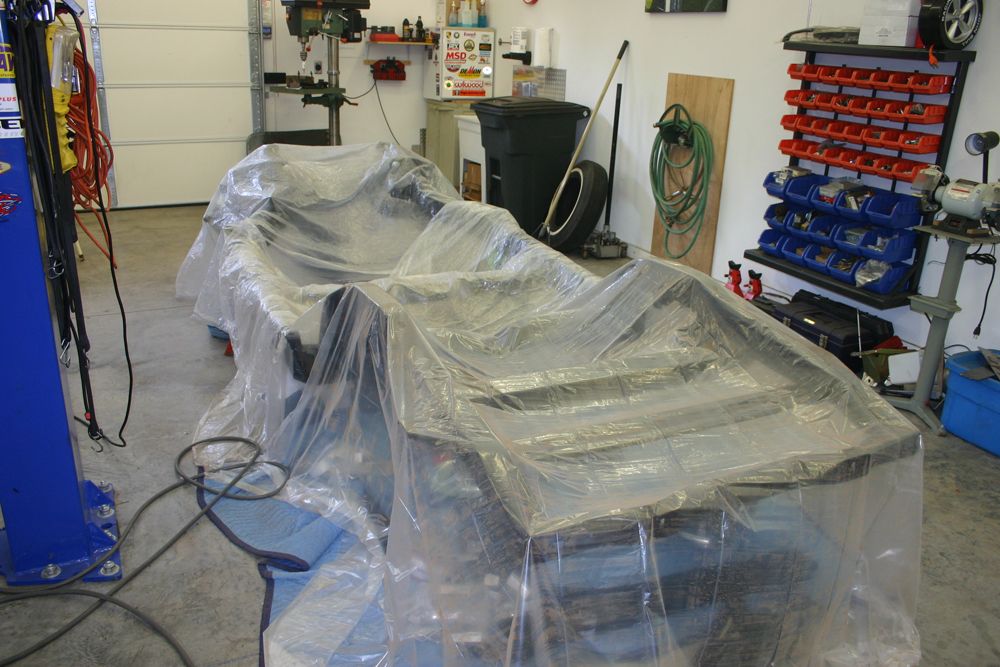
Speaking of said son, he arrived this morning to complete the repair on the birdcage. First thing I did was cover my newly powdercoated frame to keep it clean.
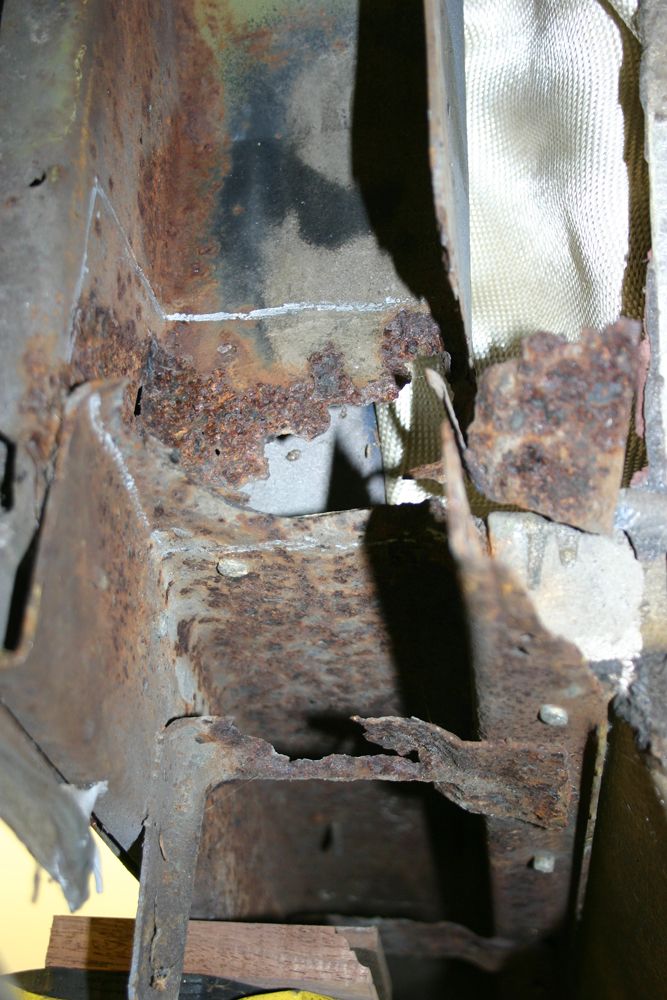
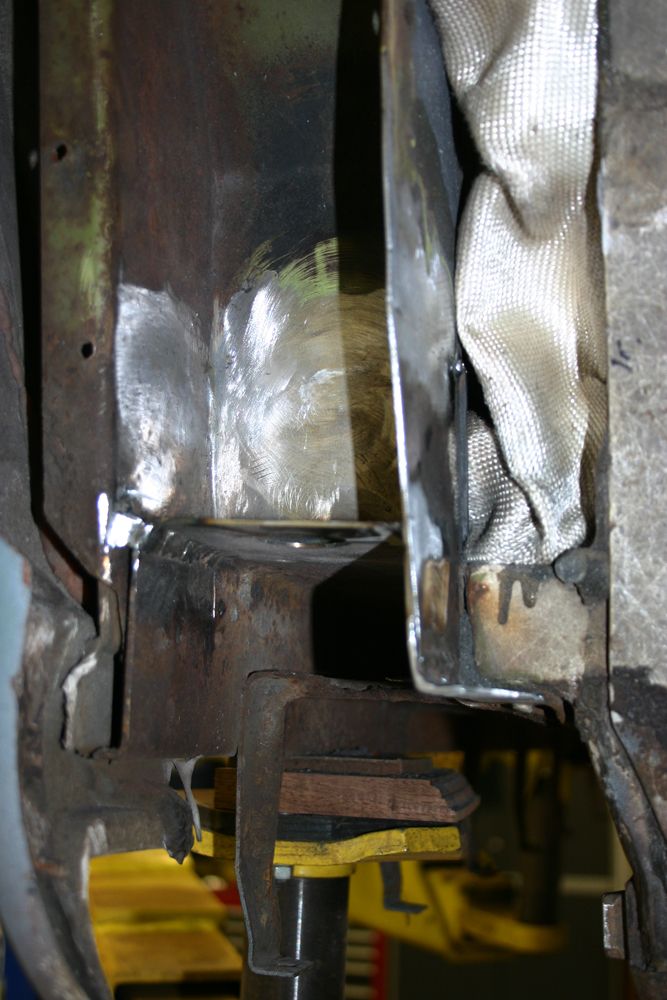
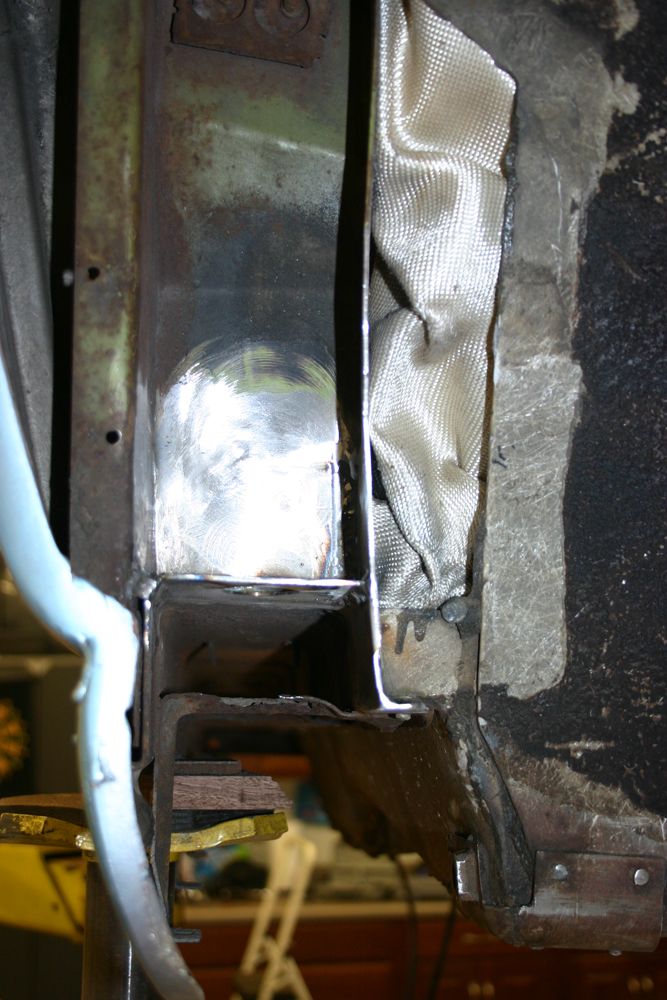
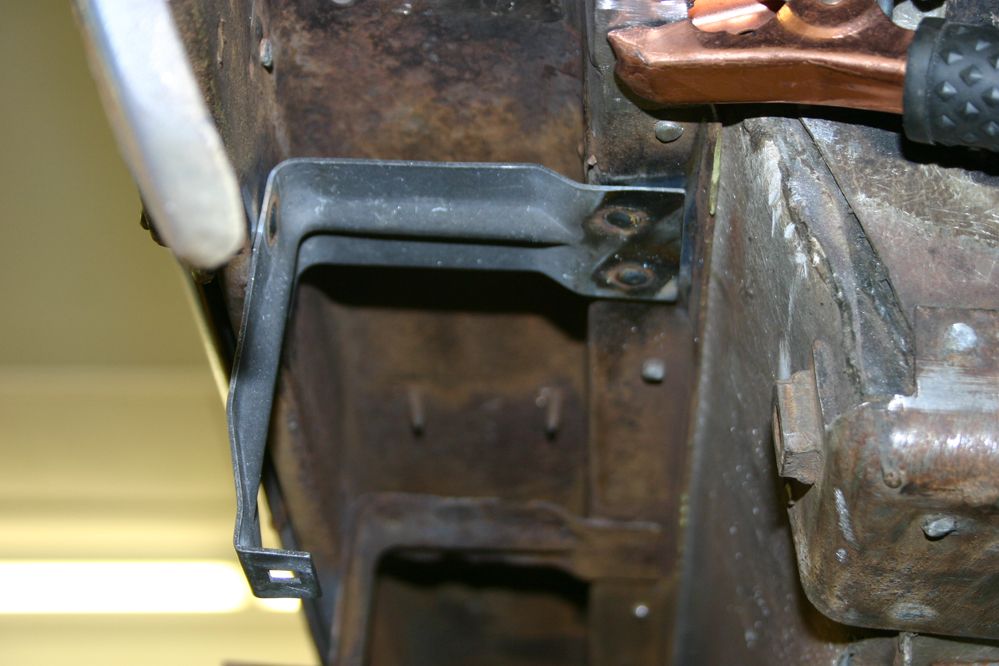
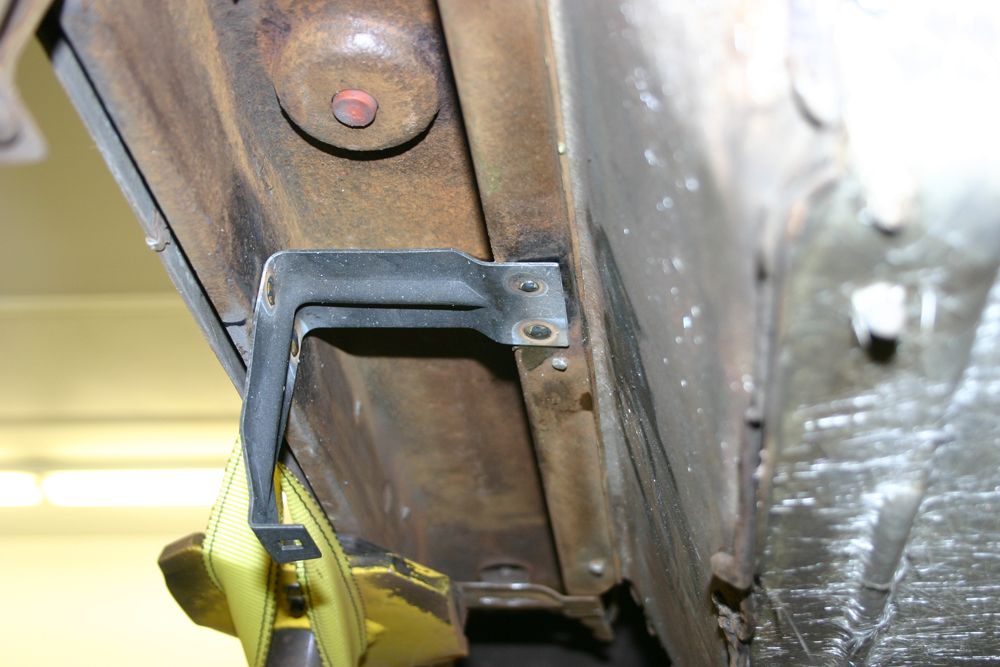
Matt then spent the rest of the day fabricating and welding in the pieces for the repair. Just one look at the before and after pictures below shows how great a job he did.
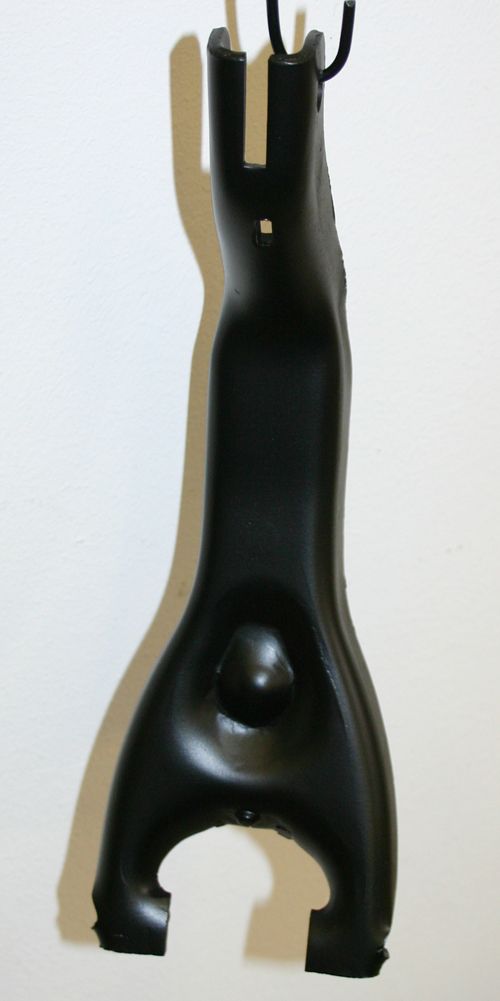
While he was busy, I worked on the lower part of the spare tire carrier. Cleaned up the rust on the support beams and then painted it.
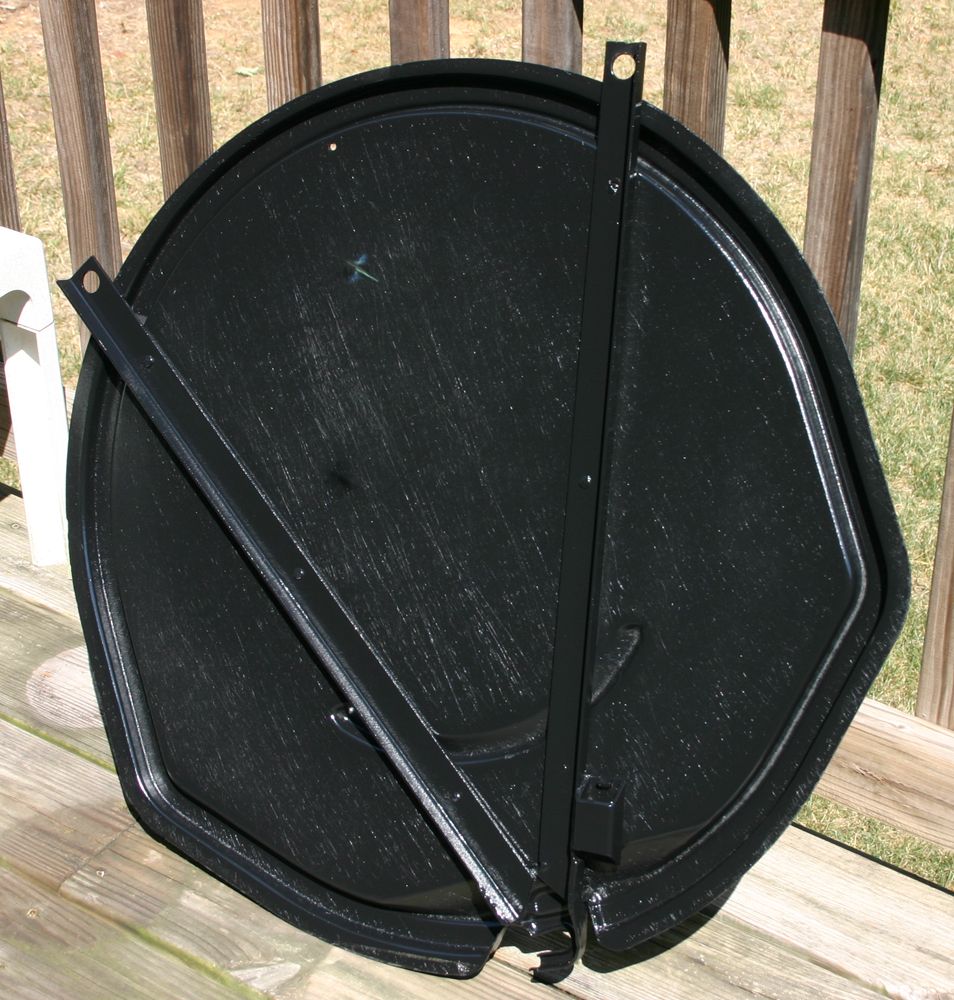
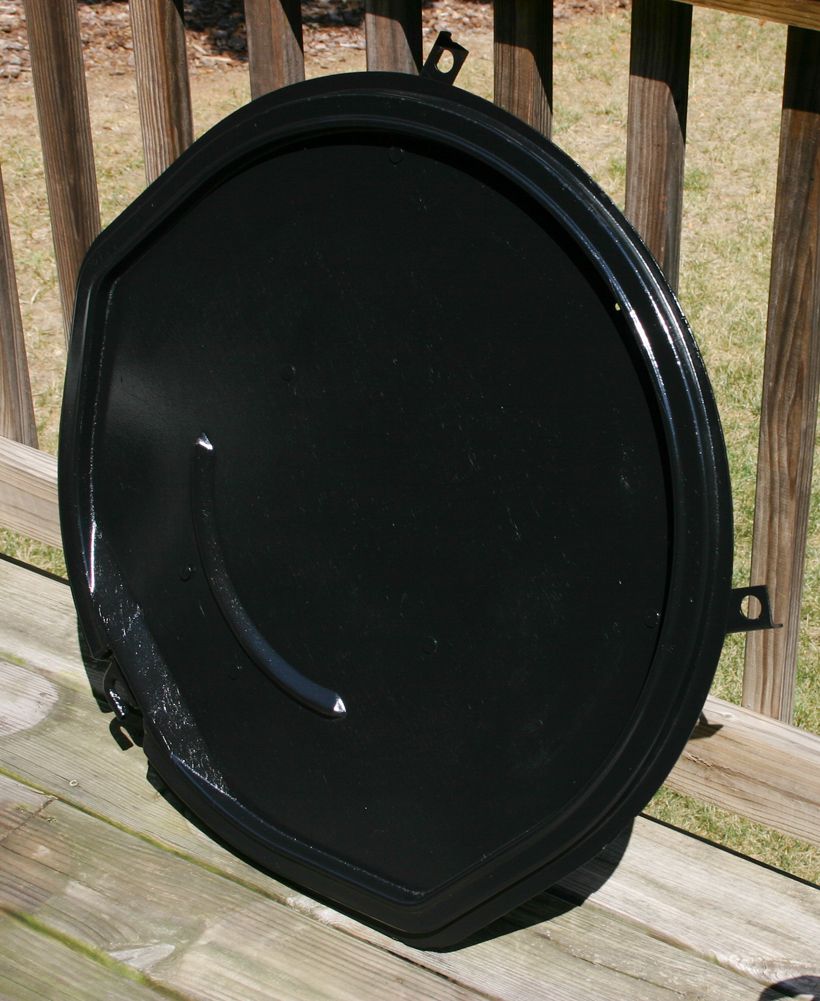
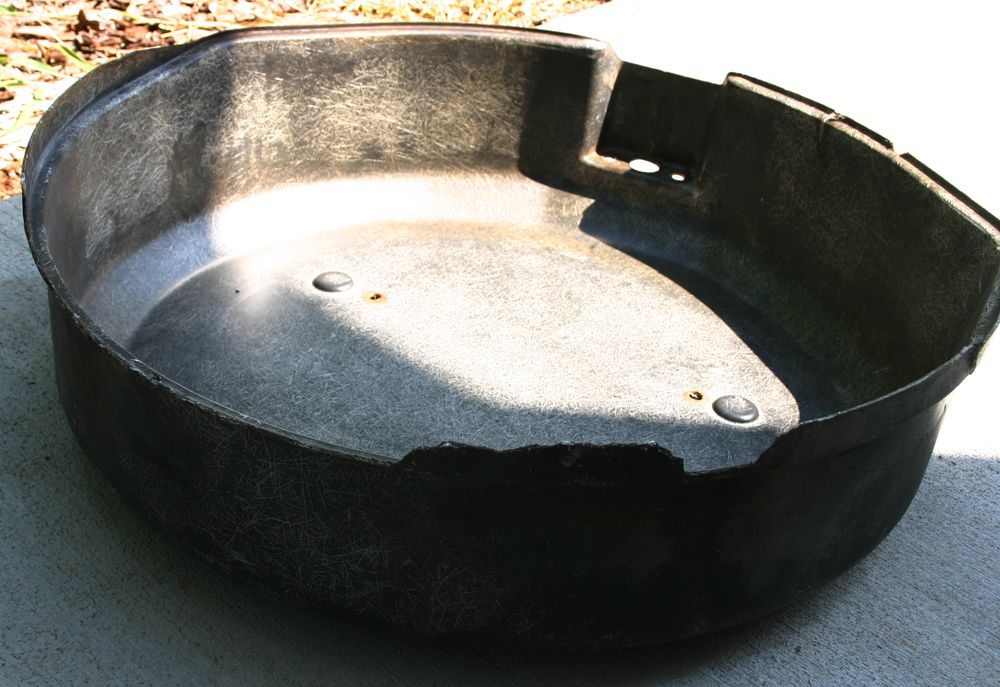
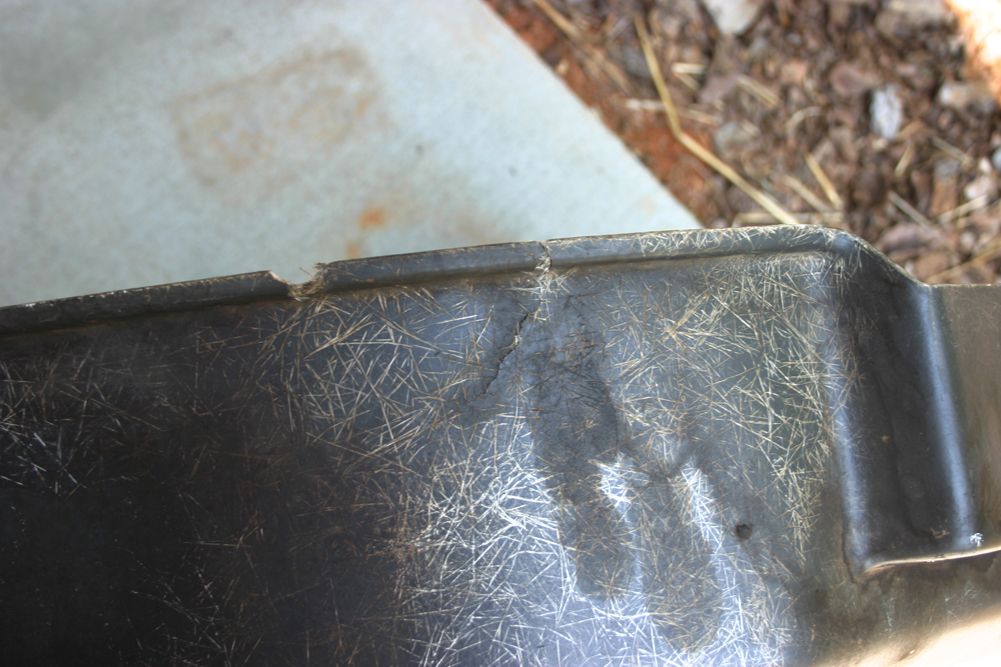
I then washed the upper spare tire carrier part but decided I needed to replace it. Parts of it were broken off and it had a pretty substantial crack in it. I will hang on to it to keep with the car's other original pieces.
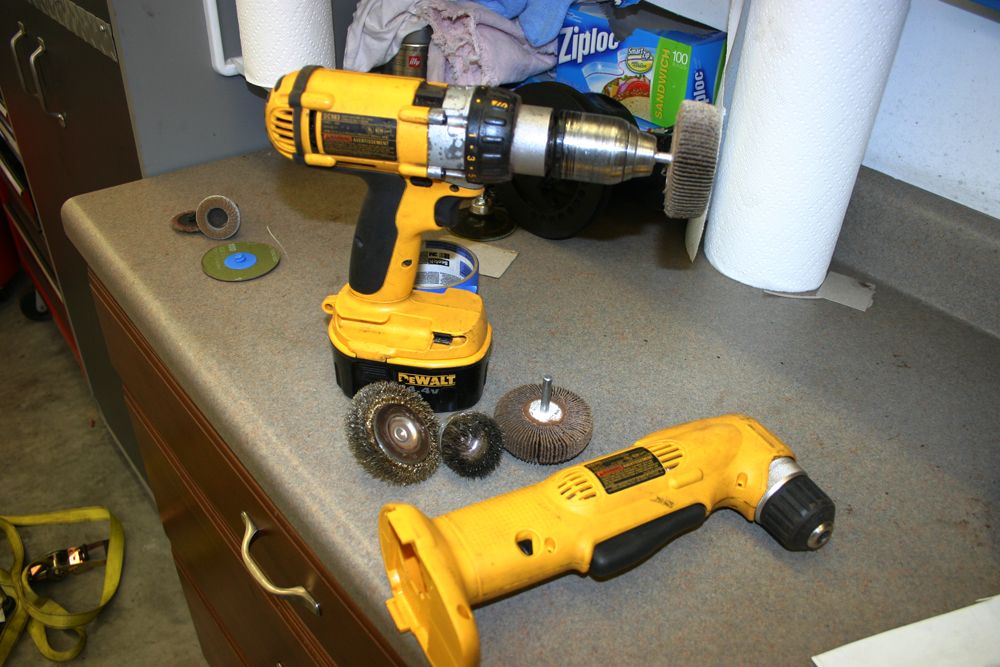
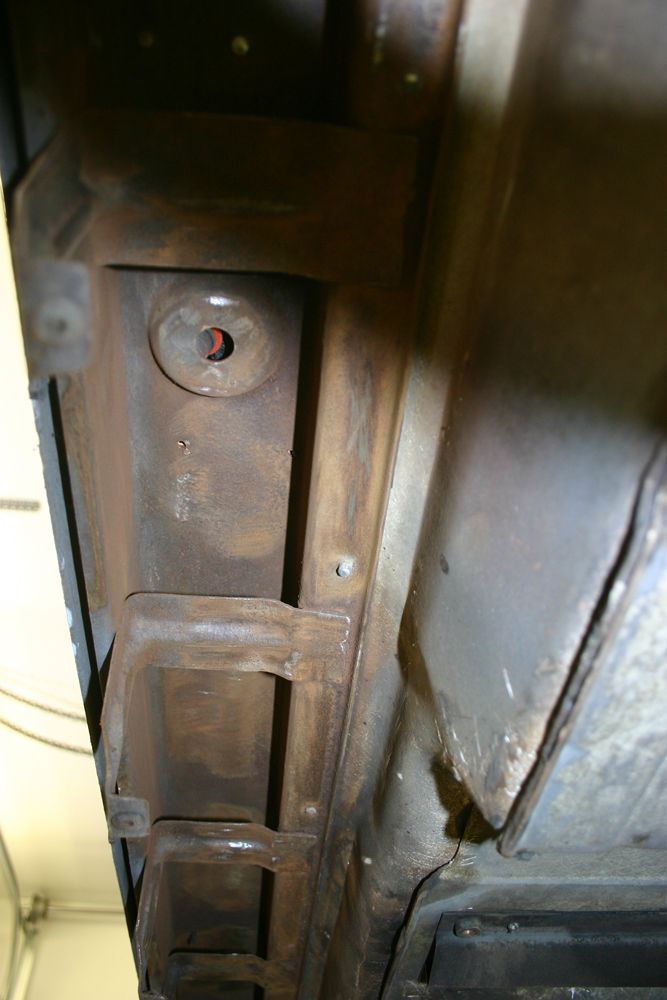
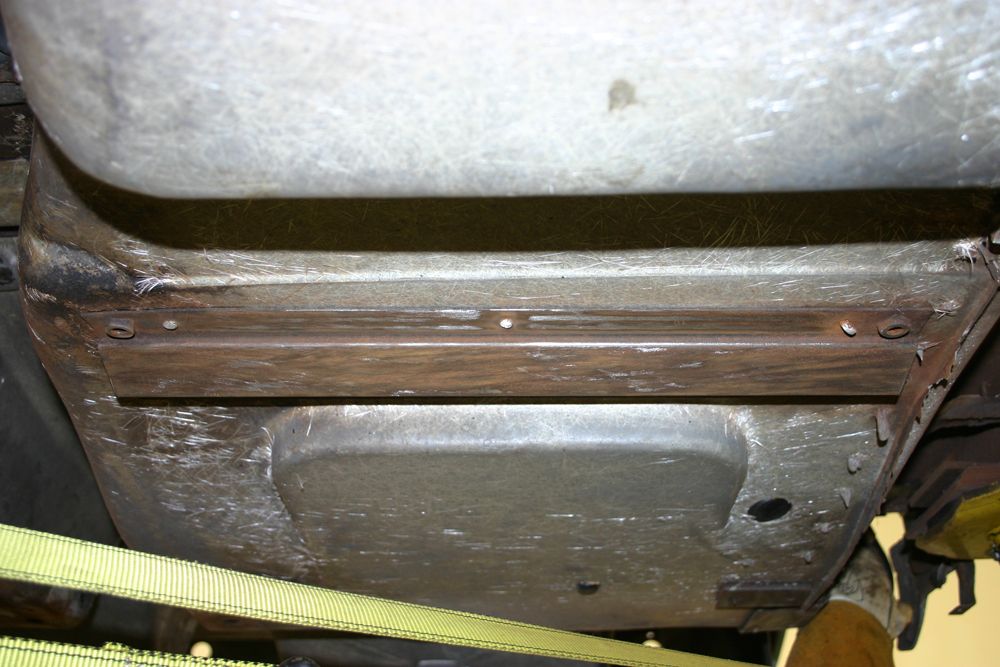
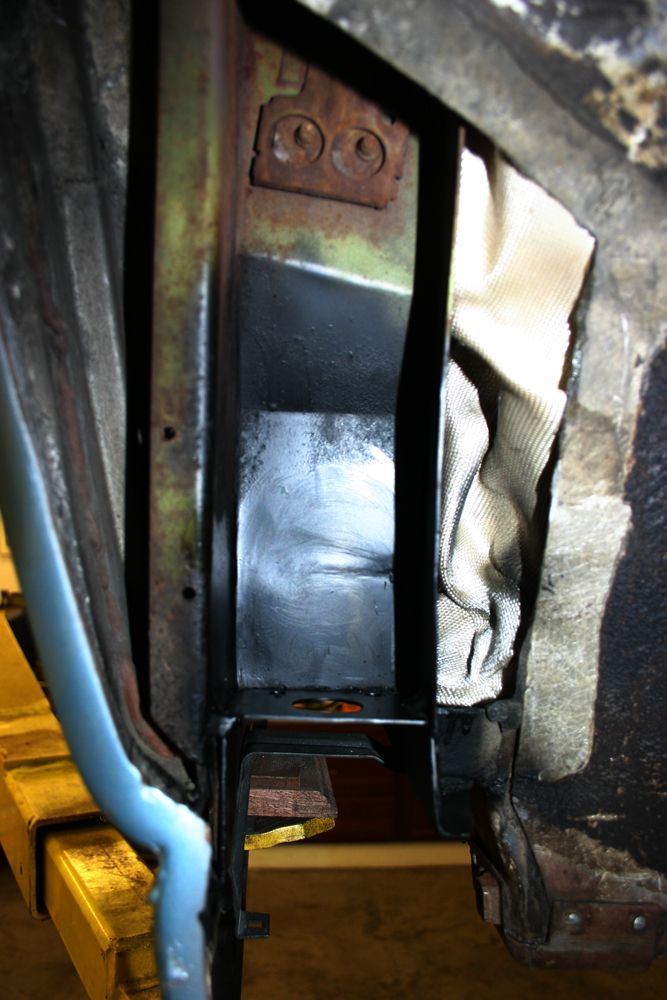
Next up was sanding down the rocker channels on both sides. These are the pieces of steel under the door sill and above the frame. There was surface rust on both sides with the rearmost part of the left one having been repaired by my son. I used a variety of wheels on my drills and they cleaned up nicely. As you can see, on the left side, some of the supports for the rocker panel need to be replaced which we are planning on doing tomorrow. Once all the repairs are complete, I will coat these area with POR 15. This was a very dirty job as most of the rust landed on me!!
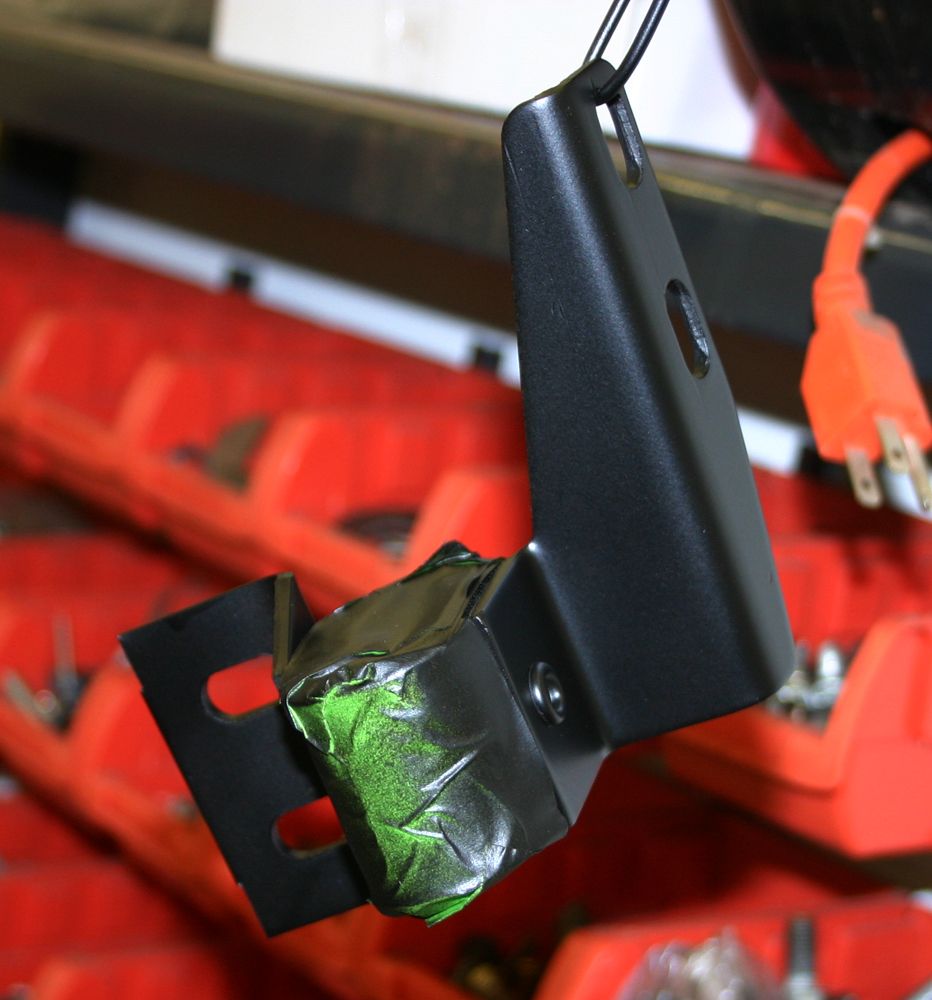
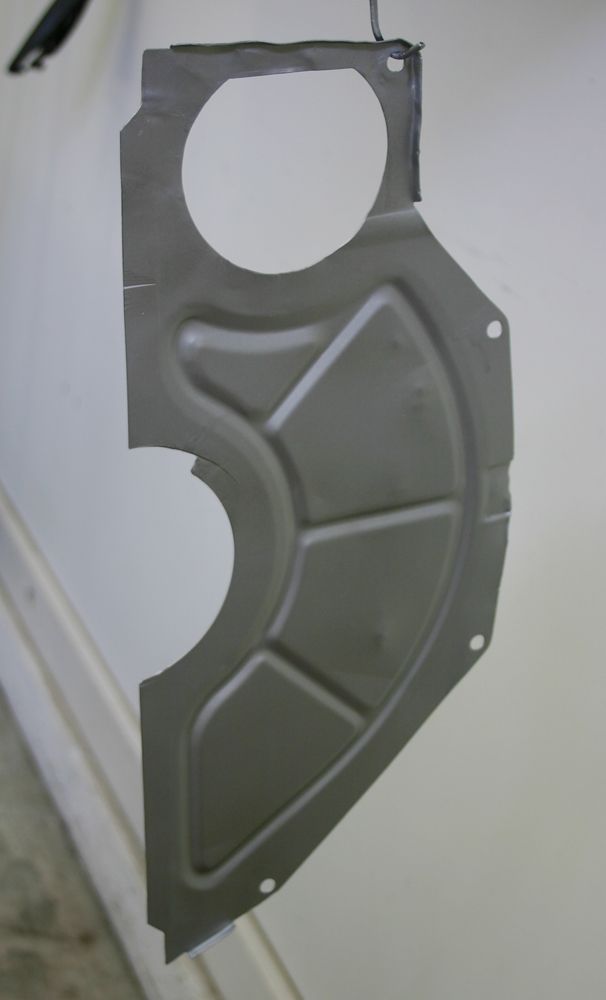
I also prepared the other reinforcement plates for the POR coating.
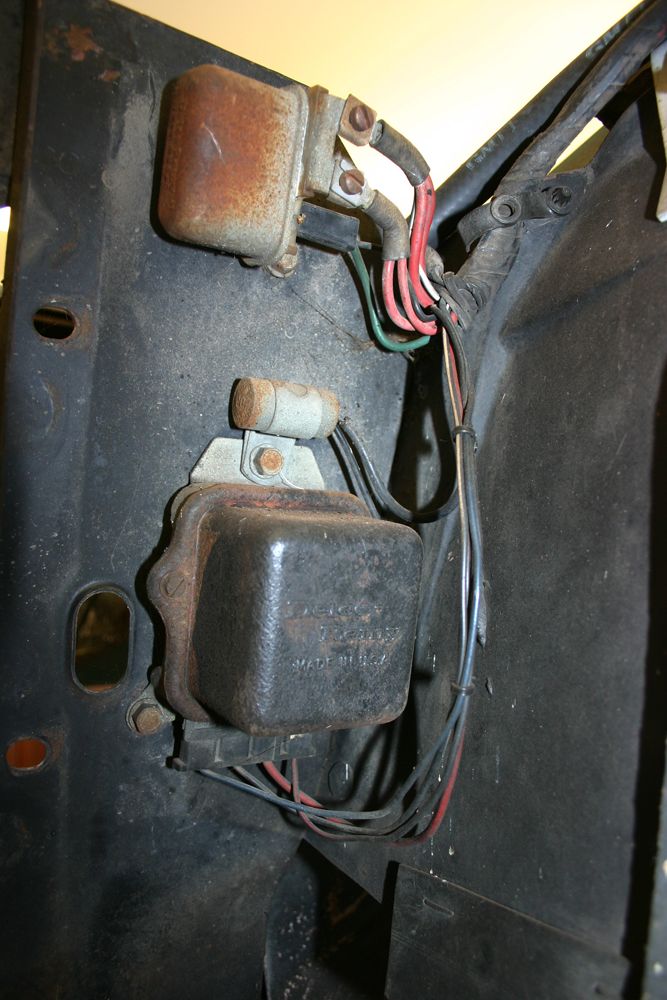
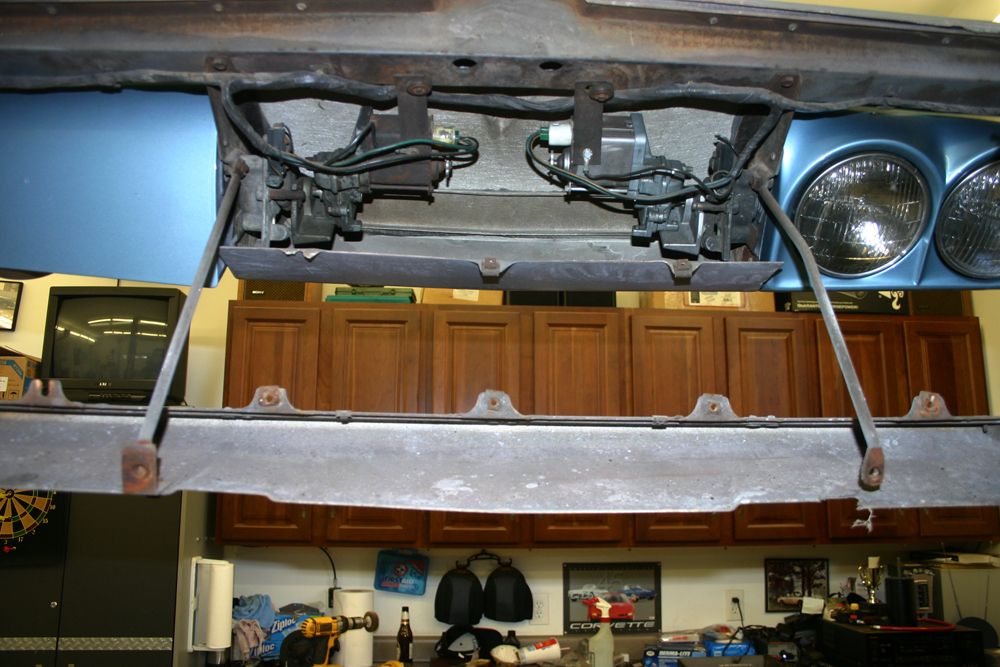
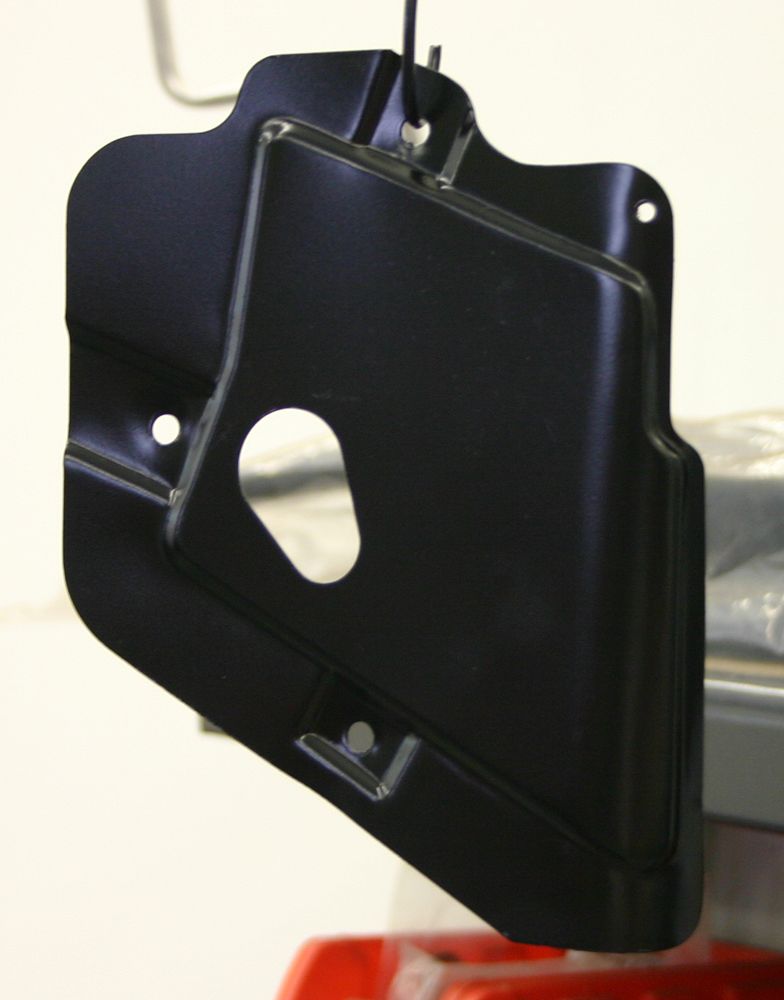
Next up was removing the rusty radiator support. First I had to remove all of the ground straps along with the voltage regulator and the horn relay switch. I also made note of the only shim that was used on the left side.
Once the radiator support is out of the way, the headlight motors are exposed. I will be cleaning up the wiring here and removing the surface rust on the steel support under the nose of the car to prep it for POR 15.
My son will be closing on his new house on August 24th and moving in on September 7th. The push is on to complete all of the jobs that may require his help during the next couple weeks so he can concentrate on moving in. Already, he has been looking for a lift. Since his garage has 10'6" ceilings, he will have to get a shorter lift than mine. When he worked for Red Bull, they used a lift like this. They are still in the process of selling off things from shutting down the team. Matt is going to see if they still have any of these lifts left.
I recently added part 4 on my blog.
http://jerryforthofer.wordpress.com/...-coupe-part-4/
After getting the cabinet home, I spent an entire afternoon cleaning it up, making room for it and cleaning out one of my toolboxes that will be going to my son. Notice that it already came with a full supply of stickers!!
Speaking of said son, he arrived this morning to complete the repair on the birdcage. First thing I did was cover my newly powdercoated frame to keep it clean.
Matt then spent the rest of the day fabricating and welding in the pieces for the repair. Just one look at the before and after pictures below shows how great a job he did.
While he was busy, I worked on the lower part of the spare tire carrier. Cleaned up the rust on the support beams and then painted it.
I then washed the upper spare tire carrier part but decided I needed to replace it. Parts of it were broken off and it had a pretty substantial crack in it. I will hang on to it to keep with the car's other original pieces.
Next up was sanding down the rocker channels on both sides. These are the pieces of steel under the door sill and above the frame. There was surface rust on both sides with the rearmost part of the left one having been repaired by my son. I used a variety of wheels on my drills and they cleaned up nicely. As you can see, on the left side, some of the supports for the rocker panel need to be replaced which we are planning on doing tomorrow. Once all the repairs are complete, I will coat these area with POR 15. This was a very dirty job as most of the rust landed on me!!
I also prepared the other reinforcement plates for the POR coating.
Next up was removing the rusty radiator support. First I had to remove all of the ground straps along with the voltage regulator and the horn relay switch. I also made note of the only shim that was used on the left side.
Once the radiator support is out of the way, the headlight motors are exposed. I will be cleaning up the wiring here and removing the surface rust on the steel support under the nose of the car to prep it for POR 15.
My son will be closing on his new house on August 24th and moving in on September 7th. The push is on to complete all of the jobs that may require his help during the next couple weeks so he can concentrate on moving in. Already, he has been looking for a lift. Since his garage has 10'6" ceilings, he will have to get a shorter lift than mine. When he worked for Red Bull, they used a lift like this. They are still in the process of selling off things from shutting down the team. Matt is going to see if they still have any of these lifts left.
I recently added part 4 on my blog.
http://jerryforthofer.wordpress.com/...-coupe-part-4/
Last edited by jerhofer; 08-13-2012 at 10:19 PM.
 08-05-2012, 08:17 PM
#42
Burning Brakes
Thread Starter
The welding is complete. First thing this morning I painted the birdcage repairs from yesterday with a self etching primer.
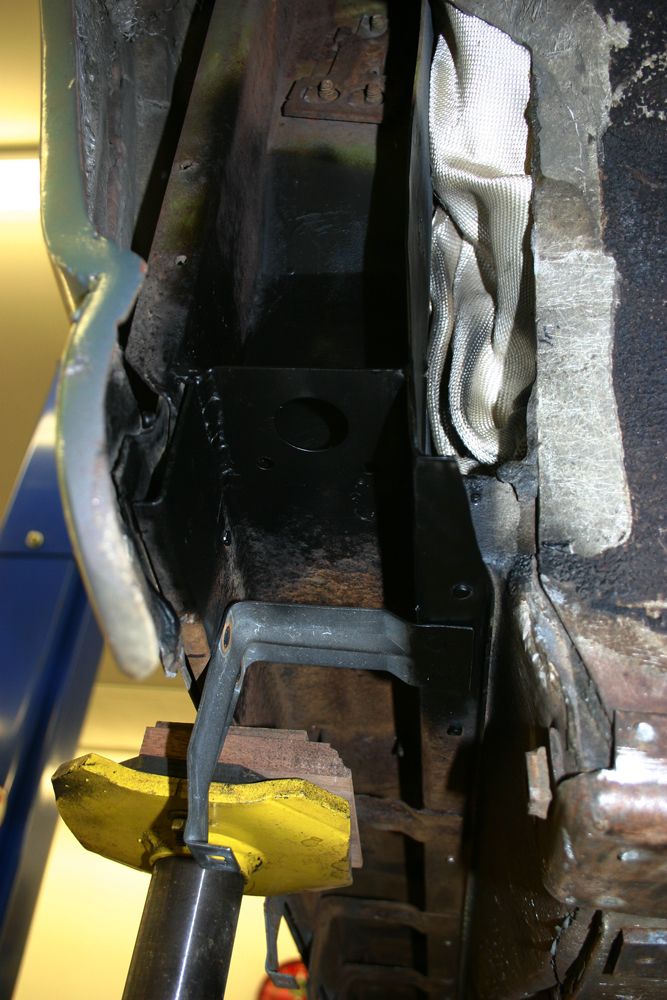
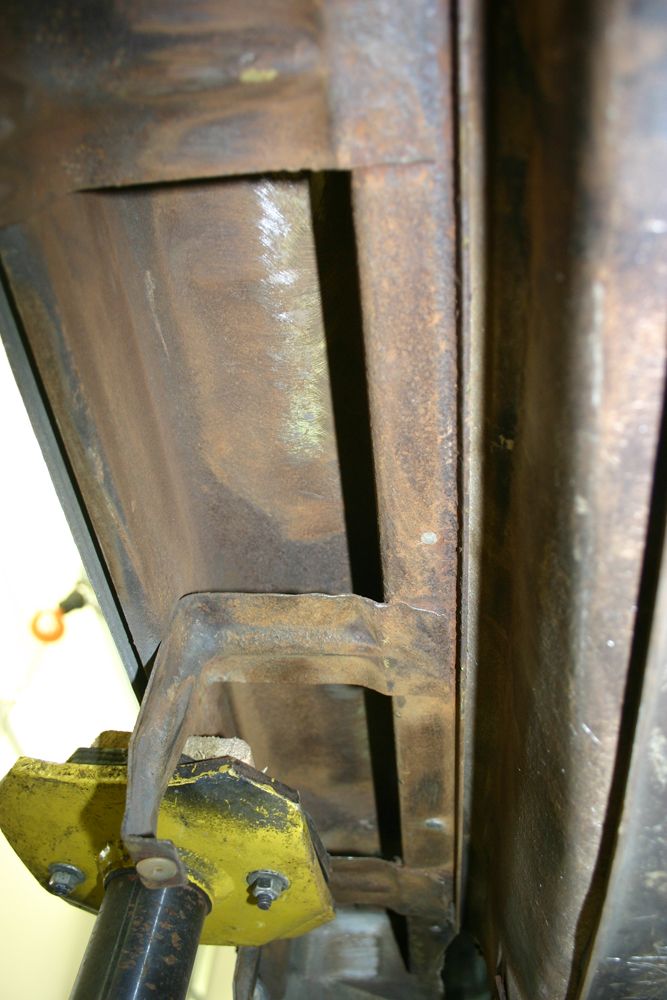
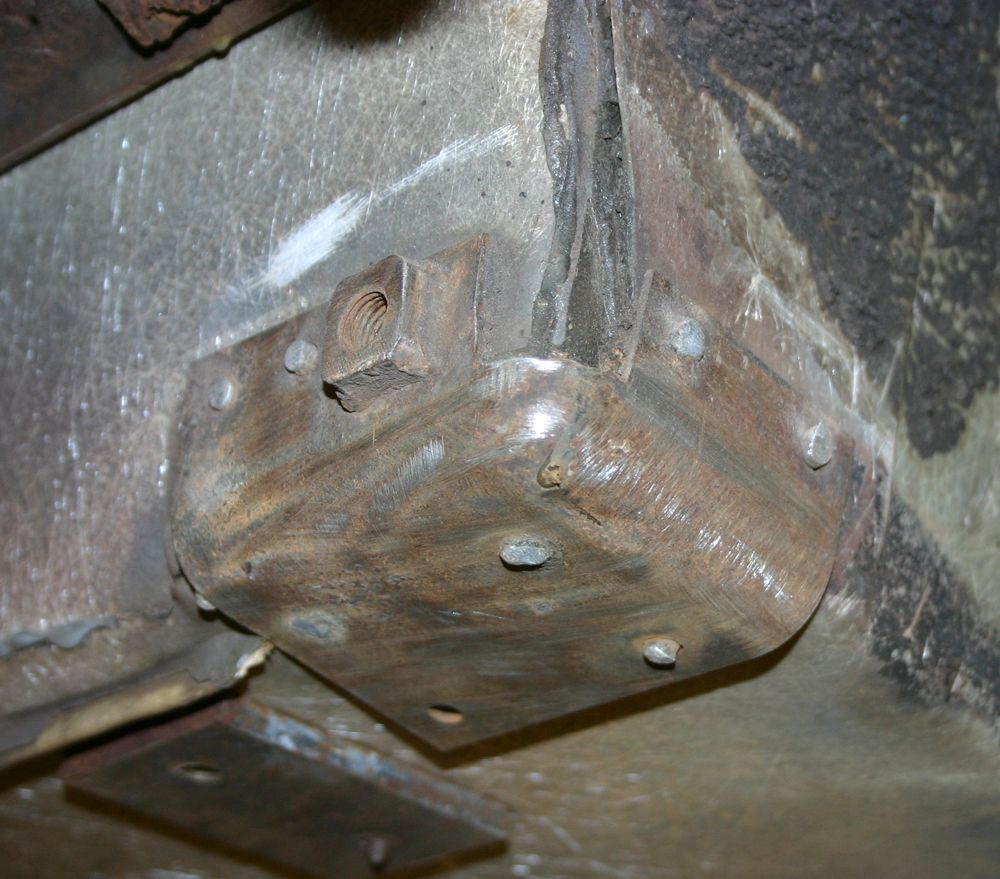
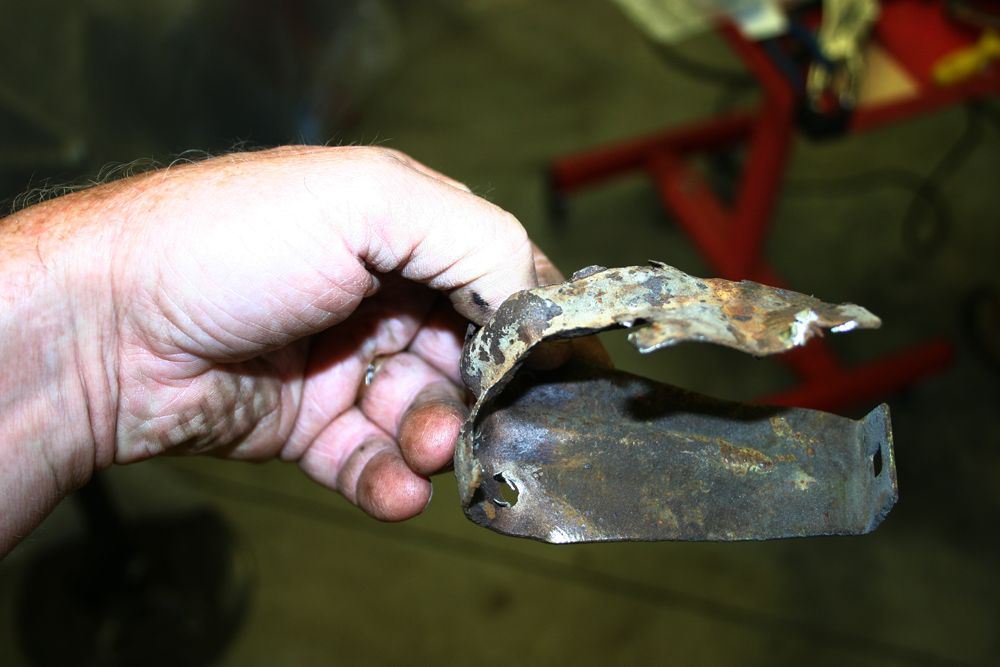
We had to replace two of the rocker panel supports and were concerned about how difficult they might be to remove. Turns out they easily came off and Matt soon had the replacements welded in. The last remaining bit of welding was to weld in a plate for the #3 body mount on the passenger side where the hole was somewhat enlarged due to rust.
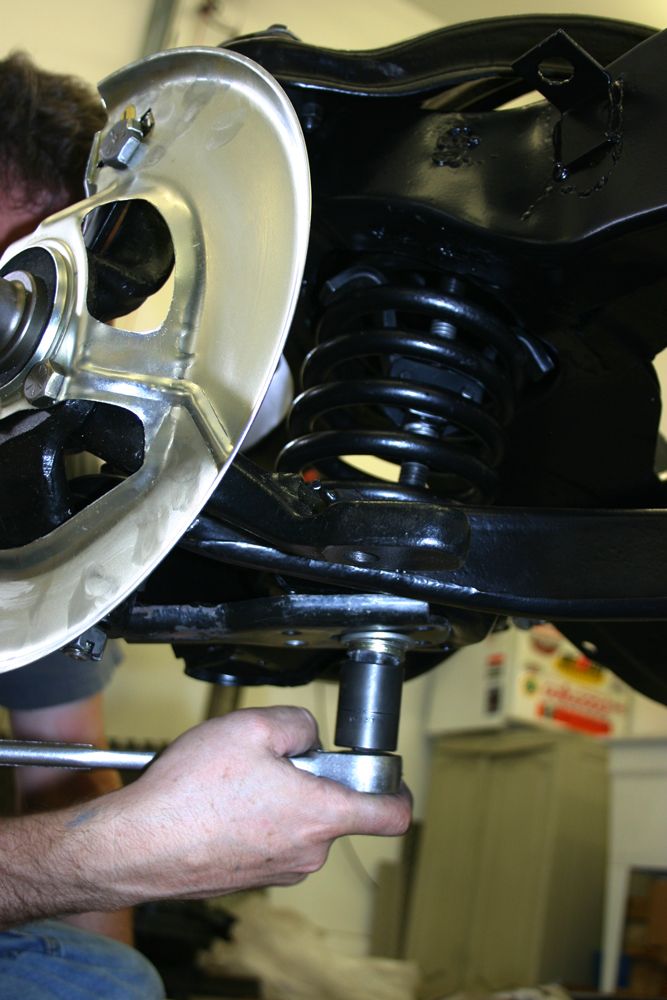
After lunch, we moved on to installing the front springs. We foundered for awhile until we decided to read the shop manual. Once we saw how the factory recommended installing the springs, we soon had them in. We put a plate on the bottom of the lower a arm and placed one set of hooks about six coils up. We then pulled the spring down to the lower a arm. Once it was compressed enough, we pushed it into the upper perch. With the help of a pry bar, we soon had it seated properly. We then use a ratchet strap to pull the lower a arm up so we could seat the upper ball joint. As is usual in these situations, we did the second one in about 15 minutes.
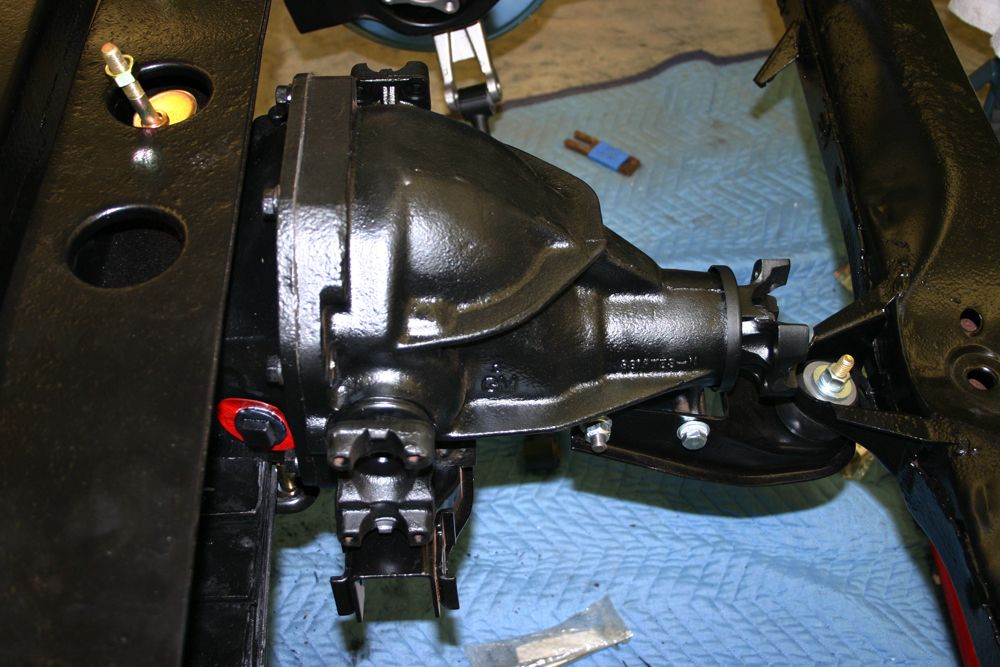
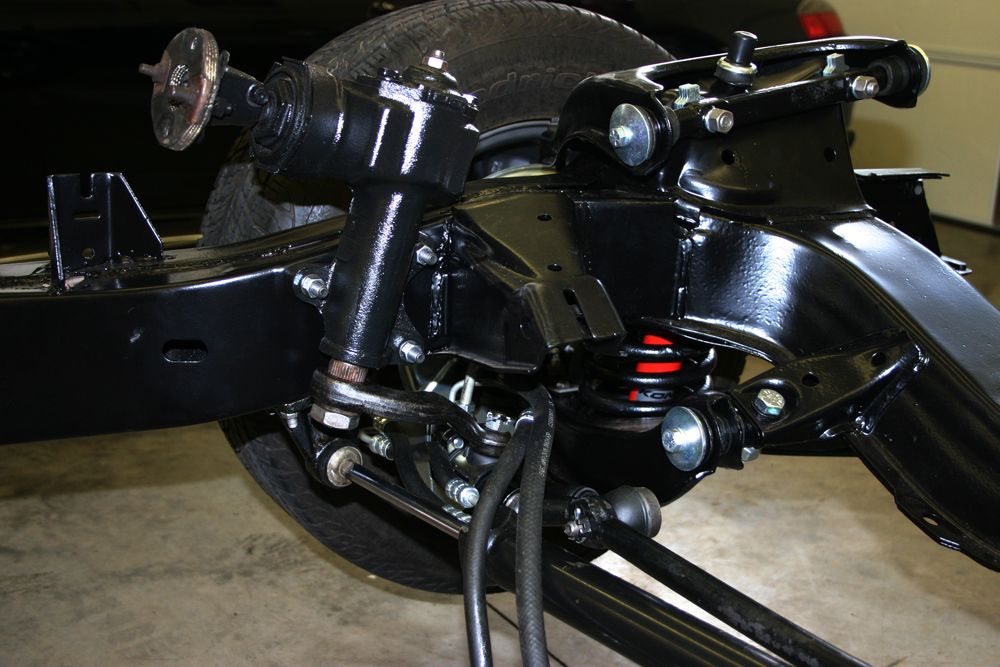
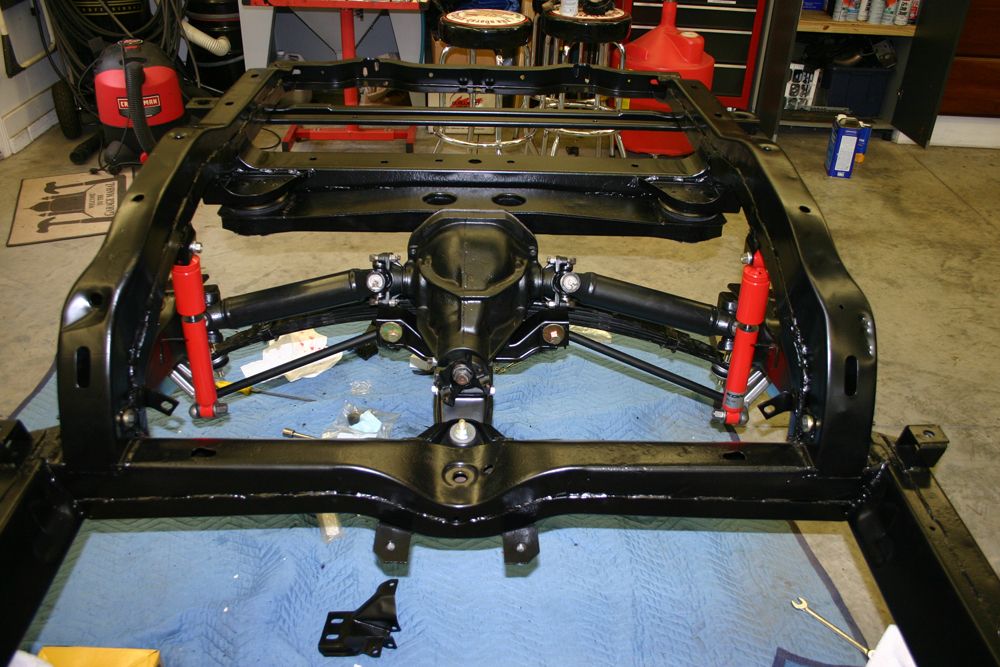
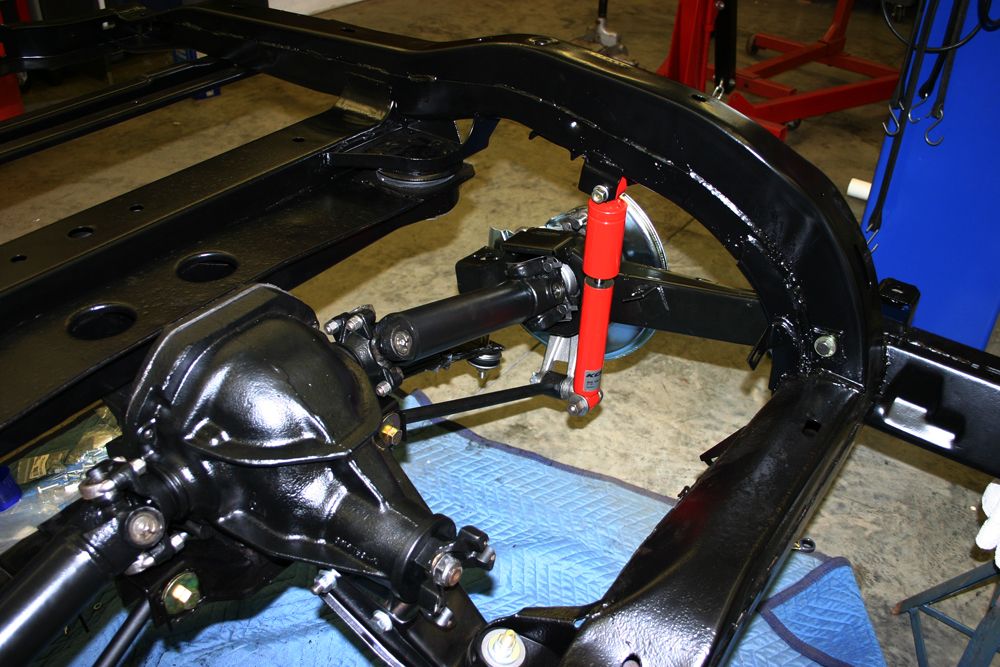
Next we installed the crossmember for the rear end. We used a jack to raise the rear end into place and the mounted it to the crossmember and the frame support.
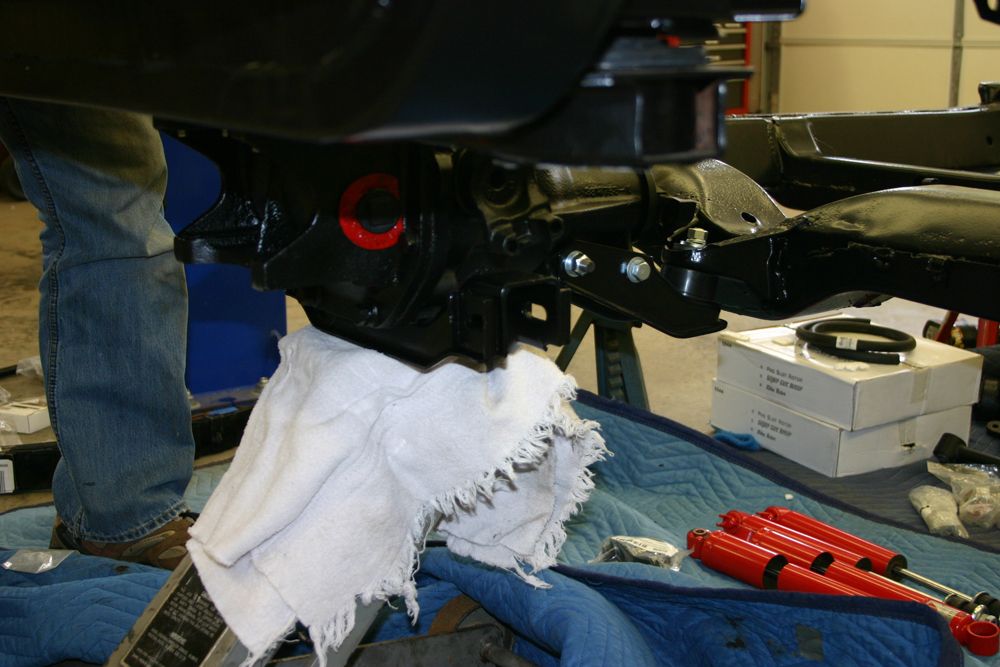
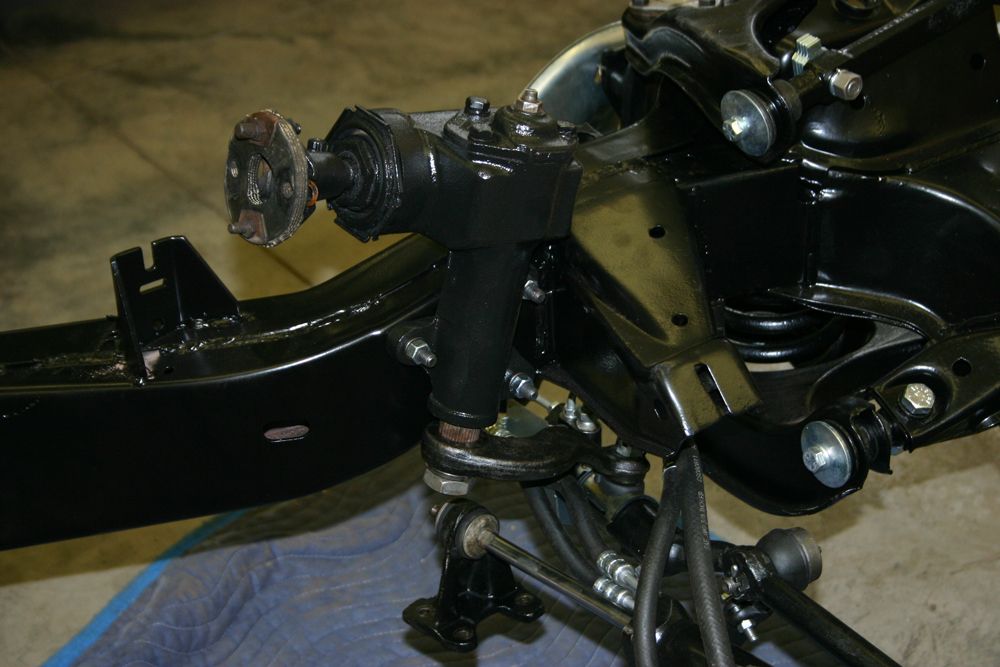
Since we now had added considerable weight to the rear, we installed the steering box and the tie rods to add some weight to the front. Our concern here was the frame teeter tottering off the jack supports.
Having done that, we installed the rear trailing arms. We had noted the number of shims when we took the arms off and installed the correct shims so we would at least have the alignment close.
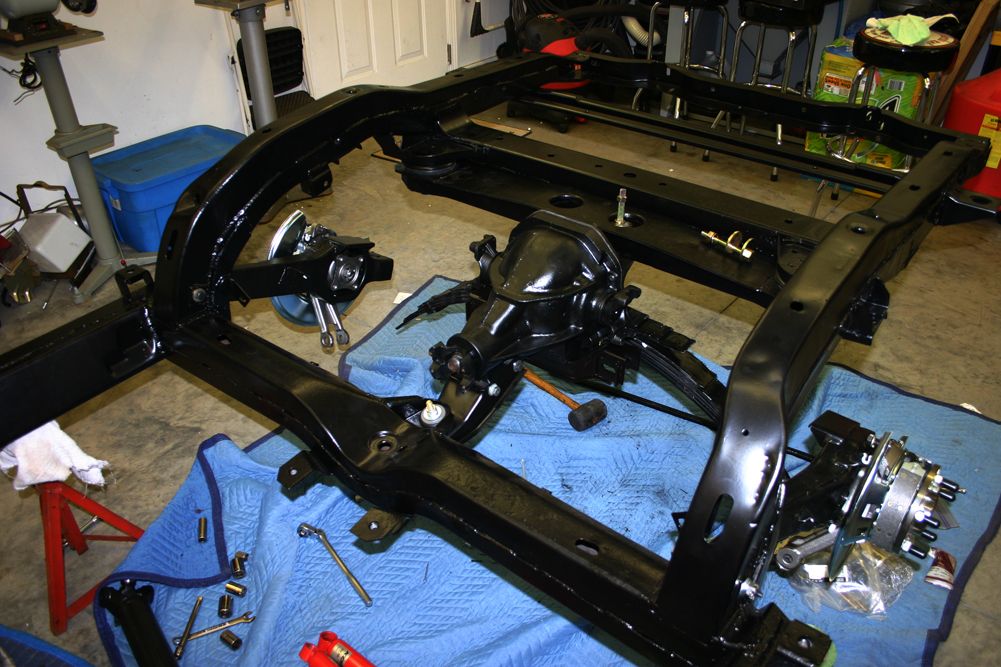
As our work day was ending, we installed the rear leaf spring. To hold it in place, we hooked a strap on each end and pulled it up against the mount.
Now I can complete the rest of the frame and hopefully have it back on the wheels and tires soon.
We had to replace two of the rocker panel supports and were concerned about how difficult they might be to remove. Turns out they easily came off and Matt soon had the replacements welded in. The last remaining bit of welding was to weld in a plate for the #3 body mount on the passenger side where the hole was somewhat enlarged due to rust.
After lunch, we moved on to installing the front springs. We foundered for awhile until we decided to read the shop manual. Once we saw how the factory recommended installing the springs, we soon had them in. We put a plate on the bottom of the lower a arm and placed one set of hooks about six coils up. We then pulled the spring down to the lower a arm. Once it was compressed enough, we pushed it into the upper perch. With the help of a pry bar, we soon had it seated properly. We then use a ratchet strap to pull the lower a arm up so we could seat the upper ball joint. As is usual in these situations, we did the second one in about 15 minutes.
Next we installed the crossmember for the rear end. We used a jack to raise the rear end into place and the mounted it to the crossmember and the frame support.
Since we now had added considerable weight to the rear, we installed the steering box and the tie rods to add some weight to the front. Our concern here was the frame teeter tottering off the jack supports.
Having done that, we installed the rear trailing arms. We had noted the number of shims when we took the arms off and installed the correct shims so we would at least have the alignment close.
As our work day was ending, we installed the rear leaf spring. To hold it in place, we hooked a strap on each end and pulled it up against the mount.
Now I can complete the rest of the frame and hopefully have it back on the wheels and tires soon.
Last edited by jerhofer; 08-13-2012 at 10:18 PM.


 08-06-2012, 08:42 PM
#44
Burning Brakes
Thread Starter
Thanks.
Had some running around to do early this morning. First priority in the garage was cleaning up from the weekend's thrash. As I was putting tools away, I kept seeing parts sitting around that needed to be painted before they became dirty again or rust began to form after beadblasting. Besides they were in the way.
The rear muffler hangers needed to be replaced and the new ones were bare metal. Masked off the rubber and used a self etching primer on them.
Next up was the plate for the bellhousing. I painted it with a high temp silver paint. I also painted the clutch arm.
I had previously painted the end cap on the starter. That paint had now dried sufficiently so I could paint the black body of the starter.

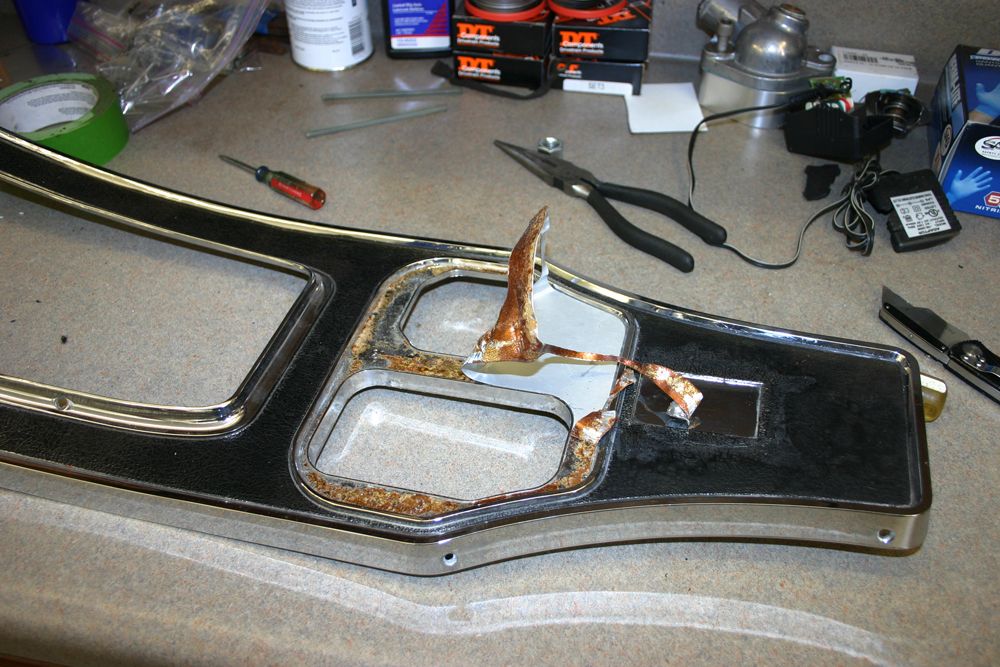
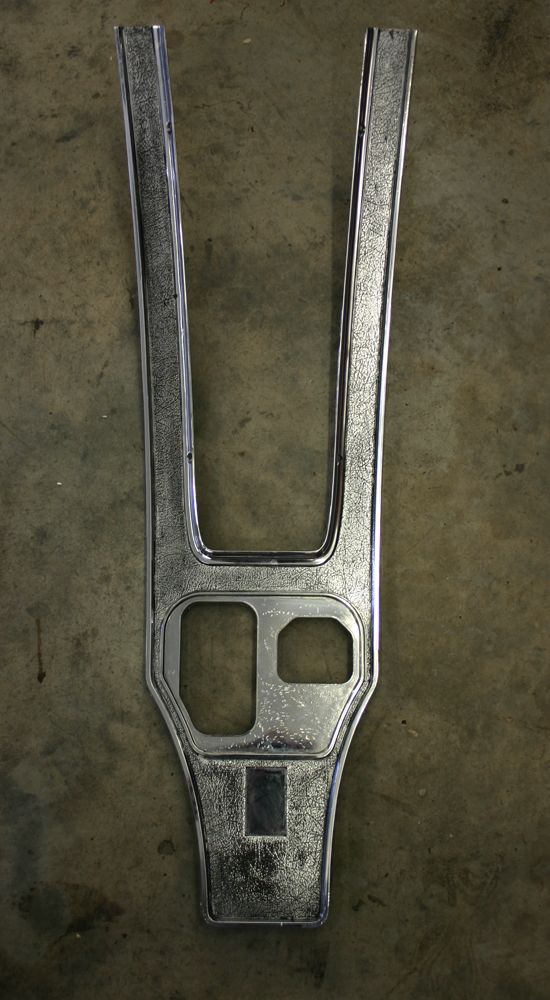
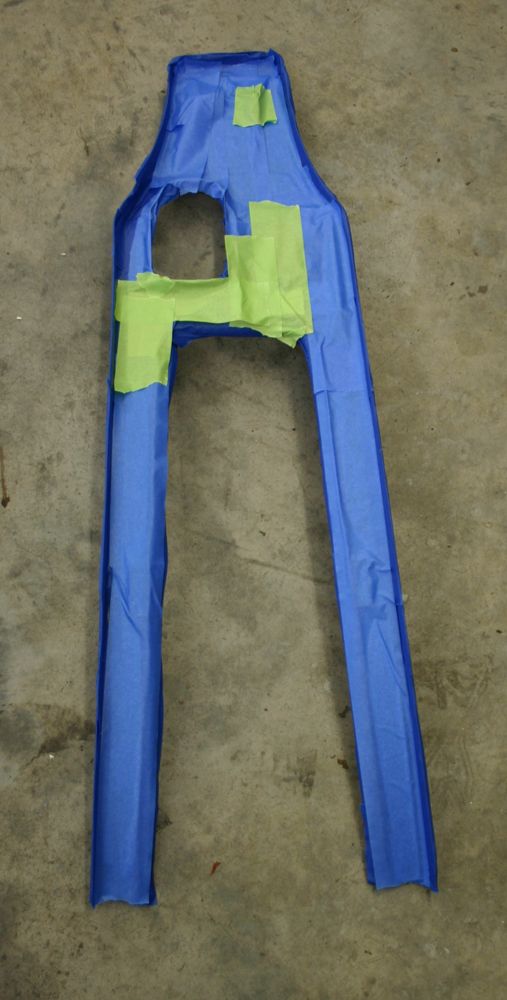
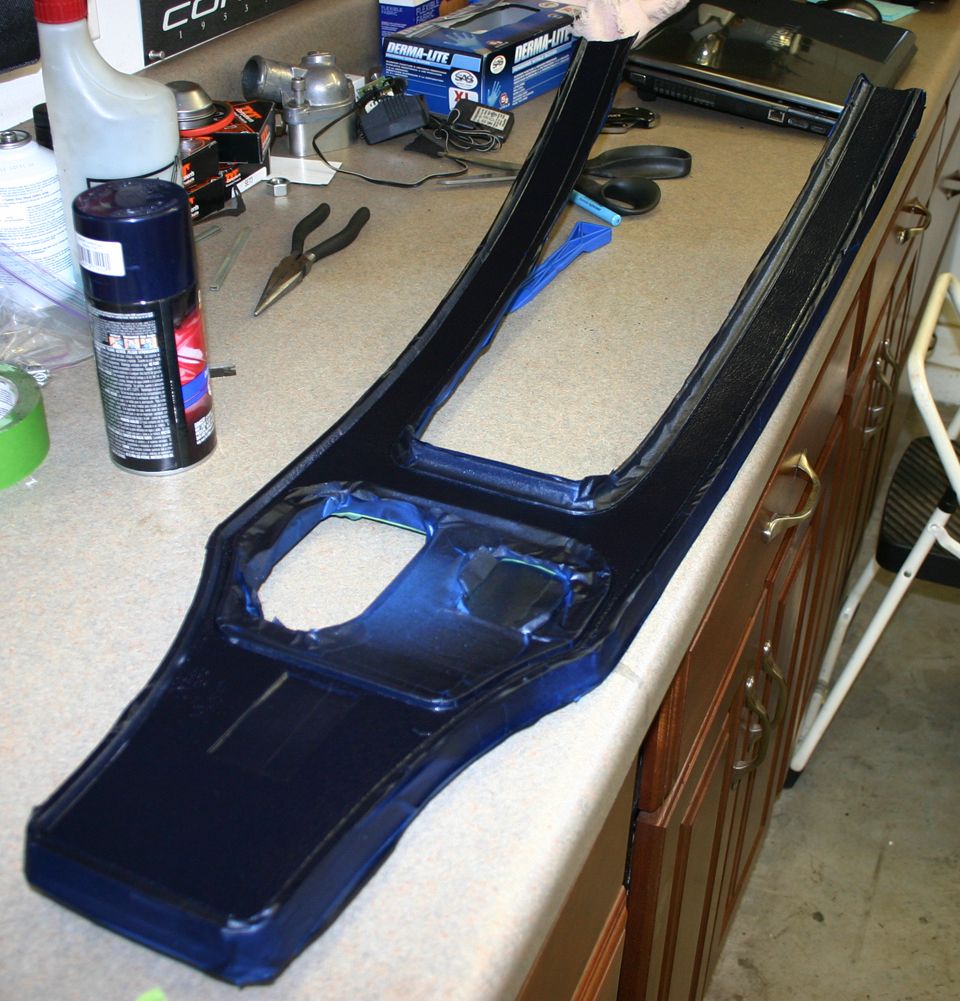
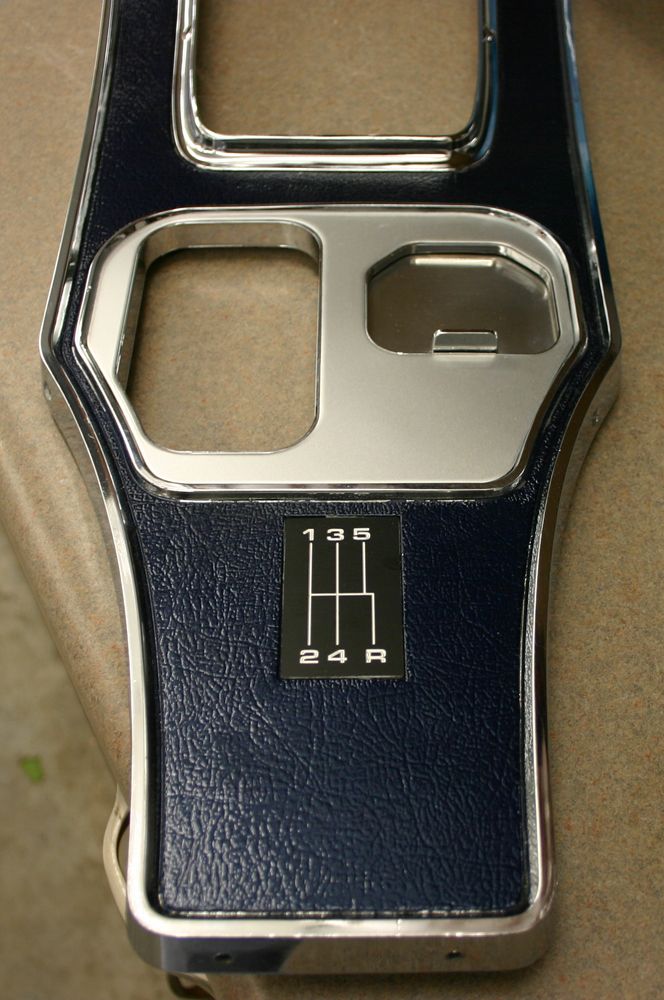
My car came with a console with the power window switches. One of the previous owners was going to install power windows and had even purchased a wiring harness, which I have. However, I have decided to keep the crank windows. I found a console without the power window switches which needed to be painted and to have the aluminum trim replaced. The new transmission came with a five speed shifter plate which I will be installing as well. The old aluminum plate came off hard as the glue was really strong. Took me about 45 minutes to get it off and to remove the glue. Once I had everything cleaned up, I masked off the chrome areas and painted it dark blue to match the interior. Later, I hit it with a clear coat as well. Tomorrow I will remove the masking tape and replace the aluminum plate, the ash tray cover and the shifter plate. I will be selling the console with the window switches eventually.
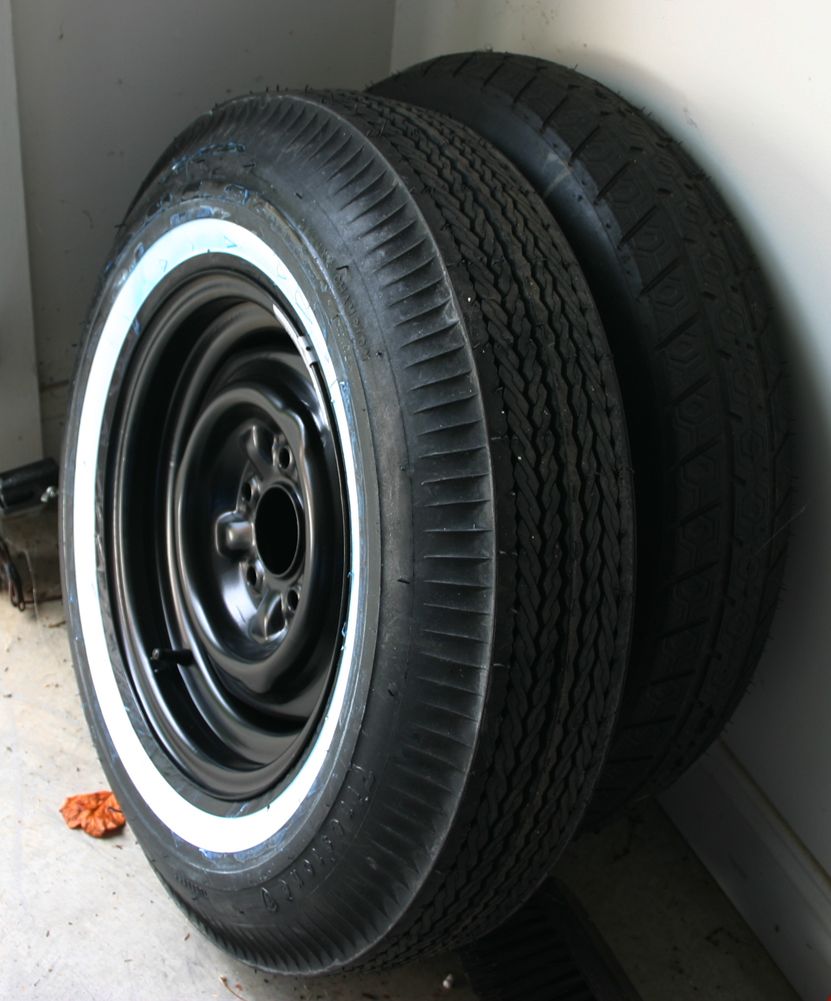
The spare wheel had a Firestone whitewall 6.70-15 tire that was dated 1961!! It was well worn with lots of weather checking so I ordered a repo tire. The spare rim had some surface rust on the front and lots on the back when I took it to the sandblasters with the frame. They made it look like new. Today I had the tire mounted to the rim. Interesting to see in the photo below that the repo tire tread width is about the same as a mini spare from a S-10 pickup!!
After finishing up the console tomorrow morning, it will be time to work on the attaching more parts to the frame.
Last edited by jerhofer; 08-13-2012 at 10:18 PM.
08-06-2012, 10:40 PM
#45
Drifting


Member Since: Jan 2008
Location: San Antonio Texas
Posts: 1,584
Received 319 Likes
on
181 Posts
2020 C1 of the Year Finalist - Modified

jerhofer,
Do you need seats? This pair would look mighty fine in your car. They came out of my '64 Coupe that I have owned for 41 years. The both still have the original GM metal part number tag attached to the springs.
Wolfman
Do you need seats? This pair would look mighty fine in your car. They came out of my '64 Coupe that I have owned for 41 years. The both still have the original GM metal part number tag attached to the springs.
Wolfman
08-07-2012, 10:18 AM
#46
Thanks for posting all your pictures. I have a '64 coupe that I'm doing body off on too and it helped me. I am in the process of replacing the whole wire harness. I took lots of pictures of the front harness connections, ect, but the rear was so simple I figured why bother. I removed the old one and a week or so later installed the new one. The wiring from the grommet to where it exits the body to go to the tail lights seemed rather taunt when I put the new harness in and since I had no picture it left me feeling uncertain whether something was wrong. One of your photos shows the wires going almost straight back, like my newly installed harness and helped confirm I'm OK.
In another post I learned of SEM 39143 black trim paint. I bought some and found it to be a perfect match for my cluster which still has original paint. I was able to touch up where the keys wore off the paint under the ignition switch and it was such a good match I don't have to do the whole cluster. This forum has turned into one of my favorite tools.
Thanks again to you and all fellow posters,
Bill
08-07-2012, 12:18 PM
#47
Burning Brakes
Thread Starter
Thanks for posting all your pictures. I have a '64 coupe that I'm doing body off on too and it helped me. I am in the process of replacing the whole wire harness. I took lots of pictures of the front harness connections, ect, but the rear was so simple I figured why bother. I removed the old one and a week or so later installed the new one. The wiring from the grommet to where it exits the body to go to the tail lights seemed rather taunt when I put the new harness in and since I had no picture it left me feeling uncertain whether something was wrong. One of your photos shows the wires going almost straight back, like my newly installed harness and helped confirm I'm OK.
In another post I learned of SEM 39143 black trim paint. I bought some and found it to be a perfect match for my cluster which still has original paint. I was able to touch up where the keys wore off the paint under the ignition switch and it was such a good match I don't have to do the whole cluster. This forum has turned into one of my favorite tools.
Thanks again to you and all fellow posters,
Bill
In another post I learned of SEM 39143 black trim paint. I bought some and found it to be a perfect match for my cluster which still has original paint. I was able to touch up where the keys wore off the paint under the ignition switch and it was such a good match I don't have to do the whole cluster. This forum has turned into one of my favorite tools.
Thanks again to you and all fellow posters,
Bill
The following users liked this post:
lyndahern (10-08-2023)
08-07-2012, 07:42 PM
#48
Burning Brakes
Thread Starter
Finished off restoring the console first thing this morning.
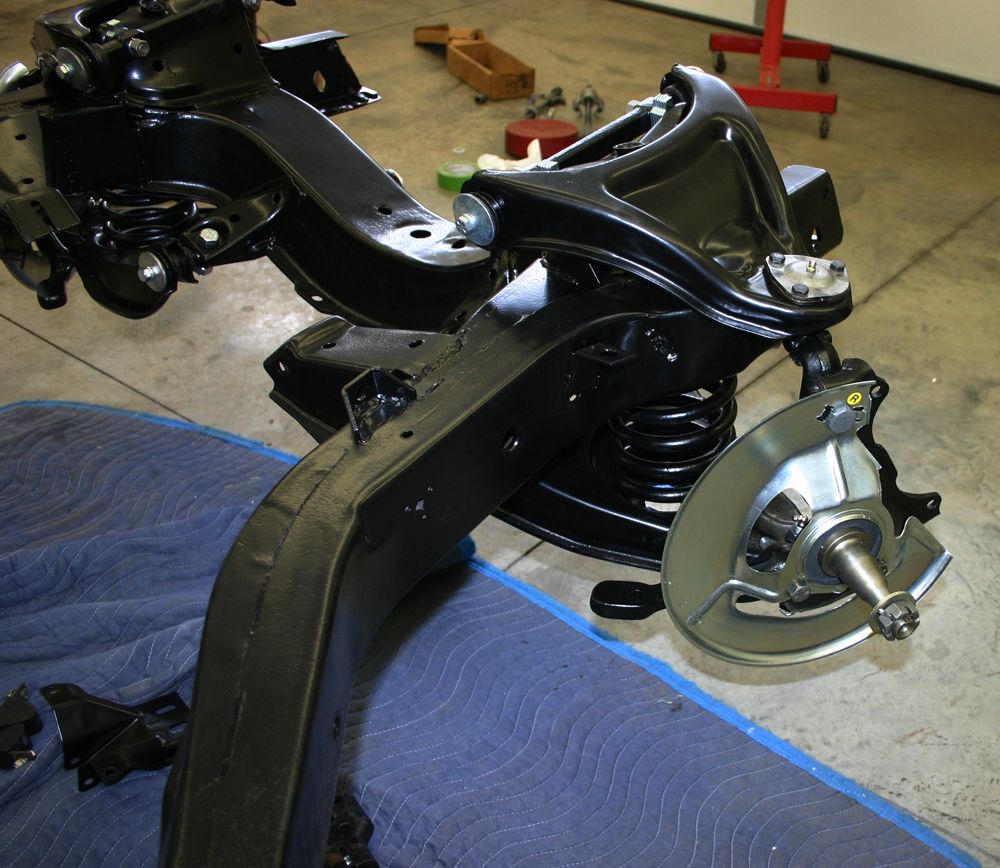
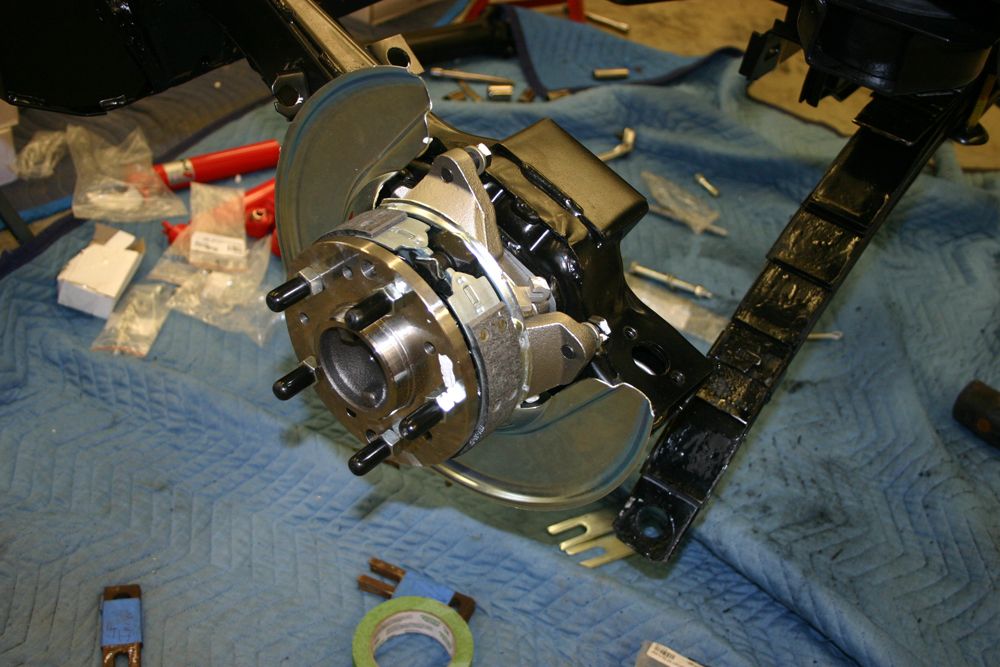
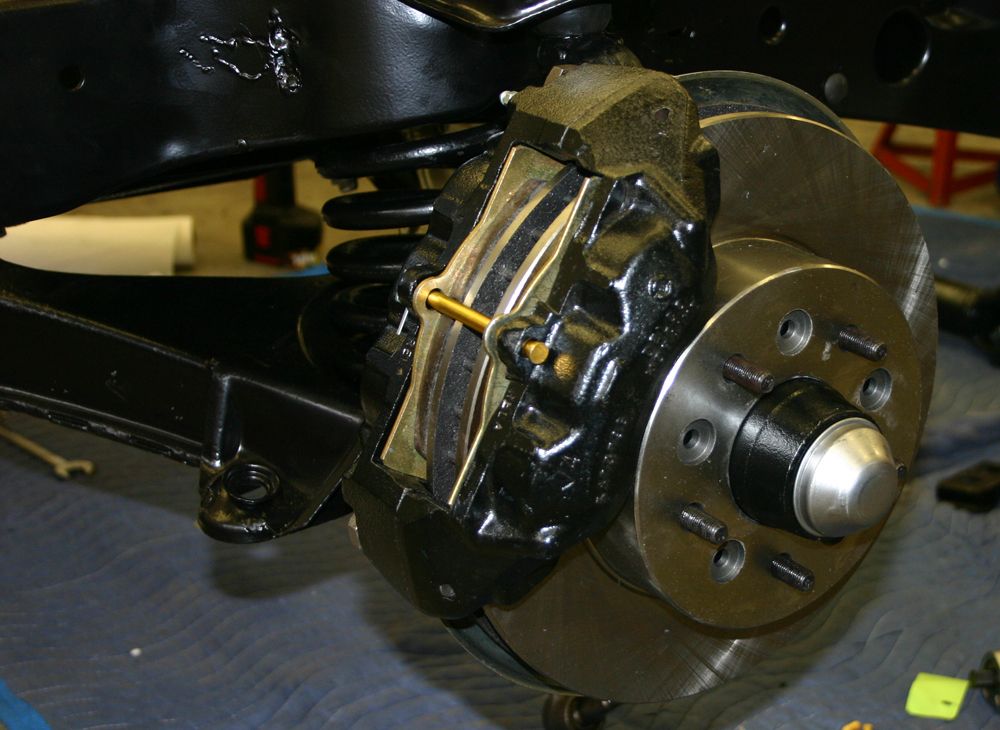
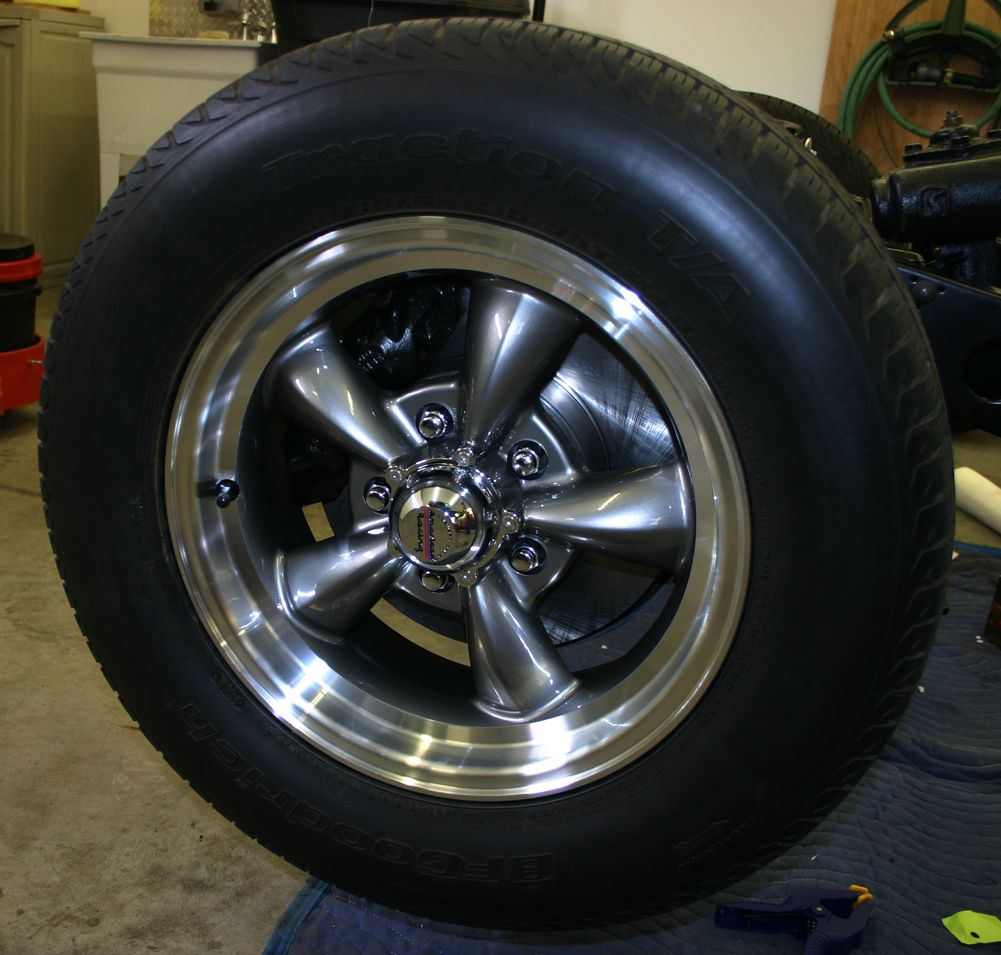
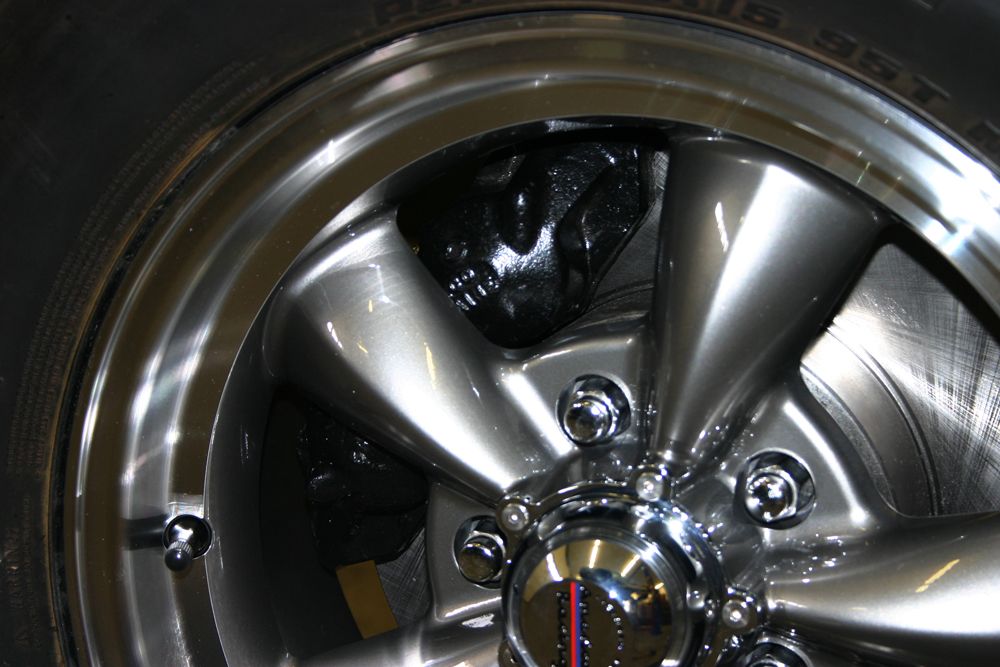
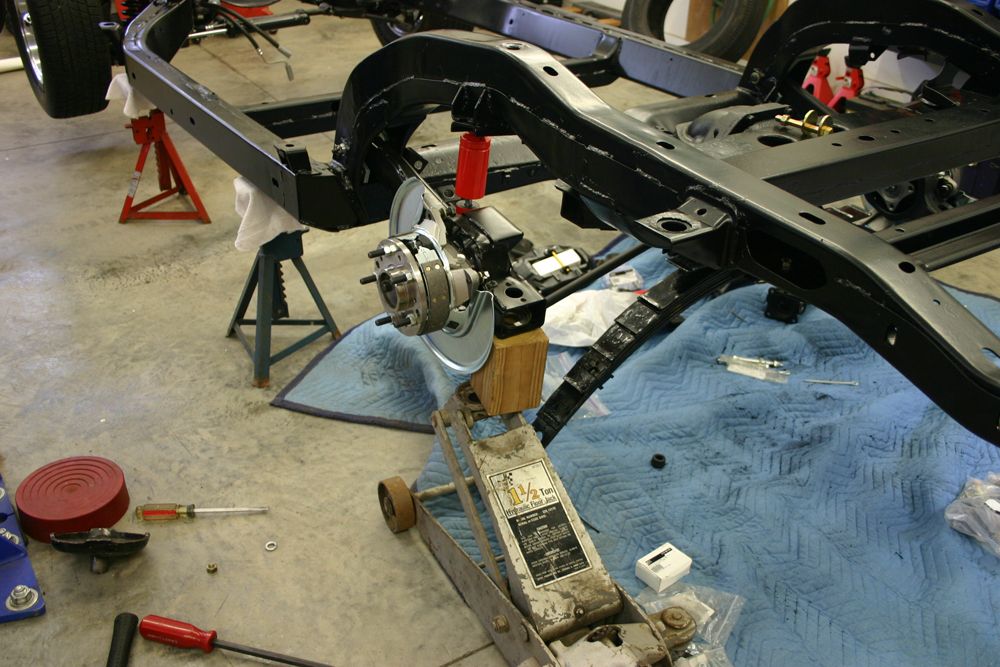
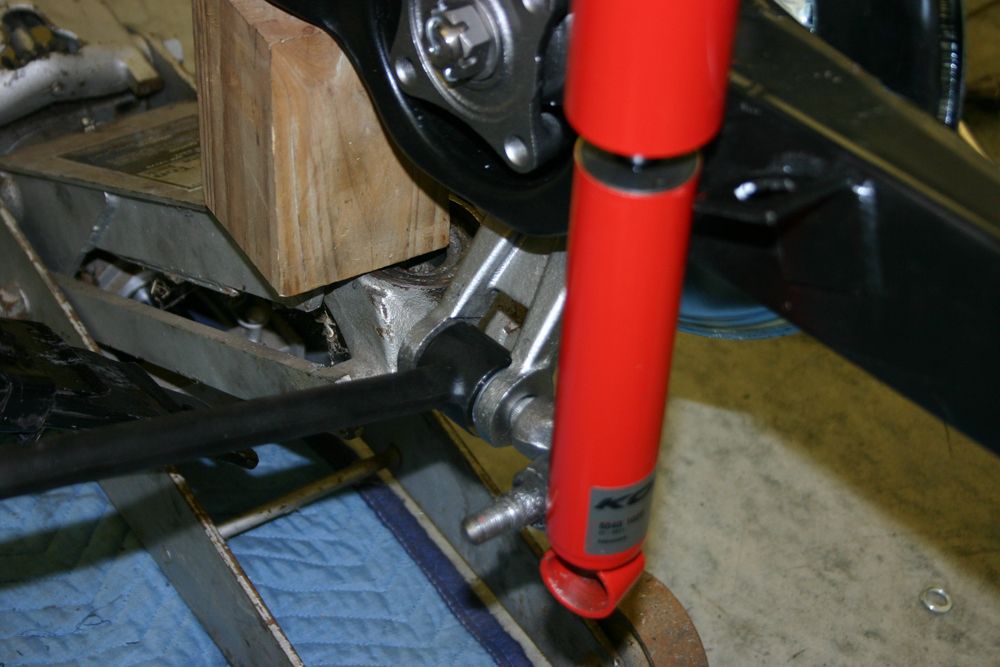
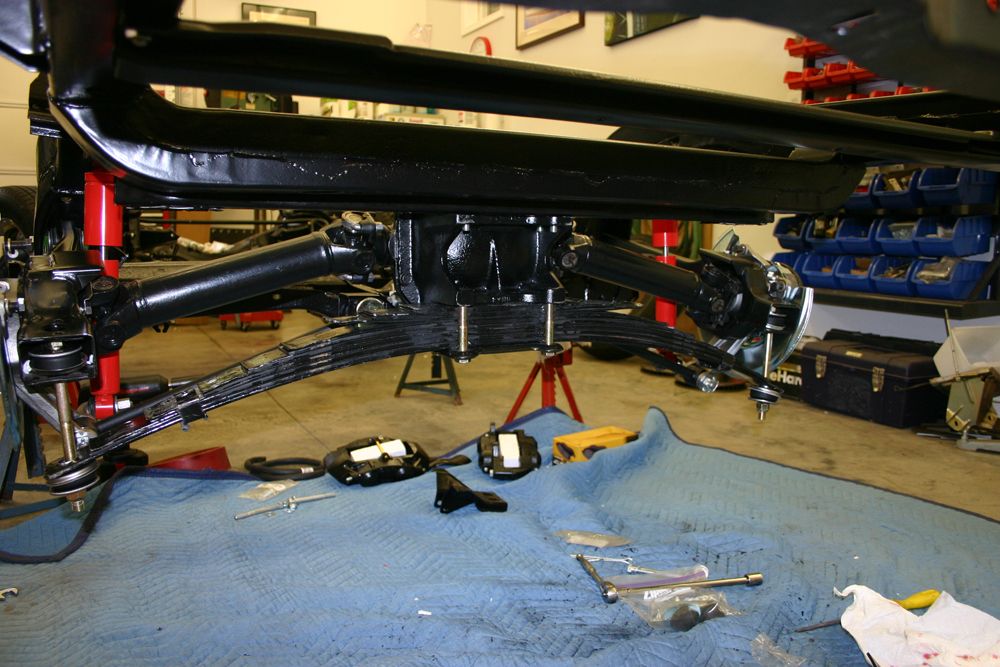
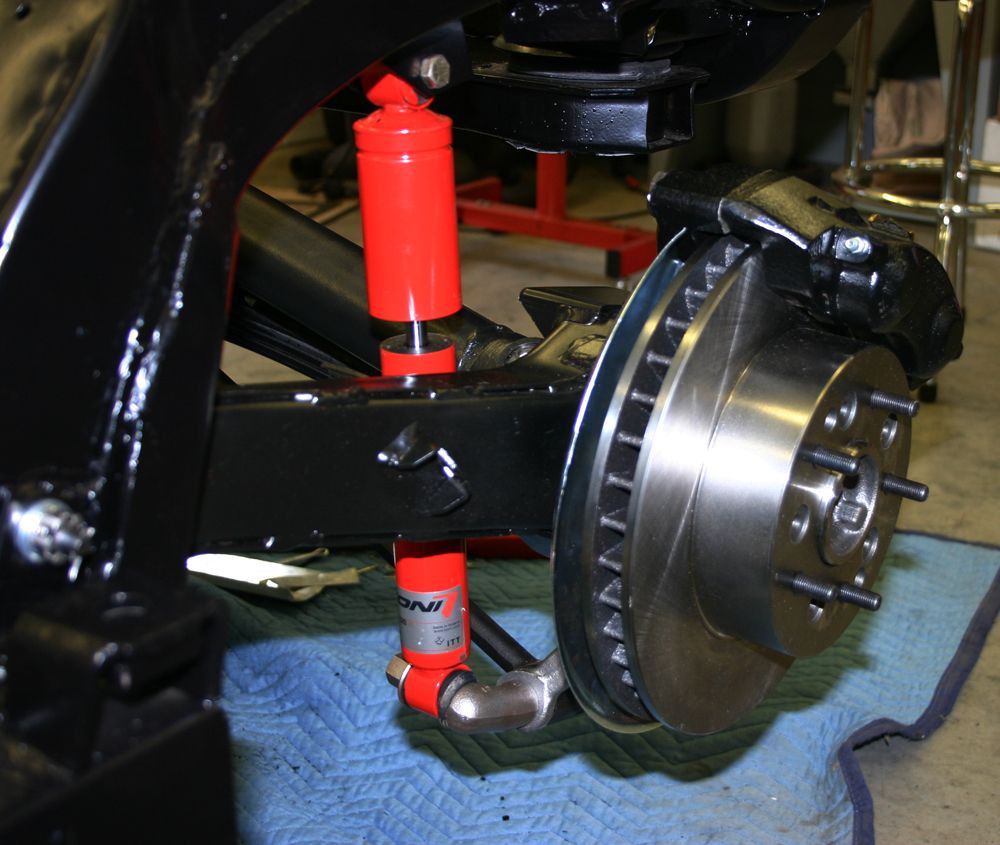
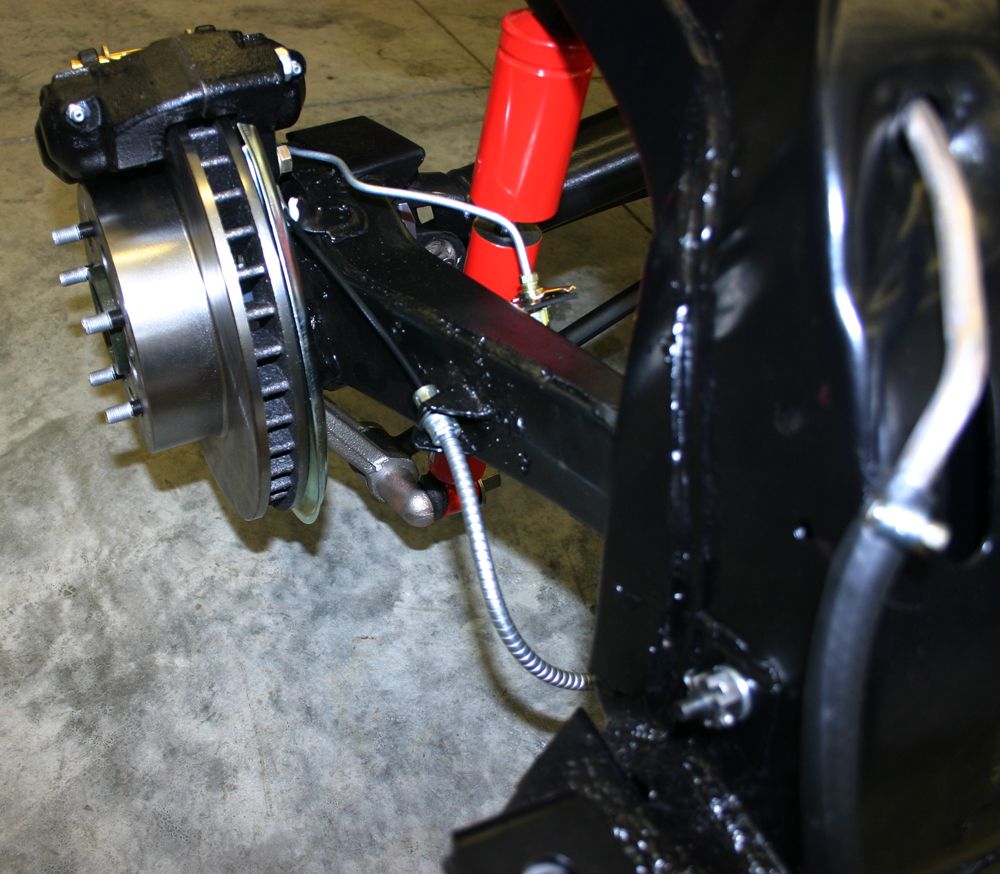
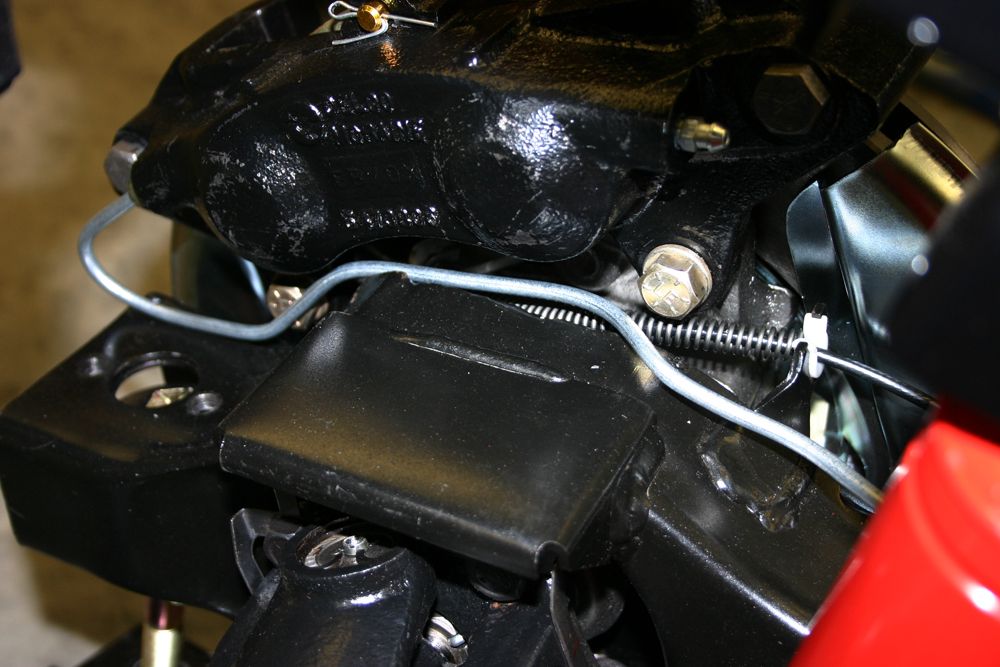
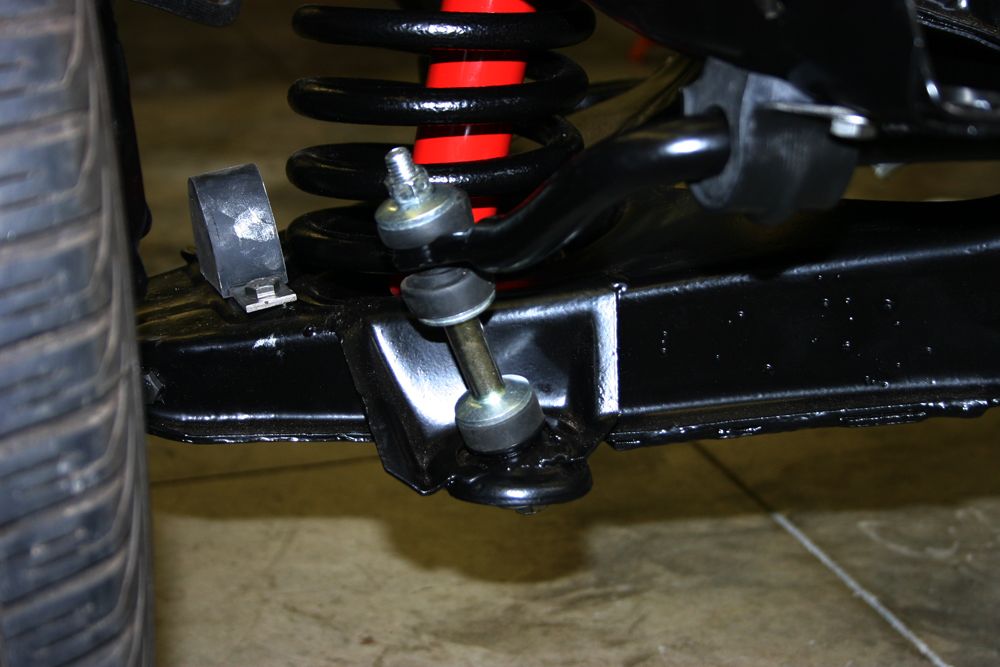
Now it was time to work on the front suspension. After installing the hubs, I mounted the rotors and calipers. Had a heck of a time getting the pads in as the pistons would not collapse all the way.
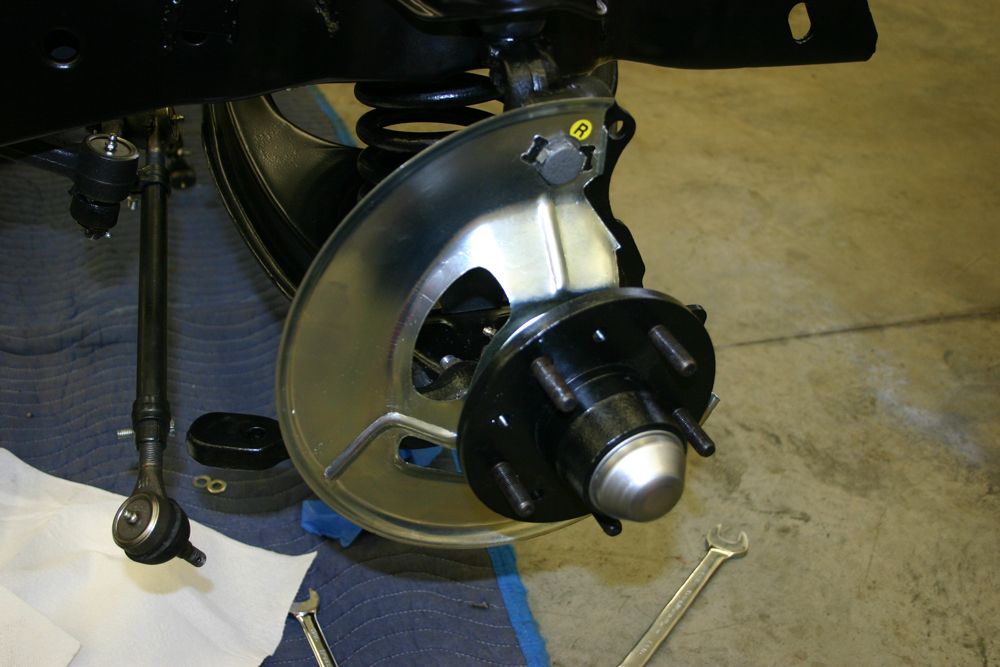
I then finished bolting together the steering components. I had installed new Koni shocks not long after getting the car so they are fresh.

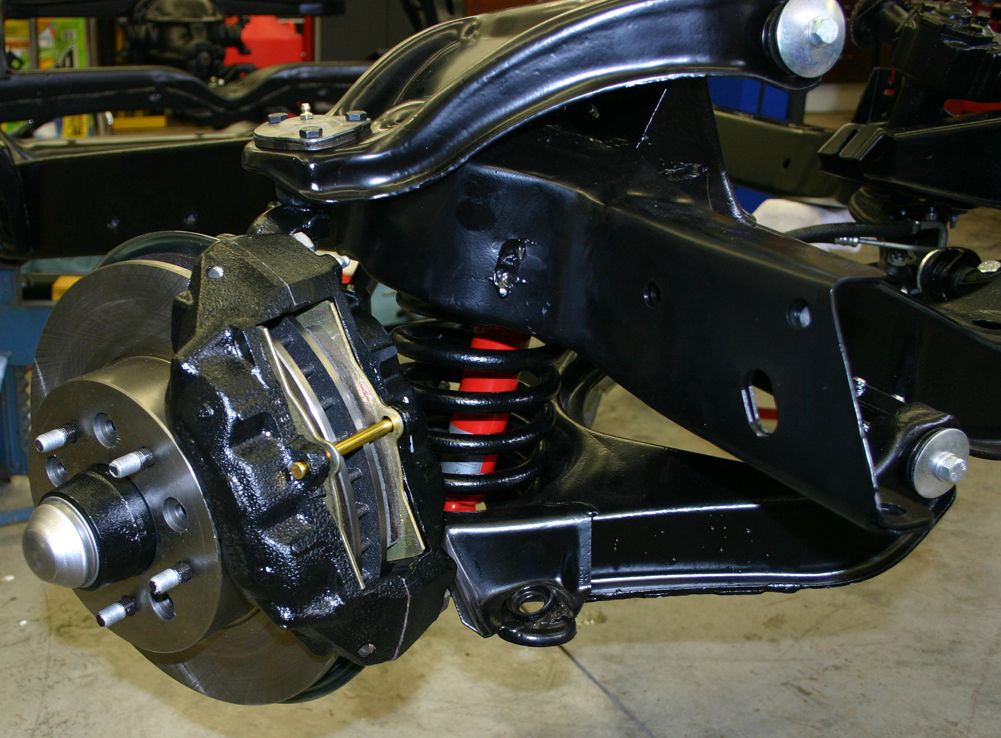
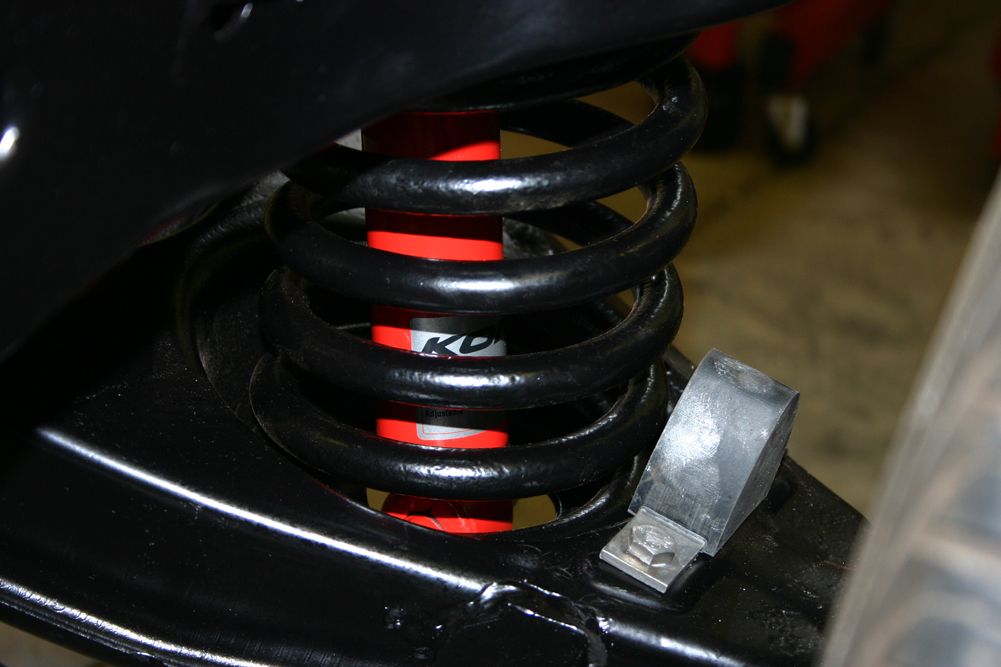
I have to bead blast the sway bar brackets and paint them so that installation will be on another day. For the finishing touch, I bolted on the new Torque Thrust wheels. Included below is on artsy-fartsy image.

If all goes well with the rear suspension tomorrow, it may be on the ground soon.
Now it was time to work on the front suspension. After installing the hubs, I mounted the rotors and calipers. Had a heck of a time getting the pads in as the pistons would not collapse all the way.
I then finished bolting together the steering components. I had installed new Koni shocks not long after getting the car so they are fresh.
I have to bead blast the sway bar brackets and paint them so that installation will be on another day. For the finishing touch, I bolted on the new Torque Thrust wheels. Included below is on artsy-fartsy image.
If all goes well with the rear suspension tomorrow, it may be on the ground soon.
Last edited by jerhofer; 08-13-2012 at 10:17 PM.
08-07-2012, 08:00 PM
#49
Le Mans Master


Seriously? That should be the first thing you replace. I replace every single wire in every restoration I do.
This is from Lectric Limited's site: Let's face it folks, auto makers never designed a wiring harness to last 30-50 years. As a matter of fact, your car's wiring was only designed to last 10 years before it starts to deteriorate! There is ample documentation to substantiate this claim.
Your car's wiring was made of copper with a plastic insulation. The plastic insulation was porous. Contaminants, like oxygen, moisture and airborne pollutants, eventually pass through the insulation to attack the wire; a condition called oxidation. There is no practical way to completely seal off the circulation of air and moisture between the individual wire strands. Once the wire strands become oxidized, the internal resistance of the wire increases substantially. This is not a good thing for your car's electrical system.
If your wire has gotten to the next stage of deterioration by becoming brittle and cracked, it is in immediate need of replacement. At this stage, a short circuit to ground is eminent. In a worst case scenario, it can cause a fire.
Jim
08-07-2012, 08:07 PM
#50
Burning Brakes
Thread Starter
Seriously? That should be the first thing you replace. I replace every single wire in every restoration I do.
This is from Lectric Limited's site: Let's face it folks, auto makers never designed a wiring harness to last 30-50 years. As a matter of fact, your car's wiring was only designed to last 10 years before it starts to deteriorate! There is ample documentation to substantiate this claim.
Your car's wiring was made of copper with a plastic insulation. The plastic insulation was porous. Contaminants, like oxygen, moisture and airborne pollutants, eventually pass through the insulation to attack the wire; a condition called oxidation. There is no practical way to completely seal off the circulation of air and moisture between the individual wire strands. Once the wire strands become oxidized, the internal resistance of the wire increases substantially. This is not a good thing for your car's electrical system.
If your wire has gotten to the next stage of deterioration by becoming brittle and cracked, it is in immediate need of replacement. At this stage, a short circuit to ground is eminent. In a worst case scenario, it can cause a fire.
Jim
This is from Lectric Limited's site: Let's face it folks, auto makers never designed a wiring harness to last 30-50 years. As a matter of fact, your car's wiring was only designed to last 10 years before it starts to deteriorate! There is ample documentation to substantiate this claim.
Your car's wiring was made of copper with a plastic insulation. The plastic insulation was porous. Contaminants, like oxygen, moisture and airborne pollutants, eventually pass through the insulation to attack the wire; a condition called oxidation. There is no practical way to completely seal off the circulation of air and moisture between the individual wire strands. Once the wire strands become oxidized, the internal resistance of the wire increases substantially. This is not a good thing for your car's electrical system.
If your wire has gotten to the next stage of deterioration by becoming brittle and cracked, it is in immediate need of replacement. At this stage, a short circuit to ground is eminent. In a worst case scenario, it can cause a fire.
Jim
Last edited by jerhofer; 08-13-2012 at 10:17 PM.
08-07-2012, 08:13 PM
#51
Le Mans Master
 Don't they all? My first body-off restoration (almost 30 years ago) started with a simple cleaning of the engine compartment. The I removed a few things to make it easier. Before I knew it, the body was off and upside down so I could clean the under side.
I just painted my 65 coupe and will be putting the body back on the frame this fall. It's a sickness I tell you, a sickness.

Jim
08-07-2012, 09:16 PM
#52
Burning Brakes
Thread Starter
Don't they all? My first body-off restoration (almost 30 years ago) started with a simple cleaning of the engine compartment. The I removed a few things to make it easier. Before I knew it, the body was off and upside down so I could clean the under side.I just painted my 65 coupe and will be putting the body back on the frame this fall. It's a sickness I tell you, a sickness.
Jim
Last edited by jerhofer; 08-13-2012 at 10:16 PM.
08-08-2012, 05:46 PM
#53
Burning Brakes
Thread Starter
To make "1snake" happy, I ordered a wiring harness today. I am sure he will sleep better now!!
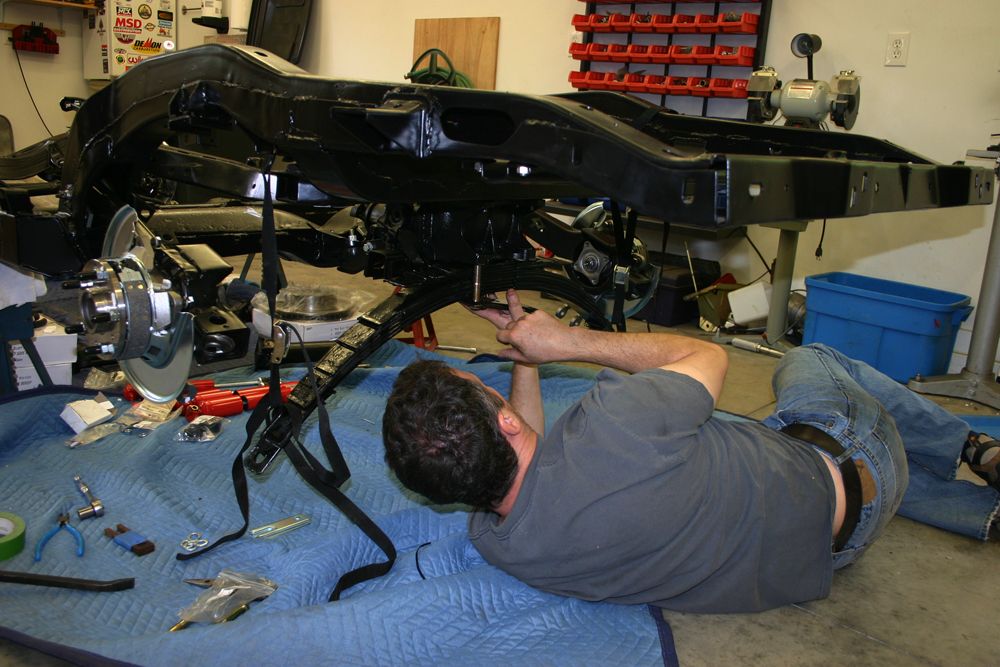
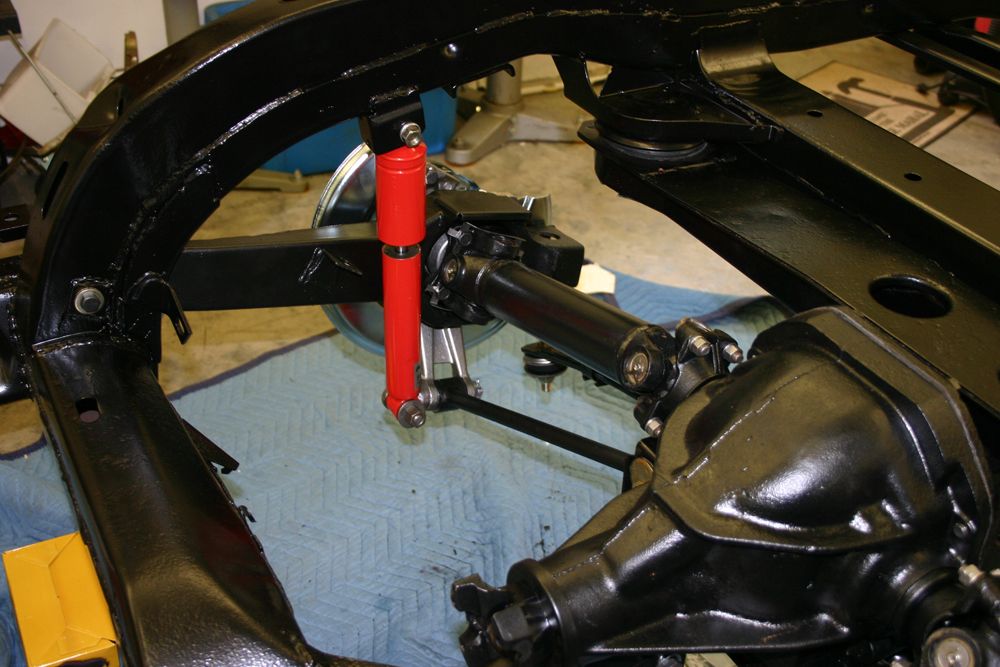
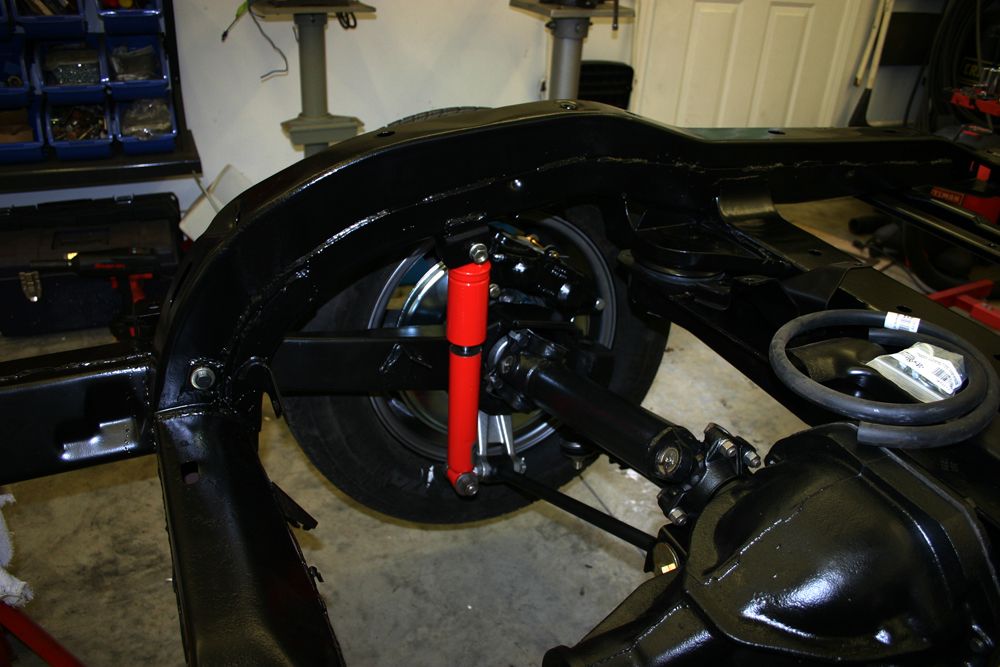
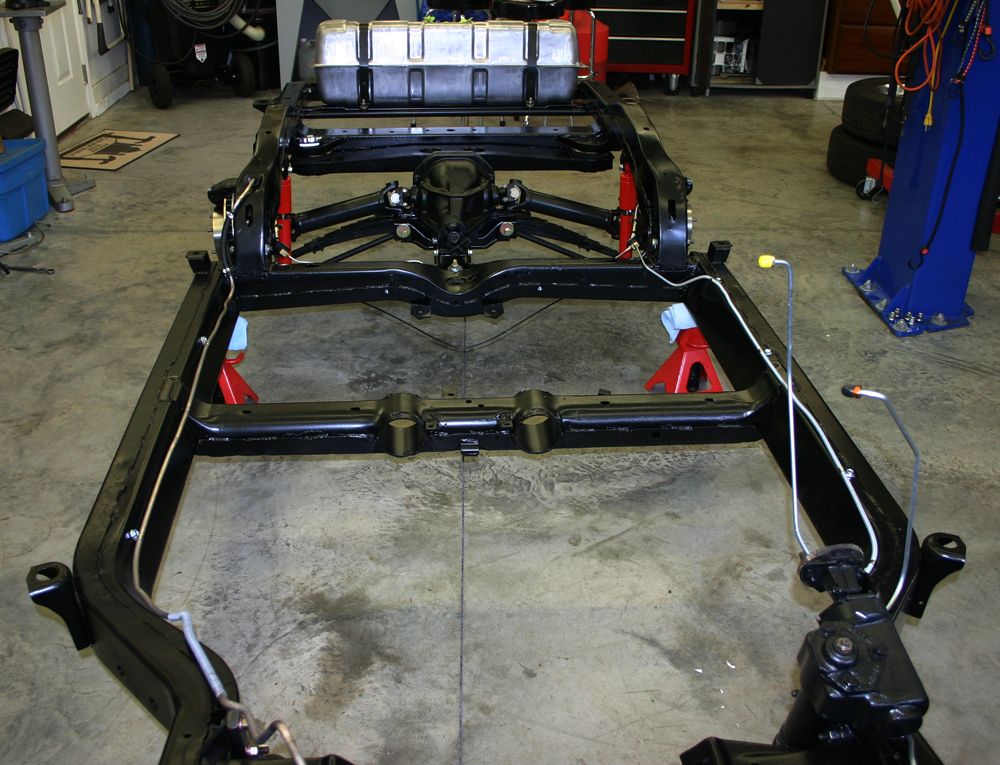
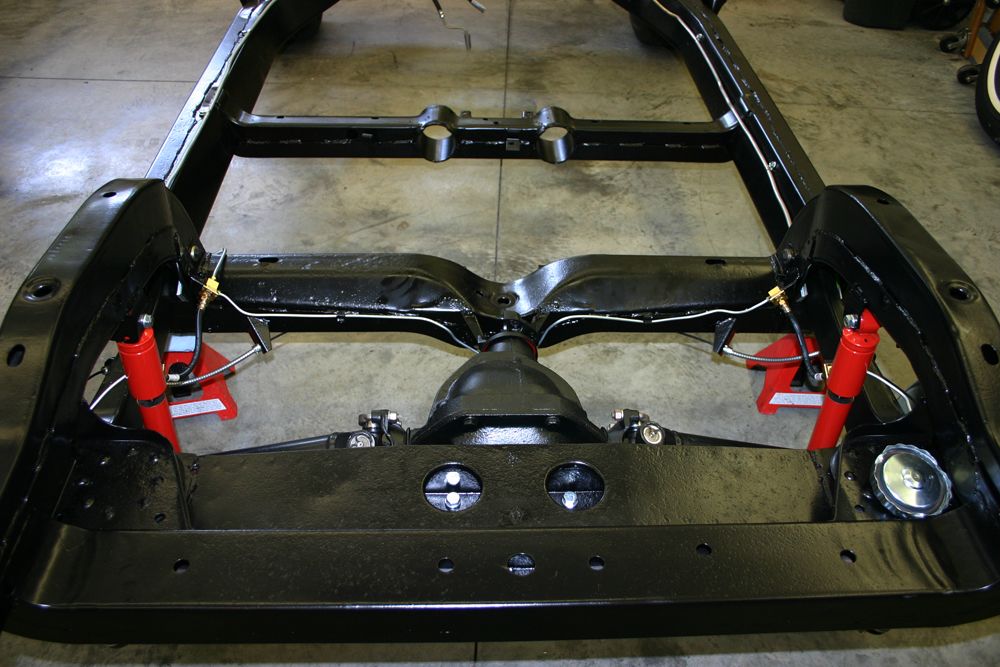
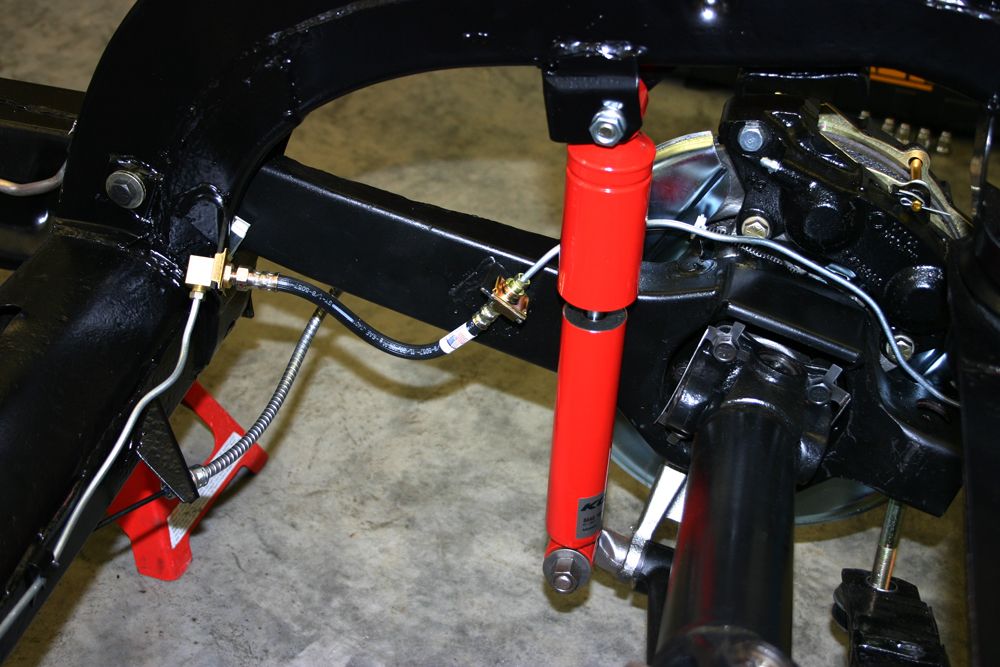
I worked on the rear suspension today. First I installed the struts and the shocks. I used my bead blaster to clean up the outer mount for the strut and shock.
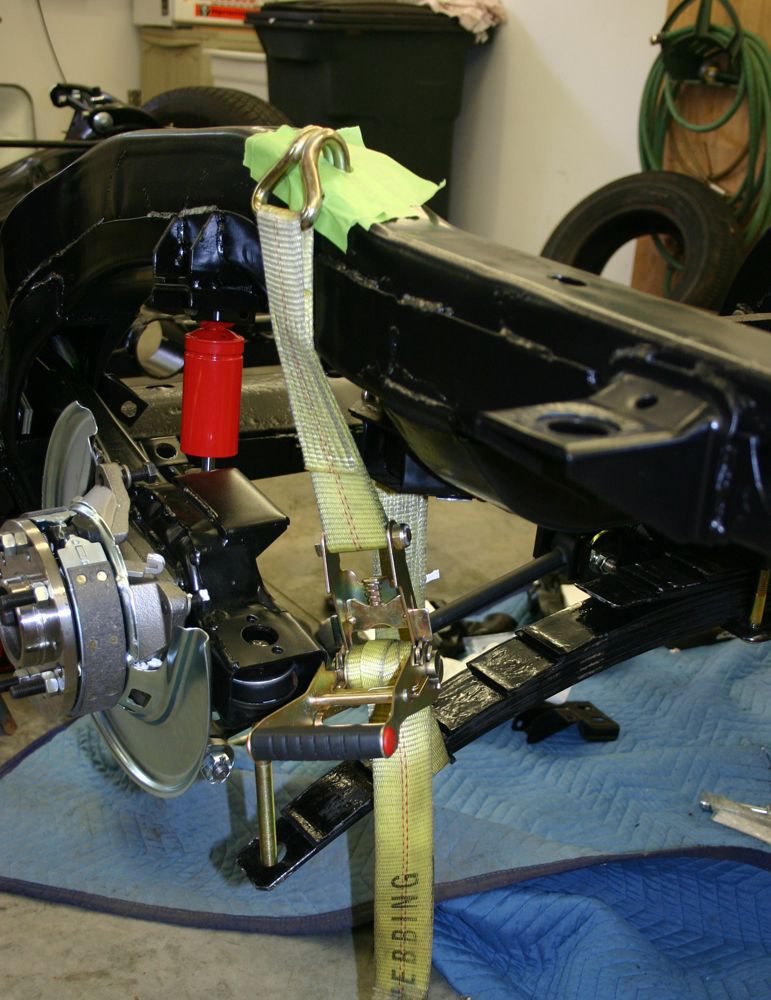
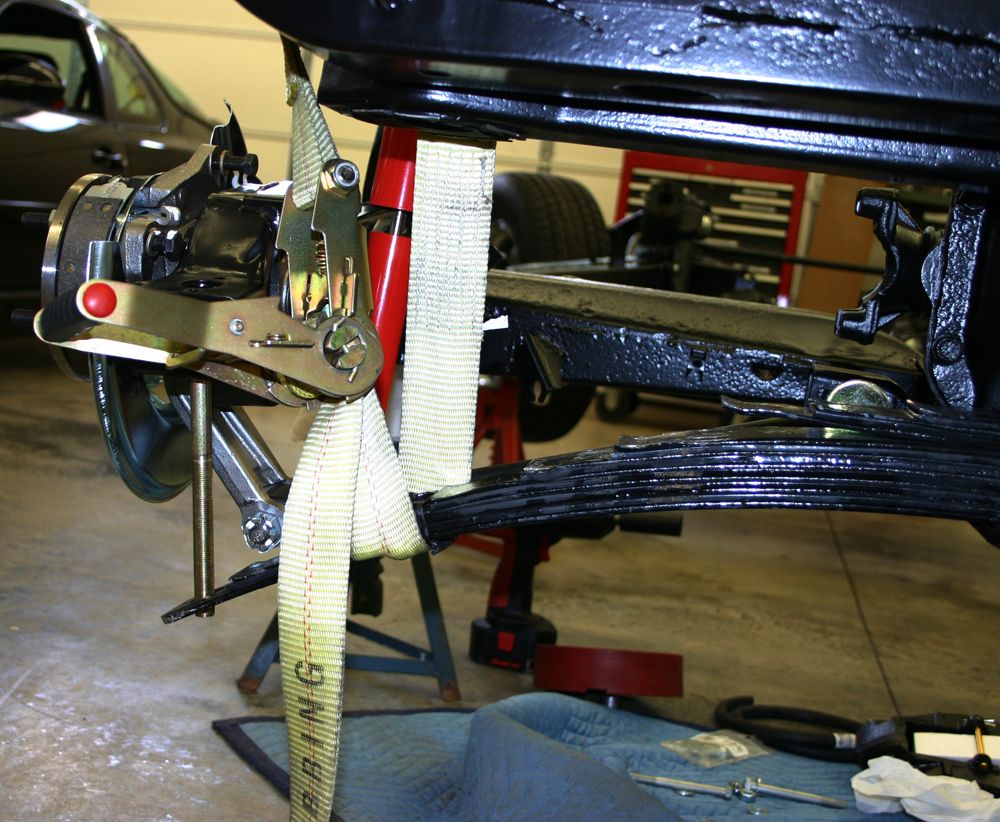
Once I had that done, I had to figure out how to raise the leaf spring so I could attach it to the trailing arm. I could not use a jack as I would lift the frame off the jack stands. After thinking about it for a bit, I decided to use a ratched strap. I hooked it to the top of the frame, placed the strap under the spring and then hooked on at the crossmember at the top. This worked very well and was one of the easiest things I did today. Since I installed a new spring, I am using the long attaching bolts so I will have quite a bit of adjustment for ride height.

Next up was installing the half shafts. I am sure I ordered new u bolts for the half shafts but I could not find them. I bead blasted the old ones which were still in good shape. My bead blaster was leaking sand from the door so installed a new seal on it.
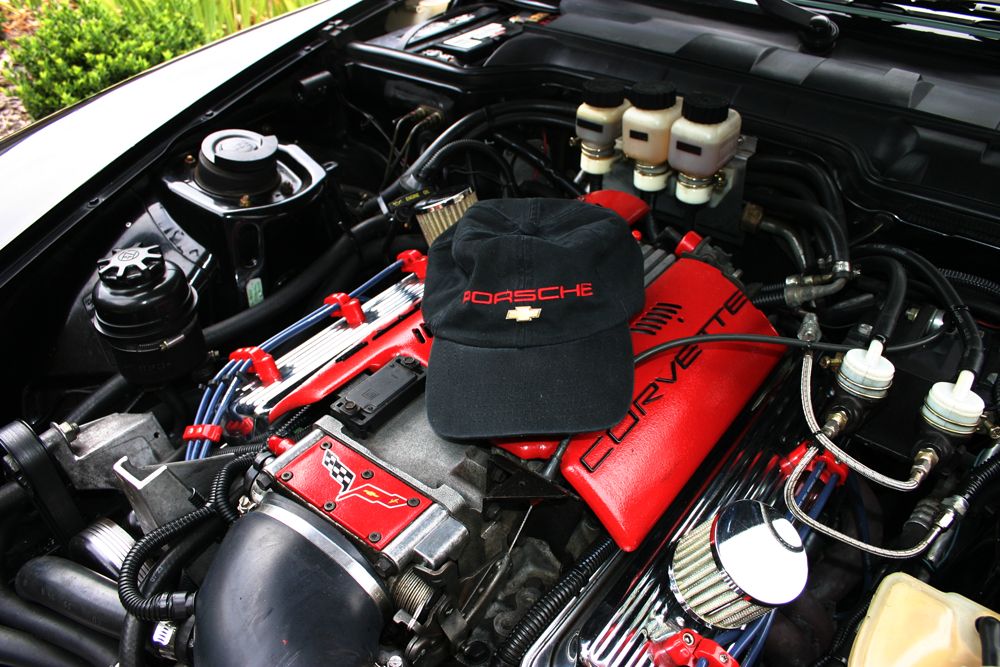
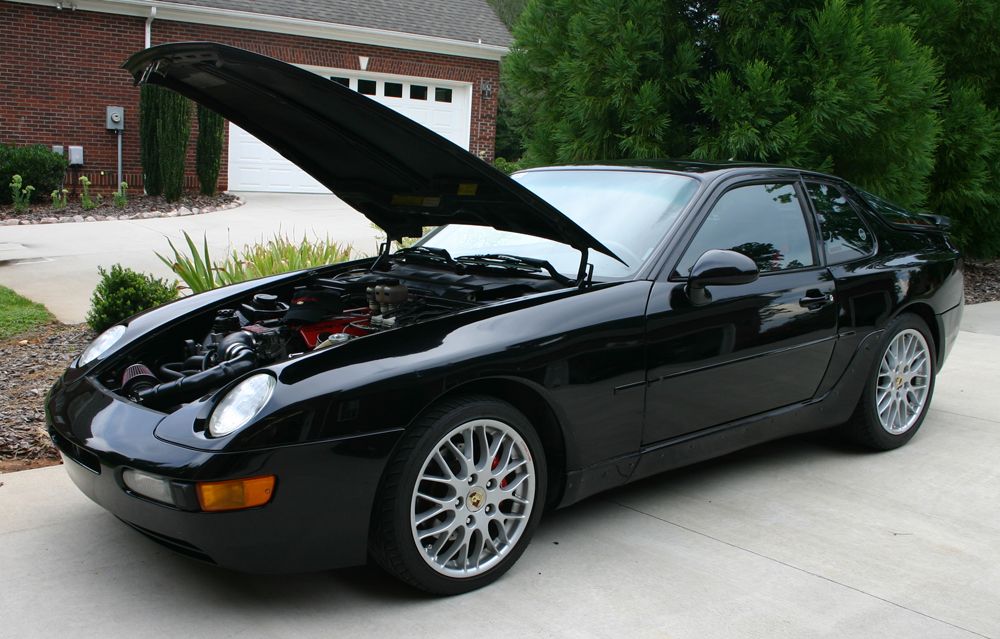
In February I bought a 1995 Porsche 968 with a LT1 motor from a '94 Vette. I did quite a bit of fixing up including a new clutch, installed a used torque tube, and did quite a bit of interior work including replacing the very cracked dash. I sold it to a local guy who regularly comes to our cruise in's. Today it was back for warranty work (long story). As I was moving it around, I noticed the hat he had in the car.
Tomorrow, after fixing the 968, I plan on installing the rear brakes and the gas tank.
I worked on the rear suspension today. First I installed the struts and the shocks. I used my bead blaster to clean up the outer mount for the strut and shock.
Once I had that done, I had to figure out how to raise the leaf spring so I could attach it to the trailing arm. I could not use a jack as I would lift the frame off the jack stands. After thinking about it for a bit, I decided to use a ratched strap. I hooked it to the top of the frame, placed the strap under the spring and then hooked on at the crossmember at the top. This worked very well and was one of the easiest things I did today. Since I installed a new spring, I am using the long attaching bolts so I will have quite a bit of adjustment for ride height.
Next up was installing the half shafts. I am sure I ordered new u bolts for the half shafts but I could not find them. I bead blasted the old ones which were still in good shape. My bead blaster was leaking sand from the door so installed a new seal on it.
In February I bought a 1995 Porsche 968 with a LT1 motor from a '94 Vette. I did quite a bit of fixing up including a new clutch, installed a used torque tube, and did quite a bit of interior work including replacing the very cracked dash. I sold it to a local guy who regularly comes to our cruise in's. Today it was back for warranty work (long story). As I was moving it around, I noticed the hat he had in the car.
Tomorrow, after fixing the 968, I plan on installing the rear brakes and the gas tank.
Last edited by jerhofer; 08-13-2012 at 10:16 PM.
08-09-2012, 04:07 PM
#54
Burning Brakes
Thread Starter
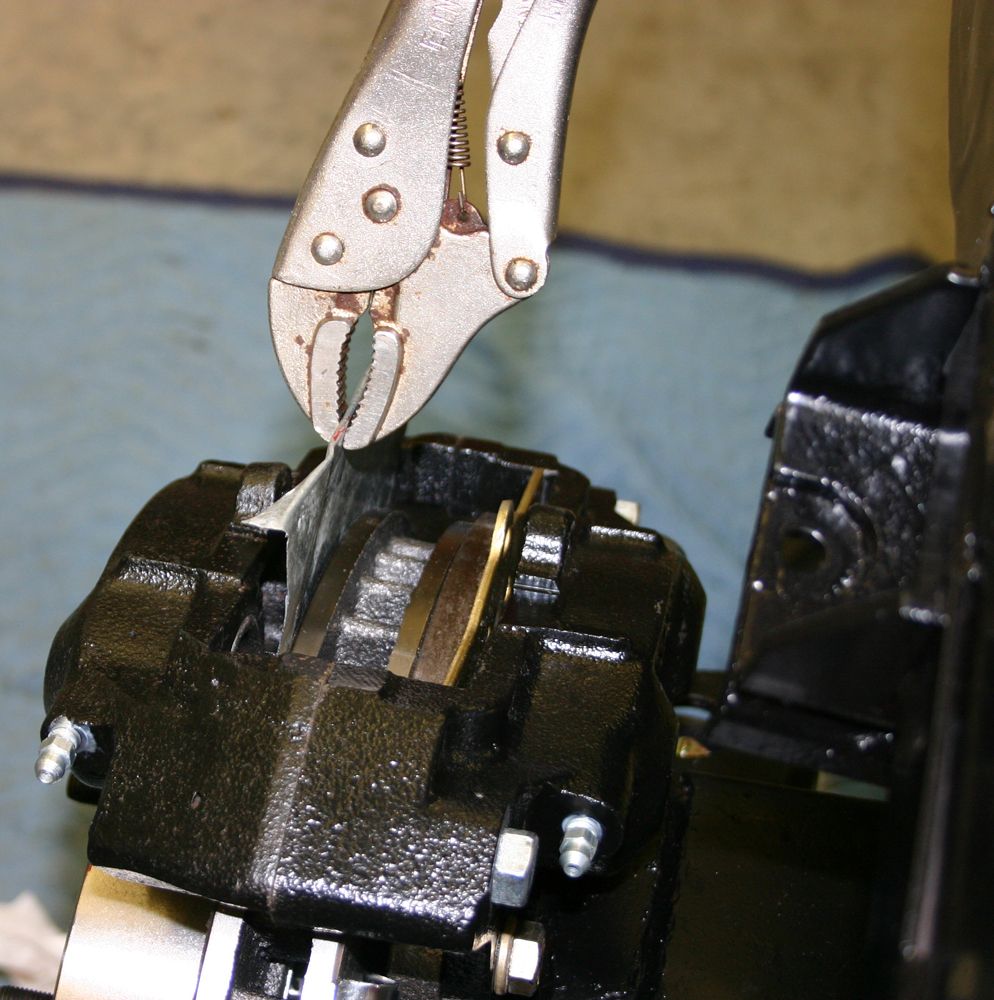
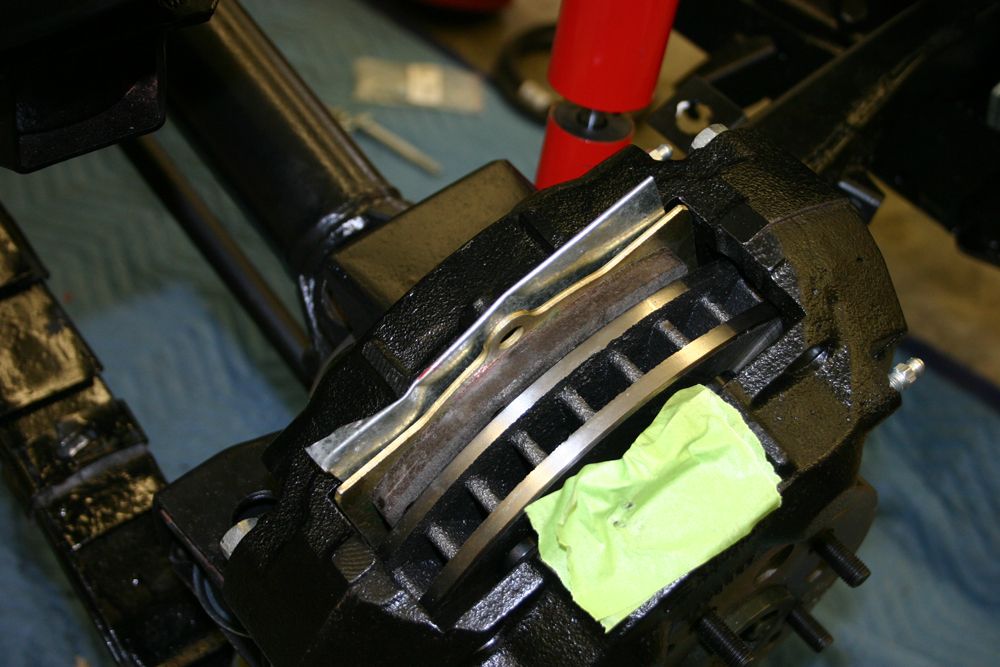
Got the rear disc brakes on before I had to do the warranty work on the 968. I had struggled with getting the front pads on as the pistons would not stay retracted. The rubber seal was pushing the pistons out. By using a skinny screwdriver, I was able to get them on.
However, there was no room to use the screwdriver technique on the rears. I finally came up with the idea of using a thin sheet of aluminum. I slid the aluminum in front of the pistons and then pushed against the aluminum with the pads. Voila, it worked like a charm. I now have this aluminum piece in my "specialty tools' drawer.

I couldn't stand the floor being dirty any longer. So I lowered the frame to the ground and rolled it and a bunch of other items into the driveway. Scubbed the floor and put everything back. Knocked off early so I can go to our cruise-in this evening. In fact, I will heading there as soon as I post this.
However, there was no room to use the screwdriver technique on the rears. I finally came up with the idea of using a thin sheet of aluminum. I slid the aluminum in front of the pistons and then pushed against the aluminum with the pads. Voila, it worked like a charm. I now have this aluminum piece in my "specialty tools' drawer.
I couldn't stand the floor being dirty any longer. So I lowered the frame to the ground and rolled it and a bunch of other items into the driveway. Scubbed the floor and put everything back. Knocked off early so I can go to our cruise-in this evening. In fact, I will heading there as soon as I post this.
Last edited by jerhofer; 03-21-2013 at 10:43 PM.
08-10-2012, 04:40 PM
#55
Burning Brakes
Thread Starter
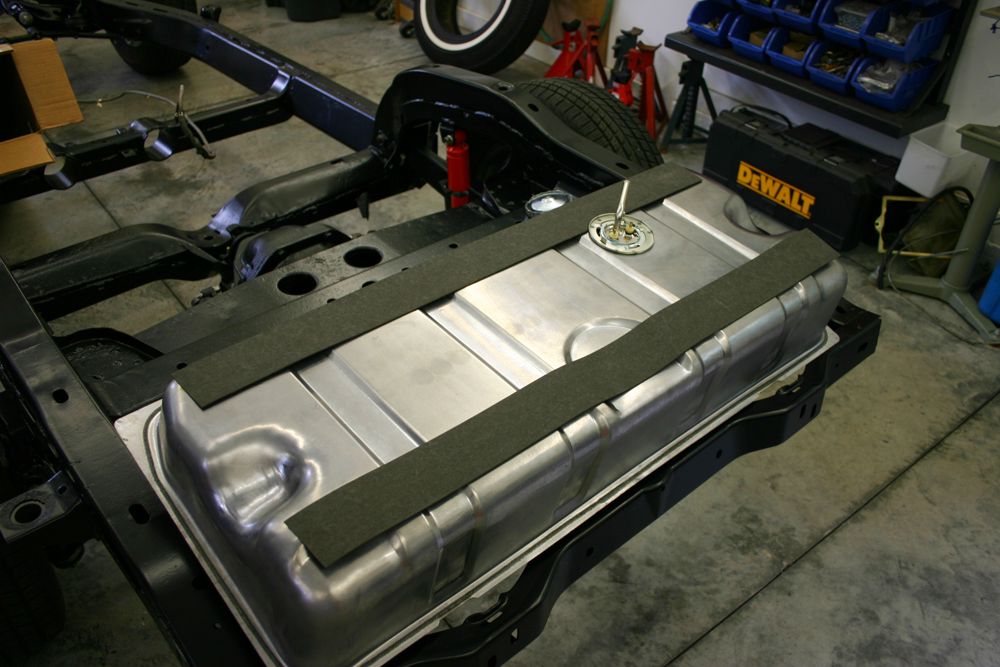
Had to do other things this morning so only had a few hours this afternoon to work. I installed the insulating pads on the gas tank where the tank rests on the frame.
Fired up the bead blaster on the sway bar and power steering pump mounts. I could use a larger compressor so I blasted for awhile, cleaned up and painted the parts that were freshly blasted. By the time I had them painted, I had pressure again and the compressor had a chance to cool down.
By Monday, the paint on the sway bar brackets should be hard and I can mount the sway bar to complete the front suspension.
Last edited by jerhofer; 08-13-2012 at 10:15 PM.
08-10-2012, 07:37 PM
#56
Le Mans Master
Money well spent
 Congrats.
Jim
08-10-2012, 07:48 PM
#57
Burning Brakes
Thread Starter
I have read that the wiring for the instruments from the factory are short which makes it difficult to remove the instrument panel. Has anyone had that issue when working on the instrument panel?
Last edited by jerhofer; 08-13-2012 at 10:14 PM.
08-10-2012, 10:39 PM
#58
Burning Brakes
Thread Starter
Last edited by jerhofer; 08-13-2012 at 10:14 PM.
08-13-2012, 10:10 PM
#59
Burning Brakes
Thread Starter
The guy who owns the company that sandblasted and powdercoated my frame and other parts, Jinx Jordan, is an eight time national autocross champion. And his wife has also won eight national titles driving Honda's. When I picked up the frame he mentioned they were having a SCCA autocross on the 11th at Z-Max Dragway next to Charlotte Motor Speedway.
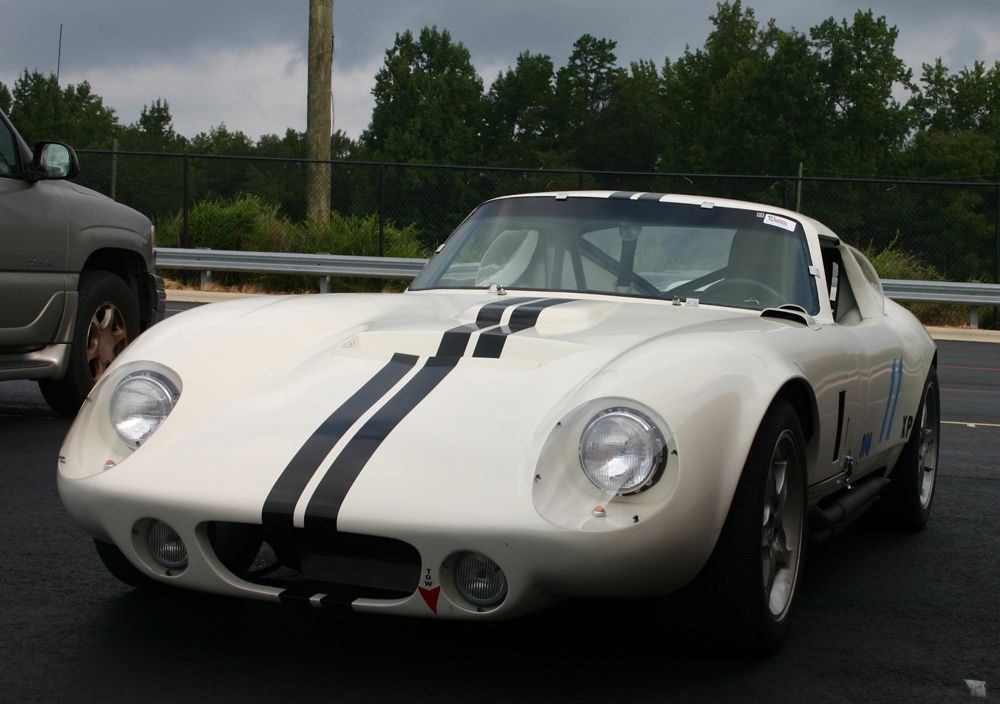
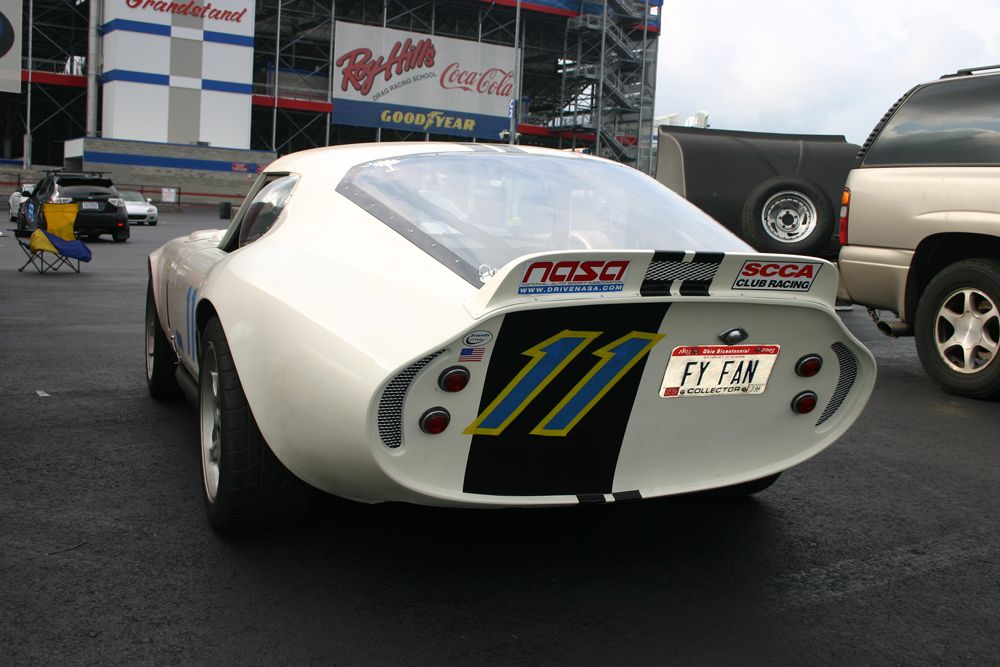
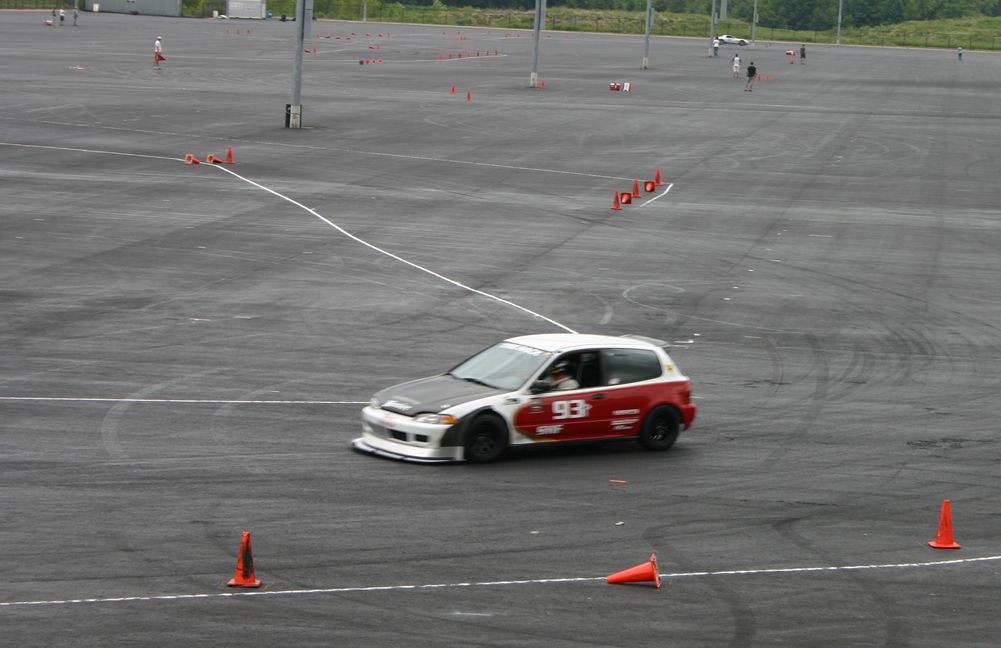
Since I was ready for a break from the car, I drove over there Saturday morning to check it out. My wife and I both used to do a lot of autocrossing back in the eighties when we lived in northern Indiana. Turns out Jinx knew some of the people from that area as he ran against them at the national's. About 140 cars showed up to run at a huge parking lot on the north side of the drag strip. Since Jinx didn't run until the second last session, I ended up spending about three hours there. Probably should not have done that as I might get the bug again. It sure looked like it was a fun course to run.
An interesting car there was this Cobra Daytona replica. A couple of the Detroit Speed cars were there as well. Jinx's car is the red and white Honda. His car ran very well and you could tell how smooth Jinx was in the way he handled the car.
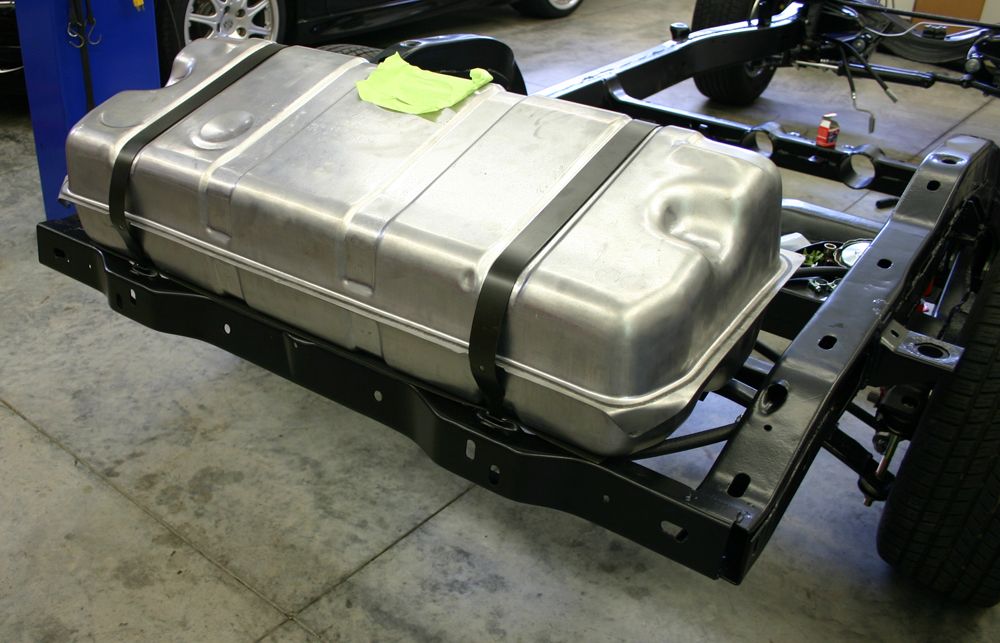
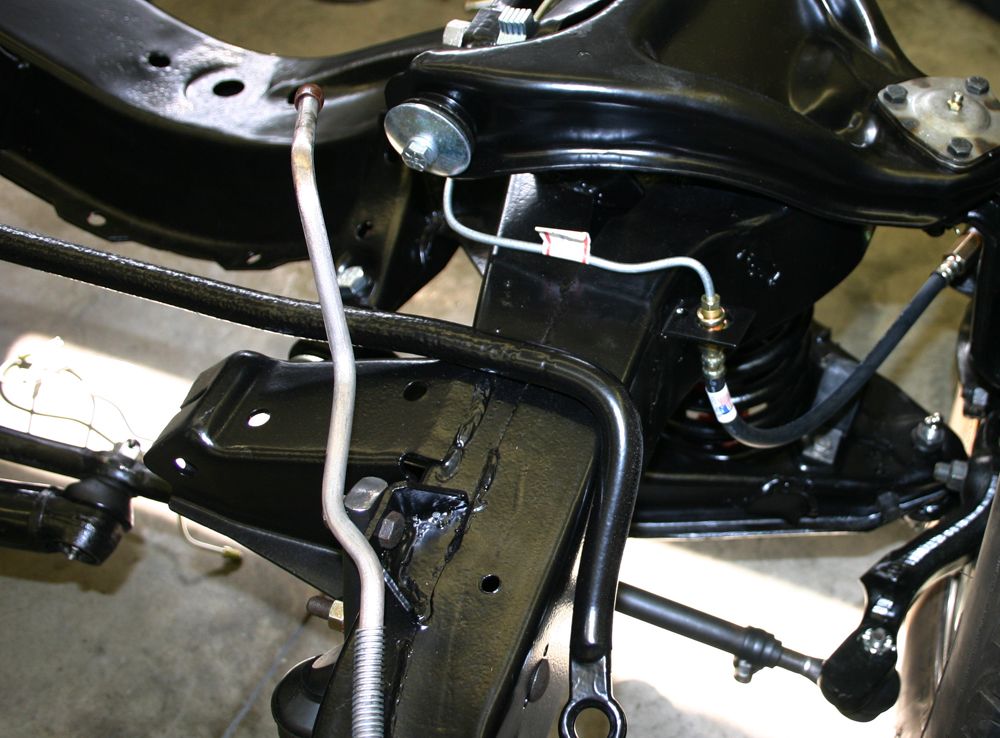
After mowing the lawn and washing a couple cars yesterday, I was back in the garage this afternoon. Got the gas tank mounted and fuel lines run.

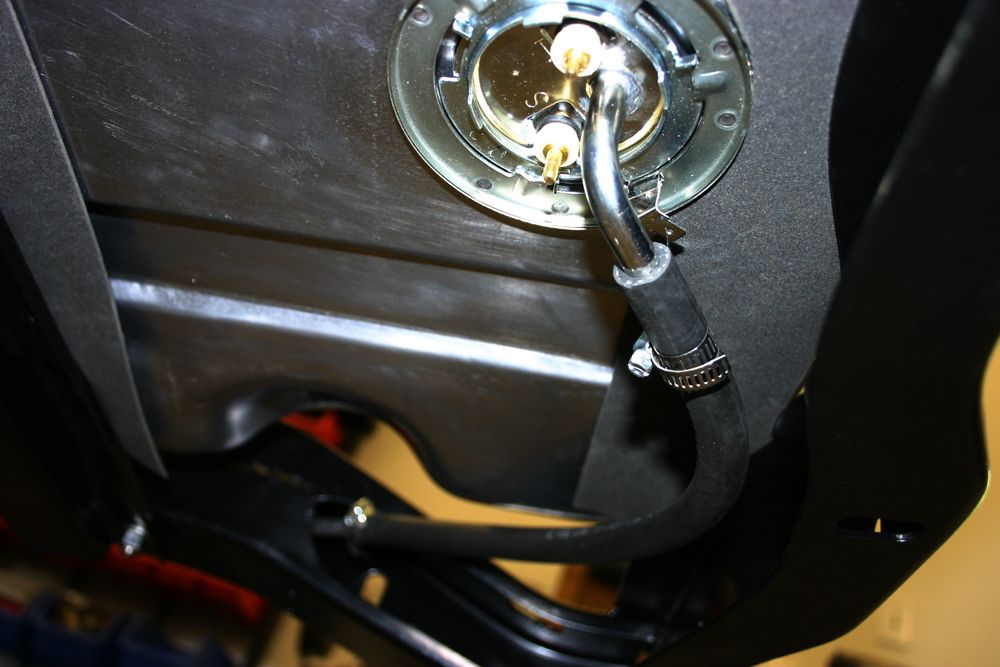
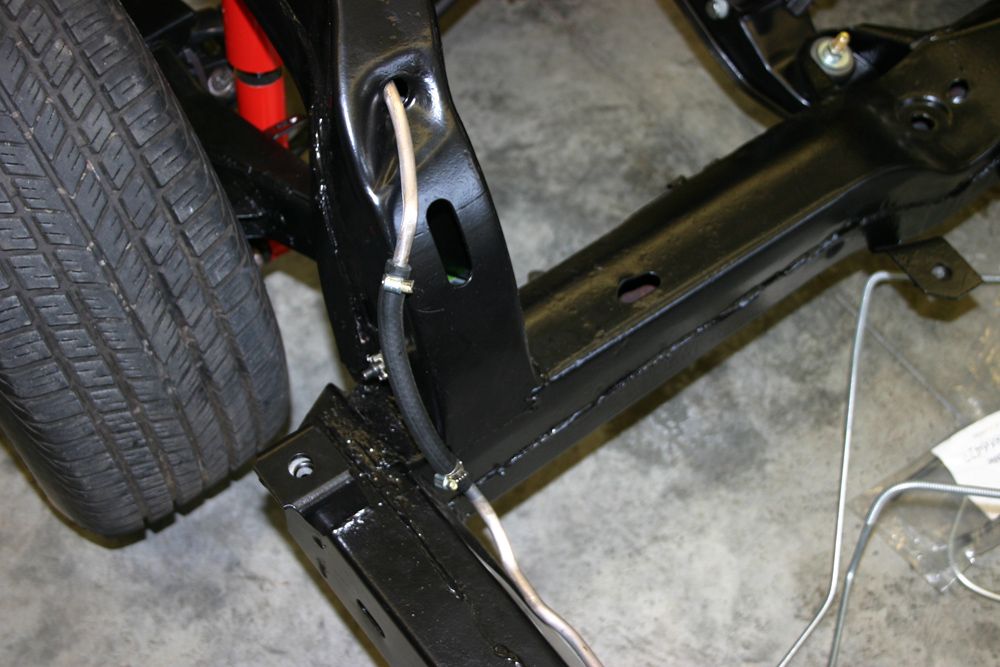
I also loosely hooked up the front brake lines. Will probably do a little more tweaking on the lines before I do the final tightening.
Since I was ready for a break from the car, I drove over there Saturday morning to check it out. My wife and I both used to do a lot of autocrossing back in the eighties when we lived in northern Indiana. Turns out Jinx knew some of the people from that area as he ran against them at the national's. About 140 cars showed up to run at a huge parking lot on the north side of the drag strip. Since Jinx didn't run until the second last session, I ended up spending about three hours there. Probably should not have done that as I might get the bug again. It sure looked like it was a fun course to run.
An interesting car there was this Cobra Daytona replica. A couple of the Detroit Speed cars were there as well. Jinx's car is the red and white Honda. His car ran very well and you could tell how smooth Jinx was in the way he handled the car.
After mowing the lawn and washing a couple cars yesterday, I was back in the garage this afternoon. Got the gas tank mounted and fuel lines run.
I also loosely hooked up the front brake lines. Will probably do a little more tweaking on the lines before I do the final tightening.
08-14-2012, 09:30 PM
#60
Burning Brakes
Thread Starter
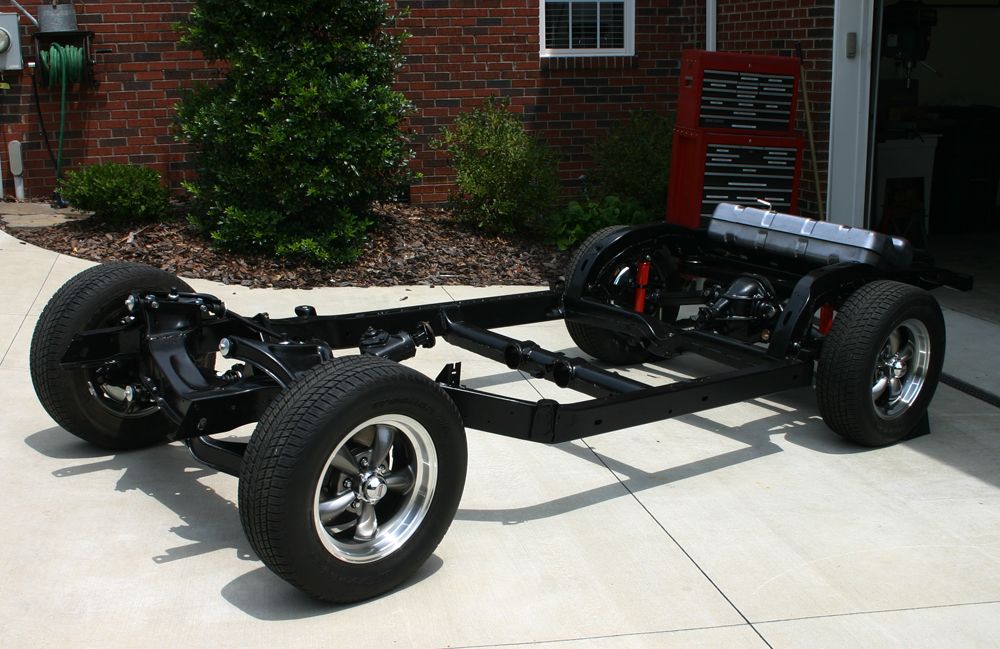
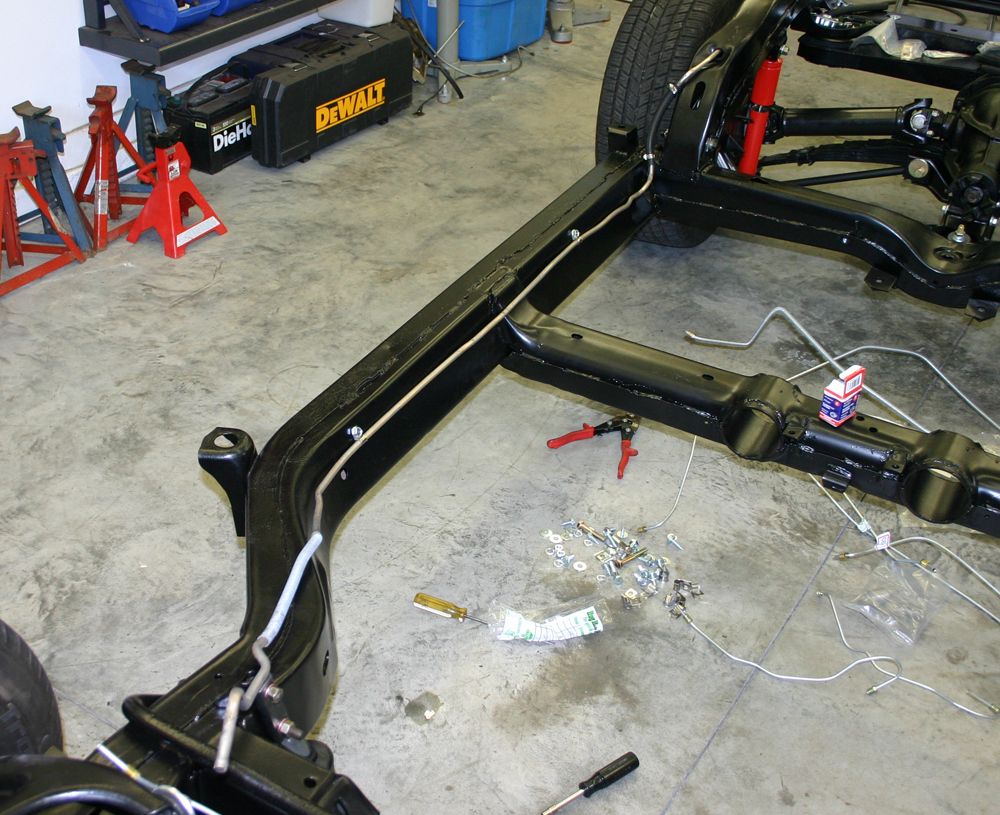
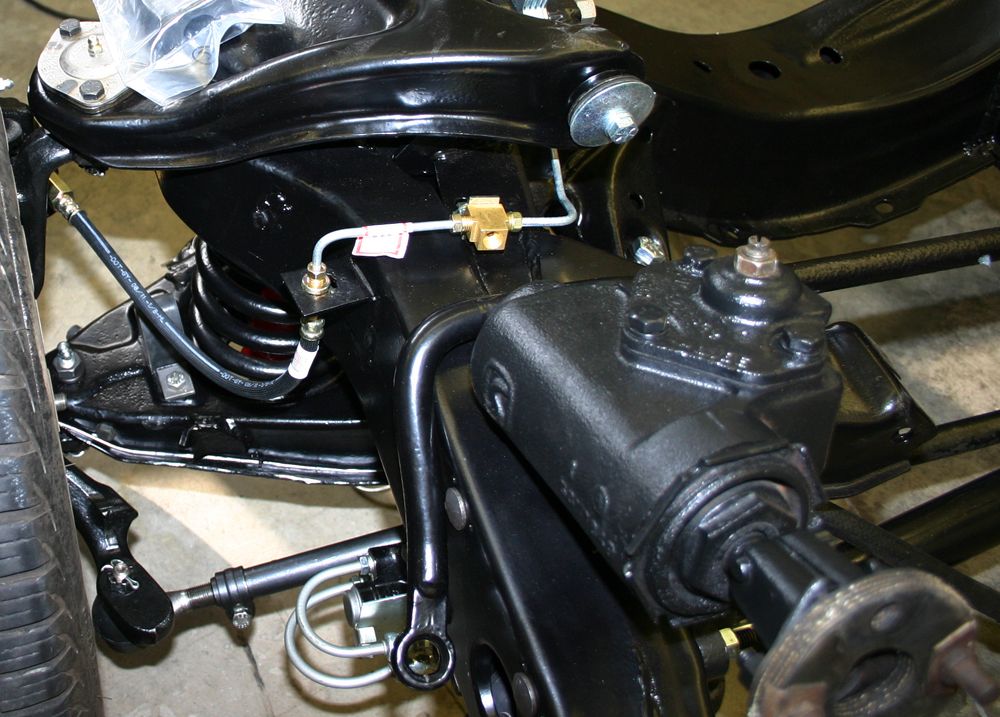
The chassis is complete...at least until the motor comes back. I finished up running the brake lines. I also hooked up the parking brake lines at the rear.
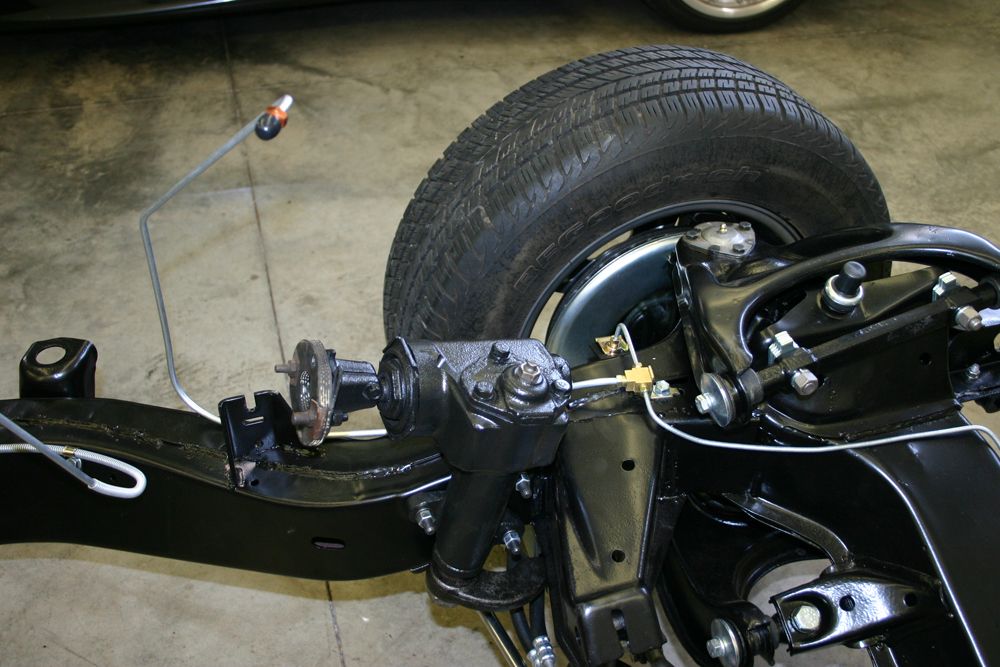
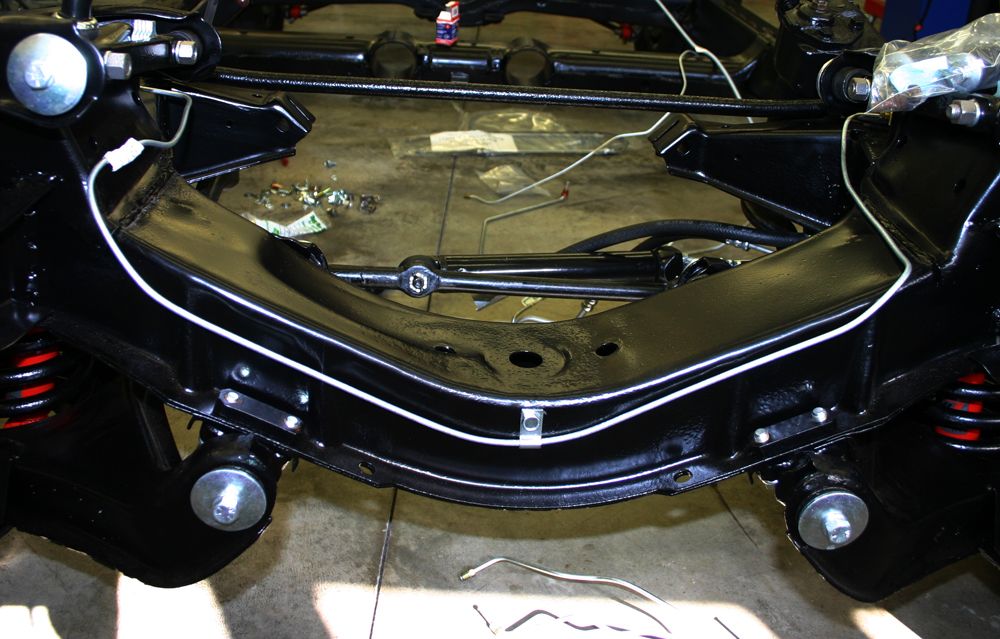
Now that the paint had dried sufficiently on the brackets, I installed the front sway bar.
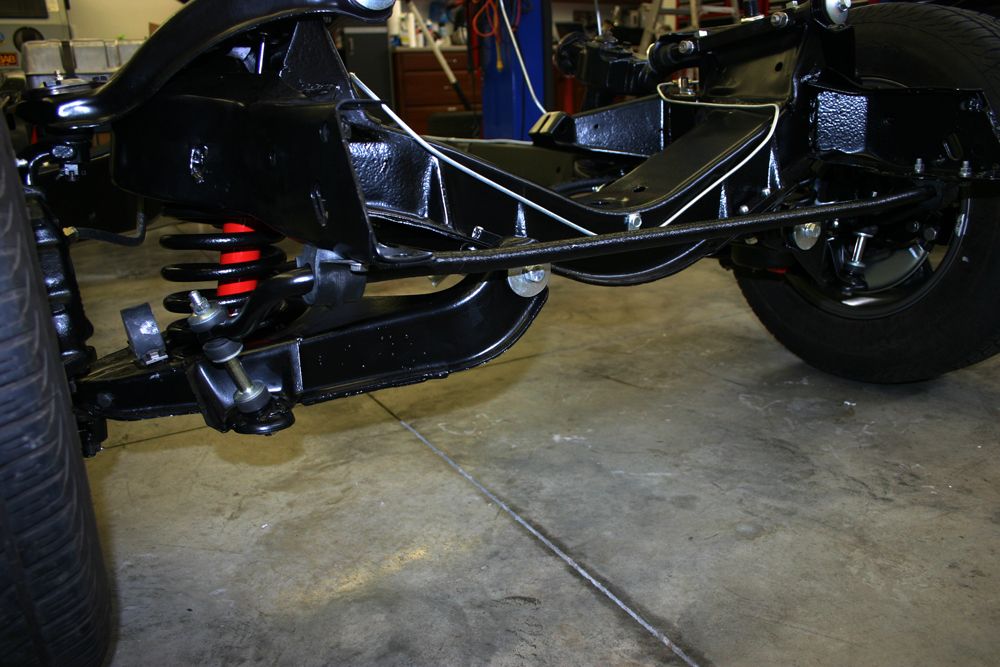
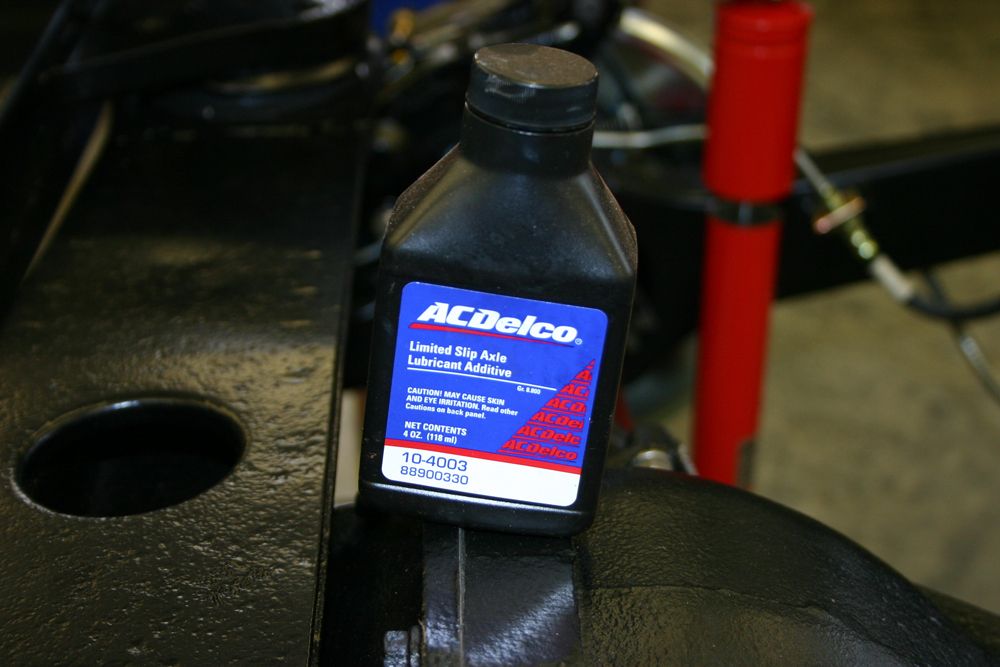
To make sure I did not forget, I filled the rear end with gear lube and the positraction additive.
I also used the bead blaster again to prepare a parking brake problem and the close off panels for the interior of the doors.
Now I can concentrate on getting the body ready. The wiring harness arrived yesterday and looks fantastic. However, my first job will be coating the metal on the bottom of the body with POR15. Messy job but someone has to do it.
Now that the paint had dried sufficiently on the brackets, I installed the front sway bar.
To make sure I did not forget, I filled the rear end with gear lube and the positraction additive.
I also used the bead blaster again to prepare a parking brake problem and the close off panels for the interior of the doors.
Now I can concentrate on getting the body ready. The wiring harness arrived yesterday and looks fantastic. However, my first job will be coating the metal on the bottom of the body with POR15. Messy job but someone has to do it.