64 Muncie 4 speed
 09-01-2014, 04:03 PM
#1
Burning Brakes

Thread Starter
Member Since: Apr 2009
Location: Somewhere North of The 49th Parallel Ontario
Posts: 1,150
Received 151 Likes
on
92 Posts

I am pretty sure my cover case is cracked, right where the (2) bolt holes go into the transmission. Is this a replaceable part? Can I get the cover separately? I have a few drops of oil on the floor and have traced it to the two bolt holes and there is a hairline crack around the bolt holes. I'll post a picture. Hang on.
 09-01-2014, 04:16 PM
#2
Team Owner


If you are talking about your side cover -- then a much improved cover is separately available....it'll have bronze bushings (like a clutch shaft pilot bushing) where the shifter fork shafts go through and a center pin secured by a C-clip instead of just being 'peened' in place. The peened pins would let the 'rooster comb' lockout levers fall into the tranny with disastrous results. You can talk to these folks...I run their product on my VERY early '63 Muncie. http://www.tbtrans.com/muncie_4_speed.htm#midplate
Scroll down the page a bit to see one version of the new side cover.
Scroll down the page a bit to see one version of the new side cover.
Last edited by Frankie the Fink; 09-01-2014 at 04:21 PM.
09-01-2014, 04:26 PM
#3
Burning Brakes
Thread Starter
Member Since: Apr 2009
Location: Somewhere North of The 49th Parallel Ontario
Posts: 1,150
Received 151 Likes
on
92 Posts
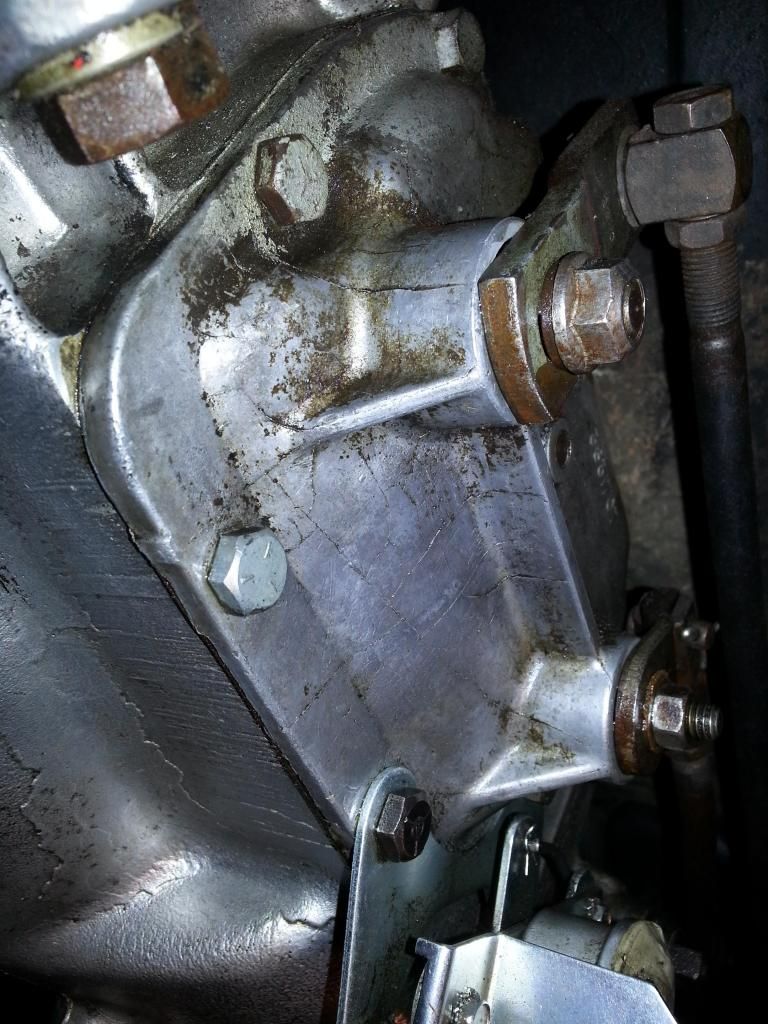
I hope I am talking about the correct cover Frank. I went out and crawled under the car (once again). I'm getting too old for this (63) and this is what I'm talking about. I cleaned it all up, but the oil was weeping down the side of the case, onto the floor. By the way Frank, I spend my winters over in Cocoa Beach, your only a hour away. Thanks for the info.
 09-01-2014, 04:38 PM
#4


I installed this cover along with new shift forks, since I was in there, and it is a sweet piece. Odds are the oil seals are leaking, and new ones may not be a permanent cure.
http://www.tbtrans.com/14f19aa0.jpg
http://www.tbtrans.com/14f19aa0.jpg
09-01-2014, 04:40 PM
#5
Team Owner
Yes. That's the side cover I refer to and 'skids' link above is to the same company that I cited. You CAN remove the side cover without pulling the tranny or rotating it around its axis. You'll have to get the speedometer cable off and out of the way, disconnect the reverse shifter rod and wangle it too out of the way. Then there is enough room to pull the cover by pulling it straight out and rotating the shifter forks up and maneuvering it downward. You'll want the transmission in second gear before starting the procedure. Here is the method I used graciously supplied by another forum member:
=======================================
1- Put the car in second gear
2- Unscrew the nuts holding the shift shaft levers off the 4-3 2-1 shafts. (gear numbers coincide with those levers). As seen from the side cover with levers it is 4-3-2-1-R
3- Remove the shift levers and let them hang free
4- Remove the seven bolts holding the cover to the tranny.
5- There is a pin that crudely locates the cover to the tranny, on the right side, be careful not to pry too much in one direction left or right. Ideally you want the cover to come straight off. Remove the cover with attached forks. You don't have to worry about dropping anything down into the gears of the transmission, as this was a service inspection port also.
6- Removing the shift forks requires nothing more than sliding them out. However upon reassembly make sure to install the forks all the way back and make sure the scissors are on top of the pin. (You'll see the pin in the fork and the scissors on the inside of the cover when you get the cover off.)
7- Pull the shifter shafts out of the corresponding holes. It doesn't matter which one came out of what hole, but being the perfectionist we are, clean them and inspect for wear. Set aside and remember what hole of the cover they came out of.
8- Pry gently the seals out of the cover.
9- Clean the old gasket remnants from the cover and the case side of the tranny.
10- Now might be a good time to get a fluid pump and pump out all the fluid from the tranny with it open like that. To refill just remove the plug on the other side and fill until it runs out of the hole. I'm not sure of the capacity since I don't know how much fluid you are or aren't removing.
11- Once everything is clean install new seals with I believe, (don't quote me and for dang sure check yourself an 11/16ths socket. Just a firm rap to get them in the hole is all you need. There is a recess and they can go about a 1/4" into the side cover hole. If your shafts are worn maybe push them in a little more, unless you want to buy new ones. They are readily available. (Think of it like a drive shaft yoke or a harmonic balancer groove.)
12- Once the new seals are installed, lube the shafts with grease (just a light coat) and slide them in. They can only go one way, and you'll see what I mean when you disassemble.
13- Move the scissors by pushing down on the opposite side of the fork you want to install. I.E. installing 3-4, push down on the 1-2 side of the scissors. Install forks.
14- Use a dot of grease in two or three places to hold the gasket on the cover side. (I've found its soooo much easier to do it that way than try to finess the cover on with the gasket on the case.
15- Now comes probably the hardest part, which isn't hard just maybe time consuming. The forks need to be straight up and down and the cover needs to be in second gear. (remember you left it in second before you disassembled) Looking at the side covers they will look like this. l \ Four three will be straight up and two one will be pushed to the left. (the front of the car.)
16- Install the cover into the tranny. The forks will only go one way in, so you know you have it when the cover sits flush to the case. Anything else you will start hurting things.
17- Torque bolts in side cover to 15 foot pounds. Less if you feel it start to strip.
18- Reinstall your shifter linkage, tighten the nuts down to 20ish foot pounds and shift through all the gears.
19- Start the car and listen for any abnormal noises and for god sakes make sure the clutch is pushed in when you go to start for the first time. Let it out slow in neutral to make sure something isn't afoul and the car doesn't creep forward and wreck itself.
20- If all else checks good and the fluid was/wasn't changed, take it for a spin. YOUR DONE!!
=============================
Finally - that is an unusual crack...I can't tell if you have a Hurst aftermarket shifter but if you do then check the adjustment on the 'stops'.
Last edited by Frankie the Fink; 09-01-2014 at 05:03 PM.
09-01-2014, 06:21 PM
#7
Team Owner
By the way - if you get the new side cover as shown in the links above it already has new seals installed so you can ignore steps #8 and #11 above....
09-01-2014, 07:14 PM
#8
Burning Brakes
That is a weird place to have a crack, but if you've got to have a crack that is the place to have it. Easy fix.
Maybe someone overtightened the side cover bolt. Use the torque spec Frank posted.
Maybe someone overtightened the side cover bolt. Use the torque spec Frank posted.
09-01-2014, 08:56 PM
#9
Safety Car

Member Since: Apr 2000
Location: New York New York
Posts: 4,819
Received 1,126 Likes
on
553 Posts
2023 C2 of the Year Finalist - Unmodified
2023 C1 of the Year Finalist - Unmodified

Are you sure that the cover is cracked or just a casting line? More than likely the shift shaft seals are leaking which are easily replaced.
Joe
Joe
09-01-2014, 09:24 PM
#10
Team Owner
Possibly just the casting line....my cover (original) shown below.
09-01-2014, 10:19 PM
#11
Burning Brakes
Thread Starter
Member Since: Apr 2009
Location: Somewhere North of The 49th Parallel Ontario
Posts: 1,150
Received 151 Likes
on
92 Posts
Thanks for the pictures Frankie, sure makes my thinking a heck of a lot simpler. My car has a stock chrome shifter. I have it all wiped down and I'm going to take it for a spin tomorrow. I'll crawl under the car and take a picture when I get back. I hope its just the cover.
Last edited by VITIV Coupe; 09-01-2014 at 10:24 PM.
 09-03-2014, 04:23 AM
#13
Burning Brakes
Thread Starter
Member Since: Apr 2009
Location: Somewhere North of The 49th Parallel Ontario
Posts: 1,150
Received 151 Likes
on
92 Posts
Not yet, I was finishing up putting the intake back on and getting the timing all set up yesterday, plus it rained here all day. Its going to be nice and sunny so I'll have a look today.
09-03-2014, 04:40 AM
#14
Well not to toot my own horn, but I am the gracious forum member who supplied Frankie with the instructions that he posted in this thread. I'm here to help in any way I can. I'm glad he did post them, as they are not lost to the forum.. Haha.. Anyway, good luck and I as well as many other members will help you out. OK!
Tony
Tony
09-03-2014, 05:39 AM
#15
Burning Brakes
Thread Starter
Member Since: Apr 2009
Location: Somewhere North of The 49th Parallel Ontario
Posts: 1,150
Received 151 Likes
on
92 Posts
Well not to toot my own horn, but I am the gracious forum member who supplied Frankie with the instructions that he posted in this thread. I'm here to help in any way I can. I'm glad he did post them, as they are not lost to the forum.. Haha.. Anyway, good luck and I as well as many other members will help you out. OK!
Tony
Tony
09-03-2014, 07:31 AM
#16
Team Owner

Member Since: Apr 2008
Location: Coloring within the lines
Posts: 27,345
Received 1,920 Likes
on
1,333 Posts
Well not to toot my own horn, but I am the gracious forum member who supplied Frankie with the instructions that he posted in this thread. I'm here to help in any way I can. I'm glad he did post them, as they are not lost to the forum.. Haha.. Anyway, good luck and I as well as many other members will help you out. OK!
Tony
Tony
FWIW, in step 10 = according to the owner's manual, a Muncie M20/21 takes 2 1/2 pints of fluid.
I will be doing this to mine to inspect it, and to change the fluid.

 09-03-2014, 07:32 AM
#17
Team Owner
Yes indeed - it was Tony....if he'd shorten his forum name I'm sure I would have remembered it to give full credit
BTW - Amsoil sells a small hand pump that is a life saver for filling trannys and diffys. Cheap, its a life saver and my NAPA had it on the shelf... http://www.amsoil.com/shop/by-produc...tle-hand-pump/
Now getting the old fluid out is a bit more fun, I have an industrial extractor that makes it a breeze but that puppy is NOT cheap. But they make cheaper versions: http://www.equipatron.com/oregon-88-...FWho7AodjFMAOQ
I would use ONLY GL-4 rated fluid....some will say GL-5 hurts the "yellow" metal components; others say it doesn't. Why take the chance ? GL-4 is what is specified and works perfectly.
....if he'd shorten his forum name I'm sure I would have remembered it to give full creditBTW - Amsoil sells a small hand pump that is a life saver for filling trannys and diffys. Cheap, its a life saver and my NAPA had it on the shelf... http://www.amsoil.com/shop/by-produc...tle-hand-pump/
Now getting the old fluid out is a bit more fun, I have an industrial extractor that makes it a breeze but that puppy is NOT cheap. But they make cheaper versions: http://www.equipatron.com/oregon-88-...FWho7AodjFMAOQ
I would use ONLY GL-4 rated fluid....some will say GL-5 hurts the "yellow" metal components; others say it doesn't. Why take the chance ? GL-4 is what is specified and works perfectly.
Last edited by Frankie the Fink; 09-03-2014 at 08:03 AM.
09-04-2014, 05:05 AM
#18
Burning Brakes
Thread Starter
Member Since: Apr 2009
Location: Somewhere North of The 49th Parallel Ontario
Posts: 1,150
Received 151 Likes
on
92 Posts
Well I took it out for a spin and dropped by my mechanic and he put it up on the hoist. I forgot to take a picture but I can rule out the side cover, it was bone dry. We determined that it was leaking by the tailhouse bushing/tail seal. What is the best way to get this out. Do I have to drop the tranny or can I disconnect the drive shaft and get the seal/bushing out while on the car?
09-04-2014, 07:10 AM
#19
Team Owner
Member Since: Apr 2008
Location: Coloring within the lines
Posts: 27,345
Received 1,920 Likes
on
1,333 Posts
Well I took it out for a spin and dropped by my mechanic and he put it up on the hoist. I forgot to take a picture but I can rule out the side cover, it was bone dry. We determined that it was leaking by the tailhouse bushing/tail seal. What is the best way to get this out. Do I have to drop the tranny or can I disconnect the drive shaft and get the seal/bushing out while on the car?
Basically, you remove the transmission end shaft by disconnecting the driveshaft and pull the seal and replace it with a new one. You may need to pick up the specialized puller tool to get the old one out.
Not an uncommon problem (mine leaks:yes nod
 and much better than a broken case or cover. I would go so far as to speculate that this seal is the number one tranny leak location on Muncies by a wide margin.
09-04-2014, 07:28 AM
and much better than a broken case or cover. I would go so far as to speculate that this seal is the number one tranny leak location on Muncies by a wide margin.
09-04-2014, 07:28 AM
#20
Safety Car
Member Since: Apr 2000
Location: New York New York
Posts: 4,819
Received 1,126 Likes
on
553 Posts
2023 C2 of the Year Finalist - Unmodified
2023 C1 of the Year Finalist - Unmodified
Well I took it out for a spin and dropped by my mechanic and he put it up on the hoist. I forgot to take a picture but I can rule out the side cover, it was bone dry. We determined that it was leaking by the tailhouse bushing/tail seal. What is the best way to get this out. Do I have to drop the tranny or can I disconnect the drive shaft and get the seal/bushing out while on the car?
Joe