Side exhaust tip orientation
 12-06-2010, 03:29 PM
#1
Pro

Thread Starter
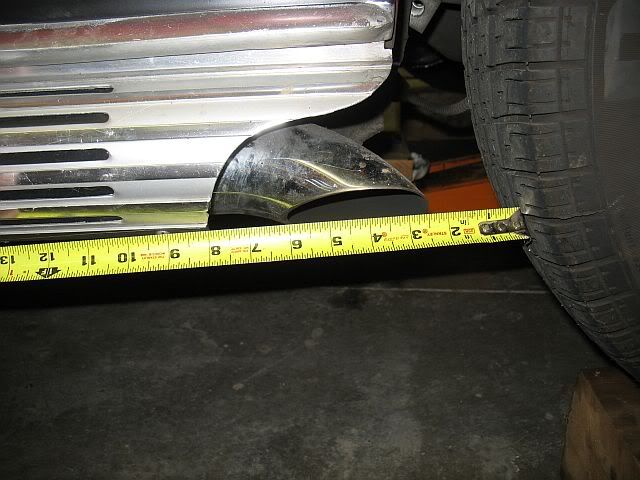
I'm getting ready to install some vettepacks for some "from-scratch" side pipes and was wondering if anyone could provide a good side on pic of the tip with the cover installed? I believe the opening points down at ~45 deg (please correct me if I'm wrong), but not sure how far back the tip extends.
Also while I'm at it, any pics of the location where the front of the side pipe cover attaches in the wheel well? Trying to figure out where to install the u-nut.
Also while I'm at it, any pics of the location where the front of the side pipe cover attaches in the wheel well? Trying to figure out where to install the u-nut.


 12-06-2010, 05:14 PM
#3
Drifting

And these:

You can make out the u nut where the battery tray comes close to the inner fender.

Here you can see the u nut below the washer bottle


Gerry
You can make out the u nut where the battery tray comes close to the inner fender.
Here you can see the u nut below the washer bottle
Gerry
 12-06-2010, 08:25 PM
#5
Pro
Thread Starter
Thanks for the pics.
Funny thought though, I saw these pics at first on my phone, where they were compressed in the horizontal. All I could think was "Why did some bubba put a chrome u-pipe on for a exhaust tip?"
Funny thought though, I saw these pics at first on my phone, where they were compressed in the horizontal. All I could think was "Why did some bubba put a chrome u-pipe on for a exhaust tip?"
12-06-2010, 08:35 PM
#7
Safety Car


Member Since: Nov 2000
Location: Clinton Township MI
Posts: 4,750
Received 120 Likes
on
99 Posts
Cruise-In III Veteran

Rustman,
Here's some views, with sound, of mine...not as exacting in measurement as Mossy66 provided for sure, but it is a closeup with the off-shore race boat sound as a bonus LOL!! Temp out was about 27 degrees and she was ice cold.
Click on this link and ENJOY!
http://s1083.photobucket.com/albums/...EXHLEAKavi.mp4
Jim
In God We Trust!
Last edited by 6T5RUSH; 12-06-2010 at 09:12 PM. Reason: VIDEO LINK
12-06-2010, 09:03 PM
#8
Pro
Thread Starter
I appreciate it Jeff. I'm ready to cut metal and fiberglass and get these pipes on. The only thing holding me back was the tips and the front mounting, but with the pics above I think I got it worked out.
Let me see; the tips opening are ~2" past the bottom of the covers and the front bracket hole lines up with the other two bolt holes in the inner fender.
But you never know I will probably still end up needing to check your car out again, just for good standard...
Let me see; the tips opening are ~2" past the bottom of the covers and the front bracket hole lines up with the other two bolt holes in the inner fender.
But you never know I will probably still end up needing to check your car out again, just for good standard...
12-06-2010, 09:08 PM
#9
Race Director

Member Since: Jan 2002
Location: Close to DC
Posts: 14,548
Received 2,130 Likes
on
1,468 Posts
C2 of the Year Finalist - Modified 2020
Mossy66, It's very apparent you DRIVE your car. Way too go!!!!  Dennis
Dennis
12-06-2010, 09:08 PM
#10
Tech Contributor

If your goal is to see a car with sidepipes to get a better sense of the cuts, my car can handle that. If however your goal is to replicate the factory cuts down to the last detail, I'm sure my cuts aren't precisely where GM would have put them (and that's assuming GM did them precisely to begin with).
Do you have the Assembly Manual that shows the location of the cuts?
12-06-2010, 09:35 PM
#11
Melting Slicks


I can't match Mossy's picture quality or digital protractor, but my '67's "Patina" is just as NICE! I'm reading more like 40* on mine. But I have old factory side pipes mounted to new front pipes. I was using the rear mount as my guide for the angle. With 255/60-15's on the back I have closer to 3" from the tip to the tire. Do you think the sound in the car would be changed much by angling the opening up more?

12-06-2010, 11:42 PM
#12
Pro
Thread Starter
12-07-2010, 12:10 AM
#13
Melting Slicks
12-07-2010, 07:59 PM
#14
Le Mans Master

When this install was done back in the fall of 2009, everything was removed so we lost our reference point & had to put everything back together by eye & "feel." Scroll down for the step-by-step photos of the retrofit. The way the installer positioned the turndowns I think looked better than the original which was more turned-down. See what you guys think. I remembered we determined the very end of the tip was about 1/4" beyond the rearmost edge of the sidepipe cover.
http://www.classicchambered.com/classic/sounds.html (scroll down to get to the series of photos). You can also see the orientation of the tip in the before & after videos down below the photos. The car owner was there all during the installation, so Muffler Dave did whatever the car owner wanted. This was a very simple retrofit, & a lot of fun.
http://www.classicchambered.com/classic/sounds.html (scroll down to get to the series of photos). You can also see the orientation of the tip in the before & after videos down below the photos. The car owner was there all during the installation, so Muffler Dave did whatever the car owner wanted. This was a very simple retrofit, & a lot of fun.
12-08-2010, 12:46 PM
#15
Instructor

Member Since: Sep 2002
Location: Barnstable Mass
Posts: 227
Likes: 0
Received 0 Likes
on
0 Posts