Paint Lifter Valley?
 07-21-2010, 01:37 PM
#1
Burning Brakes

Thread Starter

I've seen engine builders paint with epoxy the front of the block where the timing chain is and the lifter valley. The argument being it helps keep oil circulating and prevents sludge buildup.
My fear is that the paint might flake off in spots and cause worse things...
Any thoughts?
My fear is that the paint might flake off in spots and cause worse things...
Any thoughts?
 07-21-2010, 01:47 PM
#2
Le Mans Master


I know that there is paint made exclusively for the lifter valley. Its purpose is to aid in the flow of oil to the bottom end and to seal any pin holes in the casting. I would imagine that if the block is prepared correctly, the paint will not flake off. Jerry
07-21-2010, 01:49 PM
#3
Drifting

I would tend to agree. If the painted surface has an oil film on it, the oil should flow just like if it wasn't painted. I would think that the only way it would flow faster is if the oil just fell off the paint leaving a dry surface.
Some say that paint fills up the irregularities in the casting and leaves a smoother surface, but I would think that a coating of oil would do the same thing.
my 2 cents
Gerry
Some say that paint fills up the irregularities in the casting and leaves a smoother surface, but I would think that a coating of oil would do the same thing.
my 2 cents
Gerry

 07-21-2010, 02:42 PM
#5
Race Director


Member Since: Mar 2001
Location: Mustang OK
Posts: 13,845
Received 3,766 Likes
on
1,669 Posts
2023 C1 of the Year Finalist - Modified
2015 C1 of the Year Finalist

I've been building engines for 45+yrs and around 40yrs ago I started painting ALLLLLLLLLLLL my engines inside and out, this also included the heads under the valve covers. ZERO problems.
The theory is to provide a smoother/faster surface for oil return to the pan and the pores of the cast iron are sealed which helps to keep the oil cleaner longer (contaminants can more easily cling to the bare iron surfaces, eventually building up as sludge and later on as big chunks of crud)
To protect the lifter/cam bores from overspray, I install an old cam and set of lifters during painting. When the painting is finished, I use lacquer thinner on an old rag to wipe the cylinders, decks and main bores. I usually use either Krylon or Duplicolor High Heat paint.

This engine (SB400) had about 10yrs on it when I pulled it out.

This engine (another SB400) in my 70 Chevelle had a tiny pin hole in #2 combustion chamber, so I replaced the head. It also had about 10yrs on it.

Tom Parsons
The theory is to provide a smoother/faster surface for oil return to the pan and the pores of the cast iron are sealed which helps to keep the oil cleaner longer (contaminants can more easily cling to the bare iron surfaces, eventually building up as sludge and later on as big chunks of crud)
To protect the lifter/cam bores from overspray, I install an old cam and set of lifters during painting. When the painting is finished, I use lacquer thinner on an old rag to wipe the cylinders, decks and main bores. I usually use either Krylon or Duplicolor High Heat paint.
This engine (SB400) had about 10yrs on it when I pulled it out.
This engine (another SB400) in my 70 Chevelle had a tiny pin hole in #2 combustion chamber, so I replaced the head. It also had about 10yrs on it.
Tom Parsons
Last edited by DZAUTO; 07-21-2010 at 02:47 PM.
 07-21-2010, 03:06 PM
#7
Burning Brakes
Thread Starter
DZ-Nice. I was leaning the other direction but after seeing your builds, now I am leaning the other way. Do you use the same duplicolor chevy red you use to paint the outside? What did you clean the block with? In the past I have scrubbed with plain lacquer thinner after its been hot tanked.
Sanding the inside of the block--I have read that this potentially causes issues with heat dissipation (which paint may as well). Those rough edges are like heat sinks allowing the block to dissipate heat better.
Sanding the inside of the block--I have read that this potentially causes issues with heat dissipation (which paint may as well). Those rough edges are like heat sinks allowing the block to dissipate heat better.
07-21-2010, 03:26 PM
#9
Race Director
Member Since: Mar 2001
Location: Mustang OK
Posts: 13,845
Received 3,766 Likes
on
1,669 Posts
2023 C1 of the Year Finalist - Modified
2015 C1 of the Year Finalist
Over the years, there have been NUMEROUS articles in the auto performance magazines regarding the smoothing/sanding of the inside of blocks/heads. On a FEW (darn few) ocassions I have VERY lightly sanded/filed/smoothed areas in some blocks because of thin casting tabs which looked as if they could easily break off and fall down into the engine. But that's about all I have ever done.
Yep, I use the same color, inside and out.
BEFORE doing anything to the block/heads, I thoroughly wash them with hot, strong detergent then rinse with a power washer and 150deg water from my hot water heater. I make sure every tiny crevice and passage gets a thorough flush from the power washer nozzle. Then I immediately blow dry with hi-press air (concentrate on all oil galleys) and lightly wipe the cylinder, lifter and main bores with engine oil. When I'm satisfied everything is as clean as possible and thoroughly dry, I install an old cam and lifters and paint. I let the paint cure for 1-2 days before beginning assembly. That gives me time to mow, accomplish honeydos and have a couple of beers.
I do the same to cranks and run small brushes through all the oil holes in the cranks, then wipe the journals with engine oil.
Unless I buy new rods, I have all rods reconditioned with new ARP bolts. But first, I lightly smooth the rod beams using a very fine grit "flapper" sander, then blast them (you CAN pay the machine shop to do this, but I can do it at home). Does this process of smoothing the beams and blasting the rods REALLY make a difference in the rods' durability???? I cannot unequivically say yes, BUUUUUUUUUUUT, I've never had a rod failure in any of the engines that I've built in this manner. And this includes a stroked 420SB that I built with small journal 327 rods!
Tom Parsons
Last edited by DZAUTO; 07-21-2010 at 03:37 PM.
07-21-2010, 04:20 PM
#10
Race Director
 07-21-2010, 05:10 PM
#11
Burning Brakes

Member Since: Jul 2009
Location: Sarasota,FL & NW Indiana
Posts: 772
Likes: 0
Received 7 Likes
on
4 Posts

 07-22-2010, 12:23 AM
#13
Le Mans Master
Member Since: Sep 2009
Location: "You may all go to Hell- and I will go to Texas- Davy Crockett
Posts: 9,151
Received 474 Likes
on
337 Posts
St. Jude Donor '12
. And this includes a stroked 420SB that I built with small journal 327 rods!
Tom Parsons[/QUOTE]
Tom, I thought I had guts..... I'm not afraid of anything... but WOW
Tom Parsons[/QUOTE]
Tom, I thought I had guts..... I'm not afraid of anything... but WOW
Last edited by vettsplit 63; 07-22-2010 at 12:25 AM.
07-22-2010, 01:33 AM
#14
Melting Slicks

I'd never used it before but I had an engine built about 13 years ago and it came with it. (glyptal) After all that time and a lot of miles it still looked as good as when I got it when I had the manifold off about a month ago.
07-22-2010, 02:21 AM
#15
Race Director
I had a couple Boss 429 NASCAR motors about 15 years ago, and the lifter valley and crankcase (and rods, and undersides of pistons) were polished to a mirror surface. No paint inside the motor.
Glyptal is a poor mans mirror polish for budget conscious racers.
Would i paint the inside of a street motor, even a hi-perf street motor?
No.
Not unless I was retired or really bored, or both.
You get sludge from not changing your oil often enough. 3K miles on a carbed motor and 5K miles on an EFI motor will prevent any sludge
Doug
07-22-2010, 08:41 AM
#16
Race Director
Member Since: Mar 2001
Location: Mustang OK
Posts: 13,845
Received 3,766 Likes
on
1,669 Posts
2023 C1 of the Year Finalist - Modified
2015 C1 of the Year Finalist
Well, here it is. This is the bottom of the 420 cubic inch small block for my jet boat, which had the rod journals of the 400 crank offset ground down to small journal size, and then 66-67 style 327 rods installed.


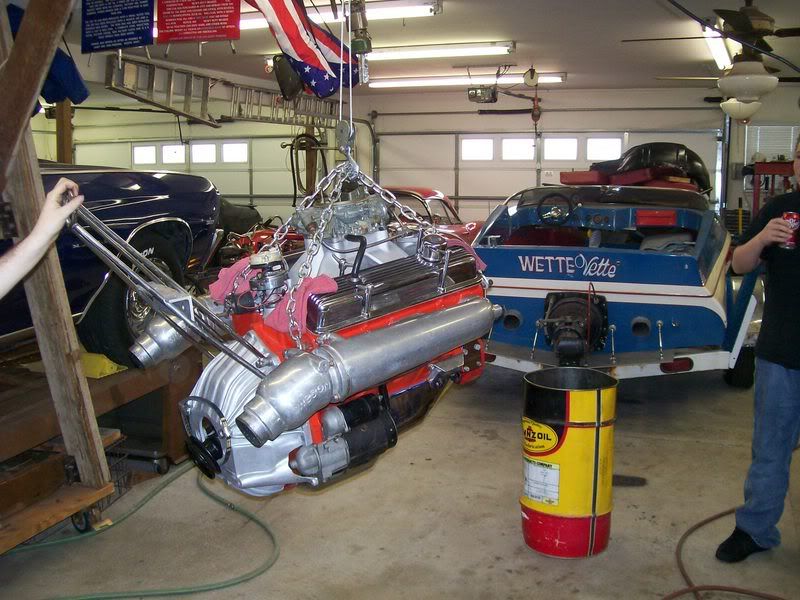
This is an oil-filled motorcycle oil pressure gauge that I install in some engines which permits monitoring pressure direct at the engine.
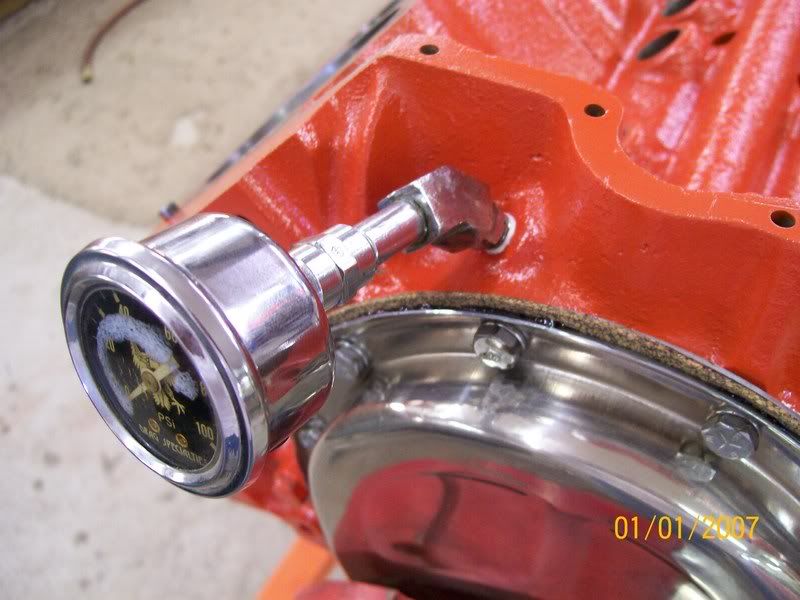
Tom Parsons
07-22-2010, 09:56 AM
#17
Racer

 with Tom
I also have built numerous SB & BB Chevy & MoPars over the years and alway prep the valley and t/c area with Glyptal even the lowly MoPar 318
I buy it by the qt at the local electrial motor rebuilder, they use it to coat the wiring on large electrical motors.
Blue
 07-22-2010, 10:55 AM
#19
Race Director
Member Since: Mar 2001
Location: Mustang OK
Posts: 13,845
Received 3,766 Likes
on
1,669 Posts
2023 C1 of the Year Finalist - Modified
2015 C1 of the Year Finalist
And, while we're on this subject, NOT all small blocks (depending on Flint or Tonawanda built) had the threaded hole up front with a plug that went down into the center oil galley.
If your block does not have this oil galley hole, and you want one for whatever reason, it is TOOOOOOOOOO EASY to add the hole. Drill/tap the hole when the engine is disassembled before sending it out for machining. I start with a small drill bit (about 1/8in) and carefully eyeball the angle going down to the center galley until the bit goes into the galley (you can feel when the bit goes through). Next, I drill only PART WAY with a larger bit and tap the hole with a 1/8in pipe thread tap.
By the way, Olds engines have a similar oil galley hole up front, so I have also installed one of these oil pressure gauges on the 455 in my 5sp Cutlass.
Sooooooooooo, why didn't I put one in the SB400 in the 56 Vette? I have no excuse!
Last edited by DZAUTO; 07-22-2010 at 11:01 AM.
07-22-2010, 11:05 AM
#20
Le Mans Master
 It's a waste of time if you think it will prevent sludge. Changing the oil prevents sludge. I changed cams on a motor I built that had the oil changed every 2000 miles. After 80,000 miles, the lifter valley looked as clean as the day I built it. Spend your precious time elsewhere.
Jim